Home > Questions

How to Delete Old Time Machine Backups In An External Hard Drive?

Hello! I wanted to create space in my external "time machine backup" hard drive, so moved old backups to the trash. I then tried to empty the trash. A large number of files won't delete ("file in use", "security settings" etc.). If I disconnect the external hard drive these files don't appear in the trash. When I reconnect, they appear again (30 GB or so). I want to remove these files so that I can empty the trash without it taking forever and having to "skip" hundreds of files, which takes an hour. How can I get rid of these files?

Best Answered by

iBoysoft author Eudora Liu

Eudora Liu

Answered on Tuesday, December 3, 2024

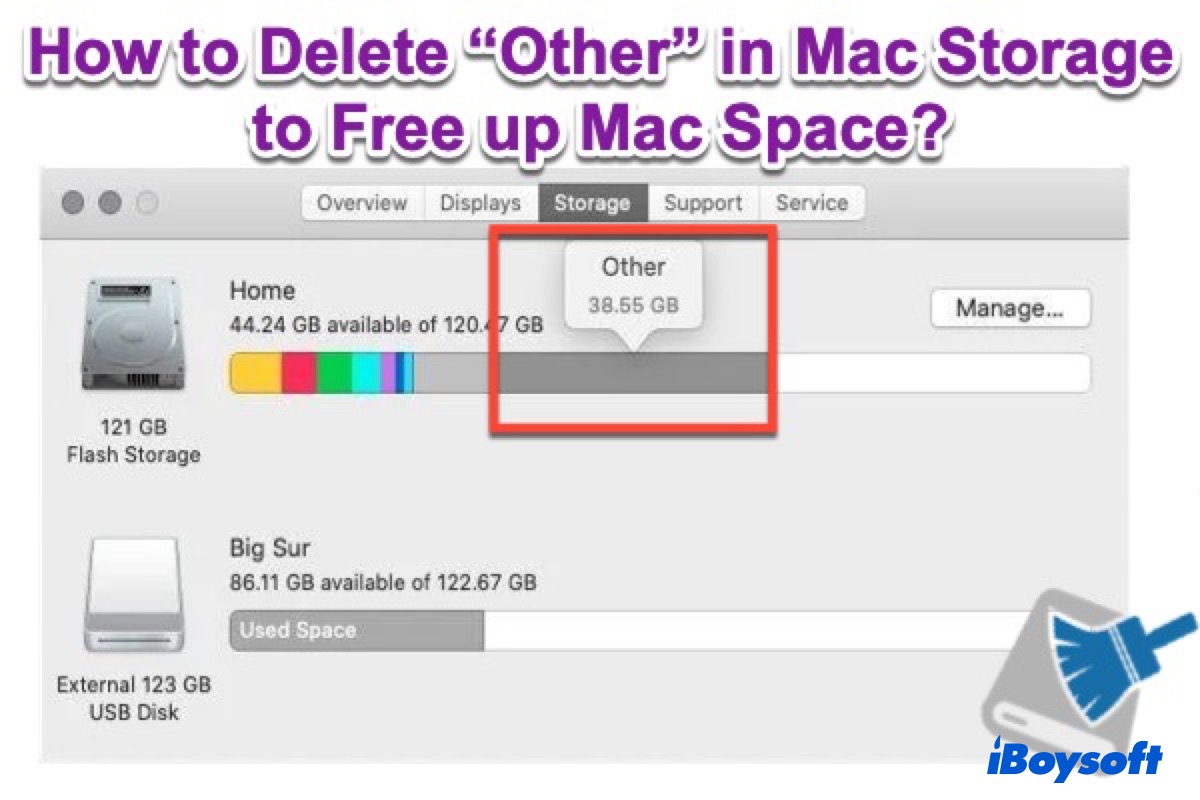
You can't delete any Time Machine backups by dragging them to the Trash, but you can delete the old backups in Time Machine. Although Time Machine will automatically delete the old backups when it starts to run out of space, you can delete them manually by the following steps:

  1. Connect your backup disk to your Mac and then open Time Machine.
  2. Find and select the backup for removal.
  3. Click the gear and choose Delete Backup.
  4. Enter your password to confirm.

Now you can check whether you can delete your old backups successfully.

Here are other three ways for you to delete your Time Machine backups and you can take one of them to solve your problem.

Method 1: Using Finder.

  1. Connect your external hard drive and then open Finder.
  2. Select your Time Machine backup drive and find Backups.backupdb.
  3. Find the folder that has the same name as your device.
  4. Right-click the backups you want to delete and select Move to Trash.

Don't forget to empty the Trash before you eject your drive.

Method 2: Using Terminal

  1. Go to Finder > Applications > Utilities > Terminal. (Or you can go to Launchpad > Other > Terminal.)
  2. Type in the following command.
    tmutil listbackups
  3. Find the backup you want to delete and then type in the 'sudo tmutil delete' command.
  4. Press Enter to delete.

Method 3: Reformt your backup drive

  1. Connect your drive to your Mac.
  2. Go to Finder > Applications > Utilities > Disk Utility. (Or you can go to Launchpad > Other > Disk Utility.)
  3. Select your drive and click Erase in the toolbar.
  4. Choose the file system and type in a new name for your drive.
  5. Click Erase to start.

After you format your external hard drive, don't forget to back up your Mac using Time Machine again to protect your essential data from losing.

People Also Ask

Read More Questions

Read More Advice From iBoysoft's Computer Experts

Zu Ordner gehen

Wie füge ich Dropbox zum Finder auf dem Mac hinzu? (Schritt-für-Schritt)

Dieser Artikel bietet zwei Möglichkeiten, Dropbox zur Finder-Seitenleiste auf jedem Mac hinzuzufügen, einschließlich Änderung von Einstellungen und manuellem Ziehen und Ablegen.

Hash Abweichung auf Volume auf macOS Monterey

Wie beheben Sie 'Hash-Abweichung auf Volume' auf macOS Monterey 2023

Hier ist die Lösungen für 'Hash-Abweichung auf Volume. Hash-Abweichung auf Volume disk1s1 erkannt. macOS sollte auf diesem Volume neu installiert werden.' auf dem Mac.

Cómo Arreglar QuickBooks que Sigue Fallando en Mac

Cómo arreglar QuickBooks sigue fallando en Mac? [Profesional]

Esta publicación le dice cómo arreglar el software de QuickBooks Online y Desktop que sigue fallando en su computadora Mac. Además, también se incluye alguna información útil sobre QuickBooks.