Summary: This post tells how to make Mac show hidden files quickly. If you can't locate certain disappeared files on your Mac computer, you can also use iBoysoft Data Recovery to find them easily.
It is reasonable and convenient that macOS keeps some files hidden by default. However, what if you need to show hidden files for some reason? For example, you manually hide files on your Mac with the "chflags hidden" command, keeping them from accidental deletion, but later you can't find these hidden files anymore.
Or you want to delete some leftover files after uninstalling apps on Mac, but you can't find them because Mac OS has hidden them. What should you do to make Mac show hidden files or hidden folders?
Don't worry. This article will guide you on how to show hidden files on macOS Sonoma, Ventura, macOS Monterey, or earlier as well as show hidden folders on Mac.
Here's a table to help you have a quick look at the solutions.
Methods
Easy to Use
Outstanding Features
Keyboard Shortcut
Yes
Good for quick viewing of hidden files
Finder
Yes
Suitable for finding specific system folders
Terminal
No
All hidden files can be displayed permanently or temporarily
iBoysoft Data Recovery
Yes
Quickly display and recover all hidden files on your Mac
Why does macOS hide files or folders?
A hidden file or folder is a file/folder which filesystem utilities do not display by default when showing a directory listing. Mac OS has always hidden some vital files on the startup disk.
You must be wondering, why Apple Inc. doesn't let you see hidden files on Mac. Generally speaking, there are two main reasons:
For security: The main reason is that the core system files must be hidden so your Mac can run correctly. It will protect these files from being damaged or deleted by the average Mac user. All the hidden files include preferences, caches, logs, and other service files of the installed apps and the Mac operating system.
For tidiness: Another reason some files are hidden is that if files on Mac are all visible to you, your computer and the desktop would appear like a mess. Therefore, files that are not used frequently are put out of sight.
However, in some cases, you probably want to find hidden files to troubleshoot apps' errors, find some lost/disappeared files, or clear the cache on Mac by deleting hidden files for more available spaces. Don't know how to spotlight these invisible files? Don't worry, the following part will go into detail.
Share this part with others to know why macOS hides files or folders.
How do you show hidden files through a keyboard shortcut?
Actually, a keyboard shortcut is the easiest and most efficient way of viewing hidden files on Mac computers, because you only need to press some keys on your keyboard. Showing hidden files and folders on your Mac with the following steps:
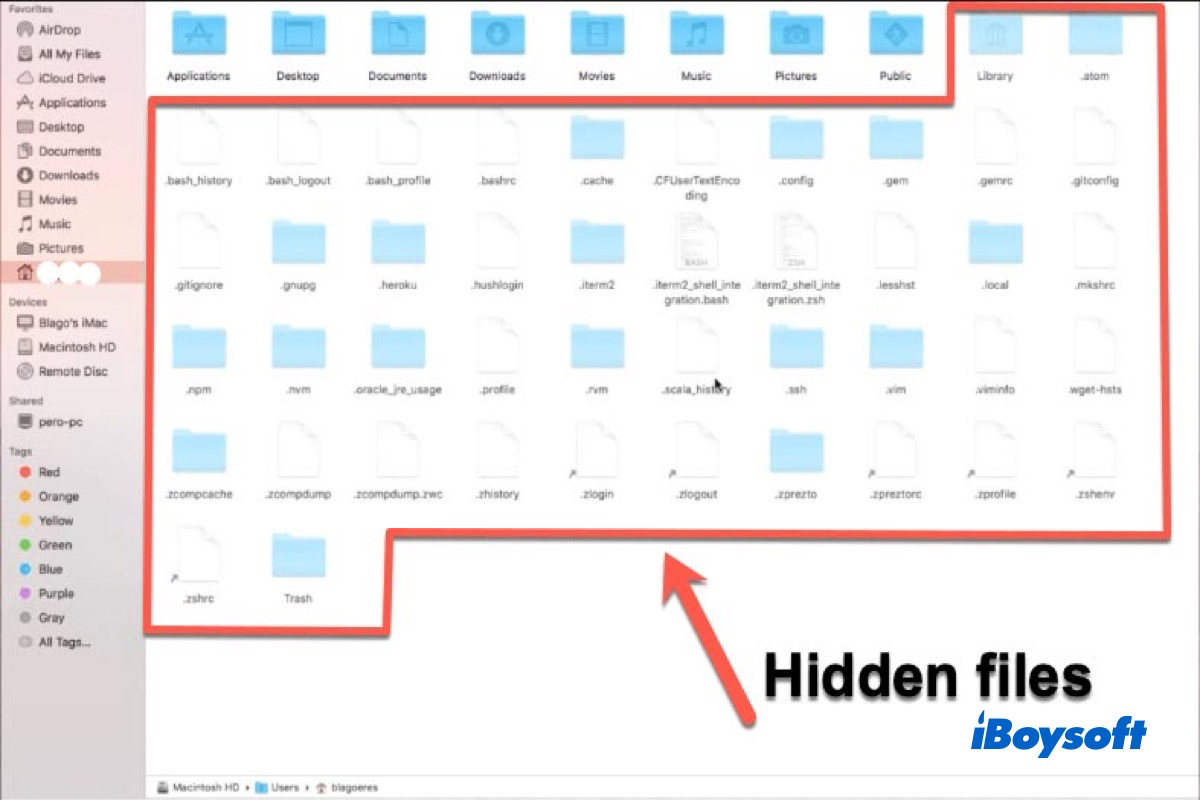
Click the Macintosh HD folder under Locations in the left sidebar.
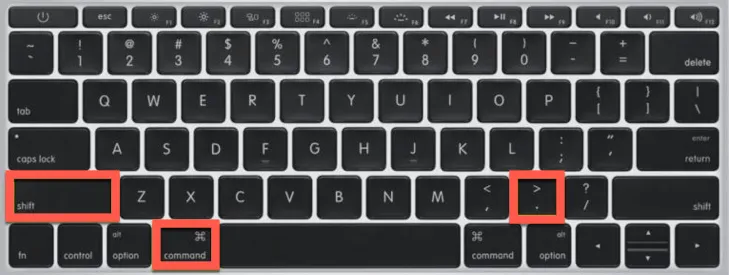
Press Command + Shift + Period (.) key combinations.
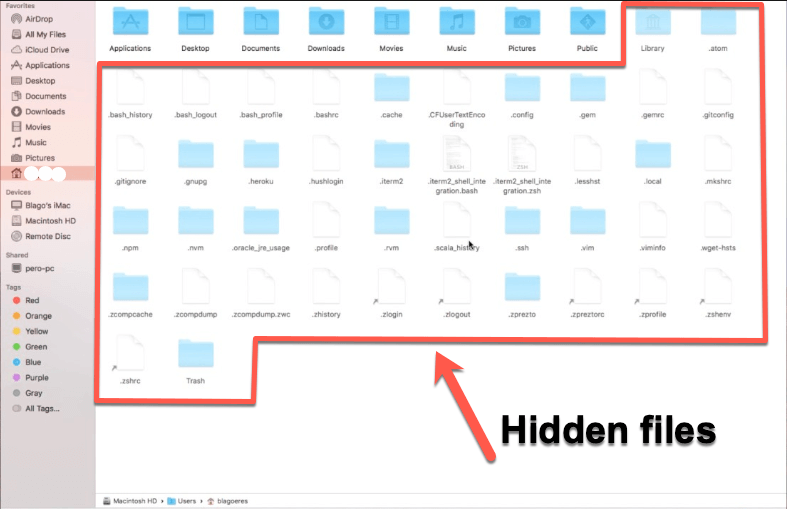
Then, you will see a dozen Macintosh HD folders and files that appear grayed out in the right column. That indicates all the hidden files are showing up. To access the files of a Macintosh HD folder, double-click on it.
Besides macOS volume, this method can also be used to show hidden files and folders on external hard drives and USB flash drives, and hidden files on SD cards. If you can't see files on the external hard drive on Mac, maybe those files are hidden. Using this key shortcut should work, too.
Taking SD cards as an example, you can take the steps below to show hidden files on SD cards on Mac.
How to show hidden files on SD cards on Mac:
Insert the SD card containing the hidden files into your Mac.
Open it from settings on the desktop.
Press the Command + Shift + Period (.) keys.
How do you reveal hidden files via the Mac Finder?
The Finder is the default file manager and graphical user interface shell used on macOS. It is responsible for all applications, files, disks, network volumes, etc. So, if you want to reveal hidden files and folders, you can show hidden files in the Finder.
Here's how to make Mac Finder show hidden files:
Open the Finder on your Mac.
Click Go on the menu bar and press the Option key (It would be the Alt key on some keyboards), you will see the hidden Library folder.
Hold the Option key still, click on the Library folder, and check if you can find the desired files.
You can also do the following to see and access the contents of the hidden Library folder.
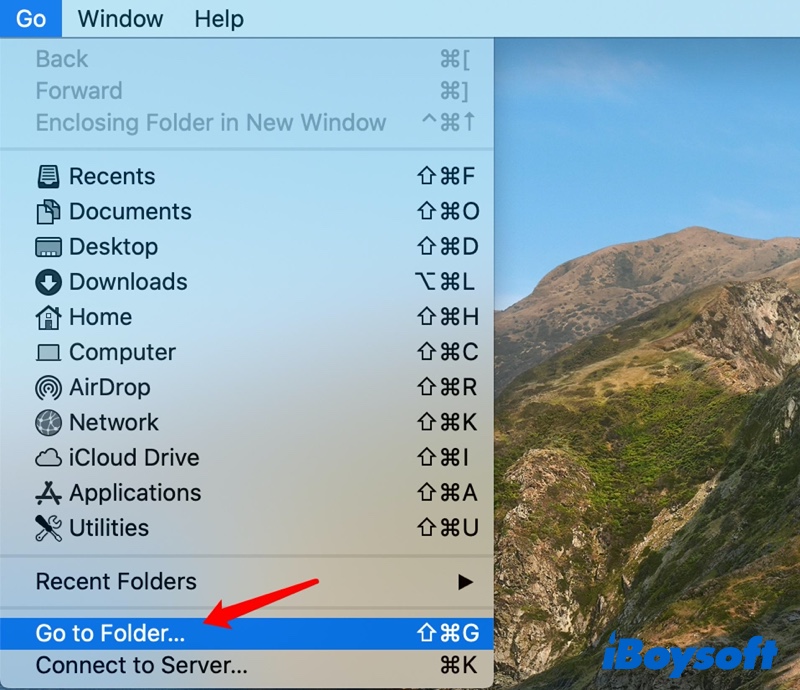
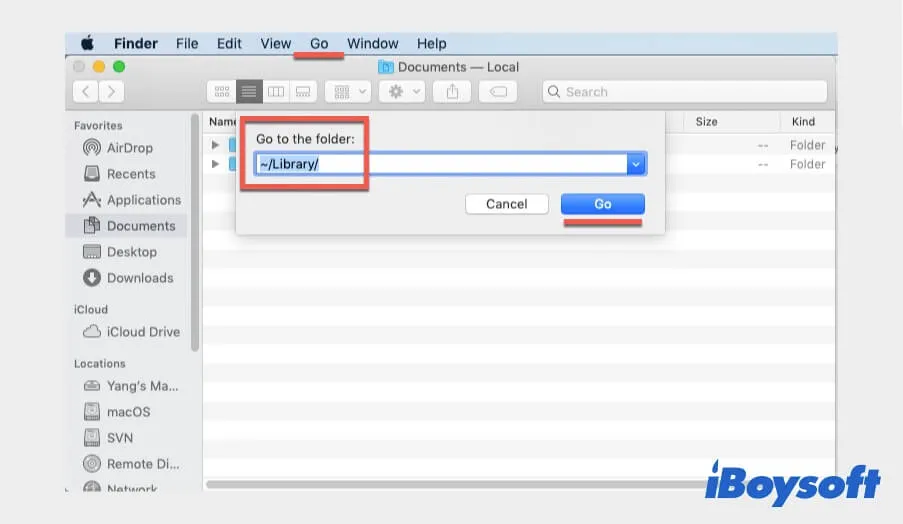
Open the Finder on your Mac.
Click Go from the menu bar.
Choose Go to Folder or press the Shift + Command + G keys.
Type "~/Library" into the box and click Go.
Didn't find the files that you want with the methods mentioned above? Well, let's move forward to the next way.
How do you show the hidden files on Mac with Terminal?
Showing hidden files on Mac with the Terminal utility is another advanced way. Running Terminal requires familiarity with the command prompt. If you are familiar with the command line, do the following to make your Mac show hidden files and folders:
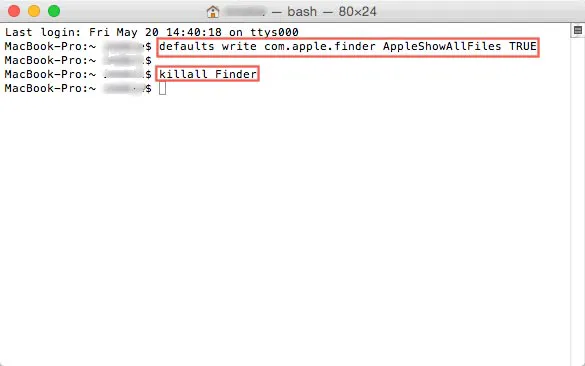
Open Terminal from Launchpad > Other.
Type the following command in the Terminal window and press the Return key.defaults write com.apple.finder AppleShowAllFiles TRUE
Then type in this one and hit the Return key to refresh the Finder and the desktop.killall Finder
Let's look at your Macintosh HD folder to see all the hidden folders/files including any temporary files saved on the desktop.
How do you recover and show hidden files on Mac with software?
It is possible that you can't see hidden or disappeared files on your Mac after trying all the mentioned solutions. The last resort to show hidden files on macOS Ventura, macOS Monterey, or earlier is to use an intuitive third-party app.
iBoysoft Mac Data Recovery is a professional and 100% safe app to help you quickly retrieve all the files on your Macintosh hard drive, including the hidden ones. Whatever reasons you lose data, such as accidental deletion, virus attack, or secret files hidden by the Mac operating system, this software can get those files back.
This app is fully compatible with macOS 14 Sonoma, macOS 13 Ventura, macOS 12 Monterey, macOS 11 Big Sur, macOS 10.15 Catalina, macOS 10.14 Mojave, macOS 10.13 High Sierra, macOS 10.12 Sierra, and Mac OS X 10.11 El Capitan. Besides, it works fine on Mac models with T2/M1/M1 Pro/M1 Max chips.
Through only 4 steps, you can recover and show hidden files and folders on M1 & Intel Macs:
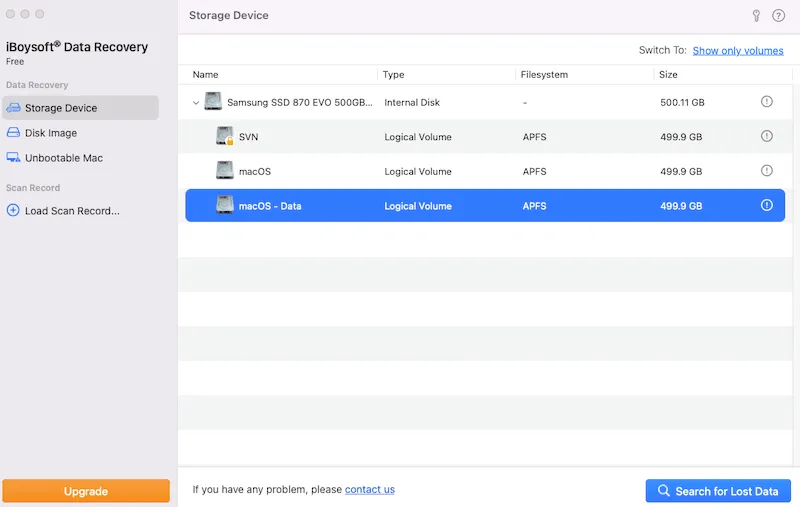
Free download, install, and launch iBoysoft Data Recovery for Mac on your computer.
Select the startup disk that contains the hidden files and folders and click Search for Lost Data. This will scan for massive files on this drive, including all the hidden files and lost/deleted data.
After finishing the scanning, you can spotlight the files you want according to their file types.
Select files you want to recover and then click Recover to get them back.
With this tool, you can recover disappeared files from external hard drives, SD cards, USB flash drives, Mac internal hard drives, etc. Moreover, it supports recovering lost files from formatted, corrupted, unreadable, and unmountable drives on Mac.
Documents Folder Missing on Mac Monterey or Big Sur, What to Do?
Files or folders lost or disappeared from Mac? This article is about how to recover lost or missing or disappeared document folders on macOS Monterey, Big Sur, and Catalina. Read more >>
How do you hide hidden files on a Mac?
After seeing and editing these files, you may want to hide these hidden files again. After all, they're related to the security of your macOS.
How do you hide hidden files on a Mac? Please take a look at the solutions below.
Solution 1: Hide hidden files on Mac with a shortcut
If you have shown the hidden files in Finder with a keyboard shortcut, and vice versa, you can also hide them using the same keyboard shortcut. To do this, press Command + Shift + Period once more.
Solution 2: Hide hidden files with Terminal
If you show them with a command line previously, you can make these files invisible with Terminal.
Open Terminal.
Type the below command in the Terminal command prompt and hit Enter. defaults write com.apple.finder AppleShowAllFiles FALSE
Still type in this one to refresh the Finder as you did before. killall Finder
How to hide files and folders to make them private?
You may have several files or folders you don't want others to access. For instance, if you stay up to work on a document or design, you don't want others to plagiarize your work. Fortunately, there is a neat trick to hide files and folders on your Mac computer.
Open Terminal on your Mac.
Type in the following command and press the Space key. chflags hidden
Drag files or folders you want to hide into the Terminal window. It will show the file path in Terminal windows, and you'd better record this path so that you can show this file when you need it.
Press Enter to ensure this operation. You will see your files disappear from the Finder.
If you want to show the hidden files and folders on your Mac as usual again, you can use the same procedure. But this time, type "chflags nohidden" instead of "chflags hidden".
It doesn't matter whether you want to show the hidden files out of curiosity or to troubleshoot some issues on your Mac. The above solutions should help locate these files. But compared with the complicated command lines, iBoysoft Data Recovery for Mac is the easiest and risk-free method to find the missing files on Mac computers.
Share this post if you find it useful and insightful.
The easiest way to reveal hidden files and folders in an active Finder window is to press the Shift + Command + period symbol (.) key combinations. This action works everywhere except for the Desktop, and you can hide the affected files and folders again simply by repeating the key combo.