When talking about transferring files from the old Mac to a new Mac, the well-known way is using Apple's Migration Assistant. Actually, there are many other simple, time-consuming, and reliable methods for transferring data between Macs.
Here, we've concluded the ways to transfer files from Mac to Mac with or without Migration Assistant and presented them in very detailed steps in this post. Let's learn more.
| Ways | Application scenarios | Highlights |
| Use Migration Assistant | 1. Transfer all data from Mac to Mac 2. Migrate files from an old Mac to a new one | Transfer everything from Mac to Mac |
| Use AirDrop | Share or transfer files with others wirelessly | No requirement for a physical connection between Macs |
| Use iMessage | Share or transfer files with others wirelessly | 1. Support remote data transfer 2. No requirement for a physical connection between Macs |
| Use e-mail | Share or transfer files with others wirelessly | 1. Support remote data transfer 2. No requirement for a physical connection between Macs |
| Use File Sharing | Share or transfer files with others wirelessly | No requirement for a physical connection between Macs |
| Use Bluetooth Sharing | Share or transfer files with others wirelessly | No requirement for a physical connection between Macs |
| Use iCloud storage | 1. Share files with others wirelessly 2. Transfer files among Apple devices | 1. Support remote data sharing 2. No requirement for a physical connection between Macs |
| Use Time Machine backups | Transfer or share files using a USB cable | Ready-made data for transfer |
| Use an external storage device | Transfer or share files using a USB cable | Not affected by Internet speed |
| Use Target Disk Mode | Transfer or share files using a USB cable | Not affected by Internet speed |
How to transfer everything from old Mac to new Mac with Migration Assistant
Migration Assistant is a useful tool that helps for transferring all your files from an old MacBook to a new MacBook, including applications, user accounts, preference settings, very large files, etc.
Preparations:
- Update both Mac computers to available software updates.
- Put the two computers near each other with Wi-Fi turned on.
- Open the Apple menu > System Preferences > Sharing to ensure the Mac computer name is listed in the Computer Name box. (For old Macs).
- Charge the two Macs for successful data transfer.
- Save editing documents and close all in-using apps.
Warning: For Macs running OS X Lion or Mountain Lion, connect the two Macs via a Thunderbolt, FireWire, or Ethernet cable and ensure they are connected to the same Wi-Fi network.
How to use Migration Assistant to transfer data between Macs:
On the new Mac:
- Open Finder > Applications > the Utilities folder > Migration Assistant.
- Click Continue and enter your admin password.
- Select From a Mac, Time Machine backup, or Startup disk > Continue.
On the old Mac:
- Launch Migration Assistant > Continue and then enter the administrator password.
- Check-in Transfer to another Mac > Continue.
Move to the new Mac:
Select the other Mac and click Continue on the Transfer Information to this Mac window.
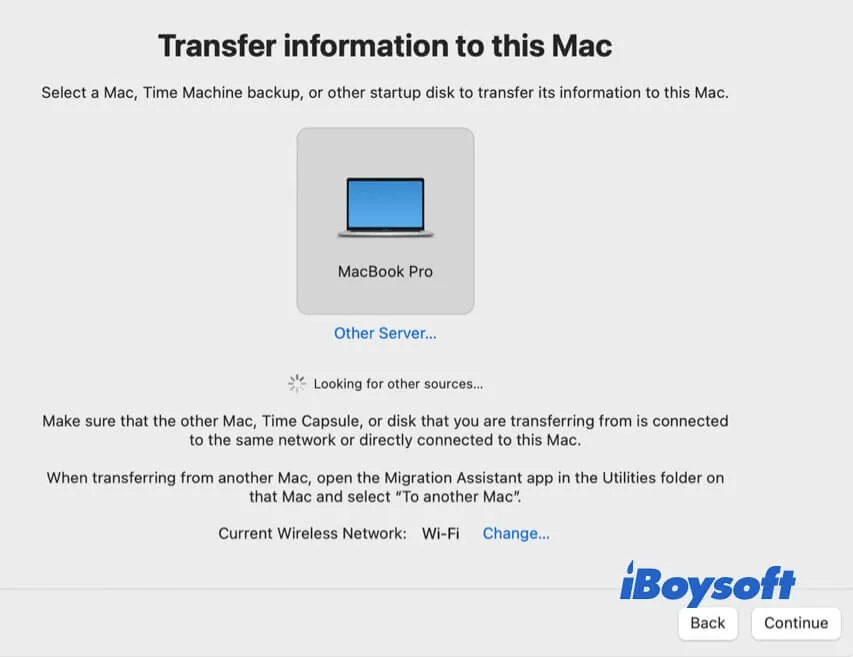
Back to the old Mac:
- Make sure the pop-up security code is the same as the code that appeared on your new Mac.
- Click Continue to move on.
On the new Mac:
- Choose the files or folders or all the information you want to move to this new Mac.
- Hit Continue at the upper right corner to start up the transfer.
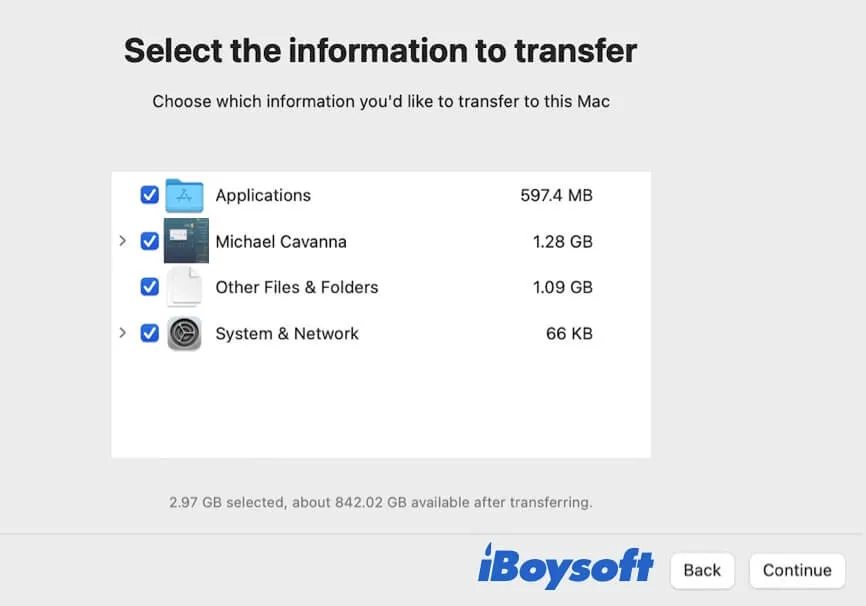
If you transfer many large files and folders, the migration process may take hours. When it is completed, close Migration Assistant on both Macs and check your transferred files on the new computer.
How to transfer files from Mac to Mac without Migration Assistant
Maybe the Migration Assistant is not working on your Mac. Or, you are seeking other ways to share some files with your colleagues or friends as Migration Assistant is a little bit time-consuming and complicated.
There are kinds of wireless data transferring methods available for you. You can select the one that meets your needs or you'd like to use.
1. Transfer data from Mac to Mac with AirDrop
AirDrop is a data-sharing feature in Mac OS. It utilizes Bluetooth to detect the target Apple device and then transfers files to Apple devices via Wi-Fi. Hence, you can turn on and use AirDrop to transfer documents, videos, folders, or other files from one Mac to another Mac.
Before you start file transfer:
- Turn on Bluetooth on both Macs.
- Make sure the two computers connect to the same Wi-Fi.
Use AirDrop to transfer files:
- On both Macs, open Finder and click AirDrop under Favorites at the left sidebar. In the AirDrop pane, select Contacts Only or Everyone in 'Allow me to be discovered by' according to your situation.
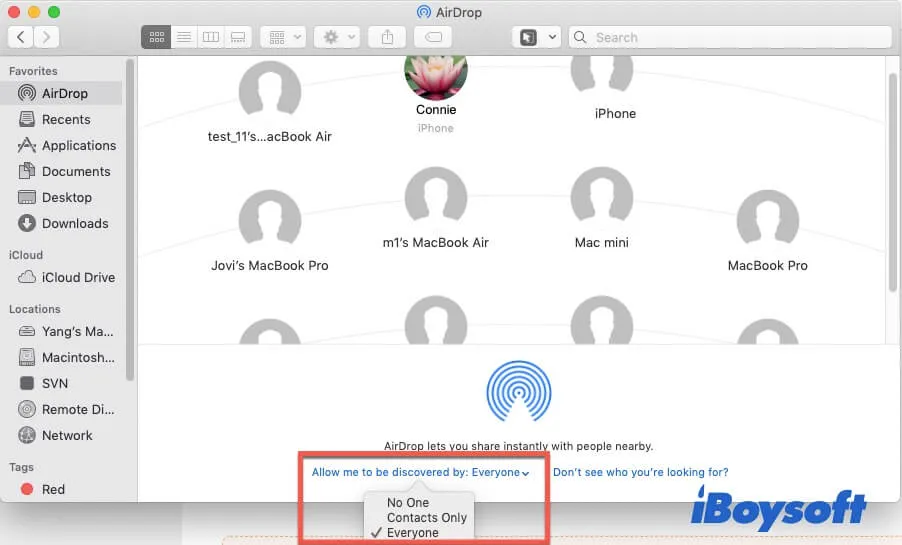
- On the Mac that you want to share files from, right-click the file and select Share > AirDrop. Then, choose the destination Mac on the pop-up window.
The file on your Mac will be sent to the receiving Mac immediately.
If AirDrop is not showing up on your right-click menu or is not working, instead, you can use iBoysoft MagicMenu to add AirDorp on your right-click menu. This right-click enhancer can add various light and frequently-used features to your context menu for quick use. With it, you can share files between Macs faster.
- Download, install, and open iBoysoft MagicMenu on your Mac.
- Right-click the target file or folder and choose AirDrop. If you can't see AirDrop, select Extension on the app's main interface, then click the download button next to AirDrop to add it to your right-click menu.
- Select a receiver to share the target file or folder.
2. Migrate files from Mac to Mac using iMessage
Apple's Messages on your Mac computer is also a nice utility for transferring data between Macs wirelessly.
- Open Finder > Applications > Messages on your Mac and add a new iMessage.
- Click the + icon at the upper right corner of the window to select the address of the receiving Mac.
- Drag and drop the files you want to send into the bottom iMessage box and hit the Return key on your keyboard.
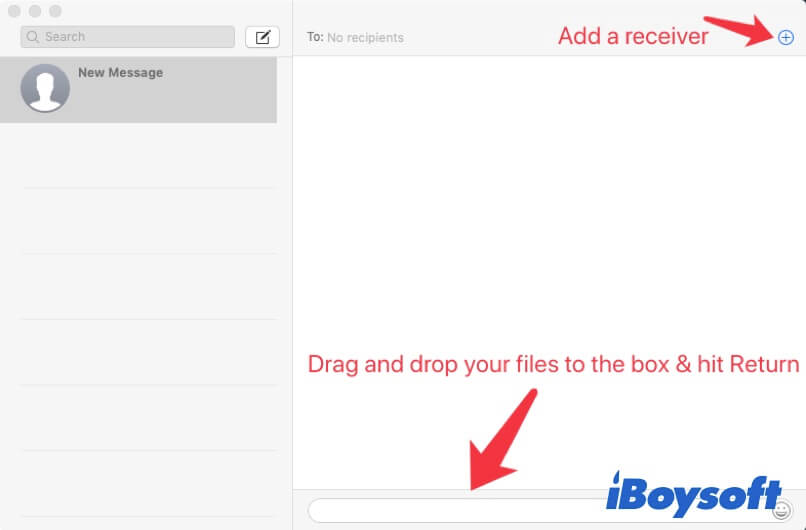
- On the target Mac, the receiver can right-click the file in iMessage to save it to a local folder.
3. Transfer files from Mac to Mac via e-mail
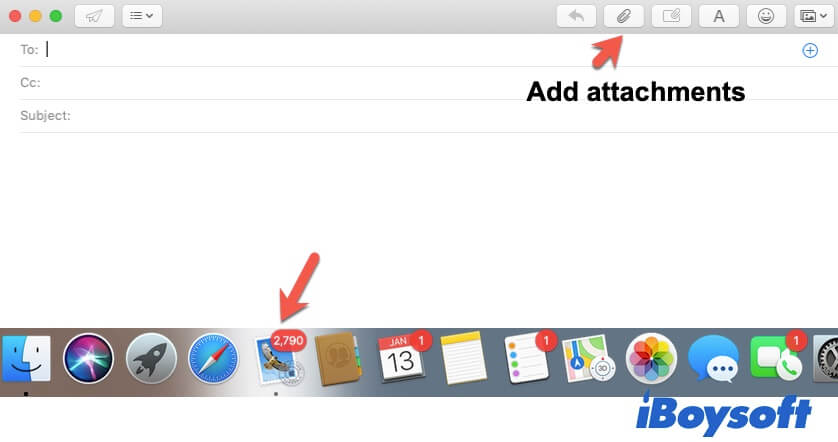
Don't forget to use e-mail. Sending e-mail is also a prior way to transfer data from Mac to Mac or even other devices. You can open your Mail app on Mac to create an e-mail and add the files you want to send as attachments. Then, you can send it to the target Mac at a specific time if you know how to schedule an email on Mac.
4. Transfer data from Mac to Mac with File Sharing
Every Mac has a file-sharing system called File Sharing. You can find it in Apple's Sharing utility. It allows Mac computers using the same network to transfer content with each other.
So, in the first place, you should:
- Check if the Macs have already connected to the same network.
- Click the Apple icon > System Preferences > Sharing and then check in File Sharing on both Mac models.
If the above steps are completed, you can follow the steps below to transfer files from Mac to Mac without a USB cable.
On the Mac that you want to share files from, add the files or folders that you want to share with to the Shared Folders field.
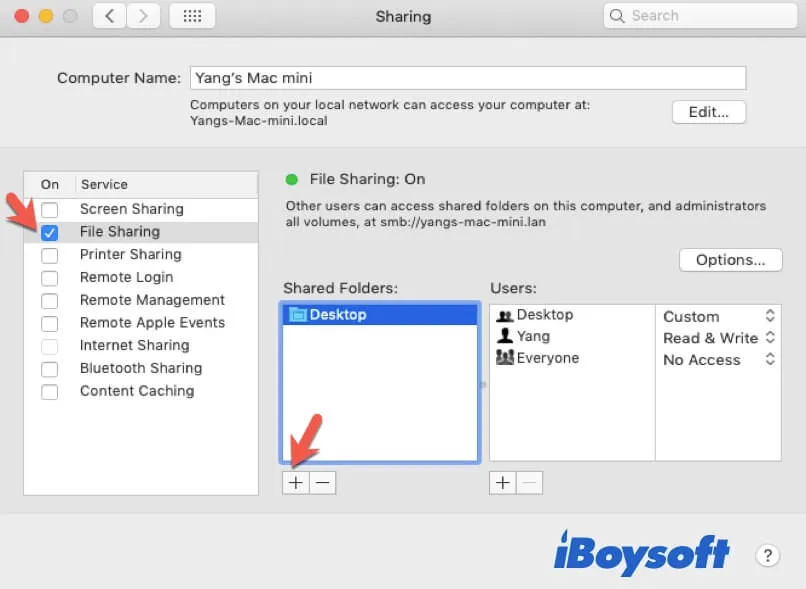
Note: In the Shared Folders box, it lists the Public folder by default. If it is the content you want to share with the other Mac, you can use it directly. Or, you need to remove it and add the folder/file you want to share.
On the other Mac:
- Open Finder and then go to the top Finder menu and click Go > Network. In the network window, you can see your Mac's name.
- Click on your Mac > Connect as > Connect. In the pop-up window, select one of the Connect As options that match the way you log in to this Mac (Guest, registered user, using an Apple ID). Then, type your account password and click Connect.
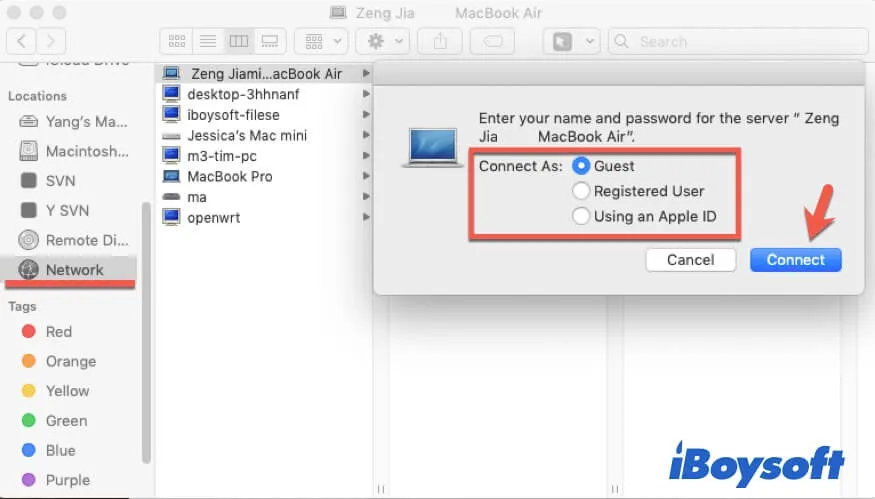
- The shared folders will show up on this Mac. You can see them or copy them to this Mac.
If Mac File Sharing is not working, try the next way.
5. Transfer files from Mac to Mac via Bluetooth Sharing
Additionally, you can enable Bluetooth Sharing in the Sharing utility to migrate data between Mac machines over Bluetooth. You need to put the Macs closer for successful data transfer.
On both Mac machines, open System Preferences > Sharing and check in Bluetooth Sharing. Next, click open Bluetooth Preferences to ensure both of their Bluetooth are turned on.
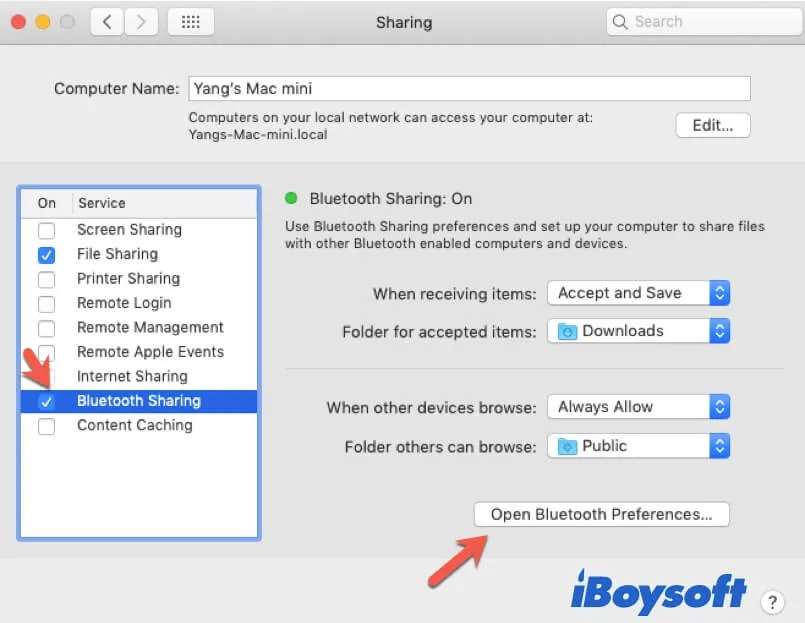
Now, navigate to the Mac you'll send files from, and double-click the target Mac device listed in the Bluetooth window. That will trigger the appearance of a Finder window. You can select the files that you want to share with the other Mac and click Send.
On the other Mac, the popup will ask the receiver whether to accept the sending files or not. Click Accept to save them on the Mac.
6. Transfer data from Mac to Mac with iCloud storage
Using iCloud Drive to transfer files is also an easy way. You can use it to migrate files to other Mac computers wirelessly.
Here's how:
- Open Finder > iCloud Drive.
- Create a folder and copy and paste the files you want to share in it.
- Log in to the other Mac with the same iCloud account and check or move files to the local destination of that Mac.
Note: This way is just suitable for sharing files between your own Macs for security.
7. Transfer from Mac to Mac using Time Machine backups
Perhaps, you think migrating files over the air is not secure enough for your secret files. Or, regarding that, the wireless data migration is time-wasting, especially for large files.
Using Time Machine backups is much more convenient and quicker to migrate all the data from an old Mac to a new Mac computer, including the old Mac's preferences, applications, user accounts, and other files.
The detailed steps for transferring files to a new MacBook with Time Machine backup are as below:
- Back up your old Mac (If you have, skip this step).
- Connect the Time Machine backup disk to your new Mac via a USB cable (If it is a USB flash drive, plug it into the Mac directly).
- Restart your new Mac into macOS Recovery Mode.
- Select Restore From Time Machine Backup in macOS Recovery Mode and click Continue.
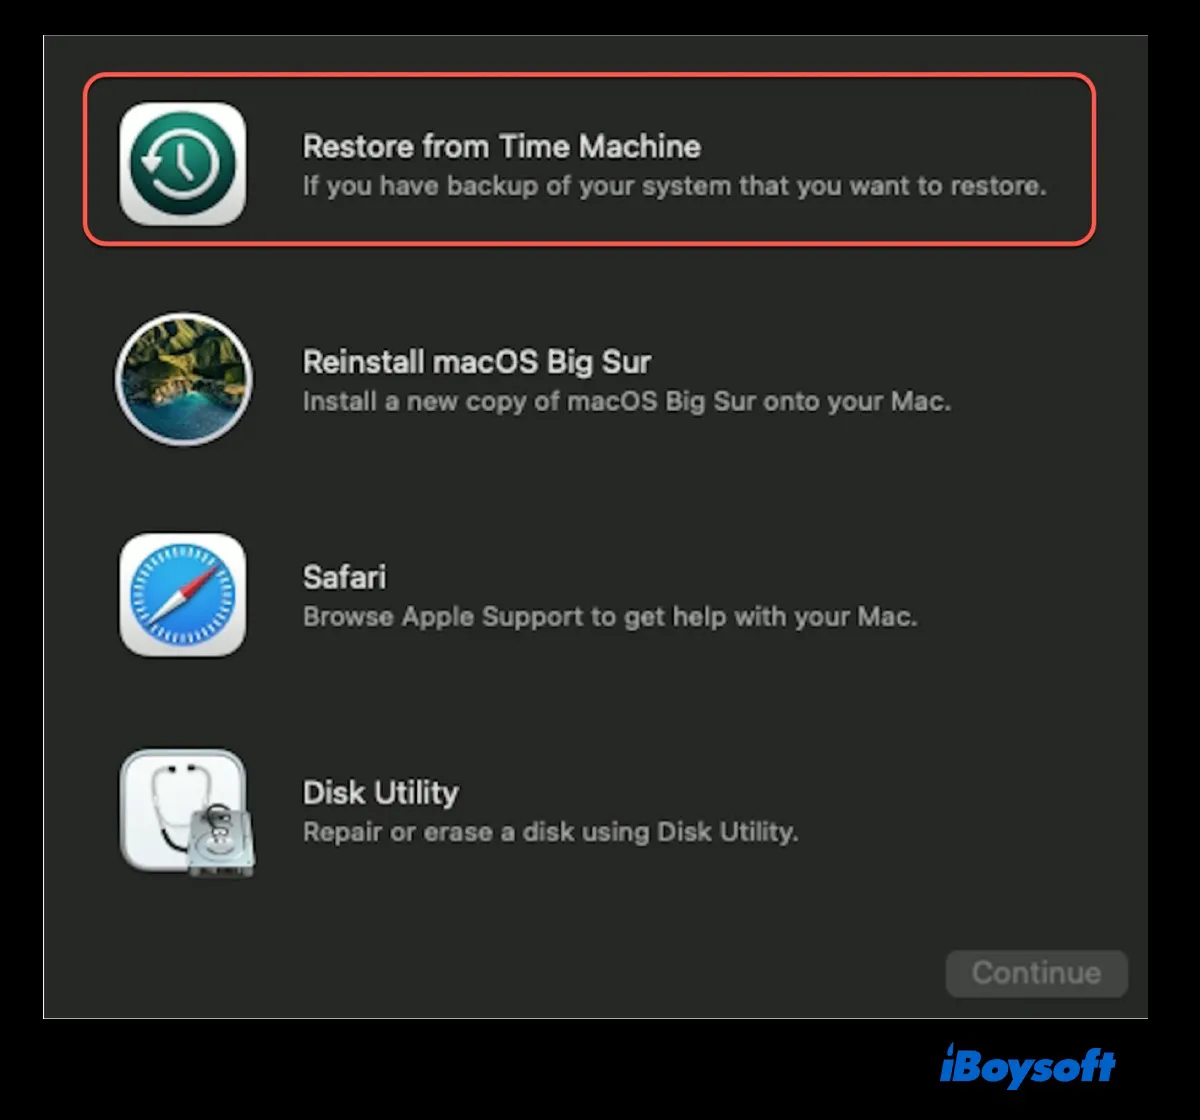
- Select your Time Machine backup disk and click Continue.
- Choose the latest backup and follow the on-screen steps to finish data transferring.
- Restart your new Mac and check the migrated files.
8. Transfer files and folders across Macs via an external storage device
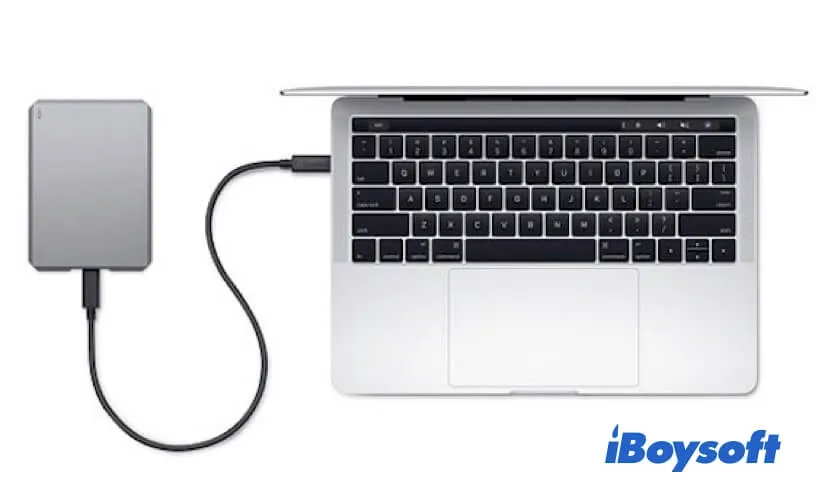
If you don't have a Time Machine backup hard drive but an available external storage device, like a USB flash drive or an external hard drive, you can use it as a bridge to transfer data from MacBook to MacBook.
You can connect the external drive to the Mac you want to transfer files from. Then, copy files or folders onto the drive and right-click the drive to safely Eject it.
Now, unplug the external drive from that Mac and reconnect it to the target Mac. Next, you can move the files on the drive to the Mac.
9. Mac to Mac transfer with Target Disk Mode
Target Disk Mode is to connect the two Macs with a USB or Thunderbolt cable to make an Intel-based Mac's internal hard drive perform as an external hard drive for the destination Mac machine. It is often used to transfer files from an old Mac to a new Mac because of the fast data transfer speed.
Here's how to use Target Disk Mode to transfer data from an old Mac to a new Mac:
- Use a Thunderbolt or FireWire cable to connect the two computers.
- On the old Mac, click the Apple menu > System Preferences > Startup Disk > Target Disk Mode to restart the Mac into Target Disk Mode. The old Mac will show a Thunderbolt icon on the screen.
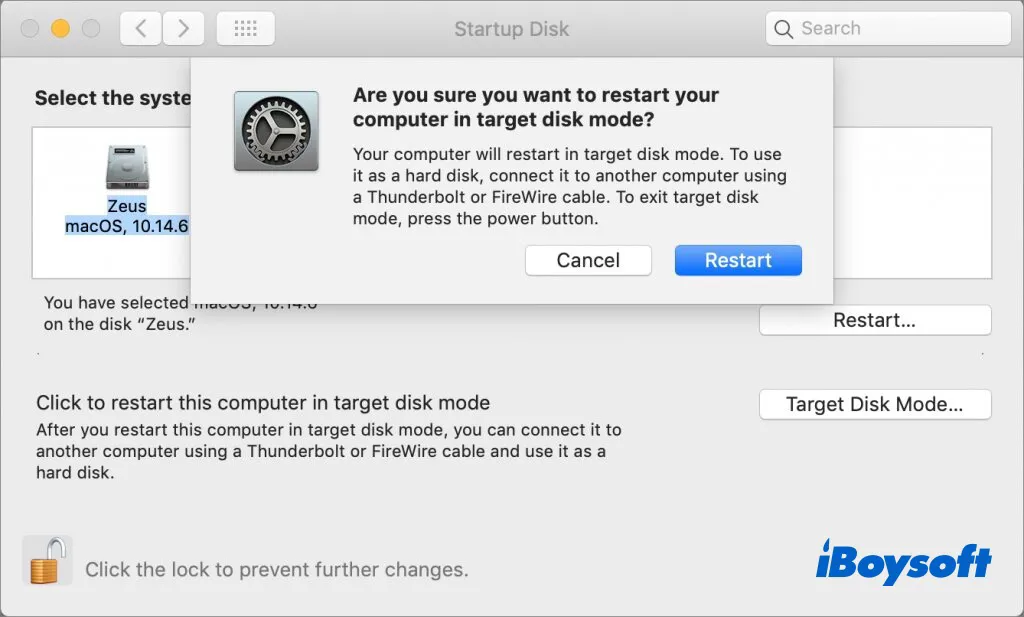
- On the destination Mac, open Finder. You can see the internal hard drive of the old Mac show up under the Locations tab on the left sidebar of Finder. Now, you can copy or move all or only the important files from the old Mac's drive to your new Mac.
How to transfer files from a broken Mac to a new Mac?
Maybe your Mac is broken and you've purchased a new one. But since the old Mac is broken, the above ways are useless for transferring files from one Mac to the other.
So, how can you transfer the files on the broken Mac to the new device? It is easy with a data recovery tool like iBoysoft Data Recovery for Mac. You can read this post carefully to get more details about how to migrate files from a broken Mac to a new one: How to transfer files from a broken Mac to a new Mac?
FAQs about transferring files from Mac to Mac
- Q1. Does Migration Assistant transfer everything?
-
A
Yes, you can use Migration Assistant to transfer everything from one Mac to another. But you can also use it to migrate some of the files or folders you want.
- Q2. How to transfer applications to new Mac without Migration Assistant?
-
A
You can use the File Sharing feature within Sharing utility in System Preferences to transfer applications to a new Mac. And you can also use AirDrop or put the app installers in an external drive to copy these applications to another Mac.
- Q3. What is the fastest way to transfer data from one Mac to another?
-
A
If you want to transfer all the files from one Mac to another, the fastest way is to use Migration Assistant. If you just want to share some files or folders with others, using AirDrop is the fastest method.
- Q4. How long does Migration Assistant take?
-
A
The time that Migration Assistant takes to transfer files from Mac to Mac depends on the amount of your data and network speed and stability. The fewer files you transfer and the faster the Wi-Fi speed is, the less time it will cost. Conversely, the longer time it will consume.
- Q5. How do I connect two Macs to transfer files?
-
A
You can connect two Macs wirelessly via AirDrop, File Sharing utility, Bluetooth Sharing to transfer files. Or, you can connect two Macs using a USB cable or Thunderbolt cable (according to the ports on the two Macs) so that one of the Mac can be an external hard drive showing up on the other Mac. That is called target disk mode.

