If you transfer or store sensitive information on the storage media, you don't want anyone else to access the drive without authorization. It could cause data leakage when your Mac or external hard drive is exposed to an unattended environment, lost, or stolen.
You can password-protect files or folders on a Mac or encrypt the whole drive on a Mac to prevent others from accessing it. Whether it is an internal drive or an external HDD, SSD, USB flash drive, SD card, etc., be it a startup disk or non-startup volume(the partition table should be GUID, and the files system should be macOS-compatible), you can apply the methods below to encrypt the drive on a Mac with or without erasing.
| Options to encrypt drive on Mac | Applicable scenarios | Erasing data or not |
| Encrypt drive in Disk Utility | Internal and external startup/non-startup volumes | Yes |
| Encrypt drive via FileVault | 1. Turn on FileVault to encrypt internal/external system volume 2. Use iBoysoft DiskGeeker to encrypt non-startup volumes with FileVault | No |
| Encrypt drive with Finder | Internal and external non-startup volumes | No |
| Encrypt Time Machine backup | 1. Encrypt the whole partition in Finder 2. Encrypt the backup in Time Machine settings | No Yes |
How to encrypt internal/external drives in Disk Utility
Disk Utility is the disk management tool on macOS. It enables you to add/delete volumes, partition, unmount, check and repair disk errors, and erase internal and external hard drives. When you format the drive in Disk Utility, you can choose an encrypted file system format to protect your data.
One thing needs to be clear, formatting the drive in Disk Utility will erase all the contents, make sure you have backed up the drive or important files. If you want to encrypt a drive without erasing it, you can apply the other two methods below.
Steps to encrypt a drive in macOS Disk Utility:
- Boot your Mac into macOS Recovery Mode if you want to encrypt the Macintosh HD.
- Connect the external hard drive to your Mac.
- Access Disk Utility from the macOS Utilities screen after entering macOS Recovery Mdoe, or open it from Finder > Applications > the Utilities folder.
- Select the internal or external drive on the sidebar of Disk Utility.
- Click the Erase button in the toolbar.
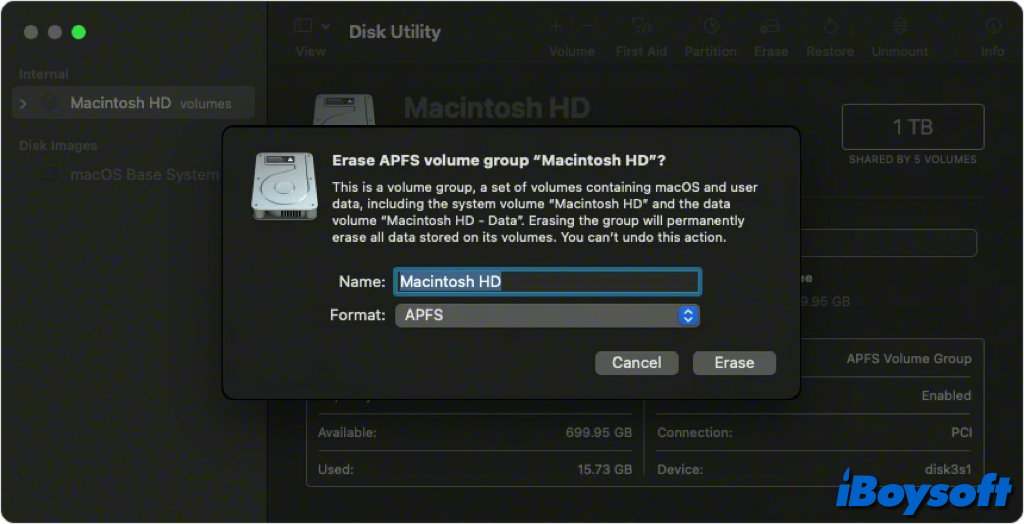
- Click the Scheme box and choose GUID for a non-system volume.
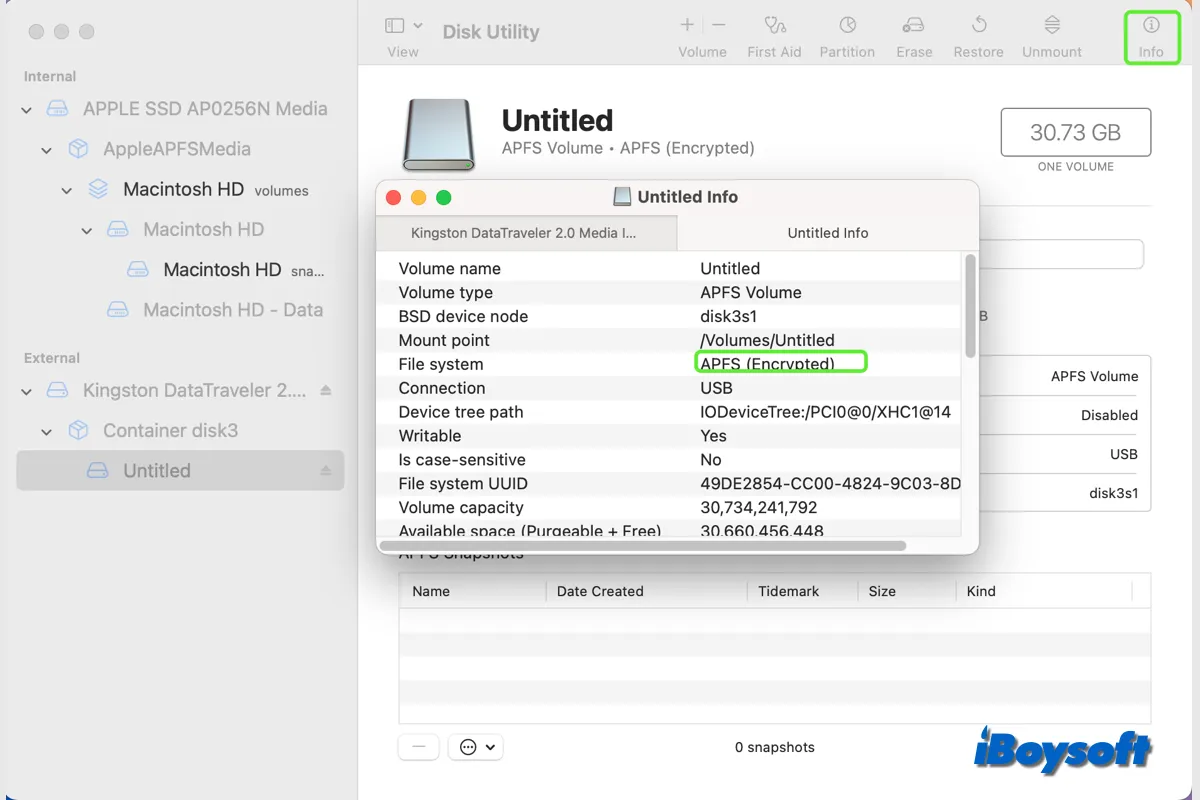
- Click the Format pop-up menu, then choose an encrypted file system format.:
APFS (Encrypted)
APFS (Case-sensitive, Encrypted)
Mac OS Extended (Journaled, Encrypted)
Mac OS Extended (Case-sensitive, Journaled, Encrypted) - Enter the password to encrypt the drive and verify it, then click Choose. If you want to change the password later, select the volume in the sidebar, then choose File > Change Password.
- Click Erase Volume Group/Erase and click Done.
- Quit the Disk Utility when it completes formatting.
Share to let others know how to encrypt a drive when formatting it in Disk Utility!
How to encrypt SSD/HDD/USB flash drive with FileVault
Turning on FileVault to encrypt the drive data won't erase the drive. Encryption happens automatically when you activate FileVault on your Mac device, but only when it's powered on and in the wake state. Files that you save to your startup disk that are newly created are automatically encrypted.
Encrypt startup volume on Mac with FileVault
Whether your startup volume is on an external or internal drive, FileVault gives you control over who can access it. With it enabled, you must enter the login password each time your Mac wakes up from sleep mode or from a screen saver to access all of the data on the device.
On macOS Ventura and later:
- Go to the Apple menu and choose System Settings.
- Scroll down the sidebar and choose Privacy & Security.
- Locate and click FileVault under Security.
- Click the Turn on button.
- Enter your password and click Unlock.
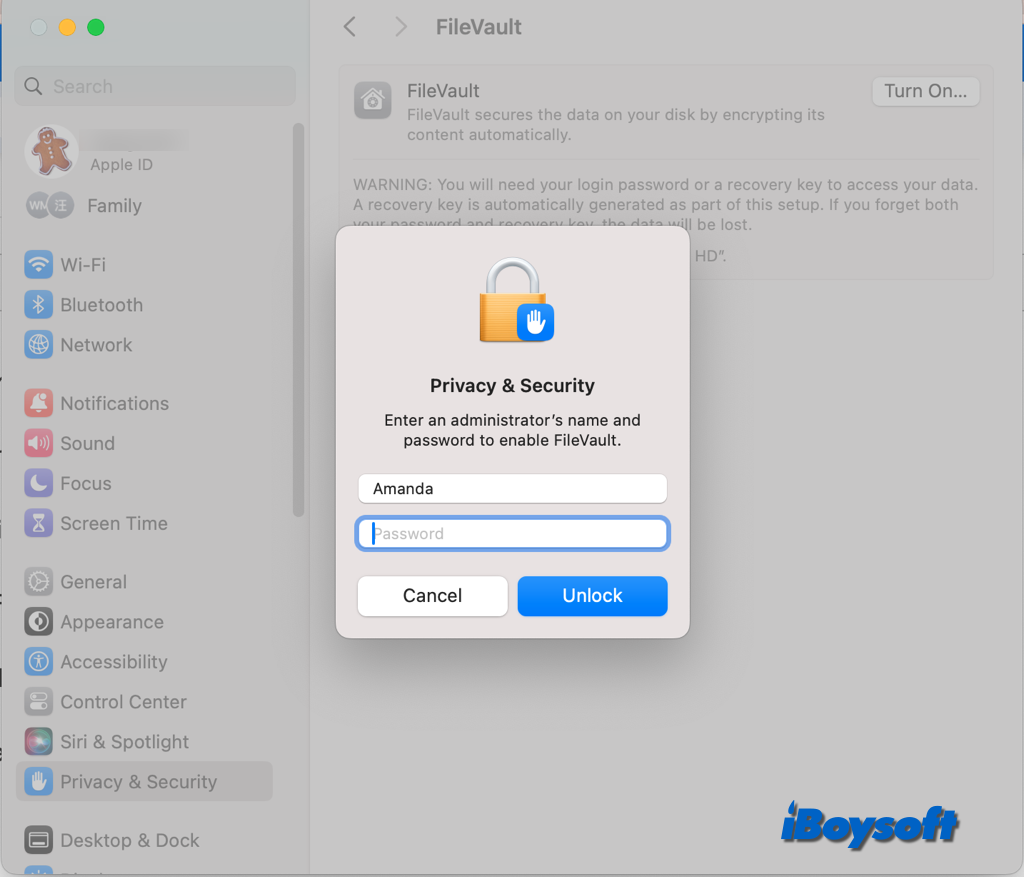
- Choose a way to unlock your disk and reset your login password if you forget it.
iCloud account: If you currently use iCloud, click "Allow my iCloud account to unlock my disk." If you haven't used iCloud before, click "Set up my iCloud account to reset my password."
Recovery key: Click "Create a recovery key and do not use my iCloud account" to generate a recovery key. Put the recovery key in writing and store it somewhere secure. - Click Continue to encrypt the startup volume.
On macOS Monterey and earlier:
- Choose Apple menu > System Preferences.
- Select Security & Privacy and click the FileVault tab.
- Unlock the preferences pane and click Turn On FileVault.fil
- Select a way to unlock the drive, iCloud account, or Recovery key.
- Click Continue to begin the encryption.
Encrypt non-startup volume on Mac with FileVault
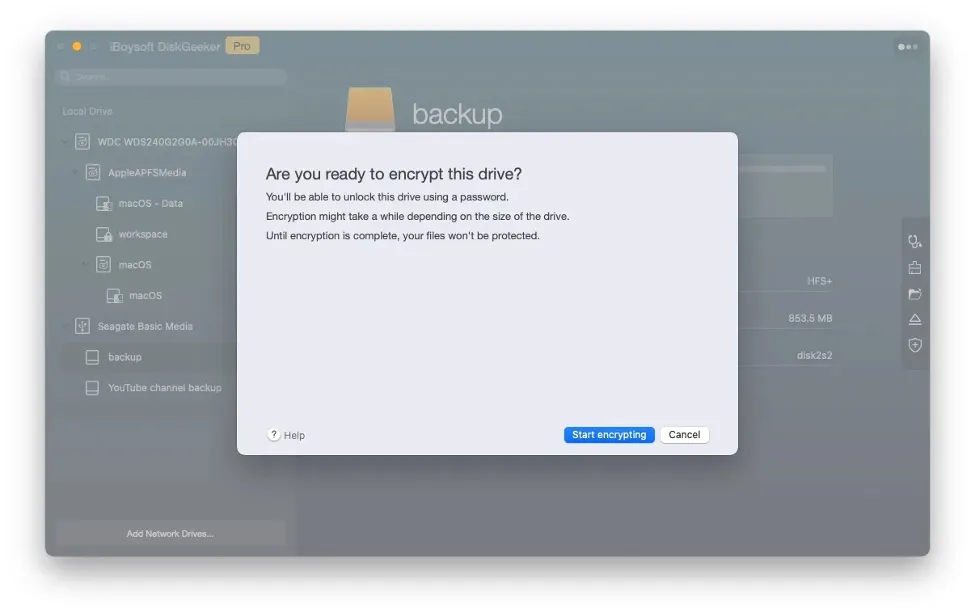
If you want to encrypt non-startup volume with FileVault, you can try iBoysoft DiskGeeker, an all-in-one disk management tool for Mac. It enables you to encrypt an APFS- or Mac OS Extended-formatted external or internal volume with FileVault. Here's how:
- Download and install iBoysoft DiskGeeker on Mac.
- Connect the external hard drive to your Mac.
- Open iBoysoft DiskGeeker and locate the non-startup volume that you want to encrypt.
- Right-click the APFS/Mac OS Extended volume and choose Encrypt from the drop-down menu.
- Click Continue when it says the compatible encryption method is FileVault.
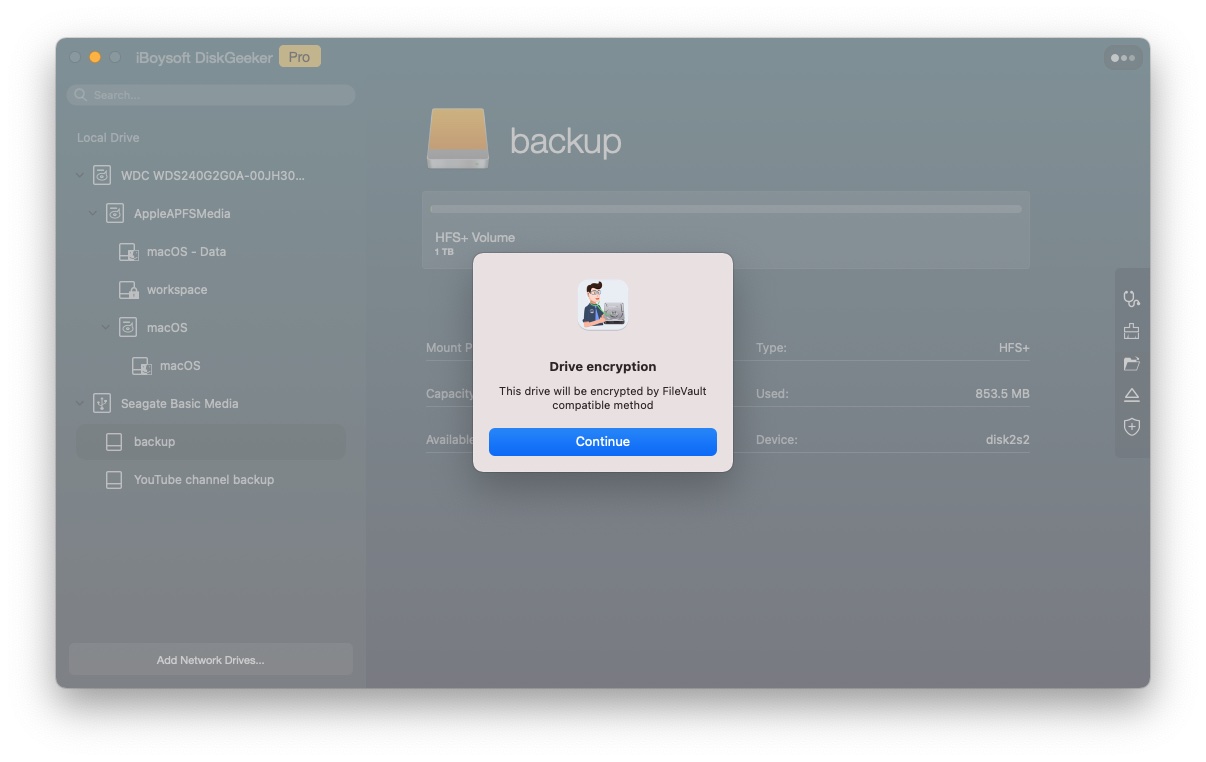
- Enter the password and verify it, then click Next > Start encrypting.
Recommend iBoysoft DiskGeeker with others to encrypt non-startup drives with FileVault!
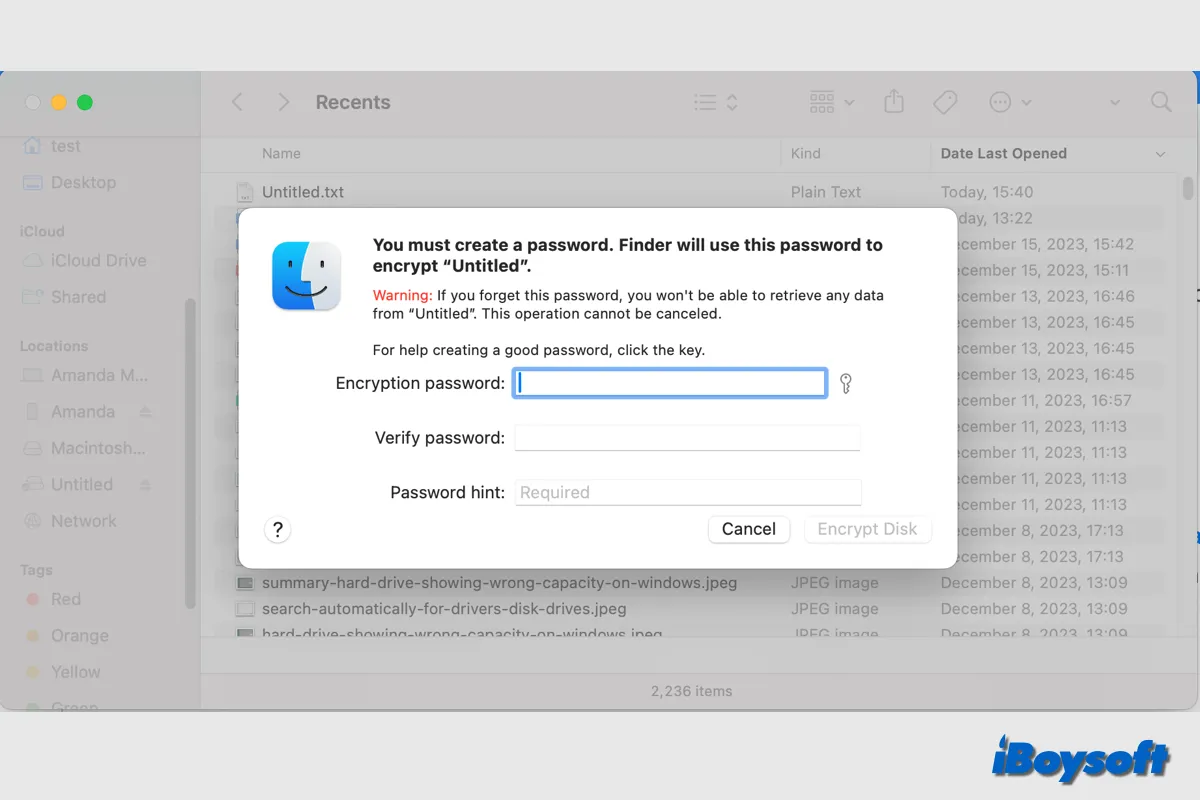
How to encrypt non-system volumes in Finder
There is another way you can choose to encrypt internal and external hard drives without erasing them, and that is using Finder. You should know that this method can only be used to encrypt non-system volumes, and the file format will be converted to APFS before the encryption.
Encrypt non-system volume via Finder step by step:
- Connect the external storage media if you want to encrypt it on your Mac.
- Open Finder and select the internal or external drive under the Locations from the sidebar. If the external hard drive doesn't show up there, check the Finder's settings to make sure the box of External disks is ticked in the Sidebar tab.
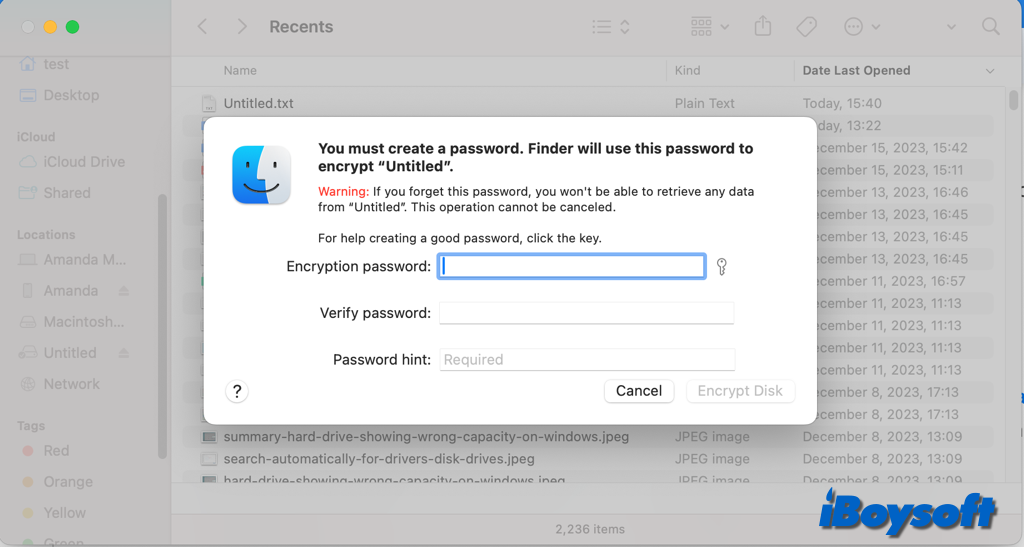
- Right-click the selected drive/volume and choose Encrypt (item name).
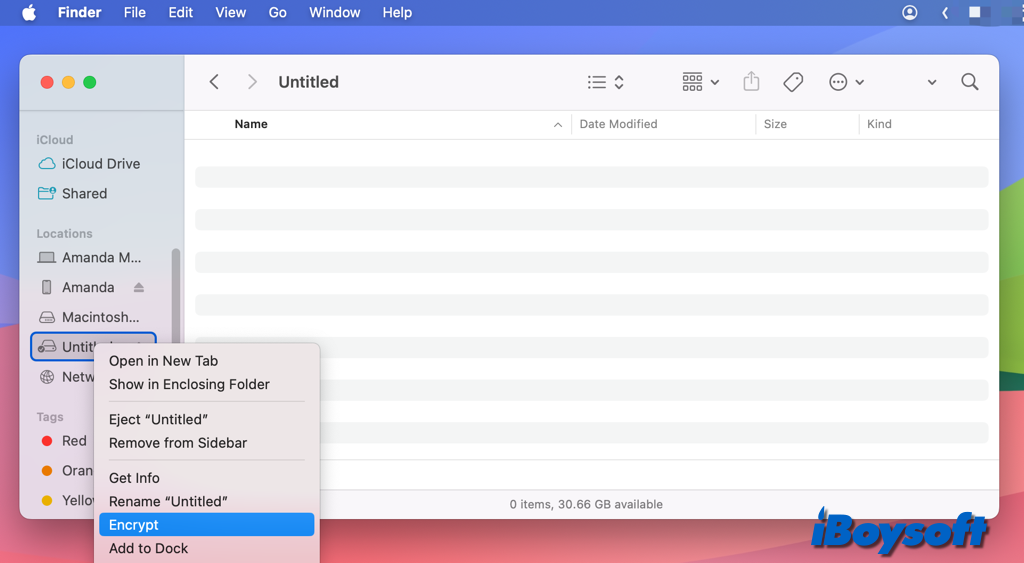
- Create a password and confirm it, then select Encrypt Disk. Make sure you write down this password and store it somewhere secure. Without it, you are unable to access the data on the encrypted disk.
How to encrypt your Time Machine backups
Some Mac users even want to encrypt the Time Machine backups to secure them. Whether it is a new drive or an existing Time Machine backup drive, you can straightforwardly encrypt the partition via Finder. Alternatively, you can encrypt the backup only in Time Machine settings, the existing backups are erased and new encrypted backup sets are created.
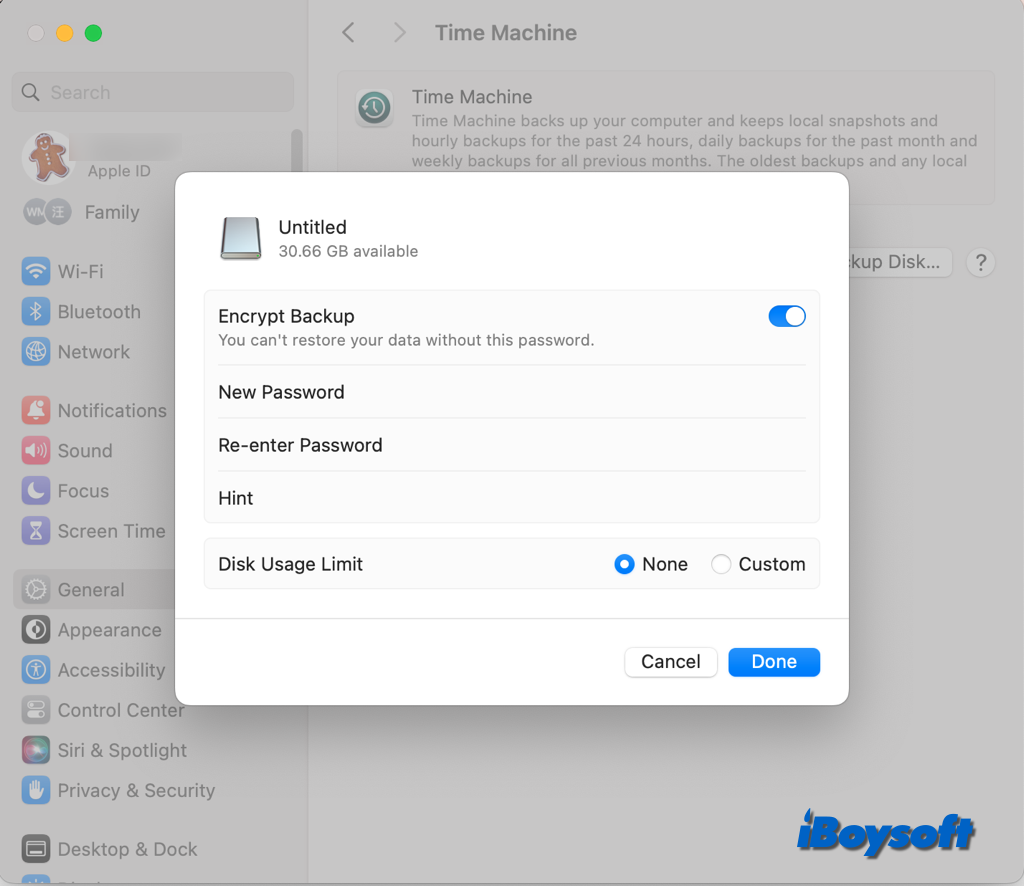
On macOS Ventura and later:
- Connect the Time Machine backup drive to your Mac.
- Navigate to the Apple menu > System Settings.
- Click General and choose Time Machine.
- Tap the Add Backup Disk and choose Set Up Disk.
If you have already used a drive for Time Machine backup and want to encrypt it, you should first select the drive and click "-", then choose Forget Destination.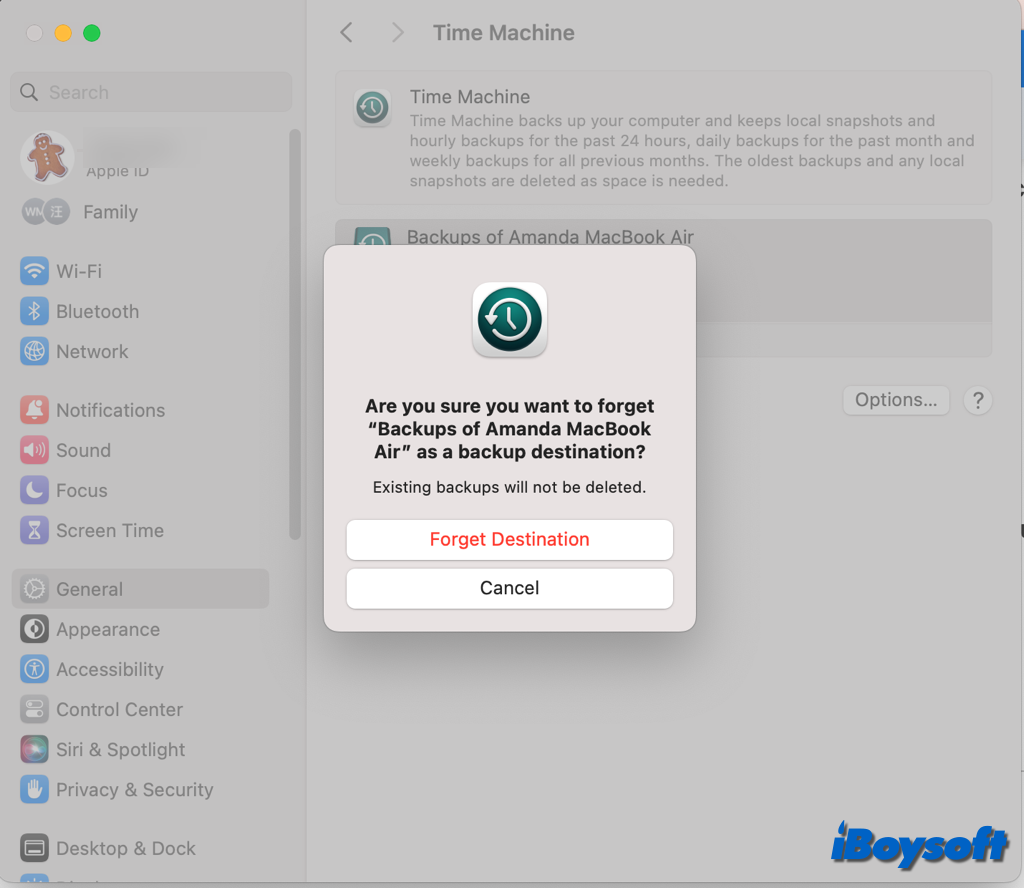
- Toggle on Encrypt Backup.
- Enter your password and the hint info, and click Done.
On macOS Monterey and earlier:
- Connect the drive for Time Machine backup to the Mac.
- Click the Apple logo and choose System Preferences.
- Select Time Machine on the preferences pane.
- Tap on Select Disk to choose a drive for Time Machine backups.
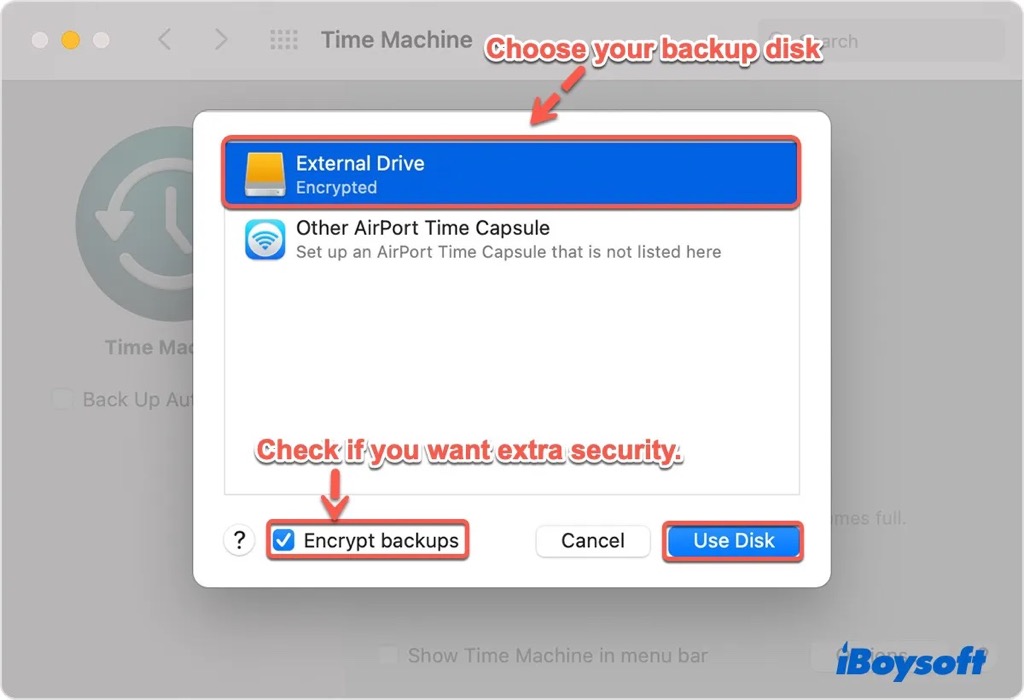
Similarly, choose your current backup drive from the list and click Remove Disk first if you want to set encrypt for an existing Time Machine backup drive. - Tick Encrypt backups, then click Use Disk.
- Type a backup password for the disk.
This post tells how to check the encryption status on your Mac, including the startup volume, non-startup volume, internal drive, and external drive.
Share this post with others who want to encrypt a drive on a Mac!