A macOS bootable USB installer offers various benefits to Mac users. For example, it allows you to perform a fresh install of macOS, boot up an unbootable Mac, downgrade macOS, and install macOS on multiple computers without downloading the installer each time.
While it's not easy to create a bootable USB installer for macOS Tahoe or other versions, you may encounter errors, such as can't download macOS Tahoe, the macOS USB installer not booting, or get stuck in the process. This article aims to help you resolve all sorts of issues you could experience when making a boot disk for macOS.
Since you're likely creating the bootable installer from Terminal or OpenCore Legacy Patcher, we'll cover the known issues relevant to them.
Tips: Have you tried creating the macOS bootable USB installer from Windows?
💡One solution for all: Use an install disk maker for macOS
The fastest solution to all problems that prevent you from creating a bootable USB installer on Mac is to use a reliable disk creator like iBoysoft DiskGeeker.
It keeps a library of installers for macOS High Sierra and later versions, allowing you to make a macOS bootable drive from DMG files in the app. This avoids the risk of downloading corrupted installers online and wasting time on complex command lines.
For macOS Sierra and earlier systems, you can download the required Mac OS DMG file and upload it to the app to quickly make a boot disk.
Follow the steps below if you're unable to create a macOS bootable USB in Terminal or OCLP:
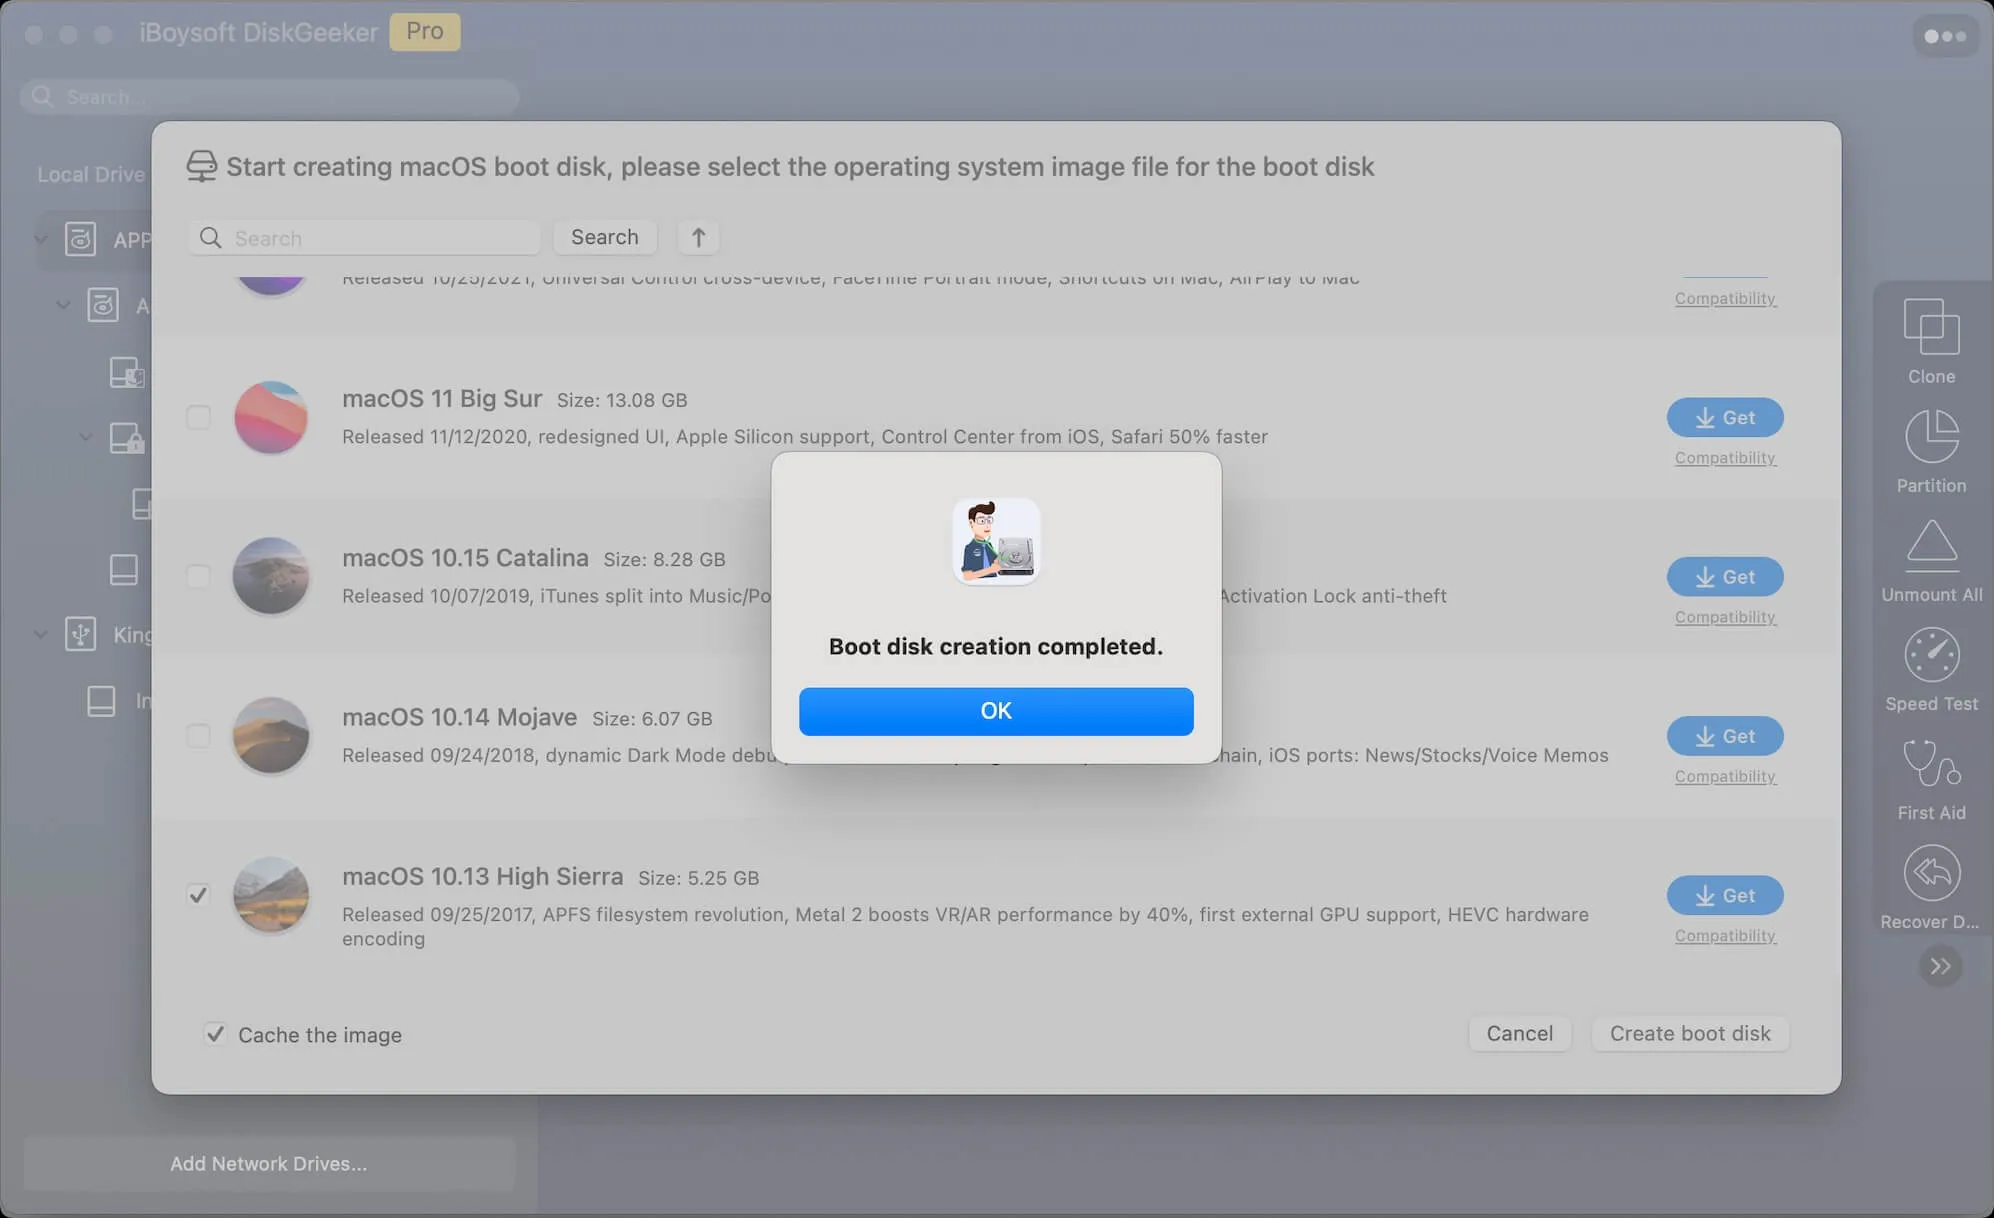
Step 1: Install iBoysoft DiskGeeker.
Step 2: Open the bootable USB tool, then select your USB drive from the left side and click Create boot disk. After that, click Continue to acknowledge that the process will erase your drive.
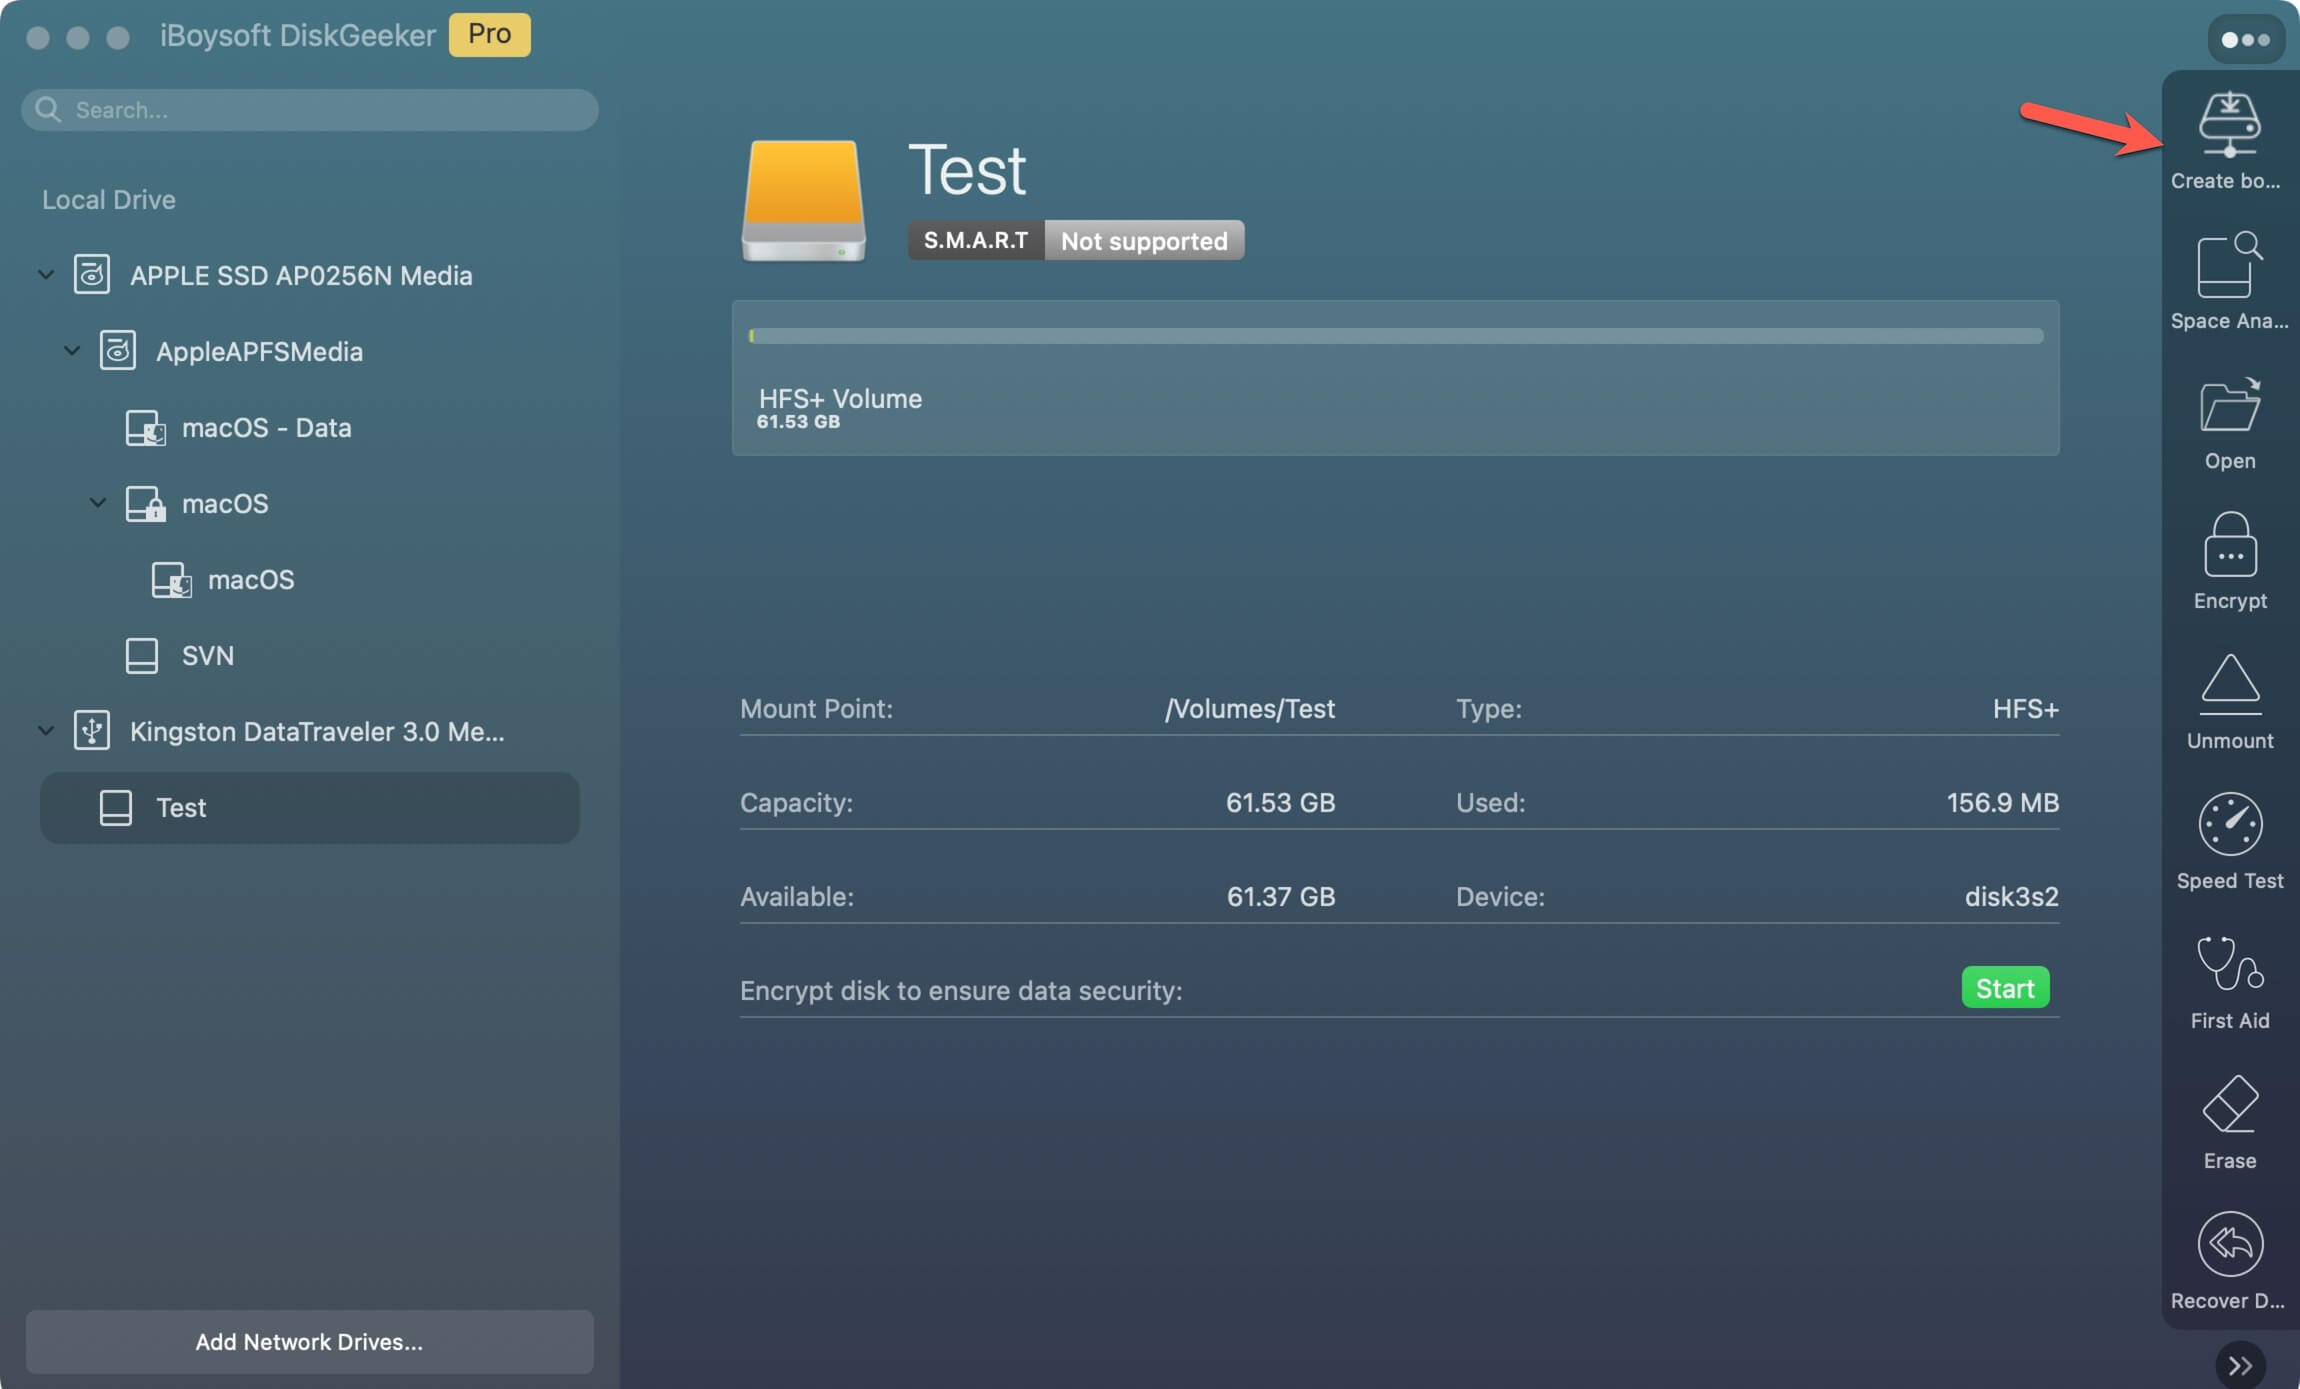
Step 3: Choose the Mac OS version you want to create an install disk with.
If you'd like a bootable USB for macOS Sequoia/Sonoma/Ventura/Monterey/Big Sur/Catalina/Mojave/High Sierra, select the macOS you want and click Create boot disk.
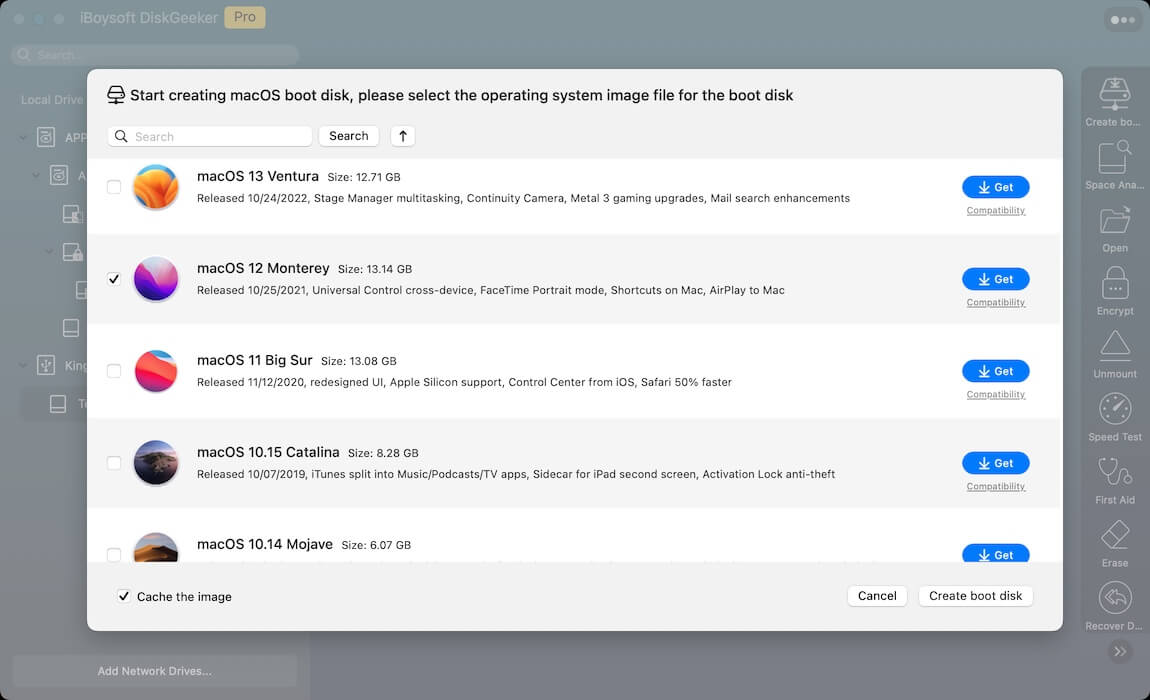
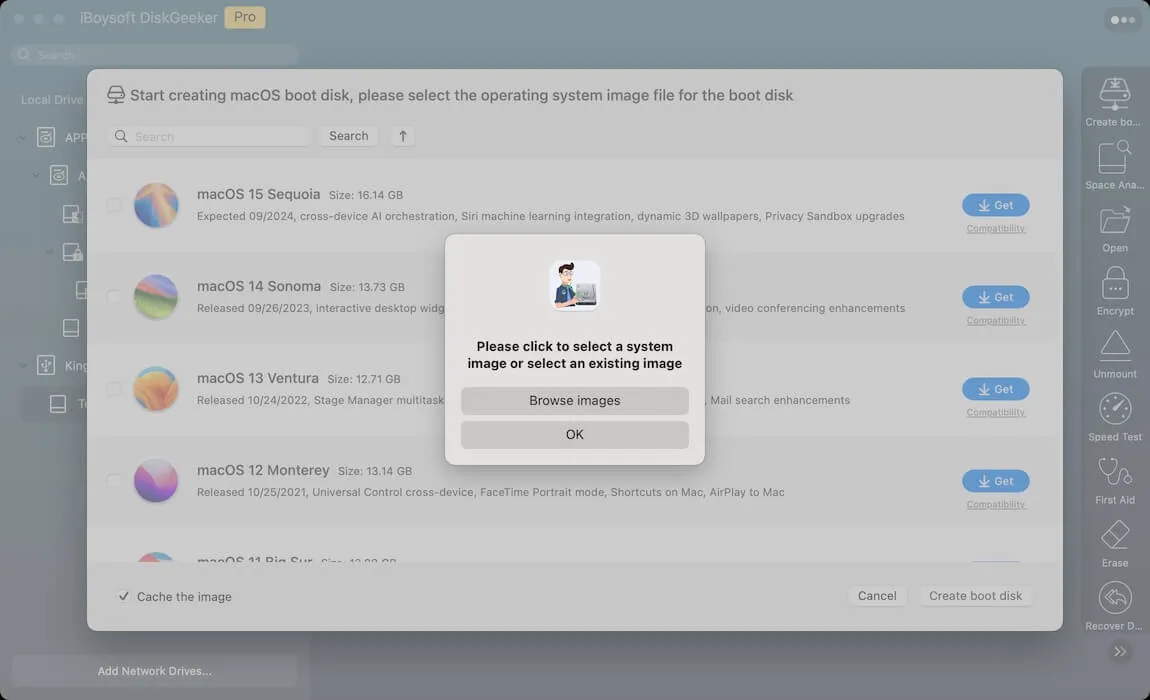
If you'd like a bootable USB for macOS Sierra/OS X El Capitan/OS X Yosemite/OS X Mavericks/OS X Mountain Lion/OS X Lion or earlier, click Create boot disk > Browse images, then upload the DMG file you downloaded earlier.
Step 4: Wait for the macOS bootable installer to be created.
Very simple, right? Share this install disk creator for macOS with other people!
Issue 1: This version of xxx cannot be installed on this computer
"This version of xxx cannot be installed on this computer" will pop up when the system detects an incompatible Mac OS version. For instance, when you decompress the OS X El Capitan DMG file and adding it to the Applications folder.
The solution is to use a Mac that's qualified to run the OS you want to install, an install disk creator, or go through the steps in Issue 2.
Issue 2: Bad CPU type in executable
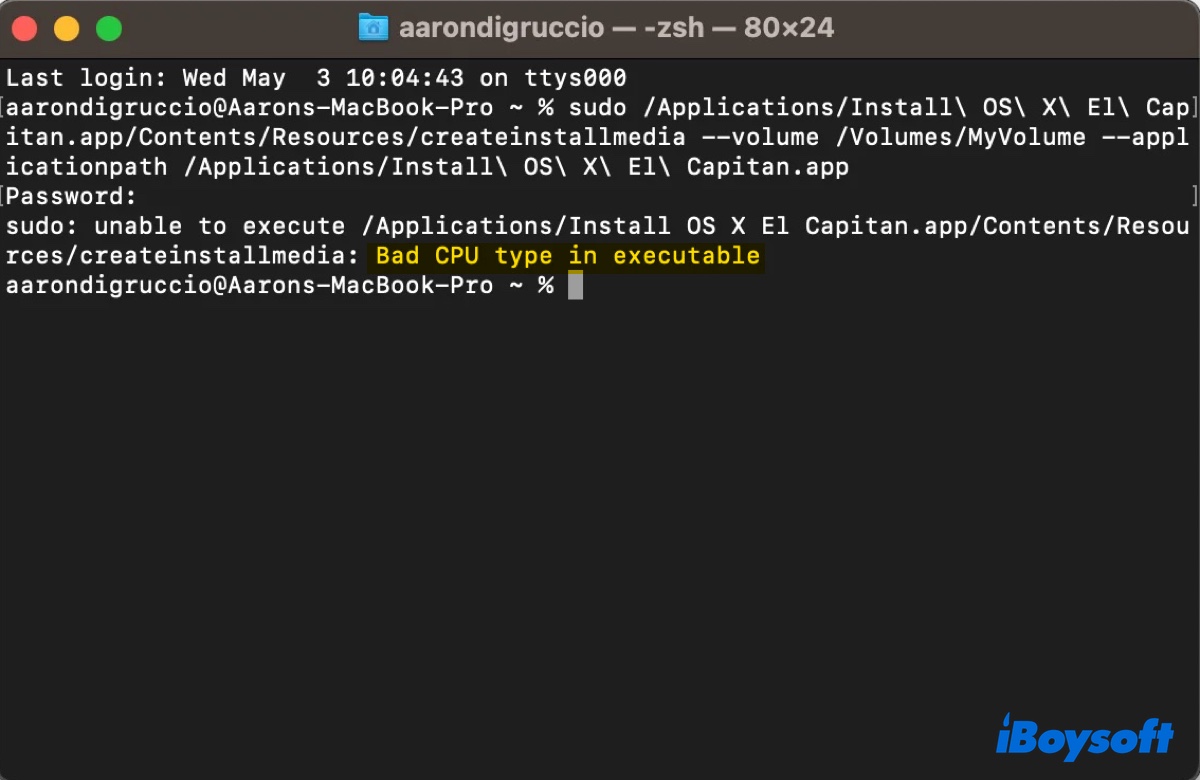
"sudo: unable to execute /Applications/Install OS X El Capitan.app/Contents/Resources/createinstallmedia: Bad CPU type in executable" is an error you may face when creating a boot disk for a system version that's incompatible with your Mac in Terminal. In the example, the user is trying to make a bootable drive for OS X 10.11 El Capitan on an M1 Mac.
To fix it, you can use a bootable USB tool like iBoysoft DiskGeeker, which enables you to make a bootable USB on any Mac in 5 clicks.
Or, extract the InstallESD.dmg file from the installation file and then create the install disk with it. To do this, download the wanted Mac OS DMG file and open it.
If you see an app installer, e.g., Install OS X Mavericks.app, right-click on it and choose "Show Package Contents". Then open the Contents folder, locate the InstallESD.dmg file inside the SharedSupport folder, and move the DMG file to the desktop.
If you see a pkg file, take the following steps instead:
- Open Terminal.
- Decompress the InstallMacOSX.pkg file in a directory:
pkgutil --expand ~/Desktop/InstallMacOSX.pkg ~/Desktop/Installer - Position yourself in the location of the pkg file.
cd ~/Desktop/Installer/InstallMacOSX.pkg - Un-compact the structure using the tar command:
tar -xvf Payload - Move the InstallESD.dmg file to the Desktop:
mv InstallESD.dmg ~/Desktop
After the DMG file is ready, you can create a bootable USB disk for the incompatible OS with the steps below:
- Open Terminal.
- Execute the following commands one by one to create a bootable macOS installer.
Attach the macOS installer disk image:
hdiutil attach ~/Desktop/InstallESD.dmg -noverify -nobrowse -mountpoint /Volumes/install_appConvert the BaseSystem.dmg to a sparse image format:
hdiutil convert /Volumes/install_app/BaseSystem.dmg -format UDSP -o /tmp/InstallerResize the sparse image to 8GB:hdiutil resize -size 8g /tmp/Installer.sparseimageAttach the resized sparse image:
hdiutil attach /tmp/Installer.sparseimage -noverify -nobrowse -mountpoint /Volumes/install_buildRemove the existing "Packages" directory:
rm -r /Volumes/install_build/System/Installation/PackagesCopy the "Packages" directory from `install_app` to `install_build`:
cp -av /Volumes/install_app/Packages /Volumes/install_build/System/Installation/Copy additional files to the sparse image:
cp -av /Volumes/install_app/BaseSystem.chunklist /Volumes/install_buildcp -av /Volumes/install_app/BaseSystem.dmg /Volumes/install_buildDetach the mounted images:
hdiutil detach /Volumes/install_apphdiutil detach /Volumes/install_buildResize the sparse image to its minimum size:
hdiutil resize -size `hdiutil resize -limits /tmp/Installer.sparseimage | tail -n 1 | awk '{print $ 1}' `b /tmp/Installer.sparseimageConvert the sparse image to a compressed read-only disk image:
hdiutil convert /tmp/Installer.sparseimage -format UDZO -o /tmp/InstallerMove the final disk image to the desktop:mv /tmp/Installer.dmg ~/Desktop - Ensure your USB is plugged in and is named as USB.
- Restore the contents of the disk image file Installer.dmg onto the target volume /Volumes/USB: sudo asr restore --source ~/Desktop/Installer.dmg --target /Volumes/USB --noprompt --noverify --erase
- Type the administrator password and hit Enter if prompted.
The steps above should have fixed the message "Bad CPU type in executable." Share them with others!
Issue 3: sudo: /Applications/Install macOS Mojave.app/Contents/Resources/createinstallmedia: command not found
"createinstallmedia: command not found" is also a common error many Mac users may encounter. It's usually caused by incorrect command syntax, an installer location issue, etc. Continue reading the article below to fix it:
Issue 4: zsh: killed sudo --volume /Volumes/MyVolume
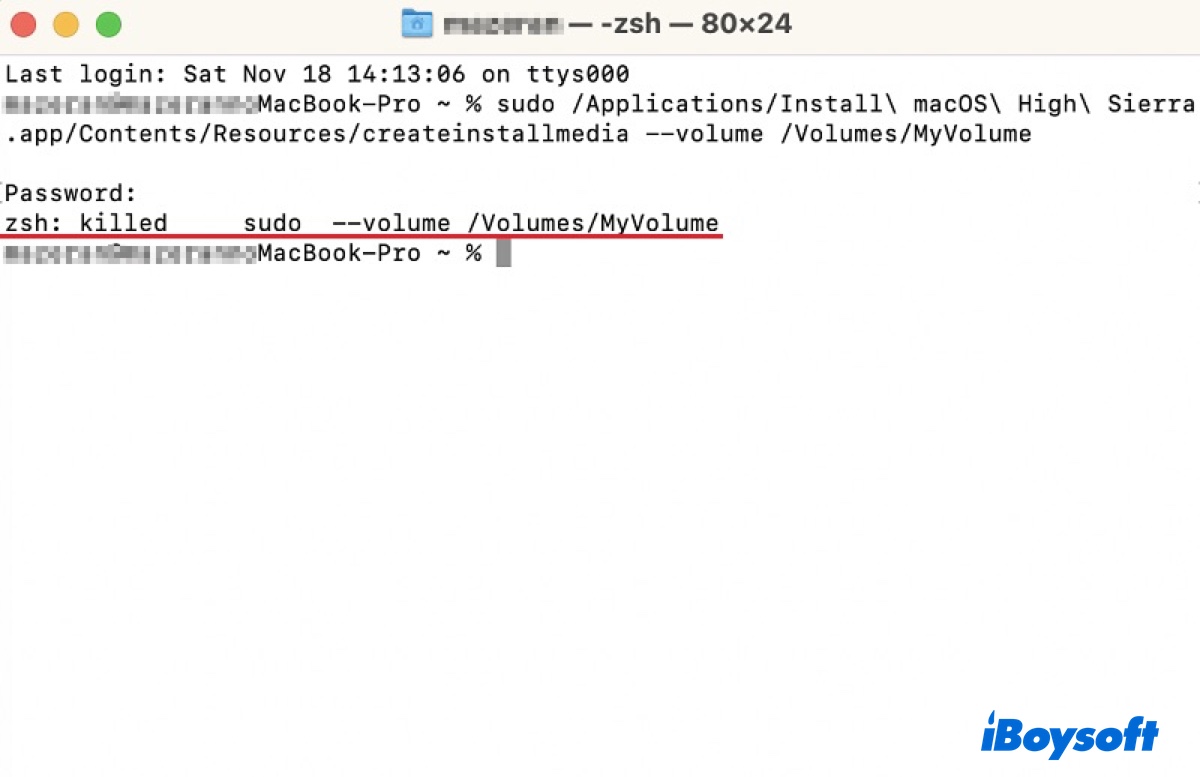
Another problem regarding Terminal when creating a bootable macOS installer is "zsh: killed sudo --volume /Volumes/volume_name." This means that the command was forcefully terminated by the system. To fix the error, you can resign createinstallmedia binary.
- Open Terminal.
- Replace Mojave in the command with your OS version and execute it to change the current working directory to the location of the createinstallmedia tool within the macOS installer app.
cd /Applications/Install\ macOS\ Mojave.app/Contents/Resources/ - Re-sign the createinstallmedia binary using the codesign tool
codesign -s - -f createinstallmedia - Then run the createinstallmedia command again to make a bootable USB installer
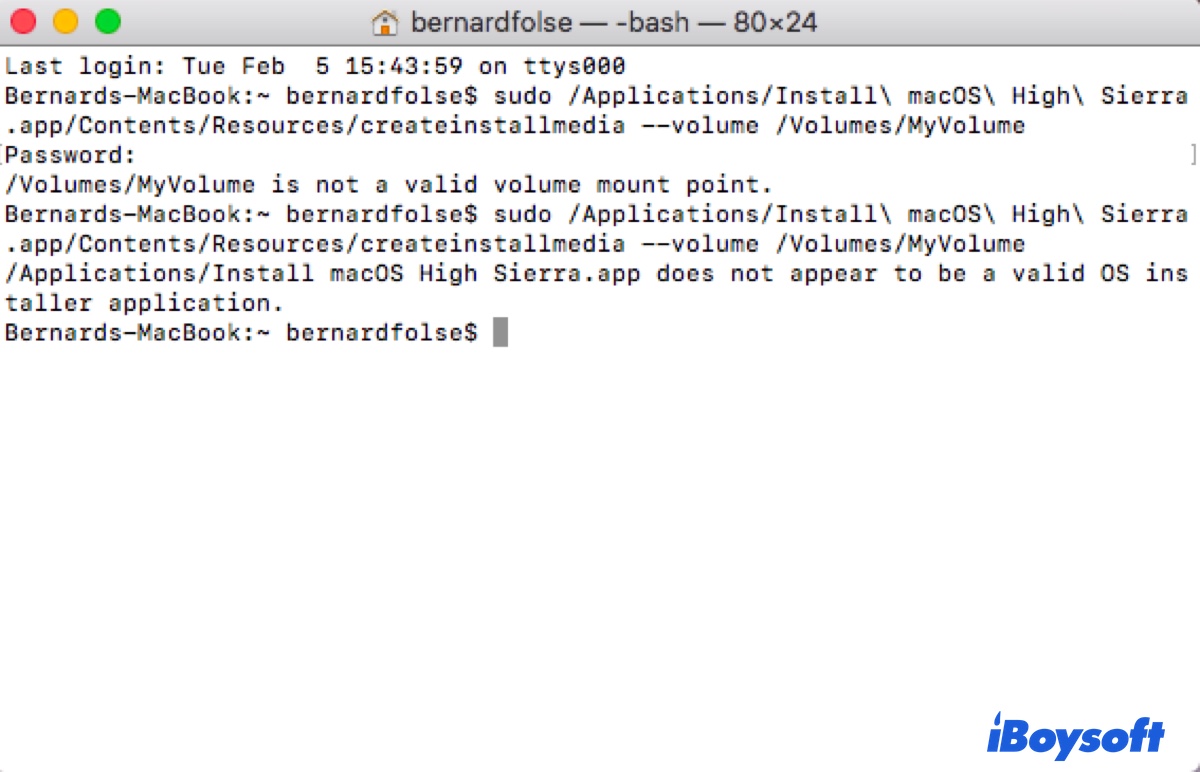
Issue 5: /Applications/Install macOS High Sierra.app does not appear to be a valid OS installer application
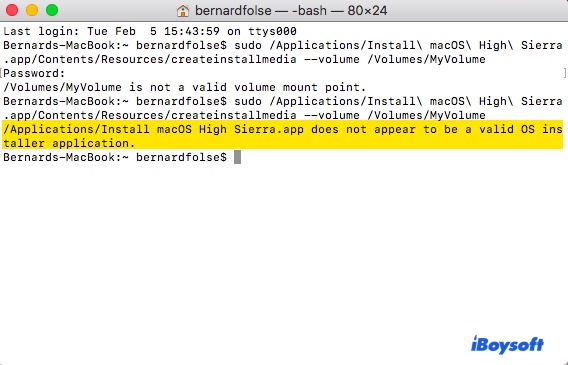
If you don't have a full installer, you'll receive this error as a reminder. The easiest way to check if you have the full installer is to view the size of the macOS installer file. For instance, if it's only 19MB, it's obviously not a full installer.
Want to easily create macOS bootable installers? Use this disk creator!
Issue 6: Untitled is not a valid volume mount point
The drive name of your USB can also cause issues. If Terminal says "Untitled is not a valid volume mount point," where Untitled is the name, try to rename the USB or reformat the physical disk with GUID partition map and Mac OS Extended (Journaled) as the format.
Another thing is to ensure the Terminal command is correctly typed. Pay special attention to the dashes, as they are all double dashes.
Issue 7: APFS disks may not be used as bootable install media
If your USB drive is formatted in APFS, Terminal won't accept it as a bootable install media. Therefore, you must reformat it:
- Open Disk Utility.
- Click View > Show All Devices.
- Select the physical disk of your USB and click Erase.
- Name the USB, choose Mac OS Extended (Journaled) as the format, and GUID Partition Map as the scheme.
Click Erase.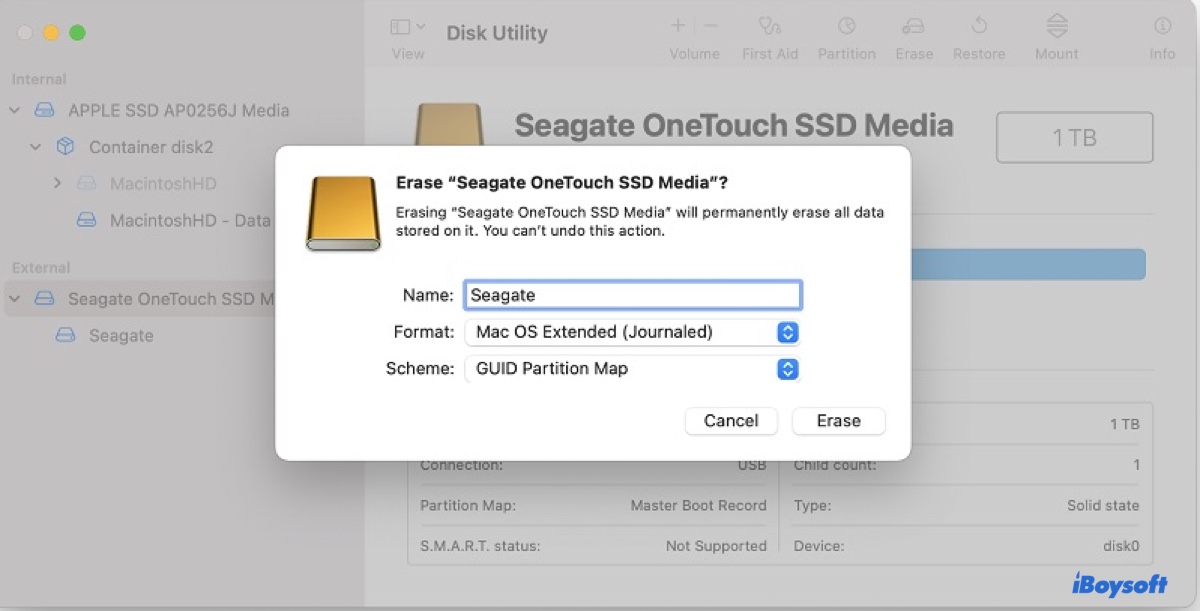
Issue 8: An error occurred erasing the disk

After typing Y to continue, Terminal will start to erase the disk, preparing it before copying files to it. This process may fail with the error "An error occurred erasing the disk." Typically, you'll also receive the disk error number, which doesn't provide much information, such as:
- Error erasing disk error number (-69888, 0) An error occurred erasing the disk.
- Error erasing disk error number (13, 0) An error occurred erasing the disk.
- Error erasing disk error number (-69618, O) An error occurred erasing the disk.
- Error erasing disk error number (22, O) An error occurred erasing the disk.
The solution is simple. You just need to ensure your USB drive isn't currently used by another process or it doesn't share a name with the physical disk or another volume. Try these tips to eliminate the issue and rerun the command again to make a boot disk.
- Reboot your Mac to close all processes. (Go to the Apple menu > Restart.)
- Relaunch Finder. (Right-click on the Finder icon on the Dock while pressing Option and choose Relaunch.)
- Change the name of your USB drive to something else. (Open Finder, right-click on your USB and choose Rename.)
- Reformat your USB drive with the Mac OS Extended (Journaled) format.
Issue 9: The erased disk did not mount
If your USB won't mount after being erased in Terminal, try exiting Terminal, ejecting the drive, and reconnecting it to your Mac. Then check if you can create the install disk. If not, reformat the external drive with Mac OS Extended (Journaled) in Disk Utility.
If you want to scan and recover data previously stored on your USB drive, use Mac file recovery software.
Issue 10: Stuck at copying installer files to disk
With the USB disk prepared, Terminal will start to copy the necessary files to it. If the process hangs for a long time without progress, consider quitting it and retrying with a faster USB disk. Otherwise, wait longer.
Issue 11: The copy of the installer app failed
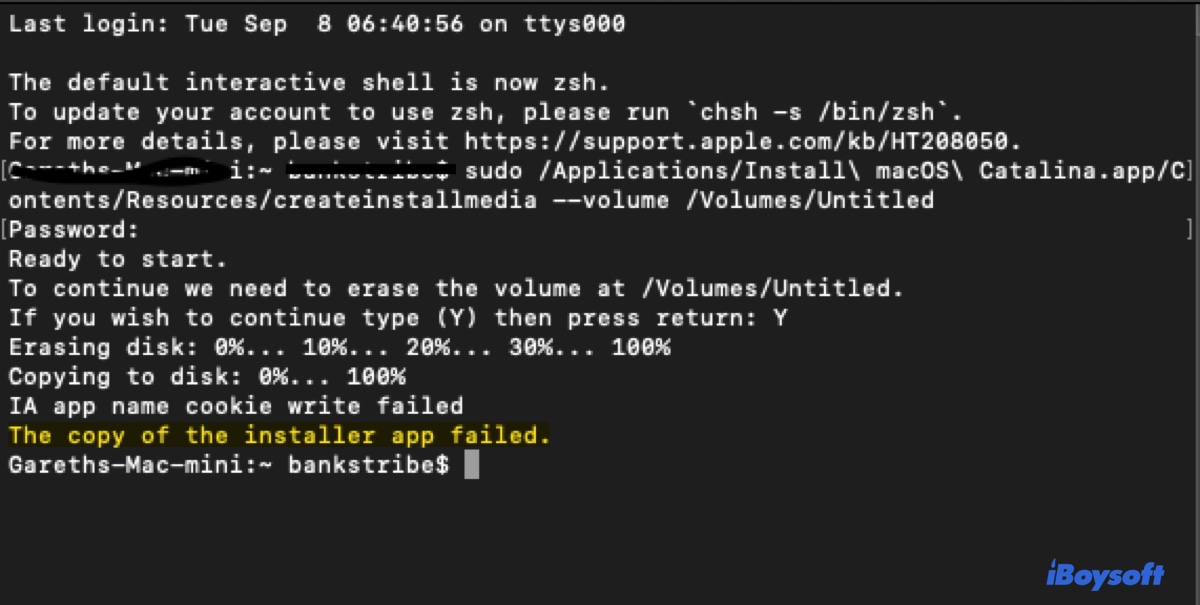
If Terminal prompts the error "The copy of the installer app failed," you can close the Terminal window and rerun the Terminal command. If the issue persists, you can change to a different USB or follow this guide: Fix "The copy of the installer app failed."
Issue 12: Copying the macOS RecoveryOS

Terminal can also hang when copying the macOS RecoveryOS. If it happens, try reformatting the USB in Disk Utility first by following the steps we outlined in Issue 7, and then create the bootable USB again.
Grab this bootable USB tool for macOS to make a boot disk instantly!
Issue 13: Terminal stuck on Making disk bootable
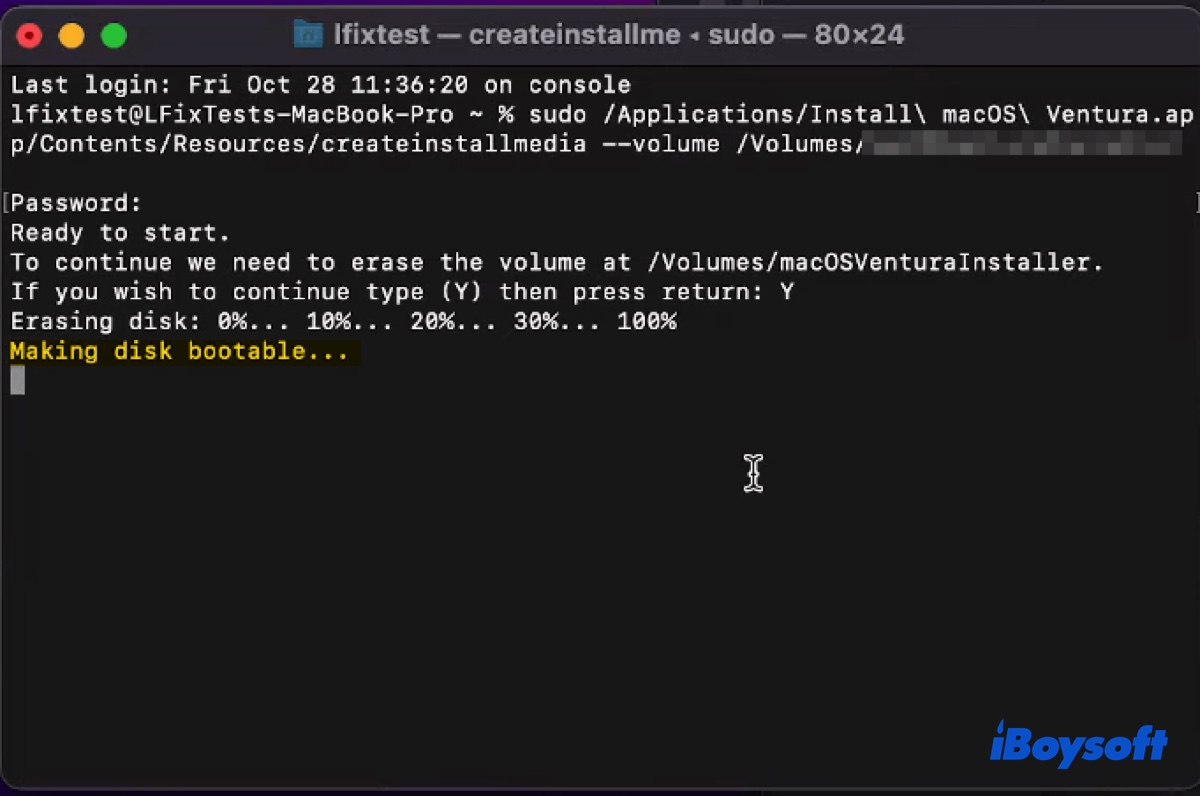
After the necessary files are copied, the createinstallmedia utility will make the USB drive bootable. However, it may be unbearably slow and seems to be stuck on "Making disk bootable" in Terminal. In this case, you can either let the drive run all night or disable Spotlight indexing on the installer.
If you don't mind waiting, you can prevent your Mac from sleeping by changing sleep settings and letting the createinstallmedia process work overnight. It will eventually finish if the USB doesn't have issues.
If you want to see effects instantly, do these instead:
- Ensure the Terminal is open.
- Click Shell > New Window > New Window with Profile from the top-left menu bar.
- Execute the createinstallmedia command in the original Terminal window.
- After the step "Erasing disk" reaches 100%, execute the command below in the second Terminal window to disable Spotlight index on the USB volume. (Replace macOS Ventura with your system version.)mdutil -i off -d /Volumes/Install\ macOS\ Ventura
Then it should start to work.
Issue 14: zsh: bus errorsudo--volume/Volumes/macOS
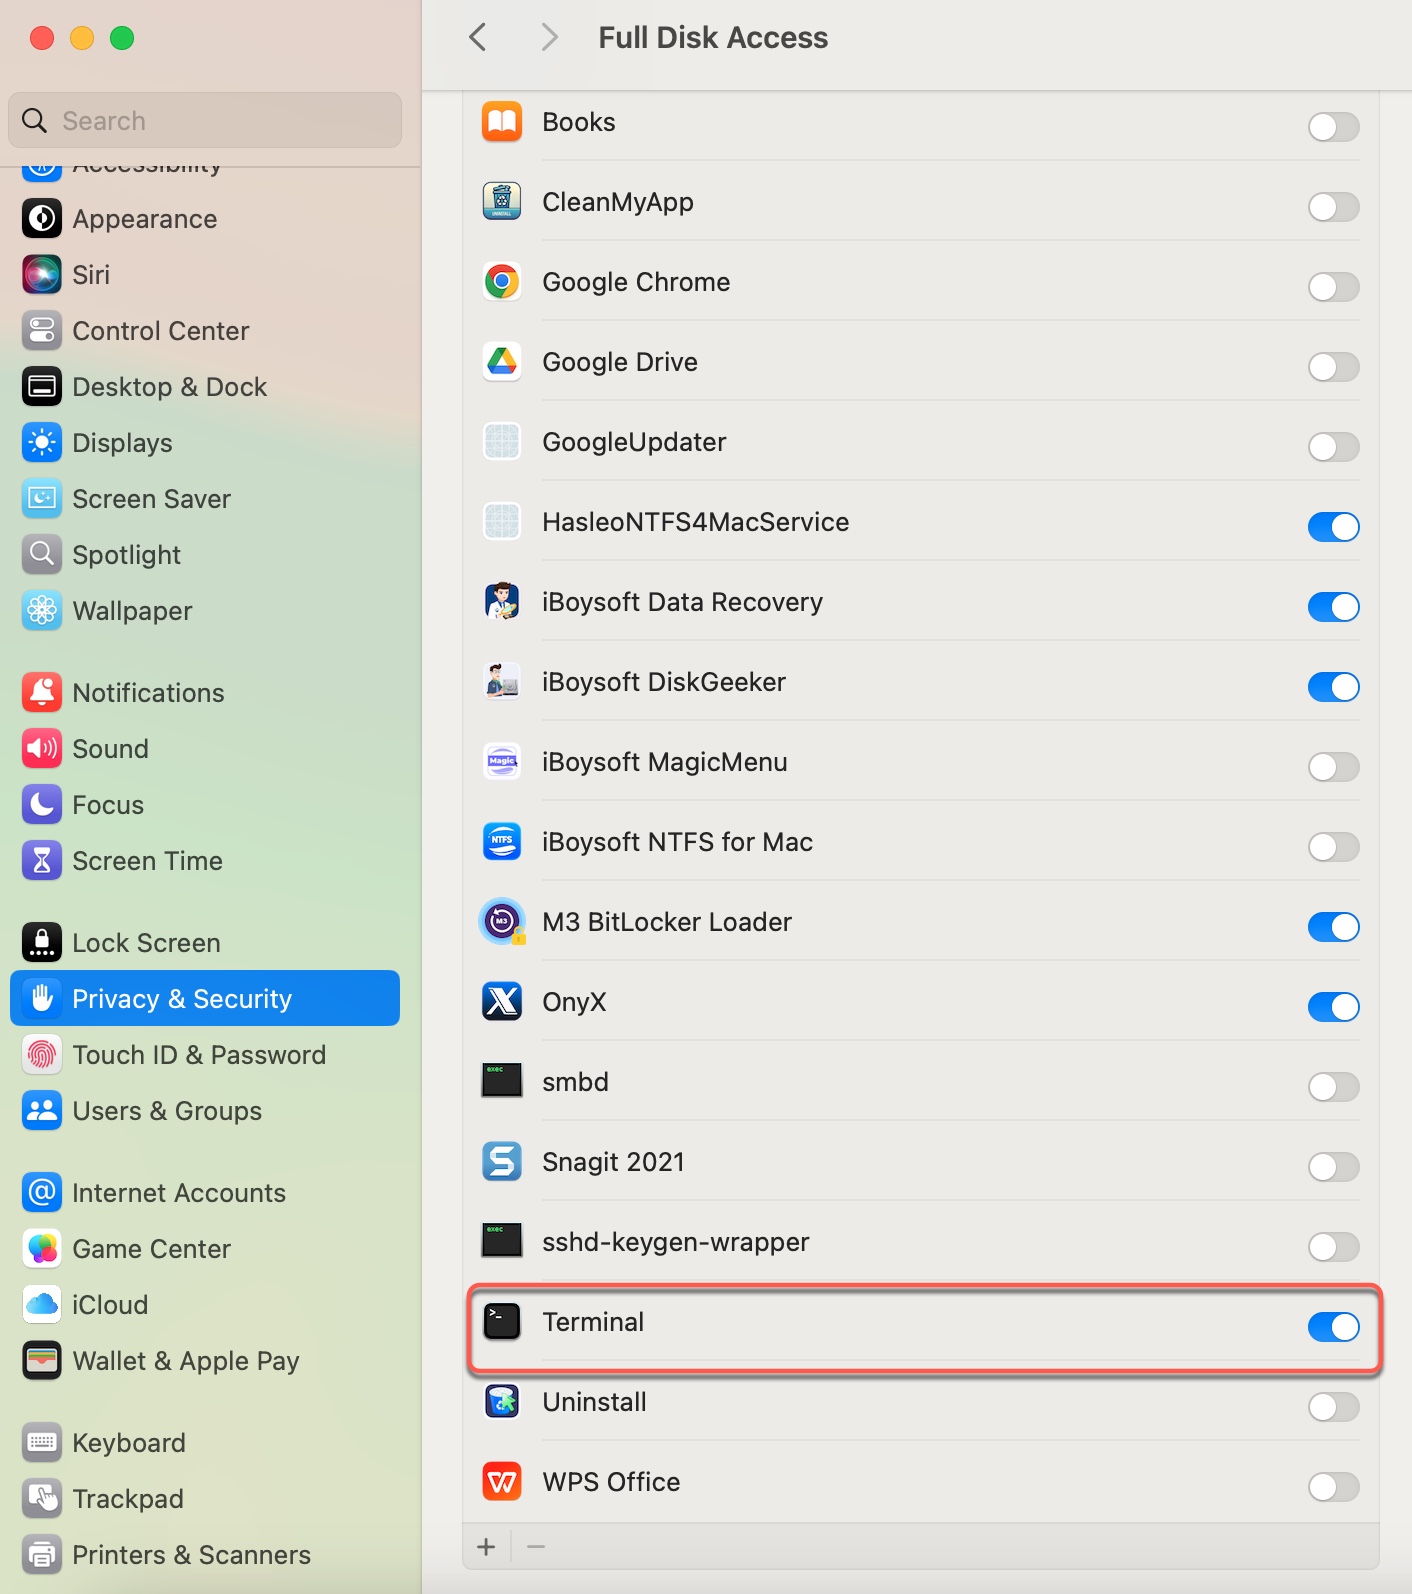
There's also the possibility that you may receive the error "zsh: bus error sudo --volume /Volumes/volume_name" after erasing the disk successfully. This error happens when Terminal doesn't have full disk access. To resolve it, you need to open System Preferences/Settings > Privacy & Security > Full Disk Access, then enable full disk access for Terminal.
Issue 16: The bless of the installer disk failed
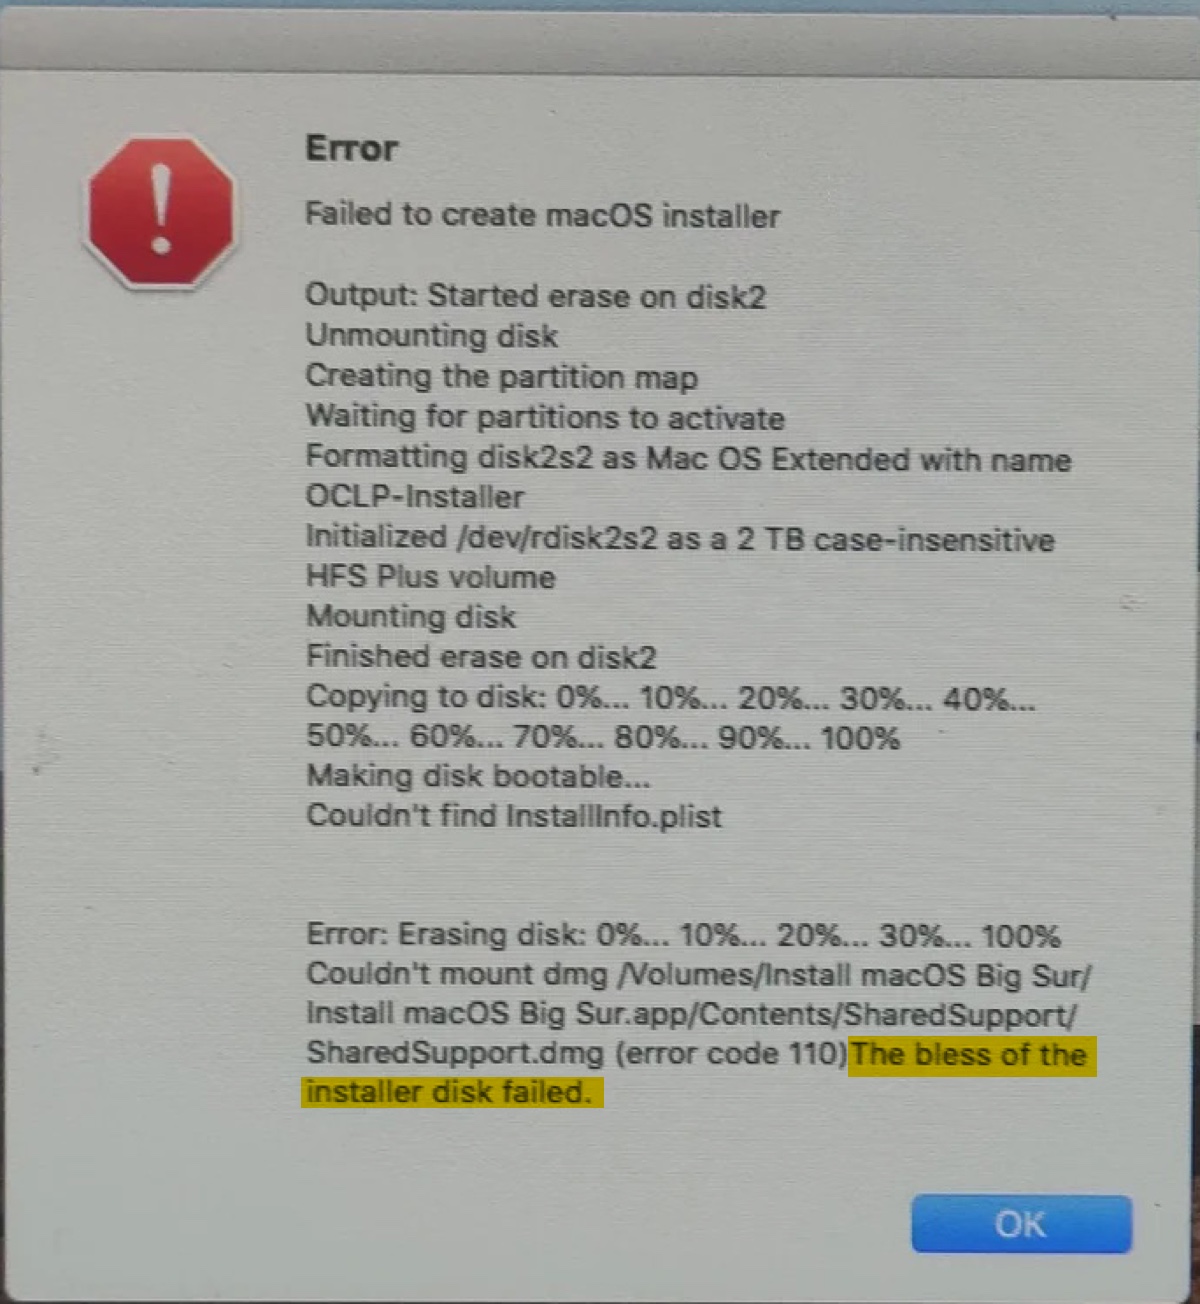
"The bless of the installer disk failed" is a message that appears for different reasons. Here are the common ones:
Warning: Failed to copy product icon to volume icon path
Making disk bootable...
IA app name cookie write failed
The bless of the installer disk failed.
Couldn't extract BaseSystem to path: /Volumes/Install macOS Ventura/BaseSystem
The bless of the installer disk failed.
Failed to write IAPhysicalMedia cookie to disk
Error Domain=NSCocoaErrorDomain Code=513 "You don't have permission to save the file “.IAPhysicalMedia” in the folder “Install macOS Sonoma”." UserInfo={NSFilePath=/Volumes/Install macOS Sonoma/.IAPhysicalMedia, NSUserStringVariant=Folder, NSUnderlyingError=0x7fe41ffc31e0 {Error Domain=NSPOSIXErrorDomain Code=1 "Operation not permitted"}}
The bless of the installer disk failed.
Error Failed to create macOS installer. The bless of the installer disk failed.
Failed to patch BaseSystem. Error: Error Domain=com.apple.ParallelCompression Code=1 "Error 0xdd00d800
Invalid patch: /Volumes/Install macOS Monterey/.TempDir/basesystem_patches/x86_64BaseSystem.dmg" UserInfo={NSLocalizedDescription=Error 0xdd00d800
Invalid patch: /Volumes/Install macOS Monterey/.TempDir/basesystem_patches/x86_64BaseSystem.dmg}
The bless of the installer disk failed.
Apart from employing a bootable USB maker to work around the issue, you can also try the following fixes:
Fix 1: Grant Terminal full disk access
To dismiss the error "The bless of the installer disk failed," you can grant Terminal full disk access in Safe Mode.
- Open the Applications folder.
- Delete the current full installer, then download a new one.
- After the OS is downloaded, you can boot into macOS Safe Mode.
- Then open System Settings/Preferences > Privacy & Security > Full Disk Access and enable it for Terminal.
Fix 2: Give OpenCore Legacy Patcher full disk access
If the problem arises when creating a bootable USB installer for macOS on OCLP, you must provide full disk access to both OpenCore Legacy Patcher and Terminal:
On macOS Ventura and later:
- Open System Settings.
- Go to Privacy & Security > Full Disk Access.
- Click the Add button to add OpenCore Legacy Patcher and Terminal.
- Restart OpenCore Legacy Patcher and rerun the process.
On macOS Monterey and earlier:
- Open System Preferences.
- Navigate to Security & Privacy.
- Click the lock to unlock the preference pane.
- Go to the Privacy tab.
- Choose Full Disk Access.
- Add OpenCore Legacy Patcher and Terminal.
- Restart OpenCore Legacy Patcher and rerun the process.
Fix 3: Directly connect to the USB
If your USB is connected to the Mac through a hub, try removing the hub and connecting it directly to your Mac. This can avoid potential issues caused by the adapter.
Fix 4: Update OCLP
If the version of OpenCore Legacy Patcher isn't the newest on your Mac, update it. This can install the new patches and bug fixes, which may allow you to create the bootable USB without issues.
Fix 5: Use a different USB
If you still can't create the bootable USB installer on Mac, it's best to try another USB or any other type of storage device. Many users ended up using a different drive after exhausting the basic troubleshooting tips.
These are all the problems that may render you unable to create a bootable USB installer on Mac and the respective solutions. If you find this guide helpful, share it to help us reach more people!