
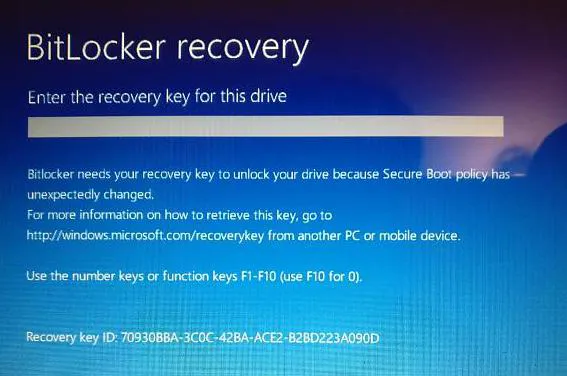
Some users have reported in forum posts that they are prompted to enter a BitLocker recovery key when starting Windows 11,10, 8, 7, or Surface every time.
BitLocker drive encryption in Windows usually won't ask for a BitLocker recovery key on a normal PC startup. However, Windows might ask for BitLocker recovery key randomly after a motherboard hardware change, a crash, or if the program believes the data might be under attack.
If you're in a BitLocker recovery blue screen loop on the startup, you can follow this post to bypass the BitLocker recovery screen or even completely make it won't show up anymore.
Do your friends meet this question too? Share the tutorial with them!
How to bypass BitLocker recovery screen on startup?
Follow the 9 step-by-step methods to stop the BitLocker recovery screen or BitLocker recovery loop asking for the BitLocker recovery key:
- Method 1: Suspend BitLocker protection and resume it
- Method 2: Remove the protectors from the boot drive
- Method 3: Enable the secure boot
- Method 4: Update your BIOS
- Method 5: Disable the secure boot
- Method 6: Use legacy boot
- Method 7: Uninstall and reinstall the problematic update
- Method 8: Uninstall the newly installed hardware
- Method 9: Format the C: drive and reinstall OS
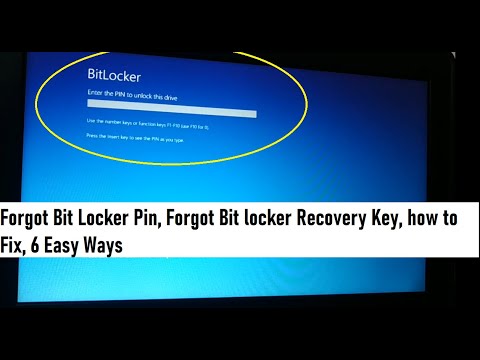
Or, you can watch this video. It offers more intuitional ways to help you out when you see the BitLocker recovery screen but have forgotten the BitLocker recovery key already.
Fix 1: Suspend BitLocker protection and resume it
You are requested to enter your BitLocker recovery key to boot up your PC before suspending BitLocker protection. Usually, your 48-digit BitLocker recovery key is either saved to your Microsoft account, a TXT file, a document, a USB drive, or a paper.
To find the key in your Microsoft account, visit Microsoft website and sign in with your Microsoft account. Then, you will see the BitLocker recovery key. Or, you can check more methods to find 48-digit BitLocker recovery key.
If you cannot find the BitLocker recovery key anywhere, refer to how to extract recovery key from TPM, but this solution is very difficult to operate in our life.
If your correct BitLocker recovery key is not accepted, go to Fix 2.
How to suspend BitLocker protection and then resume:
- Start your Windows computer or Surface.
- Enter the BitLocker recovery key when seeing the BitLocker recovery screen.
- Once Windows OS is started, go to Start -> Control Panel -> BitLocker Drive Encryption.
- Click Suspend protection option next to the C drive (Or click "Turn off BitLocker" to disable BitLocker drive encryption on C drive).
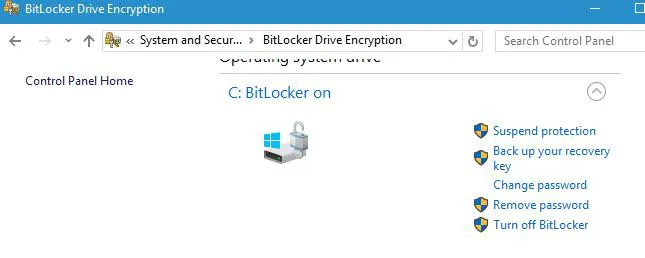
- A dialog box window will open asking "Do you want to suspend BitLocker protection?", press the Yes button to confirm.
- Wait a few minutes after suspending protection and then click the Resume protection option to update BitLocker TPM.
- Click Change password to reset the invalid BitLocker password.
- Restart your computer and check if the BitLocker recovery screen persists.
Fix 2: Remove the protectors from the boot drive
If you've entered the correct BitLocker recovery key multiple times, and are still unable to pass the BitLocker recovery screen, follow these steps to break out of the BitLocker recovery loop.
- On the BitLocker recovery screen, press Esc for more BitLocker recovery options.
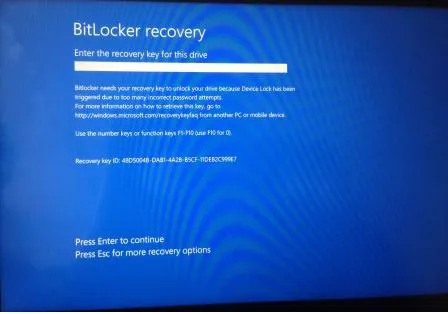
- Select "Skip this drive" at the right corner.
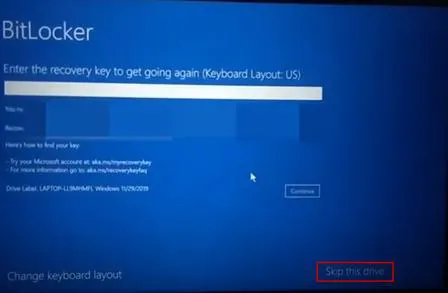
- On the next screen, select "Troubleshoot."
- On the Troubleshoot screen, select "Advanced options."
- On the Advanced options screen, select "Command prompt."
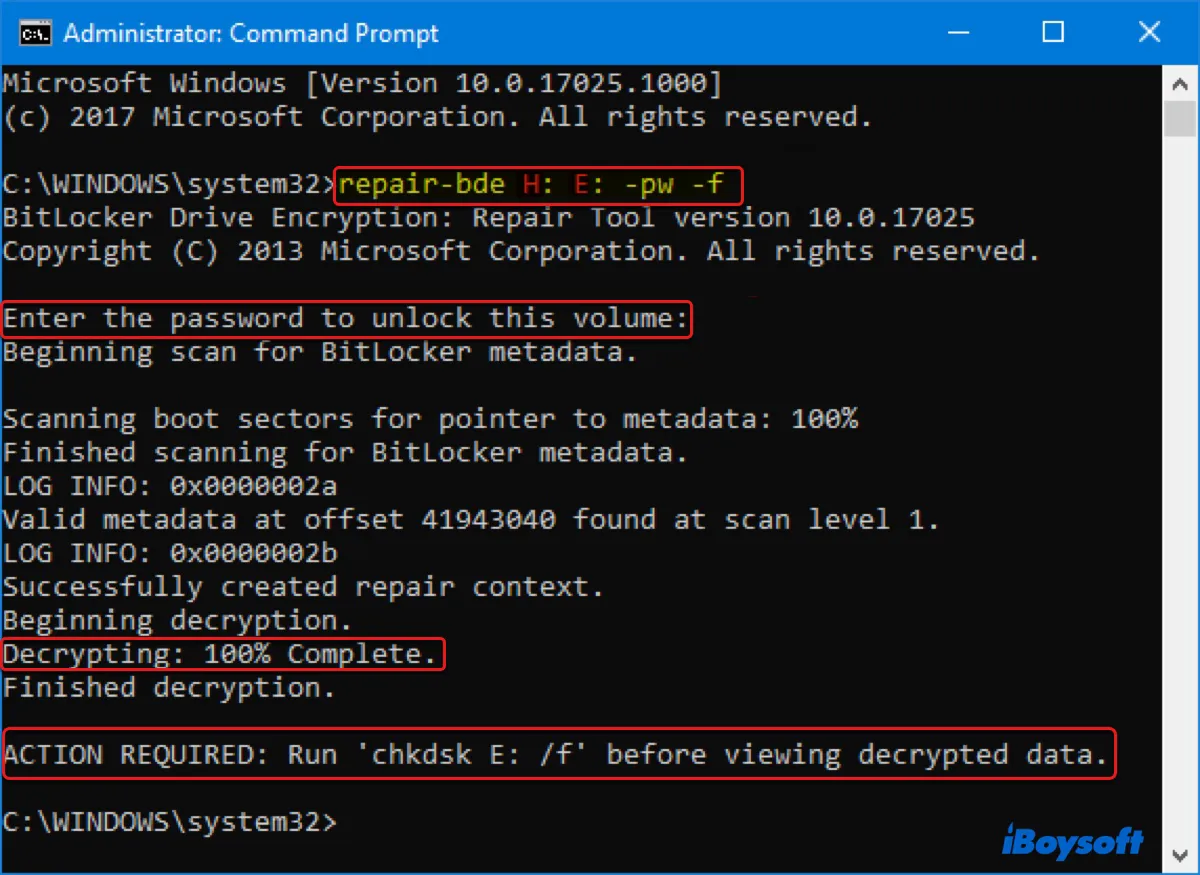
- From the WinRE command prompt, manually type the command below to unlock the drive and press Enter. Here, you need to replace password in the command to your BitLocker password. manage-bde -unlock C: -rp password
- Type the following command to remove the protectors from the boot drive. manage-bde -protectors -disable C:
Note: If manage-bde -unlock C: -rp password failed to unlock this BitLocker volume with the correct password, download iBoysoft Data Recovery WinPE edition and create an iBoysoft Data Recovery WinPE boot disk to save your data.
Once the last command is run, you can safely exit the command prompt and continue to boot into your operating system.
Fix 3: Enable the secure boot
Users from some communities reported that enable Secure Boot on the Windows PC can block the BitLocker recovery screen from appearing anymore.
- On the BitLocker recovery screen asking for the recovery key, press Esc for more BitLocker recovery options and then select "Skip this drive."
- On the next screen, select "Troubleshoot."
- On the Troubleshoot screen, select "Advanced options."
- On the Advanced options screen, select "UEFI Firmware Settings" and then select "Restart."
- Your computer will be started to UEFI, select the "Security" section.
- Click "Change Configuration" under Secure Boot.
- Select "Microsoft Only" and click "OK."
- Select "Exit" and then "Restart" to reboot the device.
Fix 4: Update your BIOS
If you're experiencing a Bitlocker password prompt screen problem, the problem might be your BIOS.
To update your BIOS to the latest version, be sure to check your motherboard manual for step-by-step instructions.
Fix 5: Disable the secure boot
If updating your BIOS has failed to solve the BitLocker password screen problem, we suggest you disable your Secure Boot feature in your BIOS options.
- On the BitLocker recovery screen, press Esc for more BitLocker recovery options.
- Select "Skip this drive" at the right corner.
- On the next screen, select "Troubleshoot."
- On the Troubleshoot screen, select "Advanced options."
- On the Advanced options screen, select "UEFI Firmware Settings" and then select "Restart."
- Your computer will be started to UEFI, find the Secure Boot setting, and set it to "Disabled."
Fix 6: Use legacy boot
Windows 10 uses a new graphical boot menu, and sometimes the boot menu can cause a BitLocker recovery prompt screen. So switching back to legacy boot can completely bypass the screen asking for BitLocker recovery key.
- Type "cmd" in the search bar of Windows Taskbar.
- Right-click on cmd.exe and choose "Run as Administrator" to run the command prompt.
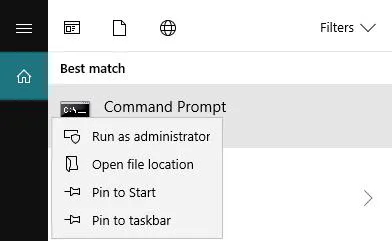
- After seeing Command Prompt window, type the command below and then press Enter. bcdedit /set {default} bootmenupolicy legacy
Fix 7: Uninstall and reinstall the problematic update
Keeping your system up to date is surely a winning strategy. However, certain updates can make the BitLocker recovery blue screen shows up on startup, and in order to fix this problem, you should uninstall the problematic update and reinstall it.
- Press the Windows logo key and the I key to open the Settings app.
- Click "Update & Security."
- Select "View your update history."
- Click "Uninstall updates."
- Locate the problematic update and double-click it to uninstall it.
- Restart your computer.
- After removing the updates you need to temporarily suspend BitLocker protection in Control Panel.
- Reinstall the updates. Simply go to "Windows Update" section in the Settings app and check for updates to automatically download the missing updates.
- Resume BitLocker protection in Control Panel.
Fix 8: Uninstall the newly installed hardware
If you have installed new hardware, it may create issues with the BitLocker drive encryption. What you need to do is make sure no unnecessary external devices are connected to your computer when booting.
Fix 9: Format the C: drive and reinstall OS
If you don't care data loss, reformatting the boot drive and then reinstall Windows will easily and quickly solve this problem. This way is the only way if you want to unlock a BitLocker drive without a recovery key and password.
Tutorial to format the C: drive and reinstall OS
- On the BitLocker recovery screen asking for the recovery key, press Esc for more BitLocker recovery options and then select Skip this drive.
- On the next screen, select Troubleshoot.
- On the Troubleshoot screen, select Advanced options.
- On the Advanced options screen, select Command prompt.
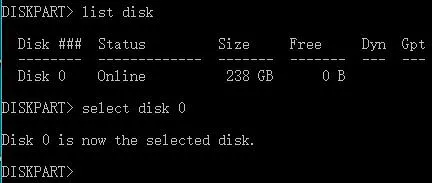
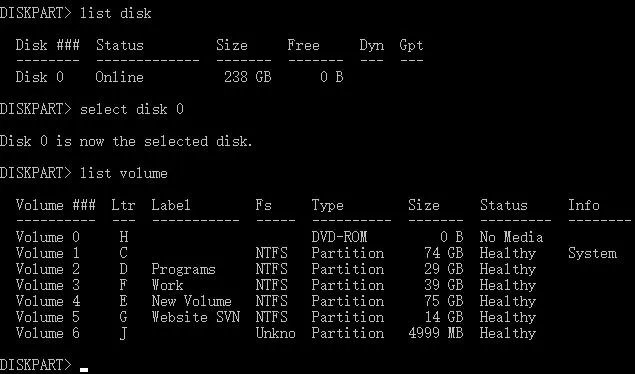
- From the WinRE command prompt, type the command: list disk and press Enter.
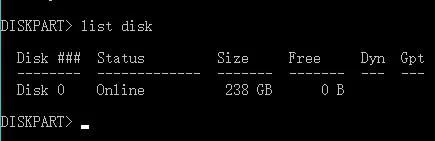
- Type select disk X command and press Enter.
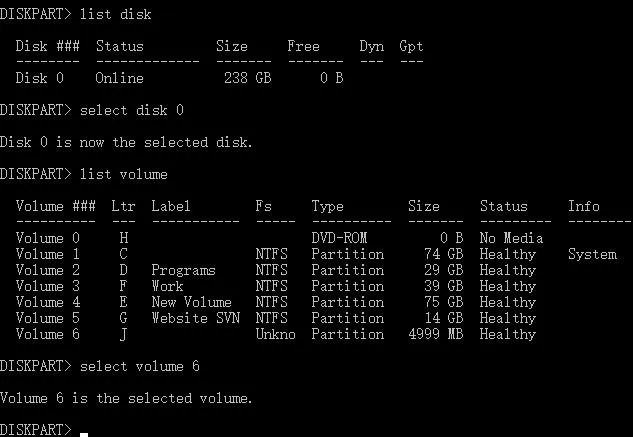
- Type list volume command and press Enter.
- Type select volume X command and press Enter (Replace X with the volume number of your OS drive).
- Type format fs=ntfs label=volume label quick and press Enter to execute the format.
- Reinstall Windows 10 from a USB drive or an external installer.
If you get out of the BitLocker recovery screen with above ways, share them to help more people!
How to recover data if BitLocker recovery screen doesn't accept BitLocker recovery key?
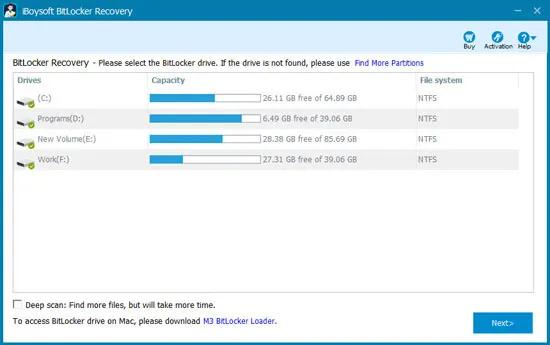
iBoysoft BitLocker Recovery is a BitLocker data recovery software which can recover data from BitLocker encrypted drive on Windows 11/10/8/7 and Windows Server 2016/2012/2008/2003.
iBoysoft BitLocker Recovery can recover lost data from failed, corrupted, inaccessible BitLocker encrypted drive; recover lost data from formatted BitLocker encrypted drive; recover lost data from deleted or lost BitLocker encrypted partition, recover lost data after BitLocker drive encryption failed, interrupted, etc. after supplying the password or BitLocker recovery key.
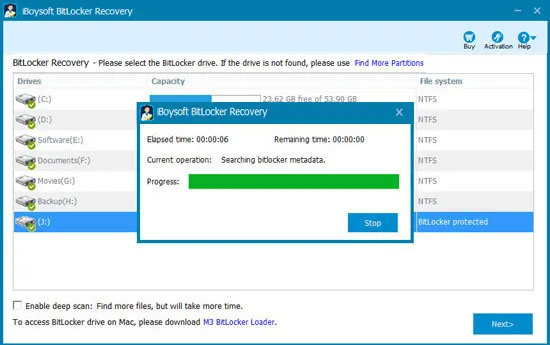
Tutorial to recover data from BitLocker encrypted OS drive:
Step 1: Connect the hard drive to another computer as an external hard drive. If not, please download iBoysoft Data Recovery WinPE edition and create iBoysoft Data Recovery WinPE boot disk to rescue your data.
Step 2: Download, install and launch iBoysoft BitLocker Recovery software on your computer.
Step 3: Select the BitLocker encrypted drive and then click Next to continue.
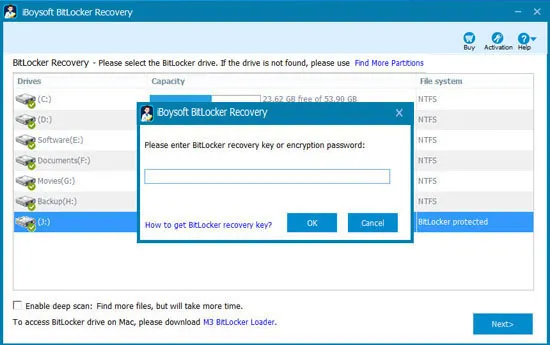
Step 4: Enter the 48-digit BitLocker recovery key and click Ok.
Step 5: iBoysoft BitLocker Recovery is decryptiong data from BitLocker encrypted drive.
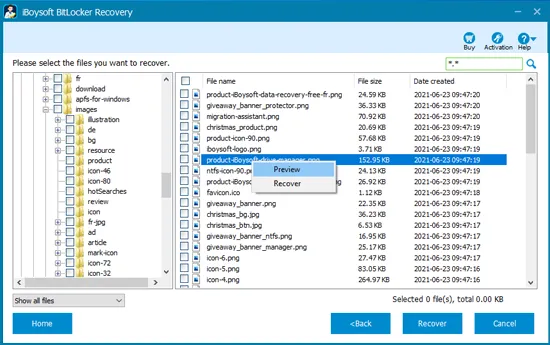
Step 6: After the scan completes, select the files you need and click Recover to start data recovery.
If this excellent tool helps you out of the trouble "how to bypass BitLocker recovery screen", why not share it with more people?
If you want to know Windows' built-in BitLocker Repair Tool, which is also used to recover data from corrupted or inaccessible BitLocker-encrypted drives, check out this guide for the details.