Secure Boot is a feature released in Windows 8 and is applied in later Windows 10 and 11, and quite a lot of Windows users are not familiar with this function. In this post, we are going to explore more about Secure Boot on Windows. Let's start.
What is Secure Boot
To launch Windows in a secure environment and stop malware from taking over the system during boot, Secure Boot is a security feature that is available on the majority of modern hardware with UEFI firmware. In other words, Secure Boot permits the computer to boot only from the Original Equipment Manufacturer(OEM) using approved software.
When a computer is turned on, the code that sets up the CPU, memory, and hardware peripherals in preparation for the operating system to boot begins to be executed. Secure Boot will examine the firmware module for an embedded signature when it is booting. The nodule is permitted to execute if the signature matches one in Secure Boot's database of signatures.
Secure Boot is available on Windows 8, 10, and 11. Because it is a component of the UEFI (Unified Extensible Firmware Interface) or BIOS needed for Windows 11 installation, this feature must be enabled to install the most recent operating system, Windows 11.
Pros and cons of Secure Boot
As we have explained what the Secure Boot is previously, the benefit of Secure Boot on your Windows PC is obvious, it ensures a safe boot environment for your device as it checks the signatures of all boot software components and only allows the trusted one to boot.
But that is not to say there are no downsides. When Secure Boot is turned on, it prevents Windows users from booting from another operating system or a dual boot. What's more, with Secure Boot enabled, some third-party software can not run.
Sometimes, enabling Secure Boot can fix issues on Windows when:
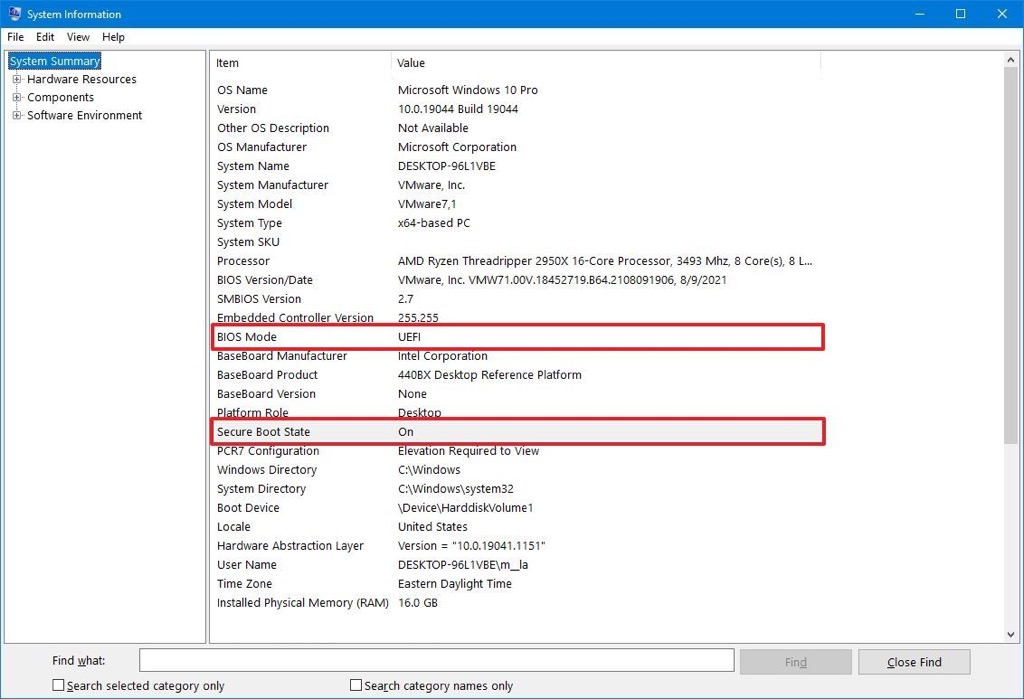
How to check the Secure Boot State
Currently manufactured PCs that came pre-installed with Windows 10 or Windows 11 have Secure Boot enabled by default. If you want to know whether the Secure Boot is turned on, you can follow the steps below:
- Open the Start menu.
- Search for System Information and open the app from the result.
- Click on System Summary on the left pane.
- Check the Secure Boot State information: On — the feature is enabled; Off — the feature is disabled or not supported.
- Check the BIOS Mode information: UEFI — indicates you can enable Secure Boot; Legacy (BIOS) — indicates you can enable the feature, but it will require additional steps.
How to enable and disable Secure Boot
Although it is strongly recommended that Secure Boot be left enabled because it has little to no impact on performance or compatibility, doing so is not mandatory. Secure Boot is not required for computer operation if the end-user refrains from downloading any harmful software or rootkit viruses. In a nutshell, whether to enable the Secure Boot or not depends on your specific situation.
Steps to enable Secure Boot on Windows:
- Remove operating systems and other components incompatible with Secure Boot.
- Press and hold the shift key and select Restart. After that, go to Troubleshoot > Advanced Options to access the BIOS menu.
- Select UEFI Firmware Settings.
- Head to the Secure Boot Settings option and set it to Enabled.
- Exit the menu after saving these changes.

Steps to disable Secure Boot on Windows:
- Open the BIOS Menu by holding the Shift key while selecting Restart.
- Navigate to Troubleshoot > Advanced Options, and go to UEFI Firmware Settings.
- Find the Secure Boot option and set it to Disabled.
- Save changes and reboot your PC.
Click the button to share this informative post now!