
I installed DriveDX and SAT SMART Driver on a 2015 iMac running Monterey via OCLP from an external USB SSD. Now, the Mac won't boot normally, and uninstalling DriveDX didn't help. How can I fix it? - MacRumors
Some users have reported that after installing extensions on macOS, their Mac fails to boot properly, even after removing the extensions.
Whether or not you're facing the same startup issue after installing macOS extensions, this article will help you diagnose the cause and provide multiple solutions.
Can't boot after installing extensions on Mac, how to fix
Incompatible extensions, system security restrictions, or corrupted system files may all cause your Mac to fail to boot after installing extensions.
But don't worry! You can try booting into Safe Mode, resetting NVRAM and SMC to restore normal startup, using Recovery Mode to repair your disk, etc. We've provided detailed step-by-step instructions below to help you resolve the issue.
Method 1: Boot into Safe Mode and uninstall extensions
Have you tried booting your Mac in Safe Mode? Safe Mode can disable all third-party extensions, loads only essential macOS components, and attempts to fix disk errors automatically.
Here is how to do it.
- Turn off your Mac (if it's stuck on the Apple Logo or black screen, press and hold the power button for 10 seconds to force shutdown).
- Enter Safe Mode. Press and hold the Shift key for Intel Macs, then power on the Mac, releasing the Shift key once you see the Apple Logo or login screen.
For Apple Silicon (M1/M2/M3) Macs, press and hold the power button until the "Startup Options" screen appears, then select your macOS disk, hold the Shift key, and click "Continue in Safe Mode." - Open "System Settings" > "Extensions," and manually disable or uninstall any recently installed extensions.
If you can't find the extensions, go to Finder and navigate to ~/Library/Extensions/ and /Library/Extensions/ to delete related files. After deleting, restart your Mac and check if it boots normally.
Method 2: Reset NVRAM and SMC
Some extensions may modify startup parameters, causing boot issues. Resetting NVRAM and SMC can help resolve this.
Reset NVRAM (Intel Macs)
- Turn off your Mac.
- Press and hold Option (⌥) + Command (⌘) + P + R, then turn on your Mac.
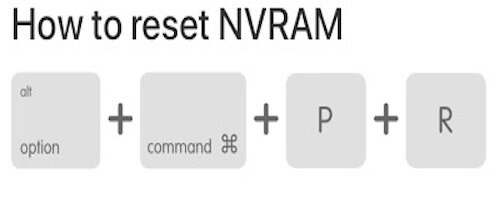
- Keep holding for 20 seconds until you hear a second startup sound or see the Apple logo.
- Let the Mac boot normally and check if the issue is resolved.
Reset SMC (Intel Macs)
For Macs with a T2 chip (2018+), press Control + Option + Shift (left side) + power button for 10 seconds, then power on. For Macs without a T2 chip, unplug the power for 15 seconds, then reconnect and power on.
Note: Apple Silicon Macs don't require manual NVRAM/SMC resets. This method won't delete files, only resets startup parameters. If the issue persists, try the next method.
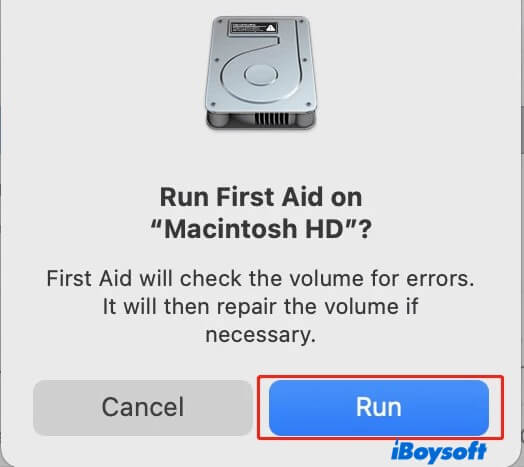
Method 3: Use macOS Recovery Mode to repair the disk
If incompatible extensions have corrupted system files and caused macOS to fail to boot, you can enter Recovery Mode and use Disk Utility to repair disk errors.
For Intel Macs, press and hold Command (⌘) + R during startup until you see the Apple logo to enter Recovery Mode. For Apple Silicon Macs, press and hold the power button until you see the "Startup Options" screen, then select macOS Recovery.
Once in Recovery Mode, open Disk Utility, select your macOS startup disk (usually named "Macintosh HD"), and click First Aid > Run to repair the disk. Wait for the process to complete and restart your Mac.
If disk repair doesn't fix the issue, you can reinstall macOS in Recovery Mode.
Method 4: Reinstall macOS (last resort)
If the previous methods fail, the damage caused by extensions might be too severe, and the only solution is to erase the disk and reinstall macOS. In Recovery Mode, you can use Disk Utility to erase the disk (APFS format) and then reinstall macOS.
This step will delete all data, so ensure to back up important files beforehand. If you don't have a backup, you need to use data recovery software to recover your files.
Share the above four proven methods with your friends!
Why Mac won't boot after installing extensions
Mac not booting is usually caused by incompatible extensions or extensions that damage system files, affecting the boot process. The specific reasons include:
- Incompatible extensions: Some third-party extensions may not be compatible with the current macOS version, causing conflicts during boot.
- System security restrictions: macOS restricts extensions that are not officially verified by Apple, which can prevent the system from booting properly.
- Corrupted extension files: Errors during the installation or update of extensions can corrupt system files, leading to boot failure.
- System parameter changes: Some extensions may modify startup parameters or hardware settings, preventing the system from loading correctly.
To avoid these issues, you should ensure that extensions come from reliable sources and are compatible with your current macOS version. It's also a good idea to back up important data before installing any extensions, so you can recover it if the system encounters problems.
Share this article with more people if you find it useful!