QuickTime Player functions remarkably as a built-in video player and video clipper on macOS computers, which completes the normal video player's work, including playing videos or audio and trimming/clipping/cropping videos, Furthermore, it is also a perfect utility for users to complete the Mac screen/audio recording and capture movies.
However, accidents sometimes happen when the screen recording work is suspended due to a device's sudden power failure, app quit, software interruption, system crashes, etc. All of them may result in the unfinished QuickTime recording items being unsaved or lost.
Luckily, this post focuses on how to recover unsaved QuickTime recording files with loads of effective solutions. Moreover, ways to recover lost QuickTime recordings due to mistaken deletion or disk corruption are also covered. Just keep reading!
Download iBoysoft Data Recovery Software to bring lost QT recordings back!
Is it possible to recover unsaved QuickTime recordings on Mac?
Generally speaking, Mac designed its pre-installed apps like QuickTime, Preview, Apple Notes, Numbers, and Pages with an autosave feature, which is set to turn on by default. Once the Mac shuts down or the app quits for any reason, the autosave feature works and saves the unfinished files automatically.
Followingly, this feature reopens the unfinished project window and presents the modifications that you've made to your work. So, it's certainly possible to recover unsaved QuickTime recordings on your Mac.
Note: The unfinished file will not be saved if you disabled the autosave feature of QuickTime previously or if you canceled to save before you shut down your Mac or quit QuickTime.
If you find this article informative, kindly share it on your favorite platform with more people!
How to recover unsaved QuickTime recordings on Mac?
Kinds of culprits can be blamed for leading to QuickTime recording not being saved. Yet let's put the possible causes aside temporarily since the unsaved QuickTime recordings matter much more. We gather several methods for you to bring the unfinished QuickTime items back here:
Method 1: Use iBoysoft Data Recovery Software
The most recommended way to recover unfinished or unsaved QuickTime recordings is to utilize iBoysoft Data Recovery Software, a top data recovery tool in the market.
It is configured with advanced disk scanning skills and excellent data recovery algorithms, which scans any traces of lost files on both internal and external hard drives. Comparaed to the chance of further data loss brought by your misoperation, this way maxmiums the success rate of data recovery.
This data recovery software offers full support to macOS Sequoia, Sonoma, Ventura, Monterey, Big Sur, and Catalina on both Intel Macs and Apple silicon lineups. With an intuitive interface, it's a simple task to recover the QuickTime recording on your Mac.
Once QuickTime keeps crashing or stops working unexpectedly, making the projects you're working on unsaved or lost, you can launch this software to bring them back.
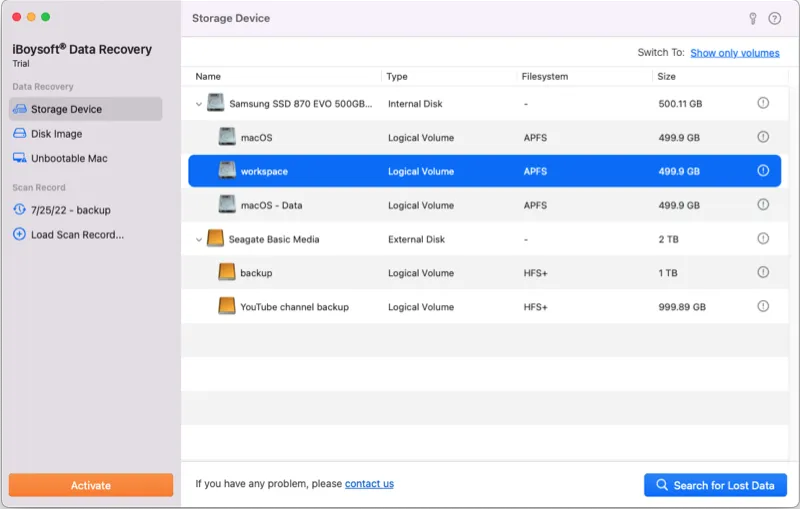
Step 1: Free download and install iBoysoft Data Recovery on your device. Do not save on the partition/volume/disk where you suffered from data loss.
Step 2: Select the partition/volume/disk where the data loss happened.
Step 3: Click the Search for Lost Data to begin the disk scanning process for the unfinished or replaced QuickTime recording files.
Step 4: When the data recovery software finishes its disk scanning, iBoysoft Data Recovery Software will present the scanned results in a visual table. You can type in the relevant file format or file name in the search box to index the wanted file.
Once you locate the desired files, select it and click Preview to check it beforehand.
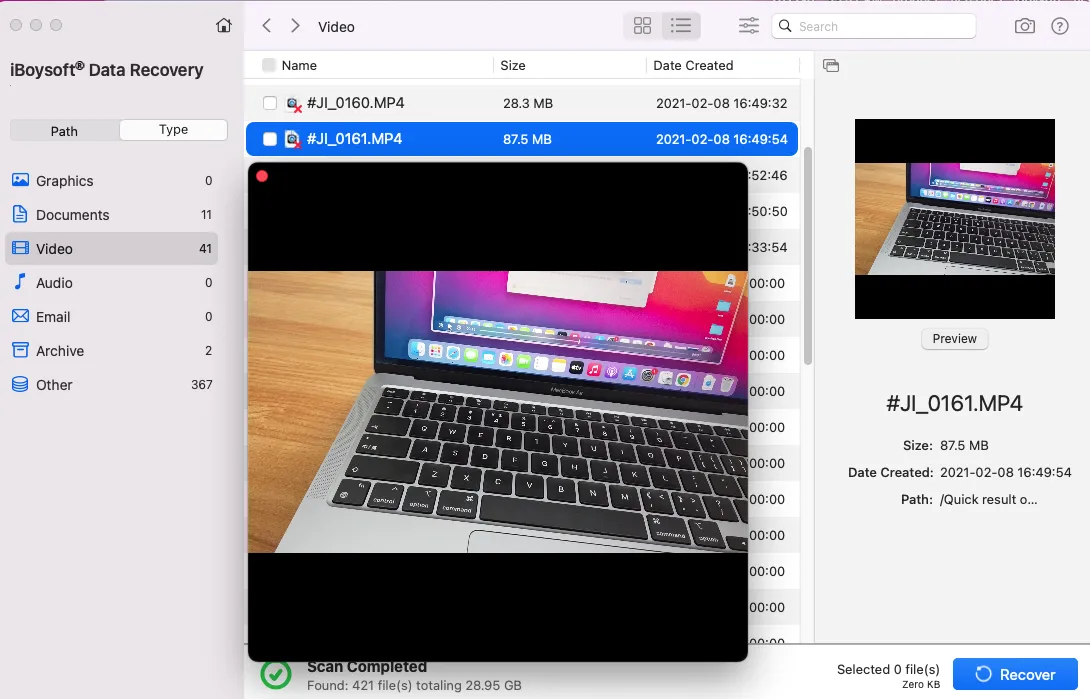
Step 5: Select the scanned files you want and click the Recover button to begin the data recovery. Please save the recovery results to another location to avoid further data loss. Please back up them well if possible.
Method 2: Recover unsaved QuickTime recordings from the AutoSave Location
If you prefer to find the unsaved files manually, this section meets your requirements. Read the succeeding content and carry on based on your Mac operating system:
Recover unsaved QuickTime recordings with AutoSave on macOS Catalina and easier macOS
- Click the Go tab on your left desktop corner and select Go to Folder from the dropdown menu.
- Copy the following path and paste it into the Go to Folder box:~/Library/Containers/com.apple.QuickTimePlayerX/Data/Library/Autosave Information/
- Click the Go button and then you'll see the AutoSave Location of QuickTime recordings.

- Control-click on the wanted recording files, select Open With, and choose QuickTime Player.
- Click the File tab on Mac top menubar and tap Save from the context menu.
- Fill information required and choose a location to save the recovered QuickTime files.
- Click Save to confirm your actions.
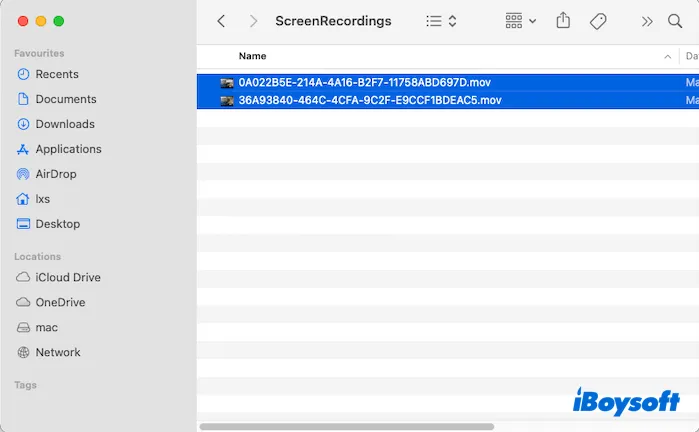
Recover unsaved QuickTime recordings with AutoSave on macOS Big Sur and later macOS
- Launch Finder and click the Go menu on the Mac top menubar.
- Select Go to Folder from the dropdown menu.
- Copy the given path and paste it into the Go to Folder box:~/Library/ScreenRecordings/
- Hit the Enter/Return key to this folder.
- Open the QuickTime recordings if you want to or copy them to another location for storing as you like.
When you want to access the QuickTime recording you recovered, go to the location where you saved it directly.
Method 3: Recover Unsaved QuickTime recordings from the Temp folder
The temp folder stores temporary files created by macOS and applications when a process is ongoing. You may need to access the temp folder for unsaved QuickTime recordings recovery.
Here is how to recover unsaved QuickTime recording files by accessing the temp files:
- Run Mac Terminal via the Spotlight Search shortcut.
- Input the command lines below and press the Enter/Return key to run it.open $TMPDIR
- You will go to the temp folder then. Go to the TemporaryItems folder and check if the unsaved QuickTime screen recordings stay there.

- If you find the unsaved QuickTime Player videos there, right-click them and click Open With > QuickTime Player. Then the file will be opened in QuickTime Player.
- Click the File tab and then tap on the Save button to save them to another location.
Method 4: Recover unsaved QuickTime recordings by app reboot
The one last solution to recover the unsaved QuickTime recording is to reboot the app. Although iffy, it has been proved useful by many data loss sufferers. If you have any interest, try it now!
Much appreciated if you would like to share this article with more people!
How to recover deleted/lost QuickTime recordings on Mac?
Data loss always happens unexpectedly due to accidental deletion, disk corruption, device system crashes, etc. You should immediately stop any writing actions on your Mac, or the lost files can be overwritten completely.
You will get 4 workable solutions to recover the deleted or lost QuickTime Player screen recordings:
- iBoysoft Data Recovery Software
- Mac Trash
- Time Machine backup
- QuickTime Player Recent files
Method 1: Recover deleted/lost QuickTime screen recordings via iBoysoft
Besides recovering unsaved or replaced QuickTime recordings or videos, iBoysoft Data Recovery Software also works brilliantly in recovering deleted or lost files on Mac.
It can recover files from unreadable, corrupted, unbootable, broken, and even failing hard drives. If you lose any QuickTime recordings, rest assured and let iBoysot Data Recovery Software bring them back!
Method 2: Recover deleted/lost QuickTime screen recordings via Mac Trash
When you drag QuickTime screen recordings to Mac Trash, you have 30 days to put them back. Mac Trash allows users to restore files deleted in 30 days if they haven't emptied the Trash. So going to Mac Trash for data recovery is worth a shot.
- Open Mac Trash on your computer.
- Search the file that you want to restore with the file name/file format in the search box.
- Locate the screen recording you want, right-click it, and select Put Back.
After these actions, your deleted QuickTime Player recording files will be back to the original location.
Method 3: Recover deleted/lost QuickTime screen recordings via Time Machine backup
Time Machine backs up everything on your Mac automatically, even the modifications or changes tyou've made to certain files/folders. If you have enabled Time Machine previously, you can recover the deleted/lost recordings via the backup drive on your Mac.
- Connect the Time Machine drive to your Mac and launch Time Machine.
- Find the wanted files in the TM window.
- Click the Restore button to recover the QuickTime recordings on your device.
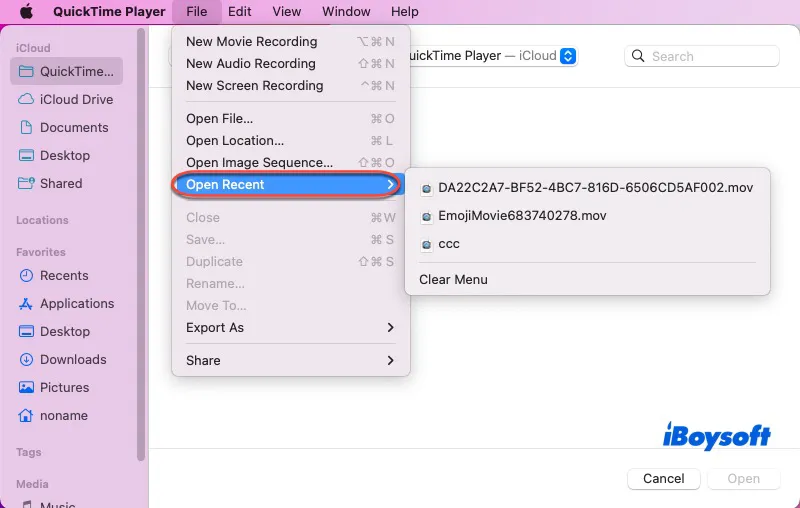
Method 4: Recover deleted/lost QuickTime screen recordings via the recent folder
The QuickTime Player recent folder contains the recording files that you opened recently, so you can access this menu to see if it stores the deleted or lost recordings.
Step 1: Launch QuickTime Player on your device.
Step 2: Click the File tab on the left upper corner of the Mac desktop.
Step 3: Select Open Recent to see if it has the files that you are looking for.
QuickTime screen recording didn't save on Mac, how to fix it?
When QuickTime screen recording didn't save on your Mac, try the solutions below:
- Check if any QuickTime Player update is available.
- Check if there is enough space for the QuickTime Player screen video to save.
- Force quit the apps using high CPU via Activity Monitor.
- Perform QuickTime screen recording/audio recording/movie capture one at a time.
- Boot your Mac into macOS Safe Mode to see if the QuickTime screen recording goes well.
Wrap up
We gather 8 solutions to recover unsaved/replaced and deleted/lost QuickTime recordings on Mac in this post. If you suffer from QuickTime recording data loss, try the methods mentioned and bring them back!
FAQ about how to recover QuickTime recordings on Mac
- QWhere did my QuickTime screen recording save?
-
A
For the macOS Big Sur and later macOS versions, the location where QuickTime screen recordings is: ~/Library/Containers/ScreenRecordings/
- QHow do I recover a deleted screen recording on my Mac?
-
A
You can recover the deleted recording via Mac Trash, Time Machie backup, and iBoysoft Data Recovery Softwae.