Upgrading macOS doesn't always go smoothly. After installing a new version, you may experience issues such as:
- Apps won't open or work properly
- Slower performance or higher CPU usage
- The battery drains faster than before
- Frequent system crashes
In this case, downgrading macOS to an earlier version (such as Sequoia or Sonoma) can often restore stability.
However, Apple does not provide a simple "Downgrade macOS" button. Commonly, you must erase your Mac and reinstall an older version of macOS.
In this guide, we'll show you three reliable ways to downgrade macOS, including:
- Restore from a Time Machine backup
- Reinstall the original macOS in Recovery Mode
- Install an older macOS using a bootable installer
We also explain what you should take care of and when downgrading is NOT possible when doing this task.
Note: This tutorial is suitable for downgrading from any macOS version to any compatible macOS, such as from macOS Tahoe to Sequoia, from macOS Sequoia to Sonoma, or so.
Keep your Mac connected to the power when downgrading macOS. A power outage will cause the macOS downgrade process to be interrupted.
Can you downgrade macOS (Compatibility & Limitations)
Before starting, it's important to know that not all Macs can install older versions of macOS.
Both Intel-based and Apple Silicon Macs (M1/M2/M3/M4/M5) cannot install a macOS version earlier than the one originally shipped with the Mac.
For example:
- An M1 Mac is shipped with macOS Big Sur. You cannot downgrade it to macOS Catalina, an older version than the original.
- An Intel-chipped Mac is delivered with macOS Catalina. You can't downgrade it to an older system like macOS High Sierra.
Because the older system lacks drivers for that Mac's hardware.
Which macOS downgrade method should you use?
The best downgrade method depends on your current situation.
Check the table below to decide which approach works best for you.
| Situation | Recommended Method |
| You created a Time Machine backup before upgrading macOS | Restore from Time Machine |
| No backup, but your Mac shipped with an earlier macOS | Reinstall macOS from Recovery Mode |
| You want to restore a specific macOS version (e.g., Sequoia or Sonoma) | Use a bootable USB installer |
If you don't have a backup, the bootable installer method usually provides the most control, but it is the relatively complex one, too.
Before downgrading: Back up your Mac first
Downgrading macOS usually requires erasing the startup disk, which means all data on the Mac will be removed.
Before continuing, make sure to back up your files. You can back up your Mac in several ways:
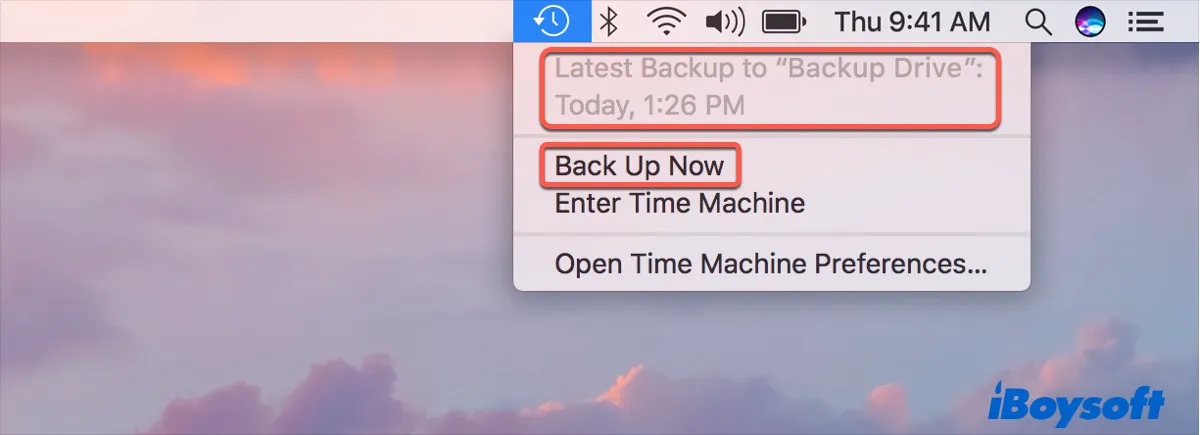
Option 1. Use Time Machine to create a full system backup
A Time Machine backup is the safest option because it allows you to restore both files and system settings after downgrading macOS.
Note that passwords are stored in the Keychain. If you restore only files instead of the entire system, your saved passwords may not be restored. To keep them, make sure iCloud Keychain is enabled so your passwords sync with iCloud.
Option 2. Copy important files to an external drive
If you only need to save a few files and don't care about backing up system settings, you can simply copy them to an external drive for a quick backup.
Option 3. Sync files with iCloud Drive
iCloud only syncs Photos (if iCloud Photos was enabled), Contacts, Calendars, Notes, Reminders, Safari bookmarks, Passwords (if iCloud Keychain was enabled), and Desktop & Documents (if stored in iCloud Drive).
Be cautious, installed apps, the Downloads folder, and local files not in iCloud Drive won't be synced.
✅ Decision suggestion:
We recommend using Time Machine for a full system backup.
Erase your Mac (Necessary)
After you've backed up your Mac, it's time to wipe all data on your Mac's hard drive.
This step is necessary.
Why? Because erasing your Mac's hard drive is to make room for the older macOS you'll install. If you don't wipe the Mac hard drive, you'll face issues like:
- macOS Sonoma downgrading failure
- Sluggish performance of your Mac after macOS reversion
- The volume cannot be downgraded
Usually, the startup volume erasure task should be taken in macOS Recovery mode.
Here's how:
- Boot into macOS Recovery mode.
On an Intel-based Mac:
Restart the Mac and press and hold the Command + Option + Shift + R keys until the Apple logo appears (or the spinning globe).
Enter the admin password if asked.
On an Apple Silicon Mac:
Shut down the Mac.
Press the power button and hold it until the startup options appear.
Select the Options icon and click Continue.
Enter the admin password if asked. - Select Disk Utility.
- Right-click the macOS - Data volume and click Delete APFS Volume.
- Choose the macOS volume and click Erase.
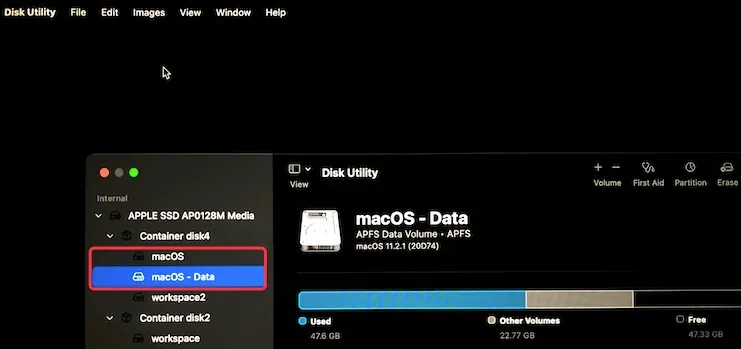
- Set a name, choose APFS in the Format: box, and then click Erase.
The erasing process will take a while; don't do any other operation during the process, or the internal hard drive may be damaged.
Method 1: Downgrade macOS with a Time Machine backup
When to use this method:
Use this method if you created a Time Machine backup before upgrading macOS.
Steps:
- Connect your backup drive to your Mac.
- Restart your Mac.
- Immediately hold Command + Option + R to enter macOS Recovery.
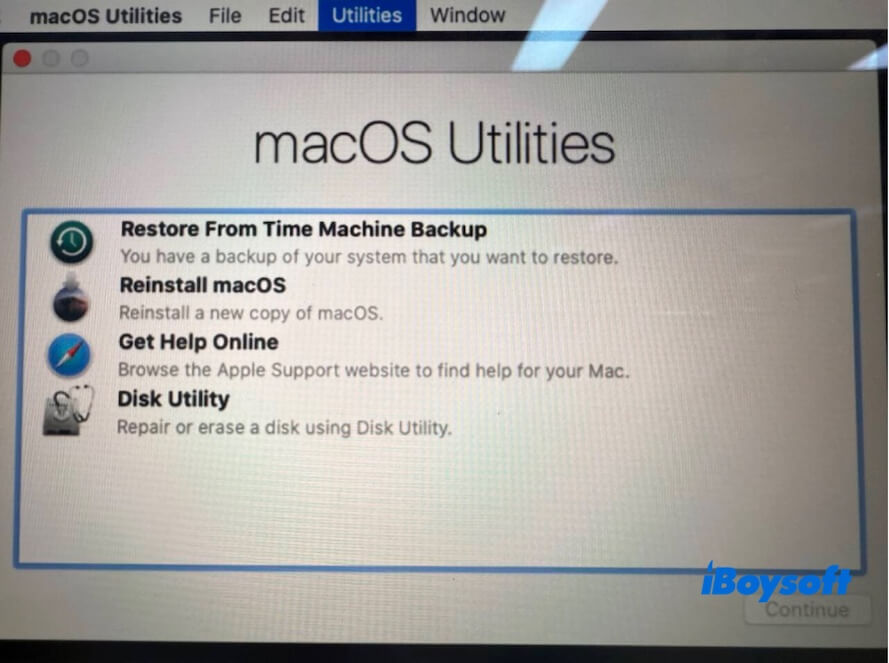
- Select Restore From Time Machine Backup in the macOS Utilities screen.
- Click Continue.
- Choose the drive containing your Time Machine backup.
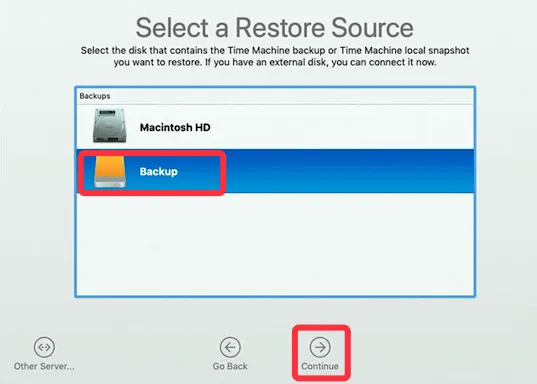
- Select the backup created before the macOS upgrade.
- Choose your internal disk as the restore destination.
- Click Restore.
The restoration process will take some time. Just wait it out.
Result
After the restore process finishes, the Mac will restart and run the macOS version included in the backup and restore files and system settings from the backup.
Risk
Files created after the backup date will not be included in the restored system.
Method 2: Downgrade macOS to the original in Recovery Mode
When to use this method:
This method works when:
- You don't have a Time Machine backup.
- Your Mac originally shipped with an older macOS version.
macOS Recovery can reinstall the macOS version that came with your Mac.
If you're uncertain about the macOS version your Mac shipped with is the one you want to downgrade to, you can click the Apple menu > About This Mac to see your Mac model details and then search for its shipped system.
Steps:
- Restart your Mac while holding Shift + Option + Command + R keys.
- Release the keys until you see the spinning globe.
- Connect to Wi-Fi if prompted.
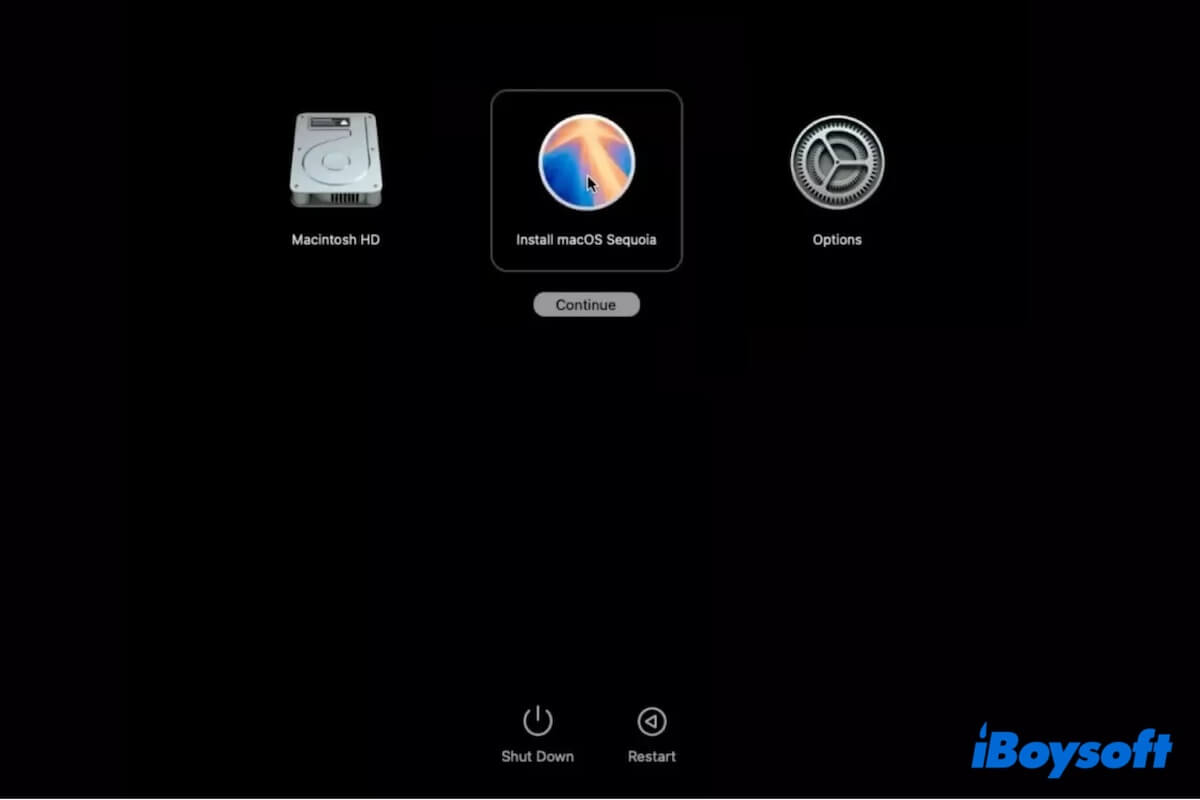
- Select the Reinstall macOS option in the macOS Utilities window.
- Follow the instructions to finish the installation.
Notably, if your Mac came with a macOS older than the version you want to downgrade to, you need to follow the above steps to downgrade your Mac to the shipped macOS first.
Then, upgrade the Mac to any compatible version you want.
- Download the macOS installer from the App Store.
Quick links to access common macOS versions from the App Store:
macOS Sequoia
macOS Sonoma
macOS Ventura
macOS Monterey
macOS Big Sur
macOS Catalina - On the prompt, follow the on-screen instructions to install the target macOS.
image
Result
Your Mac installs the original macOS version that shipped with the device. If you reinstall the shipped the macOS and then upgrade the system, your Mac installs the version you want.
Method 3: Downgrade macOS using a bootable installer
If the previous methods don't work, you can create a bootable macOS installer and use it to downgrade macOS.
This method allows you to directly install a specific macOS version compatible with your Mac model, such as macOS Sequoia, macOS Sonoma, macOS Ventura, macOS Monterey, etc.
Step 1: Create a macOS bootable installer
Note: If you had erased your Mac when trying the above two ways to downgrade from Sequoia or Sonoma, you need to create the bootable installer on another healthy Mac.
The traditional way to create a bootable USB installer for macOS requires using Terminal. It is time-consuming, complicated, and error-prone for tech newbies.
If you are a tech-snavy and would like to try this way, you can follow Apple's official guide: How to create a bootable installer for macOS
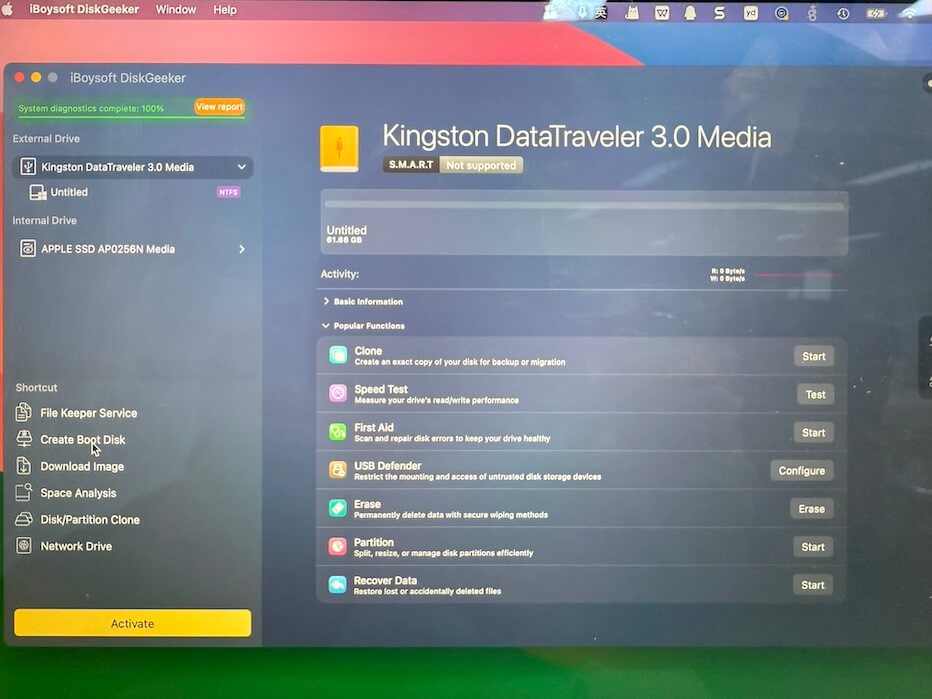
If you are not familiar with Terminal and want to quickly get the macOS bootable installer, I suggest you use iBoysoft DiskGeeker. This all-in-one disk management tool can help you create a macOS bootable USB installer with only a few clicks.
Here's how
- Free download, install, and open iBoysoft DiskGeeker on your Mac.
Ensure you've connected an empty USB or external drive to your Mac. - Click Create boot disk on the left sidebar.
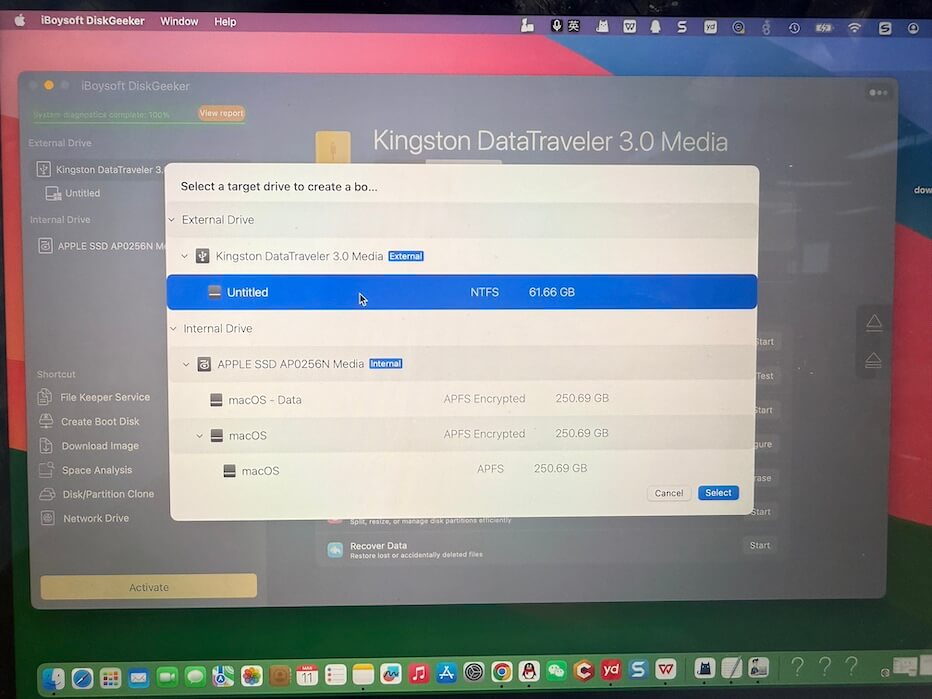
- Select the connected drive on the prompt, and click Select > Continue.
- Choose your desired macOS version on the list and click Create boot disk > OK.
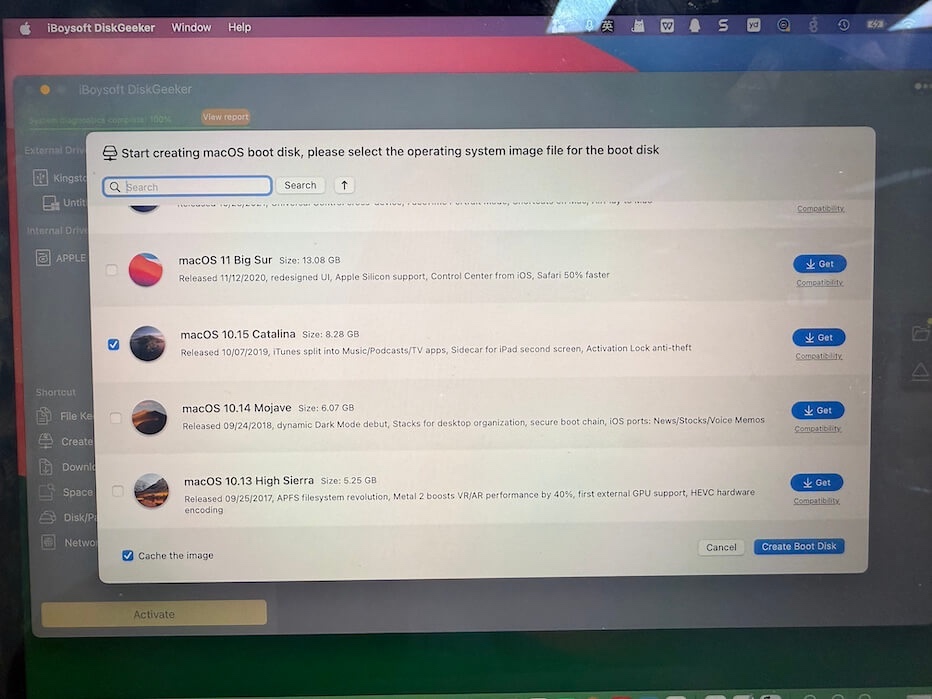
Wait for the macOS DMG file to be downloaded, and then it will automatically create a bootable installer for that macOS version.
Step 2: Change security settings (Only for T2-chipped Mac)
By default, a Mac with an Apple T2 security chip doesn't allow starting up from an external drive. You should change the security settings first.
- Check if your Mac has an Apple T2 chip in the Apple menu > About This Mac.
- If it has, boot into macOS Recovery mode.
- Select Utilities > Startup Security Utility.
- Check "Allow booting from external media."
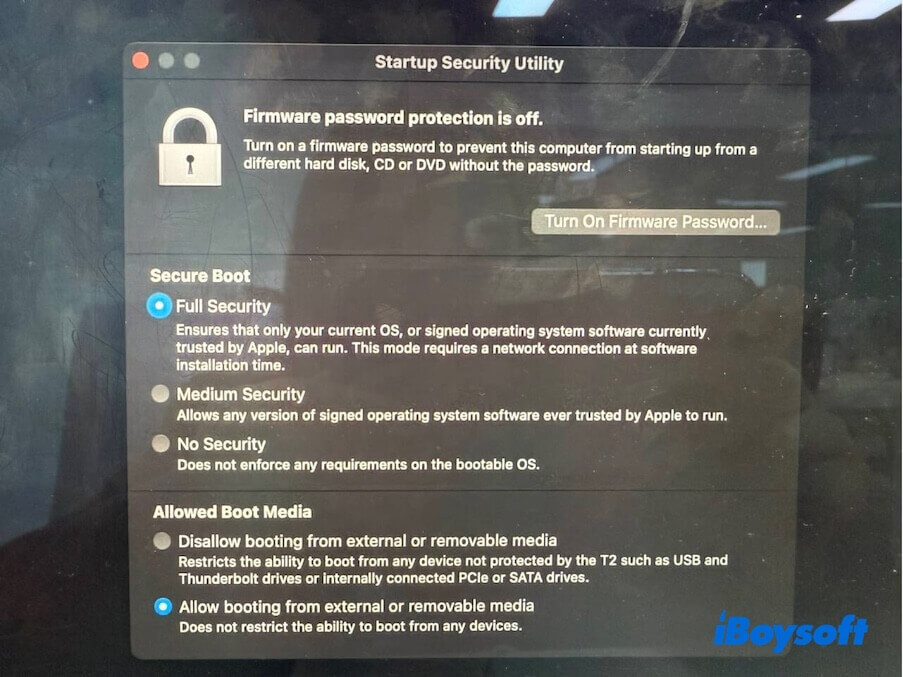
Then, restart your Mac and proceed with the next step.
Step 3: Use the bootable installer to reinstall the earlier macOS version
Please confirm the internet connection is okay. Then, follow these steps to use the bootable installer to reinstall macOS Sonoma, Ventura, Monterey, or another version on your Mac.
- Restart your Mac while holding the Option key until you see the list of startup disk options.
- Choose the disk with your target macOS installer.
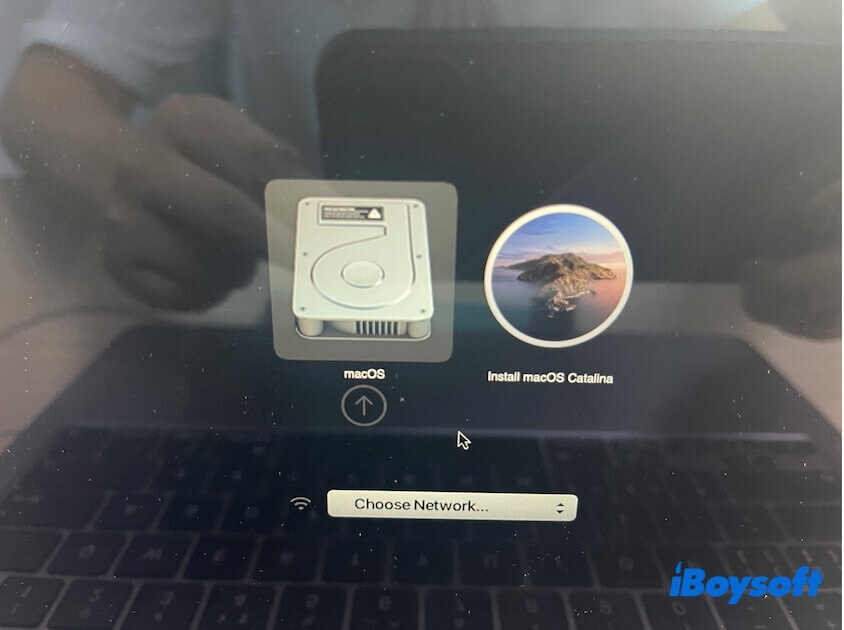
- Select Reinstall macOS [Version] from the utilities.
- Select the Macintosh HD as the destination disk.
- Follow the on-screen guide to finish the installation.
The installation may take 30–60 minutes or longer. During the process, your Mac will restart several times. After the installation is complete, your Mac will boot into macOS Catalina, and you'll need to complete the setup process before using it.
Restore your data after downgrading macOS (Optional)
After downgrading from Tahoe to Sequoia, from Sequoia to Sonoma, or any other, the last step is restoring data from the backup you've taken just now. Of course, this step is up to you.
If you saved the necessary files or folders on an external hard drive, move them to your Mac.
Or, if you have backed up your Mac with Time Machine, you can use the Time Machine backup to restore your Mac with the help of Migration Assistant.
Here's how:
- Connect your Time Machine backup external drive to your Mac.
- Open Finder > Applications > Utilities > Migration Assistant.
- Click Continue, and you may be asked to enter your admin password.
- Select From a Mac, Time Machine backup, or startup disk and click Continue.
- Select the drive that includes your backups and click Continue.
- Choose the latest backup that contains files before downgrading to Catalina and click Continue.
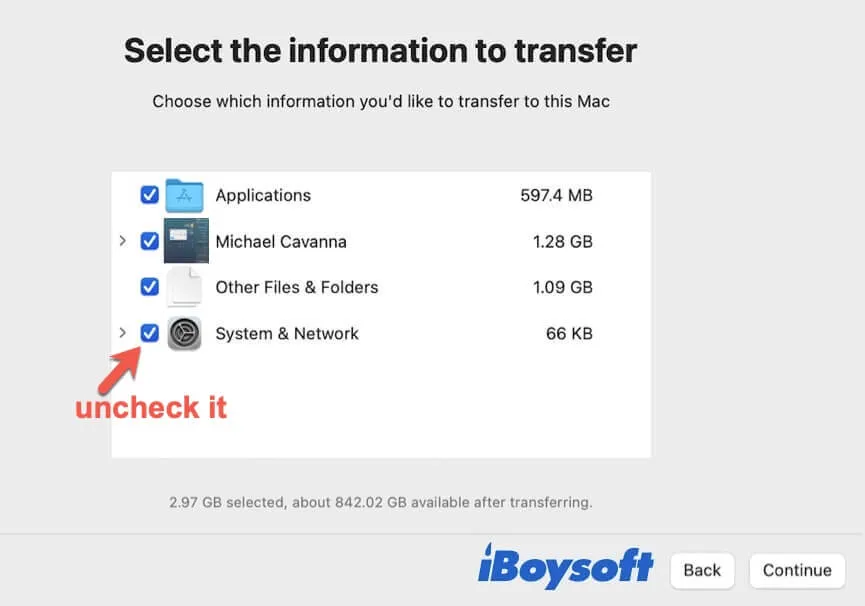
- Select the data you want to transfer to the Mac.
Remember to uncheck the System & Network option to avoid restoring the previous system files, which will make your Mac restore to the previous macOS version.
Note: If you accidentally delete the backup files or the backup hard drive is not working, you can recover the lost backup with iBoysoft Data Recovery for Mac. This Mac Data Recovery focuses on recovering deleted files and files from corrupted or inaccessible external hard drives.
Common macOS downgrade problems and fixes
You may encounter issues during the downgrade process. Below are the most common problems discussed by Mac users in online communities, along with solutions based on my own experience.
| Error | Cause | Solution |
| The volume cannot be downgraded | Disk not erased | Erase the startup disk in Disk Utility |
| Installer cannot be verified | Incorrect system date | Correct the system date in Terminal |
| Mac won't boot from installer | Security settings | Enable external boot in Startup Security |
| Installation fails midway | Internet interruption Power outage | Ensure stable internet and power connection |
Final thoughts
As we know, downgrading Mac OS is not an easy task and may cause data loss. No matter which way you choose to downgrade macOS, please follow every step carefully and do not arbitrarily change the order of the steps.
Besides, pay attention to the macOS version you'll downgrade to is compatible with your Mac machine.
FAQs
- Q1. How do I get an older version of macOS?
-
A
You can access support.apple.com and search for any older macOS version like Catalina, Mojave, High Sierra and then download it.
- Q2. How do I downgrade my Mac without Time Machine?
-
A
You can press the Command + Shift + Option + R keys while restarting your Mac to enter into Recovery Mode. Then, click the Reinstall macOS utility to downgrade macOS to the version that came with your Mac. Or, you can also create a bootable installer to downgrade your Mac.
- Q3. Can you downgrade macOS without losing data?
-
A
Yes. To avoid data loss, you need to back up your Mac with Time Machine or synchronize your data to your iCloud drive. After you finish the macOS downgrading process, you can restore your files.