
Hi there,I'm writing this for a straightforward solution. The simple task at hand was to move the time machine backups from an external drive (Old drive) to a new bigger drive (New drive). My old drive with 3TB was getting full and I decided to buy a new one with 8Tb and re-purpose Old drive to other tasks and use new drive also for backup of a new Macbook Air. At the time I started the migration, the backup folder had 2.9 TB.
Why do you need a new drive for Time Machine backup?
Actually, the reasons to transfer the Time Machine backup to a new drive on Mac can be generalized into two aspects:
Firstly, since you downloaded more apps and created more files on your Mac, the number of your data keeps increasing constantly.
Due to limited storage space, the Time Machine backup disk gets full easily, and it stores more recent data but discards previous ones. Or, you can't store files on your Time Machine backup drive. So, transferring Time Machine backup to a larger hard drive size is a must.
Secondly, just as a saying goes, there are two kinds of hard drives, those that are failing and those that are going to fail. If you're worried about an older hard drive dying on you, you can check the disk SMART status and then migrate the Time Machine backup to a new hard drive to avoid this issue.
If your Time Machine backup disk exists any problems mentioned above, then it's time for you to figure out how to transfer time machine backup to a new drive.
How to transfer Time Machine backup to a new hard drive?
This part provides you with detailed guidelines on how to transfer Time Machine backup to a new hard drive. This method is time-wasting and the steps are a little bit complex, and your patience is essential.
Before transferring, there are some preparations you need to complete:
Prepare the new drive to transfer the Time Machine backup
Note: Transferring Time Machine backup to a new drive will overwrite the data on it, please make sure you have backed up all important data on the new drive.
- Make sure that your new drive has a larger storage capacity than your Time Machine drive.
- Ensure your new drive is formatted as macOS Extended (Journaled) with the GUID Partition Map scheme.
- Right-click the new drive and select the Get Info option in the dropdown menu.
- Locate Sharing & Permissions and then click the padlock icon.
- Enter your admin password and uncheck Ignore ownership on this volume.
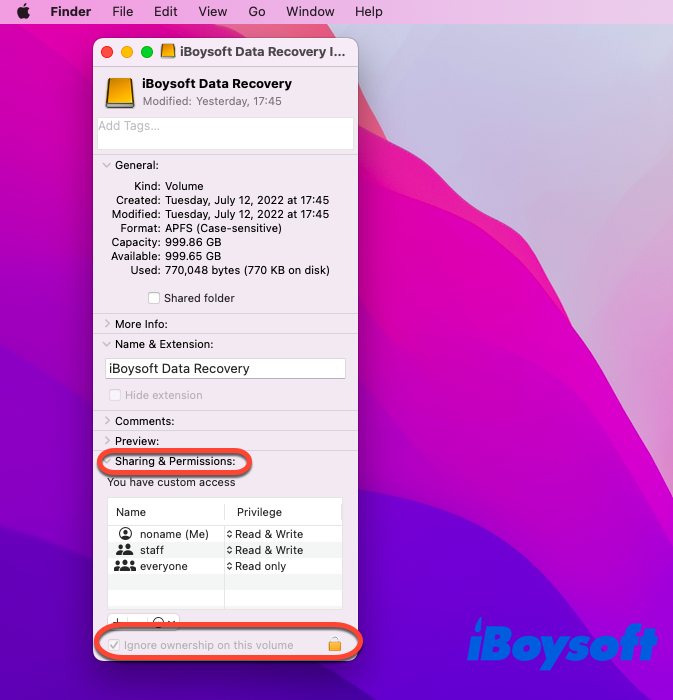
- Click the padlock to save your change.
Transfer Time Machine backup to the new drive
After finishing the preparation work, you can transfer the Time Machine backup to a new hard drive straightforwardly. The time of transferring process depends on the size of your current Time Machine backup, which may take hours to days.
- Connect the two hard drives to your Mac.
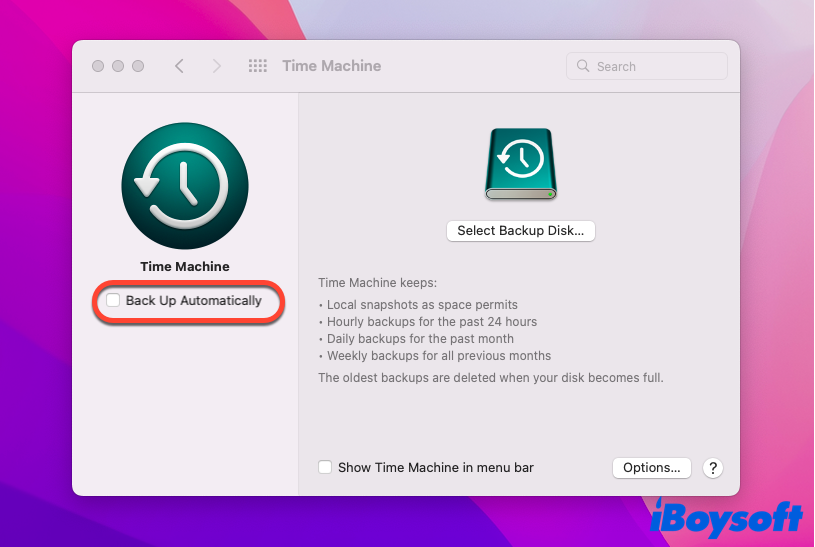
- Click the Apple menu, and select System Preferences.
- Locate Time Machine and turn off Back Up Automatically in the Time Machine home window.
- Open the Finder windows for the Time Machine drive and the new drive.
- Find the 'Backups.backupdb' folder on the Time Machine drive. If you cannot find it, then find a file ending with '.sparesbundle'.

- Drag the folder to the new drive, and then you're prompted to enter your administrator account password.
- Wait for the transferring process to finish.
If your Time Machine cannot find the backup disk, then you need to tix this problem first, since the Time Machine backup disk is indispensable for this process.
Select the new drive for Time Machine backups
After the transferring process ends, you need to select the new drive to make new Time Machine backups.
- Click the Apple menu, select System Preferences, and locate Time Machine.
- Open Time Machine, and check Back Up Automatically in the left sidebar.
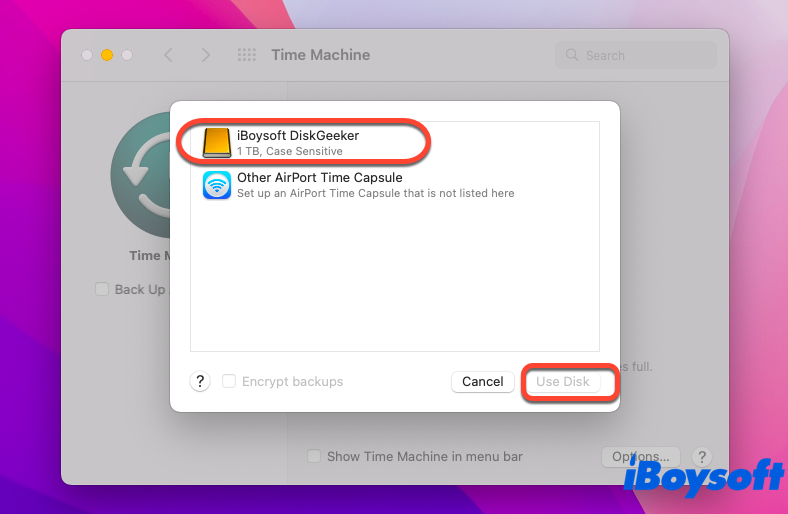
- Click Select Disk and choose your new drive.
- Hit Use Disk to make new Time Machine backups.
Since then, the new drive is going to make new Time Machine backups. Don't drag your old Time Machine to Trash directly, because they might get stuck for a large number of files. You can apply Disk Utility to erase the old Time Machine drive instead.
How to use iBoysoft DiskGeeker to transfer Time Machine backup?
iBoysoft DiskGeeker is designed with a unique feature, disk clone, which grants you to copy everything on the Time Machine disk to another disk with a fast and stable data transfer speed, extremely shortening the time by this function than the transferring method mentioned above.
Before cloning, you should notice that:
- The important data on the new drive is backed up securely for the clone action will overwrite the drive.
- The new drive is formatted as macOS Extended (Journaled), and it is bigger than the Time Machine backup drive in storage space.
- Install iBoysoft DiskGeeker on your Mac.
- If you're running macOS Monterey, go to the Apple menu > System Preferences > Security & Privacy > Privacy > Full Disk Access to ensure the "drivermanagerd" program is checked.
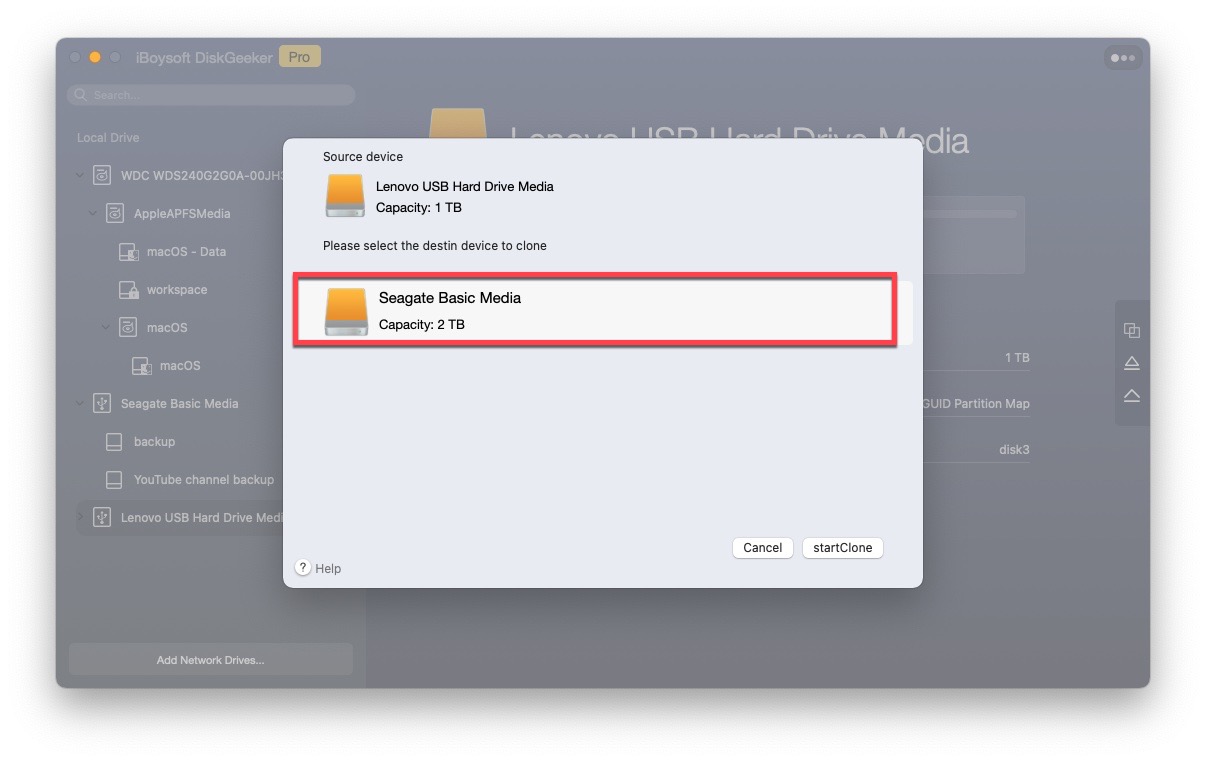
How to clone the Time Machine backup disk?
- Connect the new drive to your Mac and launch iBoysoft DiskGeeker.
- Select the Time Machine backup disk at the left sidebar of the main window.
- choose Clone from the right toolbar.
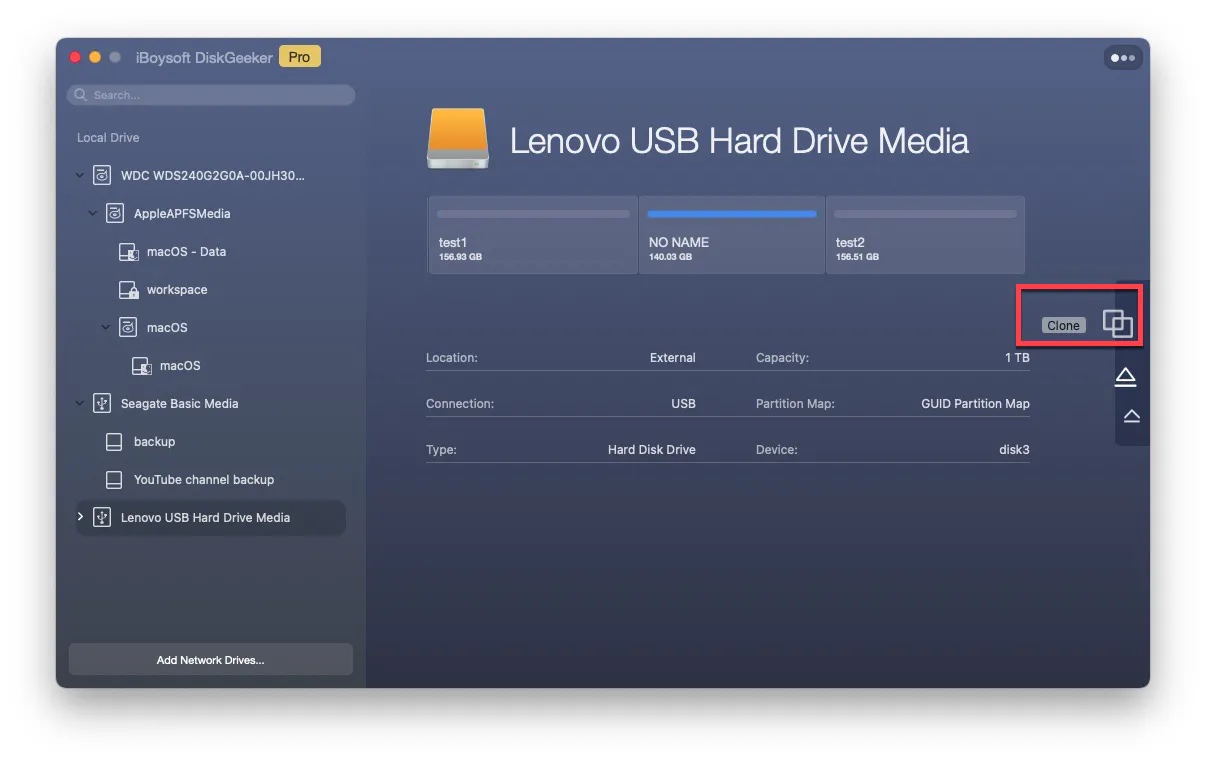
- Choose the new drive from the pop-up list and click StartClone. You will be prompted with a warning that clone disk will overwrite all data on the new drive. If you click OK, the clone starts.
The cloning process cannot be terminated once it begins. If the process is terminated accidentally, the disk cloning will resume automatically when the drive is connected to your Mac again.
After the clone action completes, you need to select the new drive to make new Time Machine backups. You can follow this process to complete your actions:
Click Apple menu > System Preferences > Time Machine > check Back Up Automatically > click Select Disk and choose the new drive > hit Use Disk to save your changes.
Verdict
If you regard that your Time Machine backup drive is limited in storage space, or the Time Machine backup drive is too old, then knowing how to transfer time machine backup to a new hard drive is a compulsory course. Also, you can apply the excellent software iBoysoft DiskGeeker to help you by cloning the disk easily, which greatly saves your precious time by applying its disk clone function.
FAQ about transferring Time Machine backup to a new drive
- QWill Time Machine back up everything on my Mac?
-
A
When Time Machine is turned on, it can automatically back up files on your Mac that aren't part of the macOS installation hourly, daily and weekly, such as apps, music, photos, videos, and files.
- QCan I move Time Machine backup to a new Mac?
-
A
Yes, you can move the Time Machine backup to a new Mac from your old Mac by applying Migration Assistant.