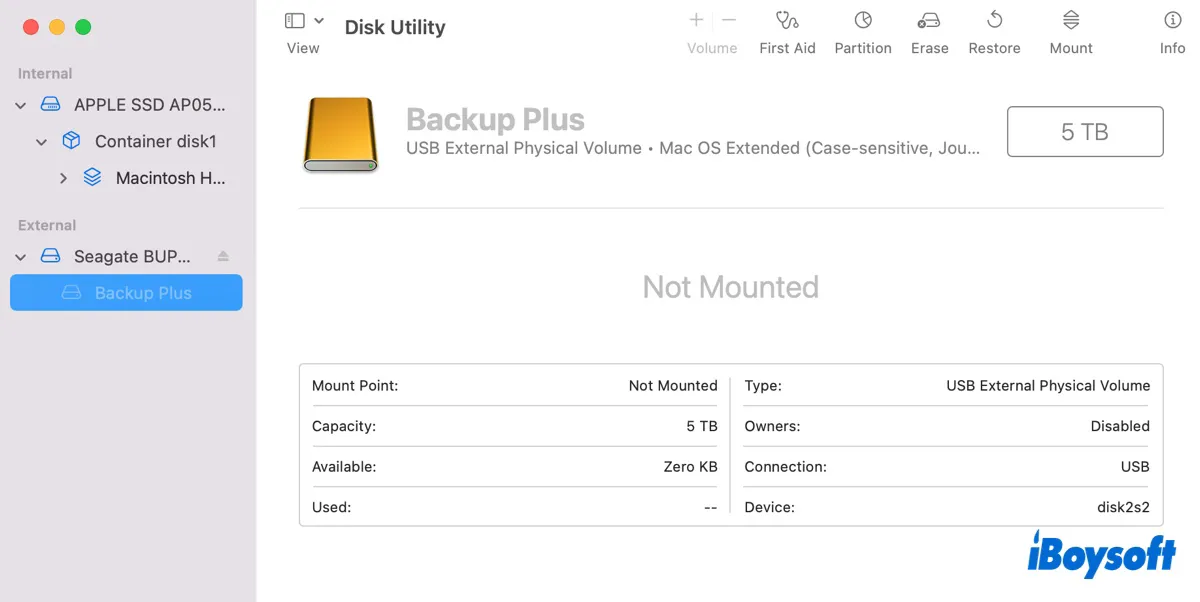
If your external hard drive is not mounting on macOS 27 Golden Gate, first check whether your Mac detects it in Disk Utility.
- If the drive doesn't appear there, you're dealing with a detection or hardware/connection problem.
- If it appears but is greyed out, the Mac detects the drive but its volume isn't mounted.
- If it is mounted in Disk Utility but missing from Finder, the problem is usually with Finder's display settings.
This guide explains what each situation means and walks you through the safest fixes first, especially if the drive contains important files.
Quick Diagnosis Table
| What you see | What it means | What to try |
| Drive doesn't appear in Disk Utility | macOS isn't detecting the storage device | Check cable, port, power, hub, accessory approval, and test another Mac |
| Drive appears but is greyed out | The physical device is detected but its volume isn't mounted | Try Mount, then check the file system and First Aid |
| Drive is mounted but missing from Finder | The volume is mounted but Finder isn't displaying it | Check Finder settings for external disks |
| First Aid fails | The file system or directory structure may have serious problems | Protect/recover important data before erasing or continuing |
| Drive repeatedly disconnects | Possible cable, enclosure, power, or hardware problem | Stop repeated repair attempts and test the hardware |
Case 1. External Hard Drive Doesn't Appear in Disk Utility
If the list of devices don't show up your external drive in the Disk Utility, it's a strong indication that macOS isn't detecting the storage device properly. To make it detectable, you should try the following solutions:
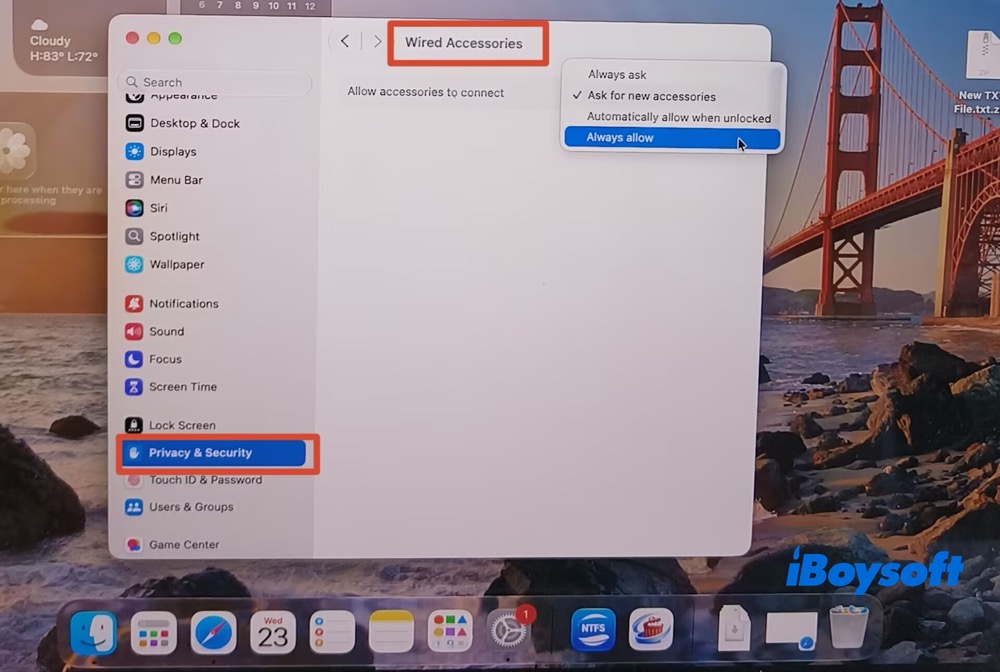
Solution 1. Check Whether macOS Blocked the USB or Thunderbolt Accessory
On some Mac laptops with Apple Silicon, macOS may ask you to approve a new USB or Thunderbolt accessory. If you previously selected Don't Allow, disconnect and reconnect the drive and check whether macOS asks you to approve it. You can also review the accessory connection settings in System Settings > Privacy & Security. Choose Always allow.
Solution 2. Ensure Your Hard Drive Is Well-Connected
An external hard drive must be properly connected to your Mac to be detected. A loose or faulty connection can prevent the drive from appearing in macOS Golden Gate. To rule out connection issues, unplug the drive and reconnect it firmly. If the problem persists, try using a different USB cable or connecting the drive to another port.
Solution 3. Check If Your External Drive Can Properly Communicate with Your Mac
If the drive doesn't appear in Disk Utility, open System Report > Hardware > USB and check whether the Mac sees the connected external storage device.
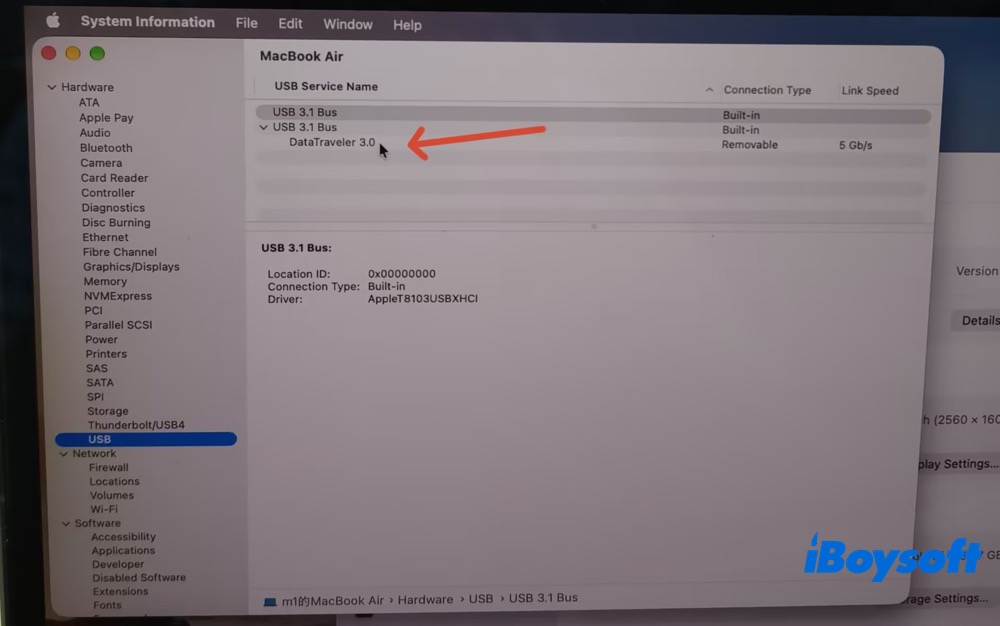
If the device appears under USB but no usable disk appears in Disk Utility, the Mac may be detecting the USB connection while having trouble communicating with the storage device or its file system. This solution also works to fix the external hard drive not mounting on macOS Sequoia problem.
Solution 4. Check Your External Hard Drive Power Supply
If the above solutions still don't solve your external drive not showing up in Disk Utility issue, don't forget to check the drive's power supply.
- Click Apple menu > System Settings > Select General → About
- Open System Report
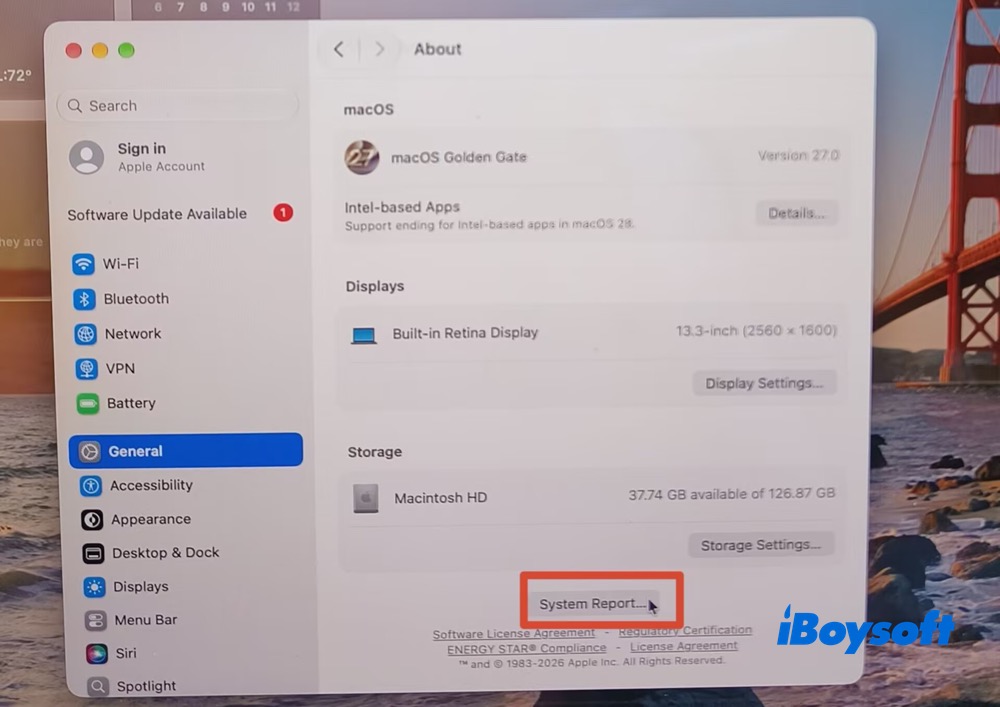
- Select USB in the Hardware section > choose my USB DataTraveler 3.0 > the Current Available and Required (mA) are 900 and 504.
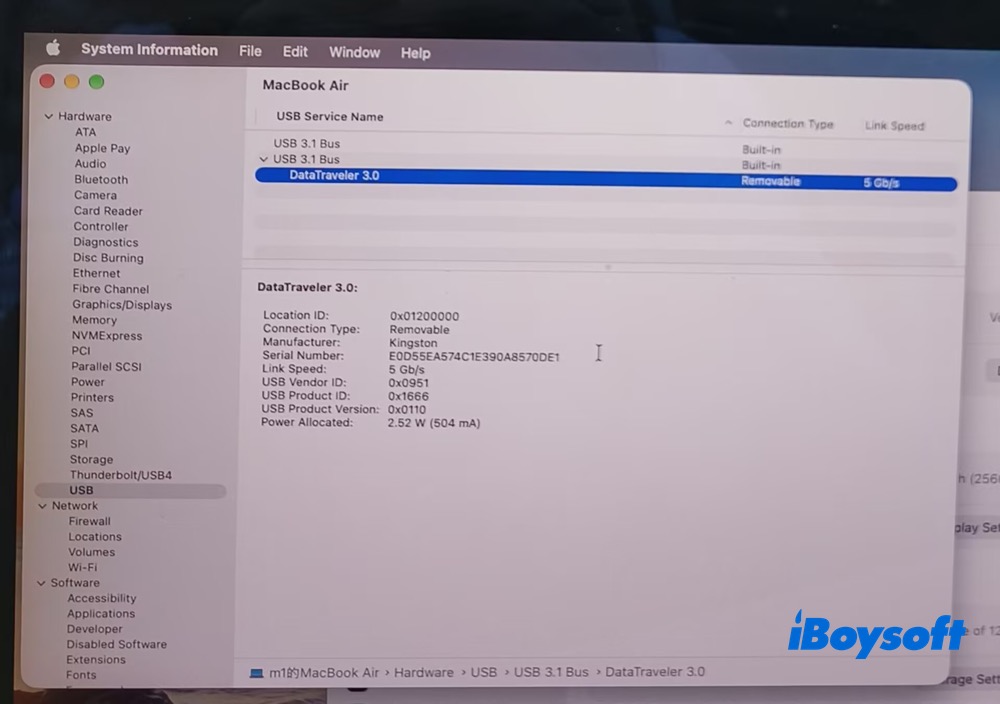
- The required power is less than the current available one. There is no shortage of power supply.
Solution 5. Test the Drive on Another Mac
Solution 6. Update macOS Golden Gate 27
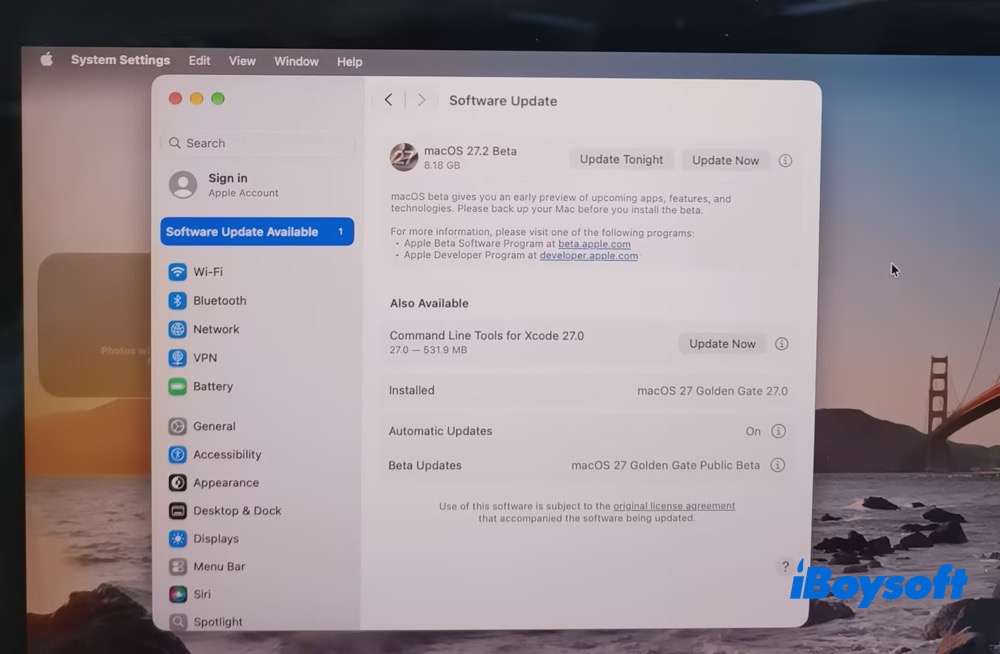
If the problem started immediately after upgrading to macOS 27 Golden Gate, install the latest available macOS 27 update and test the drive again. If the same drive works normally on another Mac but not on yours, software, driver, accessory, or macOS compatibility may be jointly responsible for this ssue.
To update macOS Golden Gate 27, go to System Settings > General > Software Update, then install the available update.
Share to help others fix external hard drives not showing up on macOS 27!
Case 2. External Hard Drive Appears in Disk Utility But Won't Mount
Solution 1. Manually Mount
This is as easy as ABC:
- Open Disk Utility
- Choose the greyed-out volume. Here I choose my exFAT volume called disk6s3s2
- Click the Mount button in the upper menu. Then my exFAT volume is mounted in Disk Utility
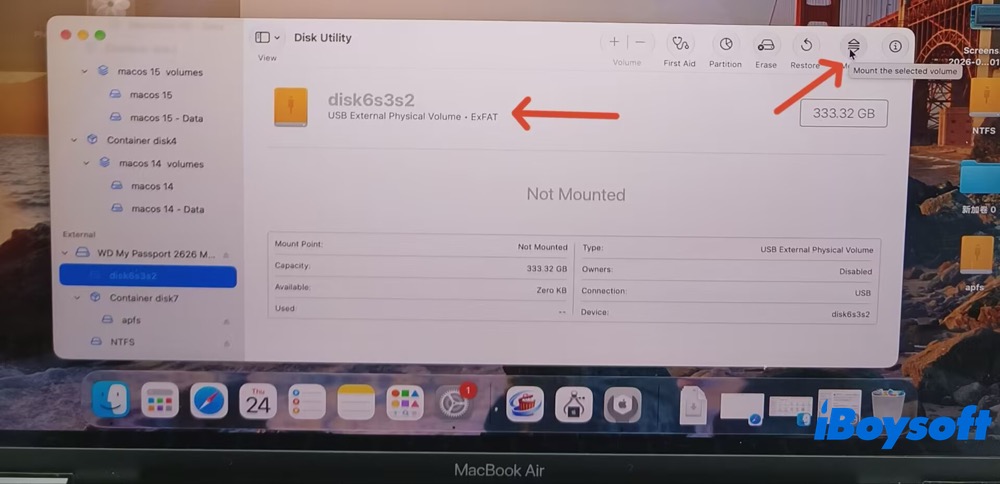
It's worth mentioning that the Mount action will sometimes fail with the com.apple.DiskManagement.disenter error, such as:
Solution 2. Check the File System
Check the file system of the greyed-out volume on your external drive in Disk Utility. In general, macOS can detect and mount drives formatted with APFS, HFS+, exFAT, and FAT32 without additional software. However, NTFS is primarily a Windows file system, so you may need to take additional steps if your external drive uses NTFS.
macOS has limited native support for NTFS and generally does not provide normal write access. Depending on the macOS version and the condition of the NTFS volume, the volume may not mount automatically. In this case, select the volume in Disk Utility and click Mount to try mounting it manually.
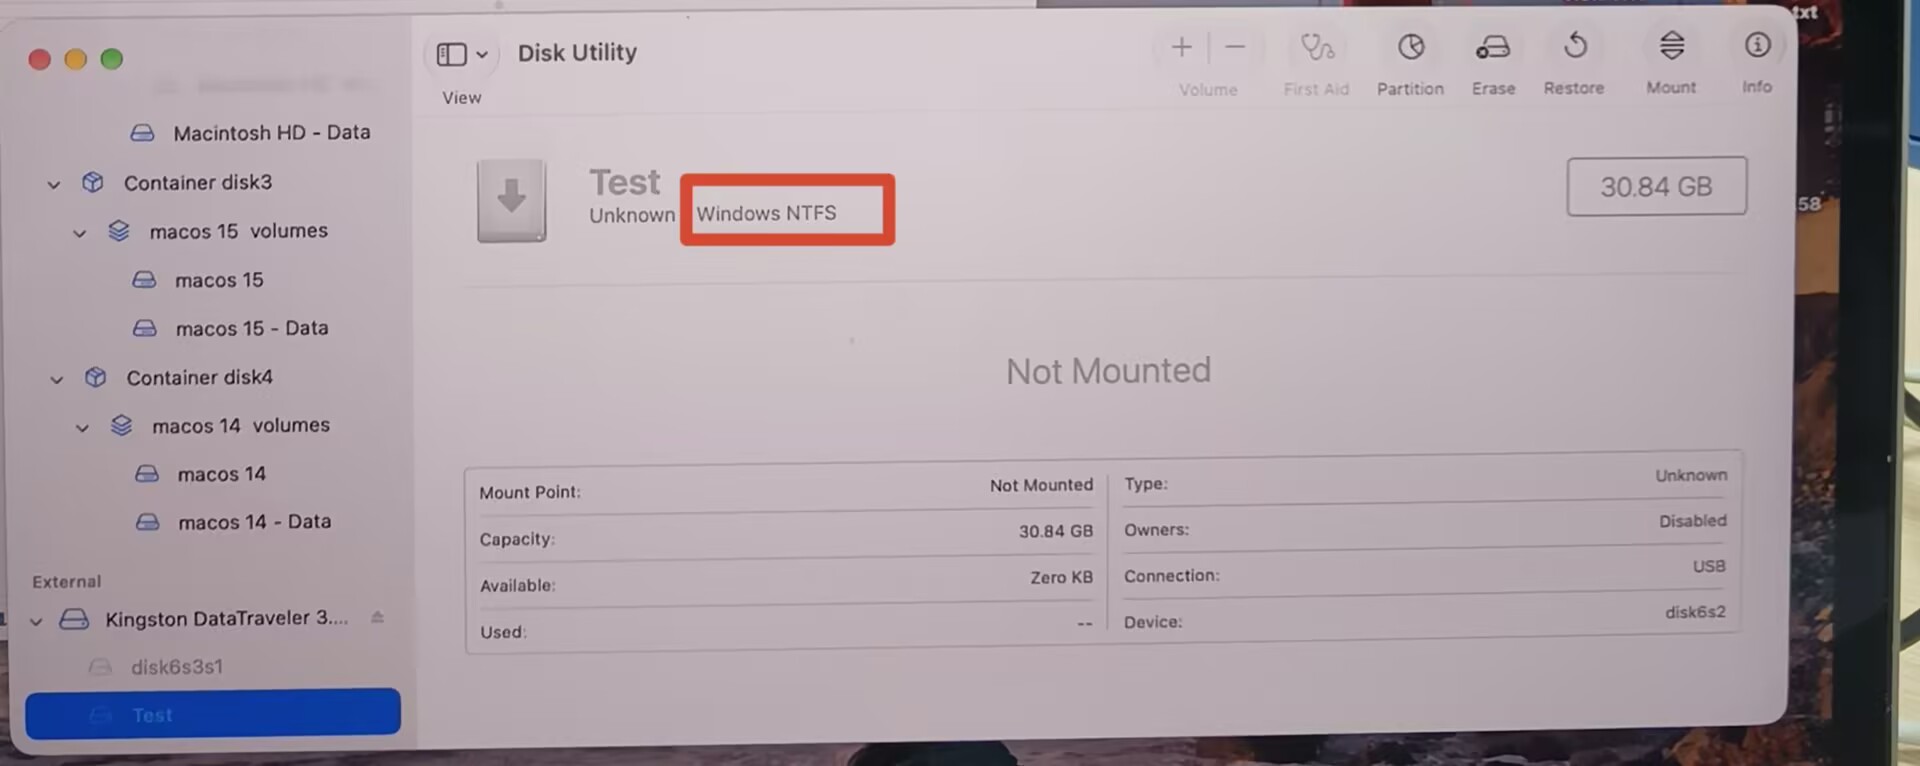
If the volume still fails to mount after you click Mount, consider whether you previously installed an NTFS driver on your Mac, as the driver may interfere with the mounting process. For specific troubleshooting steps, jump to the following Is an NTFS driver causing the problem? section.
Keep reading on troubleshooting NTFS external drive not working on macOS Sequoia.
Solution 3. Run First Aid
- In Disk Utility, click View > Show All Devices.
- Run First Aid on each volume.
- Then click First Aid on each container.
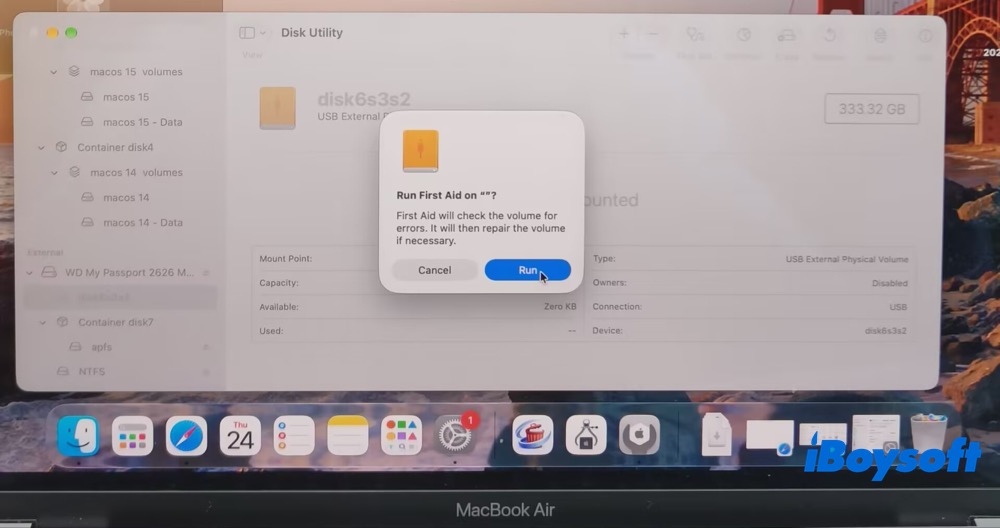
- Last, choose the physical storage device to run First Aid.
Note: If the drive contains important files, don't treat First Aid as a guaranteed data-recovery tool. First Aid repairs certain formatting and directory-structure problems, but Apple notes that Disk Utility cannot detect or repair every disk problem.
Solution 4: Use diskutil to Mount the Volume
This solution is more suitable for those with certain Terminal command-line skills. Run the following commands to mount your external volume.
- Open Terminal from Launchpad or Applications in Finder.
- Run the command below and hit Enter.diskutil list
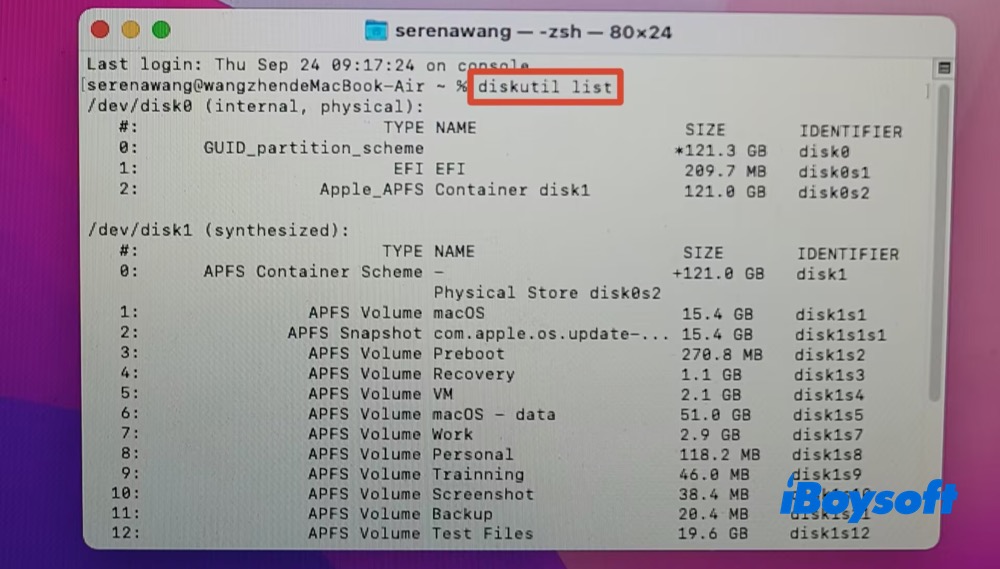
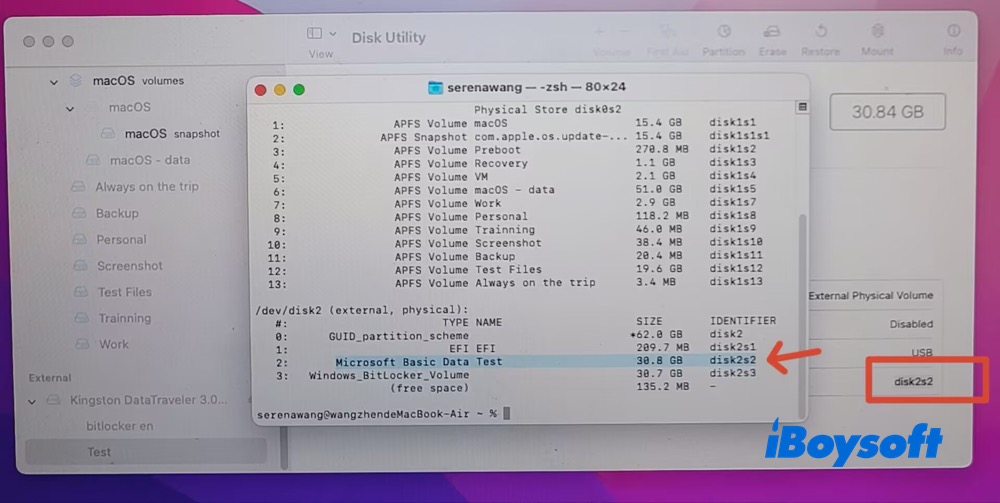
- Note down the disk or partition identifier. Here my unmounted volume "Test" identifier is disk2s2.
- Input the command below and hit Enter.
To mount a partition:diskutil mount disk_identifier Here my volume identifier is disk2s2. The complete command is diskutil mount disk2s2. You can see my test volume is successfully mounted now.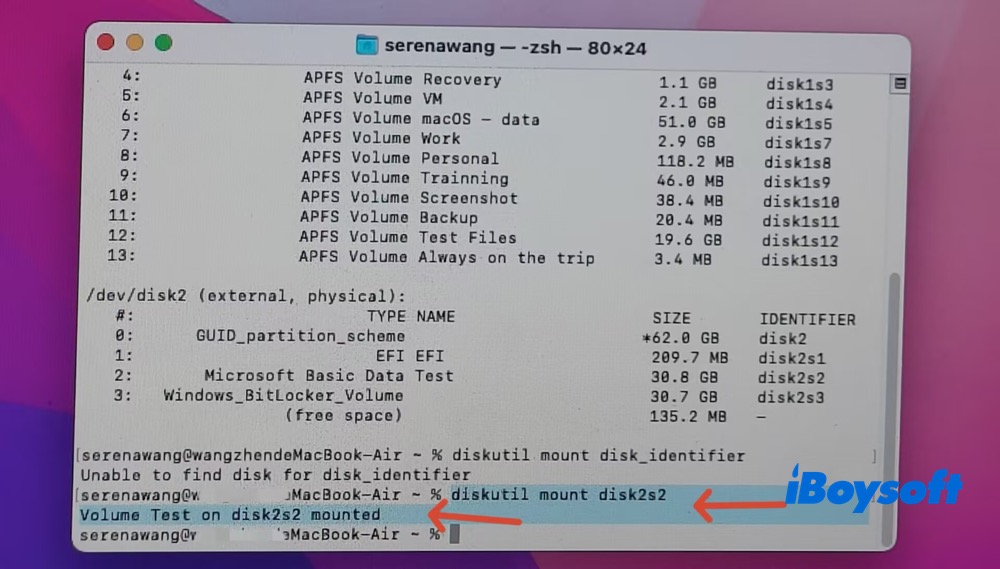
If you want to mount a disk, run: diskutil mountDisk disk_identifier
Case 3. External Drive Is Mounted But Missing from Finder
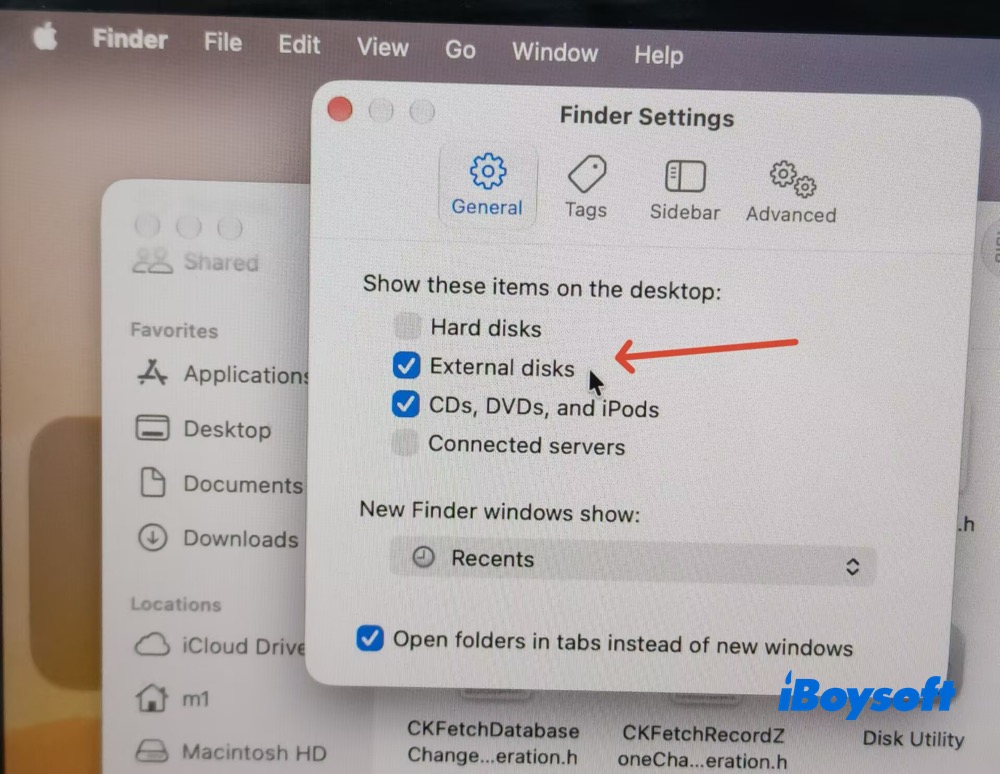
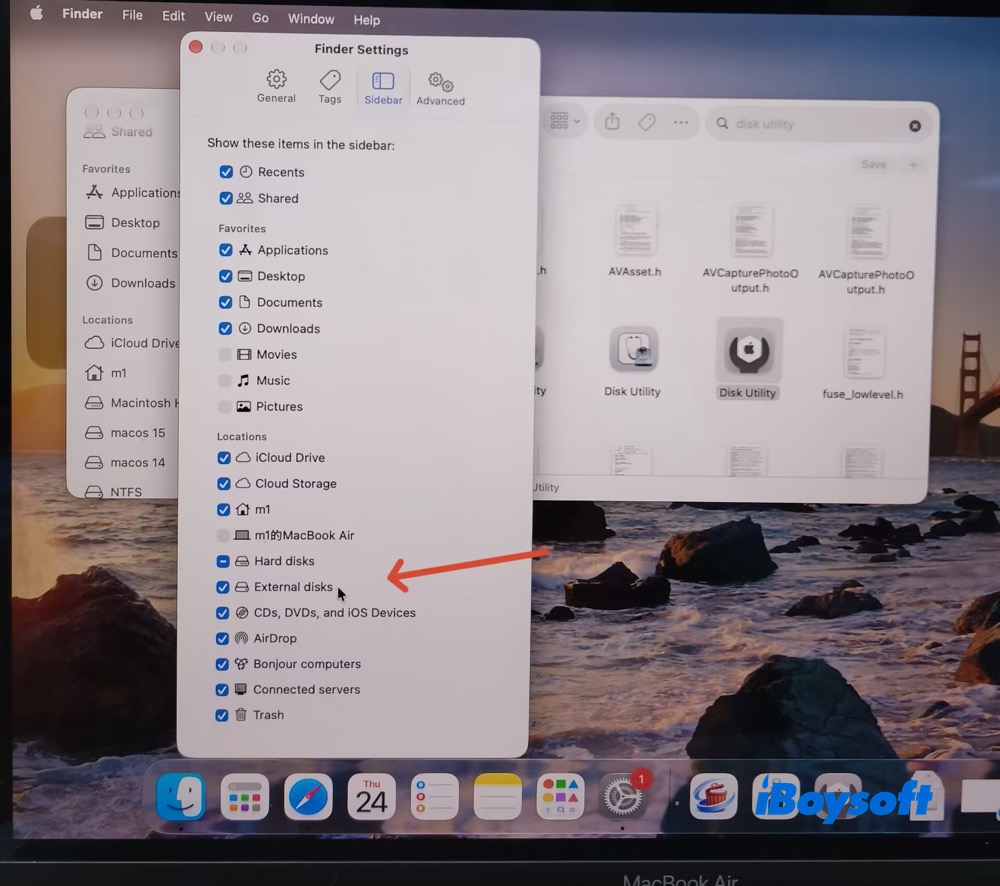
Here's how to show external USB drive on the Mac desktop and Finder on macOS Golden Gate:
- Open Finder.
- From the menu bar, click Finder > Settings.
- In the General tab, tick the box next to "External disks" to show the item on the desktop.
- In the Sidebar tab, tick the box next to "External disks" to show them in the Finder sidebar.
Is an NTFS Driver Causing the Problem?
Is your external drive formatted as NTFS?
If your external hard drive is formatted as NTFS and you installed a third-party NTFS driver before upgrading to macOS 27, check whether the driver is compatible with macOS 27 Golden Gate. If it isn't, the incompatible driver may be preventing your external drive from mounting properly.
In this case, use iBoysoft NTFS for Mac, which has been updated for macOS 27 and provides full read/write access to NTFS drives on macOS 27 Golden Gate and earlier versions. Its latest version also introduces an Extension mode based on iBoysoft's NTFS driver and Apple's FSKit framework, allowing NTFS volumes to be mounted and accessed from macOS user space.
Unlike traditional NTFS drivers implemented as kernel extensions, this mode does not require enabling a kernel extension or restarting your Mac, providing NTFS read/write access with a more streamlined and secure architecture.
It's well compatible with both Apple Silicon Macs and Intel-based Macs. Here's how I mounted NTFS in read-write mode on macOS 27 without a kernel extension enabled:
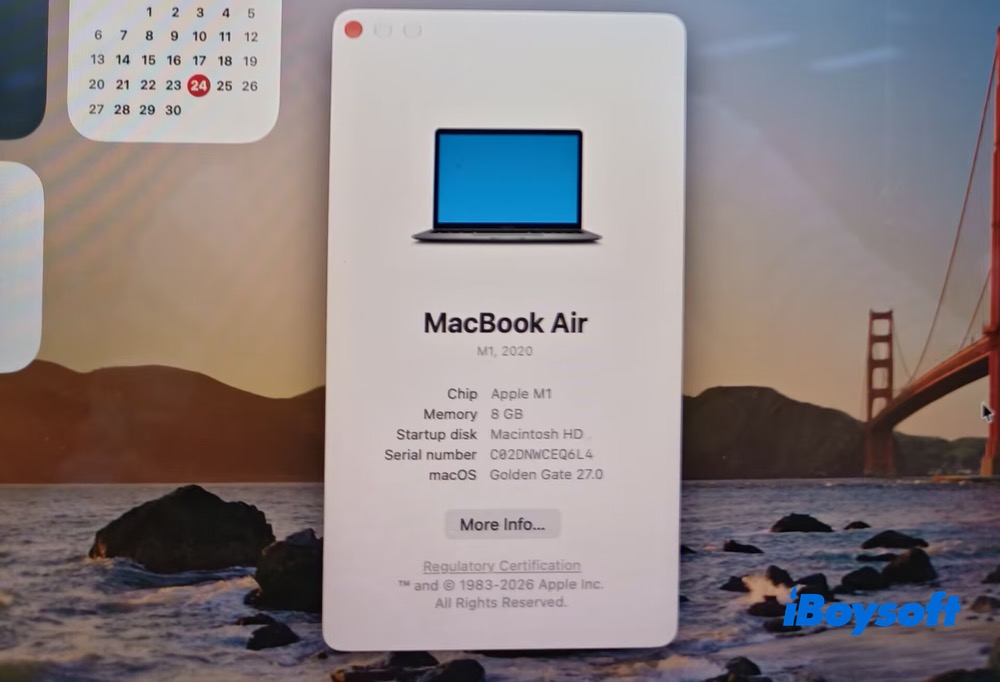
Step 1. I downloaded and installed the latest version of iBoysoft NTFS for Mac (version 9.0) on a Mac with a 4-core 2.19 GHz processor and 16 GB of memory, running macOS Golden Gate 27.0
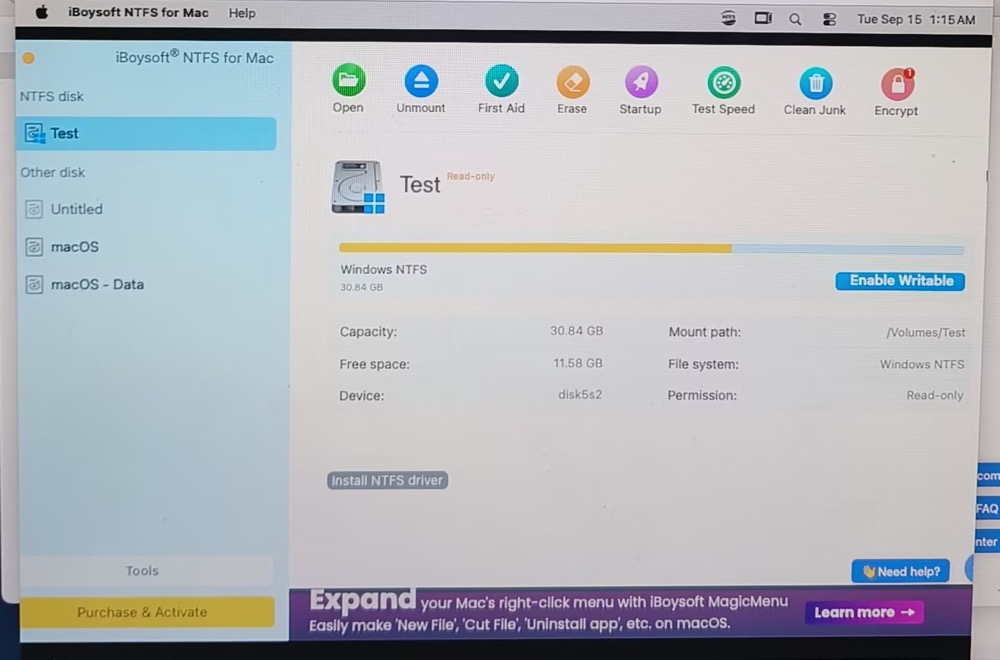
Step 2. Connect my external hard drive (Test) to my Mac. Launch this NTFS for Mac software and it auto-mounts my NTFS drive in read-only state.
Step 3. Click Settings > Advanced. This Windows NTFS for Mac auto-selected Extension mode (FSKit) in "Default mount mode" option.
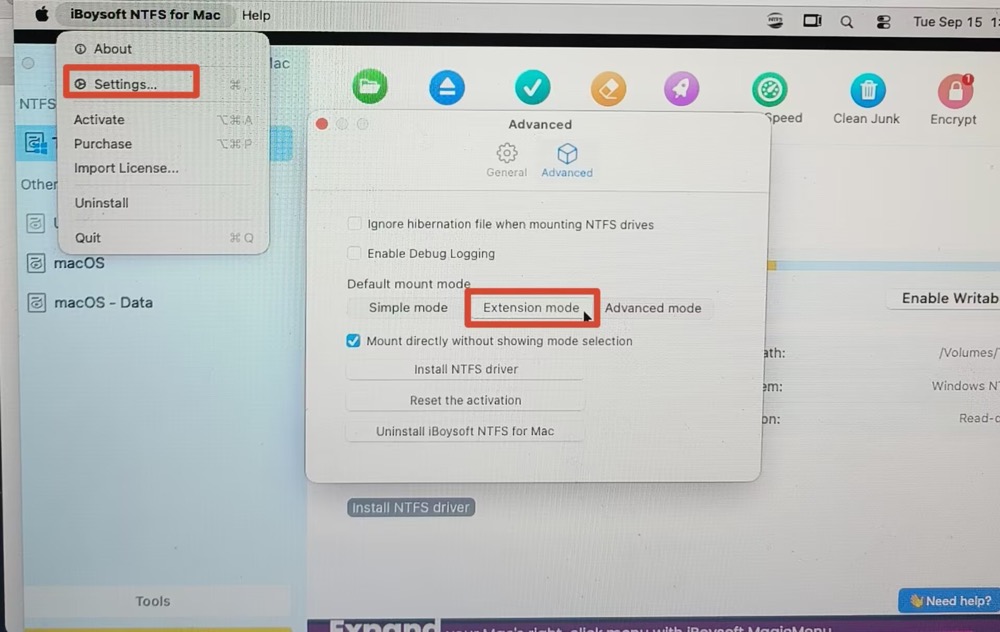
On macOS Tahoe 26 and later, iBoysoft NTFS for Mac automatically selects Extension mode for reading from and writing to NTFS drives. On macOS 15 and earlier, Advanced mode is selected by default.
Step 4. Enter my activation code to activate the software. Once activated, the NTFS drive “Test” is successfully mounted in read/write mode and appears in the Permissions section.
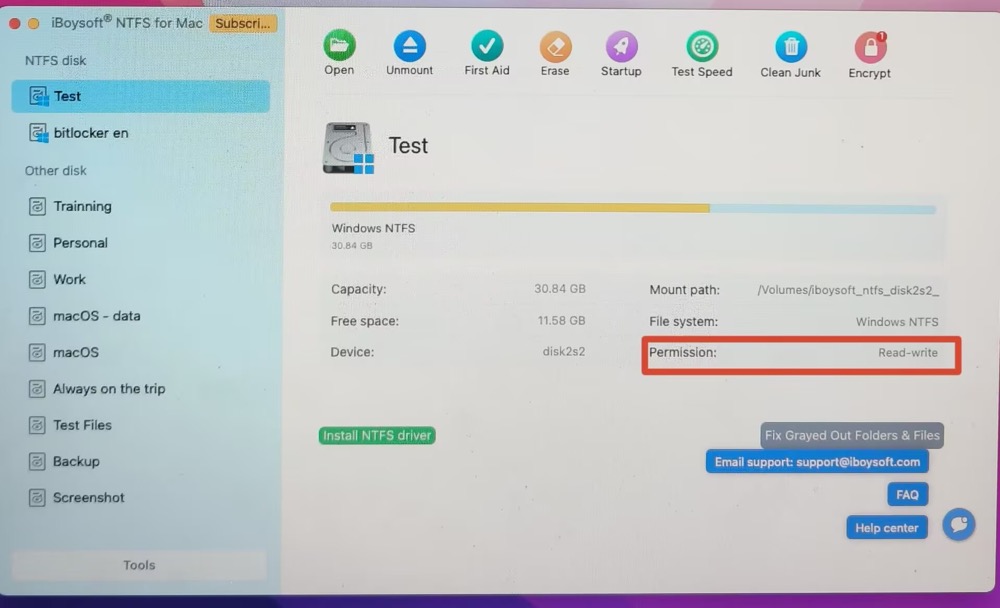
Note: In Advanced mode, the green Install NTFS Driver option appears on the home screen. You must install the NTFS driver component and enable System Extensions. In the new FSKit mode, no additional configuration is required—the NTFS drive is automatically mounted in read/write mode after installation.
Step 5. I can rename, edit, copy files from/to, or delete files in my NTFS drive.
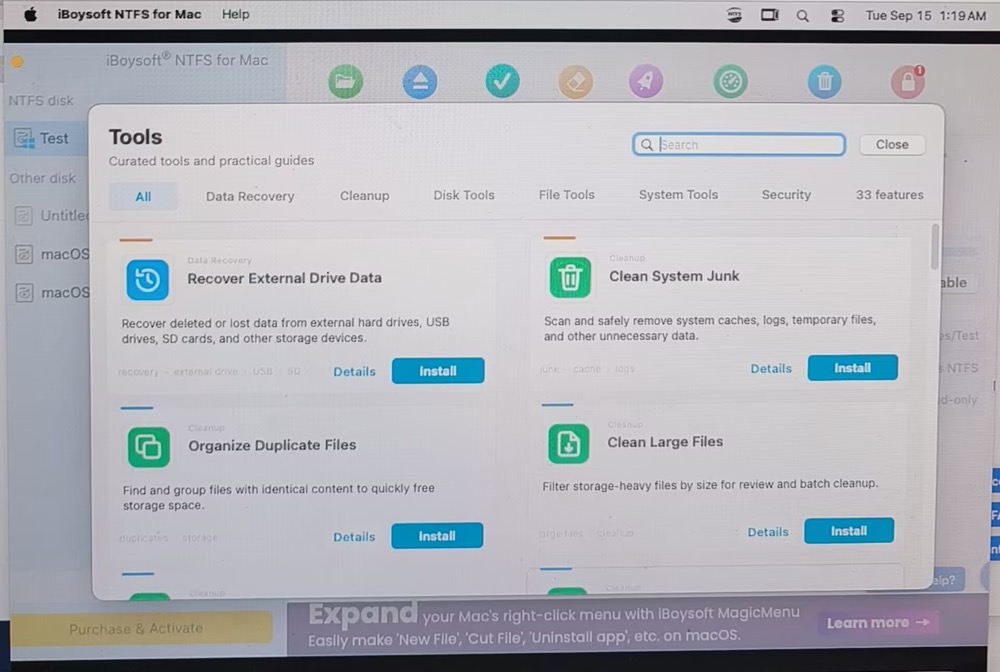
The latest version 9.0 also adds a Tools section in the lower-left corner, providing quick access to iBoysoft utilities for external-drive data recovery, macOS junk cleanup, large-file management, and BitLocker drive read/write access.
Last Resort: Erase and Reformat the External Drive
The last resort is to reformat it. Erasing the drive deletes its existing data. You ought to recover the important ones in advance if they are not backed up already.
To retrieve files from unmountable external hard drives, try iBoysoft Data Recovery for Mac. It supports the recovery of all types of files, including photos, movies, audio, Emails, archives, documents, and allows you to preview the found files for free.
It also recovers missing or lost files from corrupted, inaccessible, unreadable, or formatted external drives, compatible with macOS Golden Gate 27 or earlier versions on both Intel and Apple Silicon Macs.
Follow the steps below to recover data from the unmountable external hard drive on macOS 27:
Step 1: Download and install iBoysoft Data Recovery for Mac.
Step 2: Open the data recovery tool, select the external drive that's not mounting, and click Search for Lost Data.
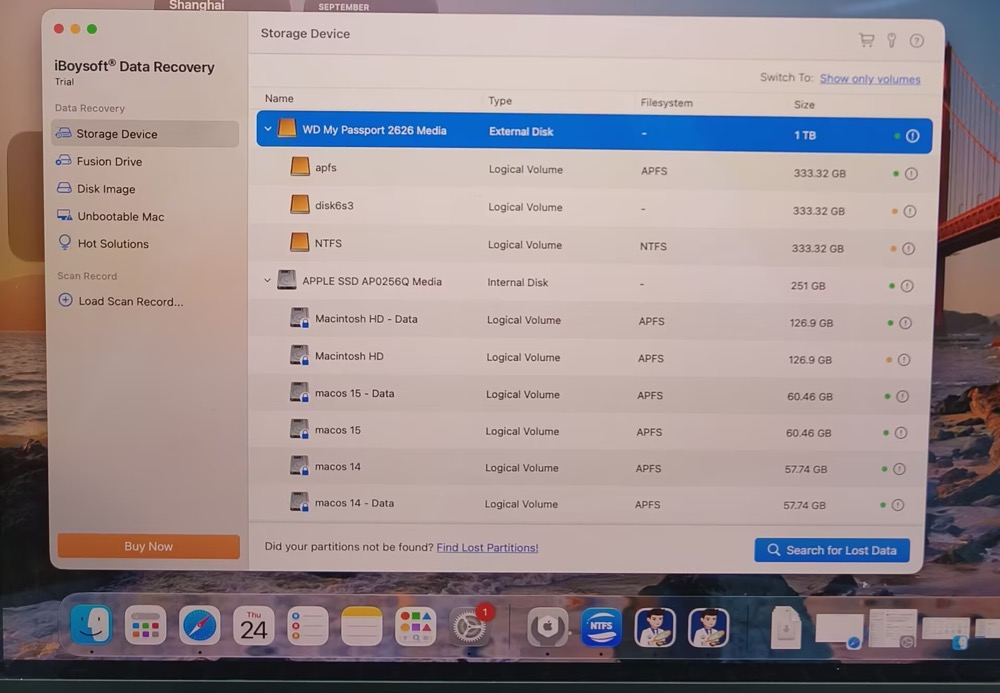
Step 3: Wait for the drive to scan. After that, preview files on your external hard drive.
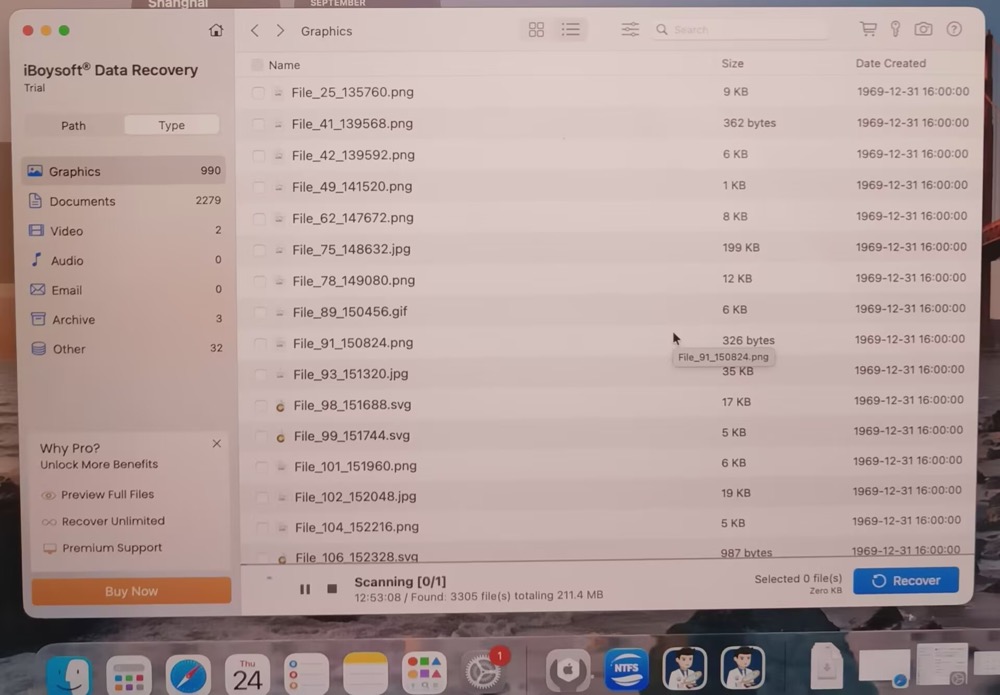
Step 4: Select the files you want to recover and click Recover to save them to a different drive.
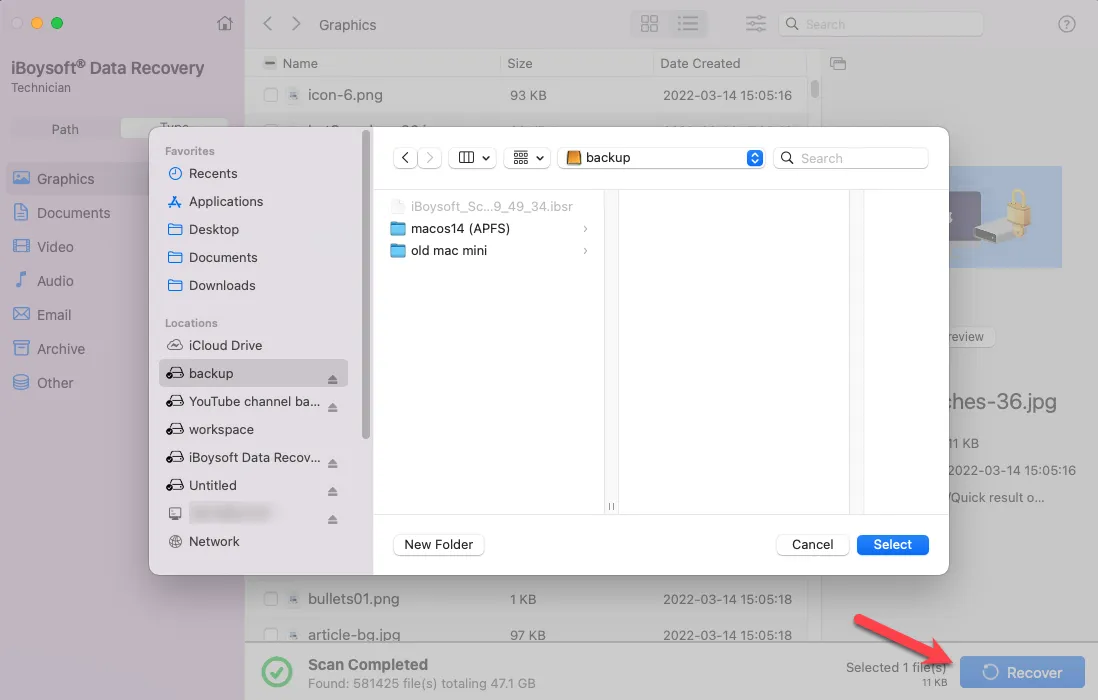
After your data is recovered, you can reformat the external hard drive on Mac to assign it a new file system that's clean and corruption-free.
FAQs
- Q1. Why does my external hard drive show in Disk Utility but not Finder?
-
A
Common reasons are:
1. The volume is not mounted.
2. Finder is hiding external drives.
3. The volume has no mount point.
4. The file system is not supported properly.
5. The file system is corrupted.
- Q2. Can First Aid fix an external hard drive that won't mount?
-
A
Yes. Disk Utility's First Aid can sometimes fix an external hard drive that won't mount, but it depends on why the volume cannot be mounted. If the drive's file-system metadata is inconsistent after an unsafe ejection, power interruption, or system crash, repairing those errors may allow macOS to mount the volume again.
Please note that First Aid cannot fix every mounting problem.
- Q3. Will reformatting fix an external hard drive that won't mount?
-
A
Yes, reformatting can fix an external hard drive that won't mount, but it should be treated as a last-resort solution because it erases the data on the volume.