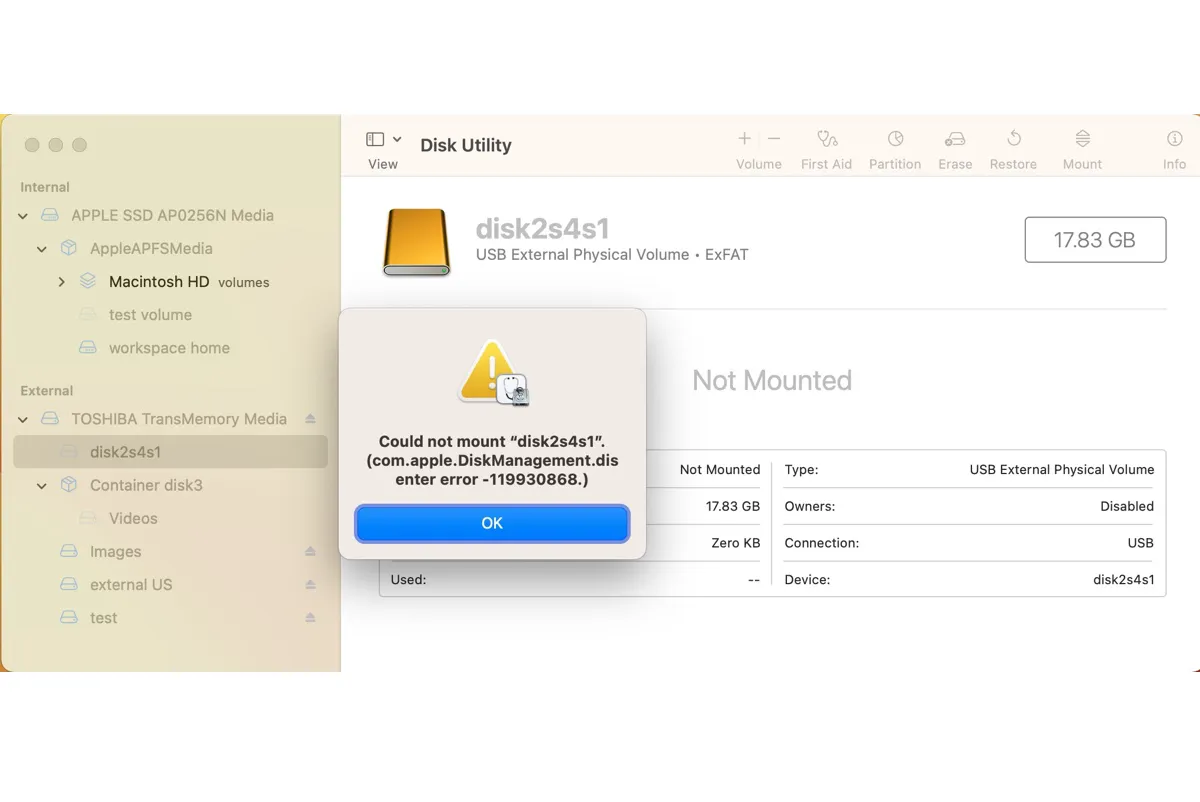
"Could not mount "drive_name". com.apple.DiskManagement.disenter error -119930868" is a Mac error that often occurs when you click the Mount button in Disk Utility in an attempt to mount an external hard drive, USB flash drive, SD card, DMG file, ISO file, etc. Though less likely, the error can also happen on internal Mac hard drives.
Tips: Apart from com.apple.DiskManagement.disenter error -119930868, it's also common to encounter:
・com.apple.DiskManagement.disenter error -119930872
・com.apple.DiskManagement.disenter error -119930874
You can apply the solutions in this post to resolve them as well, as their causes and solutions are similar to error -119930868.
When it happens, you can't access images, videos, audio, documents, and other files on your drive because your drive will be grayed out in Disk Utility and won't appear on the desktop or in Finder.
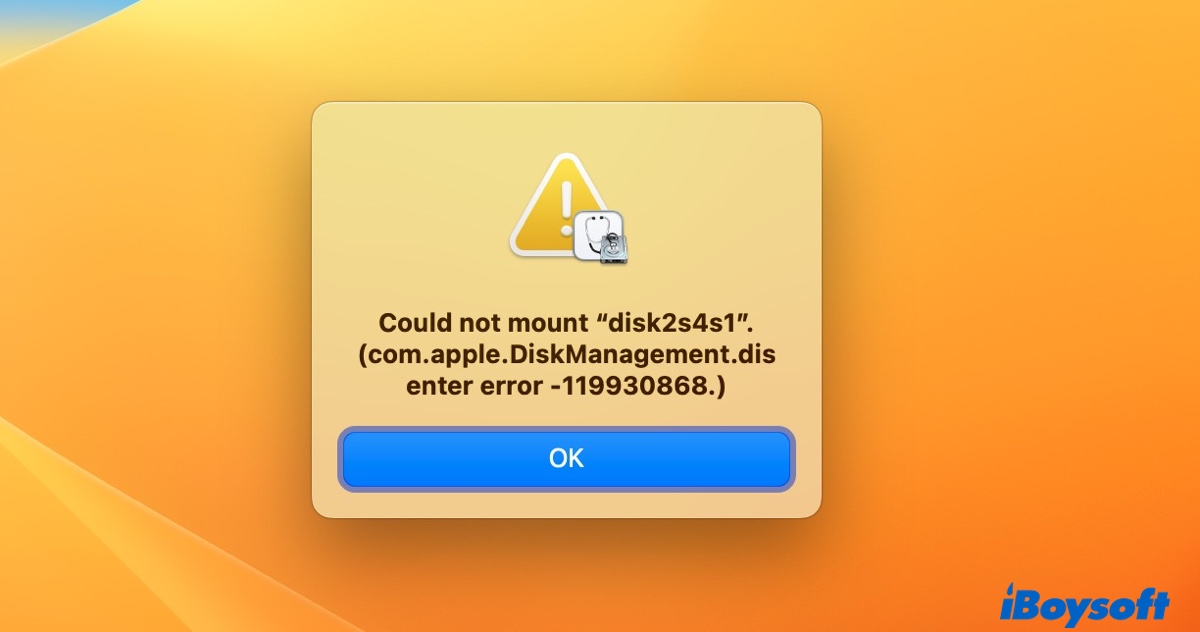
com.apple.DiskManagement.disenter error -119930868/119930872 is not specific to any version of macOS. It has been reported to show up on macOS Sequoia, macOS Sonoma, macOS Ventura, macOS Monterey, macOS Big Sur, and other macOS versions. Its full message reads like the following:
- Could not mount "disk2s1". (com.apple.DiskManagement.disenter error -119930868.)
- Could not mount "disk2s2". com.apple.DiskManagement.disenter error -119930868.)
- Could not mount "disk3s2". (com.apple.DiskManagement.disenter error -119930868.)
Here, we'll cover the proven solutions to the error to help you access your files and use your drive on Mac freely.
| Fix error 119930868/119930872 on external drives | Fix error 119930868/119930872 on internal drives |
| Solution 1: Restart your Mac Solution 2: Mount your drive with iBoysoft DiskGeeeker Solution 3: Check your external drive's file system Solution 4: Force quit fsck in Activity Monitor Solution 5: Disable antivirus programs Solution 6: Repair your drive in Disk Utility Solution 7: Mount the drive in Terminal Solution 8: Format your drive on Mac | Solution 1: Mount in Recovery Mode Solution 2: Erase the internal hard drive |
Recover data from drives triggering com.apple.DiskManagement.disenter error -119930868/119930872
If the drive that's experiencing com.apple.DiskManagement.disenter error -119930868/119930872 contains important data you don't want to lose, it's recommended to recover the inaccessible data from your unmountable drive first. You can use iBoysoft Data Recovery for Mac to get back your data.
It's a reliable data recovery tool that can retrieve photos, videos, documents, audio, and other types of data from unmountable internal and external hard drives, USB flash drives, SD cards, and more. It's also compatible with macOS Sequoia, macOS Sonoma, macOS Ventura, macOS Monterey, macOS Big Sur, and other macOS versions later than OS X Yosemite.
Besides, it allows you to preview files on unmountable drives for free and supports data recovery of drives formatted with APFS, HFS, HFSX, HFS+, FAT32, and exFAT. You can take the following steps to recover data from unmountable drives that are experiencing com.apple.DiskManagement.disenter error -119930868/119930872:
Note: If your drive is NTFS-formatted, you don't need to recover data from it. Simply download iBoysoft NTFS for Mac as said in Solution 3 of the next section, and then you can mount it in read/write mode on Mac.
Step 1: Download and install iBoysoft Data Recovery on your Mac for free.
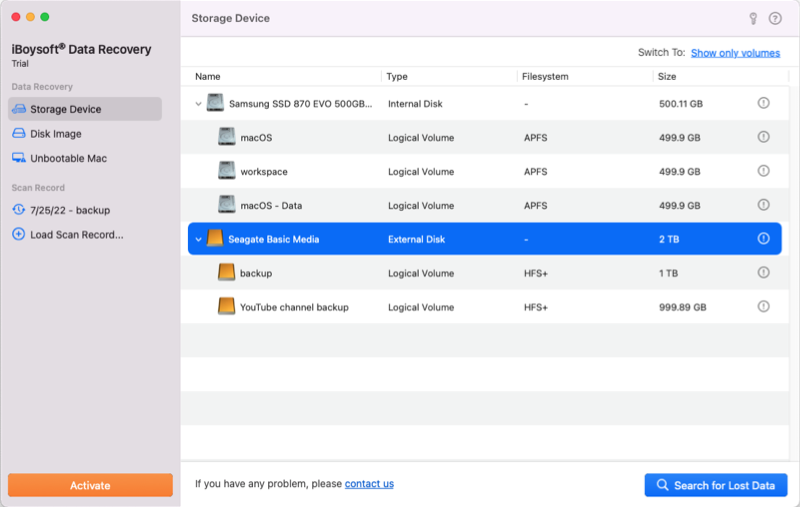
Step 2: After the software is launched, select your unmountable drive and click "Search for Lost Data."
Step 3: Wait for the scan to complete, then preview files on the unmountable drive for free.
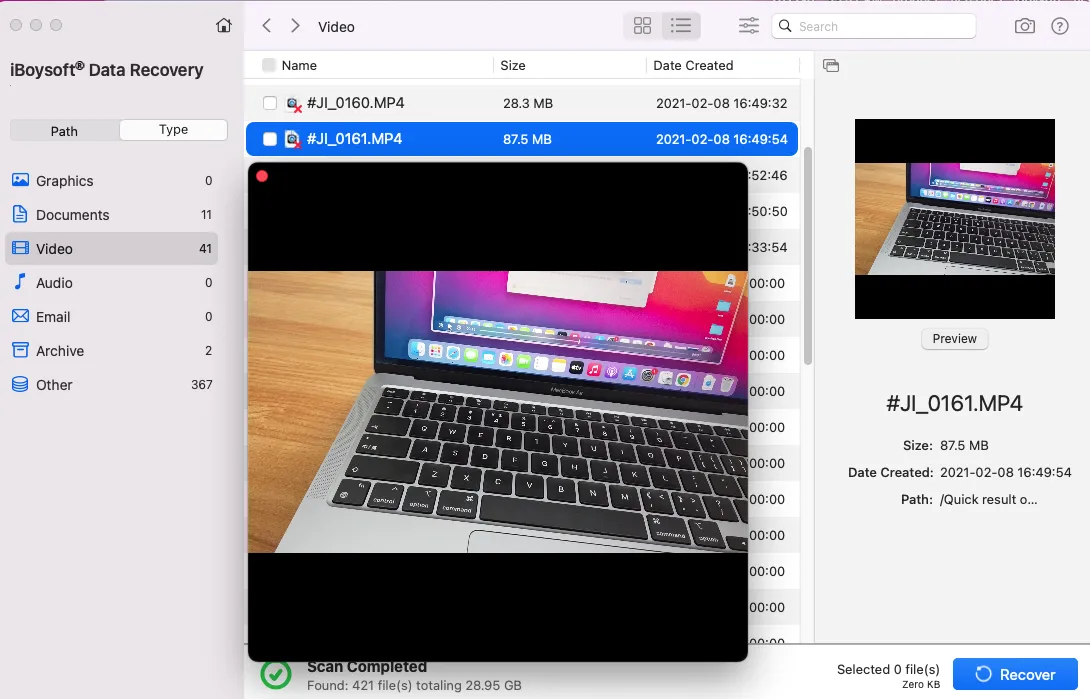
Step 4: Select the files you want to restore, click the Recover button, then choose a location to save the files.
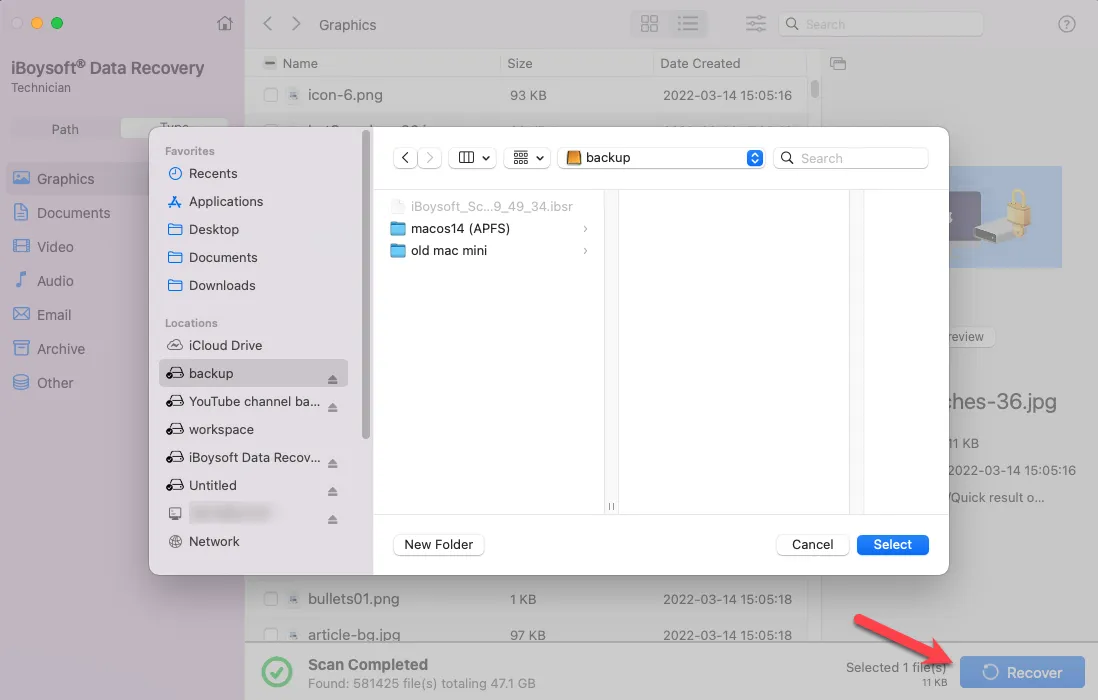
Now that your data is recovered, you can use the solutions in the next section to troubleshoot the "Could not mount com.apple.DiskManagement.disenter error -119930868/119930872" issue on macOS Sequoia/Sonoma/Ventura/Monterey/Big Sur and other releases.
Fix com.apple.DiskManagement.disenter error -119930868 on external drives
If you are unable to mount your external drive on Mac due to com.apple.DiskManagement.disenter error -119930868/119930872, you can follow the methods provided below to resolve it.
Solution 1: Restart your Mac
The first thing we recommend you try is to restart your Mac with the unmountable drive connected. This simple trick has helped many users resolve minor issues on Mac, including the mounting problems of external drives. It will clear memory, reload your operating system, and reset hardware devices like external hard drives connected to your Mac.
If that doesn't do the trick, continue reading the other solutions below.
Solution 2: Mount your drive with iBoysoft DiskGeeeker
Is your external drive BitLocker-encrypted? If it is, mounting it in Disk Utility will certainly get you the error "com.apple.DiskManagement.disenter error -119930868" because BitLocker encryption isn't supported on Mac.
A BitLocker-encrypted drive can only be mounted and accessed from an app that enables you to read and write to BitLocker drives on Mac. iBoysoft DiskGeeker is such a tool. Apart from mounting your BitLocker-encrypted drive in read-write mode, it can also mount drives formatted with NTFS, exFAT, APFS, HFS+ (Mac OS Extended Journaled), and FAT32.
Follow the steps below to unlock your BitLocker-encrypted drive on Mac:
Step 1: Download and install iBoysoft DiskGeeker for free.
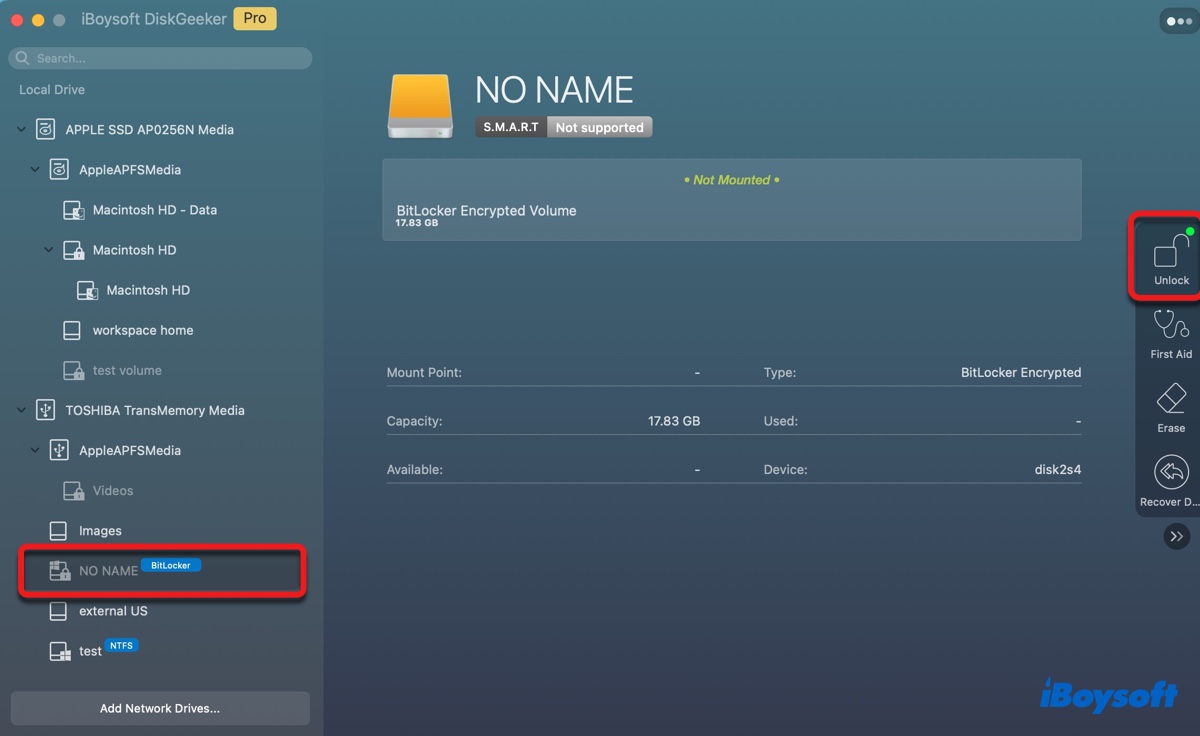
Step 2: Launch the app, select your BitLocker drive, and click Unlock.
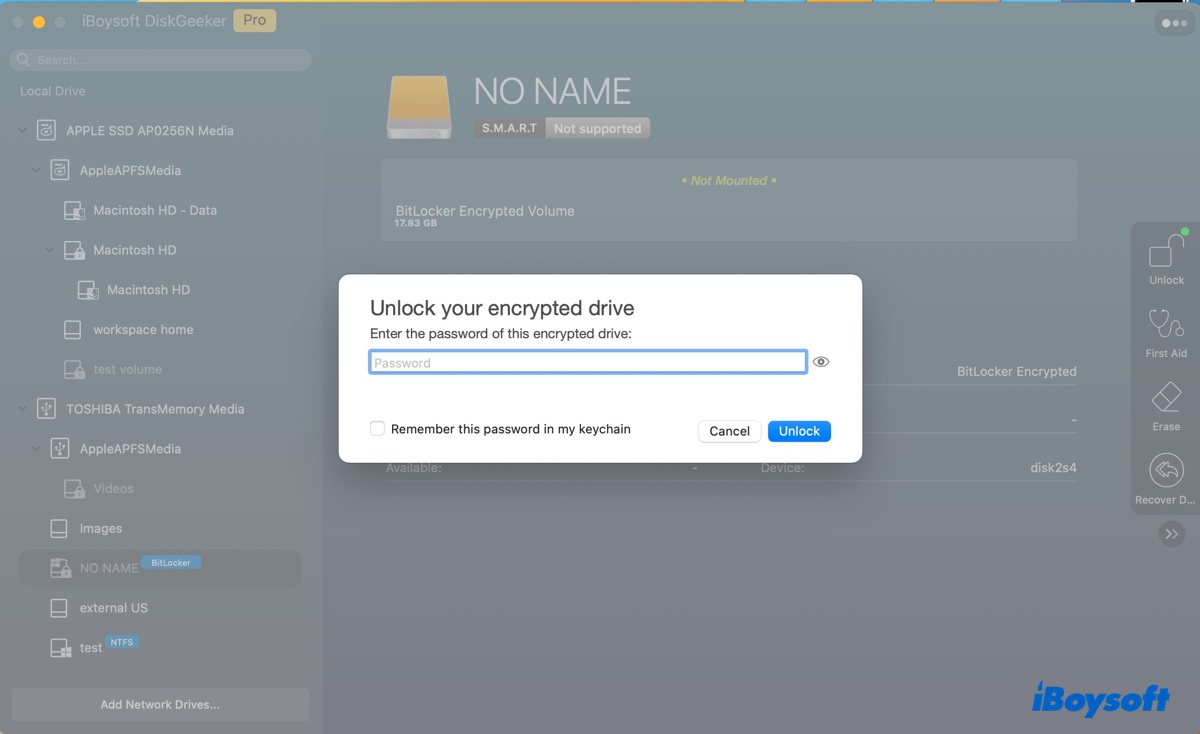
Step 3: Enter your BitLocker password and hit Unlock again.
Follow the steps below to mount non-Bitlocker drives on Mac:
Step 1: Download and install iBoysoft DiskGeeker for free.
Step 2: Launch the app, select your unmounted drive, and click Mount.
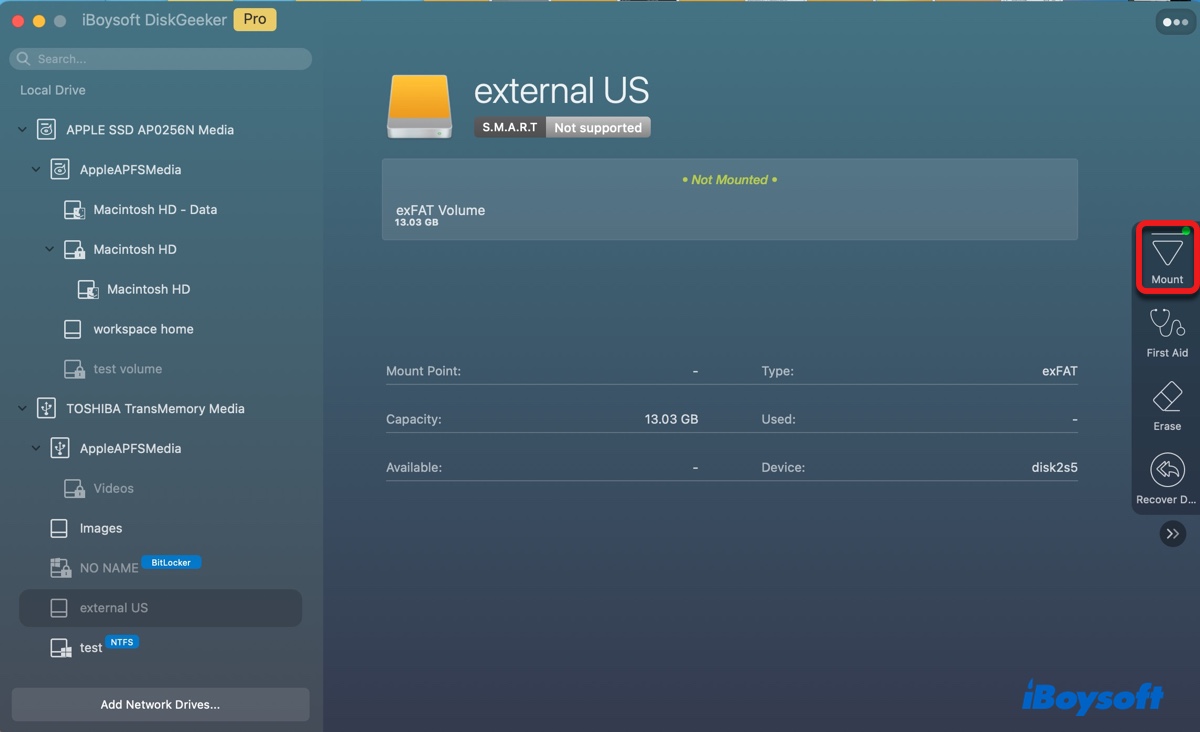
Then your drive will be mounted and you can use it on Mac as you want.
Solution 3: Check your external drive's file system
To fix com.apple.DiskManagement.disenter error -119930868/119930872, you need to know your external drive's file system. To do it, open Disk Utility, select the unmountable partition of your external drive, and check the file system information displayed under the drive name.
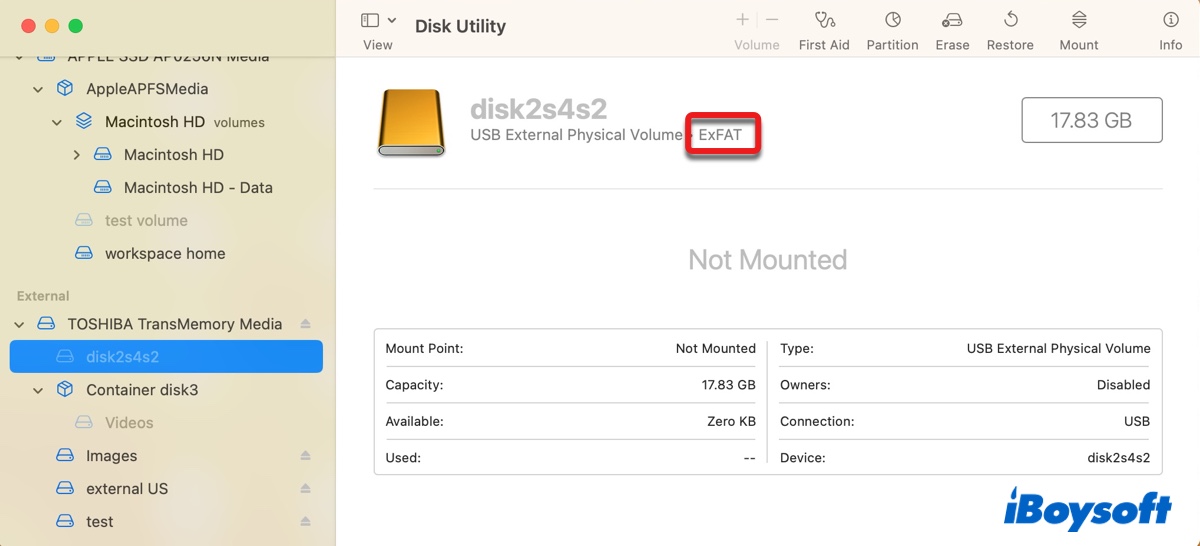
If it says NTFS, you can fix the problem with a professional NTFS for Mac driver like iBoysoft NTFS for Mac. It can mount your NTFS-formatted drives on Mac in read-write mode, allowing you to open, edit, rename, delete, and copy files to the external drive. This tool can also be used to repair NTFS drives, a feature that's not natively supported on Mac.
It will come in handy if you want to use your NTFS drives on Mac freely without losing data, as it automatically mounts your drive, saving you the time to relaunch the software after a reboot or reconnecting the drive.
If you want to give it a try, click the button below to download it for free.
#Mount NTFS drive in read-write mode on Mac #Support macOS Sequoia #Support macOS Sonoma ~ macOS High Sierra
After the NTFS driver is opened, you can check whether your NTFS drive is automatically mounted. If not, select the unmountable drive and click the Open button. You can also repair the NTFS drive by selecting it and clicking the "First Aid" button.

If your drive isn't NTFS formatted, move on to the next solution.
Solution 4: Force quit fsck in Activity Monitor
If you have disconnected the external drive on your Mac without ejecting it first, the next time you connect the drive to your Mac the fsck process will automatically run to repair it. While the fsck is running, you can't mount or use the drive.
This process may take several hours. You can give the process some time to finish its task by leaving it connected to your Mac overnight. Or, if you need to access the drive immediately, you can force quit the process in Activity Monitor.
- Open Finder, then launch Activity Monitor from the Applications/Utilities folder.
- Search fsck in the top-right search bar.
- Select the fsck process and click the x icon.
- Click Force Quit.
Solution 5: Disable antivirus programs
Some antivirus software can prevent external drives from working properly on Mac. This is because the antivirus tool may be scanning your external drive, causing it to be unmounted, or it may have a feature that blocks external drives' connections.
You can take a look at the preferences of the antivirus software and disable those that may influence your external drive. If it doesn't help, disable or uninstall the antivirus software.
Solution 6: Repair your drive in Disk Utility
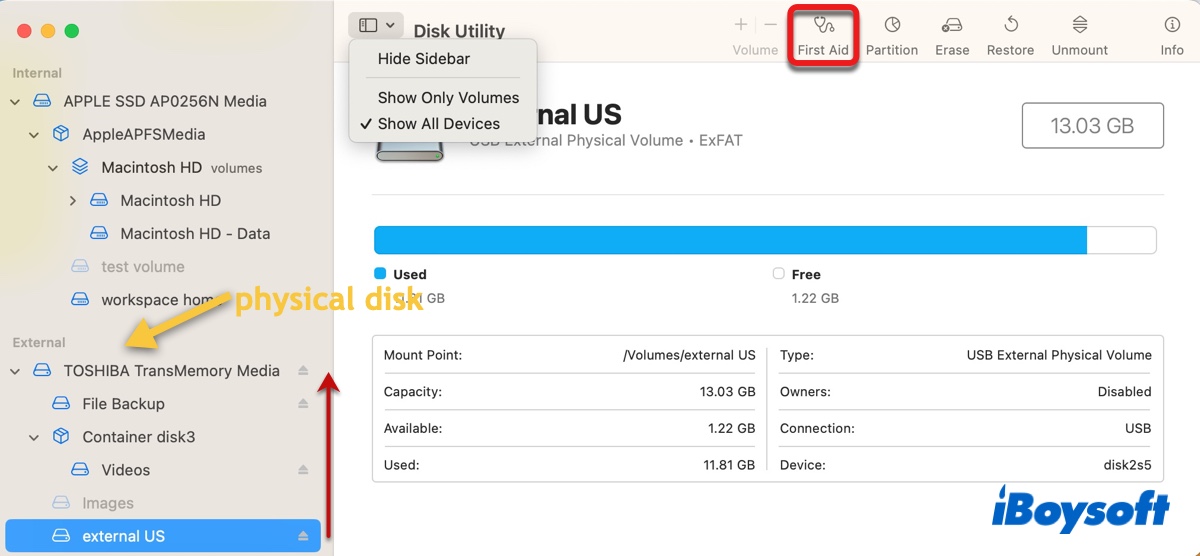
It's also a good idea to repair your external drive in Disk Utility. Its First Aid feature can check and repair disk errors related to the formatting and directory structure of your external drive. Here's how to use it:
- Open Disk Utility.
- Click View > Show All Devices.
- Select the last partition of your external drive and click First Aid > Run.
- After this partition is repaired, continue checking the next partition until the physical disk is repaired.
Solution 7: Mount the drive in Terminal
Terminal is the command-line interface of your operating system. Through the correct commands, it will also allow you to mount drives on Mac. If you're not familiar with the usage of commands, read the following steps carefully before executing them.
- Launch Terminal from the Applications/Utilities folder.
- Type the following command and press Enter to list all devices on your Mac.diskutil list
- Note down the disk identifier of your unmounted drive or partition, such as disk2 or disk2s3.
- Input the following command and press Enter to mount your drive. (Replace disk_identiifer with your disk or partition's identifier.)
To mount a drive:diskutil mountDisk disk_identifier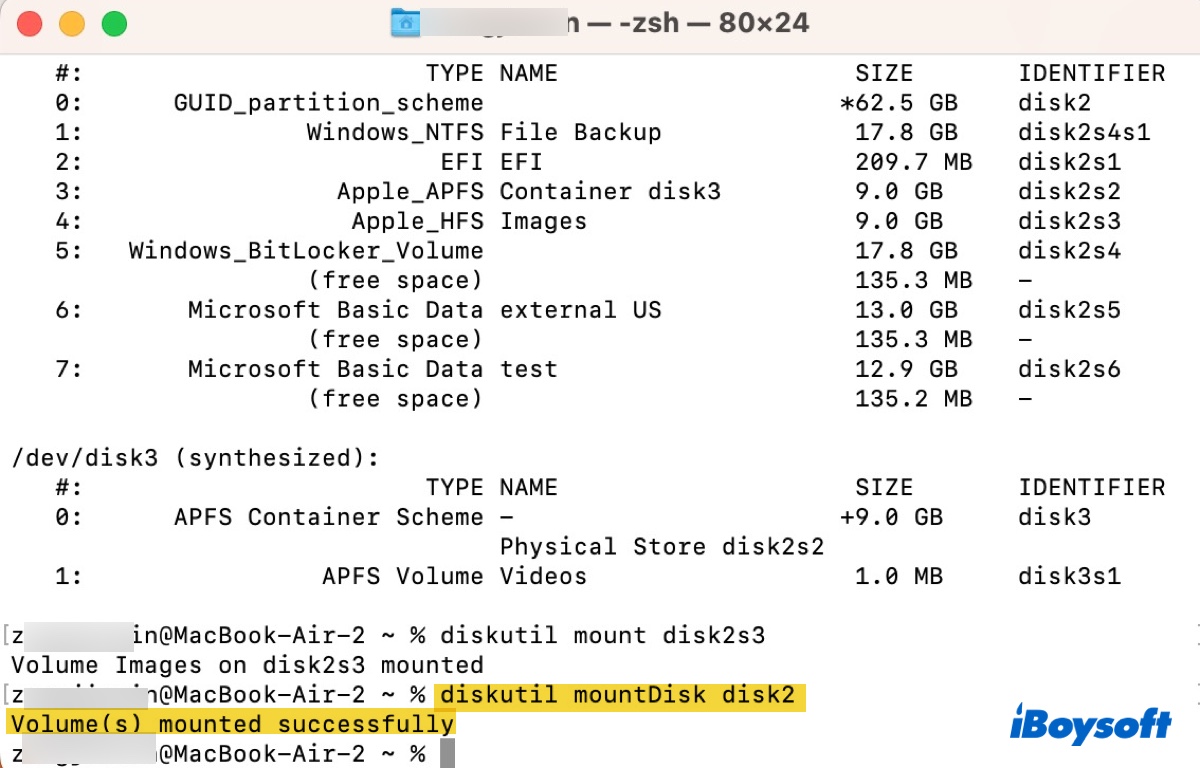
To mount a partition:diskutil mount disk_identifier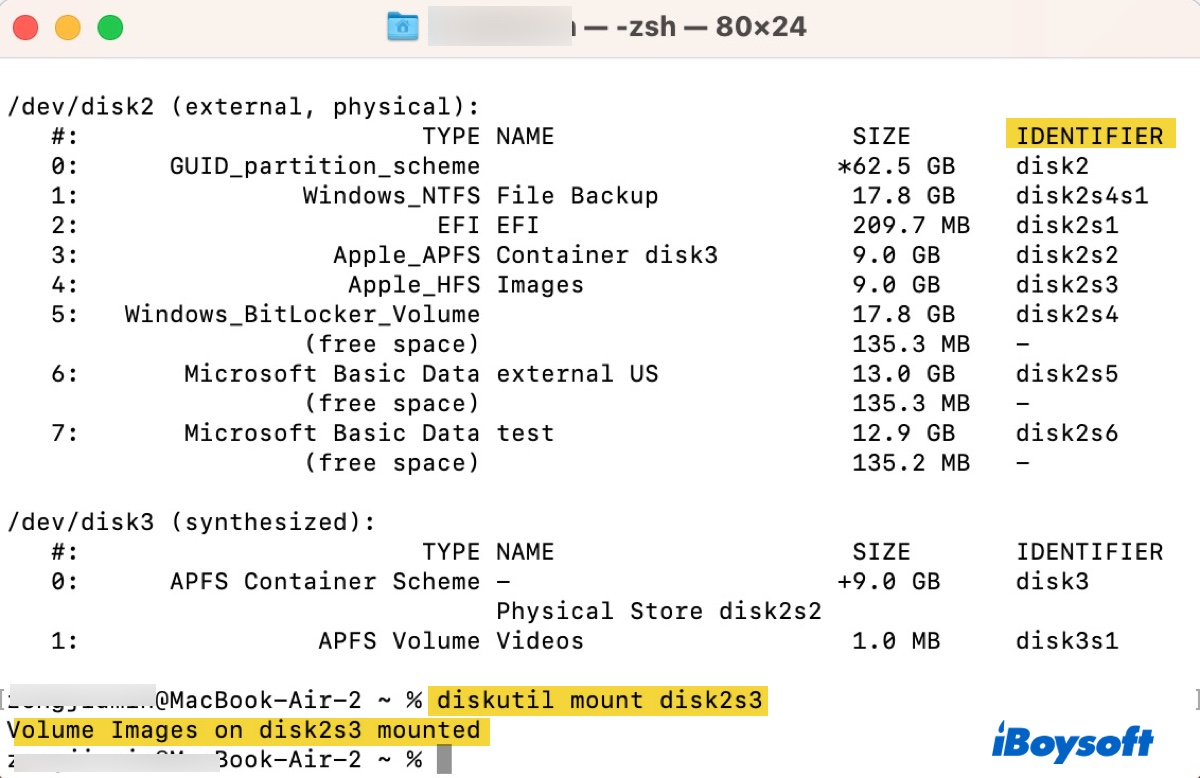
Solution 8: Format your drive on Mac
If your external drive still won't mount, the last resort is to format your drive in Disk Utility. This will resolve file system corruptions that may cause com.apple.DiskManagement.disenter error -119930868/119930872 to appear. Besides, if your drive is formatted with exFAT on a Windows PC, its allocation unit size may not be compatible with Mac and needs to be reformatted. (Learn more about exFAT drive not mounting on Mac)
Be reminded that formatting a drive will erase all data on it. Therefore, if you haven't restored your files, it's advisable to download iBoysoft Data Recovery for Mac from the button below to secure them first.
How to format the unmountable drive on Mac:
- Launch Disk Utility.
- Click View > Show All Devices.
- Select the physical disk of your unmountable external drive and click Erase.
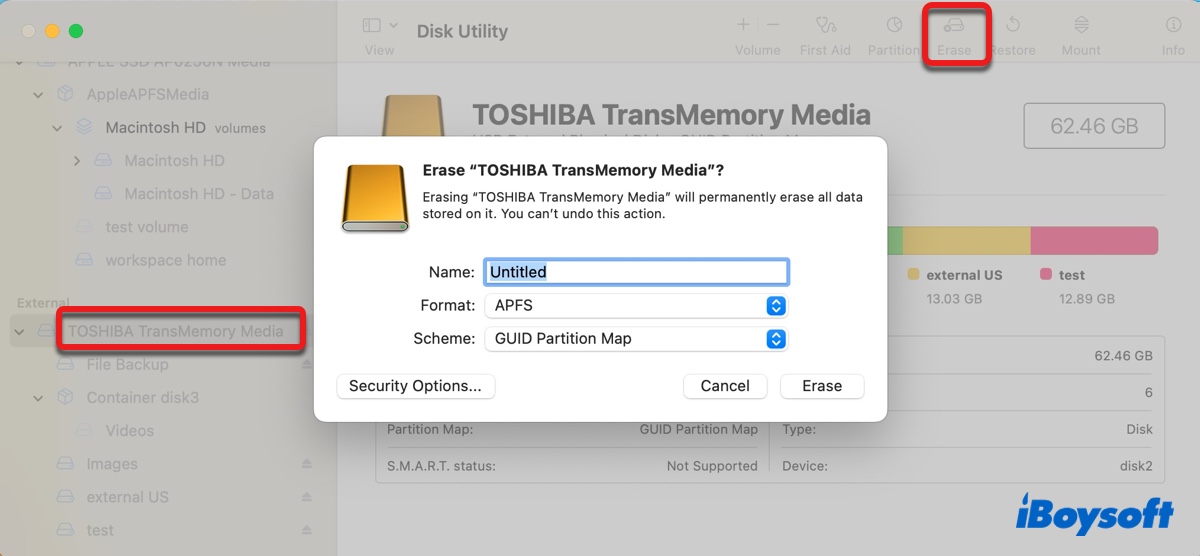
- Give your drive a name.
- Select a proper file system.
- Choose GUID Partition Map as the scheme.
- Click Erase.
Hopefully, you can now mount your drive without any problem. If you find this article useful, please share it.
Fix com.apple.DiskManagement.disenter error -119930868 on internal drives
If you get the error "Could not mount com.apple.DiskManagement.disenter error -119930868" when trying to mount your internal Mac hard drive, boot into macOS Recovery Mode, then retry mounting the drive. Follow the steps below:
Boot an Intel-based Mac into macOS Recovery Mode:
- Shut down your Mac.
- Press the power button, then immediately press and hold the Command + R keys.
- Release the keys when seeing the Apple logo.
Boot an Apple Silicon (M1 & M2) Mac into macOS Recovery Mode:
- Shut down your Mac.
- Press and hold the power button until "Loading startup options" appears.
- Click Options > Continue.
Select a partition and enter the administrator password if asked. When you see the macOS Utilities window, click Disk Utility > Next. Then select the unmounted partition and click Mount.
If you still can't mount the partition, consider erasing the internal disk. This will delete everything on your Mac. If there're files important on your Mac, back them up before proceeding. Suppose you want all data intact, make a Time Machine backup.
After your data is secured, you can erase your internal hard drive with the following steps:
- Restart your Mac into Recovery Mode.
- Inside Disk Utility, click View > Show All Devices.
- Select the physical disk of your internal hard drive. (The top-level disk, possibly labeled with APPLE SSD)
- Click the Erase button.
- Name the internal hard drive.
- Set the format to APFS.
- Set the scheme to GUID Partition Map.
- Click Erase again.
- When the erase process is complete, you can exit Disk Utility and click "Reinstall macOS" to install the operating system again.
Hope you find it helpful!
Why do you see com.apple.DiskManagement.disenter error -119930868/119930872?
Here are some of the common reasons behind com.apple.DiskManagement.disenter error -119930868/119930872:
- Incompatibility issues with NTFS
- Unsupported exFAT allocation unit size
- Corrupted drive
- Temporary system bugs
- BitLocker encryption
- fsck is repairing your drive
- Third-party programs blocking connections
Which one do you suspect is the cause? Share this article!
FAQs about com.apple.DiskManagement.disenter error -119930868
- QHow do I fix my external hard drive not mounting on Mac?
-
A
If your external hard drive is not mounting on Mac, you need to check whether it's NTFS-formatted or BitLocker-encrypted. If it is, use the appropriate software to mount or unlock your drive. If not, repair your drive in Disk Utility, mount it in Terminal, or reformat your drive as described in this article.
- QHow do I force a hard drive to mount on a Mac terminal?
-
A
To force mount a hard drive in Mac's Terminal app, run the following command after replacing disk_identifier with your unmountable disk's identifier: diskutil mountDisk disk_identifier.
- QHow do I remount my external hard drive on Mac?
-
A
If your external hard drive isn't NTFS-formatted or encrypted by BitLocker, you can normally remount it in Disk Utility by selecting it and clicking the Mount button.
- QWhat is mounting a disk on Mac?
-
A
Mounting a disk on Mac allows you to access its content from your desktop or the Finder's sidebar.
