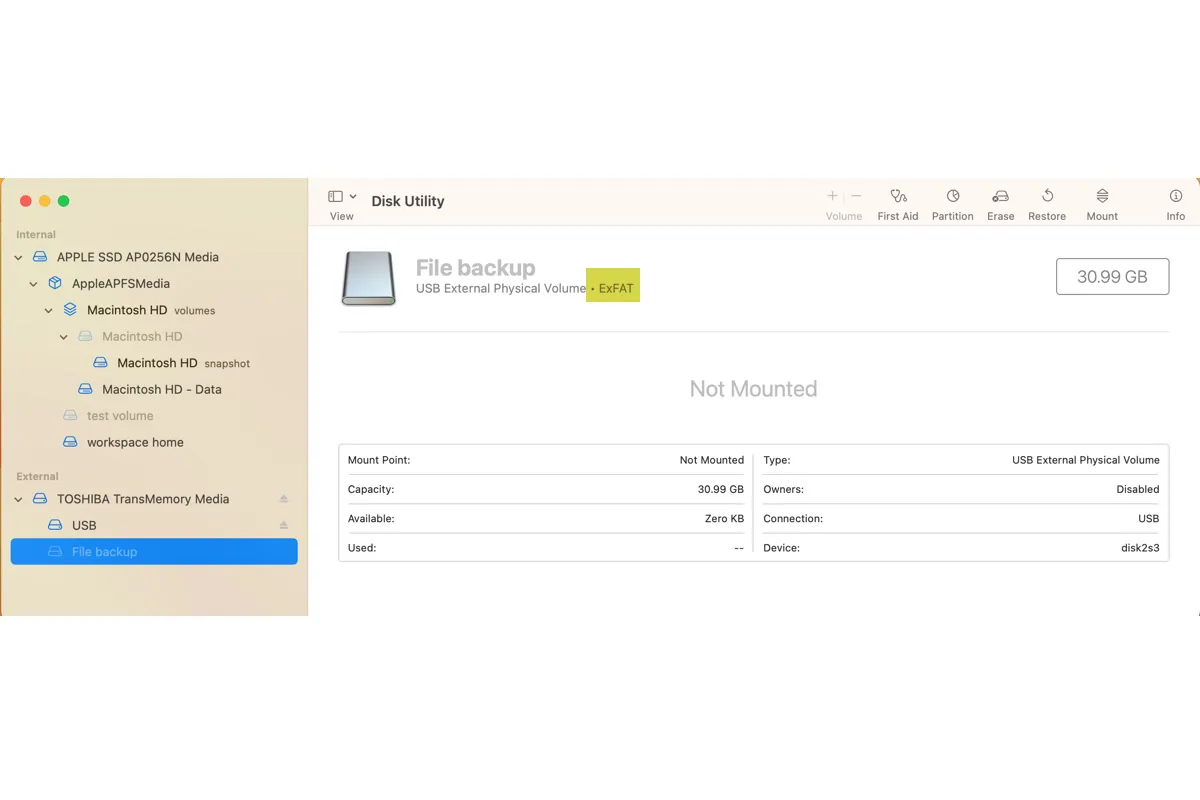
Many users have reported experiencing issues regarding exFAT drives, such as exFAT drive not mounting on Mac, exFAT not readable on Mac, or exFAT not showing up on Mac. The former is easier to deal with as the exFAT drive is at least detected by your Mac and is usually free of physical damage. However, the latter two are more complex. It could be a serious hardware problem or a simple configuration issue.
Here, we'll discuss these problems in detail and help you mount exFAT on Mac.
Recover data from an exFAT drive that's not mounting on Mac
If your exFAT drive contains valuable data you can't afford to lose, but you can't mount the disk on Mac, you should back it up before moving forward, as running repairs on the drive may cause data loss.
Try connecting it to a Windows PC. If your PC mounts it properly, you can open the drive and copy the important files to a safe location. If you don't have a PC around or your drive doesn't work on the PC, you can recover the inaccessible data using iBoysoft Data Recovery for Mac.
It's a reliable data recovery app capable of retrieving files from unmountable, inaccessible, corrupted, and unreadable exFAT drives on Mac. You can use it to restore data from exFAT external hard drives (HDDs & SSDs), USB flash drives, SD cards, etc that are not mounting on Mac.
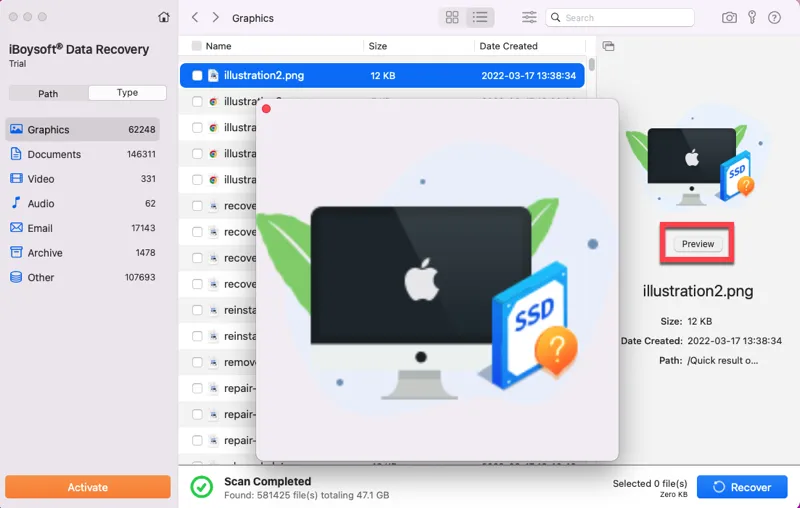
It also allows you to preview recoverable files for free. Here are the simple steps to get back data from the unmountable exFAT drive on Mac:
Step 1: Download and install iBoysoft Data Recovery for Mac.
Step 2: Launch the software, select your unmountable exFAT drive, and click "Search for Lost Data."
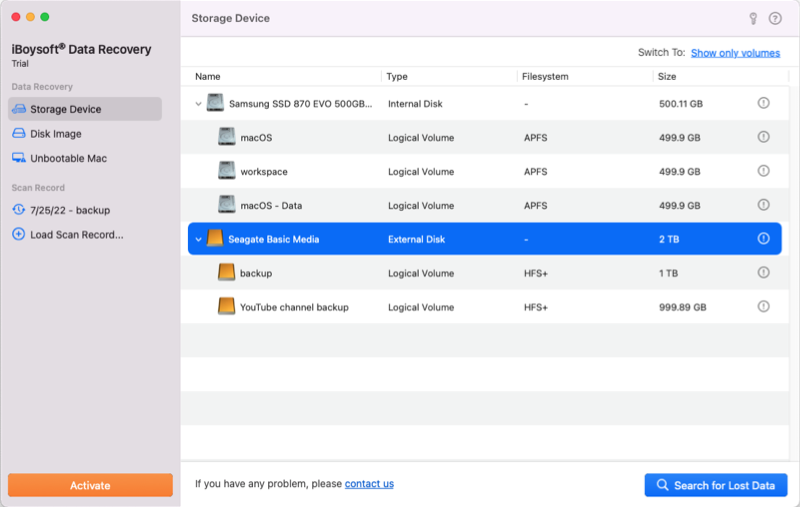
Step 3: Filter and preview found files.
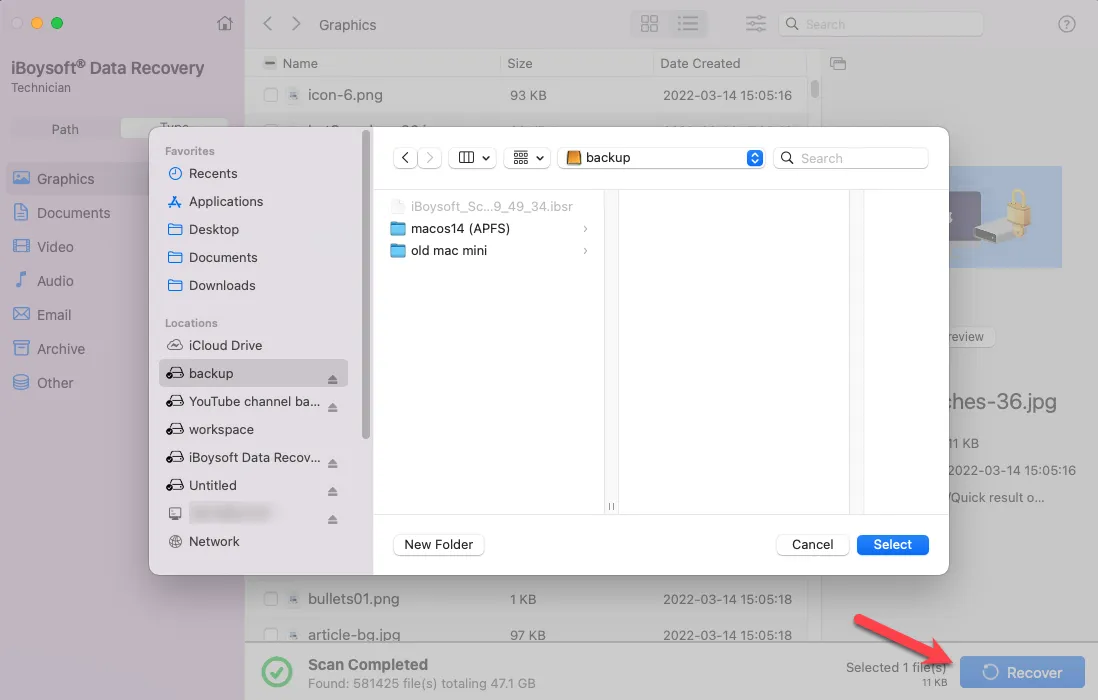
Step 4: Tick the boxes before the files you want to recover, then click the Recover button and save them to a different location that's not the unmountable drive.
Did you recover the lost data? Share these steps to help more Mac users.
How to read exFAT on Mac?
If you're not familiar with the exFAT file system, you may have the question "Can Mac read exFAT?"
The answer is YES. Mac can read exFAT and write data to it. Usually, if an exFAT drive is connected to your Mac, you can open it by double-clicking its icon on the desktop or Finder's sidebar to edit its files. However, if the exFAT drive doesn't mount, it won't show up on the desktop, appearing unreadable.
Mac cant read ExFat
by u/_-_beyon_-_ in MacOS
The user in the Reddit post above also encountered the issue of exFAT not readable on Mac and figured that it was because the drive was formatted in Windows. It's indeed an important factor but other issues can also render Mac not reading exFAT drive. Read the next section to find out!
Why is your exFAT drive not mounting on Mac?
There are tons of posts online discussing the issue of the exFAT drive not mounting on Mac. Through further research, you will notice the exFAT drive mounting issue resulting from various causes. Here are some of the common ones:
- Unsupported exFAT allocation unit size by Mac.
- Drive corruption due to improper ejection, paused file transfer, etc.
- Faulty USB cable or port.
- Software glitches.
- Broken hard disk enclosure.
How to fix exFAT drive not mounting on Mac?
If you notice your exFAT drive grayed out in Disk Utility and doesn't show up on the desktop or in Finder, it means that your Mac can't mount it correctly. The issue can happen to exFAT drives (external hard drives, USB sticks, SD cards, etc) of any brand, such as Lacie, WD, Seagate, Toshiba, and so on.
Some found the exFAT disk not mounting on Mac after updating to macOS Ventura or other versions, after being improperly ejected, or going through other triggers. Others reported the issue came out of nowhere. Regardless, you can use the following solutions to mount exFAT external drives on macOS. Keep your exFAT drive connected and let's begin.
Try some basic troubleshooting tips
In some occasions, what renders the exFAT external hard drive not mounting on Mac is the cable, USB port, adapter, hard disk enclosure, or other things participating in the mounting process of your drive. So, it's a good idea to try the following tips before carrying on further.
- Try a different adapter or use no adapter.
- Switch to a different USB cable or port.
- Unplug unnecessary peripherals connected to your Mac.
- Use a new hard disk enclosure that's supported on Mac.
Manually mount exFAT drive in Disk Utility
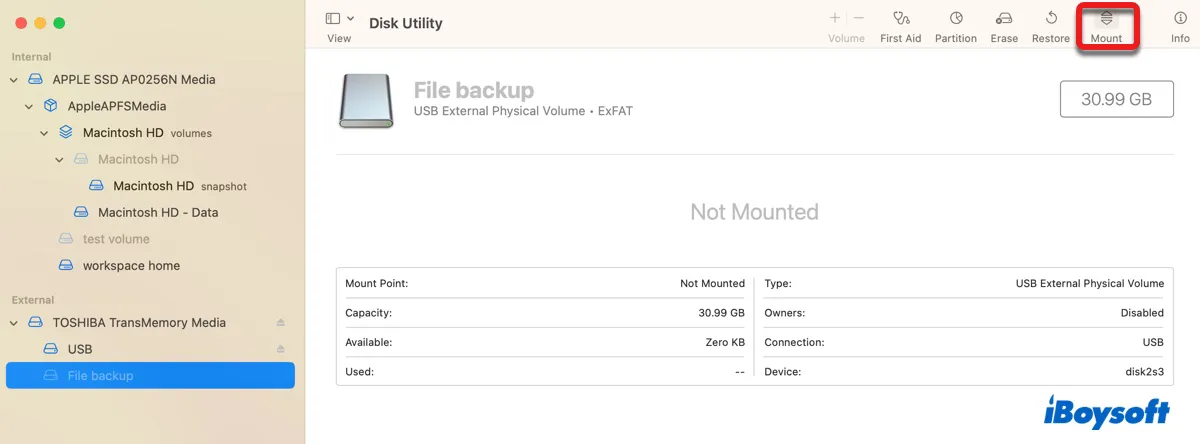
If your exFAT drive is not mounted on Mac, try manually mounting it in Disk Utility. Select your exFAT drive, then click the Mount button in the toolbar. If it mounts your drive correctly, congratulations. If it does nothing or prompts an error like com.apple.DiskManagement.disenter error 49244 or com.apple.DiskManagement.disenter error 49223, keep reading the other solutions below.
Mount exFAT disk on Mac using Terminal
If you can't mount the exFAT drive through Disk Utility, try it on the command-line interface using the Terminal app. This has helped many with the mounting issue. You can take the steps below to mount the exFAT disk on Mac. Note that you need to hit the Enter key after typing each command to execute it.
How to mount exFAT on Mac in Terminal:
- Launch Terminal from the Applications > Utilities folder.
- Copy and paste the following command in Terminal to list all drives connected to your Mac.diskutil list
- Locate the identifier of your exFAT disk or partition.
- Run the following command to mount your exFAT drive or partition.
To mount a disk:diskutil mountDisk /dev/identifierIf the identifier of your exFAT disk is disk2, the command should be: diskutil mountDisk /dev/disk2.
To mount a partition:diskutil mount /dev/identifierIf the identifier of your exFAT partition is disk2s3, the command should be: diskutil mount /dev/disk2s3.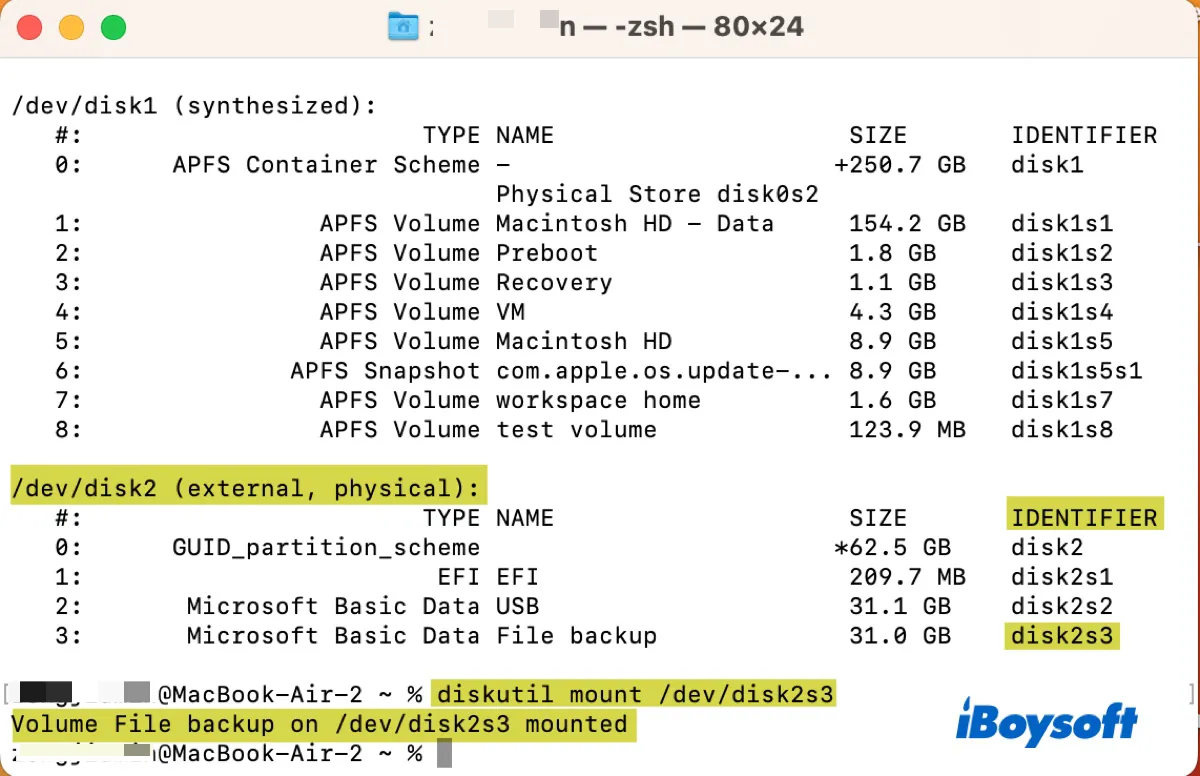
If the command runs successfully, Terminal will return a message saying the drive is mounted. If not, try mounting it in readOnly mode by following the steps in this guide: How to (Force) Mount External Hard Drive on Mac? (Terminal)
Kill the fsck process
If your exFAT disk is removed without ejecting before, macOS will try to repair it with the fsck process the next time its plugged in. However, the fsck process will also prevent your exFAT disk from being mounted on Mac.
You can wait until it's finished but that may take some time. Some mentioned their exFAT drive automatically mounted after one hour or six hours.
If you need to access your exFAT drive immediately, do the following:
- Open Terminal.
- Execute the command below to check whether fsck is hijacking your drive.ps aux | grep fsck
- If it is, use the command below to quit fsck.sudo pkill -f fsck
- When it asks you for the administrator password, type it in and press the Enter key.
Repair exFAT drive on Mac
macOS can't mount exFAT drives that are corrupted. You can run First Aid to check whether your drive has file system errors and repair them if possible. Follow the steps below to repair exFAT drive on Mac:
- Open Disk Utility.
- Select the exFAT drive from the left sidebar.
- Click First Aid > Run.
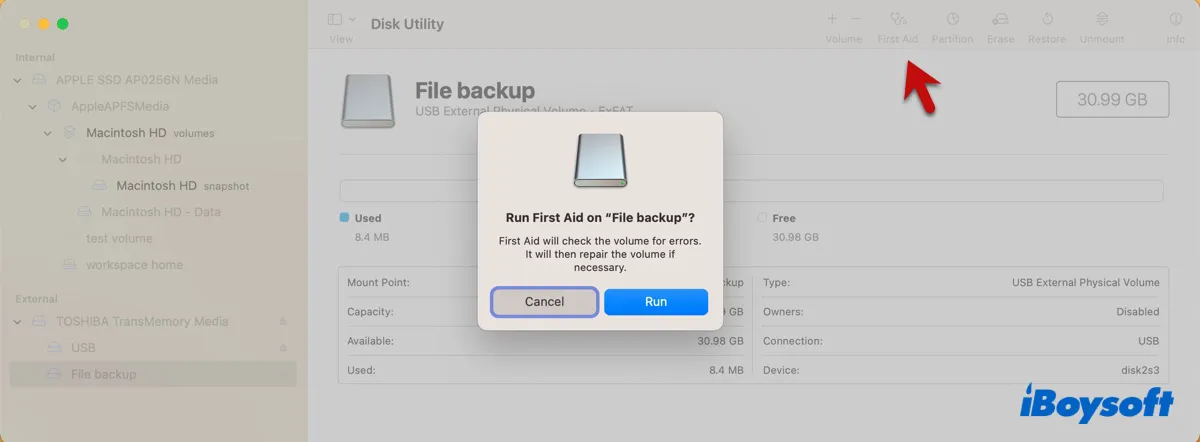
After completing the First Aid process, you can click Done to close the window. Then check if your exFAT drive is mounted. If First Aid found errors it can't repair, you can reformat the drive on Mac after recovering data, as it's the most effective way to eliminate drive corruption.
Repair exFAT drive on Windows
You can also repair the exFAT drive on your Windows PC. Usually, it will ask you to repair the drive if it has detected corruption right after it's connected to your computer. If not, you can manually check and repair it, as guided below.
- Open File Explorer.
- Click on This PC from the left pane.
- Right-click your exFAT drive and select Properties.
- Select the Tools tab.
- Click the Check button under "Error checking."
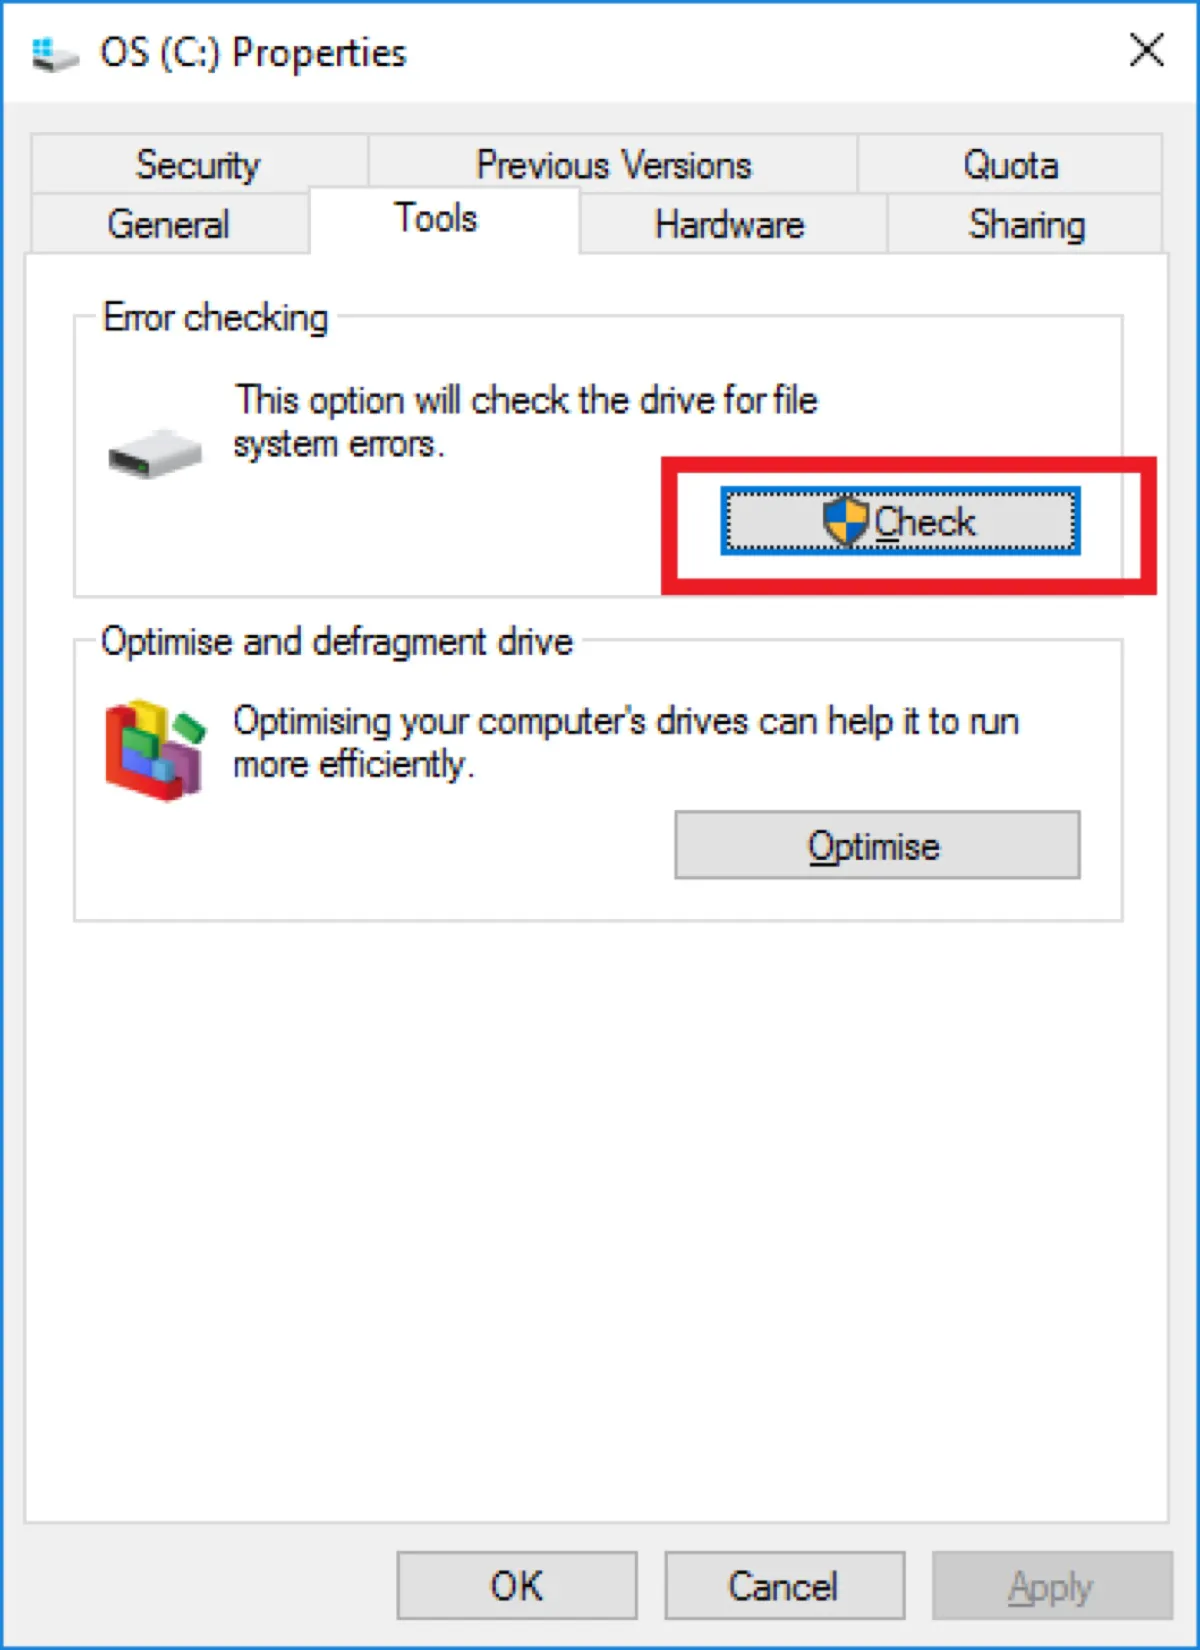
- Tap on the "Scan Drive" option.
Reformat the exFAT drive on Mac
It's not uncommon to see large exFAT external hard drives formatted on Windows to be unmountable on Mac. And the reason behind it is an incompatible exFAT allocation unit size. The allocation unit size, also called cluster size, is the smallest amount of disk space that can be used to save a file.
When Windows formats a drive with a large capacity like 4 TB or above in exFAT, it will format it using the 2048 KB or higher allocation unit size by default, which is incompatible with macOS which can only natively mount exFAT drives with cluster size from likely 512 bytes to 1024 KB, based on user's tests.
There's no official documentation of the default exFAT allocation unit size on Mac but it seems that the supported allocation unit size of a specific capacity is also restricted. According to users, Macs will default a 5 TB exFAT drive to 256 K and will not mount the 5 TB drive if its allocation unit size is less than 128K and greater than 1024K.
While Windows supports all the allocation unit sizes available, macOS certainly doesn't. Therefore, it's always recommended to format a drive on macOS if you want to use it between Windows and macOS. Naturally, you can reformat your exFAT drive to change the allocation unit size to one that works on macOS to fix the mounting issue.
Here's how to fix your exFAT drive not mounting on Mac: (Ensure your data are backed up first.)
- Launch Disk Utility.
- Click View > Show All devices.
- Select your exFAT drive or partition and click Erase.
- Modify the name if you want.
- Keep the format to ExFAT if it's needed on macOS & Windows. Otherwise, choose APFS or Mac OS Extended (Journaled).
- (Only available when selecting a disk.) Set GUID Partition Map as the scheme.
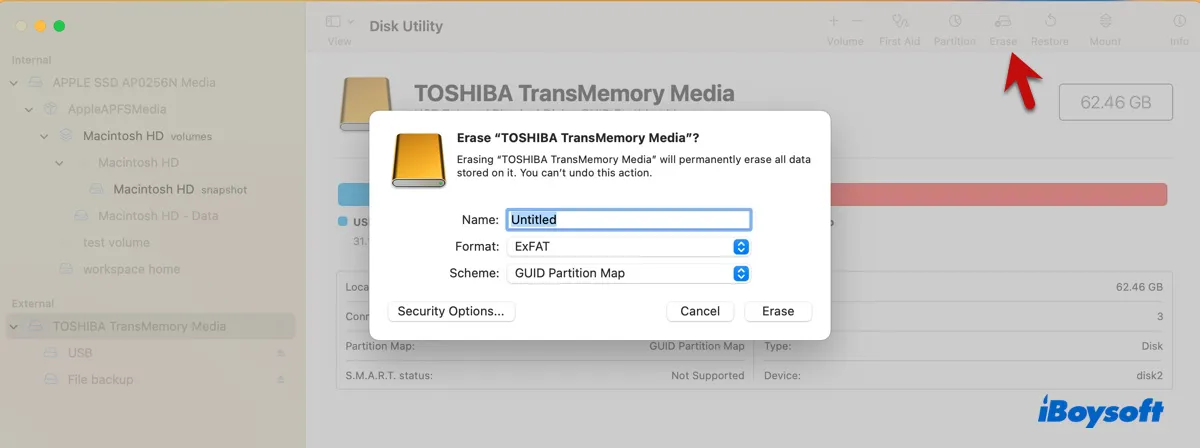
- Click Erase.
Now, you can see your exFAT drive mounted in Disk Utility. If Disk Utility won't let you erase the drive, repeat the process with a different format. If it succeeds, you can format your drive back to exFAT.
Note: If the drive is meant for both macOS and Windows, you can plug it into your Windows PC to see if it works as well. If it doesn't, try formatting it on Mac again with Master Boot Record.
If you're curious, you can check the allocation unit size of your exFAT drive on Mac in Terminal.
- Open the Terminal app.
- Execute the following command and note down the identifier of your exFAT disk or partition.diskutil list
- Run the following command to view the exFAT allocation unit size.diskutil info /dev/identifier | grep "Block Size"If the identifier of your exFAT partition is disk2s3, change the command to diskutil info /dev/disk2s3 | grep "Block Size".
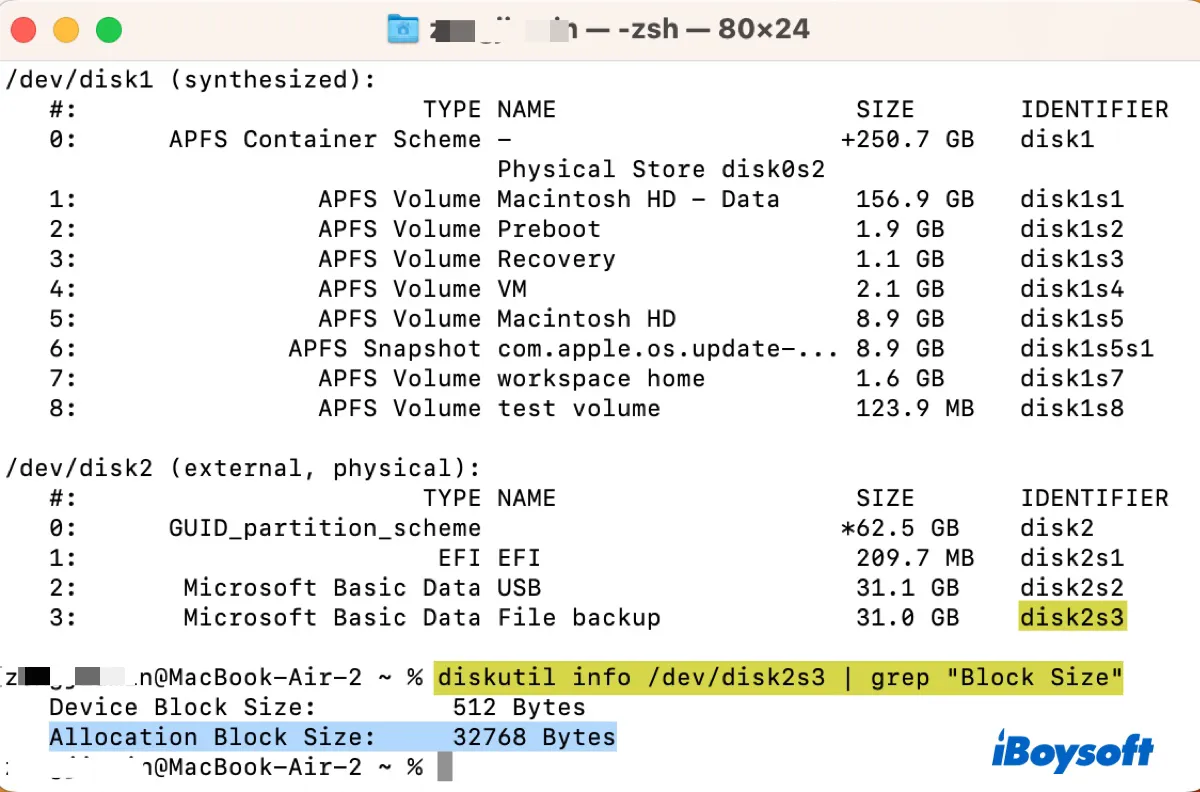
- View the value of "Allocation Block Size."
Were you able to mount exFAT on Mac? If so, share these solutions to help others fix exFAT not working on Mac.
How to fix exFAT not showing up on Mac?
When you find exFAT drive not showing up on the desktop and in Finder, you need to check whether it appears in Disk Utility.
If your exFAT drive shows up in Disk Utility but is grayed out, it is recognized but not mounted. In this case, you can take the solutions in the section above to fix them.
If your exFAT drive shows up in Disk Utility and looks all good, the problem lies in your Finder preferences. You can edit them to show your exFAT drive on the desktop and in Finder.
- Open Finder.
- Click Finder > Preferences/Settings > General from the top-left menu bar.
- Select "External disks."
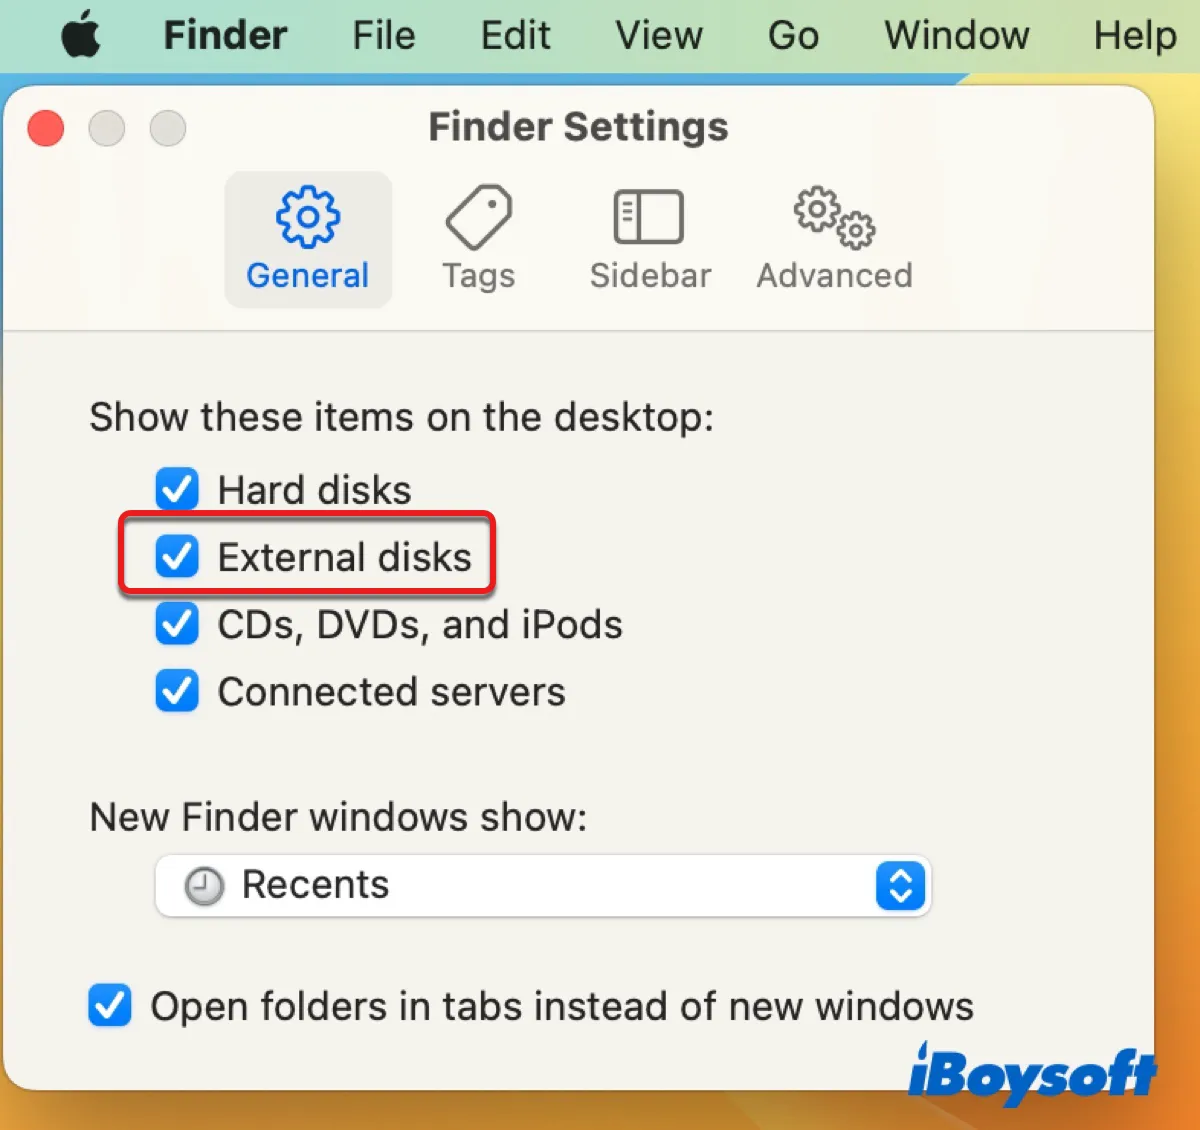
- Click the Sidebar tab.
- Ensure "External disks" under "Locations" is selected.
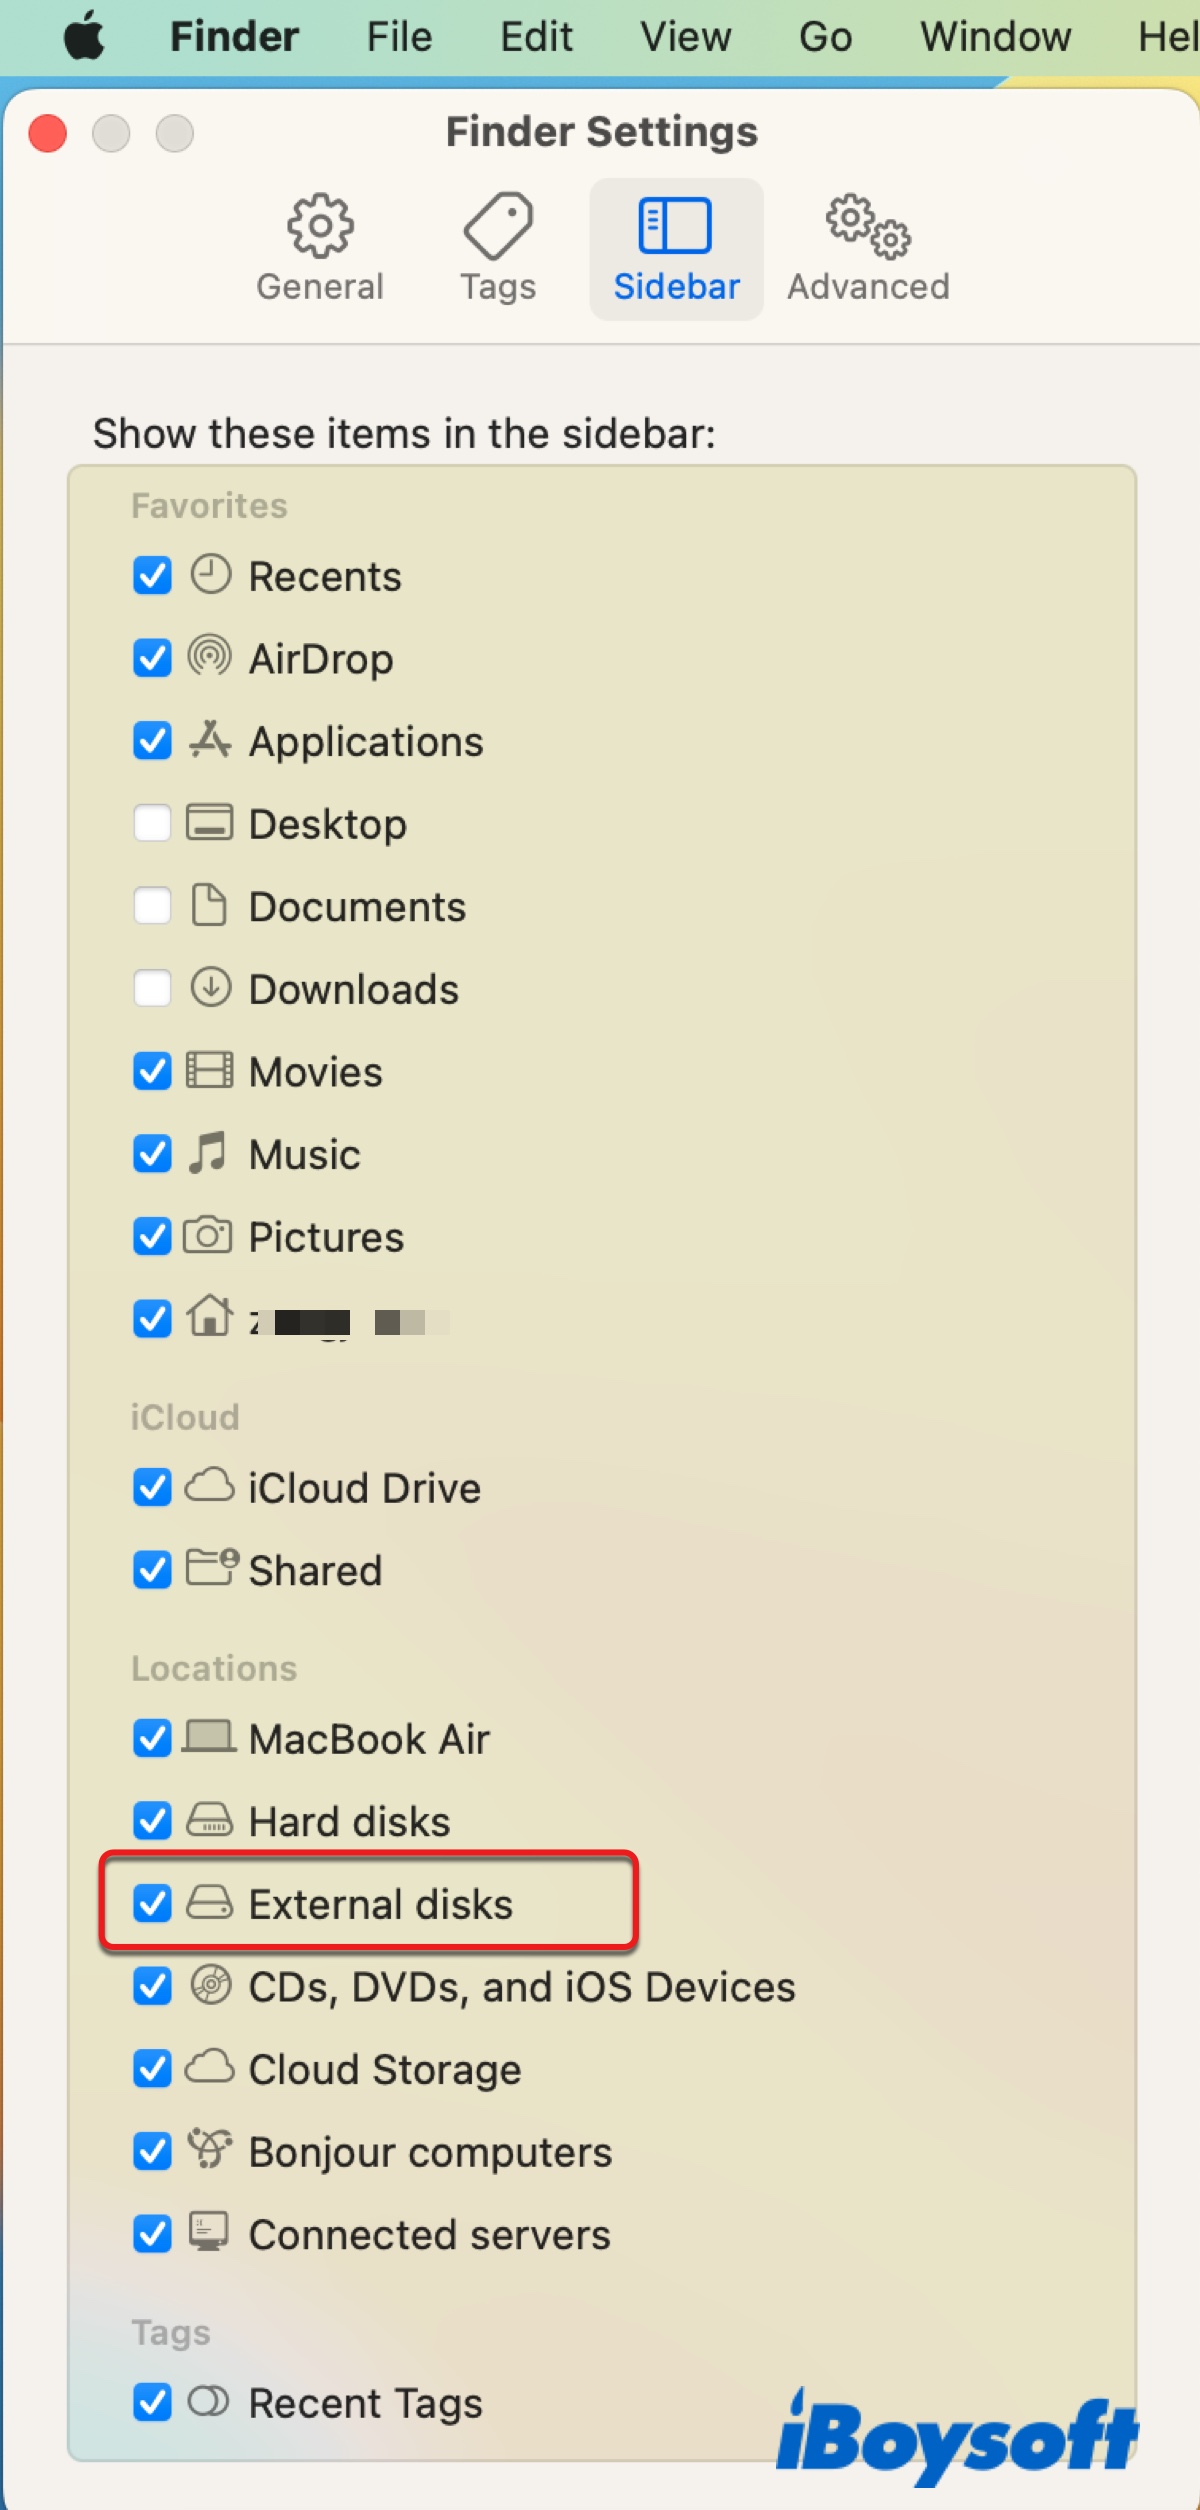
If your exFAT drive is not showing up in Disk Utility, it means that it's not recognized by your Mac. This often results from connection issues caused by broken USB cables, ports, or adapters, third-party software interventions, or severe drive corruption. Your next move should be to enable your Mac to recognize it.
Try the following tips if you can't see exFAT drive on Mac including in Disk Utility:
- Restart your Mac and slowly reconnect the drive.
- Ensure your drive is connected to a power source if it's a desktop external hard drive like Seagate Backup Plus.
- Change to a new, qualified USB cable.
- Switch to a different USB port and make sure it's not dusty or wobbly.
- Make sure your Mac isn't in low-power mode.
- Try a different USB hub or adapter.
- Use a new hard disk enclosure.
- Boot your Mac into Safe Mode.
If you can't see exFAT drive on Mac no matter what you try, your drive likely has hardware problems that you can't fix by yourself and you need to send it to a local repair shop.
Hopefully, you have resolved the issue of exFAT USB not showing up on Mac with these tips.
Don't forget to share them with your friends.
Final thoughts on using exFAT on Mac
ExFAT is often the go-to file system for cross-platform drives because it's compatible with both Windows and macOS. However, its lack of support for journaling makes it prone to errors, data corruption, and data loss.
Journaling file systems like NTFS, APFS, or Mac OS Extended (Journaled) can track any changes to the files on a disk and record them in a log or journal before they are actually performed. As a result, these file systems can be brought back online faster with a lower probability of becoming corrupted.
That's why exFAT is not recommended for drives that are primarily used to store data. If you need to transfer files between Windows and macOS, assign a USB flash drive to do it and use it for that purpose only. If you need to rely on one drive to keep data and work with it on macOS and Windows, choose a more reliable file system like NTFS.
Although you'll need an NTFS for Mac driver to write to the drive on Mac, it can avoid many future troubles of exFAT not working on Mac. You can give iBoysoft NTFS for Mac a try if you decide to format your exFAT drive to NTFS. It supports the latest macOS 14 Sonoma ~ macOS 10.13 High Sierra running on Intel-based and Apple Silicon Macs.
FAQs about exFAT drive not mounting on Mac
- QCan I mount exFAT on Mac?
-
A
Yes, you can mount exFAT on Mac. It is a file system that's compatible with both macOS and Windows. If you notice your exFAT drive not mounting on Mac, you can solve it with the solutions in this post.
- QHow do I get my Mac to read exFAT?
-
A
You can get your Mac to read exFAT through the following ways:
1. Select your exFAT drive in Disk Utility and click the Mount button.
2. Mount your exFAT drive in Terminal.
3. Quit the fsck process.
4. Repair your exFAT disk.
5. Reformat it.
