macOS Sonoma has been available since September 26, 2023. Many Mac users have upgraded to macOS Sonoma to enjoy this new version for powerful features such as Game Mode, Widgets on the desktop, enhanced video conferencing, etc.
Tips: The latest macOS version is macOS Tahoe. If you want to test the newest features, install macOS Tahoe on VMware on your Windows PC.
For Windows users who want to try macOS Sonoma on their PC, using a virtual machine such as VMware Workstation is the choice of most people. Based on computer architecture, it virtualizes or emulates the computer system to provide the functionality of a physical computer.
If running macOS Sonoma on Windows is what you are looking for, you can learn how to install macOS Sonoma on VMware on Windows in this post.
Preparations for installing macOS Sonoma on VMware on Windows
There are some required files you need to download so that you can proceed to the steps to install macOS Sonoma on your Windows PC using VMware Workstation.
To successfully download these items and install macOS Sonoma VMware, you should ensure sufficient disk space on your Windows computer. macOS Sonoma requires a minimum of 20 GB of disk space for the macOS system itself. However, this is the bare minimum, and you'll need extra space for the VMware virtual machine files, any applications, data, and additional space for updates.
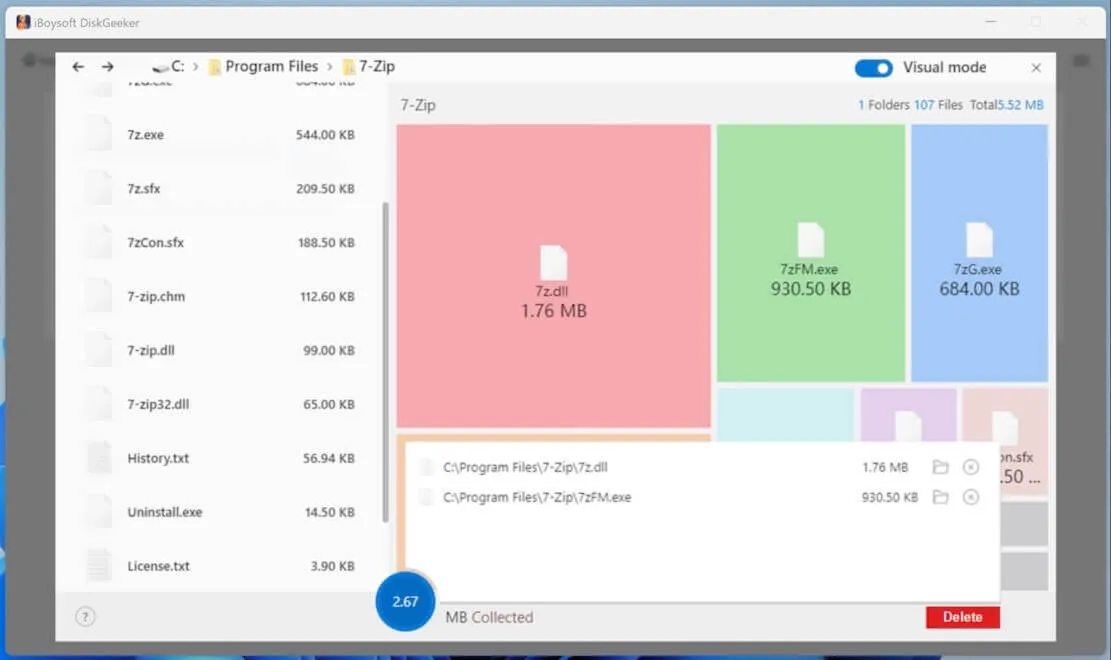
If you need to free disk space after checking storage on PC, you can try iBoysoft DiskGeeker for Windows, an all-in-one disk management tool, the Space Analyzer feature can scan the selected disk to analyze space usage, and you can easily collect and delete unnecessary files to release disk space.
Then, check and download the following files for installing macOS Sonoma on VMware:
- Download VMware Workstation. According to your needs, choose the right version for yourself, VMware Workstation Pro(paid) and VMware Workstation Player(free).
- Download VMware Unlocker. This auto-unlocker tool for macOS virtual machines can get beyond the limitations prohibiting macOS virtual machines from operating on non-Apple hardware.
- Download macOS Sonoma ISO Image for Windows. It contains a copy of the macOS Sonoma Installer. You can also create macOS Sonoma ISO for VMware on a Mac.
How to install macOS Sonoma on VMware on Windows 10/11
In this part, we will guide you to install macOS Sonoma on Windows 10/11 with VMware Workstation in detailed steps, you should patiently follow this tutorial.
- Step 1. Install VMware Workstation on Windows
- Step 2. Unlock VMware
- Step 3. Create macOS Sonoma VM
- Step 4. Edit macOS Sonoma VMX File
- Step 5. Install macOS Sonoma on VMware on Windows 10/11
- Step 6. Install VMware Tools (optional, but recommended)
Now, let's dive into the specific steps.
Note: If you don't want to go through the complicated steps, download the macOS Sonoma VMDK file.
Share with anyone who wants to install macOS Sonoma on VMware on Windows!
Step 1. Install VMware Workstation on Windows
This first step is to install VMware Workstation on your computer. Using VMware Workstation Player is recommended. This version is free and includes all the functionalities needed to run macOS Sonoma on a Windows or Linux computer.
- Locate and run the downloaded installer and click Next to begin the installation.
- Agree to the License Agreement conditions and click Next.
- Check the box for Install Windows Hypervisor Platform (WHP) automatically, and click Next.
- Tick the box next to Enhanced Keyboard Driver to integrate the keyboard effectively. In addition, select the option to add other console tools to the system PATH. Click Next.
- In User Experience Settings, select your preferred settings and click Next to proceed.
- You can accept or change the default installation location on the following page. When done, click Next.
- Click the Install button on the screen, then click the Finish button to complete the configuration.
- Click Yes to restart your system for the changes to take effect when a window pops up.
Step 2. Unlock VMware
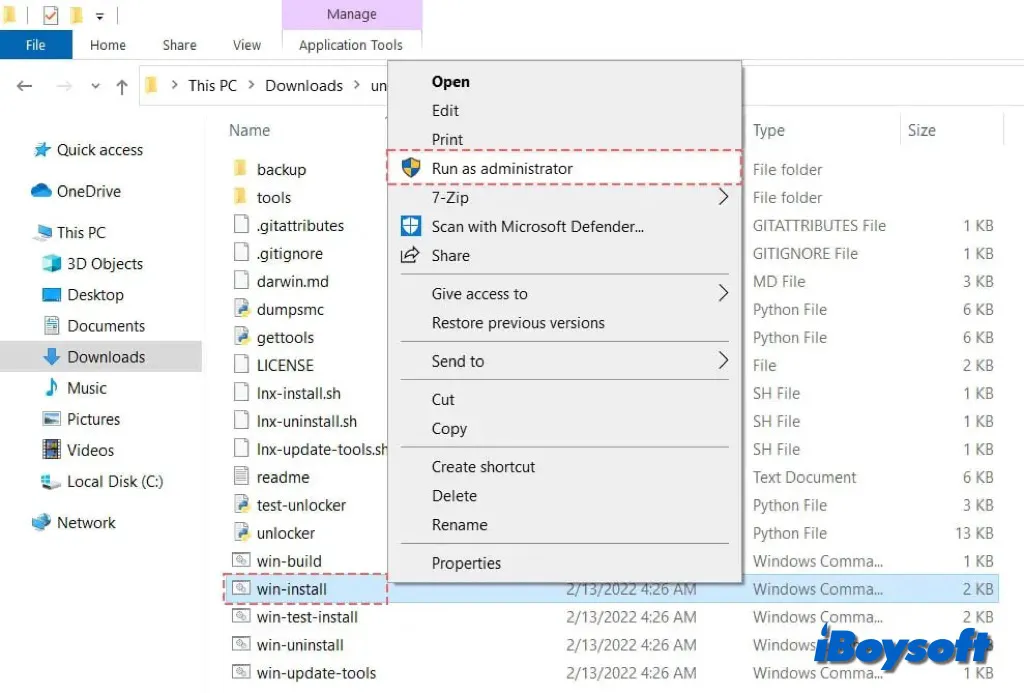
Now, you can install the downloaded VMware Unlocker to enable the required features for macOS. After downloading the VMware Unlocker, open it and click Extract All, then right-click win-install.cmd and select Run as administrator to complete the Patch Tool installation.
Step 3. Create macOS Sonoma VM
The next step is to launch VMware and create a virtual machine dedicated to macOS Sonoma.
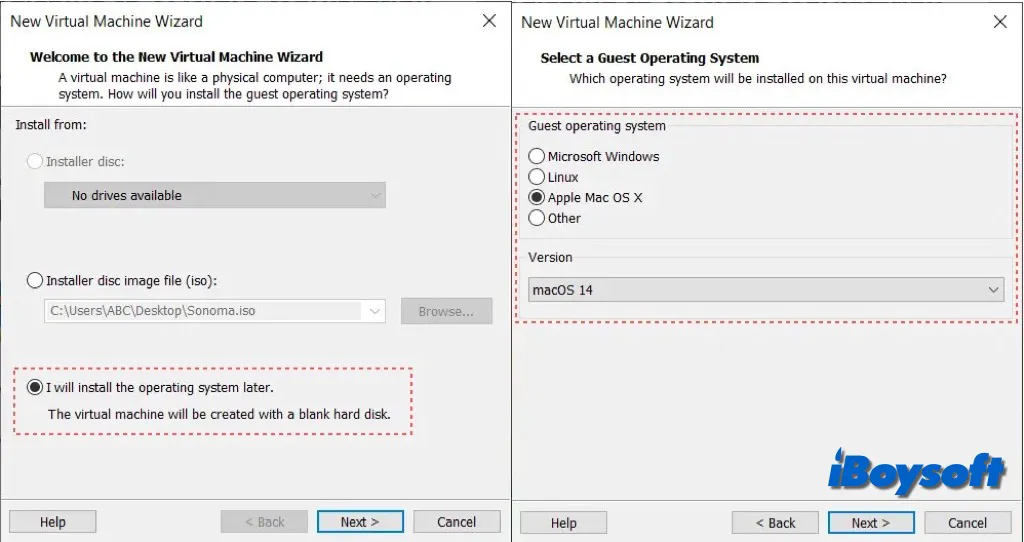
- Open VMware and click on Create a New Virtual Machine.
- Click on Typical (Recommended) and tap on Next.
- Check the I will install the operating system later option and tap Next.
- Select Apple Mac OX and then macOS 14 from the drop-down menu and tap Next.
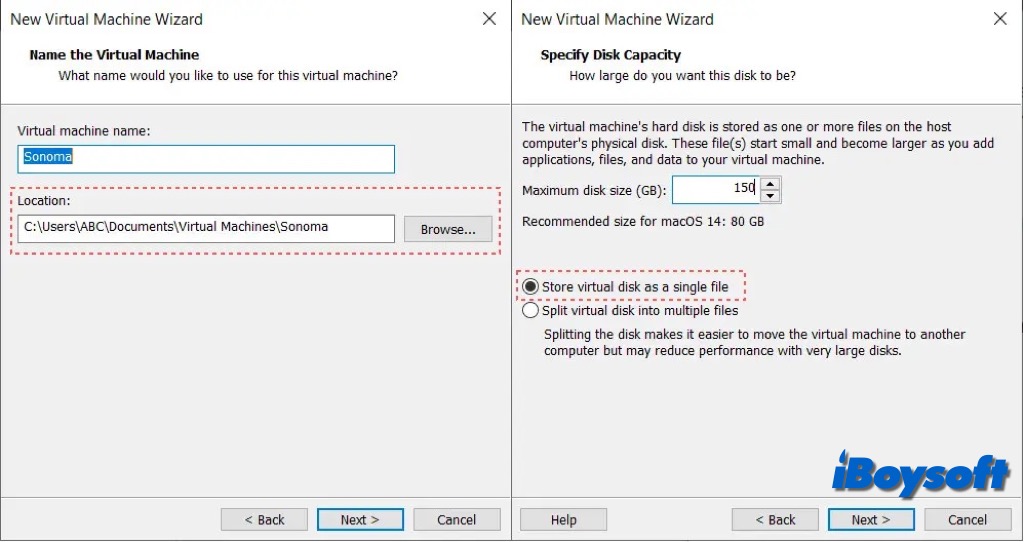
- Name your virtual machine like macOS Sonoma or macOS 14 and tap Next.
- Tap on Customize Hardware.
- Increase the Memory to 4GB-8GB for better performance.
- In the Processors menu, increase the CPU Processor.

- Select New CD/DVD (SATA), then check Use ISO image file > Browse.
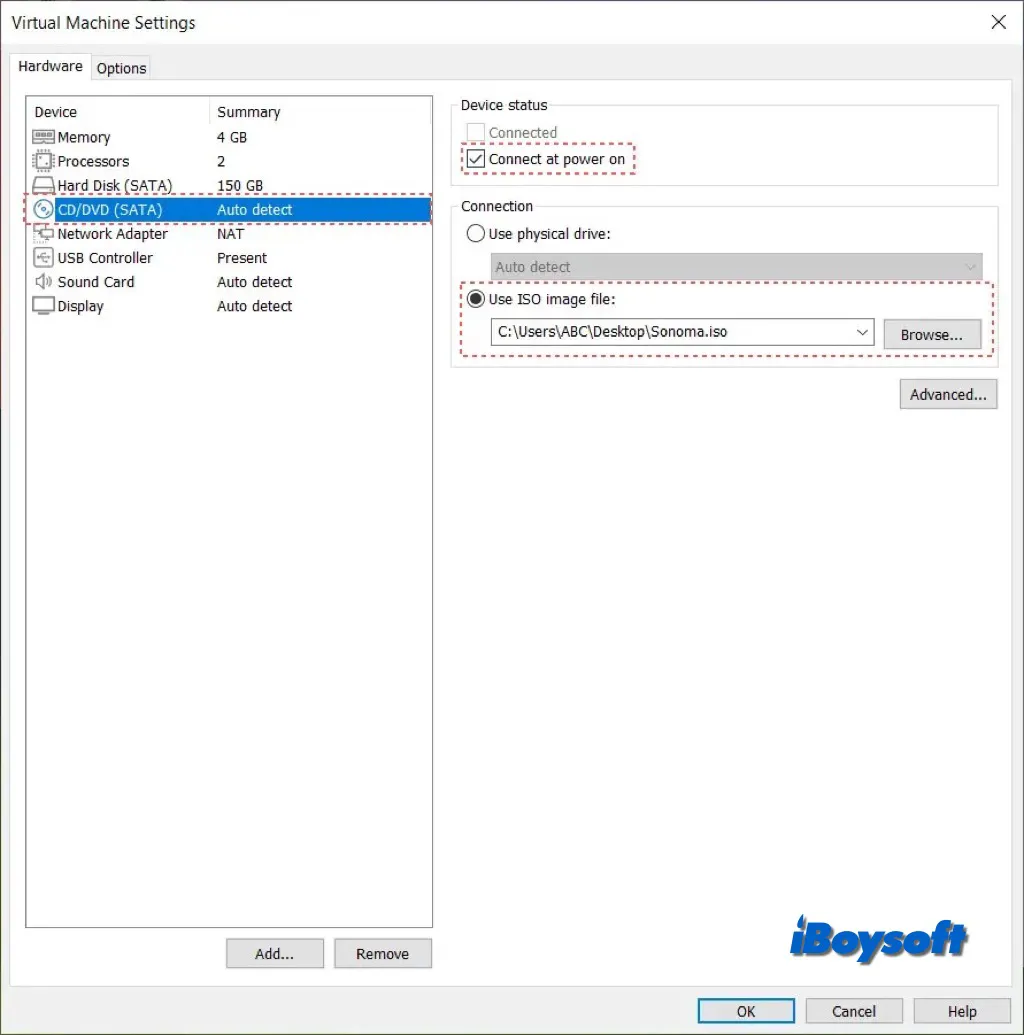
- Tap the macOS Sonoma ISO File and choose Open.
- Click Close and tap on Finish.
Step 4. Edit macOS Sonoma VMX File
SMC (System Management Controller) faults can occur on macOS Sonoma under specific scenarios. The SMC settings on the Virtual Machine must be changed to avoid such problems. Locate the folder holding the files related to your Sonoma Virtual Machine before continuing.
- Right-click on macOS Sonoma.vmx and select Notepad.
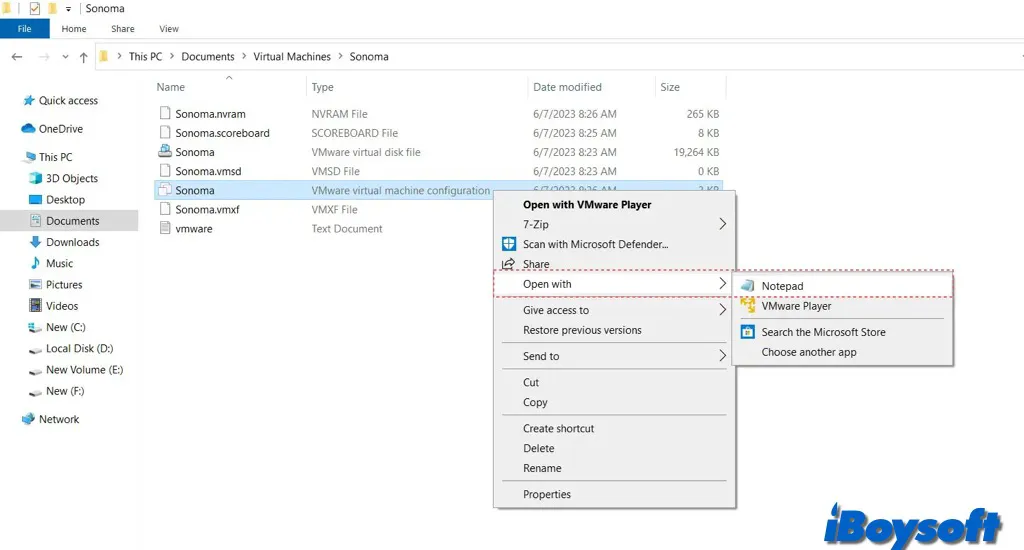
- Add the following command at the end of the file: smc.version = "0"
- Head to File and select Save or Ctrl+S to save the changes.
Step 5. Install macOS Sonoma on VMware on Windows 10/11
You may now begin installing macOS Sonoma.
- Launch VMware, then select Power on this Virtual Machine.
- Choose your preferred language, and tap on Disk Utility > Continue.
- Select VMware Virtual SATA Hard Drive Media and click Erase.
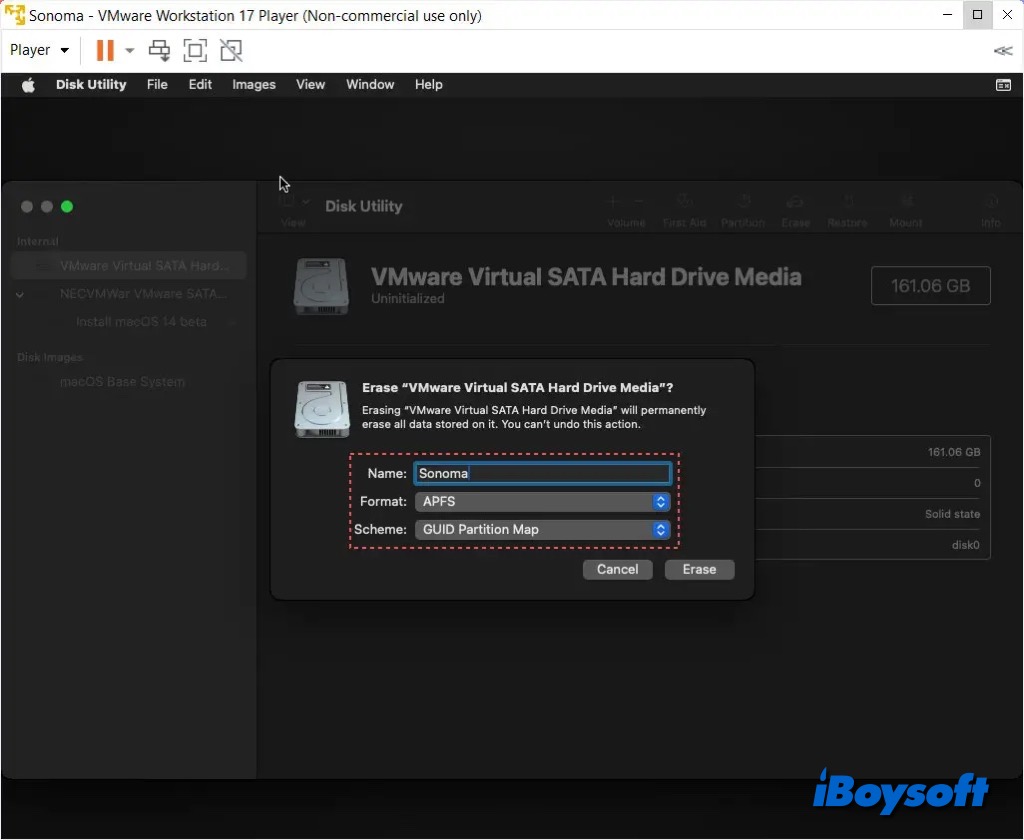
- Name the drive, select Mac OS Extended (Journaled), choose GUID Partition Map, and click Erase.
- Click Done and quit Disk Utility.
- Tap on Install macOS Sonoma and tap Continue twice.
- Agree with all the Terms and Conditions.
- Wait for the downloading process to complete and the Mac will restart 2-3 times.
Step 6. Install VMware Tools (optional, but recommended)
macOS Sonoma does not support VMware full-screen mode on Windows PCs. You may run macOS Sonoma in full-screen mode on a Windows computer by using VMware tools. With the aid of VMware tools, several macOS Sonoma features can be exploited. Thus, VMware tools improve your VMware WorkStation experience.
- Open your VMware Workstation and power on the macOS Sonoma.
- Click on the VM options and select Install VMware tools.

- Double-click on the Install VMware tools > Install.
- Enter your password and click Install Software.
- Click on open system settings when a VMware warning says System Extensions Blocked.
- From the Security and Privacy page, click Allow.
- Enter your password click on Modify Settings, and select Not Now.
- During the process, click Restart to reboot your VMware of macOS Sonoma.
Also read:
How to Install macOS Catalina on VMware on Windows? (Full Guide)
How to Install macOS Big Sur on VMware on Windows?
Share these detailed steps to help others install macOS Sonoma on VMware on Windows.