Visual Studio Code, or VS Code, is a free open-source alternative to Mac TextEdit developed by Microsoft, which can work on different operating systems like Windows, Linux, and macOS.
Developers and programmers frequently use it in creating IntelliSense, code debugging, built-in Git commands, and extensions. Today we mainly focus on how to uninstall Visual Code on Mac, along with its associated extensions, components, and utilities totally from your Mac with several practical solutions.
Why do you need to uninstall Visual Studio from Mac?
The reasons that you want to uninstall Visual Studio from Mac are obvious and plain, that is, Visual Studio becomes useless after a temporary usage and takes up so much of your precious storage space.

For the first one, it is recommended to clean non-useful apps and files from your Mac regularly to release more Macintosh HD space for prolonging the computer's life span and improving its performance.
For the latter one, some users have complained about encountering an issue that Visual Code consumes heavy storage and RAM when running, rendering the Mac computer to perform slowly and work inefficiently.
However, VS Code is a small download (< 200 MB) and has a disk footprint of less than 500 MB, yet it can eat up tens to hundreds of GB of storage based on a rough investigation. In order to make Visual Studio return to its normal state, you can give it an uninstall and then install it one more time!
Uninstall Visual Studio Code via CleanMyApp (easy & quick)
Among sorts of Visual Studio Code methods, we recommend the professional app remover CleanMyApp here. Unlike other methods you have to move the targeted app and its associated files separately, CleanMyApp allows you to uninstall the app and its related files simultaneously, which saves time and effort to a great degree.
It gathers all extensions, components, packages, root files, caches, preferences, user files, etc. in the middle of Visual Studio Code uninstall, and you can determine which files or components to delete along with the uninstall within a few clicks.
How to uninstall Visual Studio Code from a Mac via CleanMyApp:
Step 1: Free download and install CleanMyApp on your Mac computer.
Step 2: Click Grant access to permit CleanMyApp to access the application folder. If the file isn't stored in the Application folder, allow CleanMyApp to access the related folder directly.

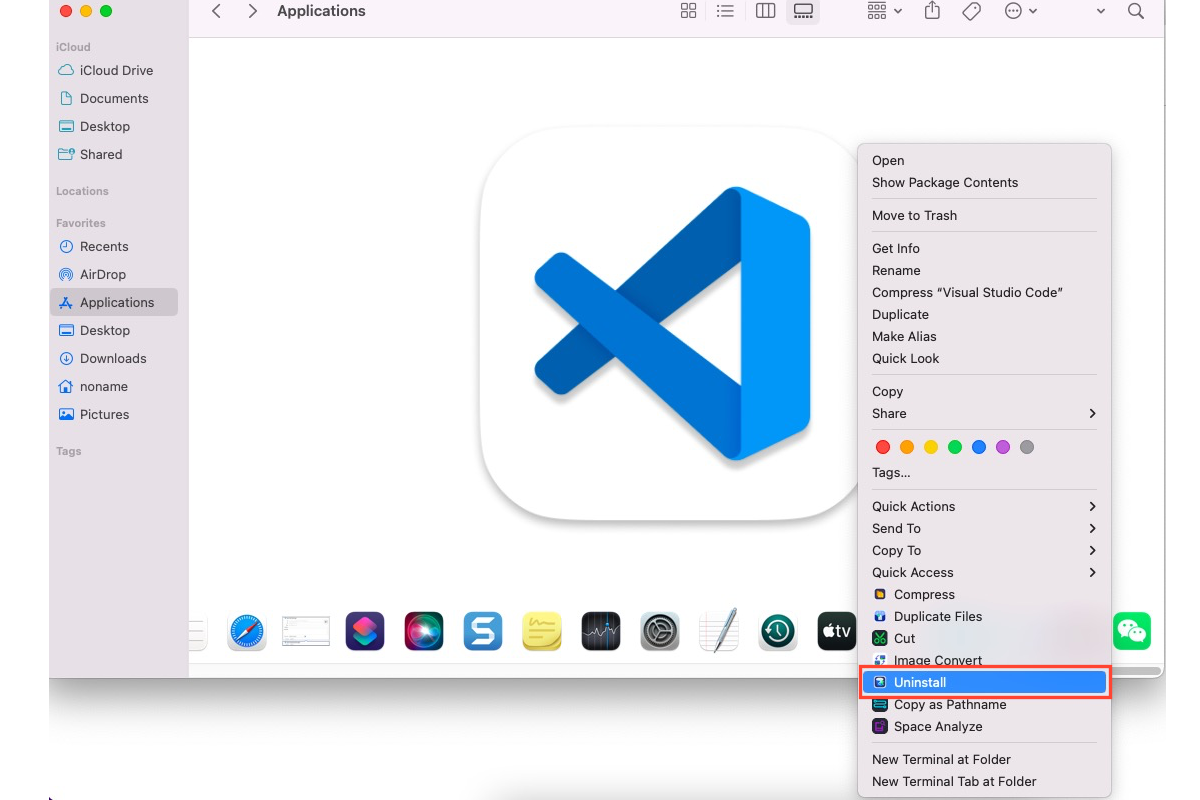
Step 3: Launch this handy app uninstaller and it will show you a list that can be uninstalled from your machine. You can scroll down to find Visual Studio Code or you can navigate this app by typing its name in the search box
Step 4: Check Visual Studio Code in the app list and click Uninstall on the right bottom corner of the main widow.

Step 5: Click Continue uninstall to confirm your uninstall plan.

Step 6: Click Finish and then you're completing this uninstall task!
See? It's quite effective and easy to perform, isn't it? If you fall in love with this professional app uninstaller, kindly share it on your favorite platform!
Uninstall Visual Studio Code via Mac built-in uninstaller (complex)
Mac is configured with a built-in app remover which can delete all third-party software and some local apps from your Mac. However, it cannot take associated files away along with the app, so you have to uninstall the app first, then repeat to find and remove the files one by one scattered on different paths and folders on your Mac.
This method is time-wasting and effort-consuming. If you want a more effective way, scroll up to use CleanMyApp. But if you still prefer this one, let's see how to uninstall Visual Studio Code on Mac manually:
Step 1: Launch Finder on your Mac computer and go to the Applications folder.
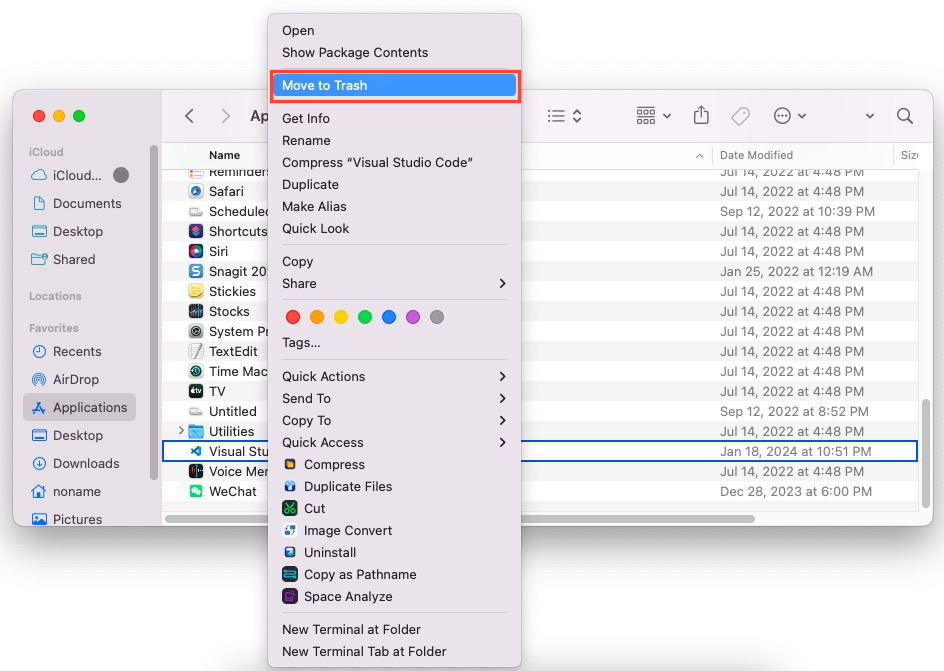
Step 2: Locate Visual Studio Code on the app list and right-click to launch the context menu.
Step 3: Select Move To Trash from the dropdown menu, then Visual Studio Code goes to Mac Trash.
Step 4: Then switch to Finder > Go > Go To Folder, and access the following path to delete them from your Mac one by one.
- ~/Library/Application Support
- ~/Library/Logs
- ~/Library/Caches
- ~/Library/Preferences
- ~/Library/VisualStudio
When you finish the file deletion, you have completed the uninstall successfully. Note that Visual Studio Code may leave some hidden root files or packages on your computer, escaping your deletion. If you find one someday, move it to the trash directly.
If you like this way to uninstall Visual Studio Code from your Mac, why not share it with more people?
Uninstall Visual Studio Code via Mac Terminal (risky)
If you have some knowledge of commands and are keen on a more advanced way to remove Visual Studio Code from your Mac, you can use Mac Terminal to reach this goal. Yet please execute the command below carefully because a wrong command execution may cause your device to behave abnormally or misfunction.
Here is how to use Mac Terminal to uninstall Visual Studio Code and its bundle files from your Mac:
Step 1: Launch Mac Terminal on your device.
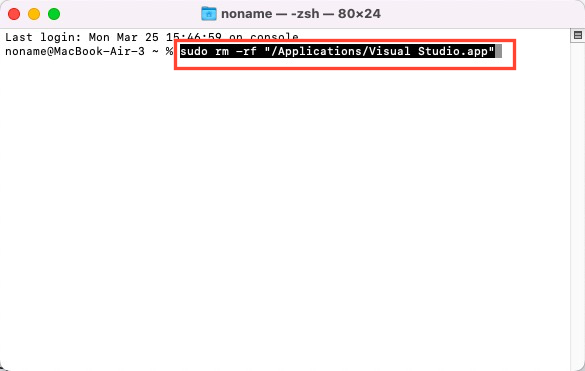
Step 2: Copy and paste the following command to uninstall Visual Studio Code. Do not forget to hit the Return/Enter key to run the command line after you type in the command.
sudo rm -rf "/Applications/Visual Studio.app"
Step 3: Copy and paste the commands below to use the rm command for bundle file deletion:
- rm -rf ~/Library/Caches/VisualStudio
- rm -rf ~/Library/Preferences/VisualStudio
- rm -rf ~/Library/Preferences/Visual\ Studio
- rm -rf ~/Library/Logs/VisualStudio
- rm -rf ~/Library/VisualStudio
- rm -rf ~/Library/Preferences/Xamarin/
- rm -rf ~/Library/Application\ Support/VisualStudio
How to install Visual Studio Code on Mac?
If you want to use Visual Studio Code on your Mac computer once again, you can do the following to install it:
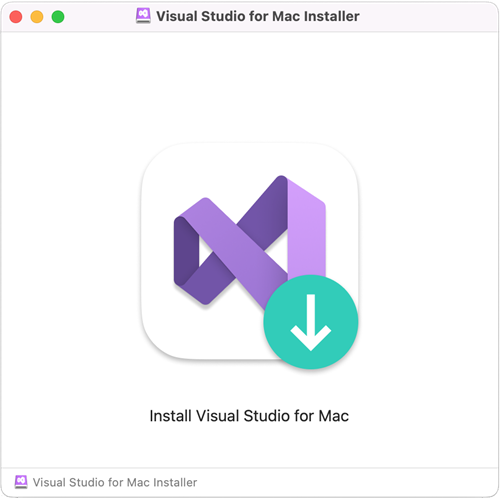
Step 1: Download the installer from the Visual Studio for Mac download page.
Step 2: Once the download is complete, click the VisualStudioForMacInstaller_<build_number>.dmg to mount the installer, then run it by double-clicking the arrow logo:
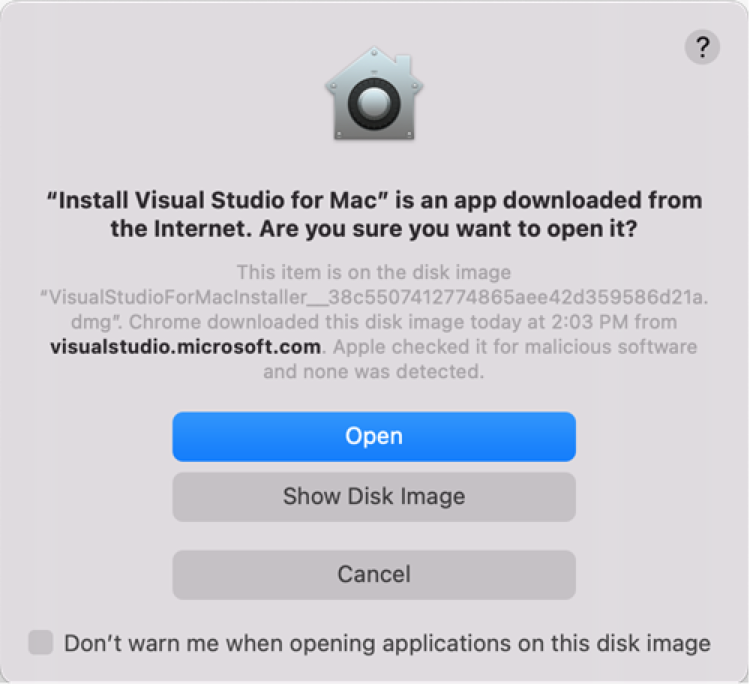
Step 3: You may be prompted by a warning about the application being downloaded from the Internet, just select Open.
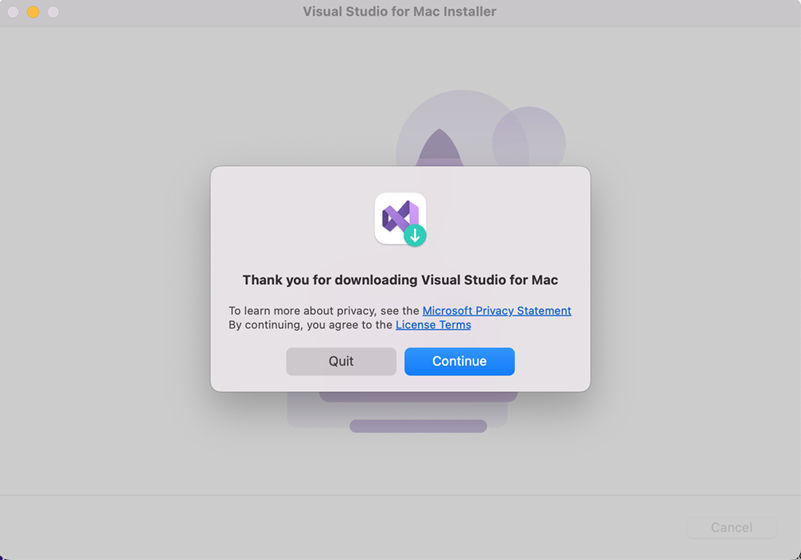
Step 4: An alert will appear asking for permission of the privacy and license terms. Follow the links to read them, then select Continue if you agree:
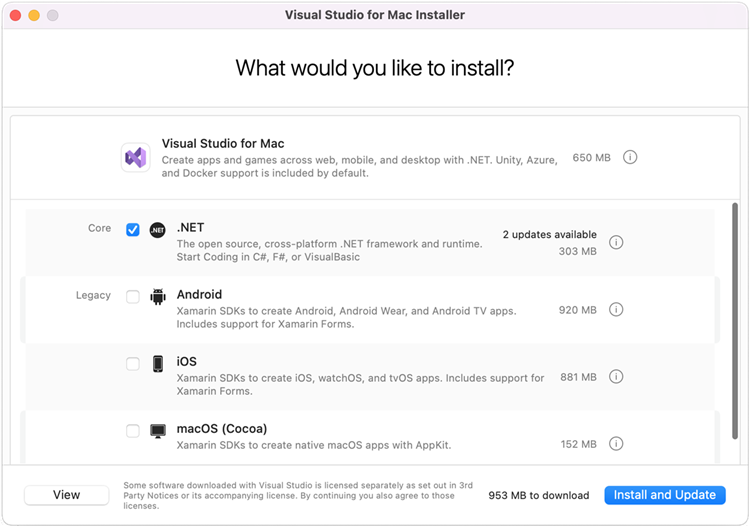
Step 5: The list of available workloads is displayed. Select the components you wish to use:
Step 6: After you've made your selections, select the Install button.
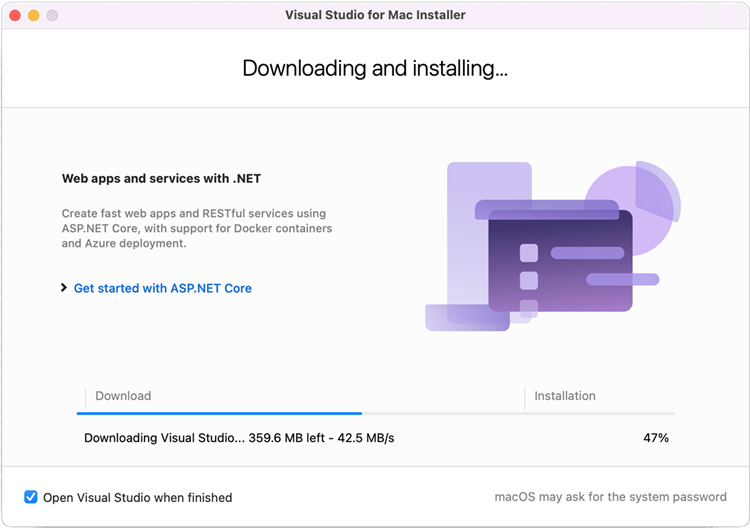
Step 7: The installer will display progress as it downloads and installs Visual Studio for Mac and the selected workloads. You'll be prompted to enter your password to grant the privileges necessary for installation.
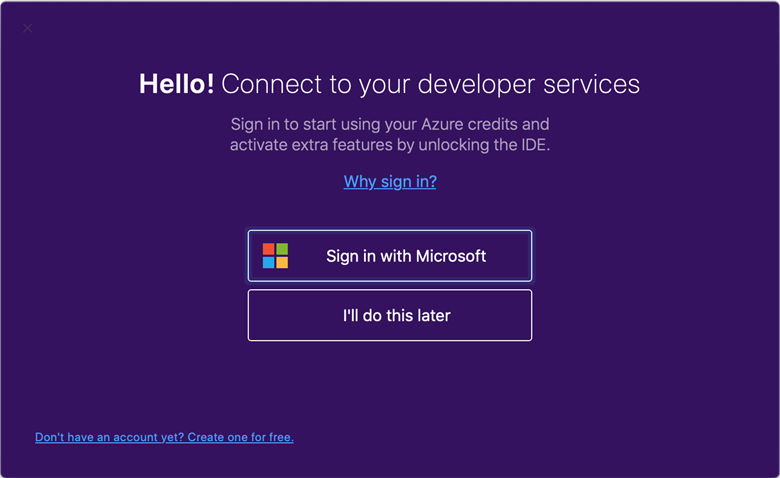
Step 8: Once installed, Visual Studio for Mac will prompt you to personalize your installation by signing in and selecting the key bindings that you'd like to use:
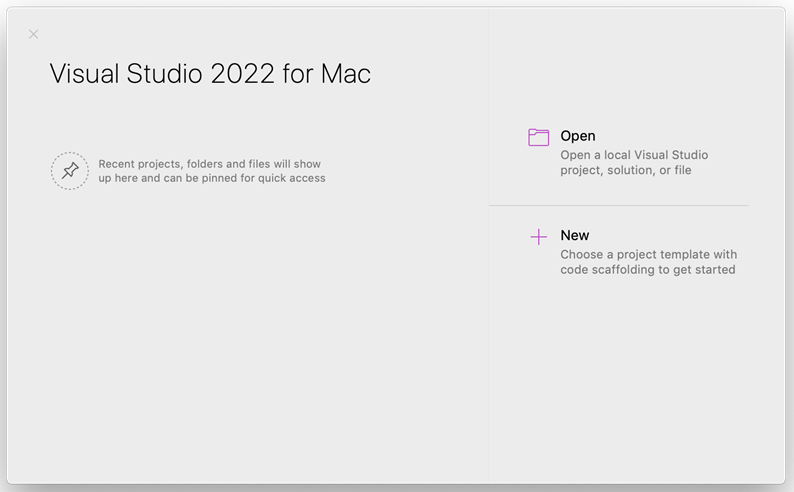
Step 9: Visual Studio for Mac will launch, and you can open a project or create a new one.
Visual Studio Code eats up too much RAM or storage, what to do?
The trouble that Visual Studio Code swallows too much RAM or storage space is not single and unique to certain users, given that so many users have complained about it on the forum. This trouble renders the Mac running slow and working poorly. If unlucky you meet the same trouble as well, try the following fixes please:
- Force quit Visual Studio Code in Activity Monitor
- Reboot your Mac computer and re-launch Visual Studio Code
- Update Visual Studio Code to the newest version
- Find and delete useless bundle files or components of Visual Studio Code
- Reinstall Visual Studio Code
- Reinstall macOS
The final words
We shed light on how to uninstall Visual Studio Code from a Mac in three ways, including a professional app uninstaller, Mac built-in app remover, and Mac Terminal. Each way comes with detailed introductions and guidelines, and you can choose one to uninstall Visual Studio Code from your computer.
Moreover, we discuss how to install Visual Studio Code and what to do if Visual Studio Code takes up too much RAM or storage space. If you're interested in anyone, please click on it and get a full reading!