After finishing its debugging and beta versions, macOS Sequoia finally came to the public on 16th September 2024. As a brand new and major macOS update, macOS Sequoia involves a plethora of stunning features and highlights, as well as new challenges for users to adapt.
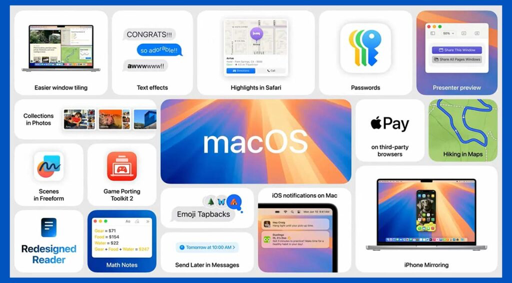
Some users are excited with these new changes like the Passwords app replacing the previous password management way, the Window Tilling updating the window organization pattern, the iPhone Mirroring allowing users to interact with the apps and notifications from the iPhone's end, etc.
While some others get used to the macOS Sonoma's (or earlier macOS versions') style and features after at least a year of usage, finding themselves unsatisfactory with the current updated macOS 15. In this case, reading this post to downgrade macOS Sequoia to Sonoma or earlier macOS helps a lot.
Essential steps before the macOS Sequoia downgrade
Before you set to uninstall or downgrade macOS Sequoia from your machine, here are necessary steps you need to complete:
Step 1: Back up everything essential on your Mac
Although it's not long before you install macOS Sequoia (or beta) on your machine, your Mac stores and manages your files by default. So, if you don't want to run into data loss, please back up everything you need with Time Machine or another cloud storage service (not cloud sync service) beforehand or they will be wiped during the process.
Step 2: Erase your Mac to make room for the next macOS
Leaving macOS Sequoia on your Mac makes your machine sluggish, more importantly, it makes continuous conflicts and errors for having two operating systems on one computer. Hence, you must erase the hard drive and macOS Sequoia before restoring the next macOS.
This preparation would better be implemented in macOS Recovery Mode, and here is how to do it:
1. Restart your Mac and press and hold the (or the spinning globe) to boot into macOS Recovery mode.
2. Select Disk Utility. Then, right-click the macOS-Data volume and click Delete APFS Volume.
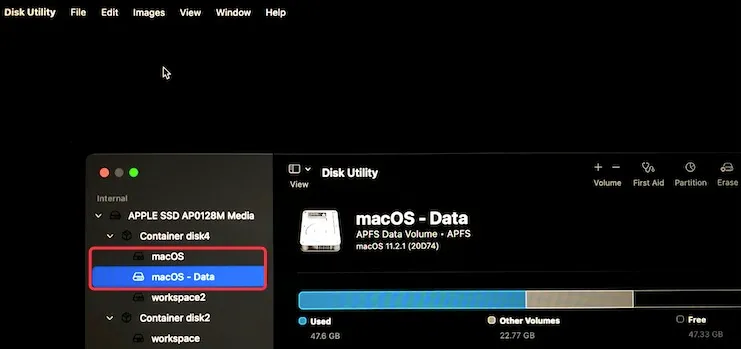
3. Choose the macOS volume and click Erase.
4. Set a name, choose APFS in the Format box, and then click Erase.
If, I mean, you're out of luck for losing files during the downgrade, please stop any actions immediately! Install iBoysoft Data Recovery Software on an external hard drive and then connect the drive to your Mac to scan the erased files ASAP!
Sharing is caring!
Reddit discussions on how to downgrade macOS Sequoia to Sonoma
You're not the only one who plans to uninstall macOS Sequoia from your machine. Like this OP in Reddit below, who meets the issue that "The volume cannot be downgraded" because he didn't erase the volume before.
Trying to downgrade from Sequoia to Sonoma
by u/ExpertAsh1 in applehelp
Therefore, please complete the essential steps - backing up your files and erasing the hard drive beforehand for a successful macOS Sequoia downgrade!
Thanks for sharing!
How to downgrade macOS Sequoia to macOS Sonoma?
No matter what reasons contribute to rolling back previous macOS from macOS Sequoia, here are three options for you to complete that mission
- Option 1: Time Machine backup
- Option 2: macOS Recovery Mode
- Option 3: A macOS Sonoma bootable installer
These mentioned ways are common and usual in downgrading the Mac operating system, and each one fits different users with its own requirements. You can choose one that suits you most after reading!
Option 1: Downgrade macOS Sequoia with Time Machine backup
Suppose that you have a good habit of system backup and get a full backup of the last OS installed on your machine, the macOS Sequoia downgrade is as easy as ABC.
The Time Machine backup always contains the original macOS installer files and the accumulated user files, making the whole downgrade process go with ease!
Let's downgrade macOS Sequoia to macOS Sonoma or earlier macOS with the Time Machine backup!
Step 1: After the Mac is erased in macOS Recovery Mode, you can exit the Disk Utility window to the macOS Utilities screen.
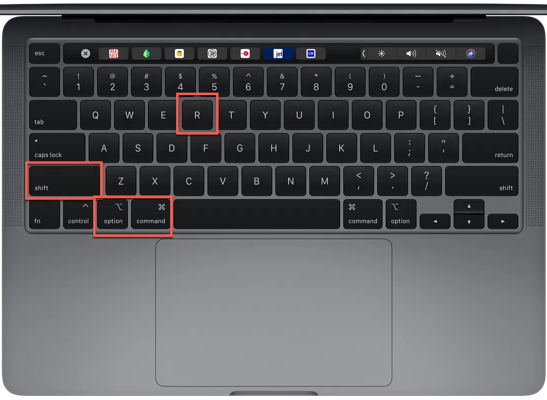
If you're not in macOS Recovery Mode, enter it again by pressing the Command + Option + Shift + R keys until the Apple logo appears.
Step 2: Connect your Time Machine backup drive to your Mac.
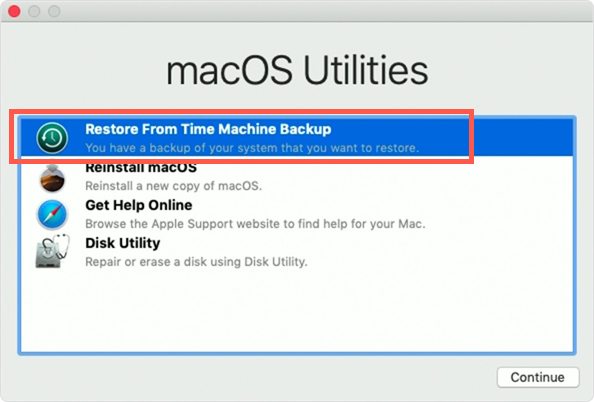
Step 3: Select Restore From Time Machine Backup in the macOS Utilities screen and click Continue.
Step 4: Select the backup disk and click Continue.
Step 4: Choose the destination (generally your Mac's internal hard drive) to save your Time Machine backup.
Step 6: Click Restore to retrieve the backup (including the macOS you want to downgrade to and your data).
This restore process may take some time, you can turn to other work until it finishes. Once this process completes, your Mac will go to the macOS you've backed up before with your user files.
Option 2: Downgrade macOS Sequoia in macOS Recovery Mode
If you have no Time Machine backup, macOS Recovery Mode is an alternative method for you to downgrade macOS Sequoia to another macOS. As you master how to boot into macOS Recovery Mode, this way can be simple and easy.
This way downgrades your Mac to the default OS when your Mac was shipped with. That is to say, if your Mac was configured with macOS Monterey or Big Sur, you can only downgrade macOS Sequoia to macOS Monterey or Big Sur.
If you want to use macOS Ventura or Sonoma on your machine, you have to upgrade your Mac to that OS with the App Store or Software Updates after the downgrade.
1. Make sure your Mac is connected to the network firmly and restart your Mac while holding the Shift + Option + Command + R keys.

2. Release the keys until you see the spinning globe.
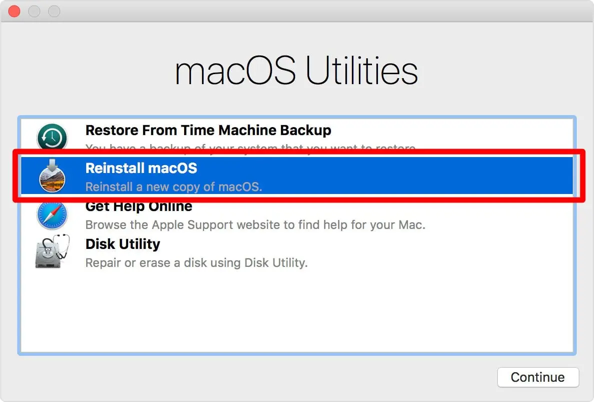
3. Select the Reinstall macOS option in the macOS Utilities window.
4. Follow the instructions to install the default macOS.
Once the downgrade completes, you can update your Mac to the OS you prefer!
Option 3: Downgrade macOS Sequoia with a bootable installer
If these two mentioned methods don't work out in your case, the macOS bootable installer is a perfect option for you to downgrade macOS Sequoia.
Step 1: Change the security settings
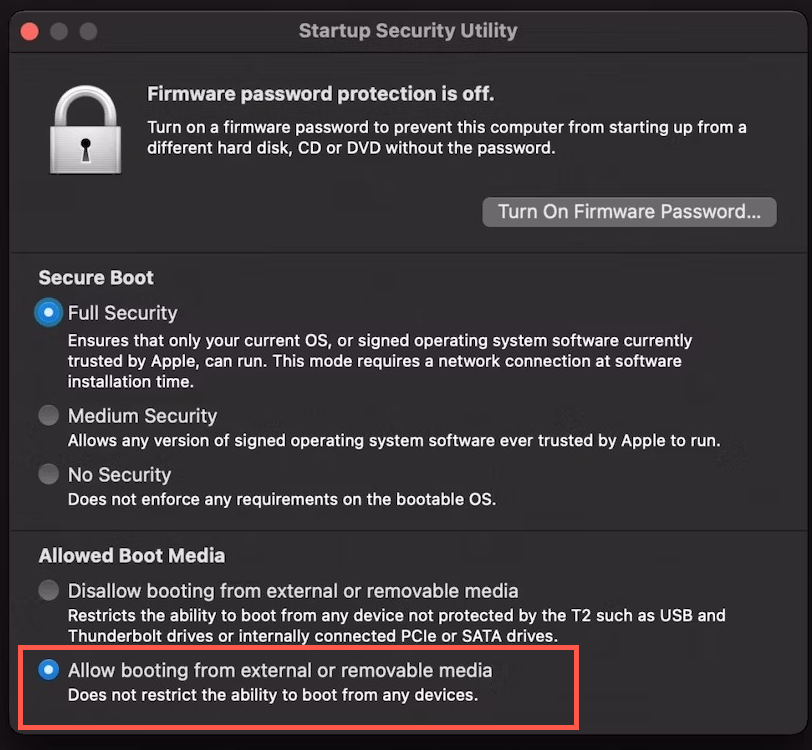
Before creating the macOS bootable installer, make sure you have changed the security settings to let Mac with Apple T2 Security chips boot from external storage:
1. Check if your Mac with Apple T2 chip in the Apple menu > About This Mac.
2. If it has, boot into macOS Recovery mode.
3. Select Utilities > Startup Security Utility.
4. Check "Allow booting from external media".
Step 2: Create the macOS bootable installer
Follow this section to create a bootable installer of the macOS you want to run later:
1. Prepare an external drive with no less than 32GB in size.
2. Erase the external hard drive to APFS in the Disk Utility app (Skip this step if it is).
3. Download the installer of your wanted macOS version from the App Store. (Don't allow the installation process to start at this time).
Warning: The Mac operating system download process will take a while. During the process, confirm that your monitor is on, the internet is connected, and the Mac is charged, or the download is discontinued.
4. Connect your APFS formatted external drive to your Mac.
5. Open Finder > Applications > Utilities > Terminal.
6. Enter the following command and press Return. Here "MyVolume" indicates where the macOS installation files will be stored, please replace "MyVolume" with the name of your external hard drive.
sudo /Applications/Install\ macOS\ Sonoma.app/Contents/Resources/createinstallmedia --volume /Volumes/MyVolume
sudo /Applications/Install\ macOS\ Ventura.app/Contents/Resources/createinstallmedia --volume /Volumes/MyVolume
sudo /Applications/Install\ macOS\ Monterey.app/Contents/Resources/createinstallmedia --volume /Volumes/MyVolumeommand]
sudo /Applications/Install\ macOS\ Big\ Sur.app/Contents/Resources/createinstallmedia --volume /Volumes/MyVolume
7. Type your admin password when asked and press Return.
8. Enter Y when warning you that it will erase the external hard drive and press Return.
9. Wait until see the "Copy complete and Done" notification.
Step 3: Downgrade macOS Sequoia to the macOS you want to run
1. Restart your Mac while holding the Option key until you see the list of startup disk options.
2. Choose the disk with your target macOS installer and click Restart.
3. Then, wait for your Mac to reboot from the macOS installer you've made.
The moment the Mac boots from the macOS installer, you successfully downgrade macOS Sequoia to your preferred macOS!
Wrap all things up
You have good reasons to degrade macOS Sequoia, for instance, you're tired of kinds of macOS Sequoia problems, you have no interest in macOS Sequoia's new features or enhancements, your Mac fails to override macOS Sequoia's very well, etc.
Regardless of the final reason, we always meet your demand by providing you with three methods for completing that mission. If you're determined to roll back the previous macOS, read this post right now!