PLIST files, also called Property List files, are used to store serialized data such as settings, configurations, and information about the properties of a program. PLIST files can be written in both XML and binary formats, making them versatile and easy to work with different apps.
Whether you are a developer managing app configurations or a user customizing system settings, knowing how to create plist files is useful. In this guide, we'll explore several methods to create a PLIST file on Mac, keep reading.
The easiest way to create a PLIST file on Mac
The built-in tools we will discuss later are somewhat cumbersome or complicated to operate due to the repetitive steps and unfamiliar command lines. So is there any alternative? Absolutely yes, iBoysoft MagicMenu is a smart right-click tool to free away these troubles.
iBoysoft MagicMenu is a user-friendly utility that enhances the Finder context menu, allowing you to create new various types of files, including PLIST, XML, PPT, TXT, and DOCX...with a few clicks. Moreover, it owns other useful functions like unwanted app removal, copying and cutting files, and compressing files for different quality levels...
Have a download and learn how to create a plist file on Mac:
- Free download, install, and open iBoysoft MagicMenu.
- Right-click on the desktop or any open folder and choose "New File".
- Select "Plist" and the file is created already.

How quickly iBoysoft MagicMenu creates new files! Why don't you download it now and share it with more friends?
How to create a plist file on Mac manually
If you are not afraid of the trouble steps and willing to take on a harder approach to create PLIST files on Mac, let's try the fixes below:
Create a plist file on Mac via TextEdit
TextEdit, the default text editor on macOS, can be used to create plist files based on XML. You can follow:
- Finder > Applications > Scroll down to find TextEdit and open it. (Or Launchpad > Others > TextEdit.)
- Click New Document, then choose Format > Make Plain Text from the top menu.
(Or after clicking New Document, just press Command + Shift + T.) - Enter your PLIST data in XML format.
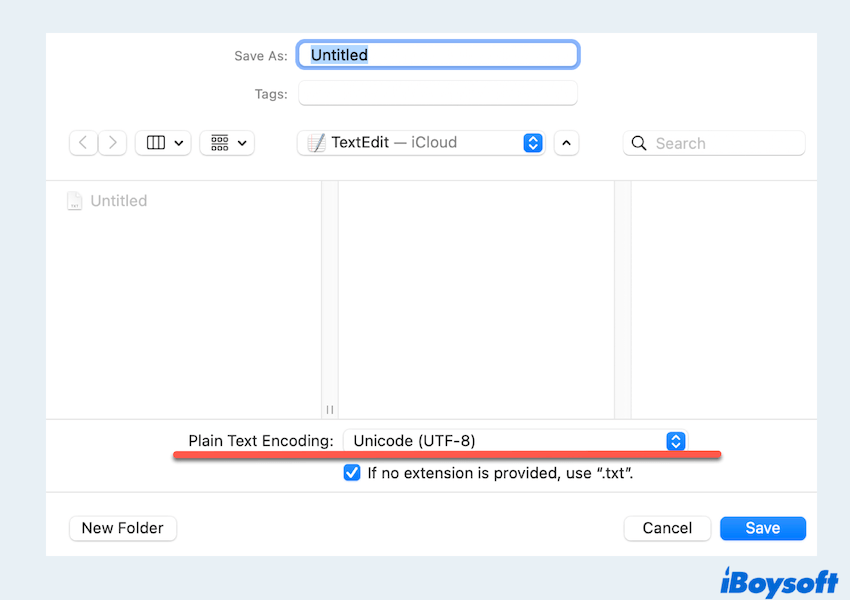
- Choose File > Save, then enter a name for your file.
(You can type .plist extension followed by the name.) - Select Unicode (UTF-8) in the Plain Text Encoding and click Save.
If you fail to create a plist on Mac with it, try another built-in tool.
Create a plist file on Mac via Xcode
Xcode is Apple's integrated development environment (IDE) for macOS and iOS development. It provides a graphical interface for editing and creating PLIST files, making it a preferred choice for developers. Let's make a plist file on Mac:
- Finder > Applications > Xcode.
- In the top menu, choose File > New > File...or use the shortcut Command + N.
- In the file template window, select Property List under the macOS or iOS section and click Next.
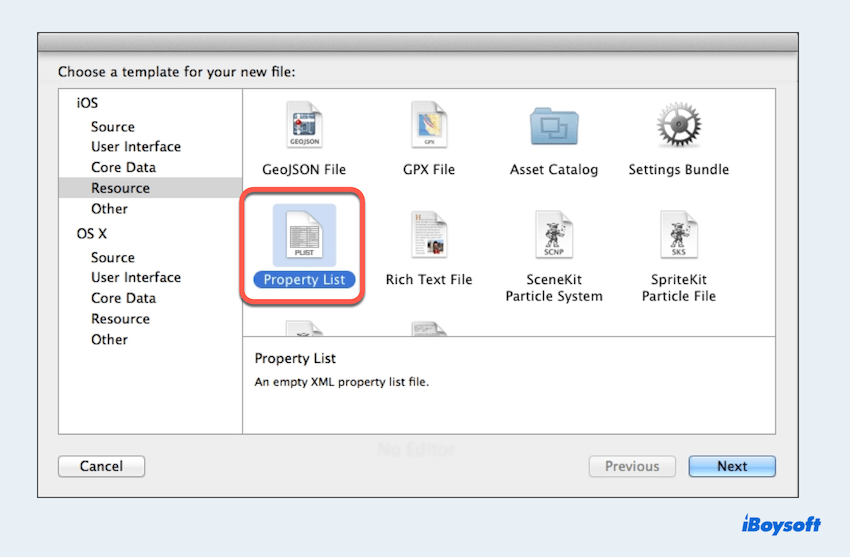
- Name your PLIST file and choose a location to save it, then click Create.
- Edit the plist file.
(You can switch to the raw XML editor if needed by right-clicking the PLIST file and selecting Open As > Source Code.) - File > Save.
(Or using the shortcut Command + S.)
Create a plist file on Mac via Terminal
For users comfortable with command-line interfaces, Terminal provides a way to edit and create PLIST files on Mac using commands. This method is particularly useful for scripting and automation, but note the incorrect operations in Terminal may cause bad consequences, so be careful to use it:
- Finder > Applications > Utilities > Terminal. (Or Launchpad > Others > Terminal.)
- Type touch ~/Desktop/example.plist to create a blank PLIST file.
(You can replace the file path ~/Desktop with others, the example.plist is the file's name.) - Open and edit the file, you can type: nano ~/Desktop/example.plist.
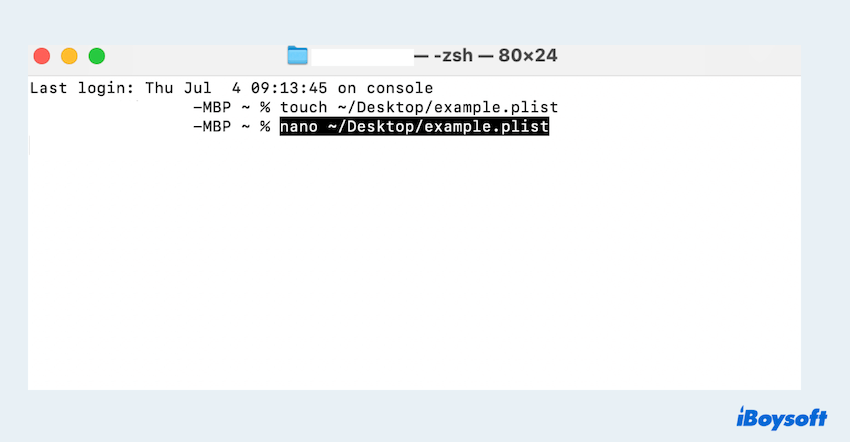
- Enter your PLIST content then save the editor.
(Note Control + 0 to write out and Control + X to exit in nano.)
You can also verify the PLIST directly in Terminal with the command plutil -lint ~/Desktop/example.plist.
Create a plist file on Mac via Automator
Using Automator, you can set up a workflow to automate the creation and customization of PLIST files. However, the process is so flexible that, you can follow these steps to create a PLIST file on Mac using Automator:
- Finder > Applications > Utilities > Automator. (Or Launchpad > Others > Automator.)
- Select New Document > Workflow > Choose.
- In the left panel, select Run AppleScript.
- Drag Run AppleScript from the list to the workflow.
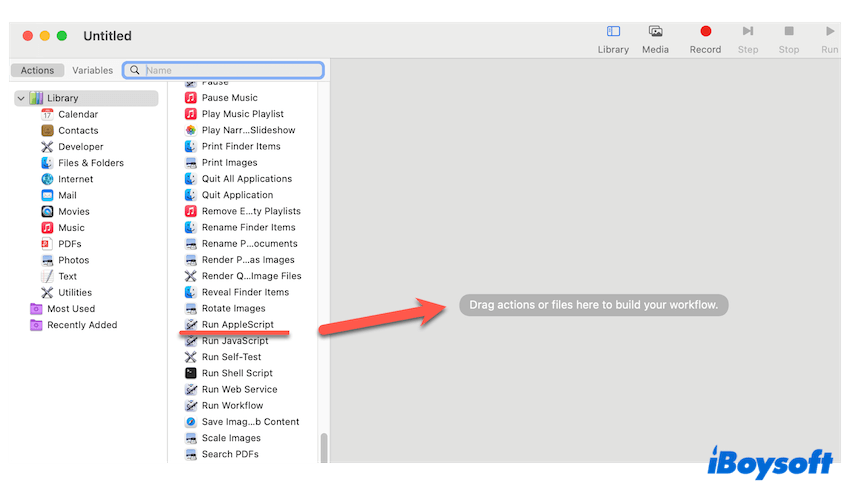
- Replace the default script with an Apple Script that creates a PLIST file.
- File > Save, name, and choose a saving location.
- Click Run and follow the prompts.
If you create a plist file on Mac with these methods, please let others know~
Final words
Creating a PLIST file on a Mac can be as simple or as detailed as you need it to be, depending on your preference and requirements. Whatever you opt for, just be careful to use them, and iBoysoft MagicMenu is the easiest choice, let it give you a shot.
Hope that you can efficiently manage and customize PLIST files, enhancing your macOS or iOS development experience in the later days.
