PNG and JPG are both popular image file formats. But JPG files are typically smaller in size and have wider compatibility. If you need to convert PNG images to JPG to meet the upload requirements of certain social media or proceed with quicker file sharing, follow this guide.
This post will show you how to convert PNG to JPG on Mac using built-in tools, third-party apps, or online services. You can choose the one that you prefer.
| Ways to convert PNG to JPG on Mac | The specific operations | Difficulty level |
| Convert PNG to JPG on Mac with Preview | 1. Open images with Preview. 2. Click on File > Export at the top Preview menu bar. 3. Choose JPEG as the output file format. | Easy |
| Convert PNG to JPG on Mac with Quick Actions | 1. Create Quick Actions in Finder Extensions preferences. 2. Right-click the PNG image to choose Quick Actions. 3. Choose JPEG as the file format. | Medium |
| Convert PNG to JPG on Mac with Photos | 1. Open Photos on Mac. 2. Drag and drop the target images in the Library section. 3. Click File > Export on the top Photos menu bar. 4. Select JPEG and click Export. | Easy |
| Convert PNG to JPG on Mac with iBoysoft MagicMenu | 1. Free download and install iBoysoft MagicMenu. 2. Enable ImageConvert in iBoysoft MagicMenu 3. Right-click the selected PNG files and select ImageConvert. 4. Choose JPG as the output format. | Easy |
| Convert PNG to JPG on Mac with Online-Convert | 1. Search for Online-Convert on your browser. 2. Click Convert to JPG on its homepage. 3. Drag and drop the file to the designated location. 4. Wait until the file is uploaded. 5. Click Start to convert the image to JPG. 6. Download the JPG image. | Medium |
Share the ways to convert PNG to JPG on a Mac with others.
How to convert PNG to JPG on Mac with built-in tools
Several preinstalled apps and functions on your Mac can help you convert PNG to JPG or other formats. You can use them to convert specific or multiple PNG files to JPG absolutely free. Conversely, you can convert JPG to PNG on your Mac with these tools.
By the way, there's no difference between JPEG and JPG.
Convert PNG to JPG on Mac with Preview
Mac Preview allows you to view and edit types of files, including converting PNG images to JPG.
Here's how to convert PNG to JPG on Mac with Preview:
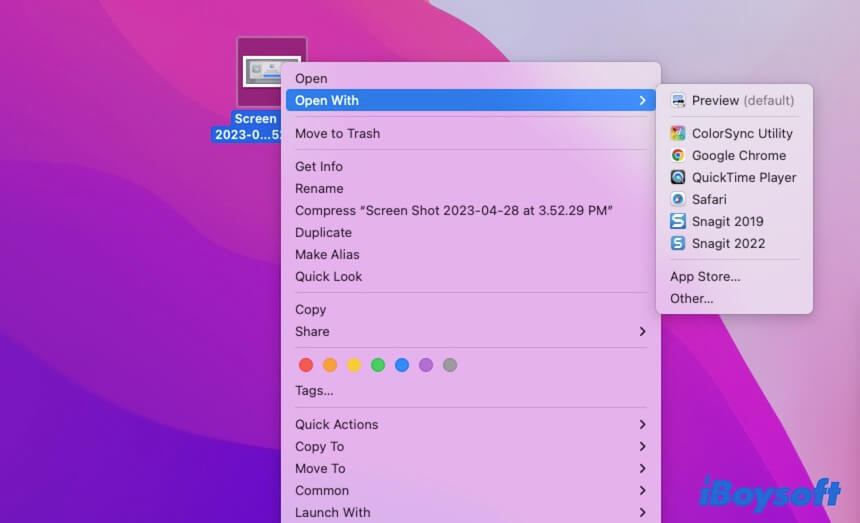
- Double-click the PNG image to open it with Preview on your Mac. If you don't set Preview as default, right-click the PNG image > Open with > Preview.
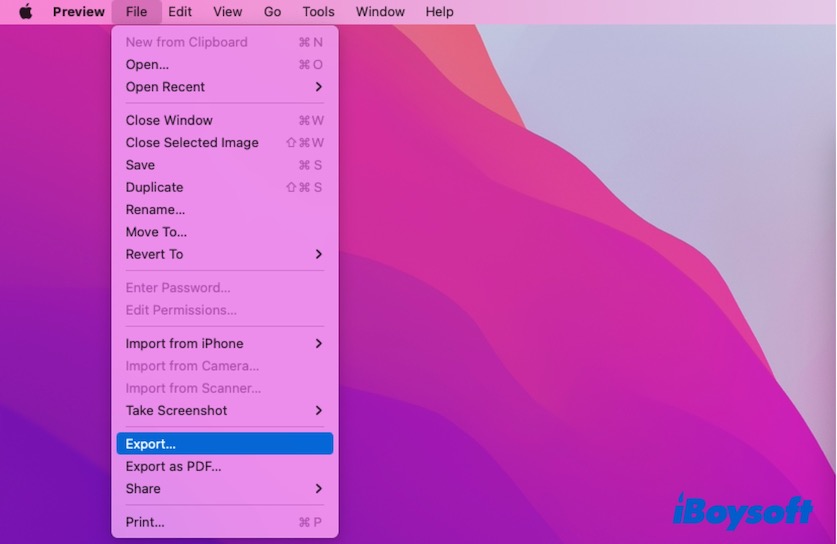
- On the top Preview menu bar, choose File > Export.
- Choose JPEG as the format, type a file name, and choose a destination for the image. You are suggested to keep the default quality for the image.
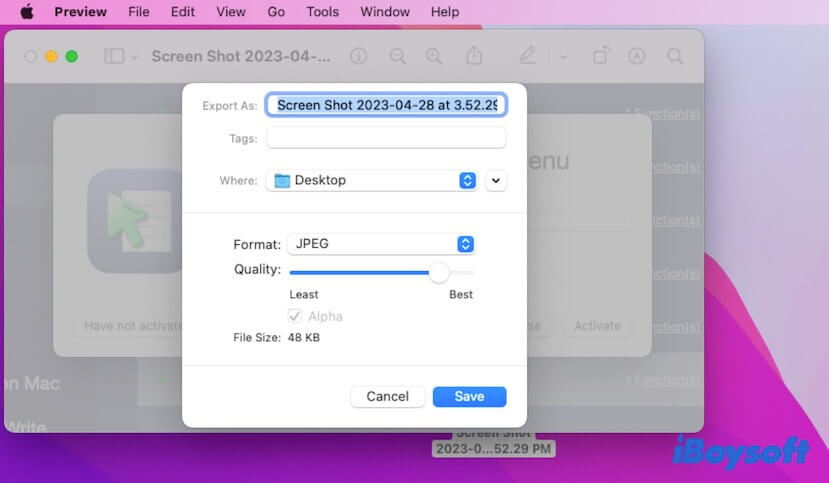
- Click Save.
Then, you can check the converted JPG image in the destination you choose on your Mac.
Convert PNG to JPG on Mac with Quick Actions
Quick Actions works to help you perform some tasks on Mac to simplify your work efficiency. It can be a free PNG to JPG converter to help you convert images from PNG to JPG.
But before using it, you need to create Quick Actions in Finder first. If you've done that, ignore this step.
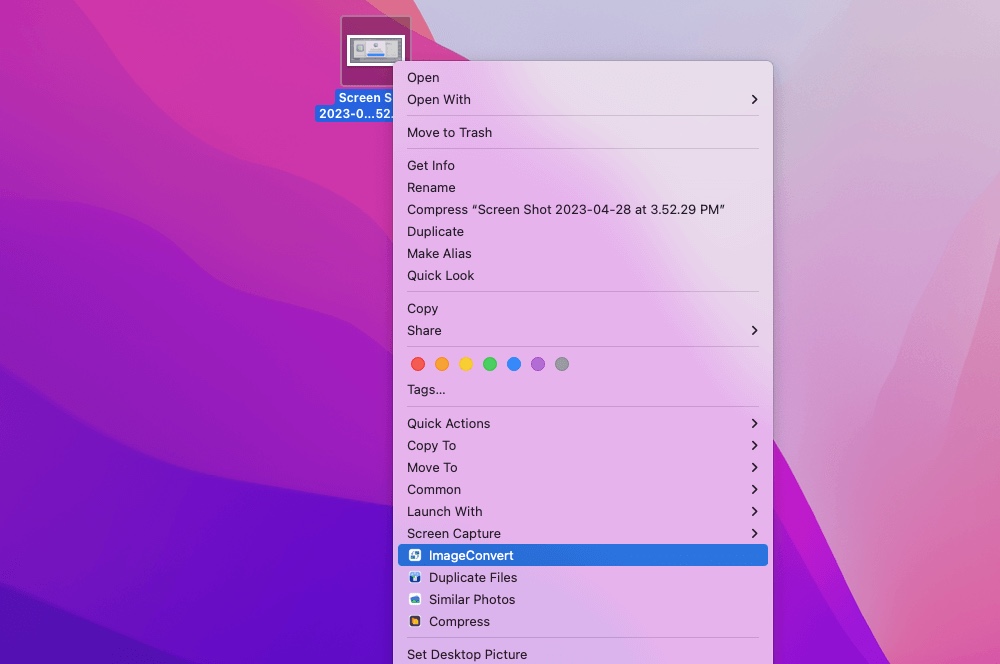
- Right-click the PNG image and choose Convert Image.
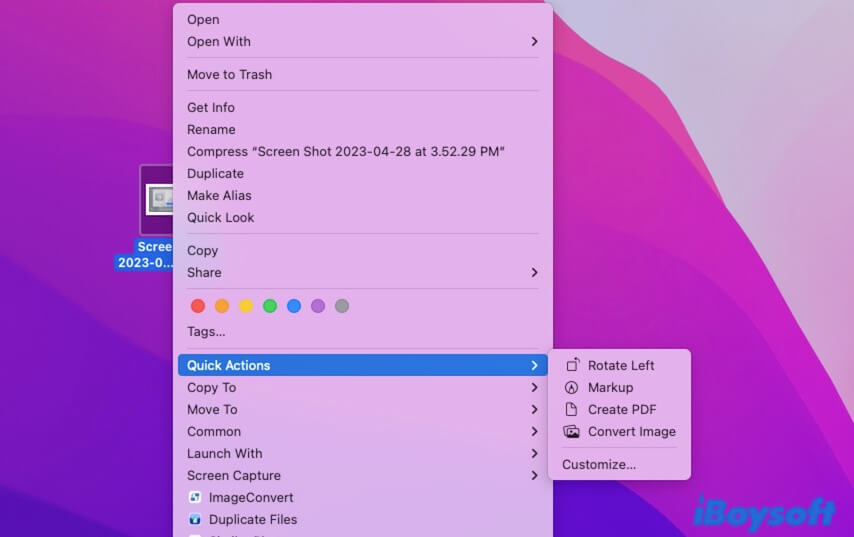
- On the popup Convert Image window, choose JPEG as the format and choose an image size (better to keep the default size).
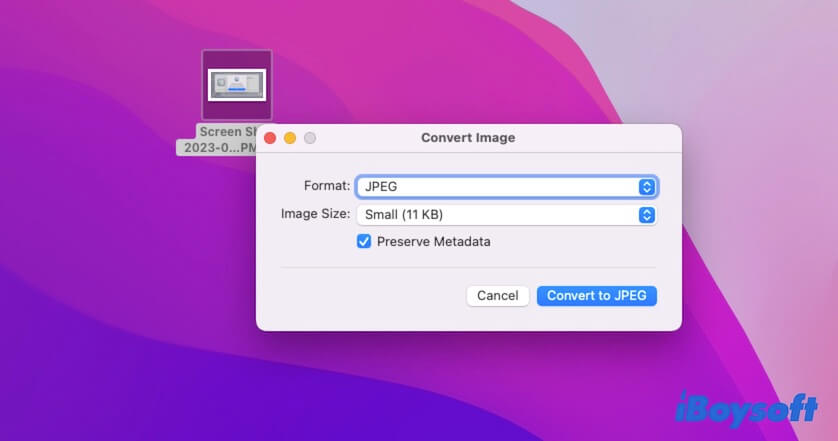
- Click Convert to JPEG.
Now, you can check the JPEG file on the same destination where the PNG is stored on your Mac. You can also select multiple PNG images and right-click on them to use Quick Actions to batch-convert pictures.
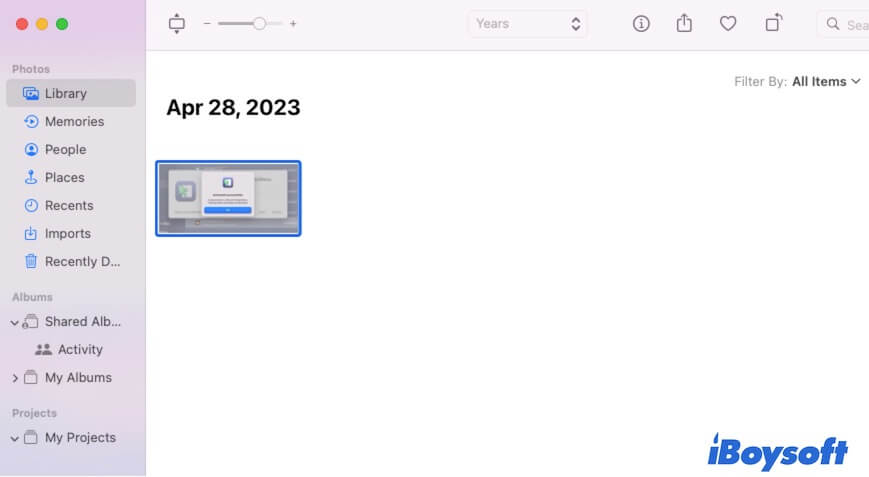
Convert PNG to JPG on Mac with Photos
The built-in Photos app on your Mac is also a free tool to help you convert multiple PNG images to JPG.
- Open the Photos app on your Mac.
- Select the Library tab on the left sidebar and drag and drop the PNG images to the right pane.
- Select the PNG images in Photos.
- Click on File on the top Photos menu bar > Export > Export "the number" Photos.
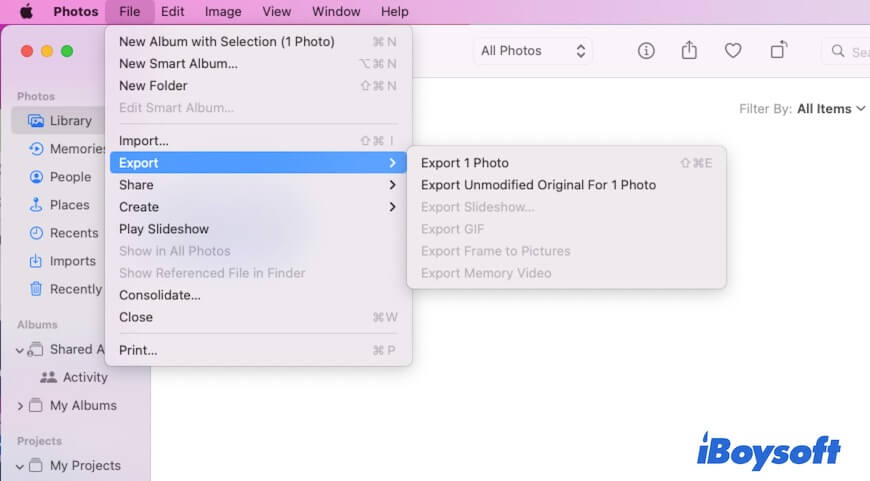
- Choose JPEG in Photo Kind and click Export.
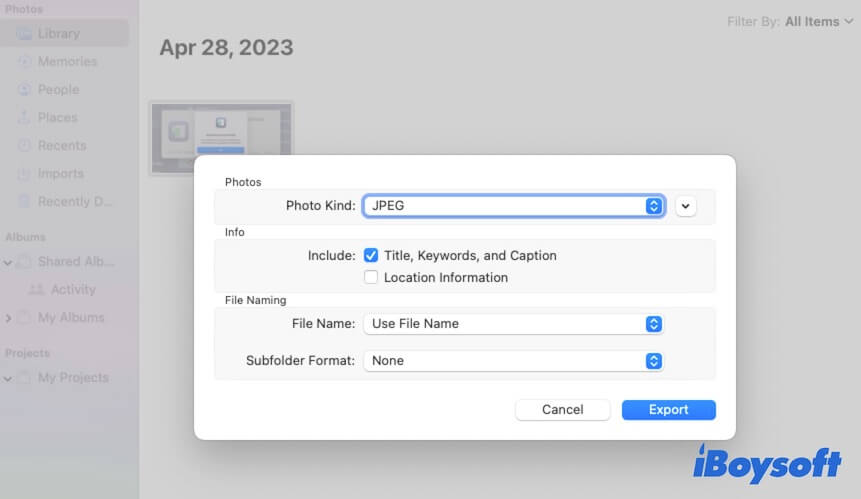
- Choose a destination to save the JPG files.
By the way, you can also use the mentioned tools to convert HEIC to JPG on your Mac.
Useful? Share with your friends.
How to convert PNG to JPG on Mac with third-party apps or services
Different from the built-in tools, third-party PNG to JPG converters are easy to operate and have additional functionalities. They can convert multiple images on your Mac more quickly while keeping the quality.
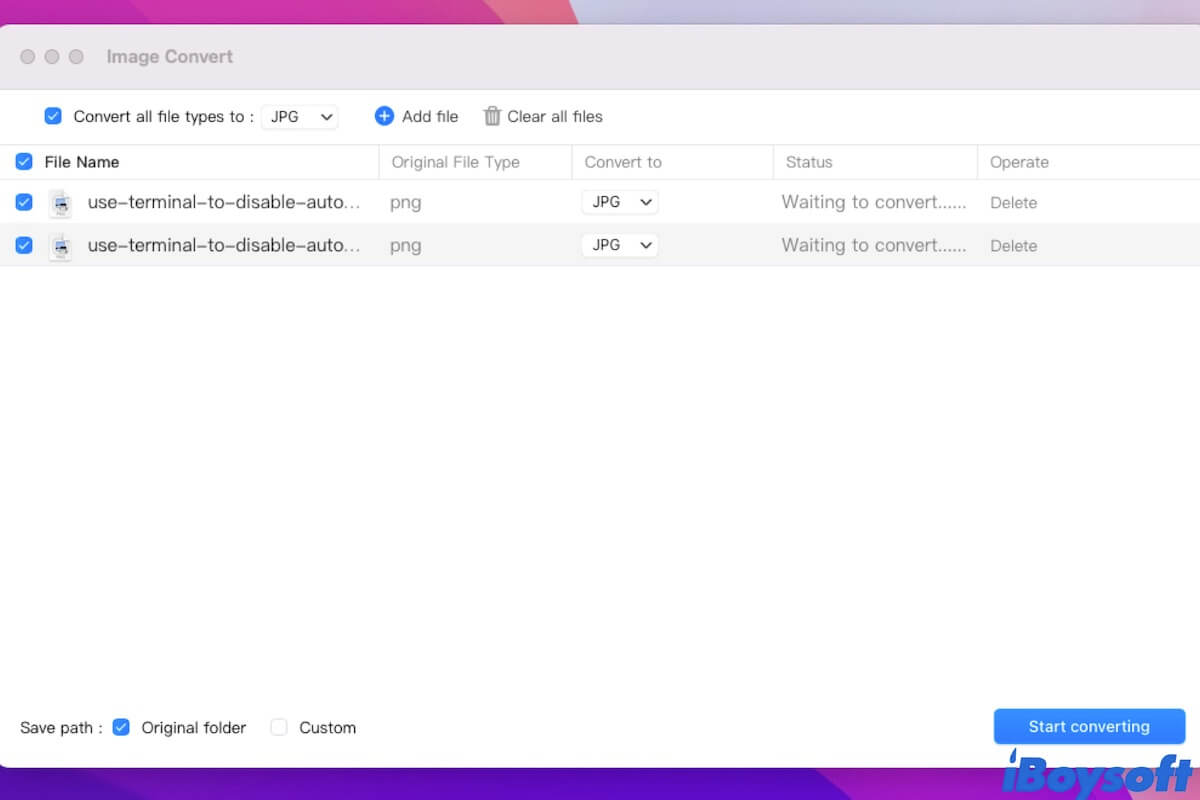
Convert PNG to JPG on Mac using iBoysoft MagicMenu
iBoysoft MagicMenu is a right-click enhancer that contains multiple functions, and converting images is one of them. This Apple-authenticated app supports you right-clicking to convert multiple images to the same file format or different file formats quickly and stably.
Besides converting PNG to JPG, you can also use it to convert various formats of pictures to the common JPG, PNG, and WEBP on your Mac.
Here's how to use iBoysoft MagicMenu to convert multiple PNG to JPG on your Mac:
- Free download, install, and open iBoysoft MagicMenu on your Mac.
- Free download, install, and enable ImageConvert extension in iBoysoft MagicMenu.
- Select the specific or multiple PNG images on your Mac and right-click on them.
- Choose ImageConvert.
- On the box next to Convert all file types to, choose JPG.
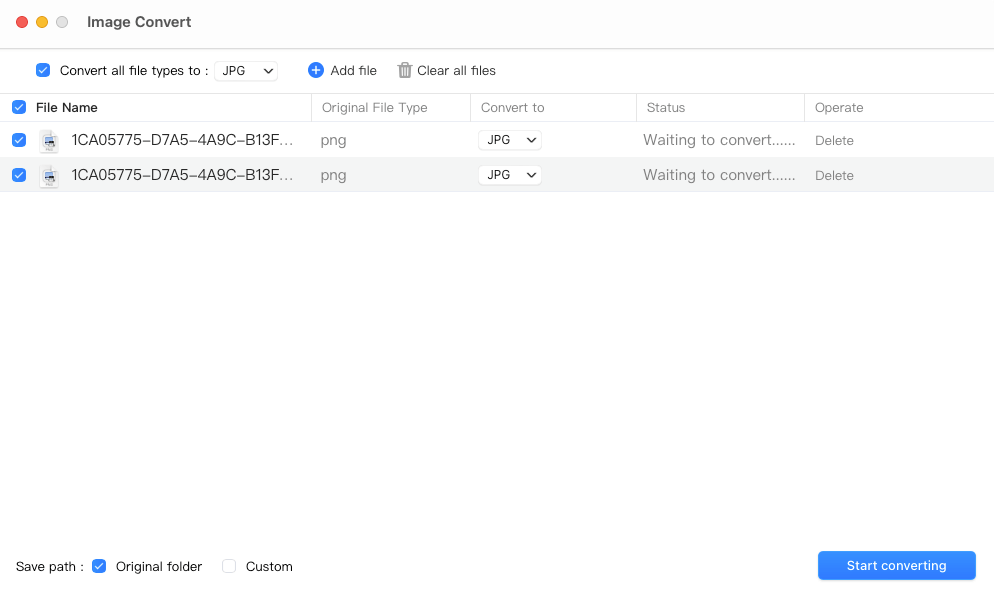
- Choose a destination to save the converted files or keep the default setting - original folder.
- Click Start converting.
Convert PNG to JPG on Mac with Online Converter
Also, you can use an online image converter to help you convert PNG to JPG on your MacBook. But to be honest, online image converters are vulnerable and not secure enough. If you are going to convert private or multiple photos, you are suggested to use a third-party tool.
There are a lot of online services that support converting images. Online-Convert is one of them. Here's how to use it to convert PNG to JPG on your Mac:
- Search for it in Google or Safari.
- Choose Convert to JPG on the homepage of the site.
- Drop your target files to the area it suggested you to or click Choose File to upload them.
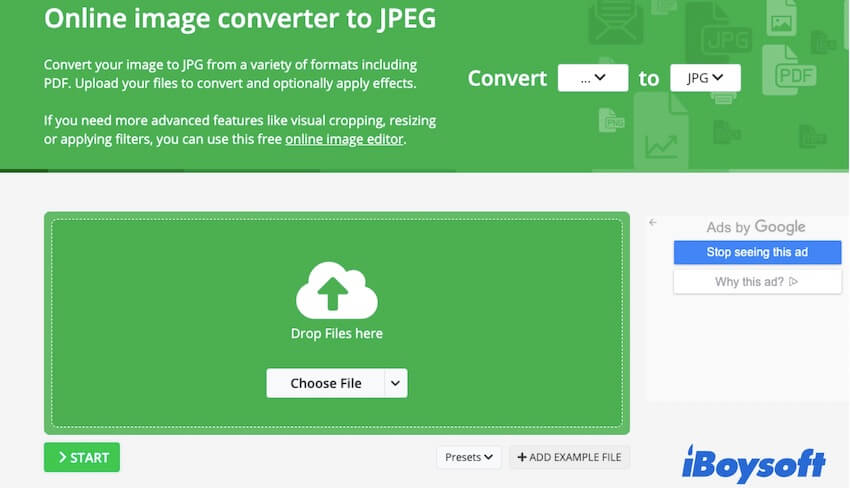
- Wait for your file to be uploaded successfully.
- Click Start.
- Wait until the converting process is done. The process may be influenced by your network.
The file will be automatically downloaded to the Downloads folder on your Mac.
Share the third-party image converters with more people.
FAQs about how to convert PNG to JPG on Mac
- Q1. How to convert a photo to JPG on a Mac?
-
A
You can use the Photos app on your Mac:
1. Open Photos and select the target photo.
2. Move to the top Photos menu bar and choose File > Export > Export 1 Photo.
3. In the Photo Kind field, choose JEPG.
4. Click Export.
- Q2. How to convert a PDF image to JPG on Mac?
-
A
You can use Preview on your Mac to convert a PDF image to JPG. Here's how:
1. Double-click the PDF file to open it with Preview.
2. Go to the top Preview menu bar and select Go > Export.
3. In the popup menu, type in the file name, choose a destination for the image and select JPEG as the Format.
4. Adjust the Quality settings as desired.
5. Click Save.
6. Preview will save the selected image as a JPG file in the location you choose.
- Q3. What app converts PDF to JPG on Mac?
-
A
Preview is a built-in app on every Mac that can convert PDF images to JPG format. Simply open the PDF file with Preview, select File on the top Preview menu bar, and then choose Export. On the popup window, choose the image format to JPEG, and then save it.