
Why do you need to convert HEIC to JPG? If you have an iPhone, the photos you take are always saved in HEIC format by default. However, HEIC images are not compatible with Windows and some websites. You need to convert your HEIC files to JPG, a popular image file format with high compatibility.
If you want to learn how to convert HEIC to JPG on Mac, follow this guide. It covers the four common ways to convert HEIC files to JPG on a Mac.
- Convert HEIC to JPG on Mac with iBoysoft MagicMenu
- Convert HEIC to JPG on Mac with Preview
- Convert HEIC to JPG on Mac with Photos
- Convert HEIC to JPG on Mac with Automator
HEIC vs. JPG: Why convert HEIC files to JPG?
Apple started to use HEIC (High Efficiency Image Container) as the default image format for iPhones with iOS 11 and above. It is derived from HEIF (High Efficiency Image File Format) developed by the Moving Picture Experts Group.
JPG (or JPEG) is the most common compressed image format widely used in digital cameras, Mac devices, Windows PCs, and websites.
Although HEIC files only take up nearly half the storage space of JPEGs with the same quality, the HEIC format has poor software and OS compatibility.
So, in comparison, JPG images are more widely used than HEIC ones.
How to convert HEIC to JPG on Mac/MacBook?
There are diverse ways available to convert HEIC to JPG on a Mac. You can use both the free HEIC to JPG converter (the built-in utilities) or third-party tools. Of course, a third-party image converter is more professional and easy to operate.
This part will introduce the most useful tools to change HEIC to JPG on your Mac. You can compare them and then choose the one you like.
Convert HEIC to JPG on Mac with iBoysoft MagicMenu
iBoysoft MagicMenu is a comprehensive right-click enhancer that contains various lite features, of course, an image converter is among them. It aims to help you right-click to finish a lot of operations on your Mac that only sole third-party tools can help you.
Its outstanding image converter feature allows you to convert images with customization. You can use it to right-click to convert single or multiple images, screenshots, or photos on your Mac at any time. It saves you much time and energy compared with those online image converters.
This powerful tool supports converting different formats of images to the mainstream JPG, PNG, and WEBP.
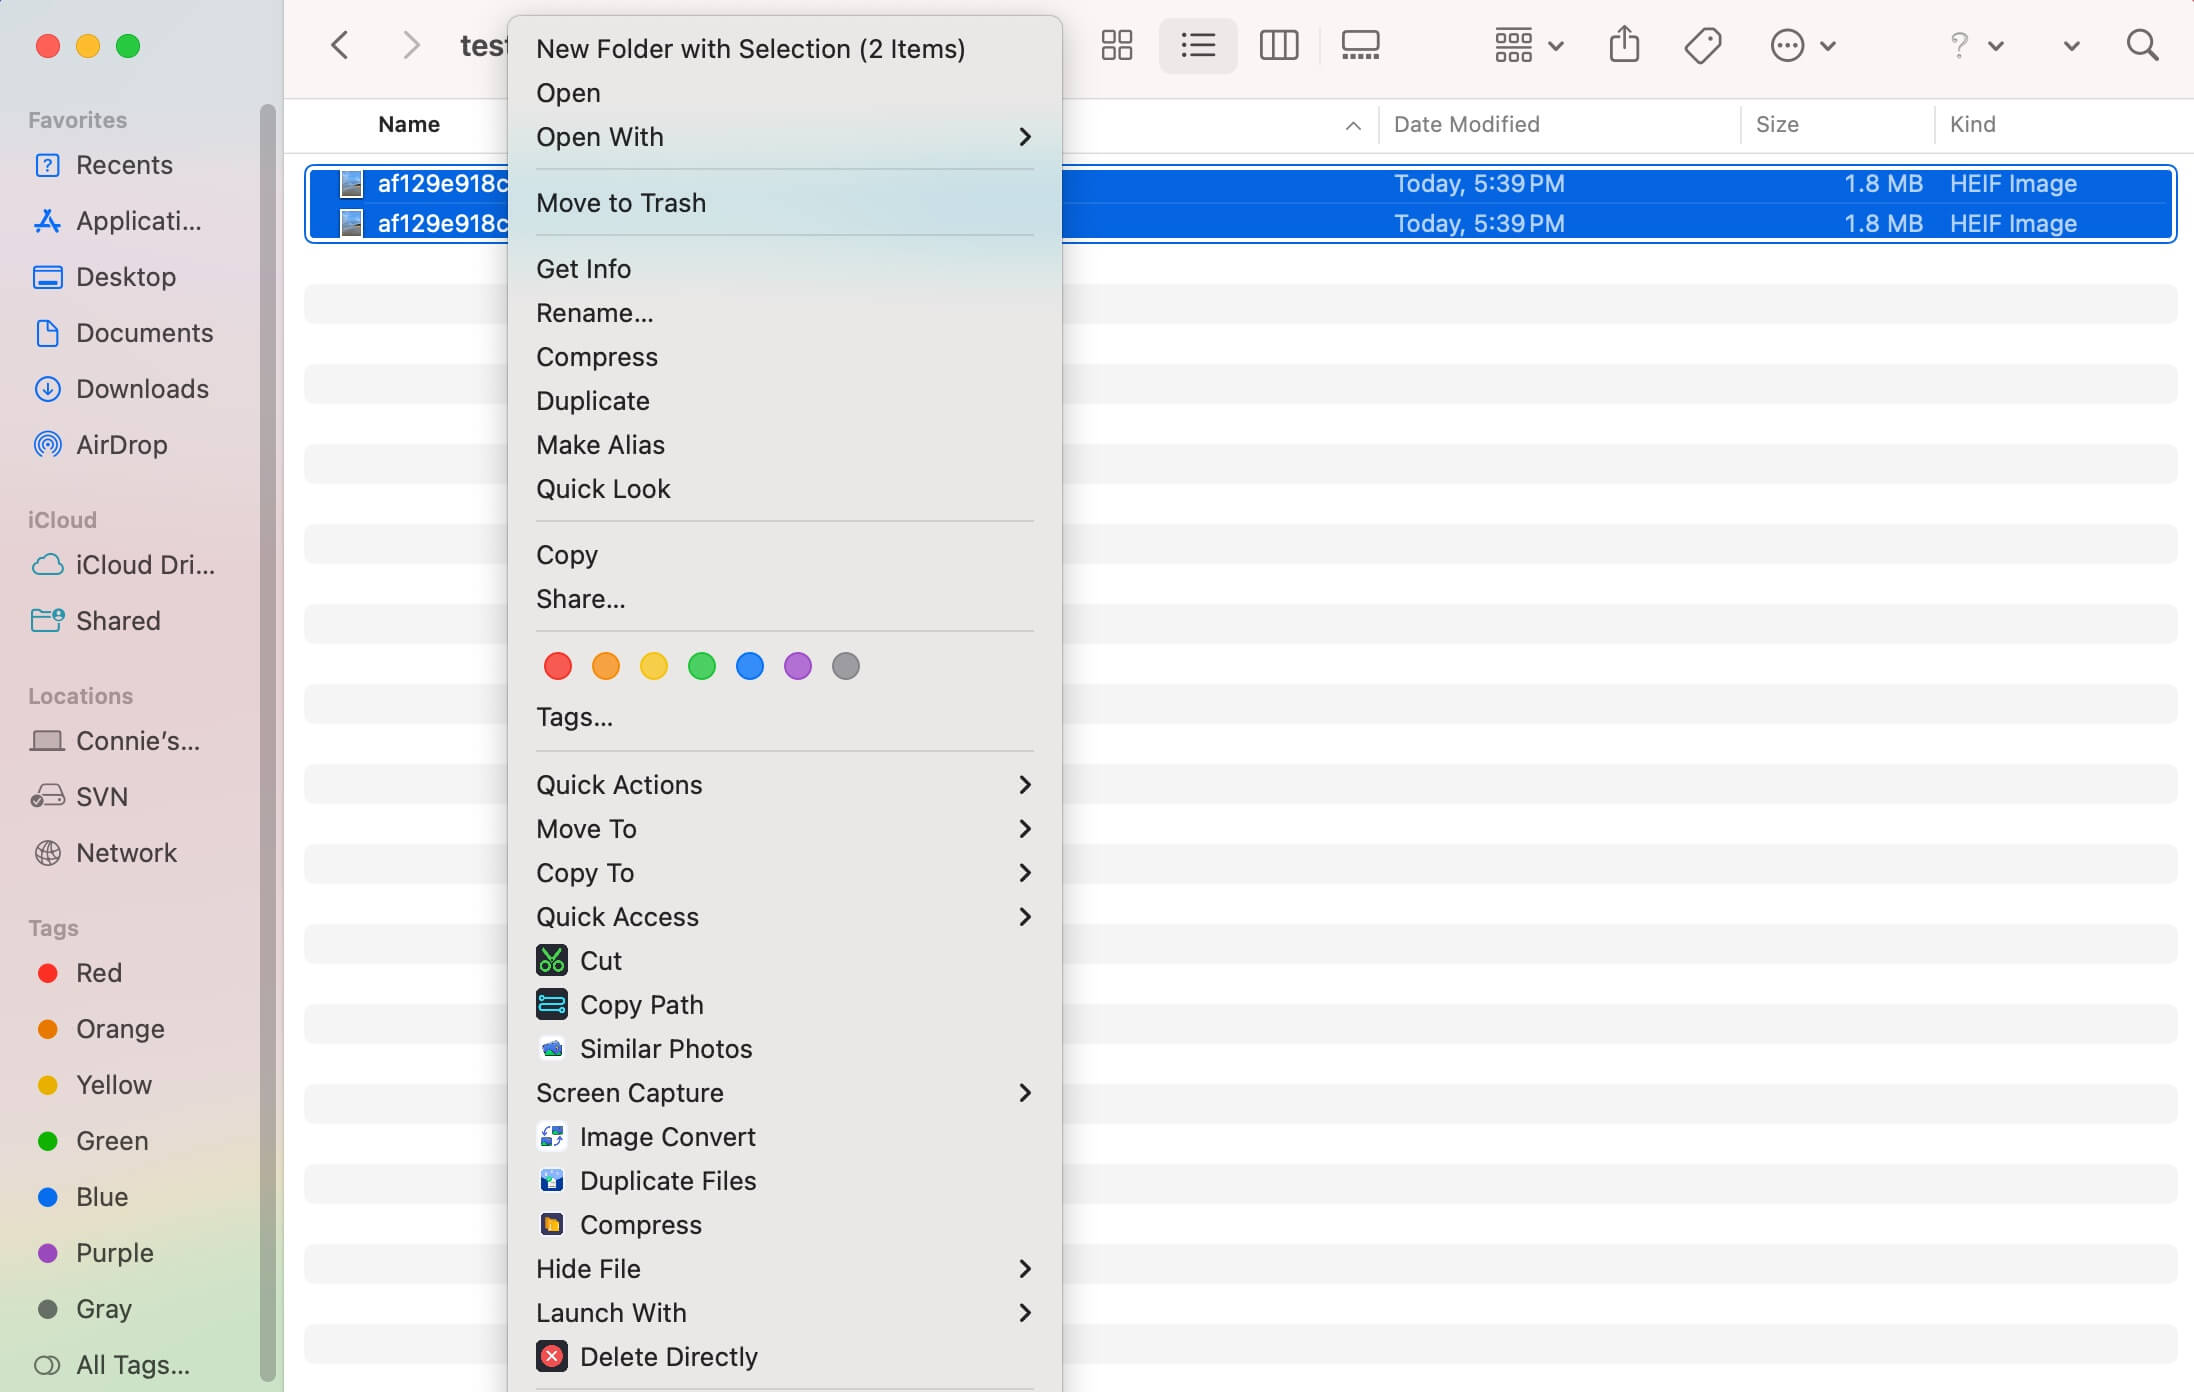
Here's how to use iBoysoft MagicMenu to convert multiple images with a right-click:
- Download, install, and open iBoysoft MagicMenu on your Mac.
- Click "Extension" and scroll down the right panel to find "Image Convert." Click the download button next to this feature to add it to your right-click menu.
- Select all the images you want to convert, right-click on them, and choose "Image Convert."
- Choose the file format you want and click "Start converting."
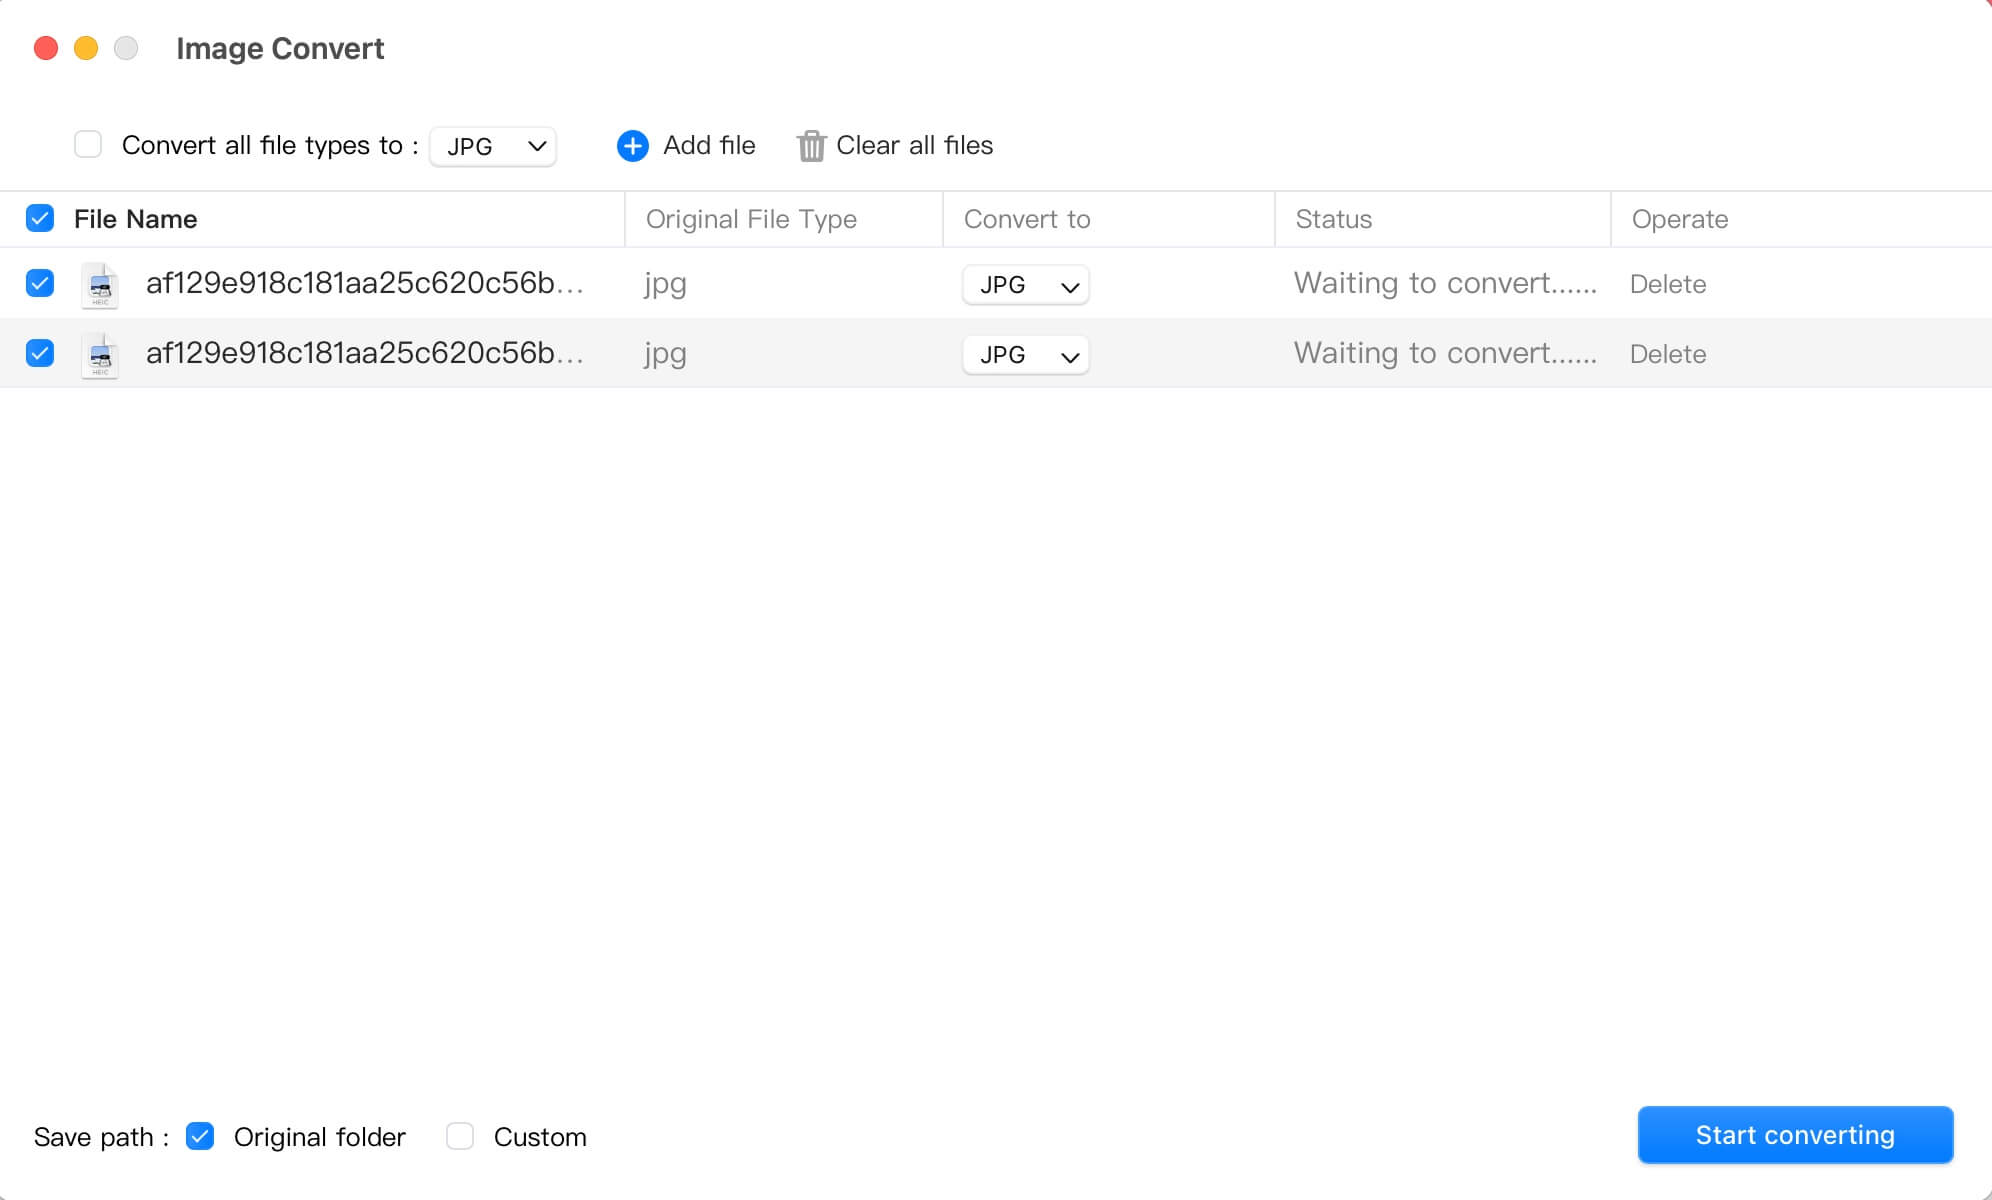
By default, the converted images are saved to the same destination as the originals. You can also customize the save path on the window.
Share this useful tool with more people.
Convert HEIC to JPG on Mac with Preview
The built-in Preview application of macOS enables you to convert your HEIC images to JPG via an easy operation.
Please follow the steps below:
- Open your HEIC photo in Preview. You can bulk open the HEIC photos to convert them to JPG at a time.
- Select File > Export from the Preview menu bar on the top left corner of your screen.

- Choose JPEG from the Format dropdown window. You can move the Quality slider to set your desired compression level. (The higher quality leads to greater image size)
- Rename the file name in Export As: filed and choose a file location in the Where: box.
Now, you get the JPG formatted images. If Preview not working on your Mac, try the below methods to convert the HEIC images to JPGs.
Convert HEIC to JPG on Mac with Photos
If you've transferred HEIC images from your iPhone to the Photos on your Mac, drag them to your Desktop or any other folder on your Mac. These HEIC images will automatically convert to JPG ones.
Or, you can convert the HEIC images to JPGs with the steps below:
- Open Photos and select one or more HEIC images.
- Select File > Export > Export "the number" Photos.
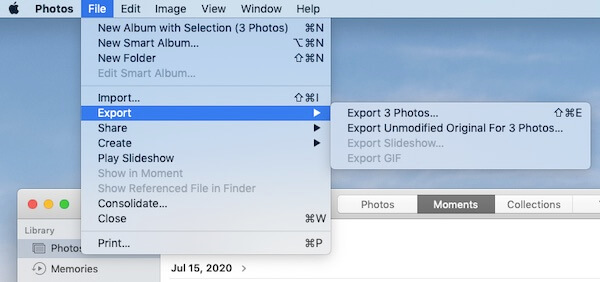
- Choose JPEG in Photo Kind: and set a file name if you want.
- Click Export.
Convert HEIC to JPG on Mac with Automator
Automator is a tool on Mac that allows you to set custom workflows to perform tasks, including converting the file format.
It is a little complex to use Automator to create a workflow for converting HEIC files to JPGs. But we list steps for you:
- Open Finder > Applications > Automator.
- Select either Quick Action or Service and click Choose.
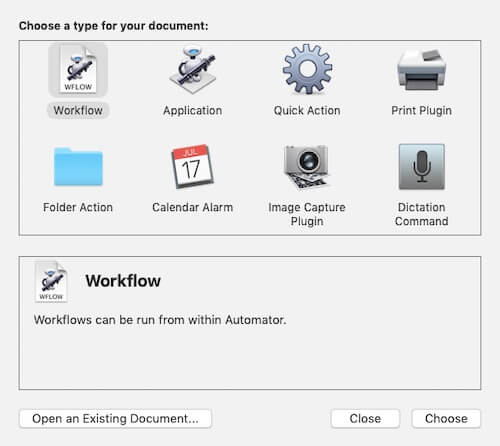
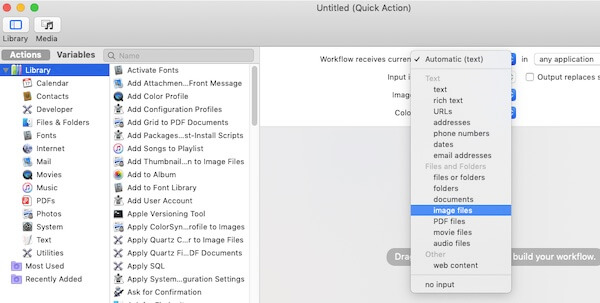
- Click Workflow receives current on the pane and select 'image files' on the dropdown menu.
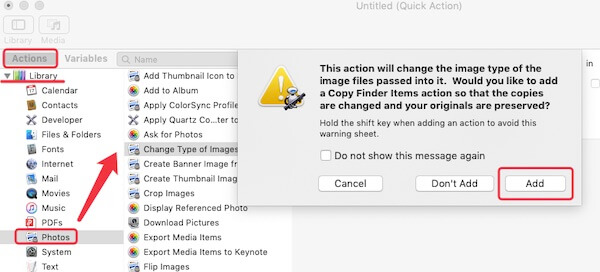
- Choose Actions > Library > Photos on the left sidebar of the window.
- Find the Change Type of Images action and drag it to the area that says 'Drag actions or files to build your workflow'.
- Click Add when the confirmation alert pops up as below.
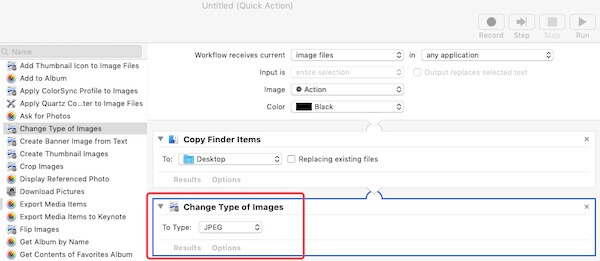
- Change the image type to JPEG in the Change Type of Images field.
- Open File in the Apple menu bar on the top left corner of your Mac. Then, choose Export. Name your workflow and choose a destination for it, and then, click Save.
- Double-click the workflow you've just saved. Click Install when asked if you want to install it.
Now, you can get down to convert your HEIC images to JPGs from Finder.
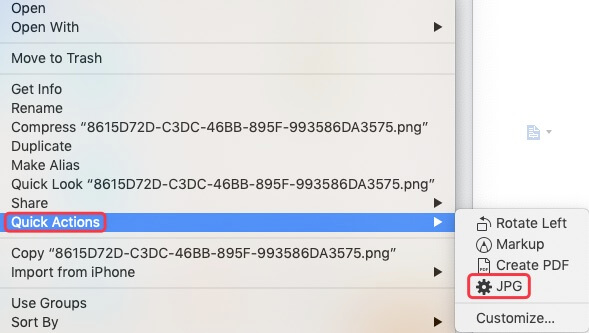
- Select your HEIC images in Finder and right-click them.
- Choose Quick Actions or Services from the menu. Then, select the gear icon with JPG.
The converted JPG image will be saved in the same location of the workflow that you've created just now.
What you may be interested in:
FAQs about how to convert HEIC to JPG on Mac
- QHow do I change multiple pictures from HEIC to JPG?
-
A
You can use iBoysoft MagicMenu. After installing and opening the app, click Extension and download Image Convert from there. Then, select all the pictures you want to convert and right-click on them. Choose Image Convert from the right-click menu and then on the pop-up window, select JPG and click Start converting.
- QIs there a free HEIC to JPG converter?
-
A
Yes, you can use the built-in applications on your Mac to help you convert HEIC to JPG, including Preview, Photos, and Automator.