As is known to all, JPEG is a widely used image format in smartphones and cameras. However, have you noticed that JPEG file sizes get bigger and bigger due to the capability of producing high-quality photography on smartphones and cameras?
If you've moved many JPEG images from your phone/camera to your Mac, you'll find your Mac lacks space soon. In this situation, what can you do to reduce JPEG file size on Mac?
Luckily, this post will walk you through how to compress JPEG images on a Mac in 5 ways, just keep reading.
| JPEG compressor | Specific operations |
| iBoysoft MagicMenu | Right-click on a JPEG file, and select Compress > Save. (You can add more JPEGs together here.) |
| Archive Utility | Right-click on a JPEG file, and select Compress"…". |
| macOS Preview | Open JPEG in Preview, select Tools > Adjust Size > Resample Image option > OK. |
| macOS Photos | Open JPEG in Photos, choose File > Export > Export 1 Photo. Set the compression level and click Export. |
| Online tools | Open CompressJPEG, upload a JPEG file, and then click Download All. |
Among these methods, iBoysoft MagicMenu seems to be the most useful tool, which can satisfy more JPEGs to compress, choose a different saving path, and encrypt the files at the same time. Download it and it will surprise you~
Compress a JPEG on Mac using right-click tool
You must know how to compress a JPEG file on Mac, how about compressing many JPEGs at once? Actually, there is a neat macOS right-click enhancer named iBoysoft MagicMenu that is able to provide a few right-click options on Mac including Compress, Create a new file, ImageConvert, etc.
This utility is capable of compressing photos on Mac in a simple way as well as compressing videos on Mac. It supports compressing various image formats, including JPEG, PNG, TIFF, GIF, etc. Besides, it can help you choose more images as well, choose the compression level, and even encrypt your compressed JPEGs.
To compress a JPEG on Mac with the help of iBoysoft MagicMenu, simply do the following:
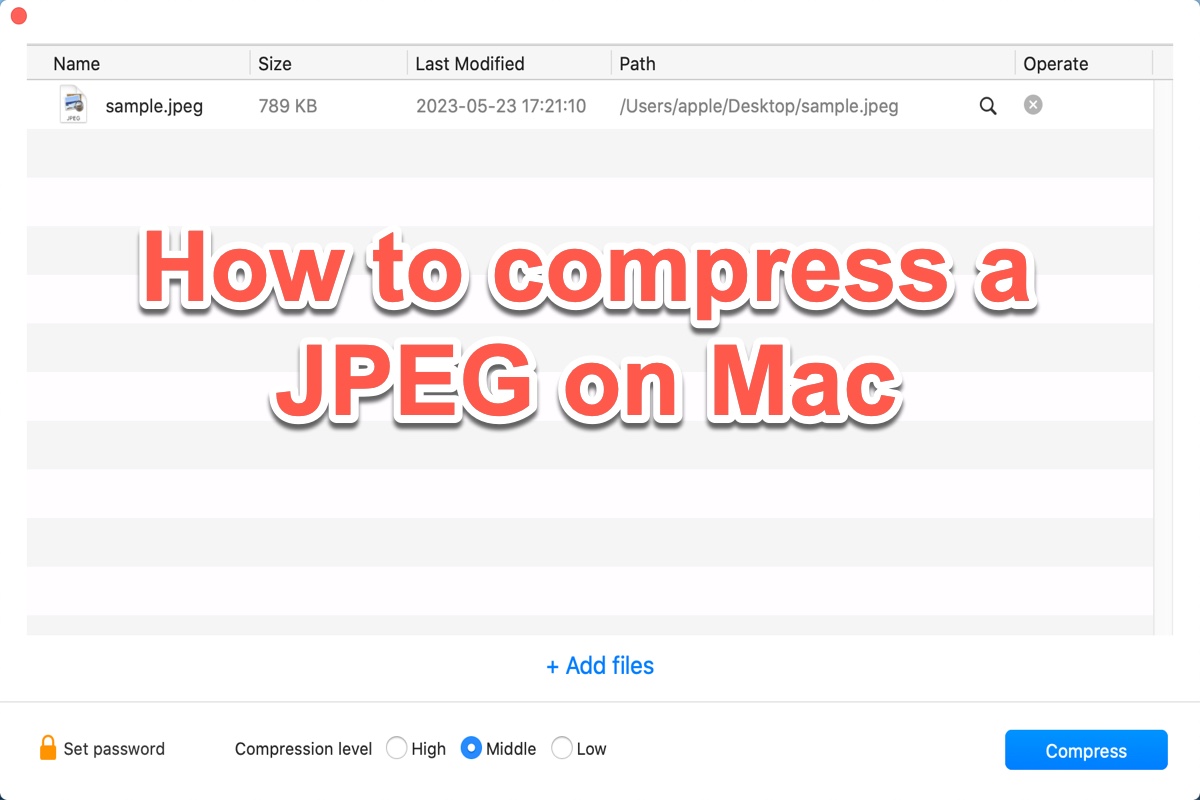
- Free download, install, and launch iBoysoft MagicMenu.
- Right-click on the JPEG and choose Compress.
- You can click "Add files" to select more JPEG pictures to be bulk compressed if needed.
(You can choose the compression level from 3 options: High, Middle, and Low; You can choose to click Set password to encrypt it.)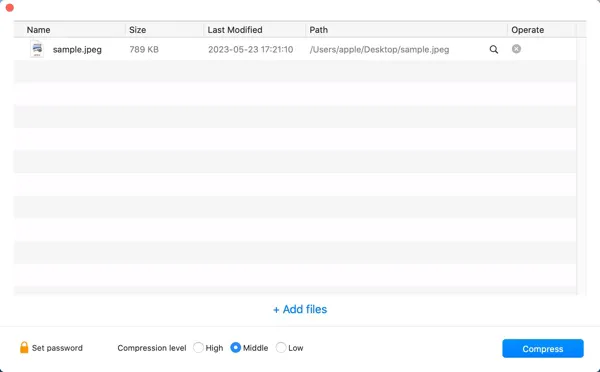
- Click Compress. Rename the compressed file and select where to keep it, and click Save.
If you think this post is useful, please share it with more people, thanks!
Compress a JPEG on Mac with Archive Utility
Apple's macOS employs Archive Utility for both creating and extracting .zip and other types of compressed files. This tool offers a range of options that give you enhanced control over the compression and expansion processes on your Mac.
But it can only compress a single JPEG on a Mac in the same place.
- Right-click the JPEG file on your Desktop or inside Finder.
- Choose Compress"…".(…always the file name of your JPEG file.)
And there are other Apple built-in apps you can choose to compress JPEG on Mac.
Compress a JPEG on Mac with the Preview app
Preview is a macOS built-in photo editor. Luckily, there's a feature in this application that allows you to compress JPEG images on Mac. Just follow these steps to see how to reduce image file size on Mac using Preview:
- Click Launchpad and open the Preview app.
- Choose File > Open and select the JPEG photos you want to compress.
- Click Tools > Adjust Size.
- Adjust the Width and/or Height by pixel. You'll see an estimate of the new size in the Resulting Size section.
- Check the Resample Image option and click OK.
Note: If you want to compress multiple JPEG pictures at the same time. Before step 3, make sure you click on one of the thumbnails in the sidebar and then press Command + A on your keyboard to select all. Then, when you make your size adjustment, Preview will apply it to all of the images.
Compress a JPEG on Mac with the Photos app
In addition to compressing JPEG images with the macOS Preview app, you can also utilize the macOS Photos app to quickly reduce JPEG file size on Mac or MacBook. Here's how to do it:
- Right-click on a JPEG picture you want to compress in macOS Finder and choose to open it with the Photos app.
- Click File > Export > Export 1 Photo from the top menu. Alternatively, you can press Command + Shift + E.
- Click the tiny arrow next to Photo Kind to see more options.
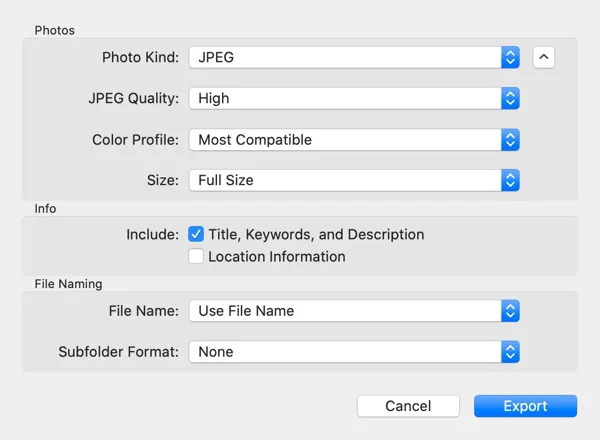
- Accordingly, set the Photo Kind, Quality, and Size to compress the images.
- Click Export > choose a location > Export.
Compress a JPEG on Mac with online compressors
If you don't want to use apps to compress a JPEG image on Mac or you can't compress files or folders on your Mac with the above-mentioned tools. You can try an online image compressor. But this way always limits the number of images and has high risks of privacy leaks.
Type the compressor in your browser then choose your preferred online image compressor. To compress a JPEG on Mac using one of them, do the following:
- Open one tool in your Mac browser, and click Upload Files.
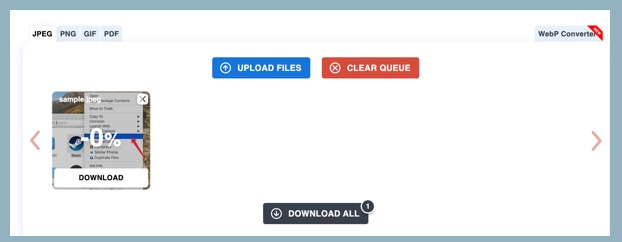
- Select the JPEG files you need to compress and click Open.
- Wait for the JPEG file to finish uploading and click Download All. A new zip file should be saved to your Mac Download folder, which is the compressed JPEG file.
Would you please share these useful ways on your social media to help others compress JPEGs on a Mac? Many thanks!
JPEG vs JPG: which is bigger in size
Sometimes, you may wonder about the difference between JPEG VS JPG. Are they the same? Which one is bigger in size?
JPEG, which stands for Joint Photographic Experts Group, is a widely used format for storing and sharing digital images. Meanwhile, JPG is a shortened version of JPEG. The reason why JPG exists is that earlier versions of Windows operating systems (MS-DOS 8.3 and FAT-16) don't support extensions with more than 3 letters.
So .jpeg was shortened to .jpg. While Windows and/or DOS had this limitation, UNIX did not, so the UNIX and Mac users continued using the .jpeg extension. Therefore, JPEG and JPG are almost the same file formats with the only difference being the number of characters used in the file extension.
This means converting JPEG to JPG on Mac won't affect the image file size. To reduce a JPEG file size on Mac, it's better to compress it using the above methods. Among all the ways to compress a JPEG on Mac is to use right-click by iBoysoft MagicMenu. Free download it and try it now.
- QHow do I reduce the file size of a JPEG photo on Mac?
-
A
To reduce the file size of a JPEG photo on Mac, the best way is to compress it using iBoysoft MagicMenu, macOS Preview, macOS Photos and online image compressor.
- QIs it safe to compress JPEG files on Mac online?
-
A
It is safe to upload and compress JPEG files on Mac using a professional online tool. Any online image compressor has no ability to delete your JPEG files from your system and a professional online JPEG image compressor should never keep or use your uploaded image files for commercial. If you're quite concerned about the safety of using an online image compressor, try macOS built-in image compress tool, instead.