macOS Sonoma has come to the public for several months since September 26, 2023. After going through a few minor iterations of the software and the operating system, and continually resolving various bugs and glitches, it gets more stable and smooth for use.
However, not all users will fancy the slightly updated software or features, so some of them choose to clone macOS Sonoma to an external hard drive as a backup to roll back the Mac someday. Besides that, here are some other reasons urging you to create a macOS Sonoma clone. What are they? Let's make them known in this post!
What does clone macOS Sonoma to an external SSD/HDD mean?
Unlike Time Machine which only backs up user files and folders, a macOS clone means that you make a full and comprehensive copy of Mac's internal hard drive, including all crucial system files, settings, and information stored to boot your Mac up and pre-installed applications or programs included in the macOS Sonoma update.
If you find this article helpful, please share it with your followers to help more people!
Why should you clone macOS Sonoma to an external SSD/HDD?
Here are sorts of reasons that encourage you to clone the whole macOS Sonoma installed on your Mac computer, which are listed here one by one:
- Clone macOS Sonoma to an external hard drive to make a macOS Sonoma bootable installer
- Clone macOS Sonoma from a damaged Mac for later restoration before professional repair
- Clone macOS Sonoma as a backup to avoid data loss as Time Machine only backs up your files and folders but not the entire drive and macOS data
How to clone macOS Sonoma to an external hard drive?
Cloning a macOS drive is not as complex as you imagine with the assistance of this article, but it does take some time. So please be patient and you can perform this task with ease!
Prepare to clone macOS Sonoma to an external hard drive
Before we carry on the macOS Sonoma clone work, here are some requirements that need to be done:
- An erased external drive with space of more than 12GB (we'll show you how to erase a drive on Mac later)
- A functional Mac computer with macOS Sonoma installed
- A suitable Mac Cloning Software for the macOS Sonoma drive clone
How to erase a hard drive for a macOS Sonoma clone?
It's worth mentioning that the data on the drive will be wiped completely after the drive is erased, so you ought to back up them firmly beforehand.
- Connect the external SSD/HDD to your Mac computer.
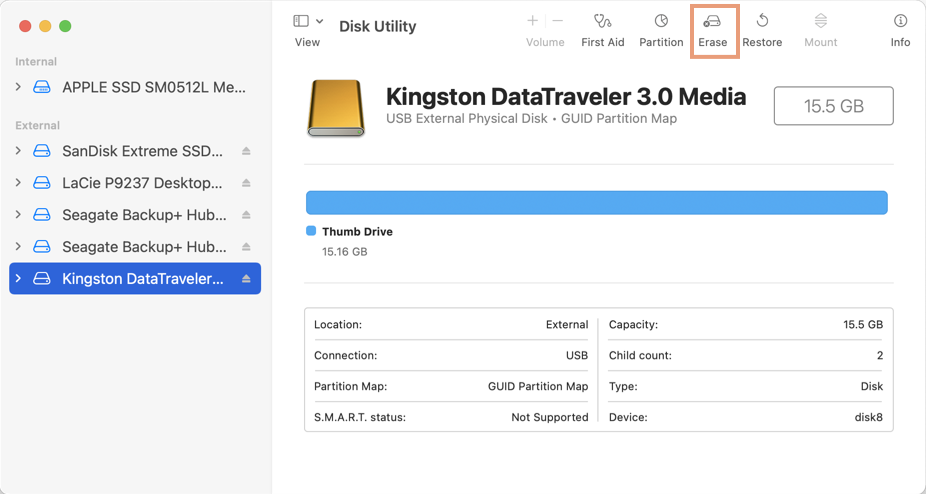
- Launch Disk Utility and select the drive you will erase in the left sidebar.
- Select Erase in the main toolbar of Disk Utility.
- Give your clone destination drive a name and choose APFS as its File System.
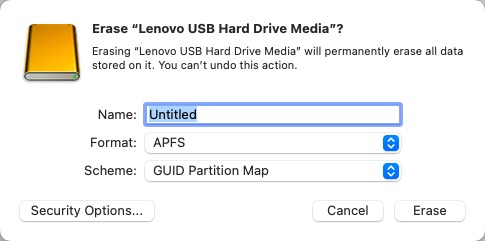
- Select GUID Partition Map in the Scheme if there is a Scheme box.
- Tap Erase to confirm your actions.
- When you're done, click the Done button.
How to clone macOS Sonoma to an external hard drive?
With all requirements done, now we can set about cloning macOS Sonoma to an external SSD or HDD. We need Disk Utility to complete the macOS Sonoma clone here. Just read on to put extra protection on your system file and the system.
- Launch Disk Utility. To do this, you can use Spotlight Search to find and launch the application. Simply press the Command + Space bar at the same time and then type in Disk Utility. It will then show up as one of the results.
- When Disk Utility is launched, select the backup drive used as the target drive and click Restore on the top menu bar.
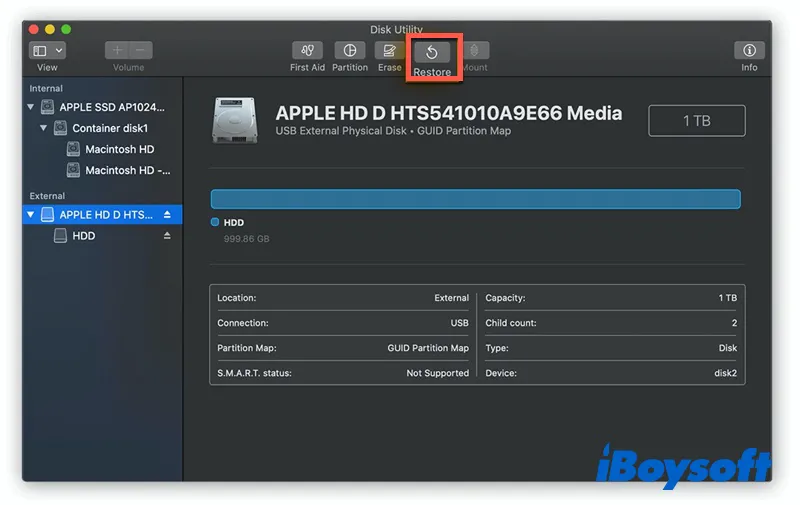
- Disk Utility will display a new window with a drop-down menu labeled Restore from. Select your Mac SSD (normally APPLE SSD XXX) from the drop-down menu as the source drive., then click Restore to begin the cloning process.
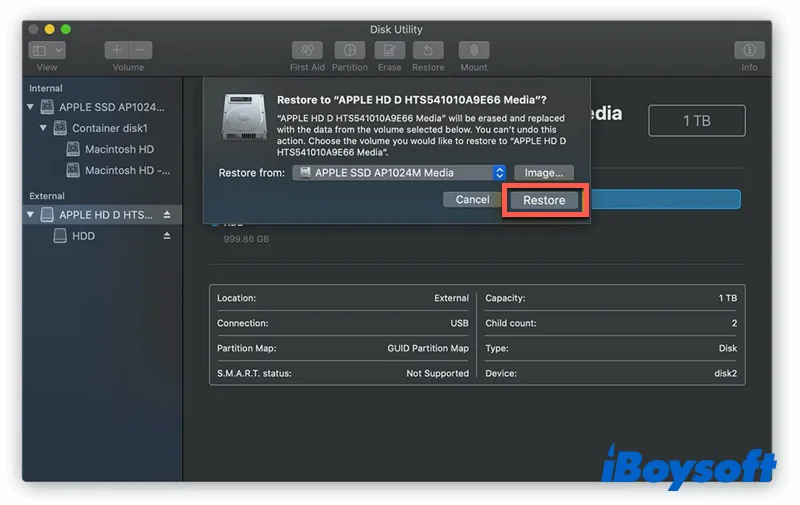
- Then, Disk Utility will show you a status bar that slowly fills up as it clones your drive. When it's finished, click Done to complete the operation.
After the macOS Sonoma cloning process
Once you have cloned macOS Sonoma to the desired drive successfully, you'd better take care of the external hard drive well, preventing it from abrasion, physical damage, and dust/water/fire/oil environment. You can also make an extra backup of this hard drive for further file safety.
We'll appreciate it if you would like to share this article with more people!
How to restore your Mac from the clone drive?
Now that you have a macOS Sonoma clone drive, you can restore your Mac by using it if you run into some trouble:
- Turn off your Mac and connect the external hard drive to your computer.
- Turn on your device and boot it into macOS Recovery mode.
- Select Disk Utility and click Continue in the macOS Utilities window.
- Select your hard drive.
- Click on the Restore tab at the top of the Disk Utility window.
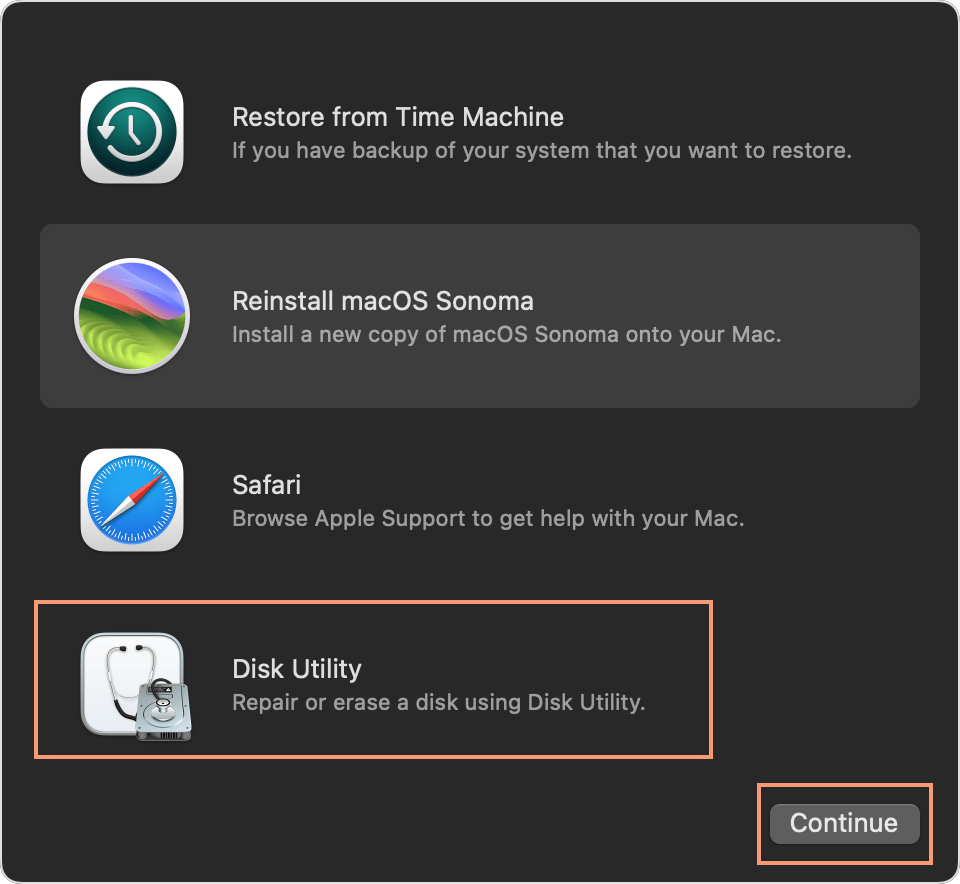
- Select your external drive next to Restore From.
- Select your Mac's hard drive next to Restore and click Restore.
- Once the backup has finished restoring, restart your computer.
How to choose a suitable Mac cloning software?
Sometimes you may be unsatisfied with the included backup utility on macOS - Time Machine, here we recommend a professional alternative that you can run as a backup tool, that is, iBoysoft DiskGeeker, which facilitates the creation of a full and exact replica of your Mac hard drive with its Disk Clone feature.
We evaluate the Mac cloning software by testing its performance, key features, ease of use, and overall values for users. Through comprehensive and professional testing, we find that stands out for its excellence among all the criteria mentioned before.
By using iBoysoft DiskGeeker, you can clone the Mac hard drive as the file backup directly. This software allows you to perform this mission with less time and effort. Note that the startup drive cloned by this software cannot used as a bootable device.
Step 1: Download iBoysoft DiskGeeker on your Mac computer.
Step 2: Connect the external hard drive to your computer with a cable or adapter.
Step 3: Launch iBoysoft Diskeeker to use its Disk Clone feature.
Step 4: Select the source disk (the entire disk you want to back up files from) at the left sidebar of the iBoysoft DiskGeeker window.
Step 5: Click Clone from the right toolbar.
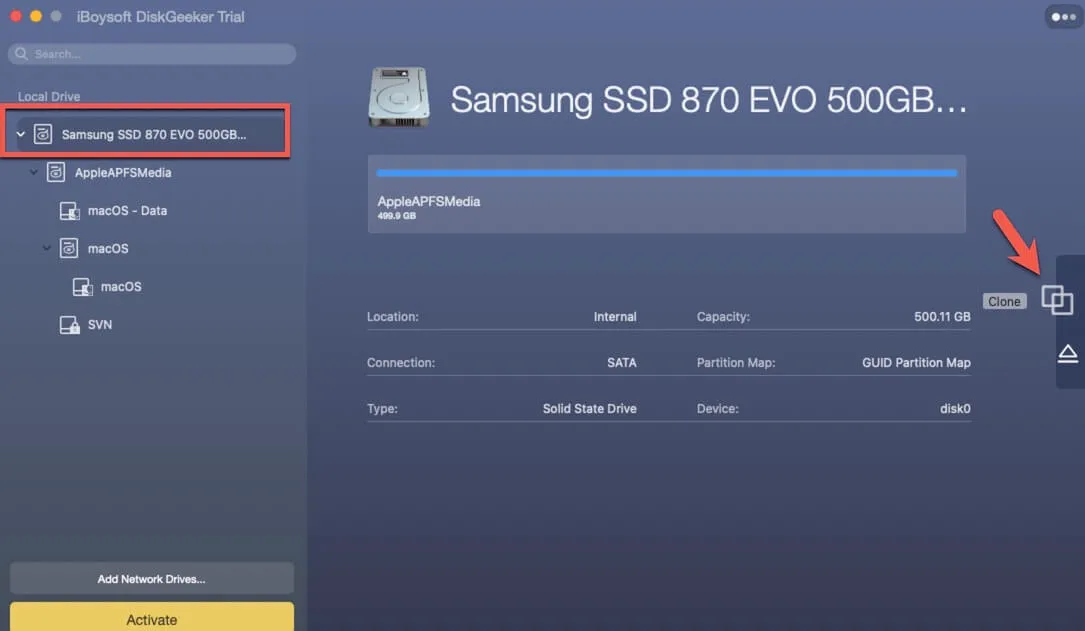
Step 6: Choose the destination SSD/HDD from the pop-up list and click startClone. A prompt will warn you to make a backup of the destination disk because cloning the disk will overwrite all data on it. If you click OK, the clone starts.
The cloning process can't be terminated once it begins. If the process is terminated accidentally, the disk cloning will resume automatically when the two disks are connected to your Mac again.
Conclusion
This post gives you an overall process on how to clone macOS Sonoma to an external hard drive for backup or other reasons, allowing you to perform that task with ease, even if you're a green hand to hard drive cloning. If you would like to clone macOS Sonoma to an external SSD/HDD, do not hesitate and have a reading right now!
