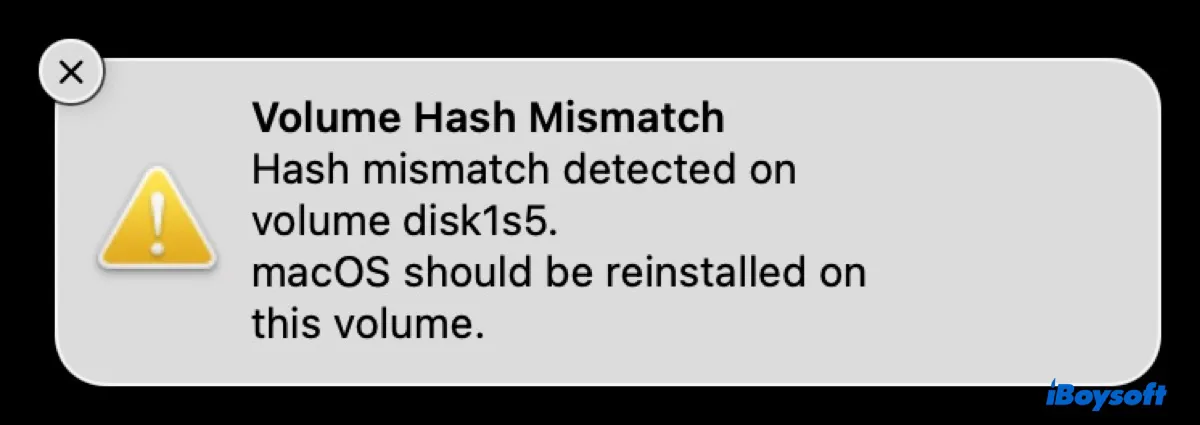
Some Mac users have encountered the "Volume Hash Mismatch" error on macOS Monterey, especially after installing a point release like macOS 12.1. Its full message reads similar to, "Volume Hash Mismatch. Mismatch detected on volume disk1s1. macOS should be reinstalled on this volume."
Though the error doesn't affect the stability of some Macs, it causes system crashes and frozen apps on others. If your Mac keeps crashing after "Volume Hash Mismatch" pops up, read on to find the solutions.
What is the 'Volume Hash Mismatch' error on Mac?
"Volume Hash Mismatch" is a Mac error that occurs mostly on macOS Monterey. It shows up randomly on Mac, as users have reported it appearing when the Mac boots up, opening an app like Safari, etc. Some possible causes of this error are: disk errors, system glitches, upgrading an unsupported Mac through OCLP, or hardware failures.
Click the button below to share this post.
How to fix 'Volume Hash Mismatch' on Mac?
If you have followed the advice in the "Volume Hash Mismatch" error to reinstall macOS, you probably have found the issue recurring after a reboot. In this case, it's a good idea to back up your Mac with Time Machine or other backup methods of your choice in case something goes wrong and you lose your essential data.
Once your data is safe in another drive, follow the solutions below to fix the "Volume Hash Mismatch" error on Mac.
- Repair your Mac with Disk Utility First Aid
- Clean reinstall macOS
- Install the latest macOS full installer
- Disable FeatureUnlock
- Flush disk cache
- Reset SMC and NVRAM
- Run Apple Diagnostics
- Downgrade macOS
- Ask Apple Support for help
Repair your Mac with Disk Utility First Aid
When encountering "Volume Hash Mismatch" on Mac, it's recommended to hard restart your Mac and run First Aid to check and repair disk errors on the offending volume. For instance, if the message states that "Volume Hash Mismatch. Mismatch detected on volume disk1s1. macOS should be reinstalled on this volume," you can select disk1s1 to be scanned.
- Press and hold the power button until your Mac shuts down.
- Restart your Mac.
- Open Disk Utility from the Applications > Utilities folder.
- Select the volume that "Volume Hash Mismatch" was detected.
- Click First Aid > Run to examine the volume.
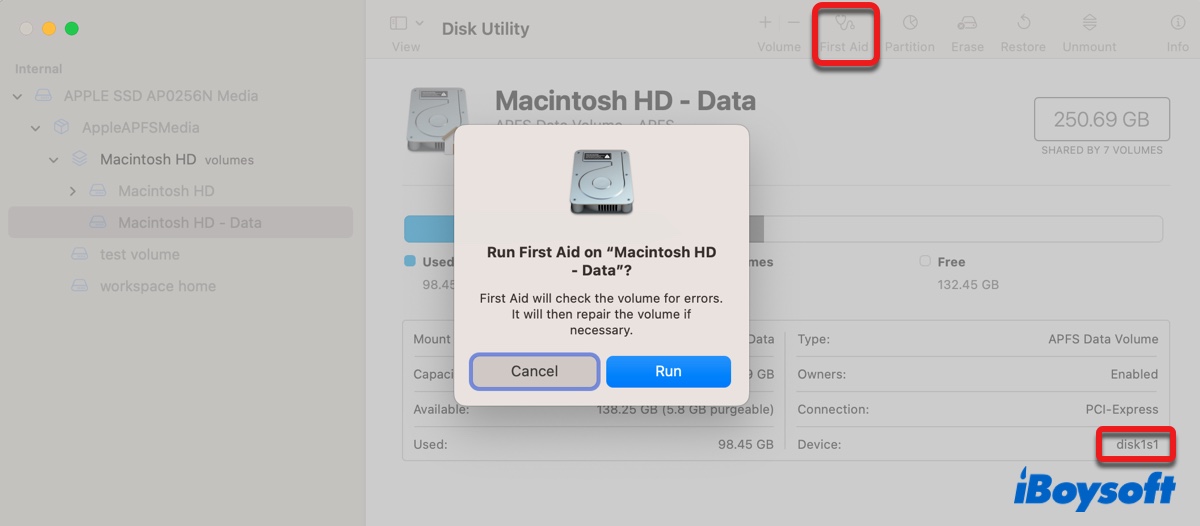
If Disk Utility finds errors, reboot in Recovery Mode to fix them. After the volume that yields the error is repaired, you can continue checking your startup disk, starting from the last volume under your APFS container (likely Macintosh HD - Data), and finishes with the disk itself (APPLE SSD).
Clean reinstall macOS
If the issue persists after running First Aid, you should consider clean reinstalling your Mac to start fresh. You might have tried to enter macOS Recovery and click the "Reinstall macOS" button to reinstall macOS as the error suggested.
This way, you overwrite the system volume but keep the data volume intact. However, this may be where the issue lies. So it's advisable to back up your Mac and erase your startup disk and then reinstall macOS.
Install the latest macOS full installer
If you started to experience "Volume Hash Mismatch" on MacBook after updating macOS, it may be caused by a software bug on the updated macOS and a later release may have the bug fix covered. You can check the Software Update pane in System Preferences to see if a newer release is available.
If there is one, download the full installer from the App Store, then install the update to your startup disk.
Disable FeatureUnlock
FeatureUnlock may also be the culprit that's causing "Volume Hash Mismatch" on Mac if you upgraded to macOS Monterey with OCLP (OpenCore Legacy Patcher). To fix it, rerun the installer and disable FeatureUnlock in Settings > Misc Settings.
Flush disk cache
Some users have managed to get rid of the error by force flushing the disk cache by running the following command in the Terminal app. You should also give it a try.
sudo purge
Reset SMC and NVRAM
Resetting the System Management Controller and NVRAM on Mac is helpful for fixing "Volume Hash Mismatch" on Monterey too. The former manages the important physical components of your Mac, such as fans, status lights, system performance, and power supply. While the latter deals with the settings information about your operating system.
Run Apple Diagnostics
You may also experience "Volume Hash Mismatch" on macOS Monterey if your Mac is having hardware issues, such as a bad stick of RAM. To verify and determine which hardware component is at fault, you can run Apple Diagnostics, the previous Apple Hardware Test.
Shut down your Mac, unplug unnecessary external peripherals except for the keyboard, mouse, display, ethernet, and power, then follow the steps below.
On an Intel-based Mac:
- Press the power button to turn on your Mac, then immediately press and hold the D key.
- Release the key when seeing a progress bar or being asked to select a language.
On an Apple Silicon Mac:
- Press and hold the power button until you see the startup options window with a gear icon labeled Options.
- Press the Command + D keys.
Downgrade macOS
Another way to stop "Volume Hash Mismatch" from affecting your Mac is to roll back to the stable version that you were using previously. You can do that easily if you have a Time Machine backup taken before the upgrade. If you don't have a backup, you can downgrade macOS through the Recovery mode or a bootable macOS installer.
Ask Apple Support for help
If none of the above solutions are able to eliminate the macOS "Volume Hash Mismatch" error, the last resort is taking your Mac to Apple Support. Hopefully, they can find the culprit and fix the error for you.
Please share this post if you find it helpful.