In daily life or work, scanning documents or photos on your Mac seems so common. Do you need guidance on scanning a document with your Mac but are unsure of where to begin?
No need to fret, this post teaches how to scan on Mac, including how to scan a photo and how to scan a file on Mac. Whether you have a dedicated scanner/printer or need to scan without one, we've got you covered, allowing you to enjoy your digital life.
How to scan on a Mac without a scanner/printer?
For many man users, you may think of a scanner or a printer when noting scanning on a Mac. However, don't worry if you don't have a physical scanner or printer, your Mac's Continuity Camera feature helps you to scan documents seamlessly.
Scan on Mac with a continuity camera
Apple introduced the capability to scan documents directly to your Mac using your iPhone's or iPad's rear camera. For this scanning process, you have to ensure that both the Mac and the device you're using to scan are connected to the same Wi-Fi and have Bluetooth activated. Besides, both devices must be signed into the same Apple account.
Many apps on Mac can scan photos or documents such as Notes, Messages, Mail, TextEdit, Pages, and even some third-party applications. Let's delve into the steps with the Note app to scan on Mac:
- Launch the Notes, then create a new note or select the one you want to import the scanned document into.
- Right-click inside the note and choose Scan Documents under your device's name.
(If multiple devices are available, click “Insert from iPhone or iPad” then select Scan Documents under iPhone's or iPad's name)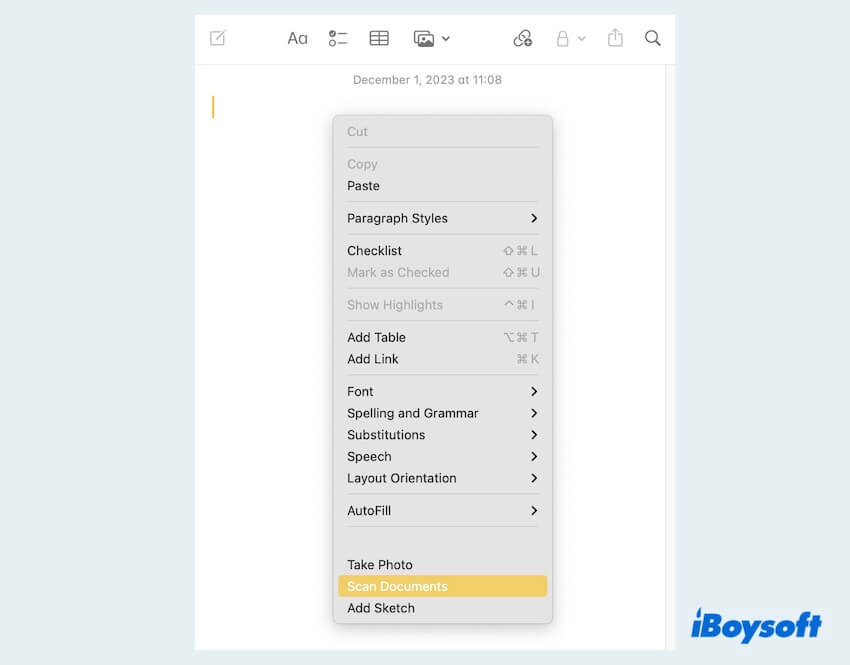
- Position the document in view with your device then take a photo.
- Drag near corners to adjust on the device then click Save, and it will automatically appear in the Notes on your Mac.
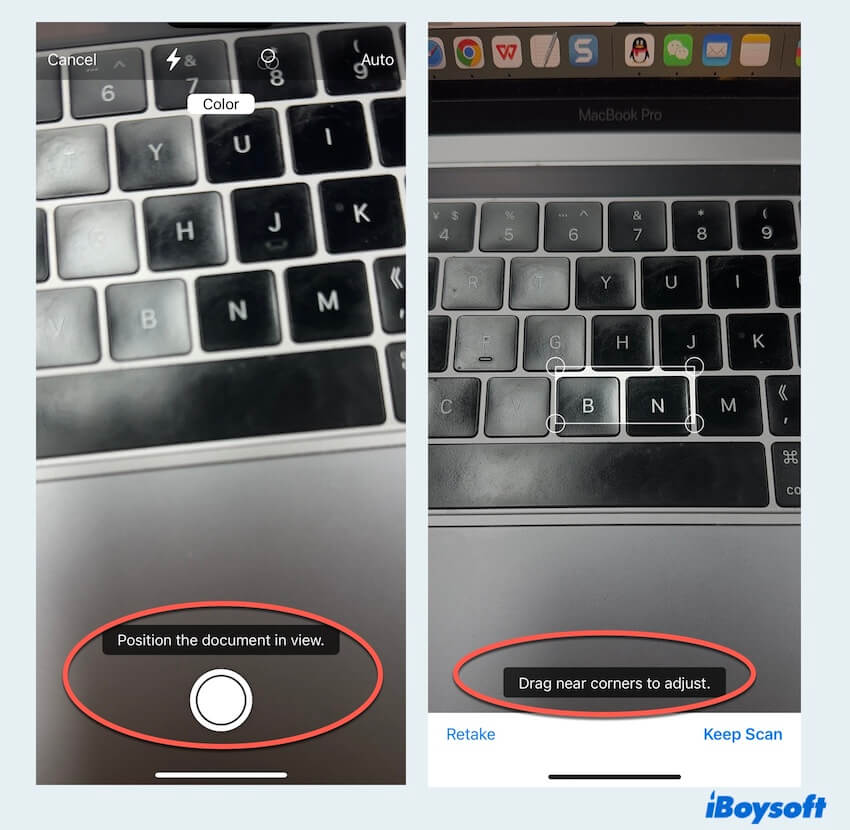
Tips: If you need to scan more, you can click Keep Scan when adjusting one.
Easy to scan on Mac, right? Please share this useful scanning method with others.
How to scan on a Mac with a scanner/printer?
For those equipped with a scanner or printer, you don't need any special software or other Mac devices to scan on Mac. Before you start scanning, be sure that you have added your printer or scanner. Here are the step-by-step instructions for scanning on a Mac with a printer or scanner.
Scan on Mac with a document-feeding scanner
Utilizing an automatic document-feeding scanner enables the simultaneous scanning of multiple pages, all employing the same settings. If pages need distinct settings, such as grayscale or color variations, it is advisable to scan them in separate groups.
- Position the pages within the document feeder of the scanner.
- Connect your scanner to your Mac with a USB cable.
- Apple > Printers & Scanners > Open Scanner > Use Document Feeder.
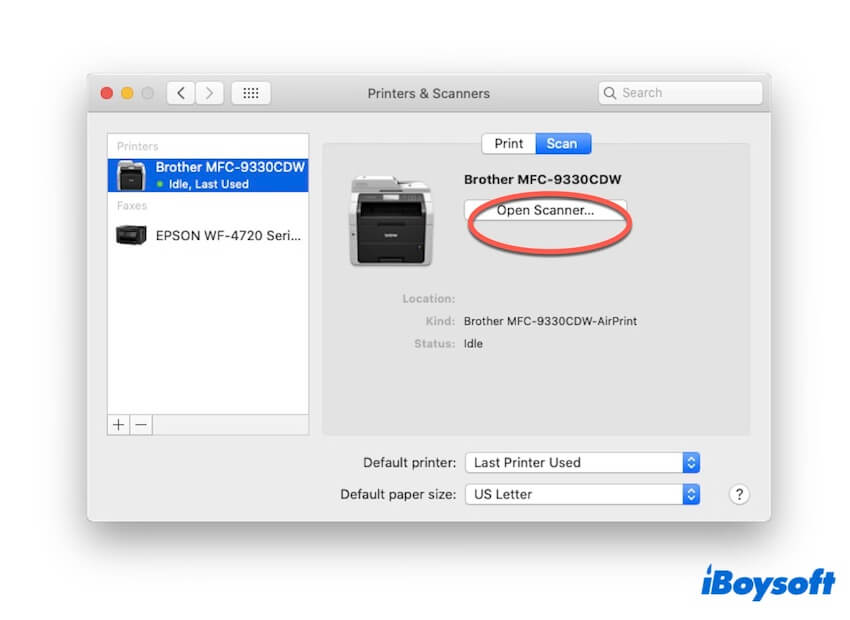
- Click Show Details to show more scanning options. (Choose your type of scanner, Choose the type of image being scanned, Scan both sides of a page, Specify the size for the scanned item...)
- Click Scan.
Scan on Mac with a flatbed scanner
Using a flatbed scanner allows you to scan smaller photos on Mac simultaneously, saving each image in its file, and correcting any misalignment of images during the scanning process.
- Position the items on the scanner bed.
- Connect your scanner to the Mac with a USB cable.
- Apple > Printers & Scanners > Open Scanner > Deselect Use Document Feeder.
- From the Scan To pop-up menu, choose the location to save the scanned items and choose the size of the photo or document you will scan.
- Click Show Details to show more scanning options. (Choose your type of scanner, Choose the type of image being scanned, Scan both sides of a page, Specify the size for the scanned item...)
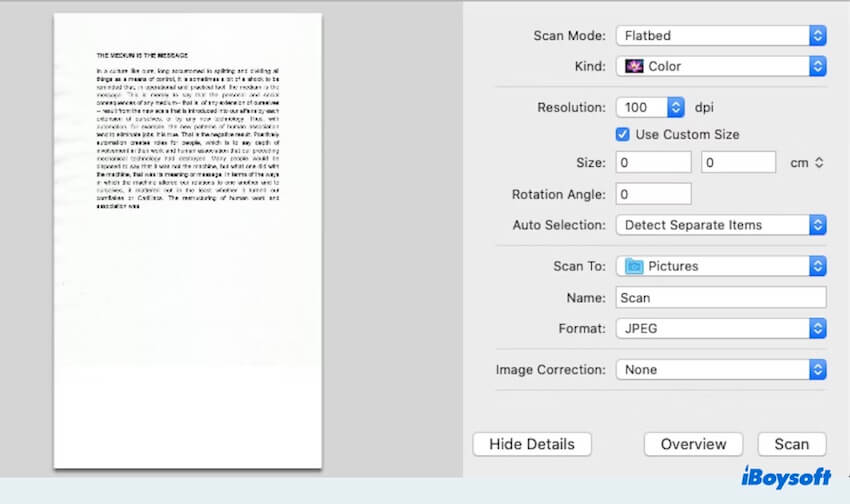
- Click Scan.
Tips: To preserve each item as a separate file, ensure there is vacant space between individual items on the scanner bed. If you scan a photo that has much white space, the scanner may import it as more than one image.
Scan on Mac with the Preview app and a scanner
If you have already learned how to scan on a Mac with a document-feeding scanner or a flatbed scanner, you can scan files in the Preview using the scanners.
- Finder > Applications > Preview.
- File > Import from Scanner > Your scanner.
- Click Show Details to set scanning options. (You can choose Scan Mode, Kind, Orientation, Size, Image Correction...)
- Click Scan.
Tips: After scanning, you also have the option to select Edit > Insert > Page from Scanner to add a page from a scanner to an existing open document.
Scan on Mac with the Image Capture app and a scanner
Opting for Image Capture is also a good choice to scan photos or files on a Mac. Just open your Scanner mentioned above and then follow:
- Finder > Applications > Image Capture.
- Select your scanner in the Devices or Shared list.
- Click Show Details then Scan your files.

Now you know how to scan on a Mac with a scanner or not. Hope you can work or study much more smoothly with the scanned files. Share your joy on your social platforms.
FAQs about scanning on Mac
- QHow can I scan photos on my Mac?
-
A
If you have an iPhone or iPad, you can open the Notes, Messages, Mail and so on, then choose Scan Documents. If you have a scanner, you can connect it to your Mac, then click scan options and scan.
- QWhere is scan document on Mac?
-
A
Scanned files are saved by default on your Mac’s Picture folder. Or they are in the app which you use to scan.
- QHow to scan documents on Mac without a scanner?
-
A
Prepare your Mac device then ensure your Mac and it are in same Wi-Fi and the Bluetooth are on. Then open your Mac’s Notes, right-click inside your note then choose Scan Documents.