Do you know there is more than one photo management tool on your Mac/MacBook? Except for iPhoto, Image Capture is also a useful app in your Applications folder on Mac/MacBook.
If you want to learn more about Image Capture on Mac/MacBook, go ahead and open Image Capture to try to operate on it.
Share this post with your friends to know more about Image Capture on Mac/MacBook.
What is Image Capture on Mac/MacBook?
Image Capture is an application program from Apple that enables users to upload pictures from digital cameras or scanners which are either connected directly to the computer or the network. Although it does not provide organizational tools like iPhoto, it is useful for collating pictures from a variety of sources with no need for drivers.
Image Capture on Mac/MacBook can also control what happens when you connect your Mac/MacBook with your iPhone, iPad, or digital camera. For instance, iPhoto always be open as soon as you plug in your iPhone. This action is actually taken by Image Capture, not iPhoto.
How to use Image Capture on Mac/MacBook?
Up to now, you may have a general understanding of Image Capture on Mac/MacBook and can't wait to use it. Let's follow the below steps to make full use of Image Capture on Mac/MacBook. When you first plug your iPhone into your Mac, Image Capture may not work or not recognize your iPhone, just replug it to try.
Transfer images in Image Capture on Mac/MacBook
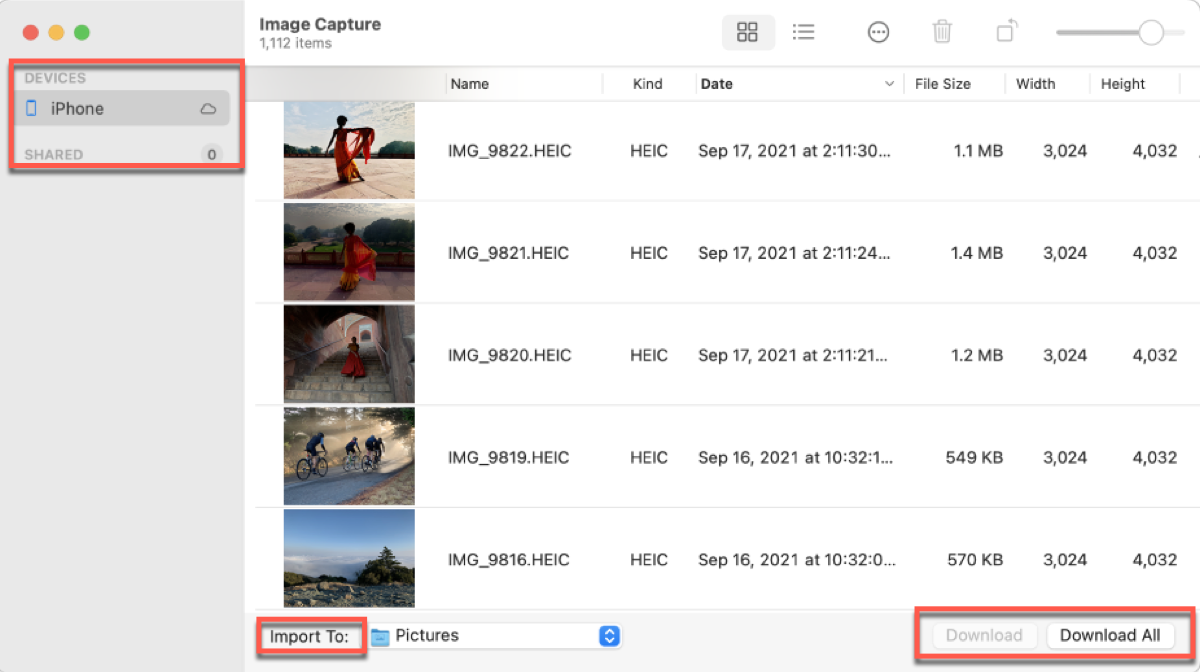
Transfer image is the main feature of Image Capture on Mac/MacBook. You can use Image Capture to transfer images and videos to your Mac/MacBook such as importing photos from camera to Mac.
- Use a cable to connect your device to your Mac/MacBook and turn the device on.
- Open Image Capture and select the device in the DEVICES or SHARED list.
- Select the images that you want to import.
- Click Import To the pop-up menu at the bottom of the window.
- Select a storage location or create a PDF or a webpage to contain them.
- Click Download or Download All at the right bottom of the window.
When you connect your device to your Mac/MacBook, you may be asked to unlock your device with a password or trust the device.
If you want to download your images to another location, choose Other and choose a location to store them.
The images you download still remain on your device, and if you want to remove them from your device, click the Action button in the upper menu of Image Capture, then select "Keep originals" or "Delete after import".
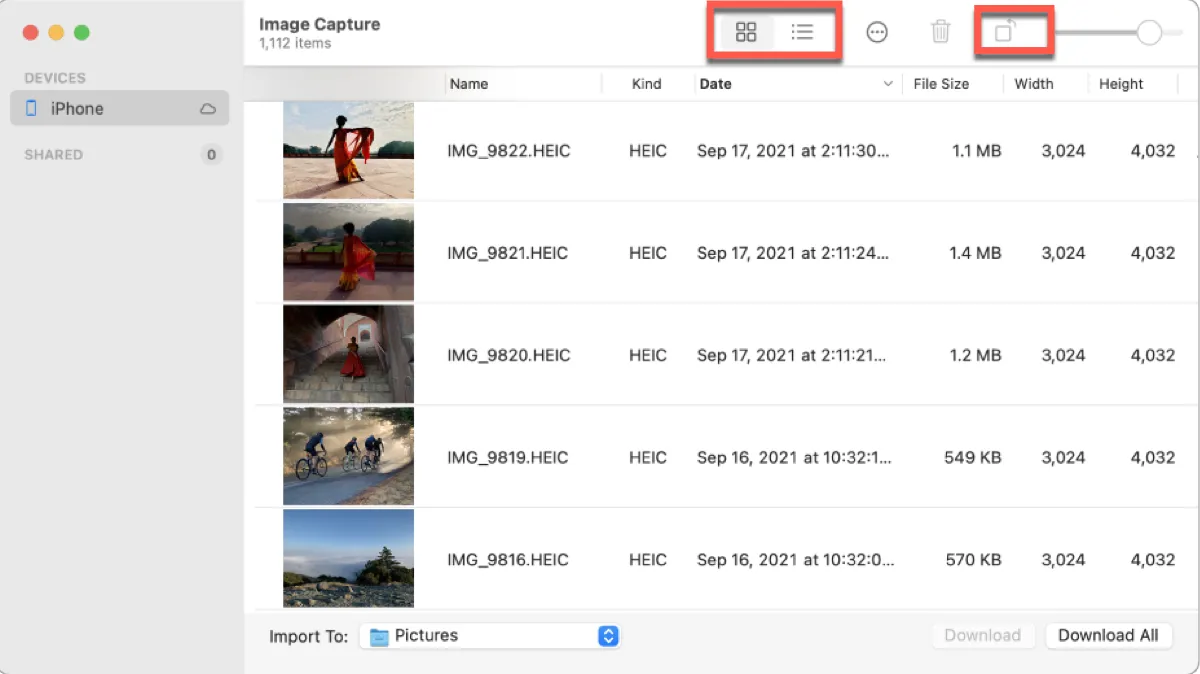
Change how the thumbnails are shown:
- Drag the slider to increase or decrease the size of the thumbnails.
- Click the View button to view images as a grid of larger thumbnails.
- Click the List View button to view images as a list.
- Click the Rotate button to rotate images. If you want to rotate the images to the right, press and hold the Option key and click the Rotate button.
Scan images in Image Capture on Mac/MacBook
Use the scanner to scan images in Image Capture on Mac/MacBook, and you can scan several images at once.
- Connect the scanner to Mac/MacBook.
- Open Image Capture and select the scanner in the DEVICES or SHARED list.
- Scan the images.
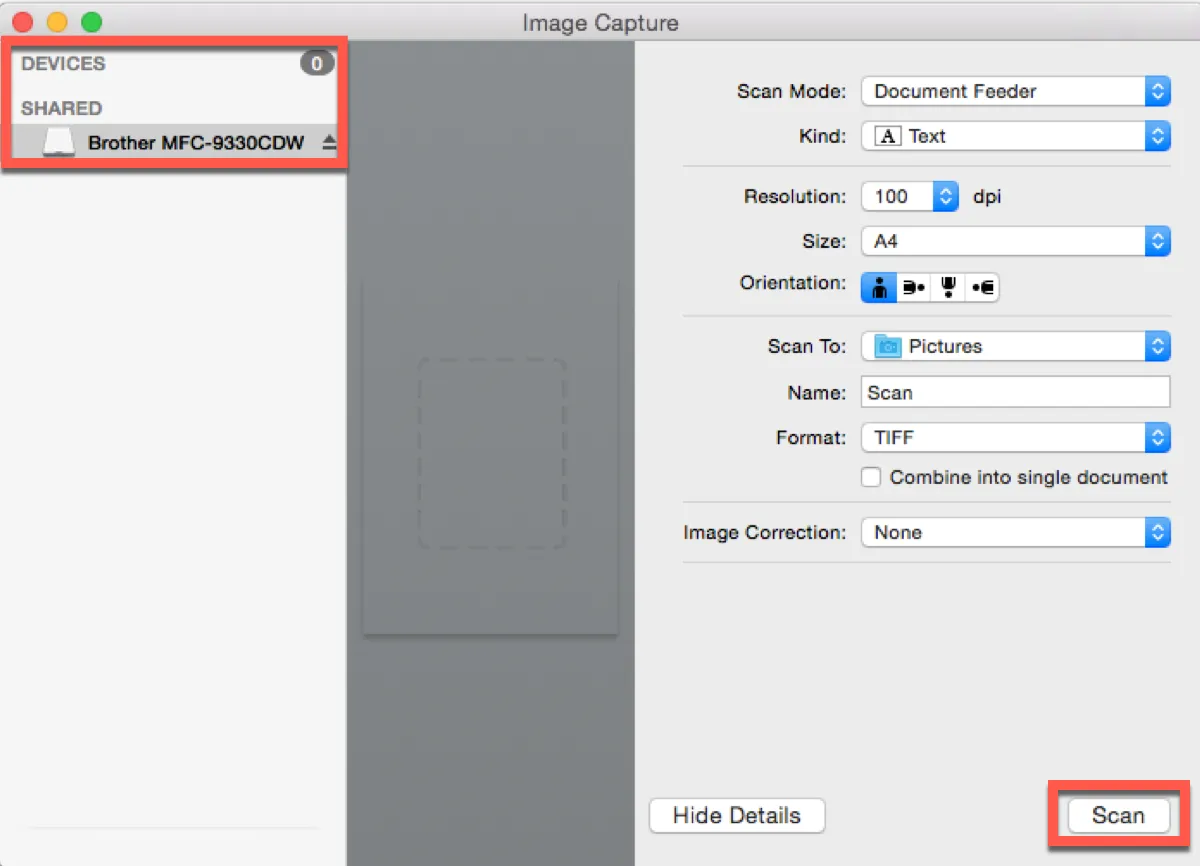
If you can't see the scanner in the list, click the Apple menu > System Settings > Printers & Scanners. If you still can't see your scanner, click Add Printer, Scanner, or Fax button. Then select your scanner and click Add.
If you have a flatbed scanner, you can scan multiple images at once, and Image Capture on Mac/MacBook will straighten any crooked images on the scan flatbed and save each image to its own file.
Build web pages of transferred images in Image Capture on Mac/MacBook
You can build web pages in Image Capture on Mac/MacBook and put the images in them so that you can share these images with others.
- Connect the scanner to Mac/MacBook.
- Open Image Capture and select the scanner in the DEVICES or SHARED list.
- Click the Import To pop-up menu, then select Build Web Page.
- Click Download or Download All.
The new page will open in your default browser.
If you think it's interesting, share it!
How to fix device doesn't work with Image Capture on Mac/MacBook
If your iPhone, camera, or scanner doesn't work with Image Capture on Mac/MacBook, and your Mac/MacBook has an SD card slot, you can insert your SD card into your Mac/MacBook to transfer images.
- Make sure your device connects to your Mac/MacBook securely and is turned on.
- Insert your SD card into your Mac/MacBook.
- Check the documentation that came with your device to see if it can work with Mac/MacBook.
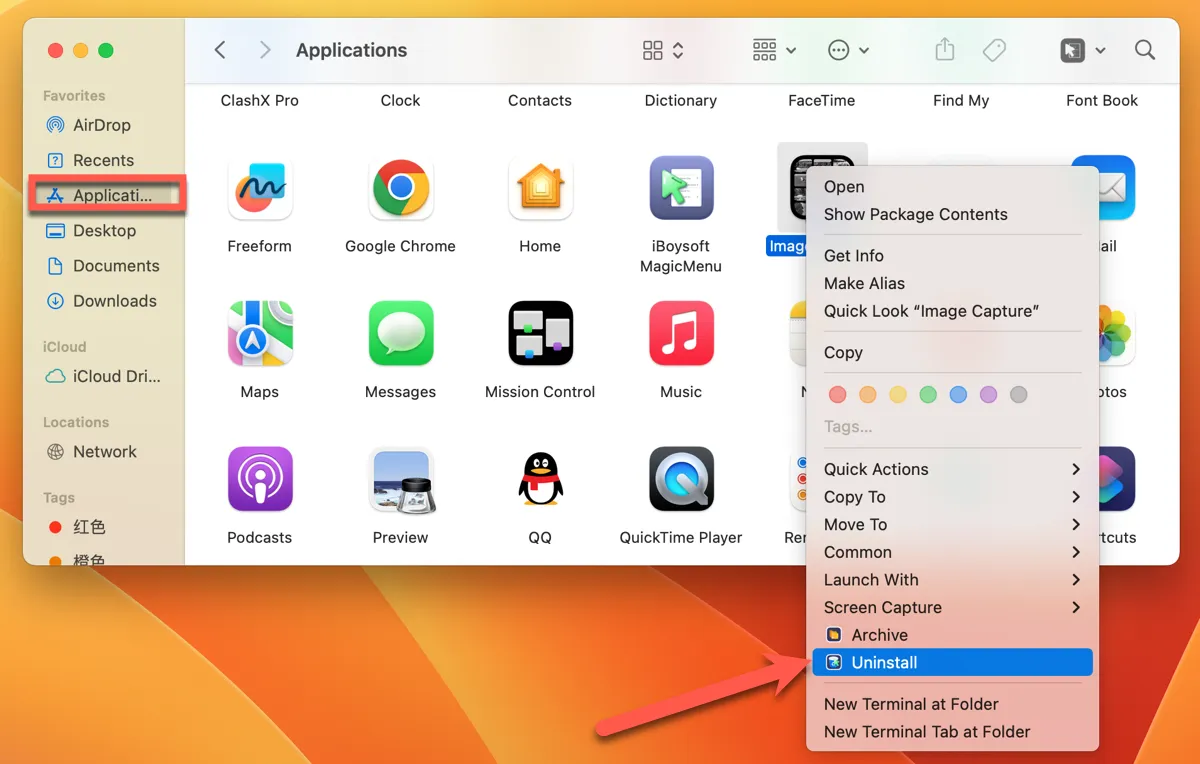
How to uninstall Image Capture on Mac/MacBook
If you don't want to use Image Capture or you think it occupies too much storage on your Mac/MacBook, you can uninstall it.
- Open Finder.
- Choose Applications in the left sidebar.
- Right-click Image Capture and select Uninstall in the pop-up menu.
Read more: [Fixed]How to Uninstall Programs on Mac/MacBook?
Share this post with your friends who don't know how to use Image Capture on Mac/MacBook.
FAQ about Image Capture
- QWhat is Image Capture service on Mac?
-
A
Image Capture is an application program that you can transfer your pictures and movies to your Mac from a camera or other device, such as your iPhone or iPad.
- QWhy is Image Capture not working on Mac?
-
A
If your scanner, camera, or other device doesn't work with Image Capture, you may need to install software that makes your device compatible. And if your Mac/MacBook has an SD card slot, you can insert your SD card into your Mac/MacBook to transfer images.
- QWhy is my iPhone locked in Image Capture?
-
A
This appears to happen due to a trust issue. You can try to grab your device, plug it in, and rifle through data and media.