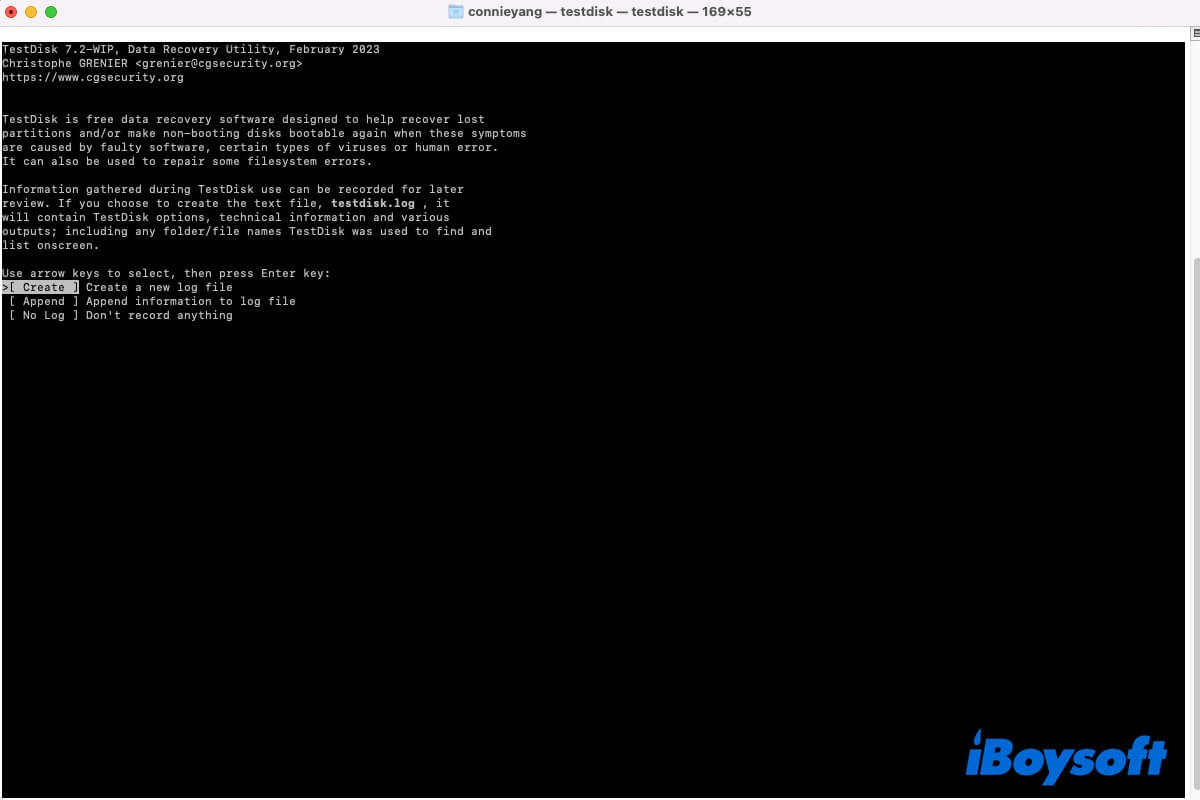
TestDisk is an open-source and free Mac data recovery software that is mainly designed for lost partition recovery and software repair of unbootable disks.
Unfortunately, this freeware is not easy to operate. It doesn't have a modern Graphical User Interface and requires you to run it in Terminal to go on data or partition recovery on your Mac.
Don't worry. This post is here to offer you a step-by-step guide to using TestDisk to recover partitions on a Mac. Also, it shows you how to recover lost partitions on your Mac when TestDisk fails due to its limitations.
Overview of TestDisk partition recovery:
| TestDisk limitations | 1. 64-bit or 32-bit Intel-based Macs only 2. macOS 10.14 and earlier 3. HFS, HFS+ (Mac OS Extended) and HFSX 4. Mac partition map only |
| Steps to use TestDisk to recover lost partitions on Mac | 1. Download and extract the download TestDisk TAR file 2. Enable Full Disk Access for TestDisk 3. Follow the on-screen instructions in Terminal to run TestDisk |
| Alternative to TestDisk if it is not working | 1. Download iBoysoft Data Recovery for Mac 2. Select your hard drive that has lost partition 3. One-click to start scanning the hard disk to find the lost partition 4. Click Recover to restore the data on the lost partition |
Download the easy-to-operate iBoysoft Data Recovery for Mac to recover files on lost APFS, HFS, HFSX, HFS+, FAT32, and exFAT partitions within a few clicks. Less time consumption to get more lost data back.
Go to tell others the best alternative to TestDisk. Help others save more time and energy.
Is it possible to recover lost partitions with TestDisk on Mac?
Objectively speaking, TestDisk is suitable for recovering partitions on older Macs while it does not apply to modern Mac computers.
1. TestDisk only supports 64-bit or 32-bit Intel-based Macs.
2. The Mac OS versions TestDisk supports are macOS 10.14 and earlier.
3. The file systems that TestDisk supports on Mac are only HFS, HFS+ (Mac OS Extended), and HFSX.
TestDisk claims that it can recover partitions for Windows FAT12, FAT16, FAT32, and exFAT, attention please, those are formatted in Windows but not in macOS. For these cross-platform compatible file systems, the block size assigned by Windows is not the same as that by macOS. So, they are slightly different.
4. TeskDisk only supports Mac partition map (also called Apple Partition Map) schemed partitions, which are not compatible with GUID Partition Map.
Therefore, if you want to recover lost partitions from older Mac hard drives (HFS+ formatted) or HFS, HFS+ (Mac OS Extended), and HFSX external drives on Mac, TestDisk can help you do that. If you want TestDisk to do APFS data recovery, it is impossible.
Note: Instead, you can use iBoysoft Data Recovery for Mac. This easy-to-use data recovery software with high compatibility can recover data from the lost or deleted APFS, APFS (Encrypted), exFAT, FAT32, and HFS+ partitions on your Mac or Apple Silicon Mac.
Go to tell your followers the situations in which TestDisk is unable to recover lost partitions on a Mac.
How to use TestDisk to recover lost or deleted partitions on Mac?
After having an overview of TestDisk mentioned above, you can follow the steps in this part to learn how to recover partitions with TestDisk on a Mac.
If you are in the scenario that TestDisk is powerless to give assistance, jump to the next part.
Download TestDisk
TestDisk bundled with PhotoRec is packed as a single TAR file. After downloading TestDisk from its official website, double-click the file to extract it. You'll see the folder named testdisk. Simply open the folder and double-click the TestDisk program to launch it. There's no extra step for installation.
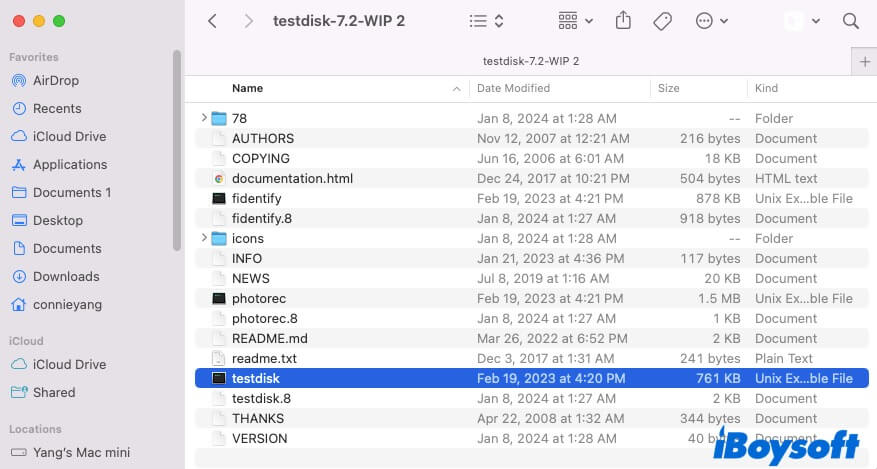
TestDisk is open-source, so you probably see the following message when you try to open it. That is because your Mac doesn't allow apps from unknown developers by default.
"testdisk" cannot be opened because it is from an unidentified developer.
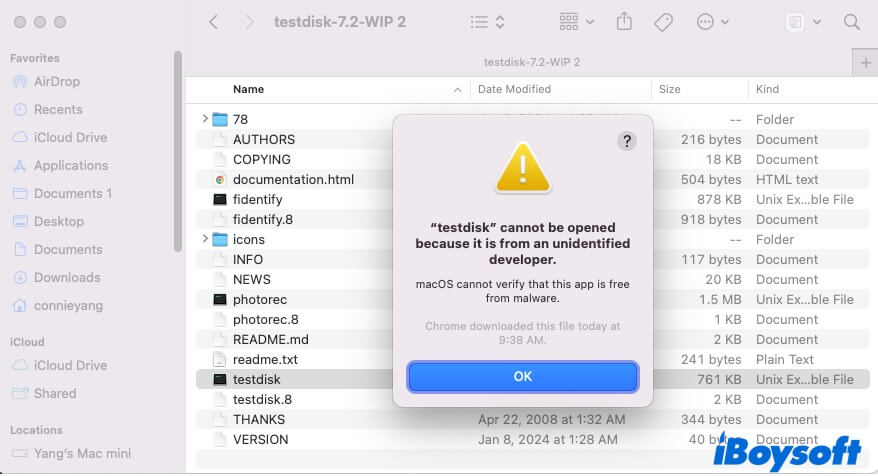
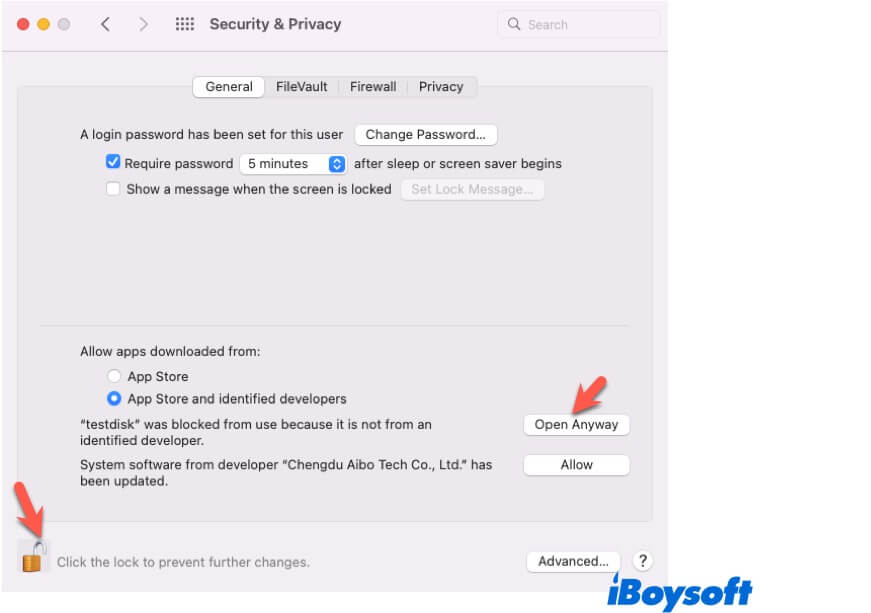
In that case, you need to go to System Preferences to allow your Mac to run TestDisk.
- Click the Apple menu > System Preferences > Security & Privacy > General.
- Click the lock and enter your admin password to make changes.
- Click Open Anyway.
Enable Full Disk Access for TestDisk
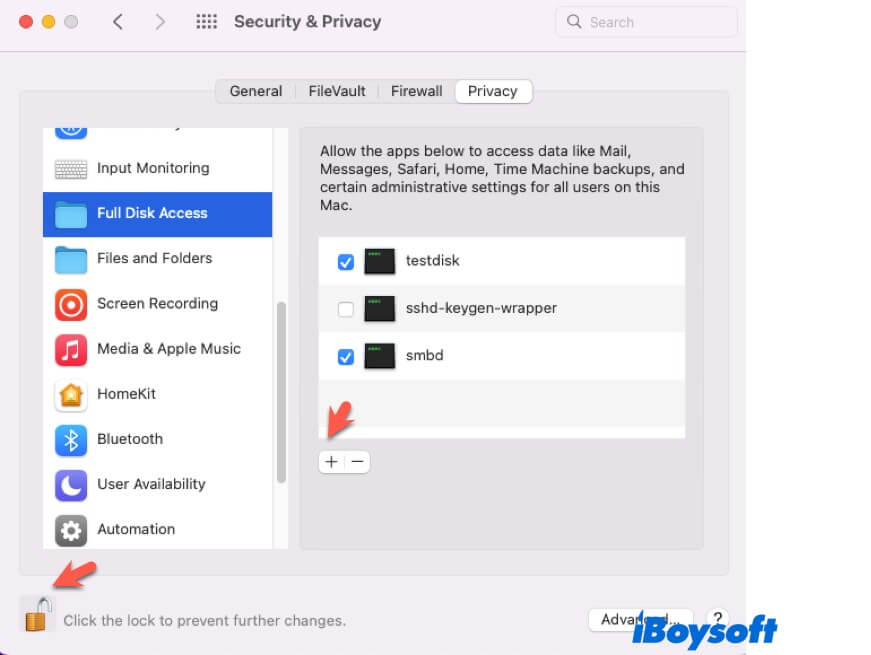
To allow TestDisk to detect all disks on your Mac, you need to enable Full Disk Access for TestDisk. Or else, it cannot perform lost partition recovery.
Here's how:
- Click the Apple menu > System Preferences > Security & Privacy > Privacy.
- Scroll down to find Full Disk Access.
- Click the lock and enter your admin password to make changes.
- Click the add button (+) to add testdisk.
Start TestDisk partition recovery
After finishing the preparations, you can begin to TestDisk partition recovery.
Step 1: Click the TestDisk program in the folder to open it.

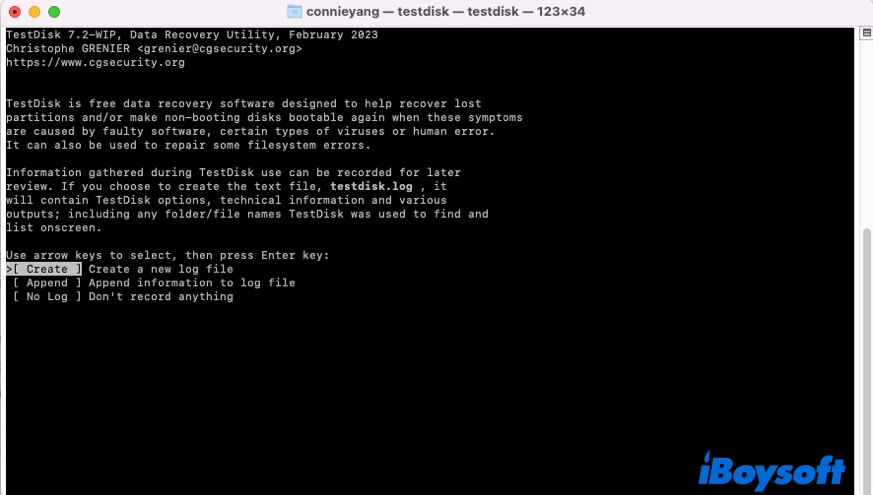
Step 2: Select "[Create] Create a new log file" and press Enter to enable to append data to the log. Then, TestDisk will create a file named testdisk.log in the current directory.
Step 3: Press the up or down arrow keys on your keyboard to select the hard drive that has the lost partition. Then, hit Enter to go on.
If TestDisk doesn't detect and list all the hard drives, maybe the hard drives are not supported by it, such as APFS, macOS FAT32, or macOS exFAT formatted ones, the macOS you're running is macOS 10.15 or later, the disk partition map is not Apple Partition Map, etc.
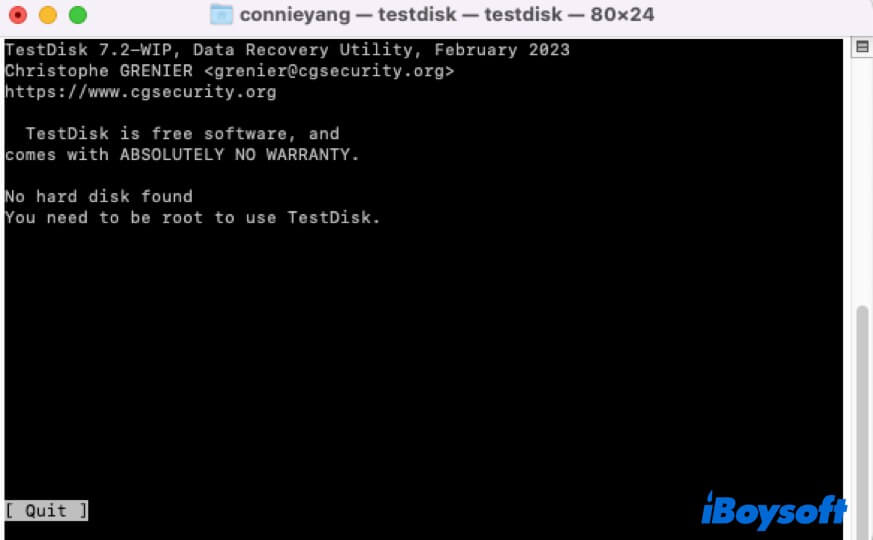
In this case, switch to the best alternative of TestDisk - iBoysoft Data Recovery for Mac. The detailed using guide is mentioned below.
Step 4: Select the partition table type of the current hard drive that TestDisk lists by default and then press Enter.
Step 5: Choose Analyse and press Enter to allow TestDisk to detect and list the current partition table.
If a partition on the selected hard disk is damaged or a partition entry is corrupted, you can see detailed information about the problem.
Step 6: TestDisk will quickly list all partitions that it has scanned on the selected hard drive.
If your wanted partition is still missing, select Deeper Search. That will take a long time, even hours, to search for the disappeared partition. During the process, ensure that your Mac won't go to sleep and the display is on.
Step 7: Hit the arrow keys to select the partition you want to recover.
Remember to check the partition size and list the file contents for confirmation. Partitions listed as D or Deleted can't be restored, so you need to check if the lost partition you want to recover is marked as non-deleted.
Review the partitions and confirm at Write with Enter, Y, and OK to let the partitions be registered in the partition table.
Step 8: Restart your Mac and check if the lost partition is back.
TestDisk can't recover partitions on Mac? Try its alternative
There are multiple limitations of TestDisk, so it is almost impossible for you to recover data on a modern Mac. If you can't recover a lost partition from your Mac hard drive or external hard drive with TestDisk, switch to using a professional data recovery tool.
iBoysoft Data Recovery for Mac is the best alternative to find lost partitions on Mac. This data recovery tool has a modern, user-friendly, and concise UI, allowing even a computing new hand to recover data from the lost partitions on a Mac. With it, you don't need to operate with the Terminal that requires you to be familiar with command lines.
In particular, this tool supports recovering files from lost or deleted APFS or APFS (Encrypted) partitions. APFS is the default file system for Macs running macOS 10.13 or later.
The best alternative to TestDisk - iBoysoft Data Recovery for Mac
- Support macOS 14, 13, 12, 11, 10.15. 10.14, 10.13, 10.12, Mac OS X 10.11
- Support Intel-based, T2-chipped, and Apple silicon Macs
- Compatible with APFS, HFS, HFSX, HFS+, FAT32, exFAT
- Support hard drives with GUID and Apple Partition Map
- Support lost and deleted data recovery
- Support recovering data from corrupted, inaccessible, or unreadable hard drives and lost partitions
Read-only & risk-free
How to recover data from the lost or deleted partition with iBoysoft Data Recovery for Mac:
- Download, install, and open iBoysoft Data Recovery for Mac on your Mac.
If the lost partition you want to find is on an external drive, connect it to your Mac. - Click "Find Lost Partitions!" at the bottom of the window and then click OK on the pop-up confirmation to continue.
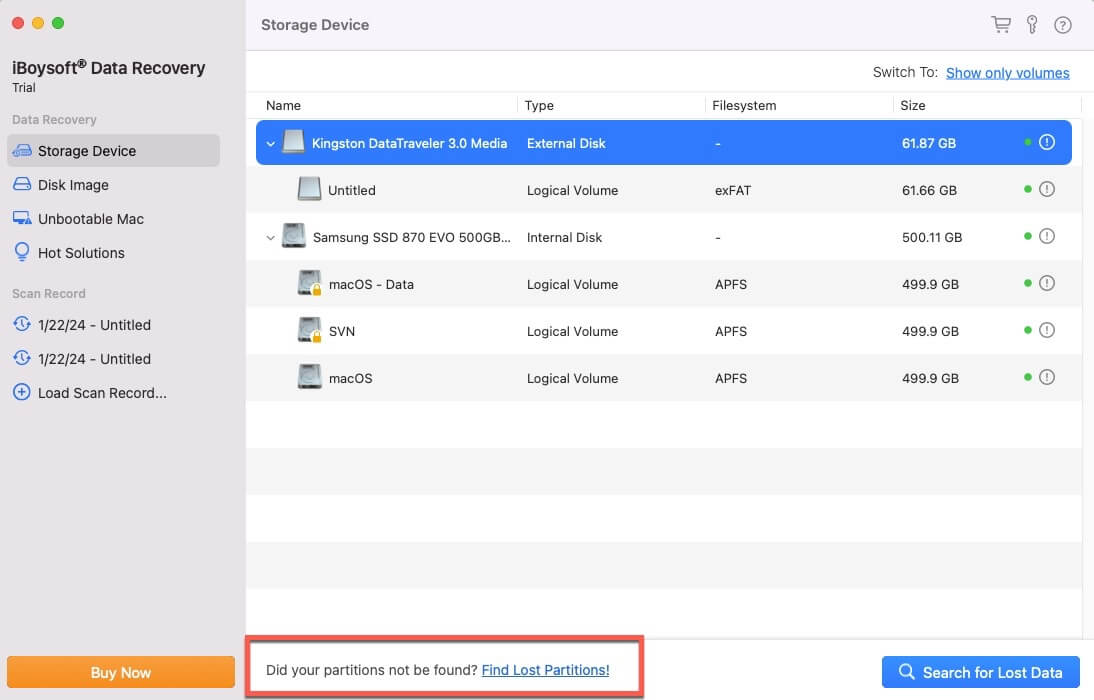
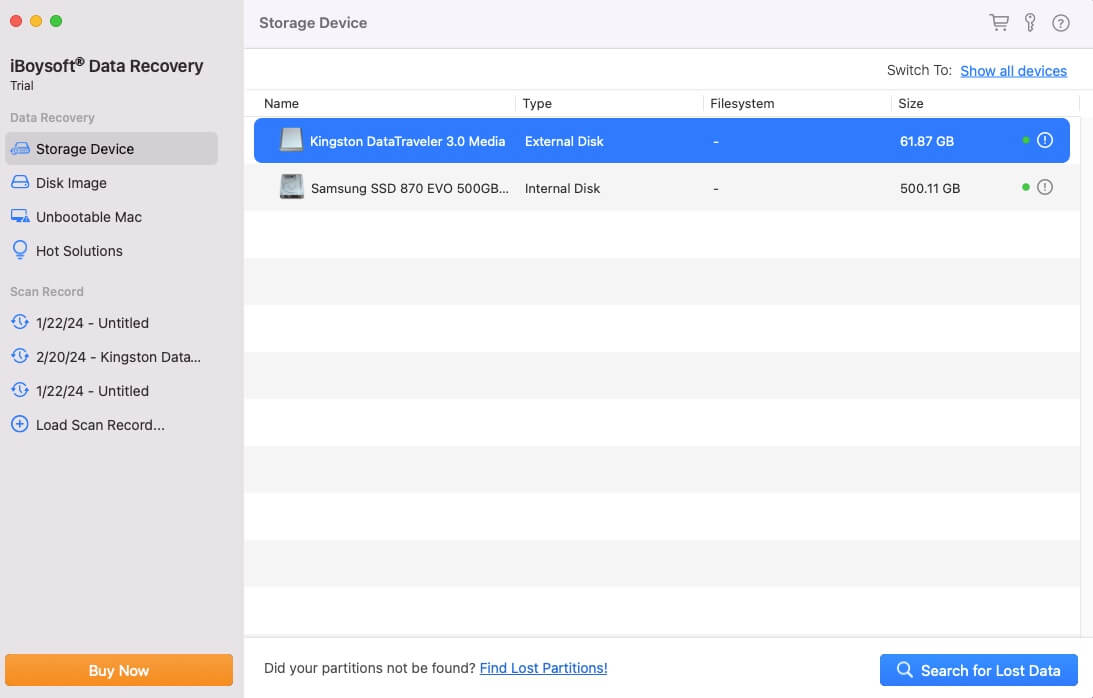
- Select the hard drive that has lost partitions and then click "Search for Lost Data."
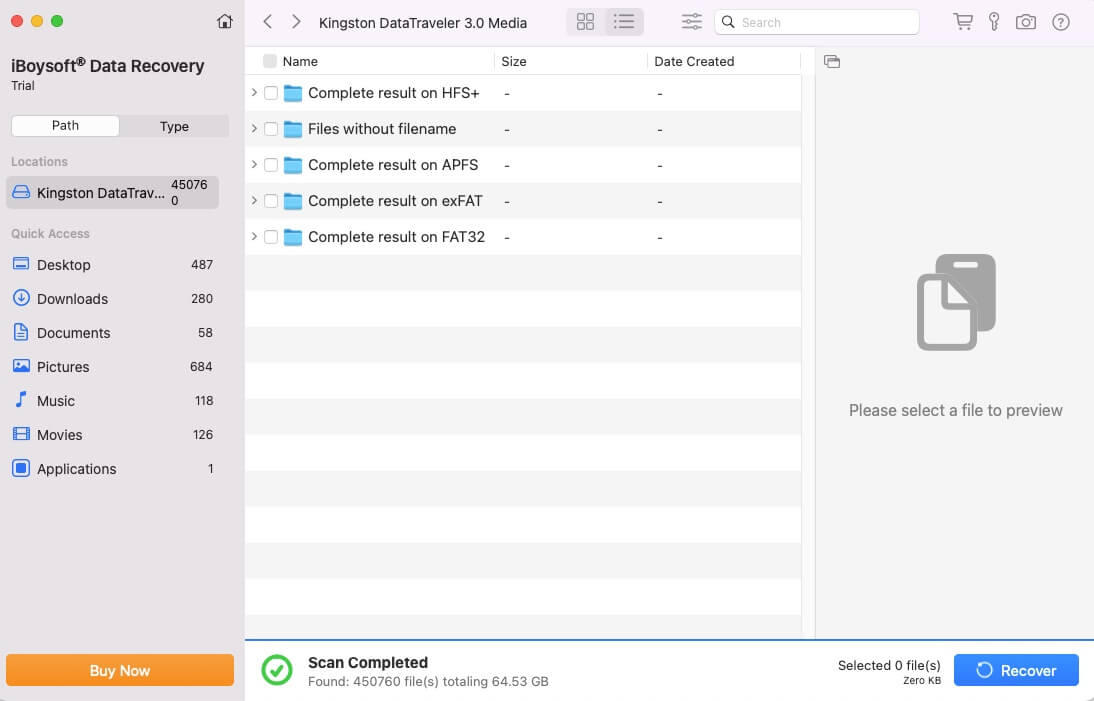
- When the scan is completed, click "Path" on the left sidebar. You'll see the folders named with the file system. They stand for different partitions and contain the data found on each partition.
- Open the folder of the lost partition you want to recover data from, and then expand the "Lost files" folder in it.
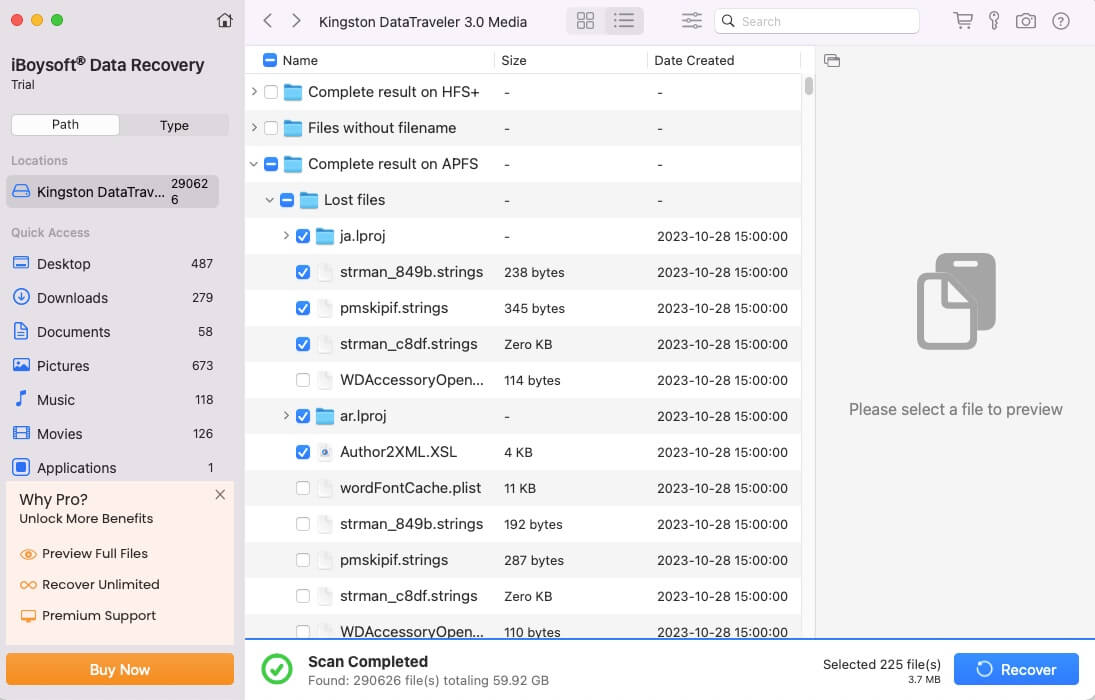
- Preview and select the files you want to recover, then click Recover to save them to a different location.
If this post helps you learn how to do TestDisk partition recovery and what to do if TestDisk can't recover partitions on your Mac, share it with more people.
FAQs about TestDisk recover partition
- QCan TestDisk recover overwritten partition?
-
A
You can use TestDisk to recover overwritten partition, but the success rate is low as this freeware has many limitations and is low in software compatibility. But in technical, the overwritten partition can be recovered doesn’t equal to data on it can be restored. If the data on the partition is overwritten, no tool in the world can recover it.
- QIs TestDisk data recovery free?
-
A
Yes, TestDisk is an open source app. It is absolutely free.
- QHow to recover partition from formatted hard disk?
-
A
You can use iBoysoft Data Recovery to recover lost or deleted partitions from a formatted hard drive. This professional data recovery tool with modern UI is easy to use. Anyone who knows nothing about data recovery techniques can use it to recover lost partitions or files from a hard drive.
