
Following its tradition, Apple unveils its 2023 operating system -- macOS Sonoma on 26th, September. As same as any new macOS released yearly, macOS Sonoma separately embraces lots of new features and improvements as well, like Game Mode, private browsing, and more.
Some Mac users can't help updating to macOS Sonoma and have a fantastic and smooth experience so far, while some others mention that they suffer from data loss -- photo loss on macOS Sonoma. Feel at ease, this article comes to help by telling you why photos disappear and how to recover missing photos after the macOS Sonoma update. Let's get started then!
How to recover missing photos after the macOS Sonoma update:
| Solutions | Steps |
| 1. Utilize iBoysoft Data Recovery Software | 1. Free download and install iBoysoft Data Recovery Software. 2. Launch it and select a drive that lost photos. 3. Select Search for Lost Data. 4. Preview found photos. 5. Recover the selected photos. |
| 2. Recover photos from Mac Trash | 1. Open Mac Trash on your machine. 2. Locate the photos that you have deleted beforehand and select them. 3. Right-click the selected photos and click Put Back, or you can move them to the folder where you want. |
| 3. Restore photos from the Time Machine | 1. Connect the Time Machine backup drive to your device. 2. Launch Time Machine on your computer and locate the photos you want. 3. Select the target photos and click Restore to bring them back. |
| 4. Recover photos from iCloud | 1. Open a blank webpage and search for the Apple ID login page. 2. Sign in with your Apple ID and password to head to My Storage for missing photos. If you have deleted files in iCloud before, go to Data Recovery instead. |
Why do photos disappear after the macOS Sonoma update?
In general, your personal files on Mac will be kept well during the operating system upgrade process while only having system settings, pre-installed software, and functions updated. Then why do your photos get missed after the update? Let's see in detail here:
- The Sonoma update package file is downloaded from a shady or untrusted third-party website.
- Sudden disruptions like poor network quality or power failure during the macOS update process.
- Mac photos get corrupted when the operating system process is ongoing.
- Photos are stored in a folder or location that is not supported by macOS Sonoma any longer.
- Mac crashes when performing the macOS Sonoma update.
- Not enough space to install macOS Sonoma so the photos are overwritten.
Yet do not be freaked out by any possible culprits mentioned above, which are helpful to avoid further photo loss on your machine. Now let's concentrate on how to recover missing photos after the macOS Sonoma update.
If you find this article informative and helpful, please share it with more people on your social platform!
How to recover missing photos after the macOS Sonoma update?
Aiming at the varying possible culprits that may cause photo disappearance, this post offers multiple solutions to help you recover them. Each one will be elaborated literally and all you need to do is pick the most effective one and then begin your data recovery work.
Solution 1: Use iBoysoft Data Recovery Software to recover lost photos
A third-party data recovery tool is the easiest and most effective way to recover missing photos from your Mac after the macOS Sonoma update. And here, iBoysoft Data Recovery for Mac is highly recommended.
iBoysoft Data Recovery for Mac is a powerful data recovery tool that can help you recover your missing images after the macOS Sonoma update. It supports recovering over 1,000 files of different formats, including documents, photos, videos, audio, music, emails, etc. Also, it fully supports data recovery on macOS Sonoma on both Intel-based and Apple Silicon Macs.
Moreover, with a redesigned and Finder-like user interface of iBoysoft Data Recovery for Mac, the data recovery process becomes smoother and easier. Even though you know nothing about computers, you can definitely get your lost files back with this tool, within a few clicks!
It supports macOS Sonoma/Ventura/Monterey/Big Sur/Catalina/Mojave/High Sierra/Sierra and Mac OS X 10.11 El Capitan. Here's how to recover deleted or lost photos after macOS Sonoma update using iBoysoft Data Recovery for Mac:
- Free download and install iBoysoft Data Recovery Software on your machine. Do not store it on the drive where you suffer from photo loss.
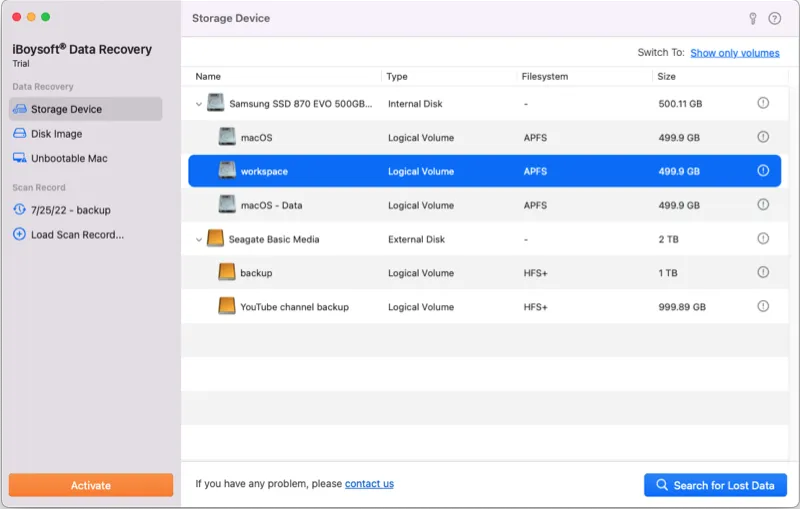
- Launch it and select the drive where you lost photos in the main interface.
- Click Search for Lost Data to start the drive scanning process sector by sector.
- Once the scanning is over, all found files will be listed. You can manually filter the found results with file type, size, and date. You can click Type and choose Graphics, then only photos will be listed.
- Select photos that you want to recover and then click Preview to have a pre-check.
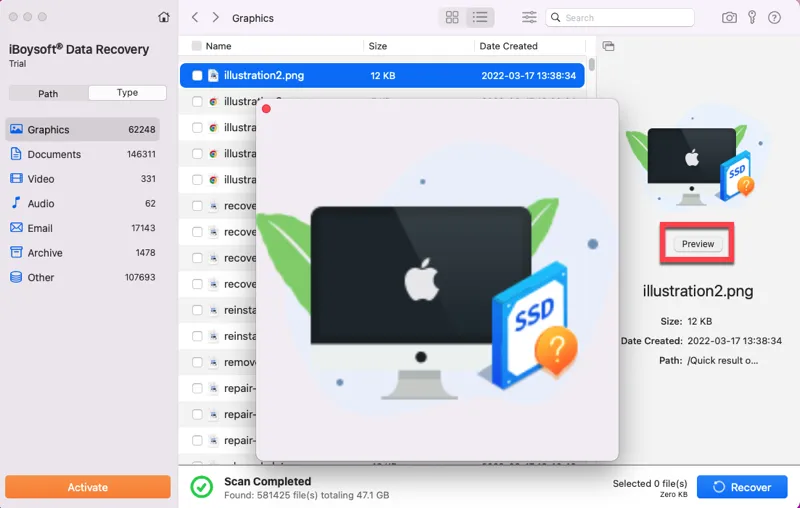
- Check the box next to the photos you want to restore and click Recover to start the recovery task. Save the recovered photos well or data loss might happen one more time.
Solution 2: Recover deleted photos on macOS Sonoma from Mac Trash
Trash saves deleted items for 30 days by default. If you drag photos to Mac Trash or use the Move To Trash shortcut, restoring photos from Mac Trash is a feasible solution.
- Launch Mac Trash on your machine via Spotlight Search or find it on the desktop.
- Once the Trash is open, you can see multiple files and folders that you have dragged to delete. You can use a filter by clicking the search icon to locate the deleted photos that you want to recover.
- Select the files you need to recover and right-click them to select Put Back. Or, you can directly drag them to the location you want.
Solution 3: Recover deleted photos on macOS Sonoma via Time Machine backup drive
If you have enabled Time Machine to back up your device to another drive (both external and internal are OK) previously, then recovering deleted or lost photos on macOS Sonoma via Time Machine is worth a shot.
Read on to learn how to recover deleted or missing image files from a Time Machine backup drive:
- Connect the Time Machine backup drive to your machine running macOS Sonoma.
- Launch the Time Machine by pressing the Command + Space keys together and then type in Time Machine.
- Locate the photos you want and select it to choose Restore for photo restoration.
- Close the Time Machine window when the photo recovery is done.

If you encounter the problem that Time Machine backup not complete, some of the files on your Mac cannot be backed up until Cloud Files syncing has completed, this post provides solutions.t
Solution 4: Recover deleted photos on macOS Sonoma via iCloud
iCloud syncs all files and folders as well as the modifications to them automatically as long as you ask it to do so. Therefore, restoring missing photos from iCloud is a nice option for you.
- Visit the iCloud official website on your machine and log in with your Apple ID account and password.
- You will be in a window that has three options: Your Plan, Your Storage, and Data Recovery. You can click Your Storage for lost photos, but if you have deleted these photos in iCloud before, Data Recovery is recommended.

Conclusion
Although data loss is inevitable, we could bear some tips in mind to lower its damage. For instance, back up files regularly, make use of the hard drive gently, visit trusted websites, download authorized apps, update macOS from formal channels, etc.
Photo missing definitely drives people crazy after a macOS Sonoma update because you are unaware of the culprits. Feel no worries. This article offers you 4 solutions to recover them!