The macOS Sonoma was finally released on September 26, 2023. Powerful features such as Widgets on the Desktop, Game Mode, web app, etc, not only attract Mac users to upgrade to macOS, but also appeal to Windows users to test out macOS Sonoma on their computers.
Unlike on MacBook Air/Pro/iMac, you can not directly install macOS on a Windows PC, but you can install macOS on VirtualBox. Using such a virtual machine(a virtual system or program that offers the same features as physical machines) to install macOS on Windows is a popular method.
VirtualBox is a free and open-source virtualization software that allows users to run different operating systems on their computers. In this post, we will elaborate on how to install macOS Sonoma on VirtualBox on a Windows PC.
Install macOS Sonoma on VirtualBox on a Windows PC step-by-step
Although it is a simple operation, installing macOS Sonoma on VirtualBox does call for some technical know-how and attention to detail. But don't worry, we will guide you through the whole installation process, just follow the steps patiently.
To install macOS Sonoma on VirtualBox, you must first make sure your computer satisfies the hardware requirements. The following are the prerequisites:
- A 64-bit processor with a minimum of two cores
- At least 4GB of RAM
- At least 20GB of free disk space
- macOS Sonoma iSO file for virtualbox
- A graphics card that is supported and has at least 128MB of video memory
You should check the storage on your computer to make sure there is sufficient disk space for the Sonoma VirtualBox, if there is not enough free space, you can consider using iBoysoft DiskGeeker for Windows to analyze the disk space and delete unused files easily from your computer. Free download it to have a try!
Now, let's dive into the details steps to install macOS Sonoma on VirtualBox on Windows.
- Step 1. Install VirtualBox and its Extension Pack
- Step 2. Create a macOS Sonoma virtual machine
- Step 3. Configure macOS Sonoma virtual machine
- Step 4. Run VirtualBox code to the Command Prompt
- Step 5. Install macOS Sonoma on VirtualBox
Share the help others install macOS Sonoma on VirtualBox on Windows!
Step 1. Install VirtualBox and its Extension Pack
From the official website, users can download and install the most recent version of VirtualBox. The VirtualBox Extension Pack is a software that adds further features to VirtualBox, including support for USB 2.0 and 3.0 devices and the remote desktop protocol. After downloading VirtualBox, it needs to be downloaded and installed.
Steps to install VirtualBox:
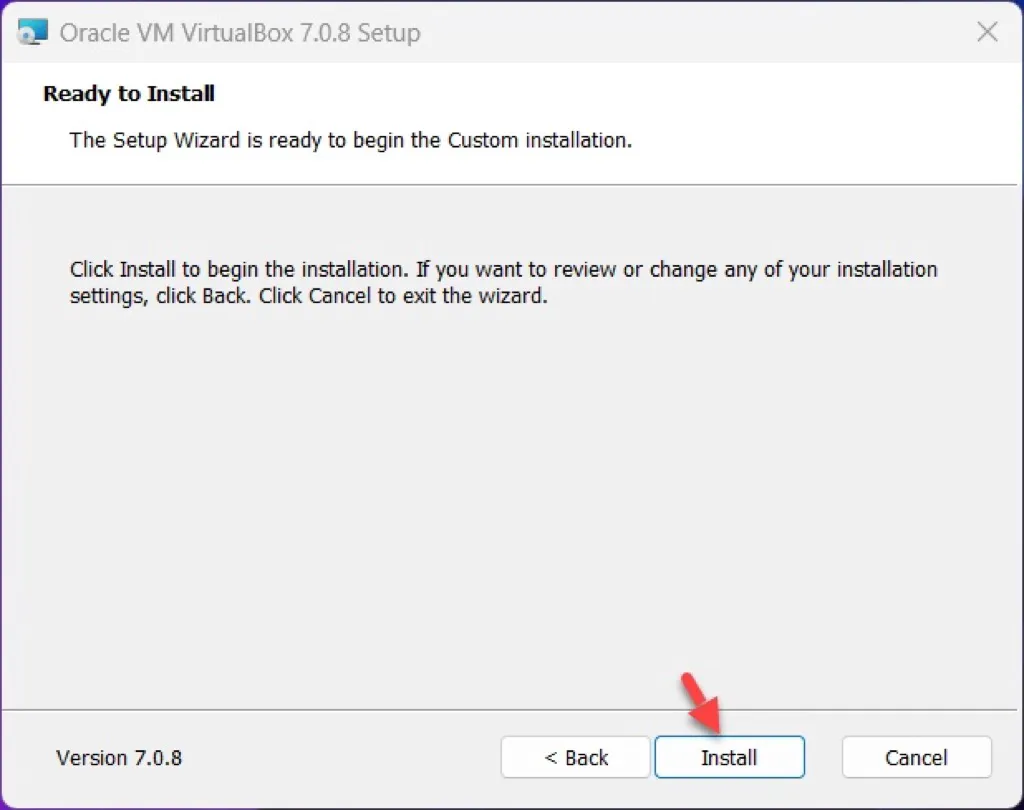
- Head to the folder where the downloaded VirtualBox is located and double-click on the downloaded "VirtualBox" file to install it.
- When the "Oracle VM VirtualBox Setup" window appears on the screen click on the Next button to continue.
- Choose a location to install the VirtualBox and click Next to continue.
- Click Yes and then click Install to start the installation process.
Steps to Install VirtualBox Extension Pack:
- Double-click on the installer of VirtualBox Extention and click Install.
- Select I Agree to agree with the terms.
- Click OK when the VirtualBox Extension Pack is installed successfully.
Step 2. Create a macOS Sonoma virtual machine
After installing the VirtualBox and its Extension Pack on your Windows PC, you can proceed to create the virtual machine for macOS Sonoma.
- Launch the VirtualBox VM on your Windows PC and click New.
- When the next window appears click on the Expert Mode option.
- Choose to create a new virtual hard disk or use an existing one.
- Enter a name for the virtual machine such as macOS Sonoma, specify the location, and Type Mac OS X, Version, Mac OS X (64-bit).
- On the Hardware tab increase the base memory size and the processor.
- Select the maximum disk size for macOS Sonoma then specify the location.
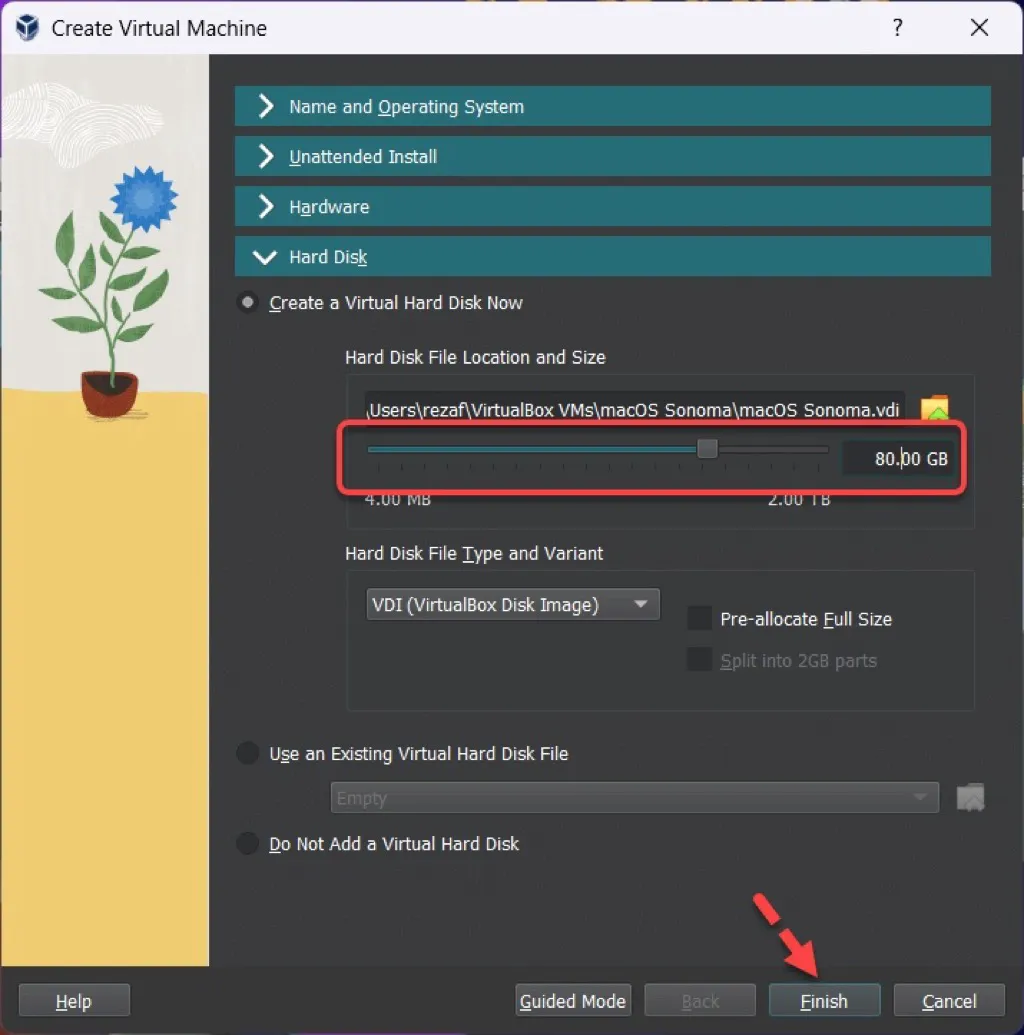
- Click the Finish button.
Step 3. Configure macOS Sonoma virtual machine
The virtual machine parameters can then be adjusted to your preferences. You can change a variety of settings, including the amount of CPU cores and audio options.
- Click the Settings tab to customize certain things.
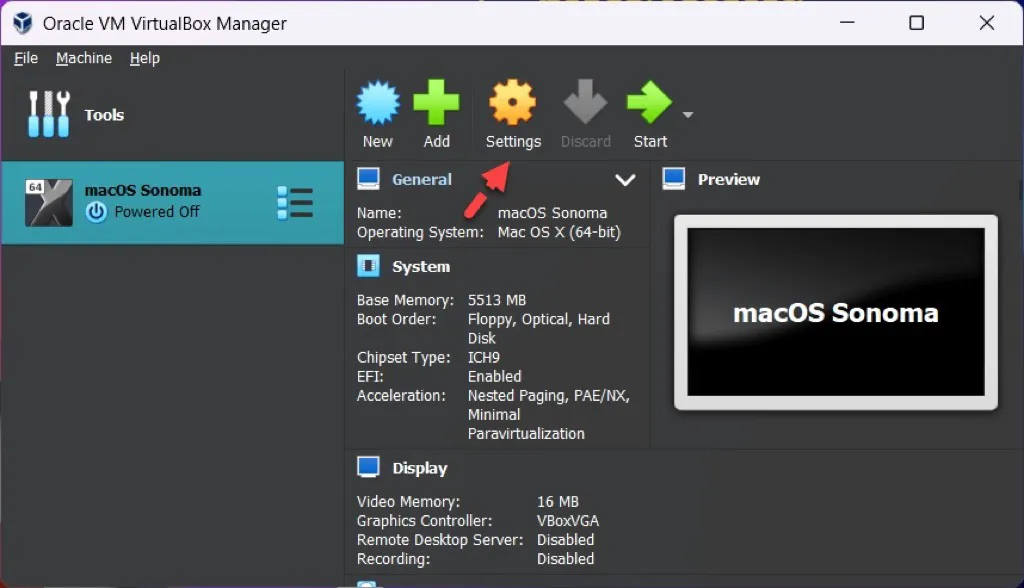
- From the left-handed sidebar select the System tab, then uncheck the floppy disk.
- In the Processor section, increase the number of CPUs for better performance.
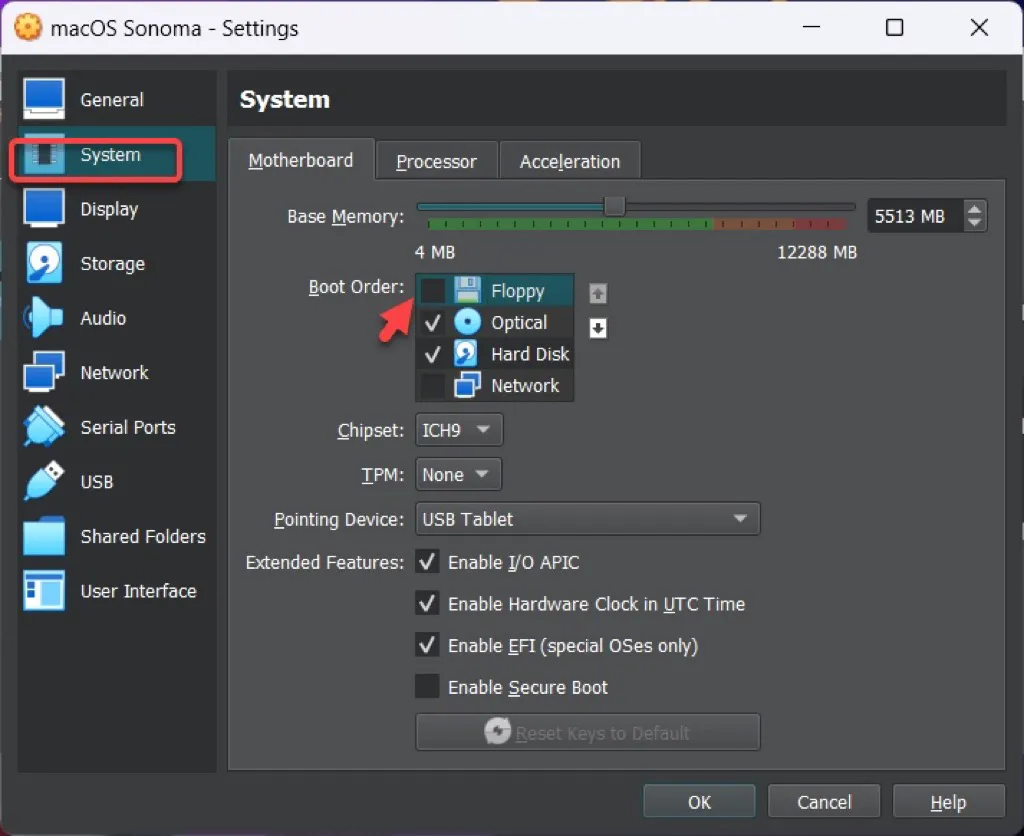
- Choose the Display tab, then increase the video memory size to 128 MB.
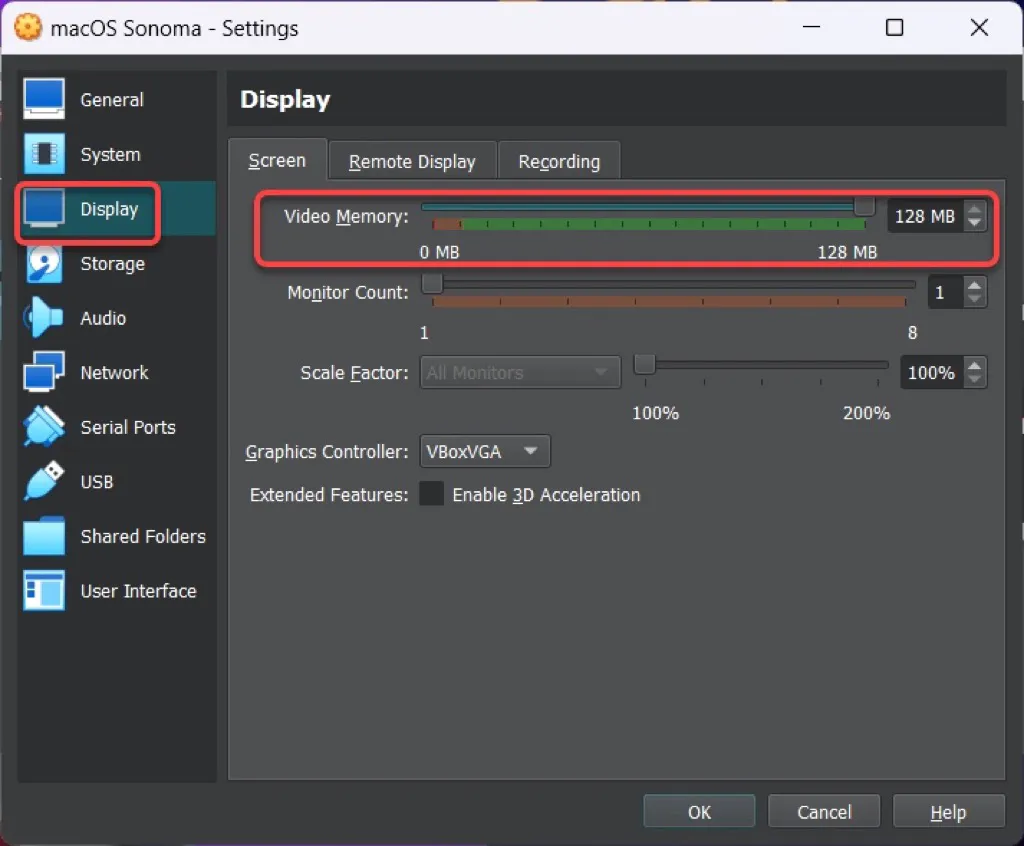
- Open the Storage tab, click Empty > disk icon > Choose a disk file.
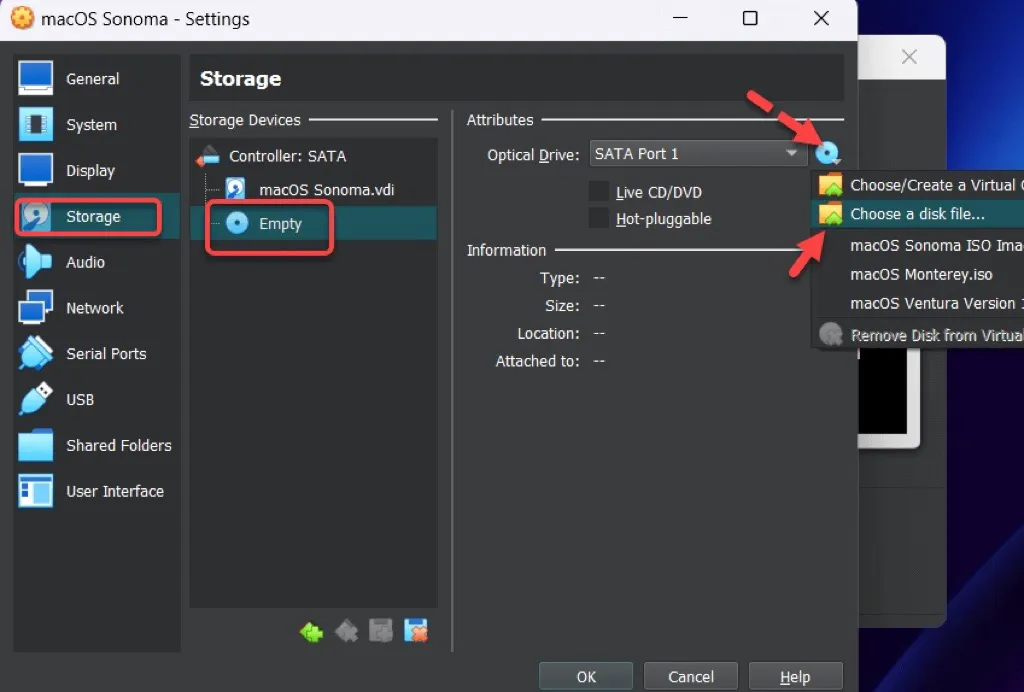
- Choose the macOS Sonoma ISO and click Open.
- From the USB tab, check the box of USB 3.0 to enable it.
- Click the OK button to save the changes.
Step 4. Run VirtualBox code to the Command Prompt
Once your virtual machine has been created and customized, you need to run a few commands to install macOS Sonoma on VirtualBox.
- Open the VirtualBox code. Click the Edit tab and select Replace.
- Replace the VM Name with the name of your virtual machine and select Replace All.
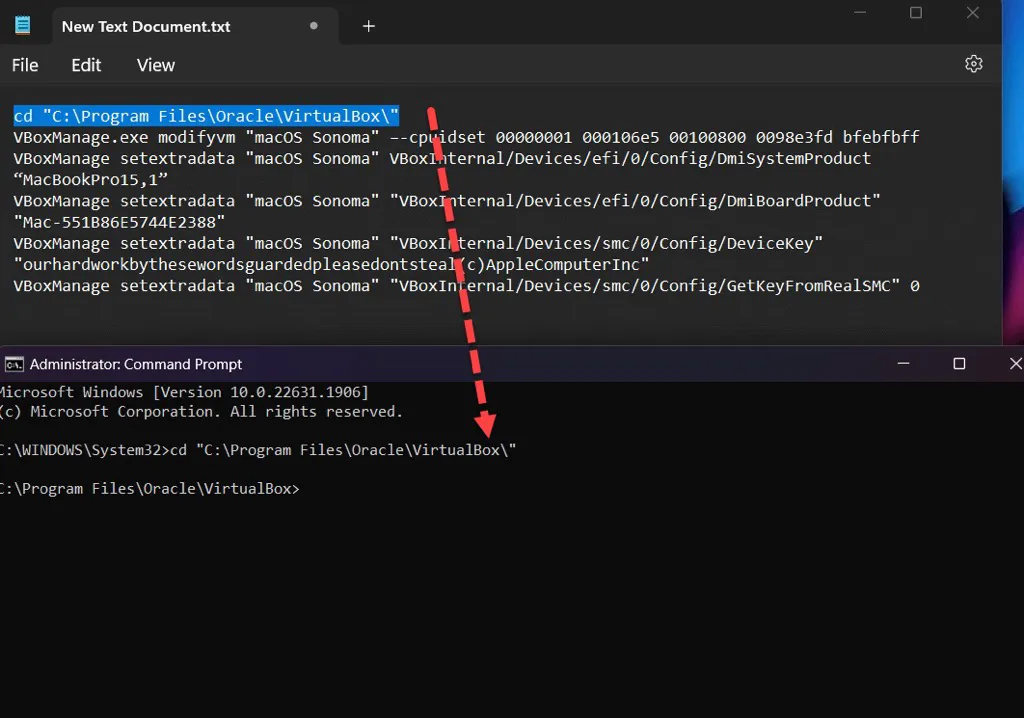
- Go to the Windows start menu and type cmd, right-click Command Prompt to choose Run as administrator.
- Respectively copy and paste the first line and the rest of the commands into the Command Prompt window, and press Enter each time.
Step 5. Install macOS Sonoma on VirtualBox
Performing a clean install of macOS Sonoma on VirtualBox on Windows 10/11 is required in this stage before running macOS Sonoma on Windows.
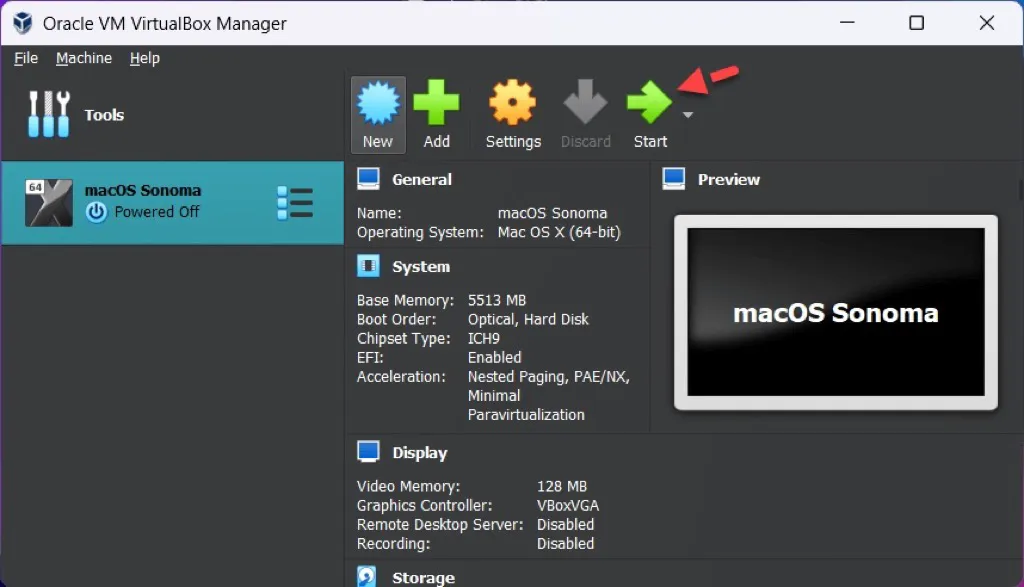
- Launch VirtualBox, select your virtual machine, and click Start, you will see the Apple logo appear after the codes flash.
- Select your preferred language and click the arrow icon at the bottom right-hand corner.
- Click on Disk Utility and select Continue.
- Select the VBOX HARDDISK Media and click Erase.
- Configure the settings such as name, format, and scheme, then click Erase.
- Quit Disk Utility and choose Install macOS Sonoma, then click Continue.
- Follow the onscreen instructions to install macOS Sonoma, and tap on Continue.
- Agree to the terms and conditions and select Agree again.
- Choose the macOS Sonoma hard disk and click Continue.
- Wait for the macOS to be installed in 40–60 minutes.
Share the detailed steps to install macOS Sonoma on VirtualBox on Windows!
