
When connecting a USB device to Mac, you may have difficulty locating it if there's no clear indication on the desktop. Consequently, you're not sure whether your USB device is detected and are unable to access it. To help you view the USB devices, we'll tell you how to find USB connected devices on Mac in all the possible ways.
How to find USB connected devices on Mac?
There're five ways to find USB connected devices on Mac. All of them can show you the external storage devices that you can plug into a USB port, such as USB flash drives, external hard drives, and devices that use disks as storage media like cameras, media players, etc.
However, only Terminal and System Information will list the non-disk USB devices, such as keyboards, mice, printers, headphones, and so on. As for your phone, you can find it in Finder, Terminal, and System Information. Here's a quick summary of where to find USB devices on Mac.
- Desktop: iPods and mounted drives connected through the USB port, such as USB sticks, HDDs, SSDs, etc.
- Finder: iPhones, iPads, and mounted drives connected through the USB port, such as USB sticks, HDDs, SSDs, etc.
- Disk Utility: USB connected drives with a file system that your Mac can read, including exFAT, FAT32, NTFS, Mac OS Extended, and APFS.
- Terminal: All USB connected devices.
- System Information: All USB connected devices but with more information than Terminal.
Share this post to help more users learn how to see connected devices on Mac.
How to find USB connected devices on Mac's desktop?
Macs are defaulted to show USB flash drives, external hard drives, or iPods on the desktop. So, the easiest way to find USB devices on Mac is from your desktop. Double-clicking the disk icons can open the USB drive and allow you to delete, add, and modify files.
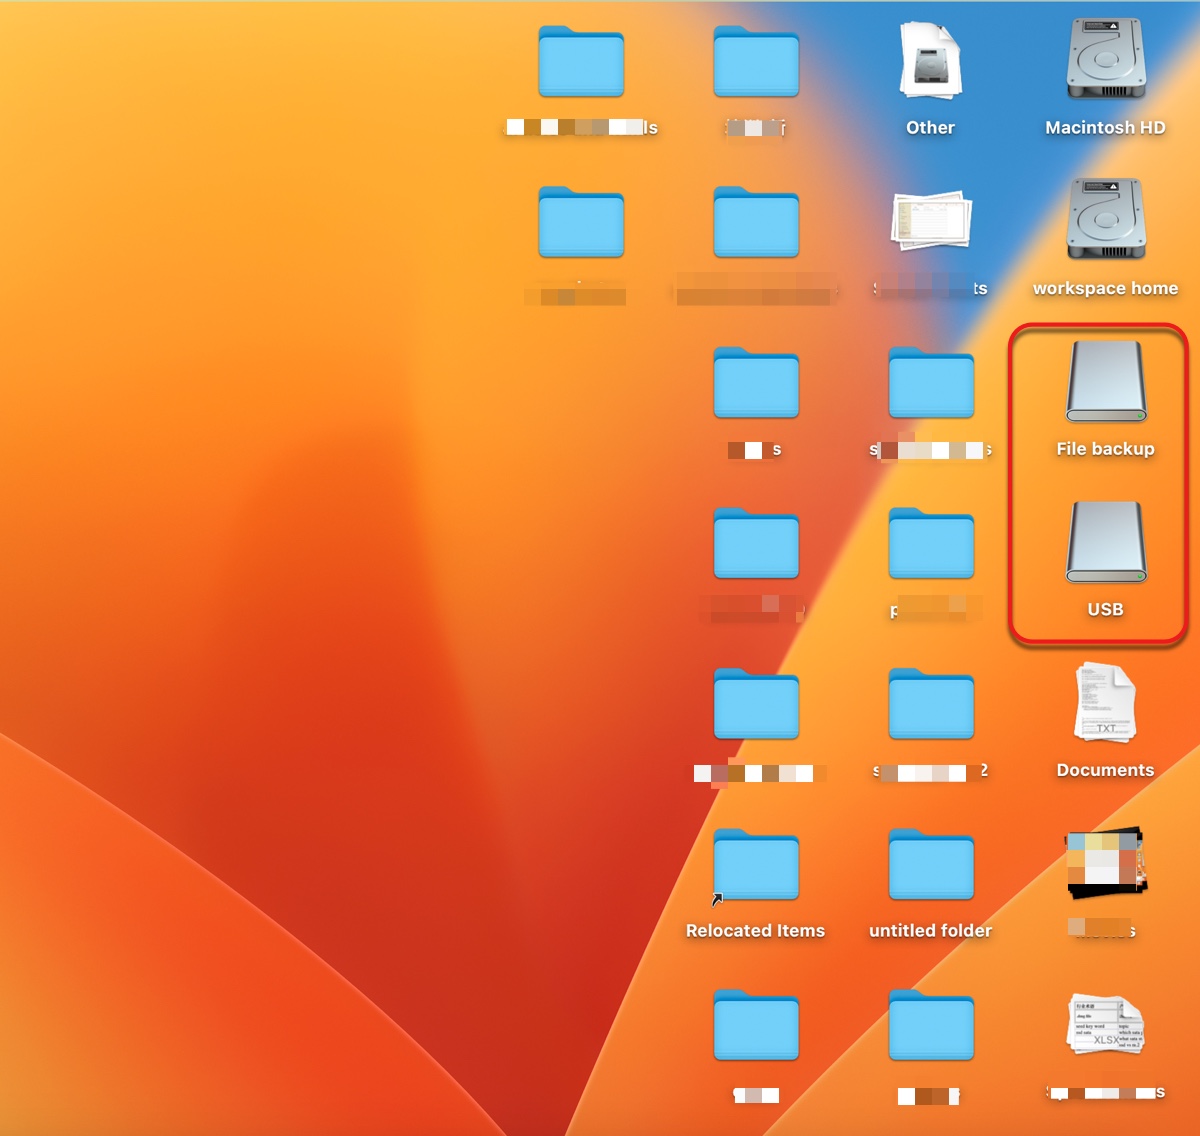
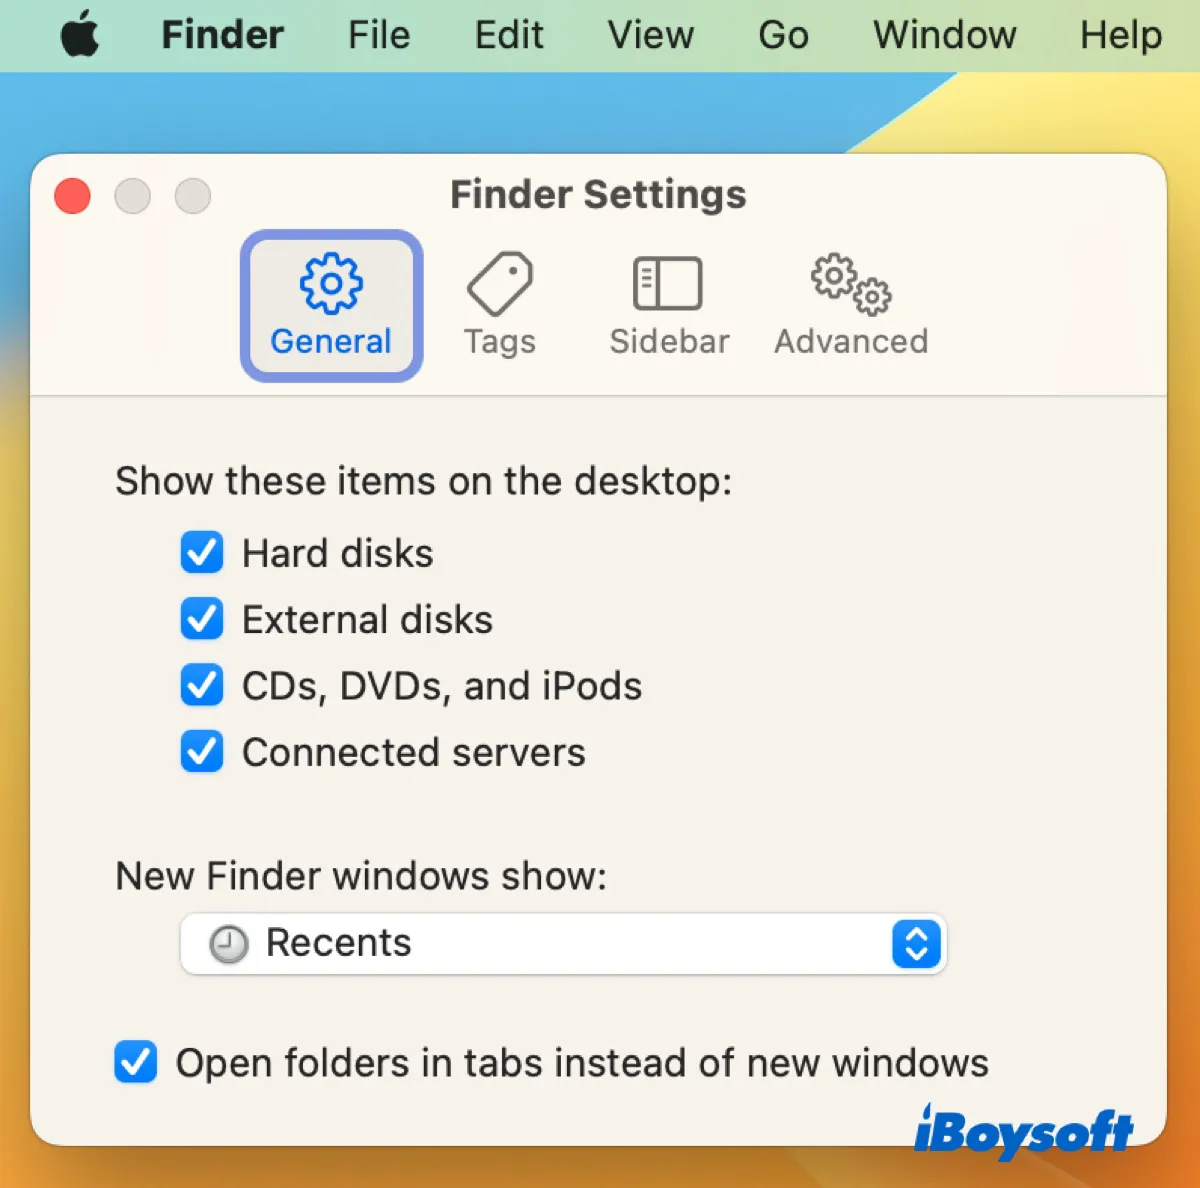
If you don't see the USB connected devices on your desktop, check if your Mac is indeed set to display them on the desktop with the following steps.
- Open Finder by clicking the blue smiley face on the left side of your Dock.
- Click Finder > Preferences or Settings from the top-left menu bar.
- In the General tab, ensure "External disks" & "CDs, DVDs, & iPods" are selected to let your Mac show USB devices on the desktop.
How to find USB connected devices on Mac in Finder?
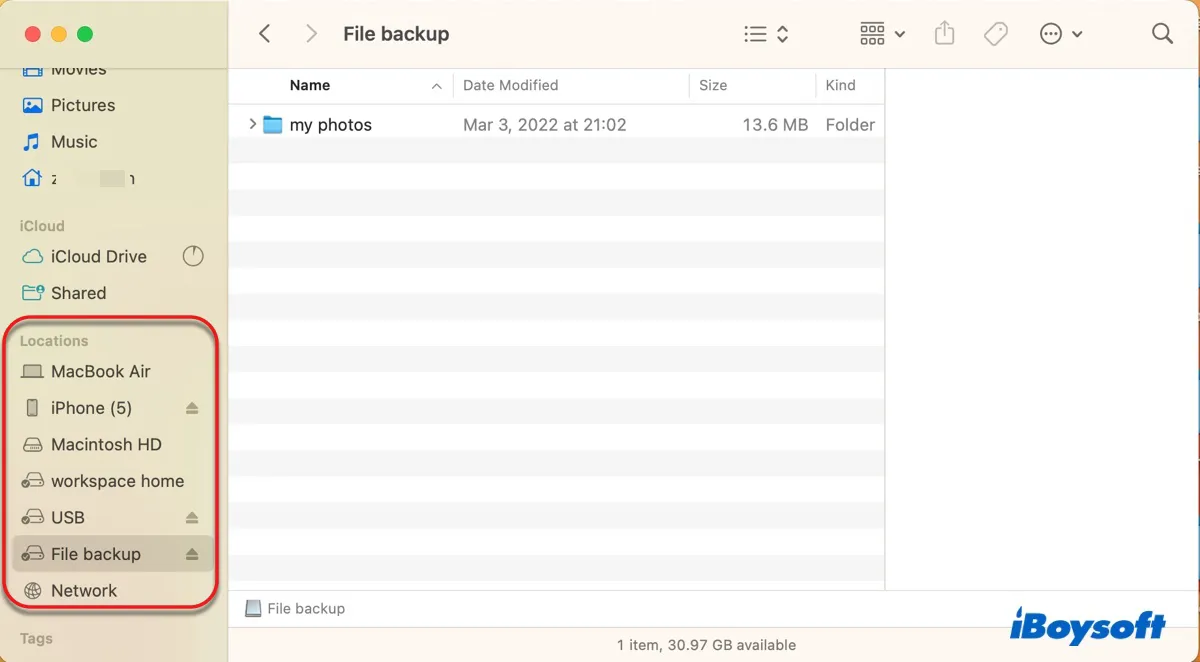
Another way to view USB devices on Mac is through Finder, the gateway to all the files, apps, and downloads on your Mac. Click the Finder icon on your Dock to open it, then you can see the USB connected devices listed under the Locations heading. You can select your USB device to access its content.
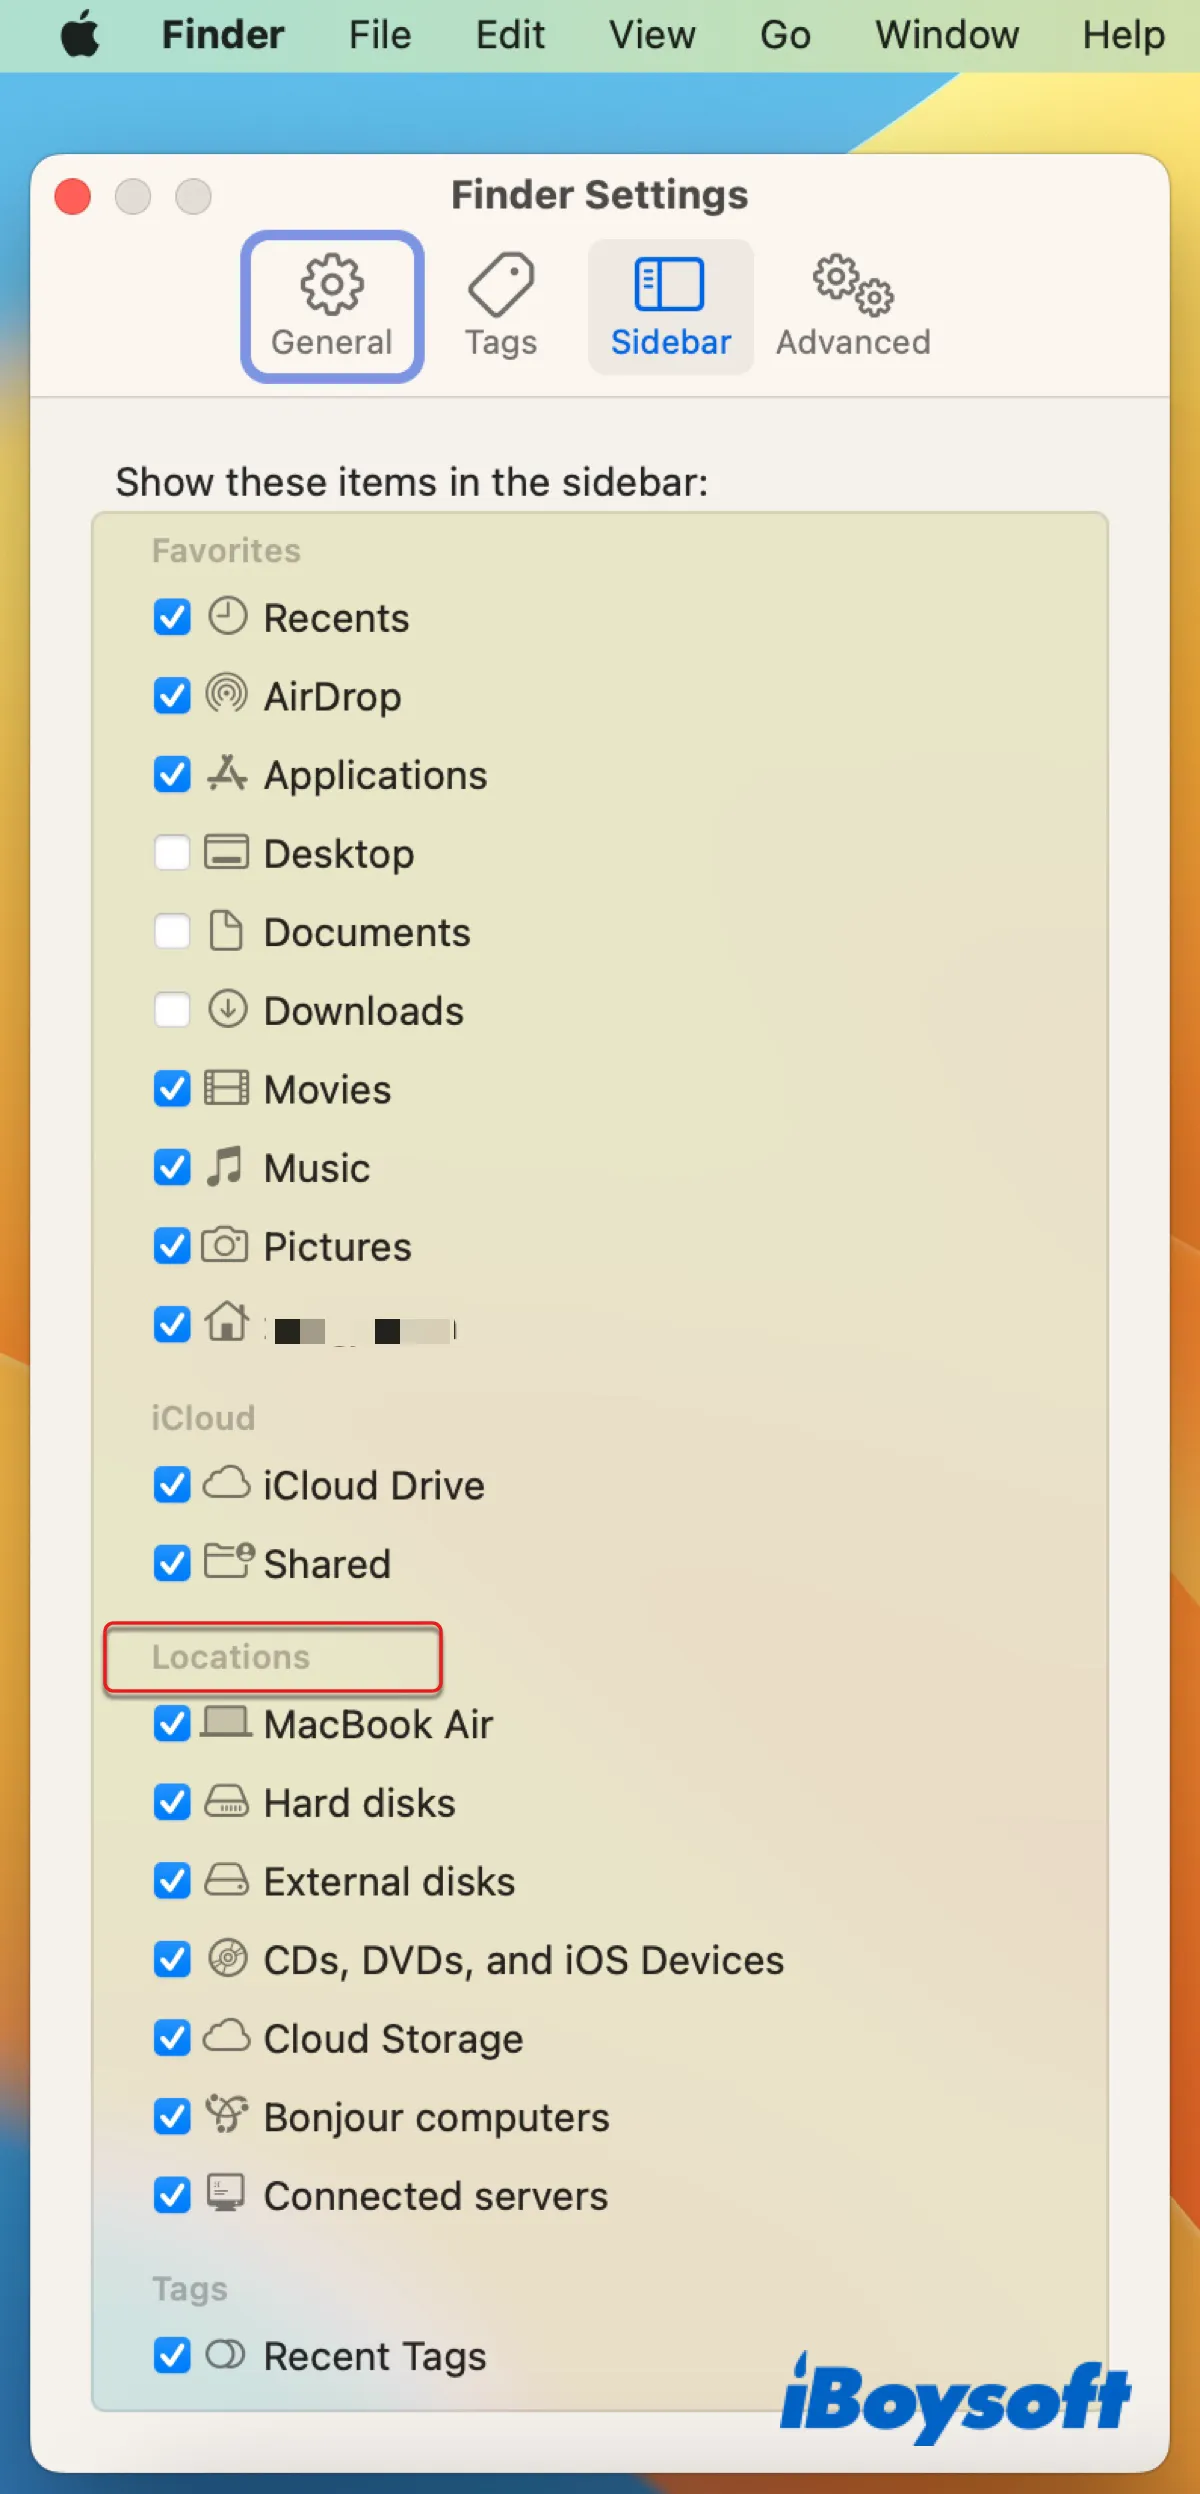
If you can't find the USB connected devices in Finder, ensure your Mac is configured to display them on Finder's sidebar, as guided below.
- Open Finder.
- Select Finder on the menu bar and click Preferences or Settings from the drop-down menu.
- Click the Sidebar tab.
- Make sure "External disks" & "CDs, DVDs, & iOS Devices" are ticked.
Note: Diskwise, Mac's desktop and Finder app will only show you the USB drives that are mounted on your Mac. So, if you can't find your USB storage device yet, it may have a mounting issue. Continue with the other ways below.
How to see connected USB devices on Mac in Disk Utility?
Using Disk Utility is also an easy way of finding USB devices on Mac. It's the built-in disk manager for the internal hard drives and external storage devices that are detected and readable on your Mac.
You can launch Disk Utility from the Applications > Utilities folder. Once inside the app, you'll notice all the connected disks in the left sidebar under the "External" section, regardless of whether it's mounted or not. It's worth mentioning that Disk Utility won't display drives with an unsupported file system, such as ext3 or XFS.
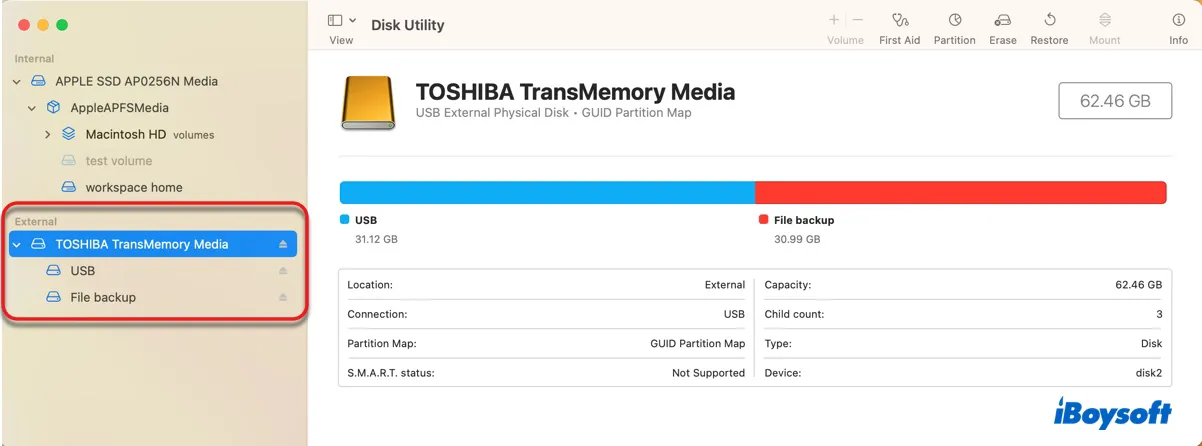
If you want to open a USB drive in Disk Utility, right-click on its name and select "Show in Finder." Note that the option won't be available if you right-click the drive instead of its volumes or partitions or try to open a grayed-out volume that's not mounting on Mac.
How to find connected devices on Mac in System Information?
The best place to find all your USB connected devices on Mac is with the System Information app. It displays every USB device recognized by your Mac with detailed information like its capacity, file system, volume UUID, free space, current required, whether it's writeable, and many more.
It helps determine whether your USB drive not showing up on Mac is caused by hardware issues or software problems. If a drive appears in System Information, it usually doesn't have serious physical damage.
Here's how to check USB connections on Mac:
- Launch the System Information app from the Applications > Utilities folder.
- Select USB under the Hardware section.
- View USB devices on Mac.
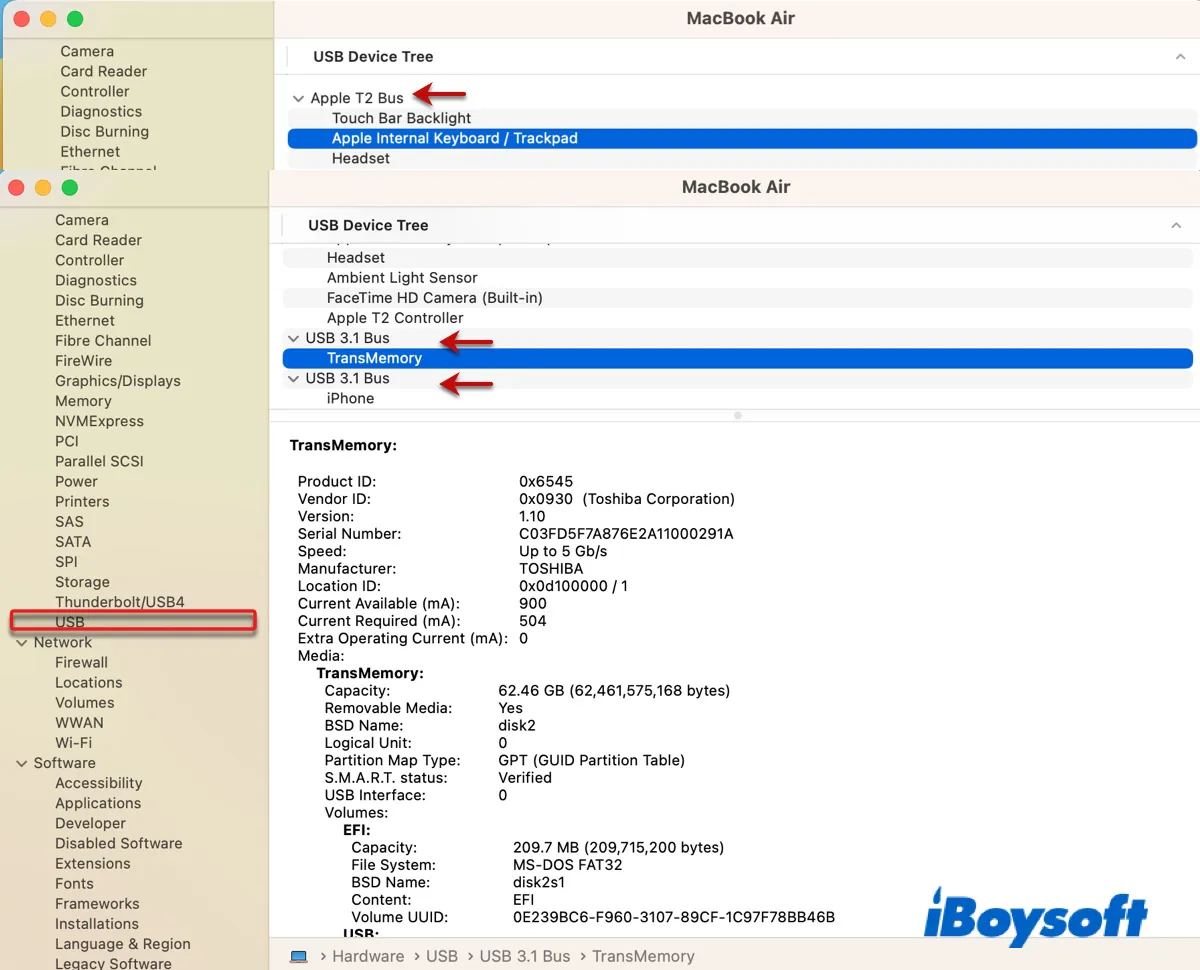
From my example above, you can see that my Mac has:
- an internal Apple T2 bus connected to the Touch bar, internal keyboard & mouse, headset, light sensor, camera, and a T2 controller.
- two USB 3.1 buses. One is attached to a USB flash drive and the other is connected to my iPhone.
How to find USB connected devices on Mac via Terminal?
Apple's command-line utility, Terminal, also allows you to list USB devices connected to your Mac. By running a simple command, it will show you all the USB connected devices that are detected on your Mac, including those items that are not storage devices and USB drives with a file system that's unreadable on Mac.
How to get the USB devices list on Mac:
- Open Finder and launch Terminal from the Applications > Utilities folder.
- Type the following command and press the Enter key.ioreg -p IOUSB
- Check the list of USB devices plugged into your Mac.
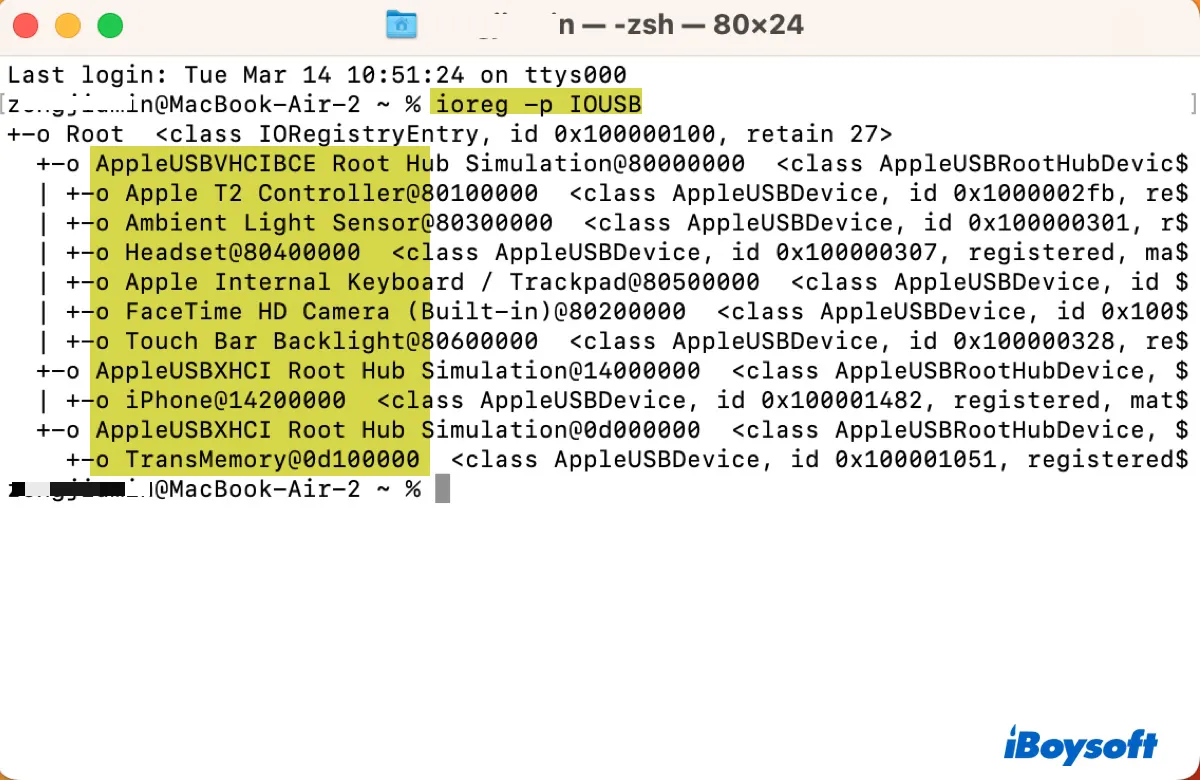
The results should be the same as what is displayed on the System Information app but arranged differently. In Terminal, the connected USB devices are listed with the device name, location ID, and class.
(Optional) If you only want to see the external USB drives mounted on your Mac, execute the following command instead.
diskutil list external
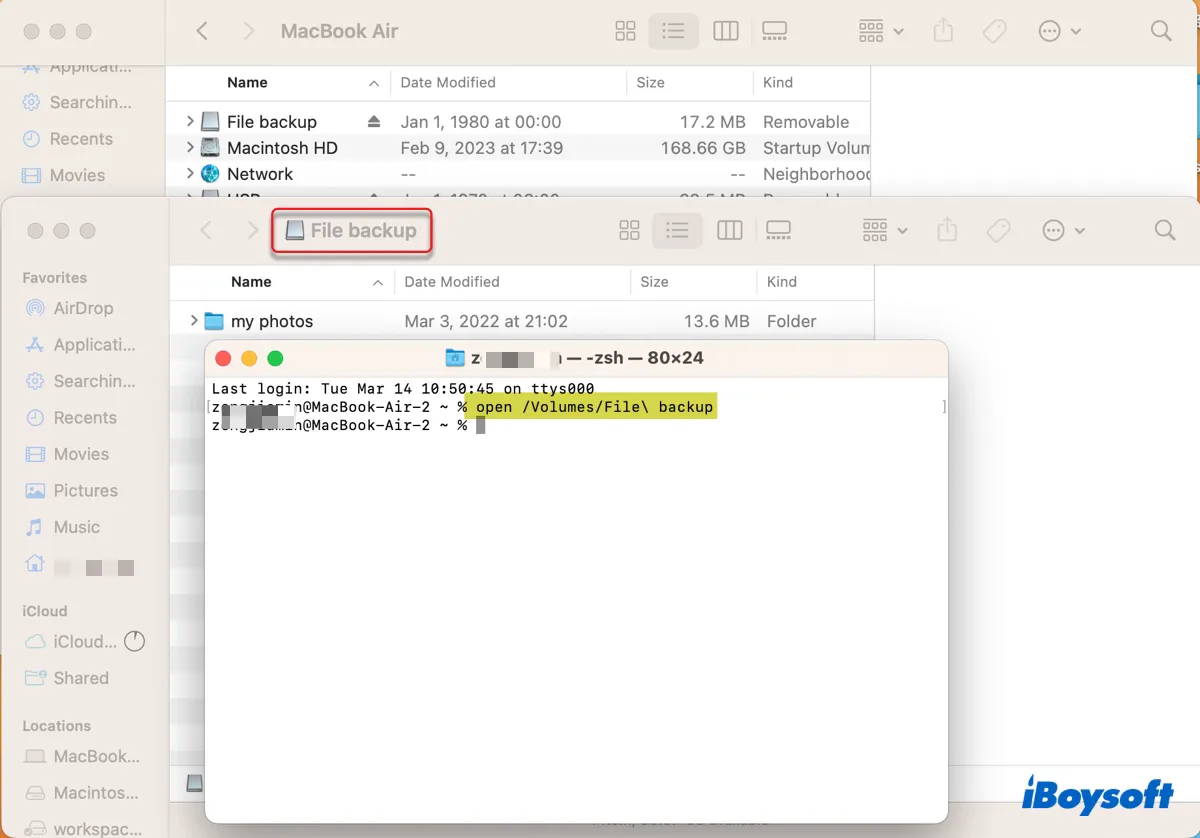
Suppose you want to open the USB drive from Terminal, then you can execute the following command. Remember to replace the volume name with yours and separate words with a backslash if the name has more than one word. For instance, if your drive name is File backup, the command should be:
open /Volumes/File\ backup
Now that you know where to find USB devices on Mac, don't forget to share it with your friends.
Troubleshooting USB connected drives not mounting or showing up on Mac
If your USB drive isn't showing up on the desktop or in Finder and you can't access it on Mac, you need to test whether your USB drive appears in Disk Utility and System Information first. Then decide which issue you're confronting according to the table below, and follow the corresponding solutions to fix it.
| Whether appear in Disk Utility & System Information | Problems | Solutions |
| USB drives can't be seen anywhere | USB drives not recognized | Check USB connections, reboot Mac |
| USB drives show up in System Information but are grayed out in Disk Utility | USB drives not mounted | Manually mount the drive, repair drive, kill fsck, reformat drive |
| USB drives only show up in System Information | USB drives are recognized but not readable on macOS | Turn off physical lock, decrypt drive, reformat drive |
Issue 1: USB drive not recognized
When Mac won't recognize your USB drive, it usually results from faulty connections, system glitches, or physical damage. The following tips can help get your Mac to recognize the USB.
- Unplugging and replugging your USB drive.
- Restart your Mac.
- Use a different USB cable and port.
- Try connecting your USB drive directly to your Mac or using a hub.
- Use a different hard drive enclosure.
- Test it on a different computer like a Windows PC.
- Update your operating system.
If these tips don't do the trick, you need to send your USB drive to a local expert for repair.
Issue 2: USB drive not mounted
Fix 1: Mount your USB drive in Disk Utility & Terminal
If your USB drive is not mounting on Mac, you can manually mount it in Disk Utility by selecting a volume and clicking the Mount button. If it reports an error or doesn't respond, select your drive and click the First Aid button to repair your drive.
If First Aid failed to repair your drive or found no error, mount your USB drive in Terminal instead. Follow these steps:
- Open Terminal from the Applications > Utilities folder.
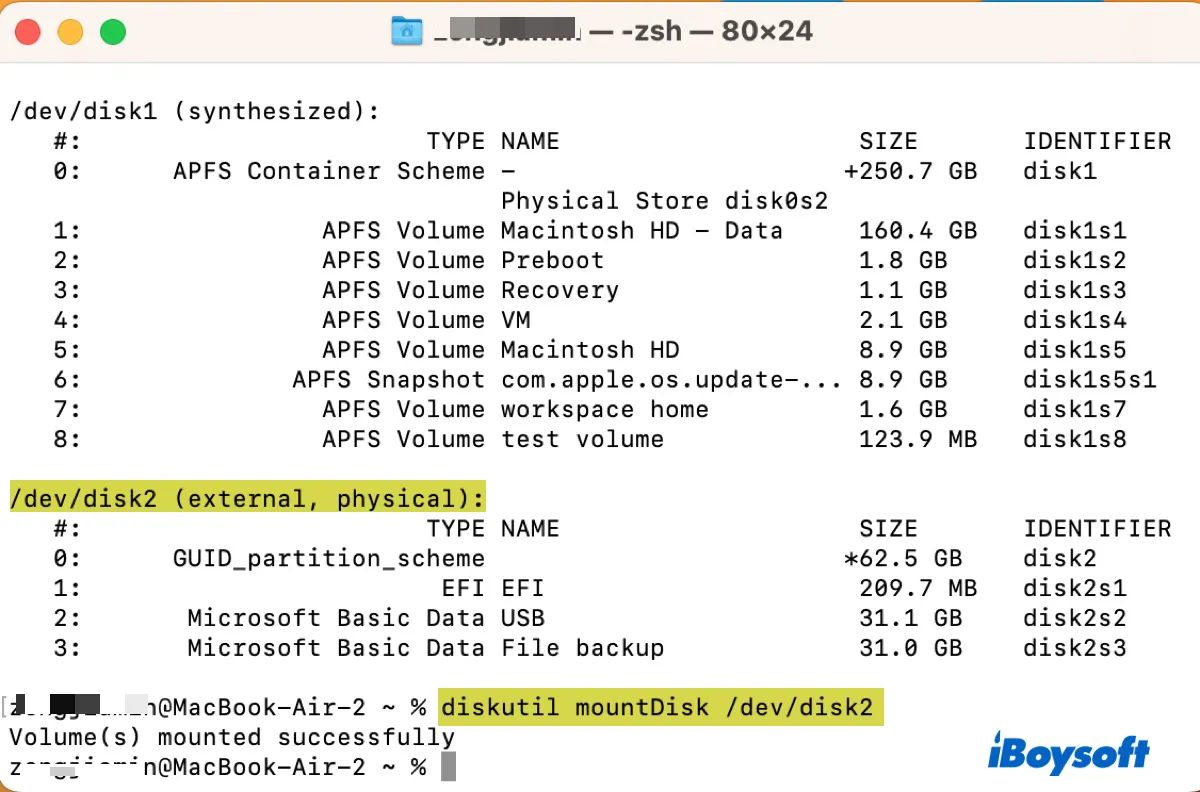
- Type the following command and hit Enter.diskutil list external
- Note down your disk identifier.
- Input the following command and press Enter to mount the drive.diskutil mountDisk /dev/disk_idnetifierIf your USB drive's disk identifier is disk2, the command should change to diskutil mountDisk /dev/disk2
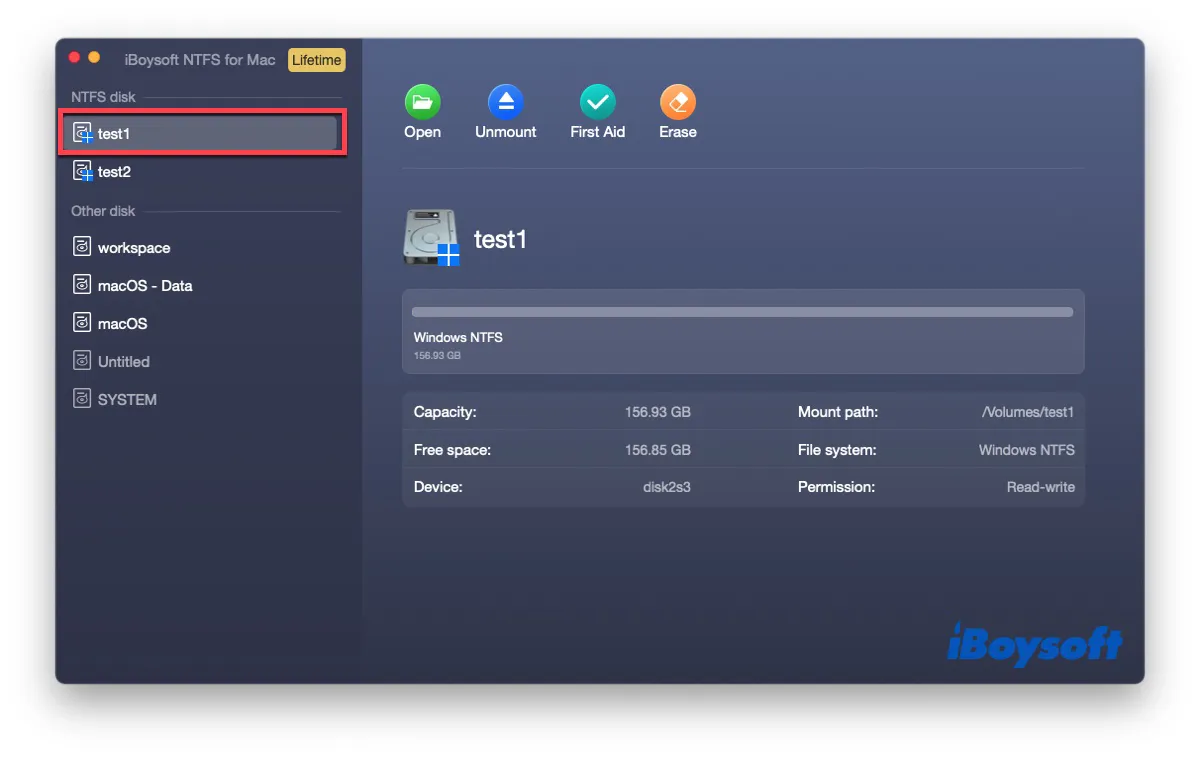
Fix 2: Mount your NTFS USB drive with iBoysoft NTFS for Mac
Suppose the issue persists and your USB drive is NTFS-formatted, then you can mount it in iBoysoft NTFS for Mac. It's a great utility many users have used to mount NTFS drives on Mac in read-write mode.
You can click the button below to download it for free.
Then check if your USB drive mounts correctly. If it does, you can access your NTFS drive as usual. If it doesn't, select your drive and click the First Aid button to repair it.
Fix 3: Boot into Safe Mode
Sometimes, third-party software like VPN or antivirus programs may prevent your drive from mounting on Mac. To avoid such software intervention, you can boot into Safe Mode and check if your USB drive is mounted there.
Fix 4: Kill the fsck process
Chances are that the operating system issued the fsck process to repair your drive and the process hasn't been completed yet, keeping your drive from being mounted on Mac. This usually happens after your drive is improperly ejected.
You can stop the process to allow your USB drive to mount by running the command below in Terminal.
sudo pkill -f fsck
Fix 5: Recover data and reformat the USB drive
If nothing works, the choice left is to reformat your disk. This will erase all data on your USB-connected drive, so it's advisable to recover the important data on it beforehand. Since the drive is currently inaccessible, you'll need a data recovery application to do the job for you.
Here, we'll show you how to restore data from an unmountable USB drive with iBoysoft Data Recovery for Mac. It's chosen because it's not only easy to use but also has an excellent recovery rate. With it, you can get back your precious data from the unmountable USB connected drive in no time.
The software is also compatible with the majority of operating systems that are commonly used by Mac users, ranging from macOS 13 Ventura to macOS 10.13 High Sierra. Besides, it supports data recovery on Intel-based and Apple Silicon Macs too.
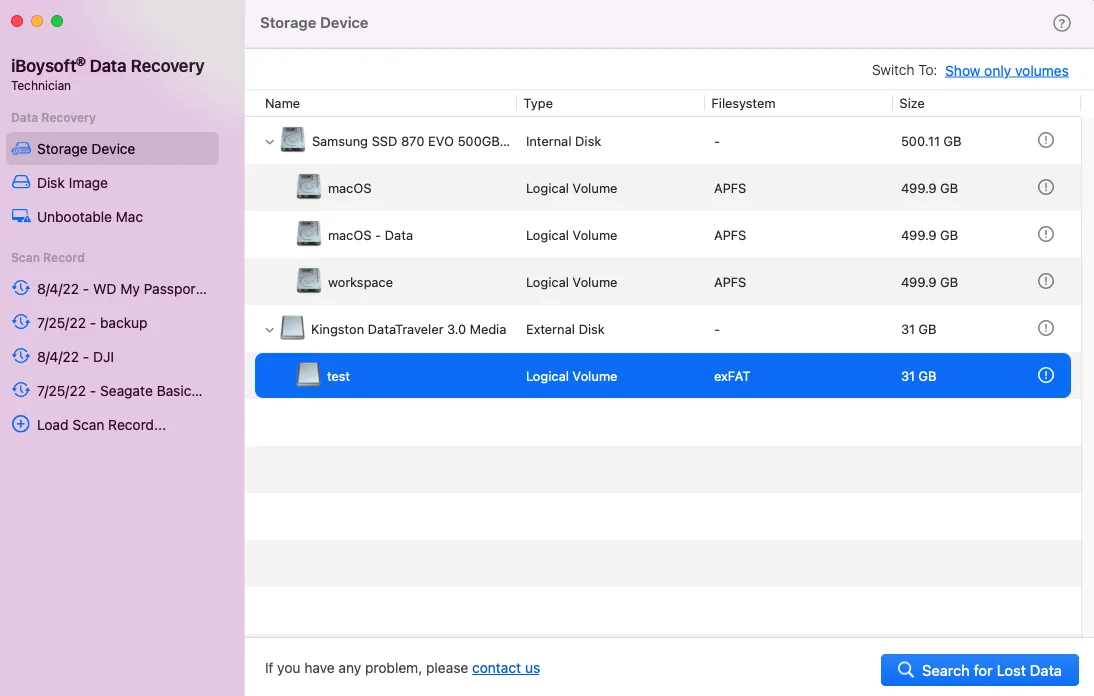
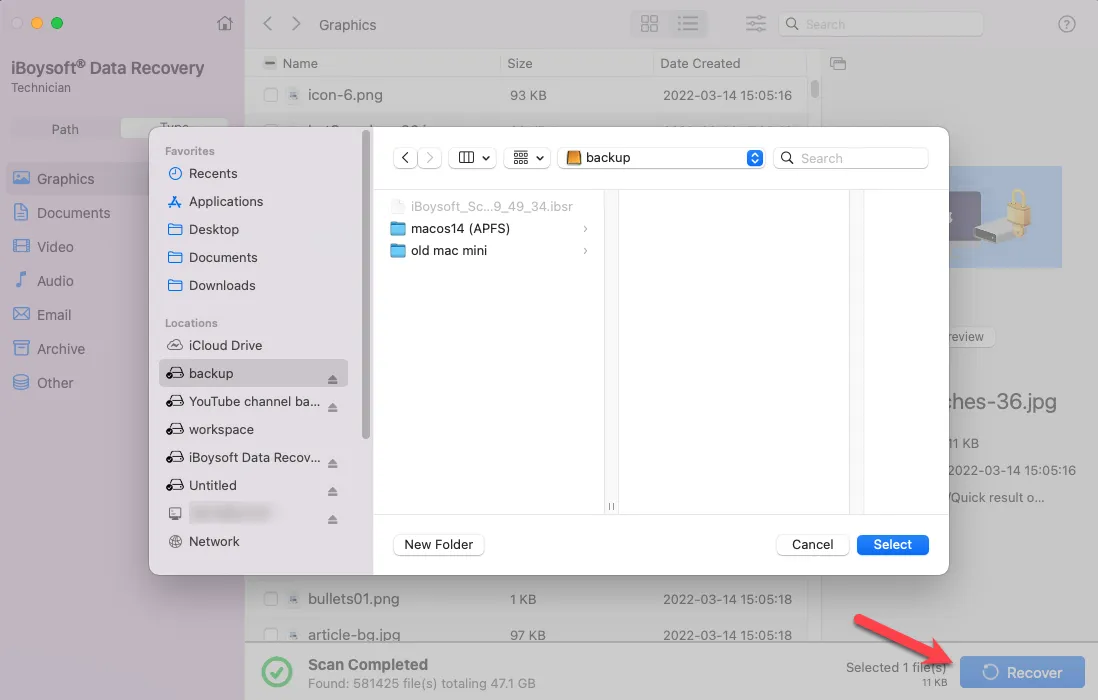
Step 1: Download and install iBoysoft Data Recovery for Mac.
Step 2: Launch the app, then select your USB drive and click "Search for Lost Data."
Step 3: Preview found files for free.
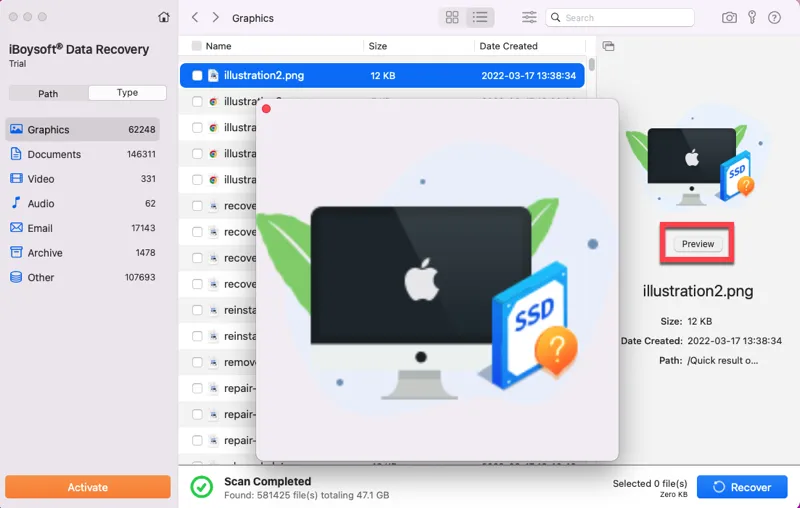
Step 4: Tick the boxes next to the files you want to restore, then click the Recover button and save them to a different location that's not your USB drive.
After your data is rescued, you can format your USB drive on Mac using the Disk Utility app.
Issue 3: USB drive recognized but not readable
There are two reasons why your USB drive is recognized but doesn't show up in Disk Utility. It's either write-protected or has an incompatible file system. So, we'd like you to try the following solutions:
- Check if your USB drive has a physical lock that you can turn off to allow write access. If you're using a USB hub with an SD card, check the SD card as well.
- If your drive is BitLocker-encrypted, plug it into your Windows PC to decrypt it.
- If your drive is formatted with a file system that macOS doesn't support, reformat it with a Mac-compatible format.
Hopefully, you can access your USB-connected drive as expected now. If you are, share this post, as others may need it too.
FAQs about how to find USB connected devices on Mac
- QHow can I see all connected USB devices?
-
A
There are two ways to see all connected USB devices on Mac:
1) Run this command in Terminal: ioreg -p IOUSB
2) Open the System Information app and select the USB section.
- QWhy is my USB device not showing up Mac?
-
A
Here are some common reasons why your USB device is not showing up on Mac:
1) Your Mac isn't set to show external disks on your desktop or in Finder.
2) Your USB drive's file system isn't supported by macOS.
3) Your USB device has corruption.
4) The USB cable or port is having issues.
5) Your USB drive is physically damaged.
- QHow to open USB on MacBook Pro?
-
A
There are four ways to open USB on MacBook Pro:
1) Double-click the USB drive icon on the desktop.
2) Open Finder and select the USB from the sidebar.
3) Open Disk Utility, then right-click on the volume name and select 'Show in Finder.'
4) Open Terminal and execute this command: open /Volumes/volume_name