When you use screen recording tools like Screenshot, QuickTime Player or a third-party screen recorder for Mac, one of the most common problems is that screen recording has no sound. It's annoying when you can't record your voice or capture audio from a video playing on Mac.
Fortunately, you can fix the "QuickTime screen recording no audio" issue with the solutions in this post and learn how to screen record on Mac with sound. let's start by answering your question: why does my Mac screen recording have no sound?"
Share the post to help more people fix fixing QuickTime screen recording no sound on Mac issue.
Why does my screen recording not have sound?
When you make a QuickTime screen recording, your microphone plays the biggest role in recording audio. Naturally, the major reason for rendering Mac screen recording no sound is the microphone's inability to pick up audio. Suppose your Mac's microphone is working fine. Then it may fail to record screen with audio when one of the following happens:
- QuickTime screen recorder isn't allowed to use your Mac's microphone.
- There's no audio source for the recording.
- Your microphone isn't set to be the sound input device.
- The sound input volume is too low.
- Your headphone's speaker is selected as the sound output device when recording sound from a video.
- The speaker volume is too low to be picked up by the microphone when recording audio from a video.
Regardless of the reason for your case, you can follow the guide below to resolve the “QuickTime screen recording no audio” issue on Mac.
Fix 1: Check and modify microphone settings
To record audio on Mac along with the screen, you need to ensure the app has permission to use your Mac's microphone.
How to screen record with audio on Mac:
- Click the Apple logo at the top-left menu bar > System Preferences > Security & Privacy > Privacy.
- Choose Microphone from the options on the left side of the window.
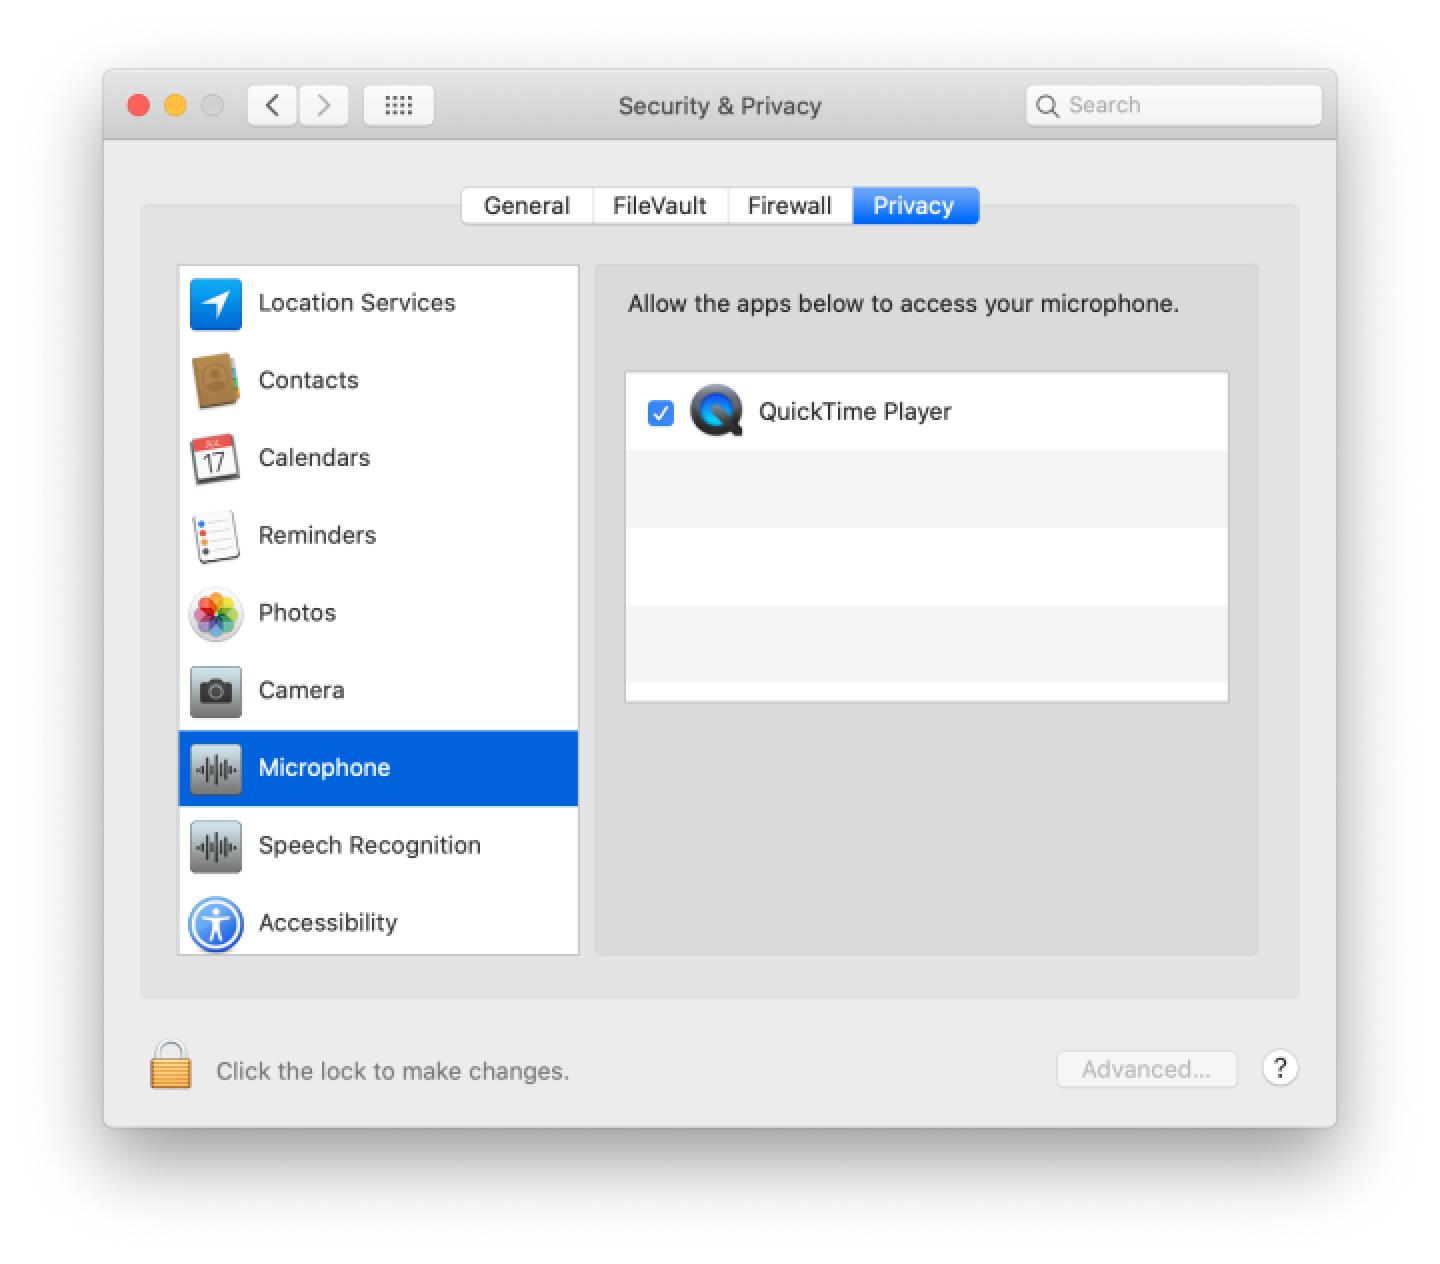
- All applications which require microphone access are shown in the left box. Check if the screen recorder is allowed to use the microphone.
- If not, click the lock icon on the lower-left corner, enter your password, and tick the box next to the app you want to grant microphone access.
Then Initiate a new screen recording on QuickTime to test whether the audio works. If the "MacBook screen recording no sound" issue still exists, move on to the next solution.
Solutions helpful? Then share this post right now!
Fix 2: Check and modify QuickTime settings
If you are facing the "QuickTime screen recording no sound" error, chances are that the built-in microphone is not selected as the audio input device. You need to manually select a microphone to record your voice or sound before heading to record screen on Mac.
How to fix QuickTime Player no sound:
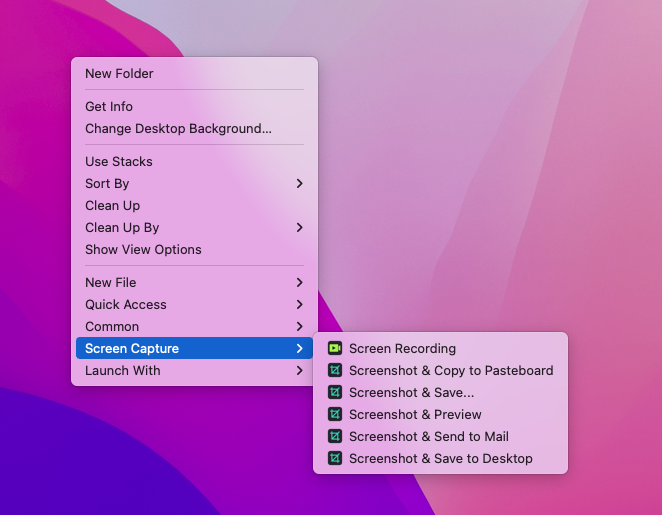
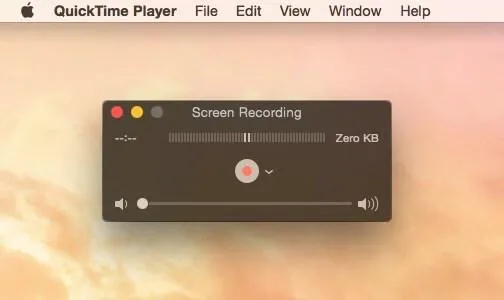
First, you need to create a new screen recording with QuickTime. You can do it by opening your Applications folder, double-clicking QuickTime Player, then right-clicking on its icon in the Dock and selecting New Screen Recording. But this is certainly not the best way to do it, especially if you need to access screen recording regularly.
That's why we recommend you use iBoysoft MagicMenu to launch a screen recording and other files you frequently use on Mac. With this right-click enhancer, all you need to do to open a new recording is to right-click on the desktop, hover over your cursor to Screen Capture, and then click Screen Recording.
Apart from providing a shortcut to popular features like screen recording or taking screenshots, iBoysoft MagicMenu also allows you to customize the items shown on the right-click menu to meet your personal needs. If you install it, a simple right-click will empower you to quickly launch an application, a file, disk or link that you use all the time; copy or move files without opening folders; and create a new file of various formats such as doc, docs, txt, pdf, etc.
After getting to the QuickTime screen recording window, the next step is to ensure that a proper audio source is selected.
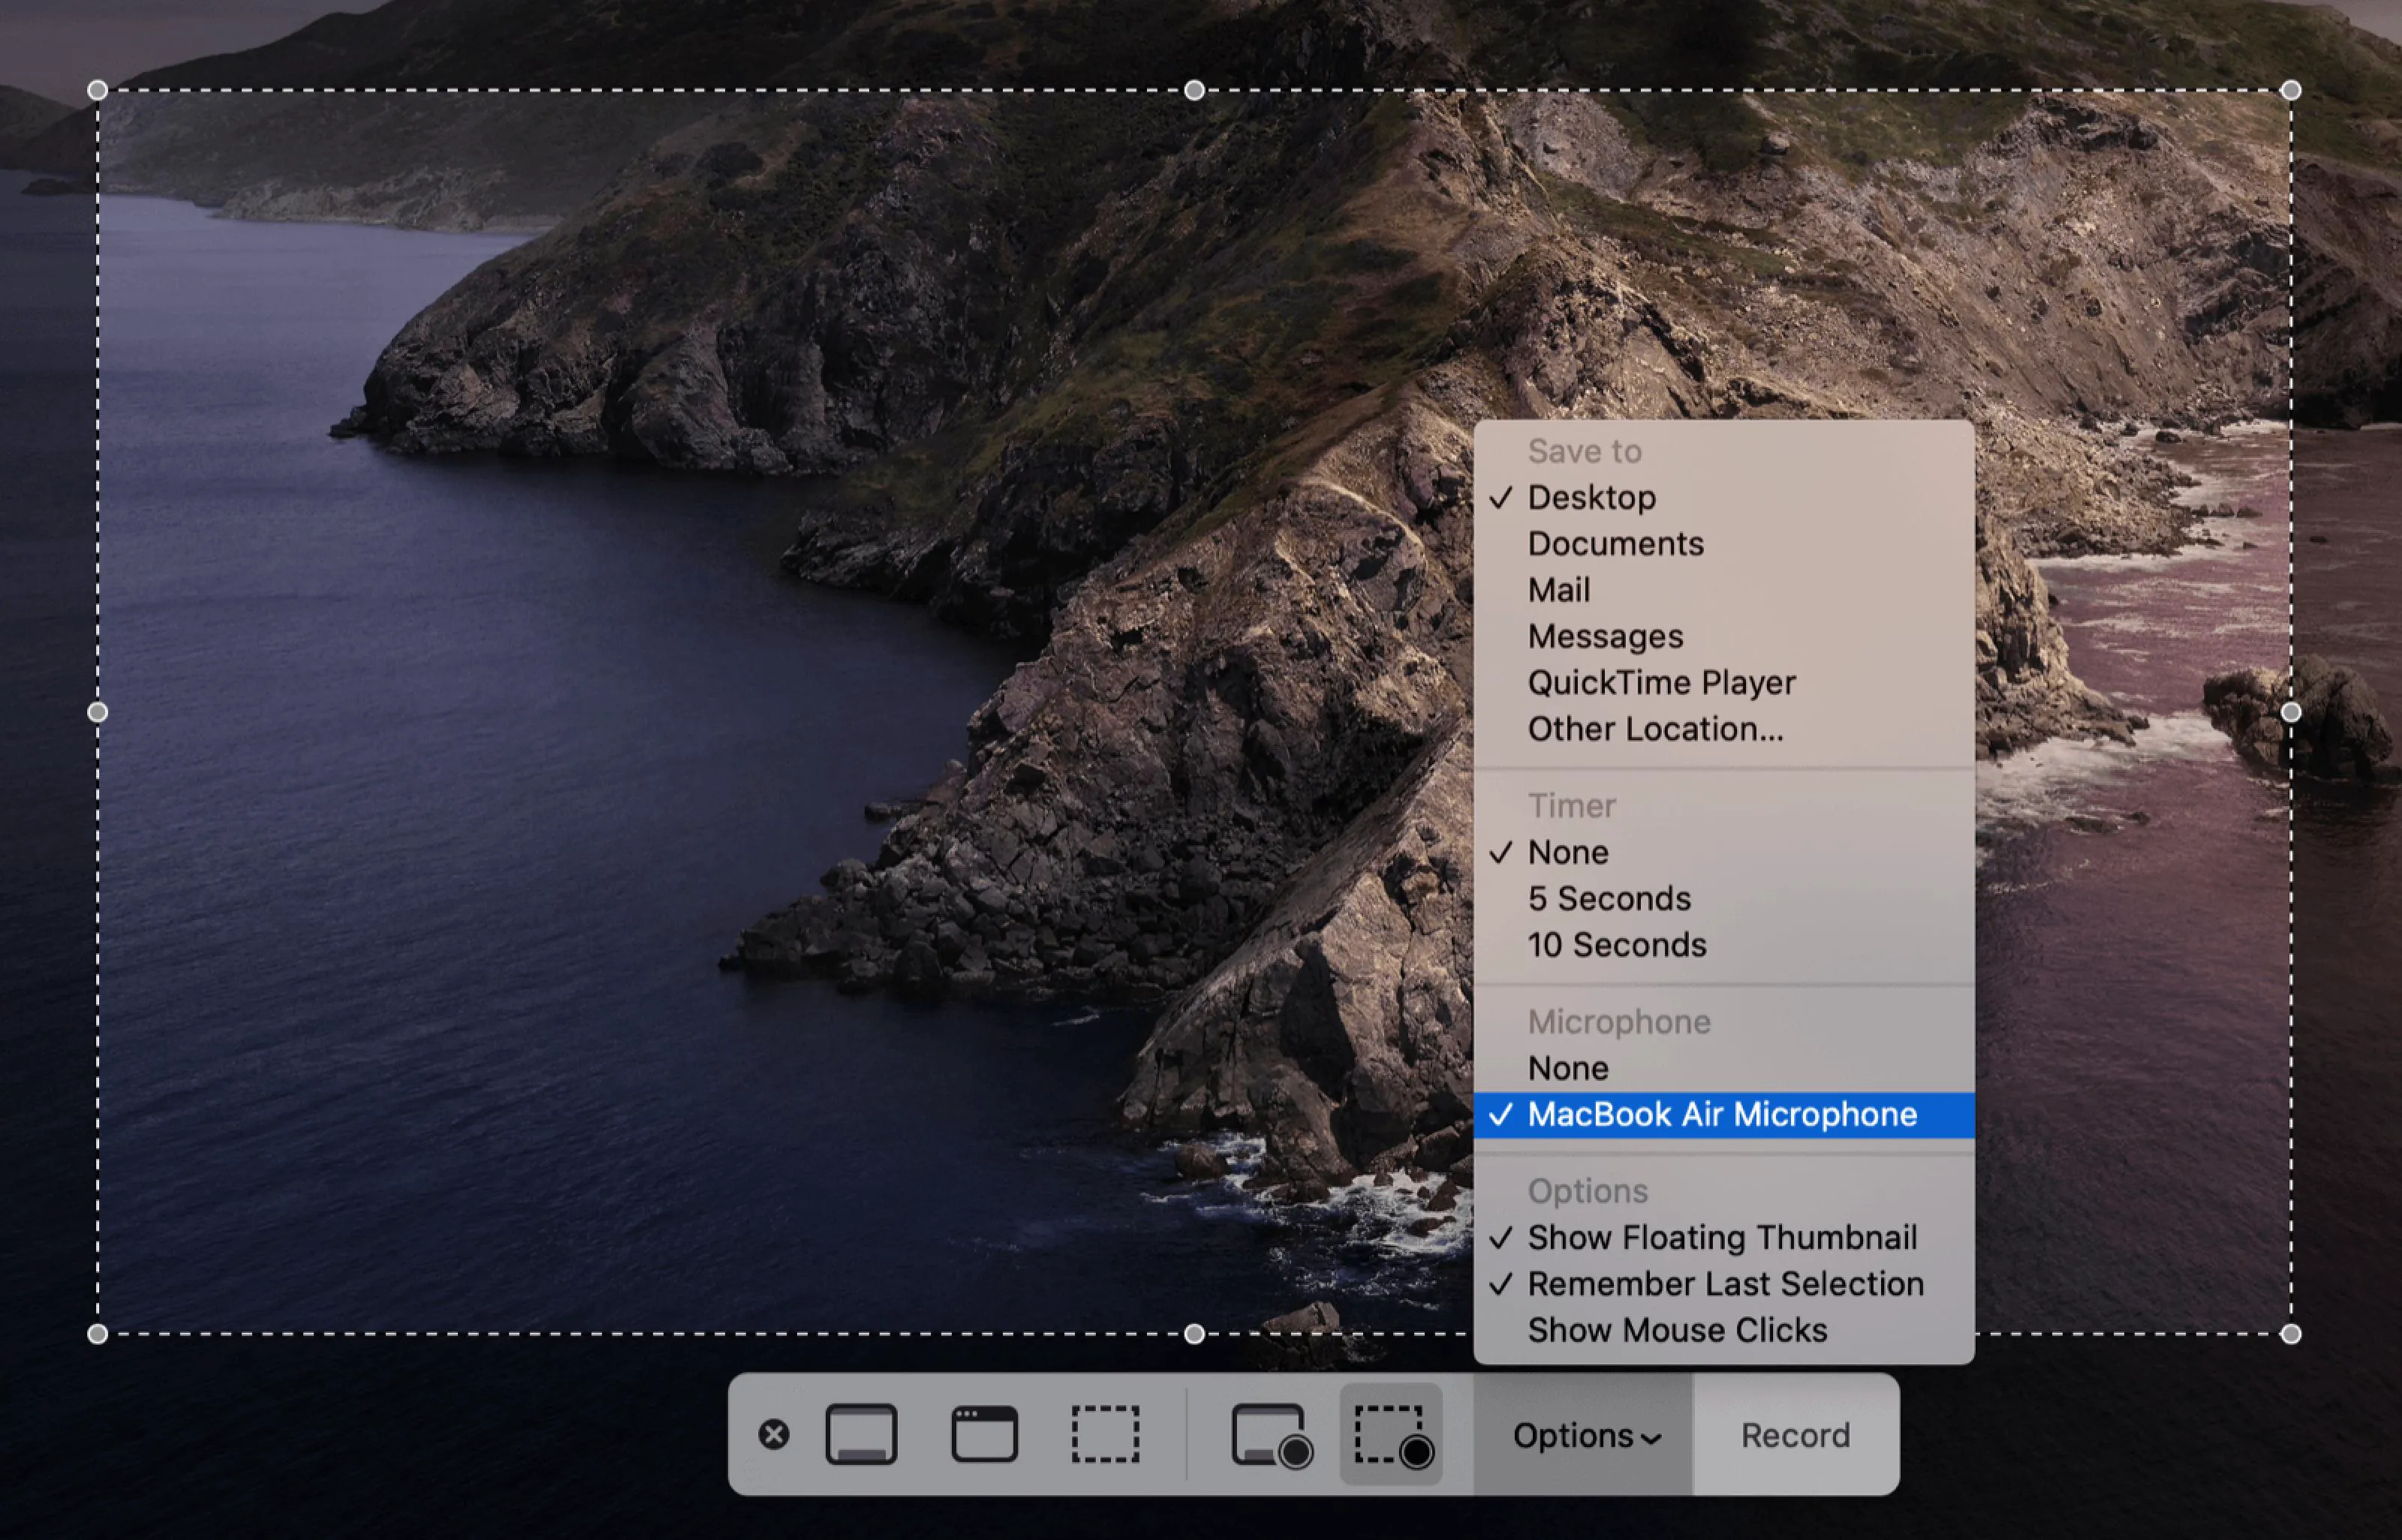
On macOS Catalina or later:
If you are using macOS Catalina or later, the QuickTime screen recorder window should appear as below:
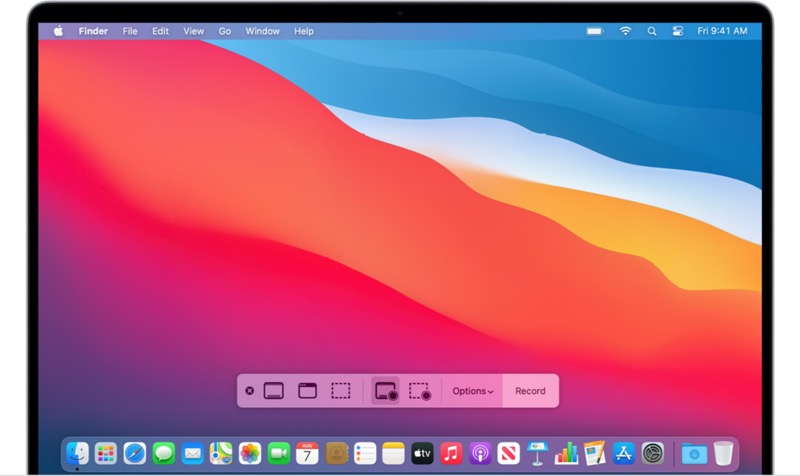
Click Options and change from "None" to the Built-in Microphone like "MacBook Air Microphone" or an external microphone under the Microphone option. In this way, you should be able to screen record on Mac with audio.
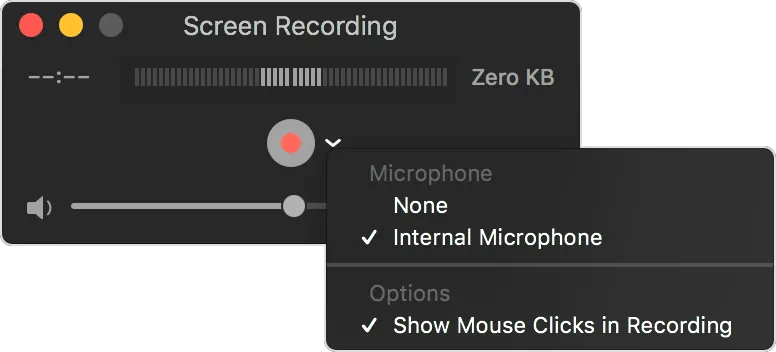
On macOS Mojave or earlier:
For macOS Mojave or earlier, you can see the screen recording window described below.
Click the arrow beside the red circle button. Choose Internal Microphone from the Microphone option.
If it didn't fix QuickTime Player no sound on Mac, the next thing you should do is to check the microphone settings.
Fix 3: Check the Sound Input settings
If a proper microphone is selected as the audio source but the screen recording on Mac still has no sound, you need to take a look at the Sound Input setting and ensure that your microphone is set to receive the sound when recording screen.
How to screen record with sound on Mac:
- Click the Apple logo at the top-left menu bar and choose System Preferences.
- Choose Sound from the window.
- Click Input from the menu.
- Select your Mac's native Microphone if you are not using an external one.
- Move the slider towards the right side to turn up the Input volume to make it easier for the microphone to capture the audio.
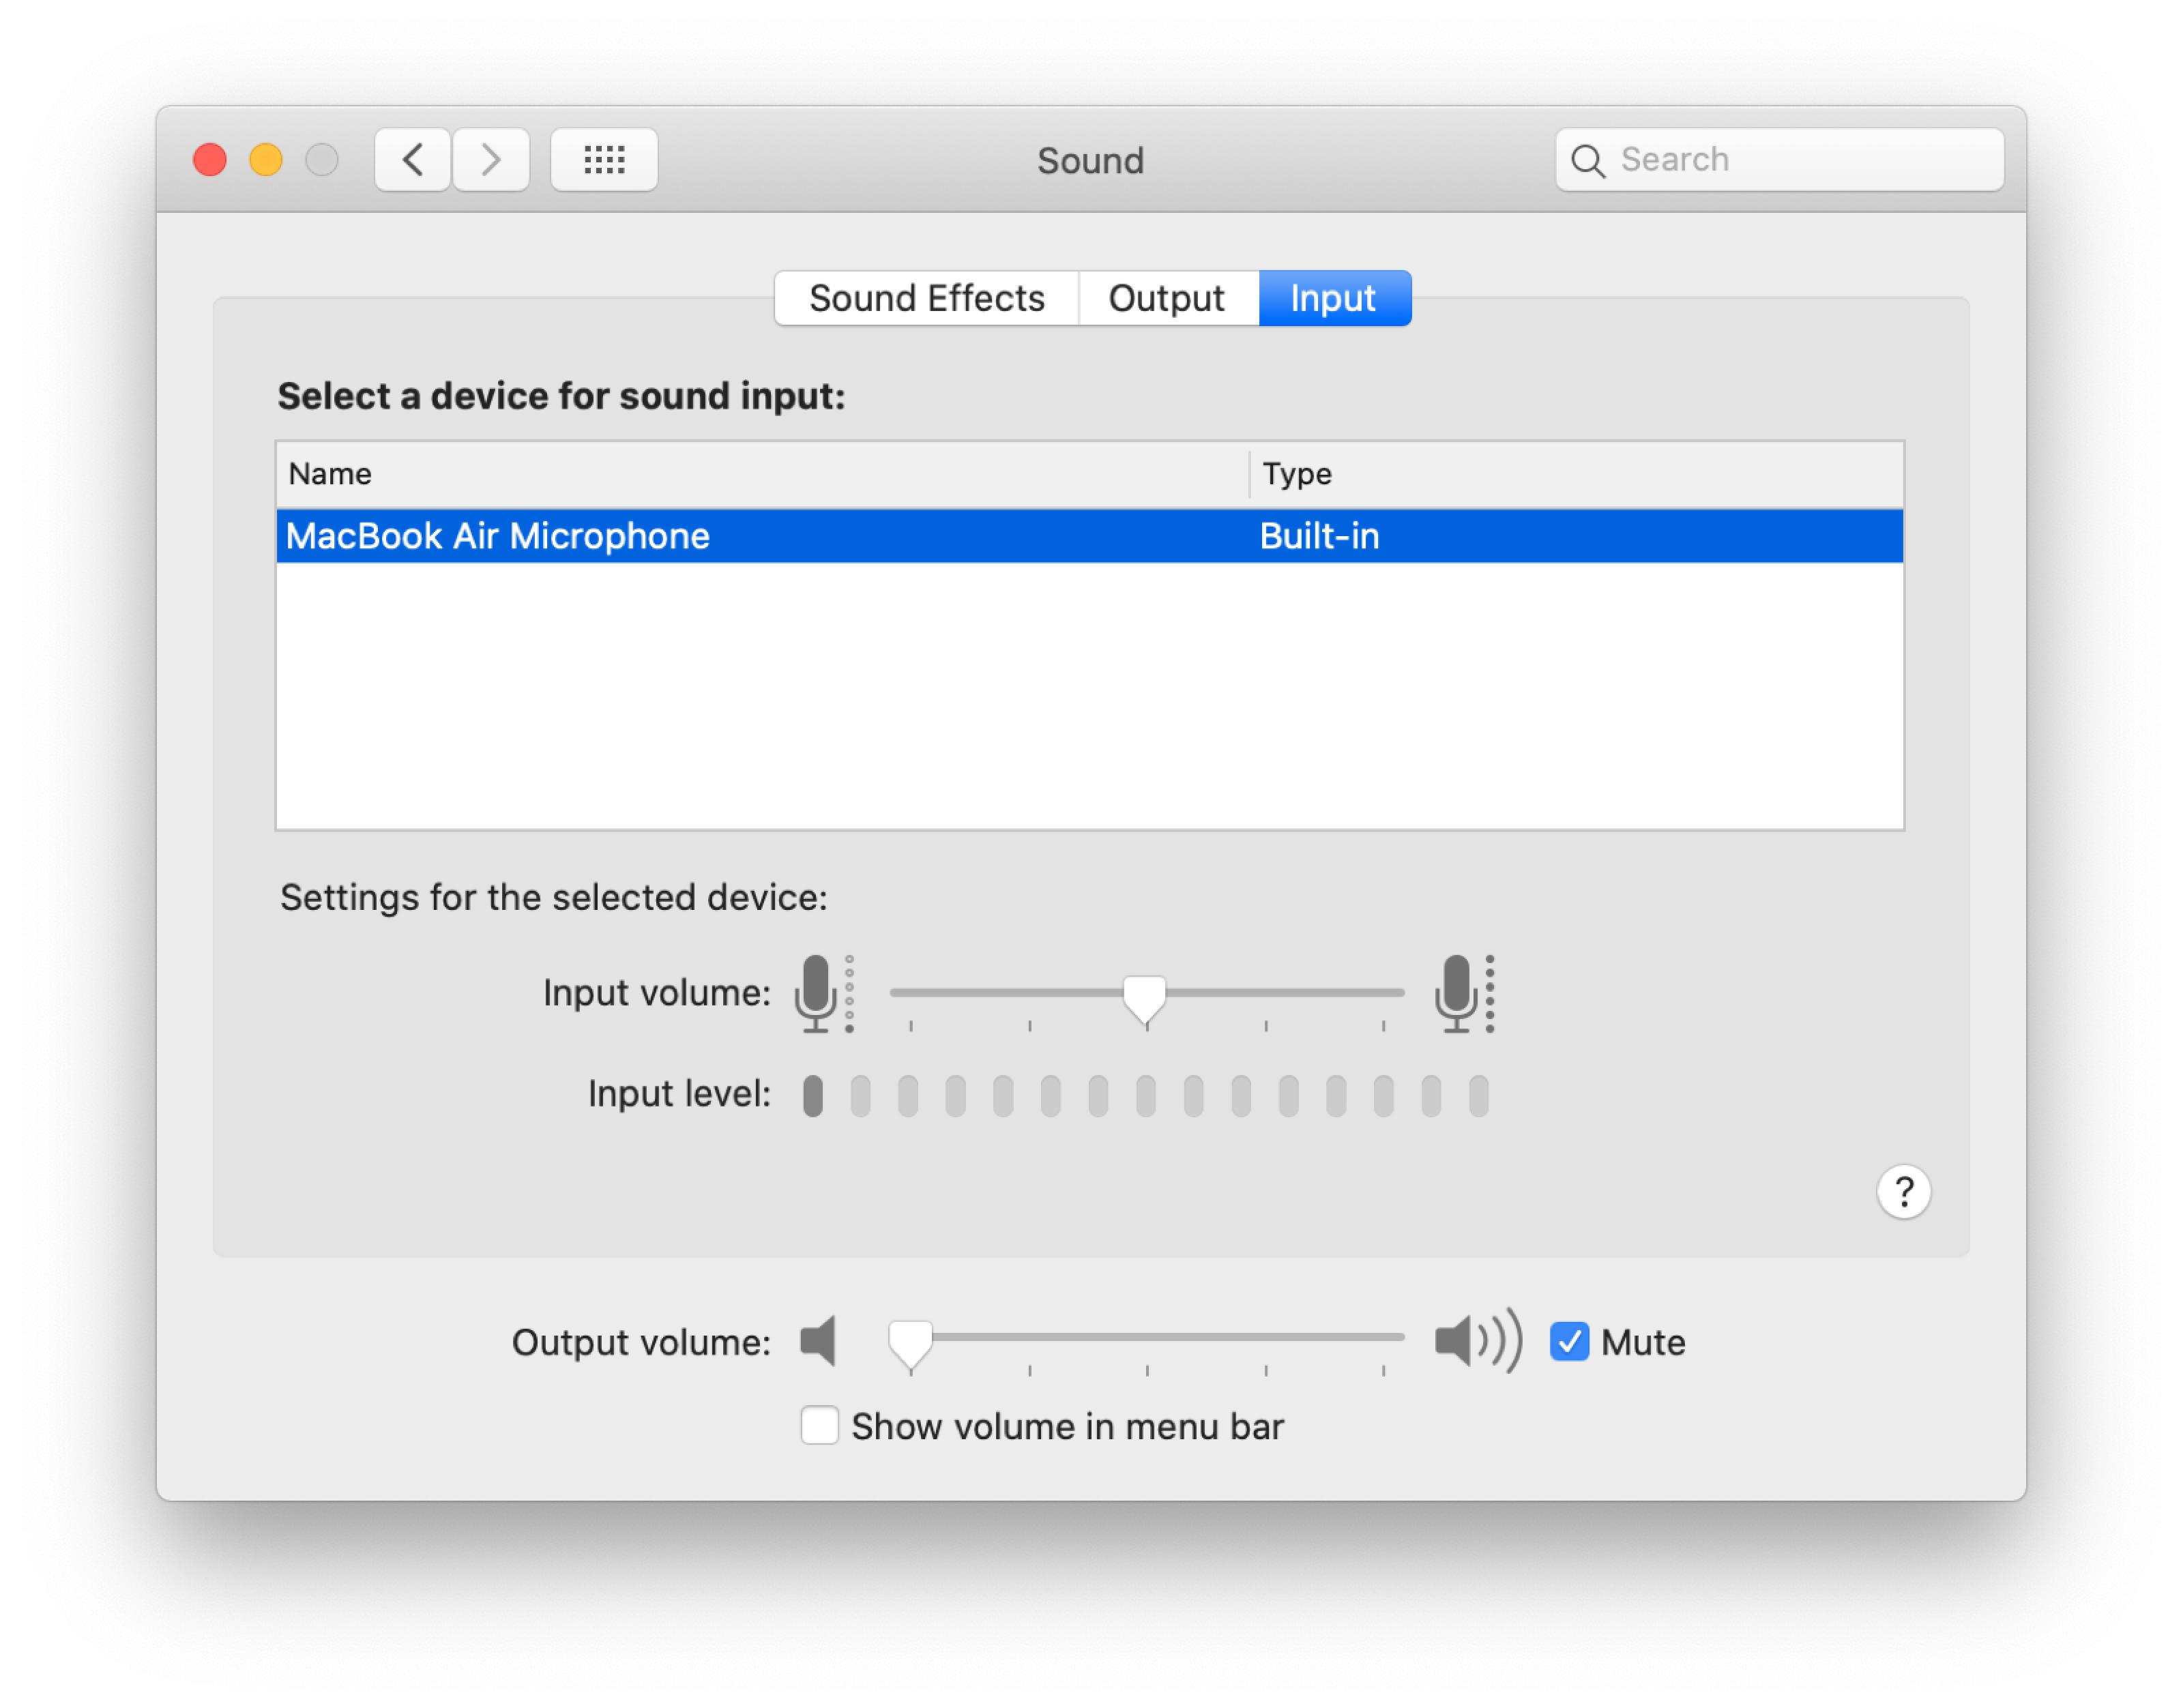
Input volume decides the sensitivity of your Mac. If it is set to a low volume, your Mac is not able to catch much of the sound. You can set it higher to make your Mac more sensitive to sound.
Input level shows you in real-time the volume of the sounds that your Mac is picking up. Speaking in a normal volume while sliding the volume left and right, you can see the input level rise and fall, which indicates the sensitivity of your Mac. If there are no changes in the input level, it's highly possible that the microphone is broken. You need to go to the local lab and have your mic repaired.
Suppose you still find screen recording on Mac no sound; keep reading to get it fixed.
Fix 4: Check the Sound Output settings
If you are wearing a headset to screen record on Mac with audio from a video you are playing, it won't work. You need to change the Sound Output device to a built-in speaker or an external speaker that broadcasts sound publicly so that your microphone can capture the sound.
Setting the Sound Input to Mac's microphone and Sound Output to the built-in speaker will do the job. It's also advisable to turn up your speaker's volume to ensure that the audio can be easily recorded by your microphone.
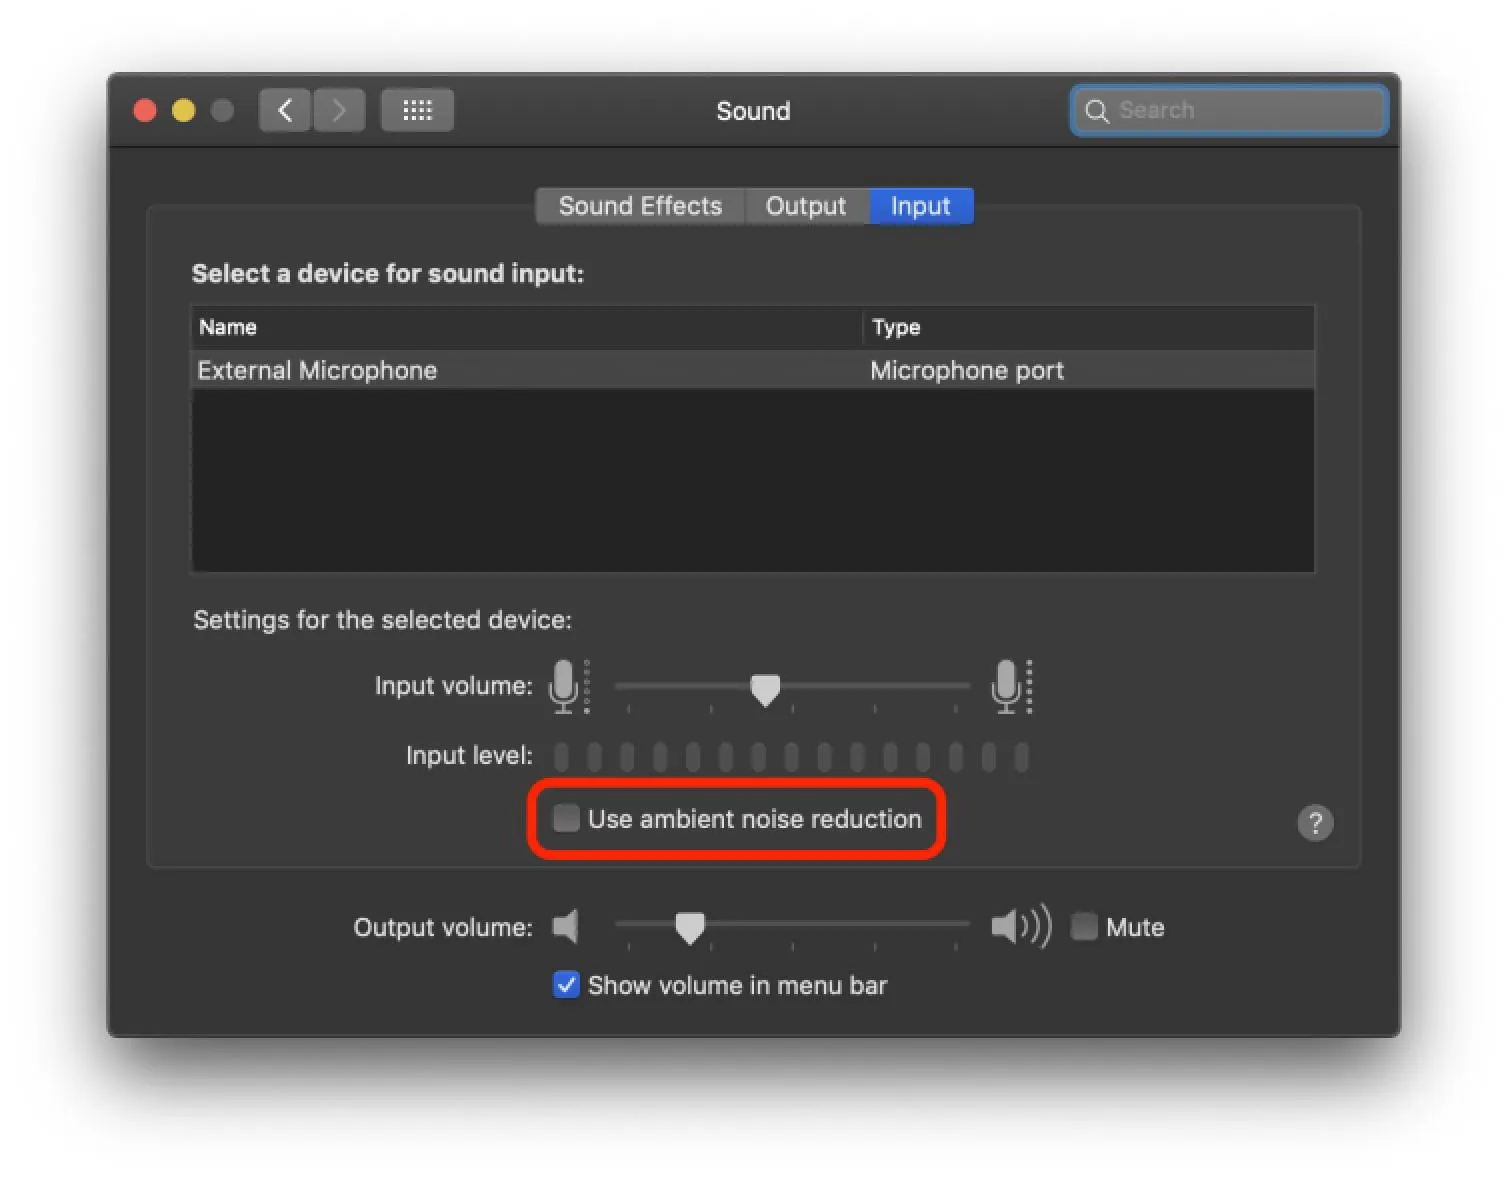
Fix 5: Disable ambient noise reduction
If you are using macOS Mojave, you can see an option of "Use ambient noise reduction" below the input level. This feature is designed to filter noise and focus on voices. However, it may at times confuses voice to noise so that blocks your voice, resulting in screen recording on Mac no sound. You can disable this option and check whether the sound is recorded along with the screen.
Hopefully, the QuickTime not recording audio error is gone and you can work with it as usual.
Fix 6: Reset NVRAM
Mac's NVRAM stores temporary settings for your Mac. It's possible that your Mac has saved a setting that is blocking the mic from working properly. If all methods above can't fix the "Mac screen record no sound" issue, resetting NVRAM may be useful.
Resetting NVRAM to fix Mac screen record no sound:
- Turn off your Mac by going to the Apple menu > Shut Down.
- Turn on your Mac and immediately press and hold the Option + Command+ P +R keys together for about 20 seconds. Then release the key. Your Mac will restart.
By resetting RAM, the temporary settings can be eliminated. You can test whether you can screen record on Mac with audio again.
Note: If you've followed the instructions we mentioned before, you should have resolved the “MacBook screen recording no sound” issue when recording with audio. If you want to screen record Mac with internal audio, read on to the next part where we explain it in detail.
[Proven Fixes!]QuickTime Player Can't Open Videos MP4/MOV/AVI
QuickTime Player can't open videos? This post elaborates on the possible causes and provides proven fixes to fix QuickTime Player can't open videos.
How to screen record on Mac with sound (internal audio)?
There are two ways to make a QuickTime screen recording with internal audio. You can either allow your microphone as the sound source to pick up sound from the speaker or install a third-party virtual audio driver. Technically speaking, the former one isn't recording the internal audio but the sound generated from your speaker, which often results in poor sound quality with noises in the near surroundings.
Most people are looking to capture the best possible sound source, accordingly, they opt for installing a virtual audio driver. You can choose a paid third-party screen recorder for Mac or take your chance with the free Soundflower kernel extension as many did. Soundflower allows you to reroute the audio output from one application as the input of another. That being said, it transfers the output (the video's internal audio) into the input of your recording.
Note that the latest Soundflower extension is supported on Intel Macs running macOS Monterey and earlier but incompatible with M1 Macs. So, if you want to screen record with internal audio on M1 Mac, use BlackHole instead.
How to screen record Mac with internal audio using Soundflower:
- Download the free virtual audio driver Soundflower.
- Go to the Downloads folder and hold the Control key to open Soundflower.pkg.
- Enter your password when asked.
- Follow its instruction to install it.
The first installation will likely fail. If so, follow the steps below to give it permission. - Go to System Preferences > Security & Privacy.
- Tap on the padlock, and enter your password to make changes.
- Click Open Anyway to allow Soundflower to be installed on your Mac.
- Click Details and check the box next to the developer Matt INGALLS and then OK.
- Restart your Mac and re-run the installation.
- Press Command + Space, type in Audio MIDI Setup and hit Enter.
- Click the + icon in the bottom-left, select Create Aggregate Device, then check Built-in microphone and Soundflower(2h). You can rename Aggregate Device to something like QuickTime Input if you want.
- Click the + icon again, choose Create Multi-output Device, then check Built-in Speaker and Soundflower(2h).
- Open the Apple logo > System Preferences > Sound.
- Click the Output tab and select Multi-output Device.
- Start a new screen recording in QuickTime Player.
- Click the drop-down menu next to Options, and choose an audio source. Select “Aggregate Device” to record the screen with internal audio & microphone. Or pick Soundflower (2h) to record the screen with internal audio only.
- Click the Record button to record screen.
Problems solved? Let's share the successful experience with others!
How to recover sound from screen recording on Mac?
Sometimes, you may forget to choose an audio source for a recording and only find the Mac screen recorder with audio missing after the recording is finished. If you wonder whether you can recover sound from the recording, the answer is negative, unfortunately. You need the microphone to be selected to record audio. Otherwise, the sound isn't recorded, thus no audio to recover.
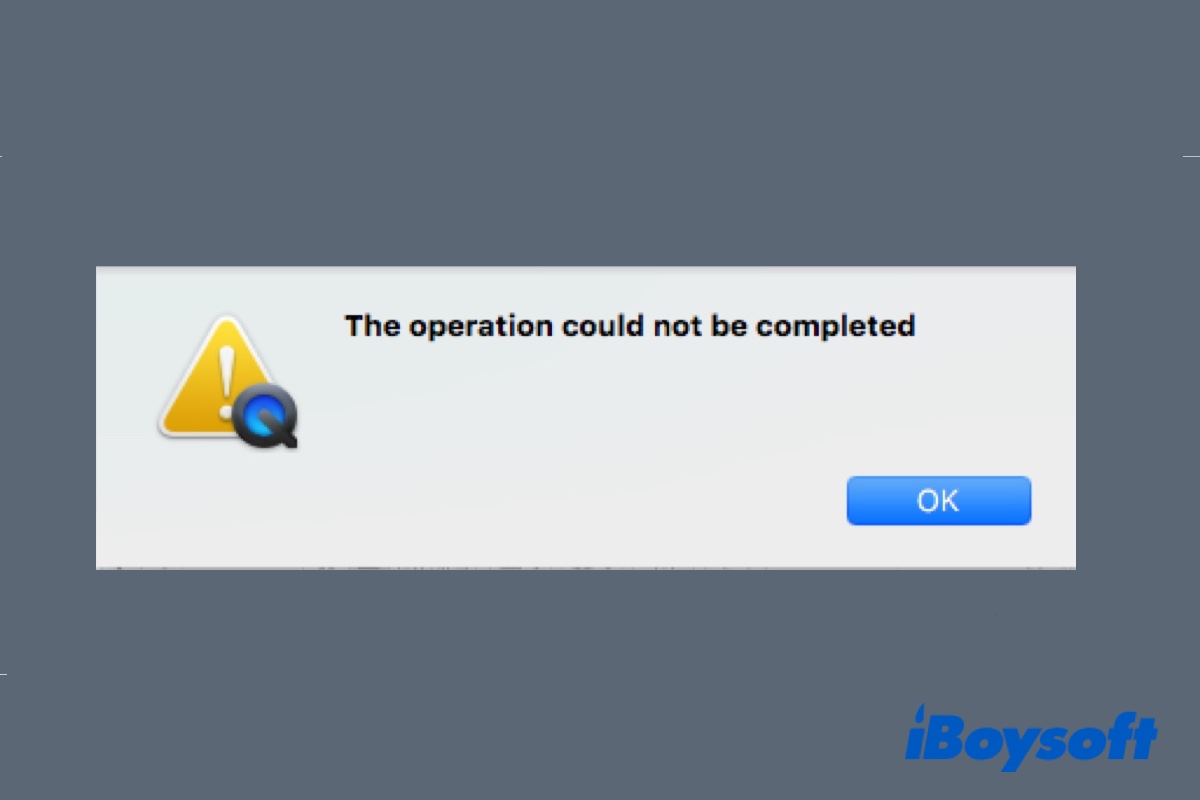
[Fixed] QuickTime Operation Could Not Be Completed Error
This post tells you what to do when QuickTime Player pops up the error reading, "The operating could not be completed." and other QuickTime problems. Read more >>