If you take Mac as your workstation, the keyboard is really a matter of much concern on Mac. The keyboard is the essential input tool, but it is more of an urgent replacement for the mouse or Trackpad when any of them goes wrong.
Read this article to know how to control mouse with keyboard on Mac with step-by-step instructions for temporary your use.
Why do you need to control the mouse with a keyboard?
Typically, a mouse or Trackpad is almost sufficient for you in daily use, whether you want to control-click the software to make further actions or scroll down when visiting a web page.
However, the accidents always hit unexpectedly without any signs. You can only find that the MacBook Trackpad not working or the Trackpad on MacBook is lagging when you scroll a webpage, show desktop on Mac, hide icons on Mac desktop, or perform right-click on Mac.
Or, you find that the mouse cursor disappears on Mac, or the Mac cursor freezes when you switch from apps or windows, quit from full screen, or apply apps like Google Chrome, etc.
Facing this, knowledge of how to control the mouse with the keyboard on Mac really touches the spot.
How to control the mouse with the keyboard on Mac?
Mac has Accessibility features to enable you to perform the Mac control mouse with keyboard operations. When your mouse cursor or trackpad fails to work, or you just don't want to take your hands off the keyboard, you can learn how to control your mouse with the keyboard.
Before applying the keyboard to control your mouse cursor, you need to enable or activate the Mouse Keys first:
- Click the Apple menu on the upper left corner of your screen.
- Select the System Preferences option from the dropdown menu then.
- Locate Accessibility and then open Pointer Control in it.
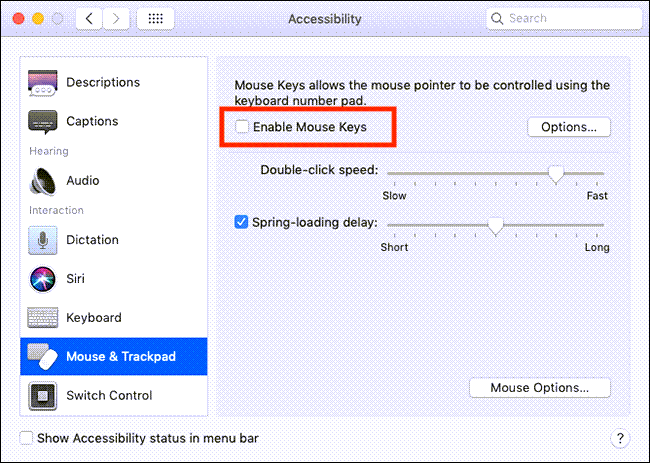
- Select the Alternate Pointer Methods, and then tick the first option to Enable Mouse Keys.
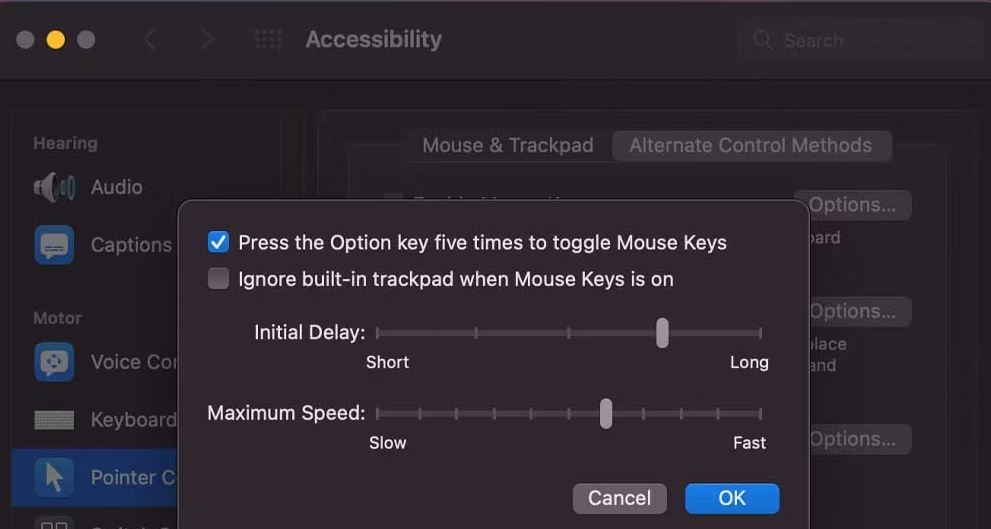
- You'll be prompted with a Mouse Keys popup, and you can tick the first box to Press the Option key five times to toggle Mouse Keys. After ticking it, you can turn off or on the Mouse Keys by pressing the Option keys five times instead of enabling it manually.
Control mouse with the keyboard on Mac
After you activate the Mouse Keys in Accessibility, your Mac turns some keys on the keyboard into "mouse keys". Hence, these keys will not still work when you want to use them in typing until you disable the Mouse Keys.
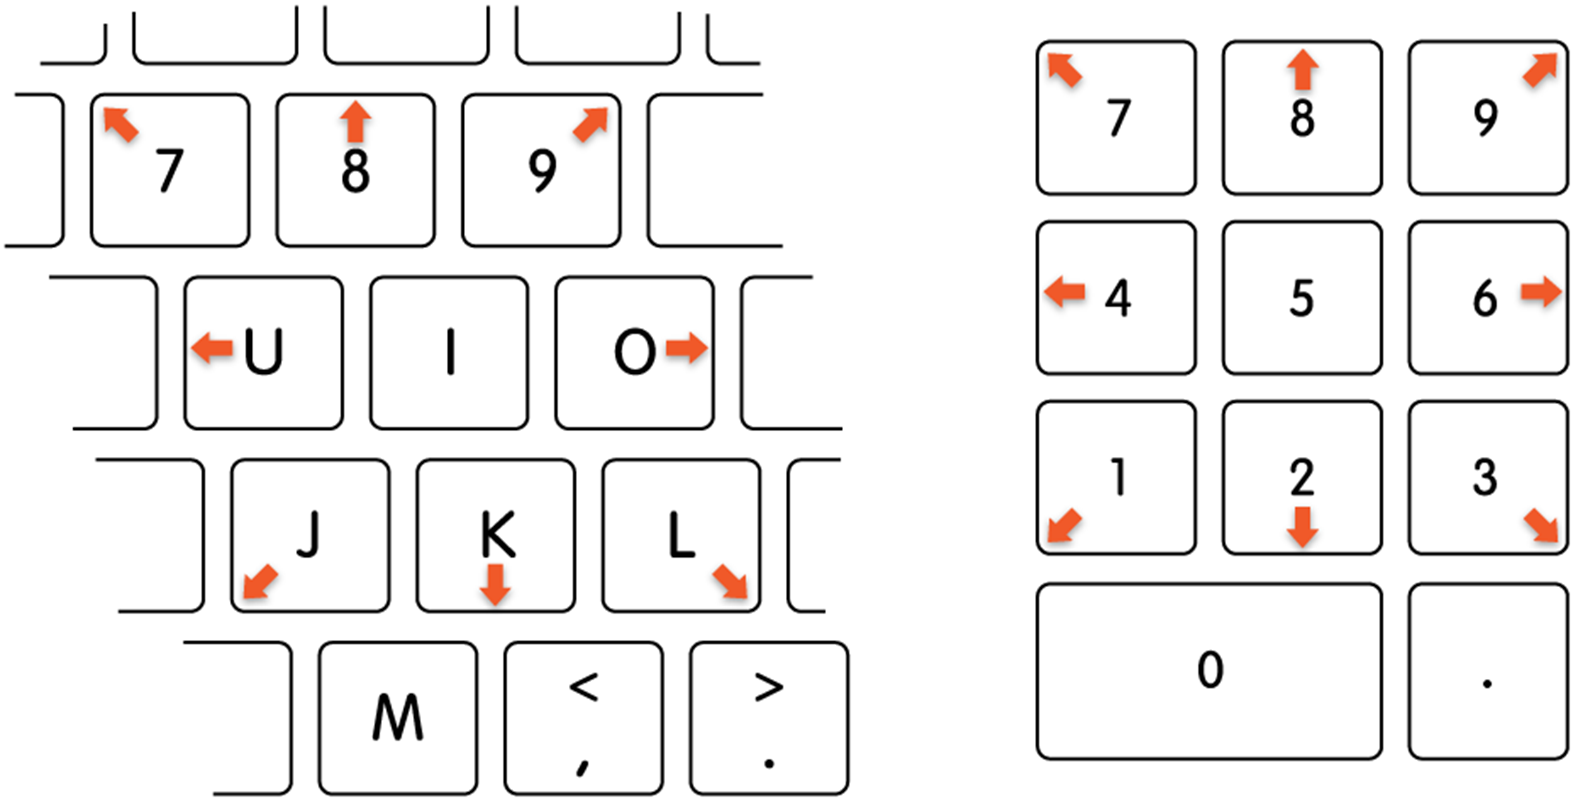
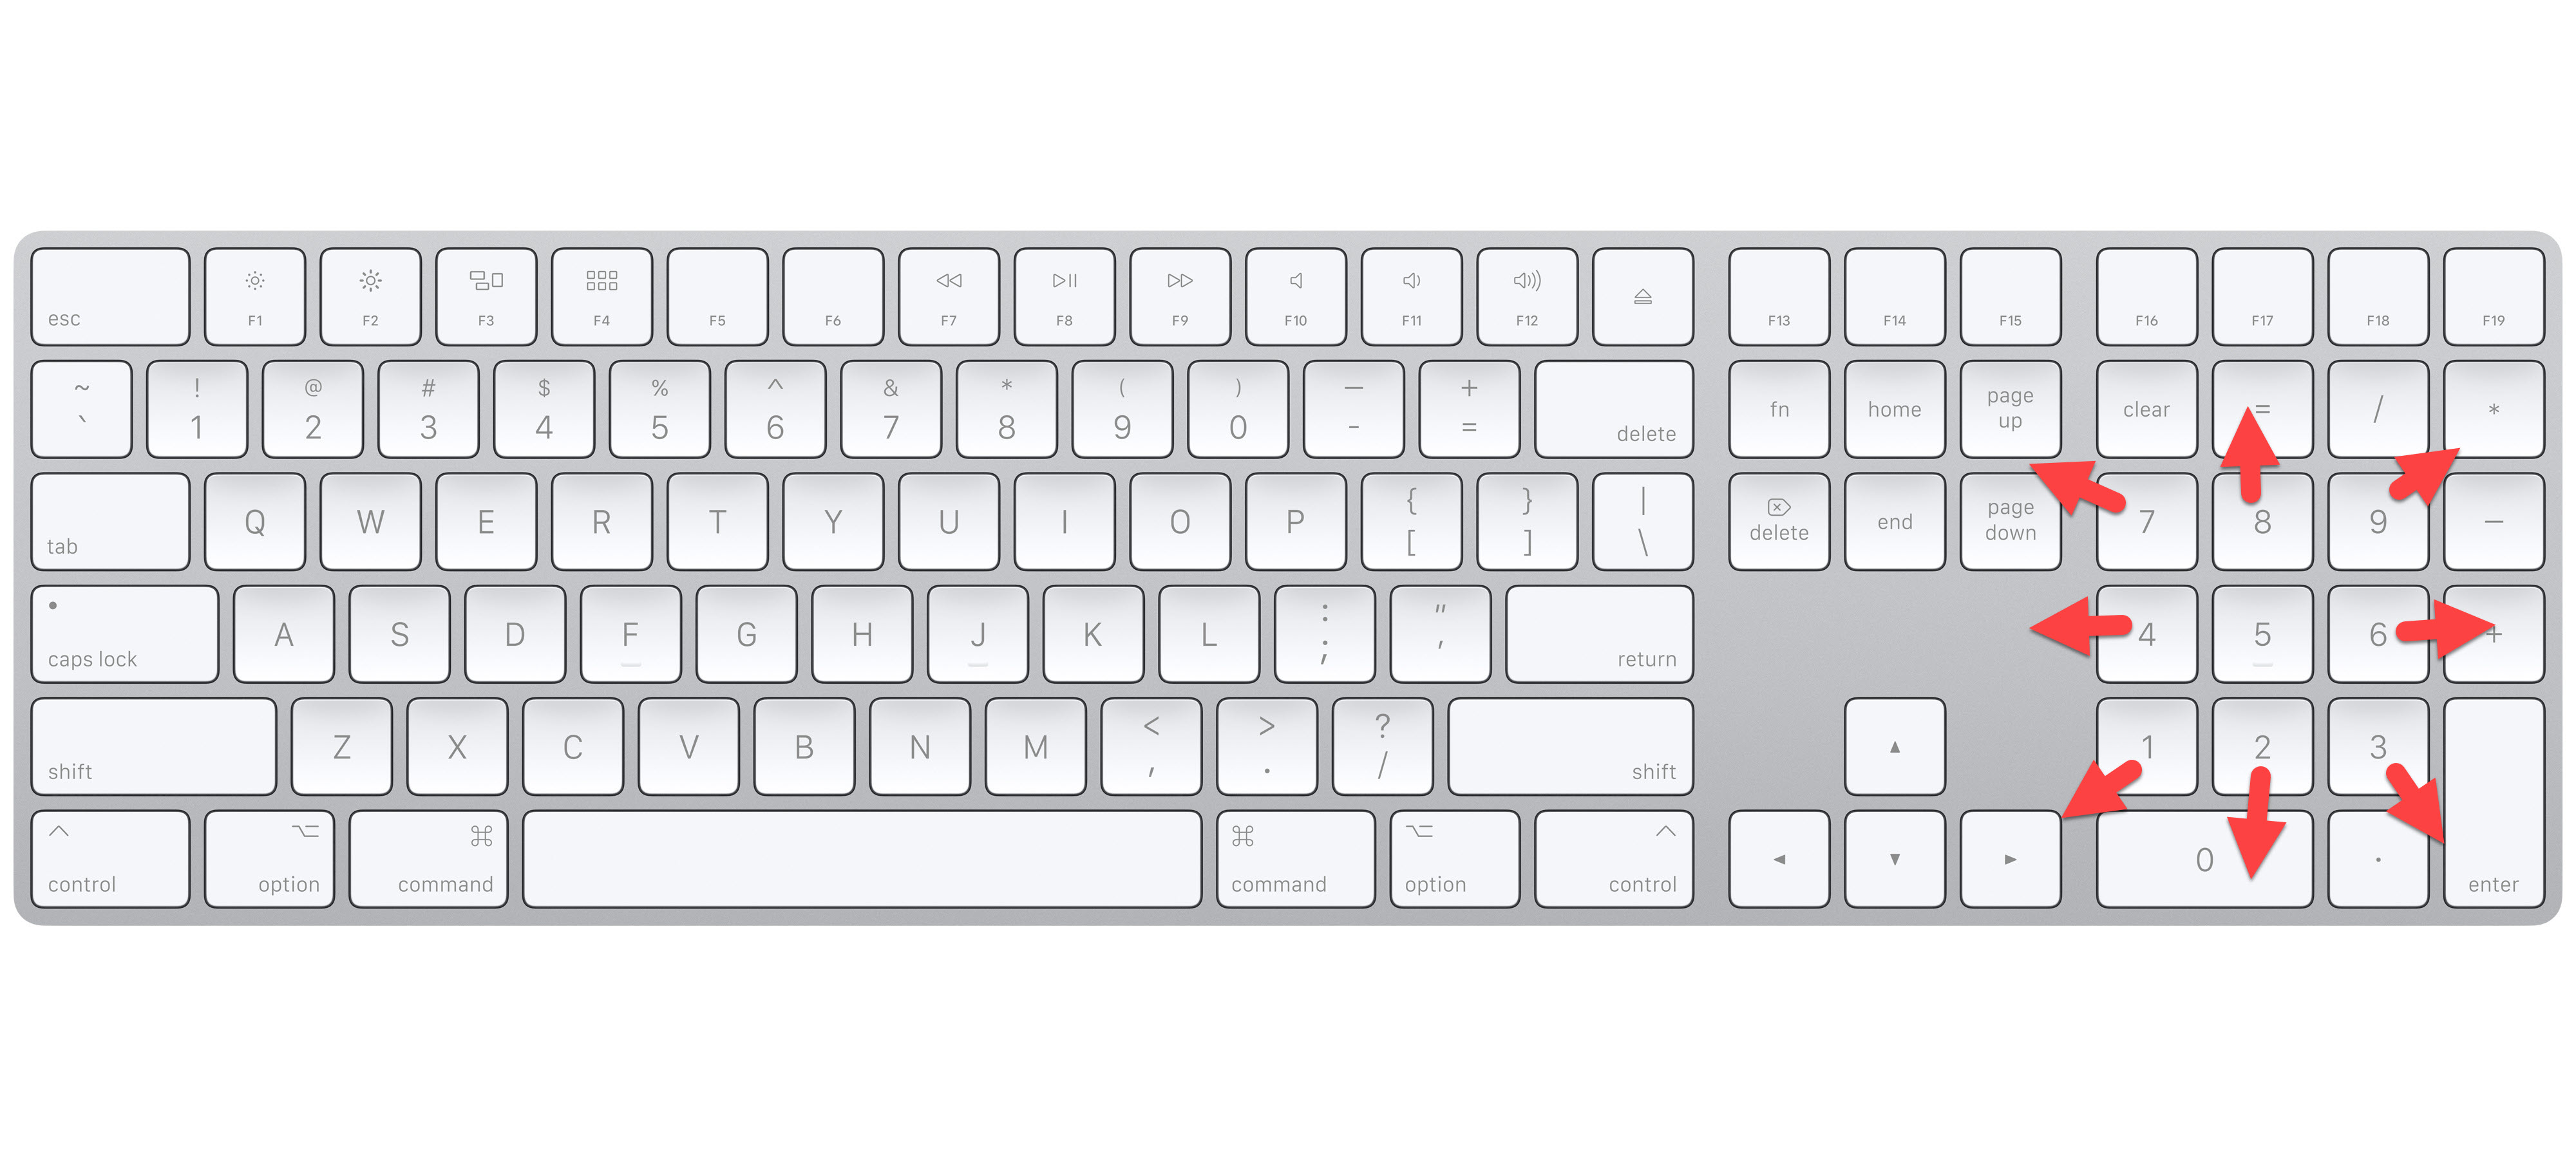
If your keyboard has a number pad, you can use the 7, 8, 9, 4, 6, 1, 2, and 3 keys to move your mouse cursor, and the 5 key to click something. You can run an eye over the picture below to know that each key indicates different directions.
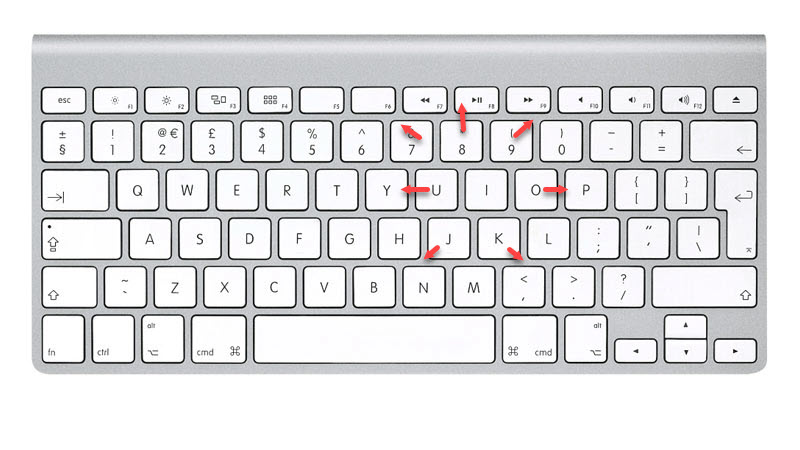
If you have no number pad on your keyboard, then 7, 8, 9, O, U, J, and K keys are available for you to move your cursor into responding directions. Similarly, the central one between these keys, the I key, is the control-clicking mouse key that allows you to make certain actions on your Mac.
Customize the Mouse Keys to meet your requirements
You can change the customizing settings like Initial Delay, Ignoring the Trackpad, and Maximum Speed of the Mouse Keys.
Ignore the built-in trackpad when the Mouse Keys are on: This option can disable the Trackpad on your Mac if you tick it. But if you don't intend to, just pass it.
Initial Delay: This option controls the time that your Mac operating system needs after you hit a Mouse Key. The longer, the better for the device to prevent some accidental pressing.
Maximum Speed: This option controls how fast you want the Mouse key to move. If you prefer a fast speed, drag it to close the Fast character as much as you can.
Conclusion
Mac control mouse with keyboard method is recommended if your mouse or Trackpad not working or you just unwant to move your hands off the keyboard. If you are desperate for ways to use Mouse Keys to control your mouse, read this article right now!
But when you want to type on your device, you'd better disable the Mouse Keys first because certain Mouse keys stop working as the input keys.
Share this article with your families and friends right now!
FAQ about Mac control mouse with keyboard
- QHow can I use my keyboard as a mouse?
-
A
You can follow the methods to use your keyboard as a mouse: Launch System Preferences > Locate Accessbility > Open Pointer Control > Select the Alternate Pointer Methods > Tick the Enable Mouse Keys > Then use 7, 8, 9, 4, 6, 1, 2, and 3 keys to move your mouse cursor, and the 5 key to click if you have a number pad on your Mac. Press 7, 8, 9, O, U, J, and K keys to move your cursor into responding directions and the I key to click.
- QWhy does some of my keys stop typing after I use the keyboard as mouse?
-
A
Since you have enabled the Mouse Keys on your device, specific keys are converted into mouse keys, allowing you to use them to move the mouse cursor or click something. Disabling the Mouse Keys is a must if you want to type with your keyboard. You can head to Accessibility > Open Pointer Control > Select the Alternate Pointer Methods > Untick the Enable Mouse Keys.