
One of the inconveniences for using Boot Camp on Mac is that you might find yourself in need of NTFS write support when you want to transfer files from the macOS partition to the Windows partition.
Even though you can get the problem solved by creating a shared FAT/exFAT partition or using cloud storage, either of the methods is unacceptably inconvenient for frequent file transferring.
You are not the only one who has faced such a need to read NTFS drive on Mac and edit stored NTFS files on an NTFS formatted disk. Take a look at the example below:
"I want to mount my BootCamp NTFS partition as drive D so I can read/write the drive for backup purposes. I have read many related materials but cannot find a solution. Does anyone know how to do this or if it is even possible to mount BOOTCAMP NTFS partition with read-write mode?"
In this post, you will discover how to mount the BOOTCAMP partition with read/write support easily.
Why you can't write to Windows Boot Camp partition on Mac
To install Windows on Mac, a tool called Boot Camp Assistant on Mac will walk you through the process. It will partition the Mac hard disk and create a partition named BOOTCAMP for installing Windows.
Both operating systems will work fine in their partition. You will be able to choose either macOS or Windows to boot into at the startup.
This Windows Boot Camp partition is by default formatted with NTFS (New Technology File System). macOS can't write to an NTFS-formatted partition, so transferring contents from macOS partition to BOOTCAMP partition is blocked.
How to mount the BOOTCAMP partition in read-write mode
The described situation above causes much inconvenience when you want to newly create, modify, or delete files on the BOOTCAMP NTFS partition when you are using Mac operating system.
You will find two ways to mount the BOOTCAMP partition in read/write mode in macOS and Mac OS X.
- To install third-party NTFS for Mac software
- To enable Mac's native NTFS write support using command line
Solution 1: Mount BOOTCAMP partition with read-write access with an NTFS driver for Mac
NTFS write support can be added through a third-party NTFS driver for macOS. There are NTFS for Mac free drivers like FUSE for macOS and Mounty and paid ones like iBoysoft NTFS for Mac and iBoysoft DiskGeeker.
Paid NTFS drivers have obvious advantages in terms of security, usability, and reliability. iBoysoft NTFS for Mac and iBoysoft DiskGeeker are examples.
Option 1: iBoysoft NTFS for Mac
iBoysoft NTFS for Mac is a tiny utility that is specially designed to enable full read-write access to NTFS-formatted drives or partitions on Mac. With it, you can easily mount the BOOTCAMP partition with read-write support in macOS and Mac OS X.
Best NTFS for Mac by iBoysoft
- Read and write NTFS volumes on Mac
- Mount and unmount NTFS volumes
- Repair NTFS file system errors
- Erase data on NTFS disks
- List and open all attached external drives
- Reformat other file systems to NTFS
- Support macOS 26/15/14/13/12/11/10.15/10.14/10.13
- Fully compatible with Apple Silicon Mac
Read-only & risk-free
Tutorial to download and use iBoysoft NTFS for Mac:
- Download iBoysoft NTFS for Mac and install it.
- Go to Finder > Applications > Utilities > Disk Utility.
- Right-click the BOOTCAMP partition and choose "Show in Finder".
- Modify files on the BOOTCAMP partition or save files on it.
Option 2: iBoysoft DiskGeeker
iBoysoft DiskGeeker is a disk management tool. It can be used as an NTFS mounter for macOS that can effectively and automatically mount NTFS drive on Mac in read-write mode.
With it, users can have full read-write access to Windows NTFS Boot Camp volume with fast write and file transferring speed. This all-in-one tool can also check and diagnose disk errors, clean junk files, prevent virus attacks, manage network drives, clone disks and encrypt and unlock NTFS drives with BitLocker encryption.
iBoysoft DiskGeeker is compatible with Intel-based Macs and Apple Silicon Macs running macOS 10.13 - macOS 15.
Instruction to enable read-write access to BOOTCAMP NTFS partition with iBoysoft DiskGeeker:
- Download, install and launch iBoysoft DiskGeeker on Mac.
- Click iBoysoft DiskGeeker at the menu bar to check if the BOOTCAMP partition is mounted (the software mounts NTFS volumes automatically by default).
If the BOOTCAMP partition is not mounted automatically, you can click the button beside the BOOTCAMP partition to manually mount it. - Read/write to BOOTCAMP partition after the partition is automatically opened in the Finder by default.
If the software doesn't open the BOOTCAMP partition in the Finder automatically, you can click the BOOTCAMP partition in the drop-down interface, click the menu button beside the drive and choose "Open".
Solution 2: Read and write to BOOTCAMP partition using command line
Apple's NTFS write support is disabled by default. It is under testing and not stable.
We have seen quite a few reports saying the native NTFS write support on Mac did damage to the NTFS partitions, so this is not a recommendation for you to have full read-write access to the BOOTCAMP partition.
The process requires certain Terminal knowledge. Watch the video below to know how to do it.
A detailed text guide is also included below:
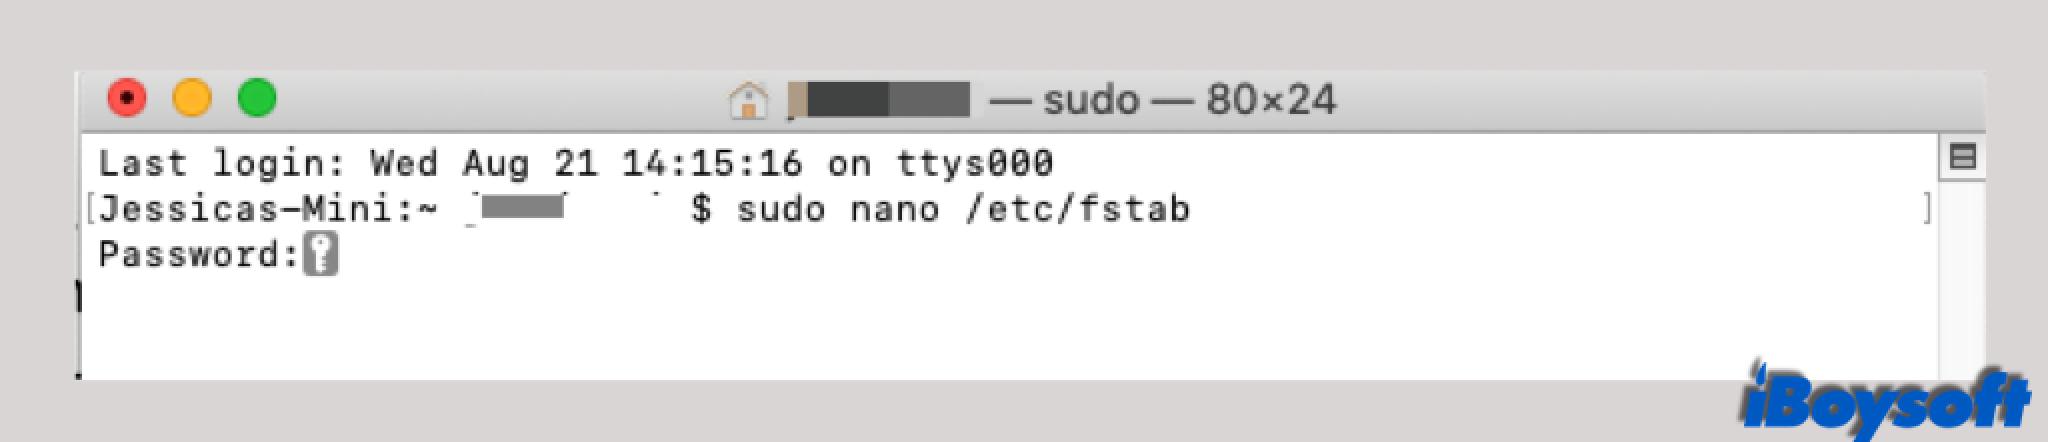
- Go to the Applications > Utilities > Terminal to launch the Terminal program.
- Input "sudo nano /etc/fstab" to edit the fstab file (provide your password when prompted). No letters will show up when you type in the password.
- Type "LABEL=BOOTCAMP none ntfs rw,auto,nobrowse" in the editor window for the fstab file and press "Control + O" to write.
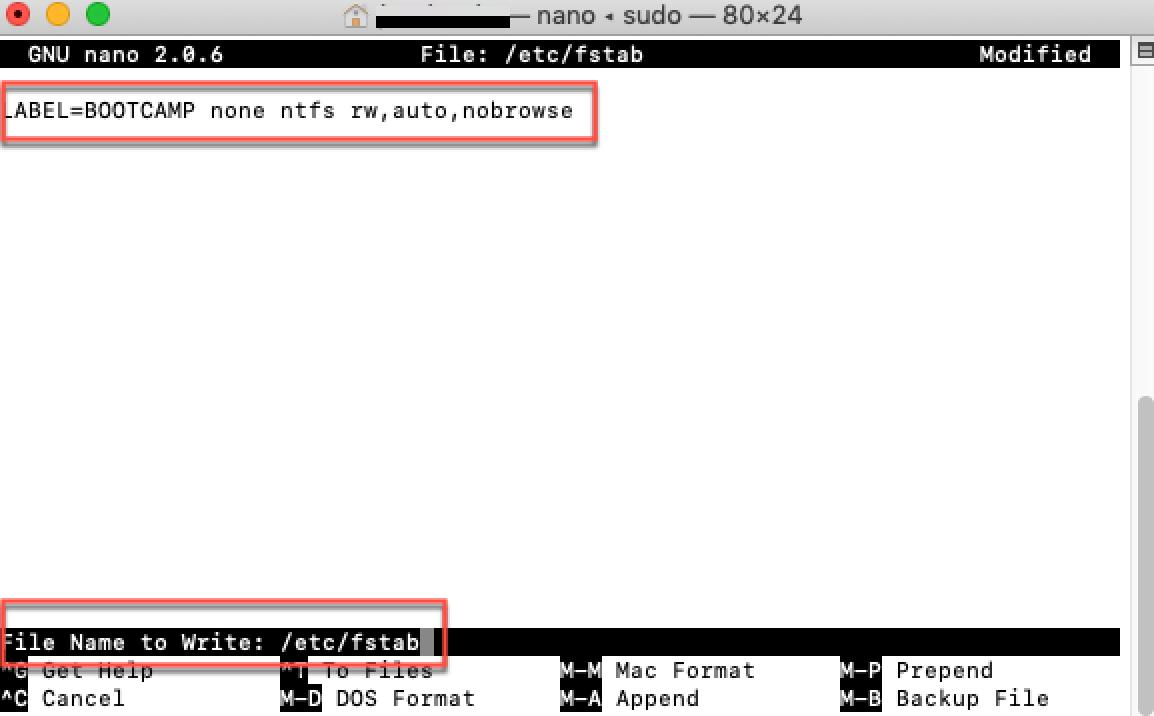
- Hit Enter and press "Control + X" to exit.

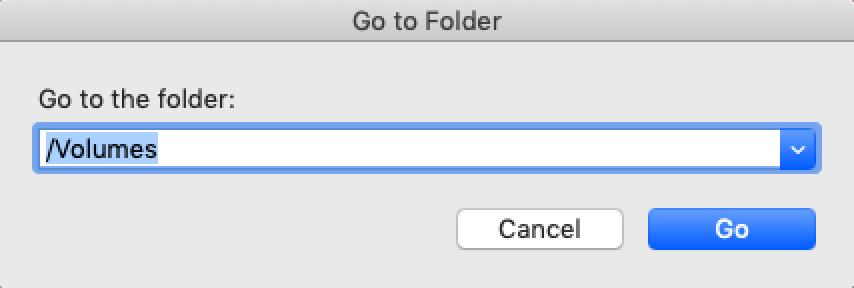
- Click "Go" at the top left menu bar and choose "Go to Folder".
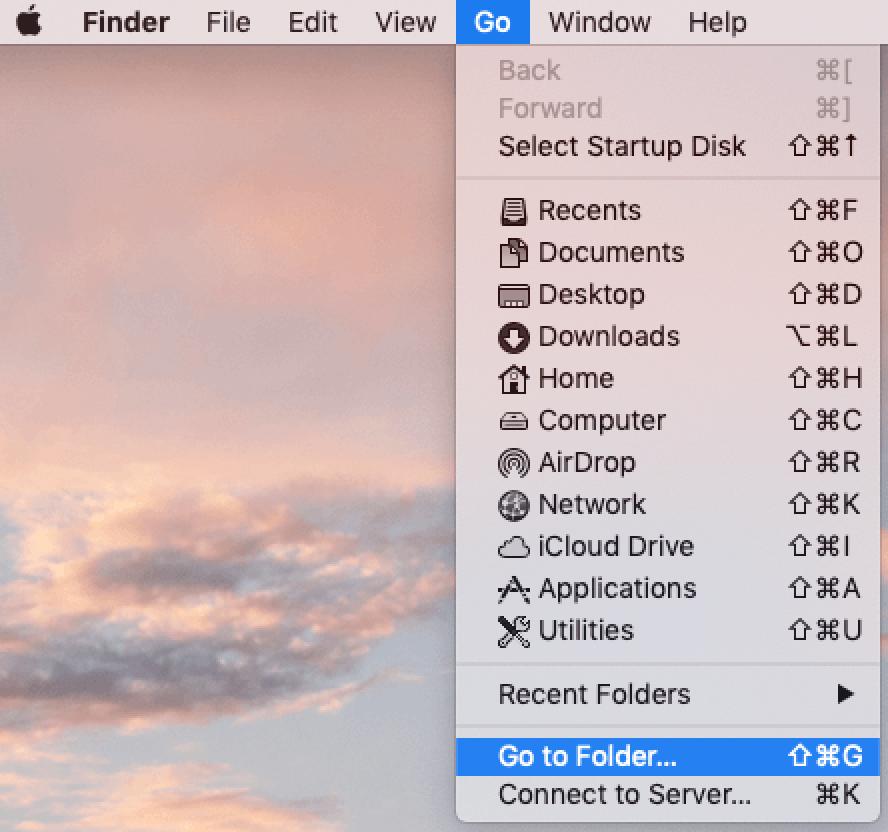
- Type in /Volumes and hit Enter.
- Find BOOTCAMP volume to open it.
Tips: If you want to undo the change, follow the step 1 and step 2, then delete the command line. Save your change and exit.
Conclusion
With Boot Camp, it is possible for Mac users to use Windows-only applications and play Windows-only games on Mac.
However, when it comes to the need to transfer contents to the Windows BOOTCAMP partition from the macOS partition, users always realize macOS can't write to the BOOTCAMP partition. The reason is that the BOOTCAMP partition is formatted with NTFS and NTFS is not fully compatible with macOS.
The post introduced two ways to mount the BOOTCAMP partition in read-write mode on Mac - by installing a third-party NTFS for Mac software or by enabling Mac's native NTFS write support.
Apparently, using NTFS for Mac software like iBoysoft NTFS for Mac or iBoysoft DiskGeeker is easier and safer.