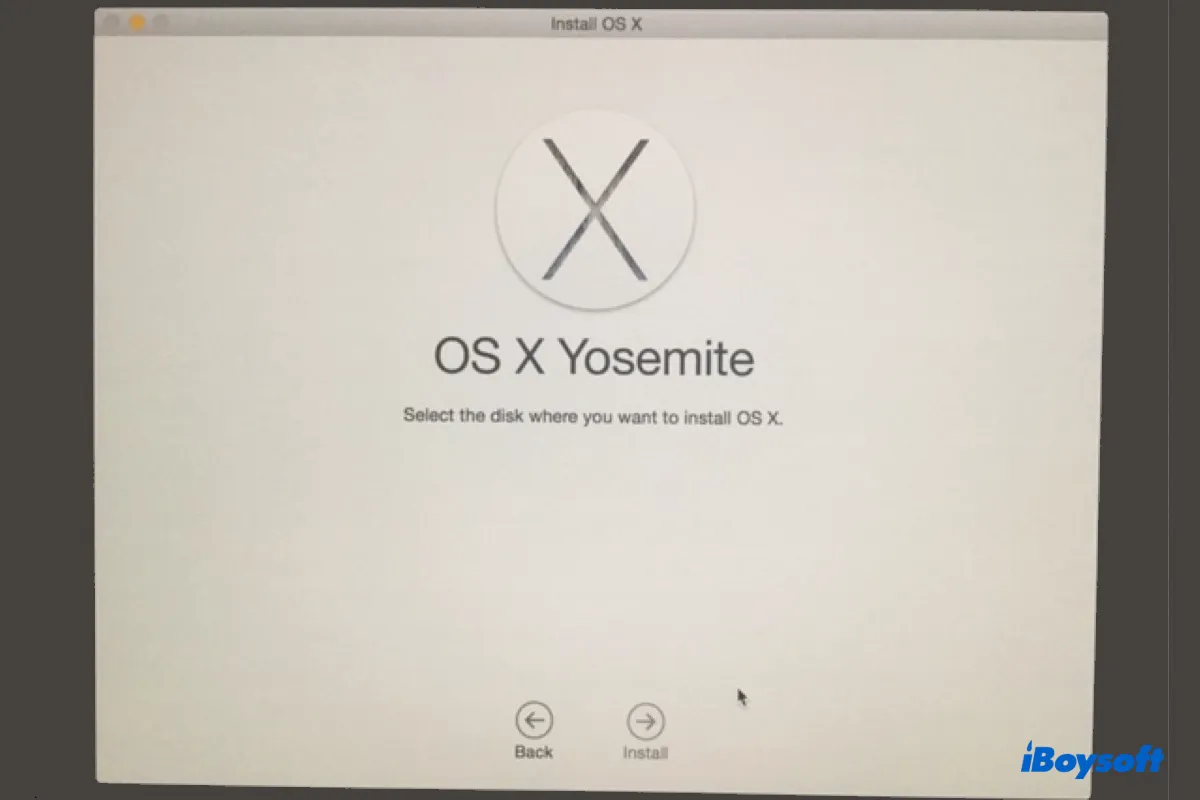
Please help! I'm in Recovery Mode but it shows no disk to install OS X Yosemite. I followed the onscreen instrucitons to reinstall OS X on my MacBook Pro but there is no disk for me to select when it says "Select the disk where you want to install OS X." The only thing I can click is the "Back" button, as the "Install" button is grayed out.
Like this OP, many Mac users have encountered the issue of no disk to select when installing OS X or macOS. This may happen when reinstalling OS X or macOS on a genuine Mac or a virtual machine like VirtualBox. In this article, we'll help you resolve the problem of "no disk available to reinstall macOS or OS X."
"If you need old Mac OS versions, download them here 👉 Old Mac OS Download."
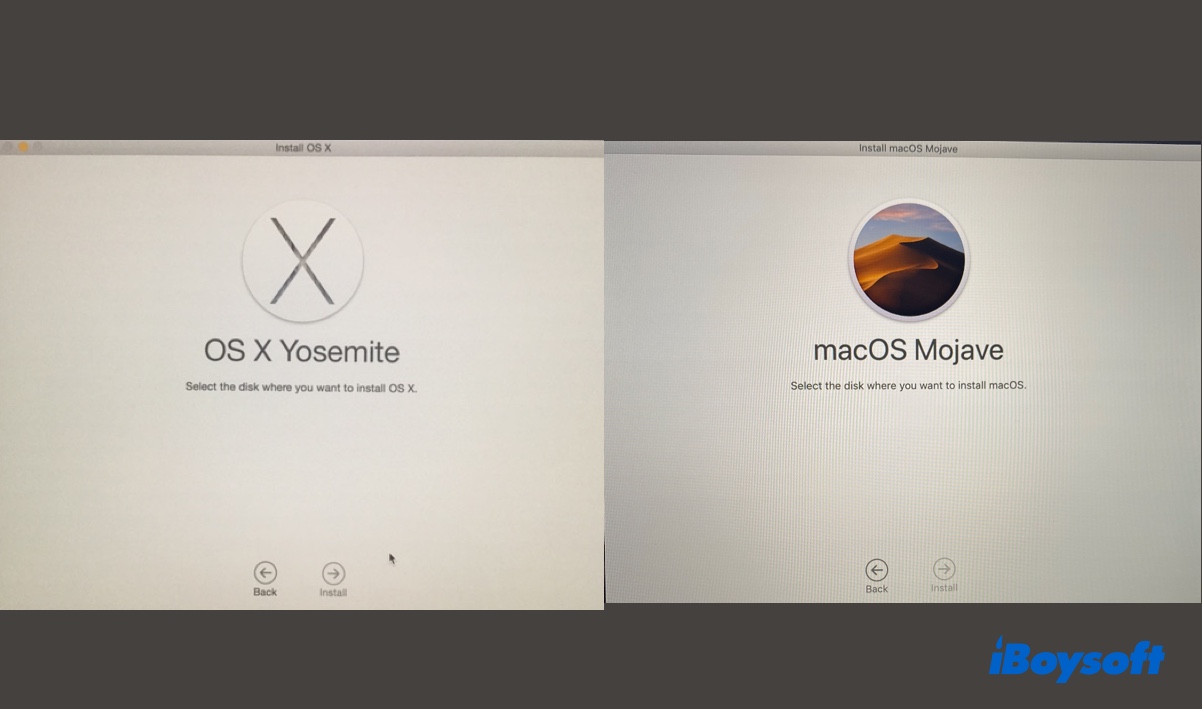
Tips: Apple switched from OS X to macOS in 2016 to comply with the naming fashion of iOS, iPadOS, watchOS, etc. So, you'll be asked to select the disk where you want to install macOS instead of OS X when reinstalling macOS 10.12 Sierra and later.
| Fixes to "No disk to install OS X or macOS" | Best Suited Case |
| Format your Mac's internal physical drive | If you didn't format or incorrectly formatted the internal hard drive |
| Try Internet Recovery Mode | If there's no disk to install on the Local Recovery Mode |
| Erase the APFS Container | If your Mac is APFS-formatted |
| Erase Mac from Recovery Assistant | If you can't erase your Mac with the above ways |
| Revive or restore your Mac using Apple Configurator | If you have another working Mac |
| Rebuild the Fusion Drive | If you're unable to select a disk to reinstall macOS on Fusion Drive |
| Use the original Apple hard drive | If your Mac's internal hard drive was replaced |
Why is there no disk to install OS X or macOS?
Typically, the disk is not showing up when reinstalling macOS because it's not formatted or not properly formatted. But there's also the chance that the internal hard drive has failed, especially if it's an old Mac. If you just replaced a failing hard drive with a new SSD, it may be caused by the firmware incompatibility between your Mac and the SSD.
Besides, if your Mac was configured with a fusion drive, it may have been split, causing no disk to install macOS or OS X.
What to do if there's no disk to install OS X or macOS?
This section summarizes several solutions users have applied to the issue that no disk appears when reinstalling OS X or macOS, or only the Recovery partition shows up. If you're also stuck at "select the disk where you want to install OS X/macOS," try them one by one until the disk shows up.
Solution 1: Format the physical drive
If you're trying to install Mac OS X but no disk is showing up, it's recommended to reformat your Mac in Recovery Mode. This is usually the most effective way to resolve the issue.
Chances are that your drive isn't formatted with the correct file system or partition map, or you just deleted the volumes but didn't format the drive, or you formatted an internal partition instead of the physical disk.
Be reminded that formatting the internal hard drive will erase everything on your Mac. That's why you should back it up before proceeding. If you're unable to back up your Mac, as you can't boot it up normally, you can recover data on your Mac from Recovery Mode. When you're ready, take the steps below to format the physical drive.
If you're still at the blank "select the disk where you want to install macOS/OS X" page, press Command + Q to quit the installer.
If you're not in Recovery Mode now, you need to boot into macOS Recovery first.
On an Intel-based Mac:
- Turn off your Mac.
- Press the power button and immediately press and hold Command + R.
- Release the keys after seeing the Apple logo.
On an M1 & M2 Mac:
- Shut down your Mac.
- Press and hold the power button until seeing "Loading startup options."
- Click Options > Continue.
After entering macOS Recovery, you can format the startup disk to solve no disk showing to install OS X:
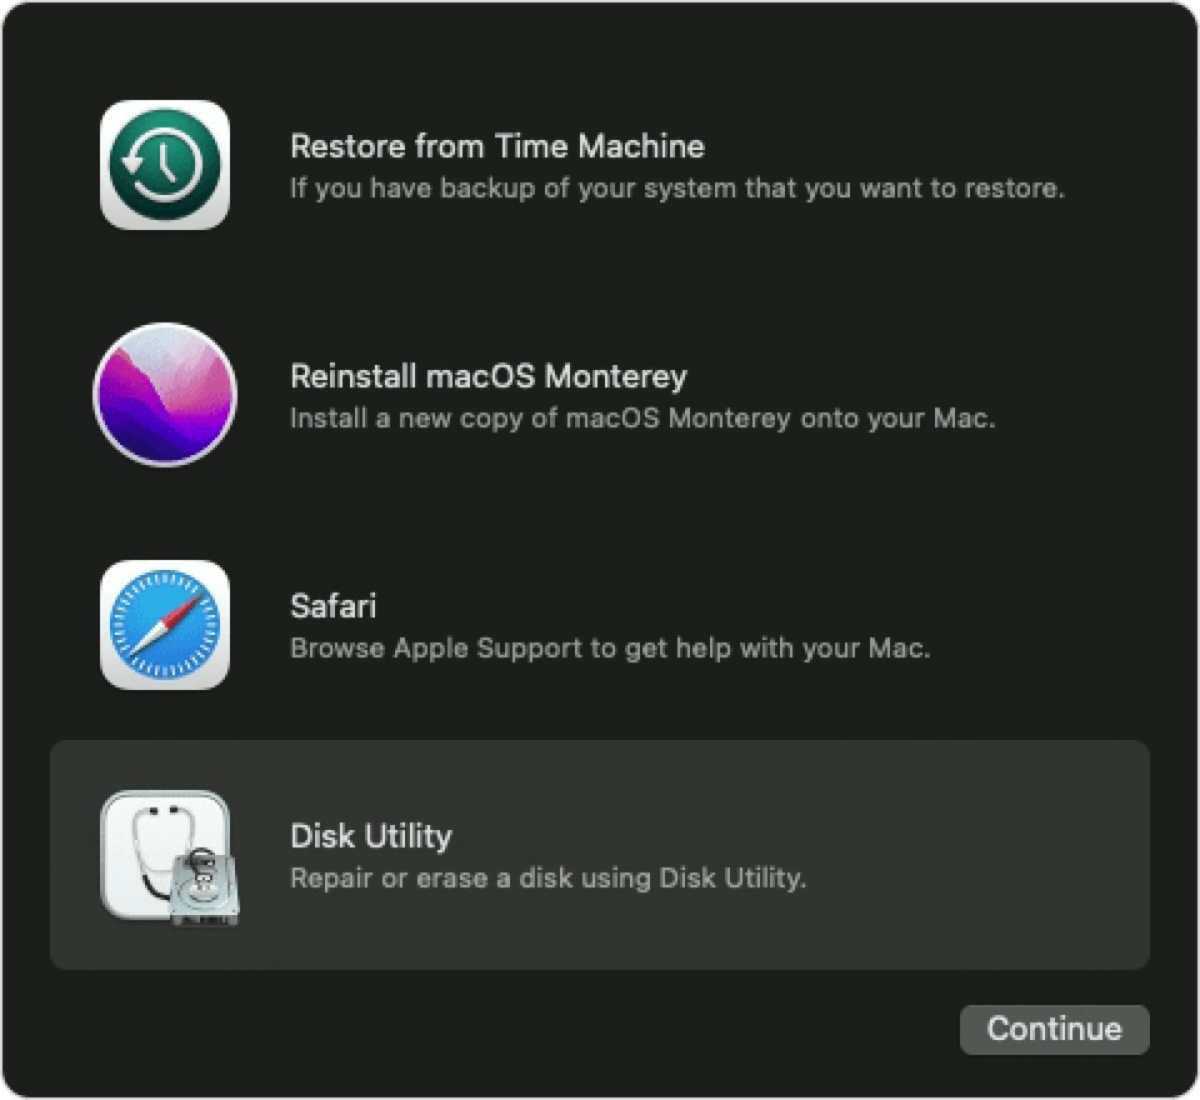
- In the macOS Utilities window, select Disk Utility and click Continue.
- Click View > Show All Devices if available.
- Select the physical disk (the first item listed in the left sidebar with a name similar to 120GB APPLE SSD) and click Erase.
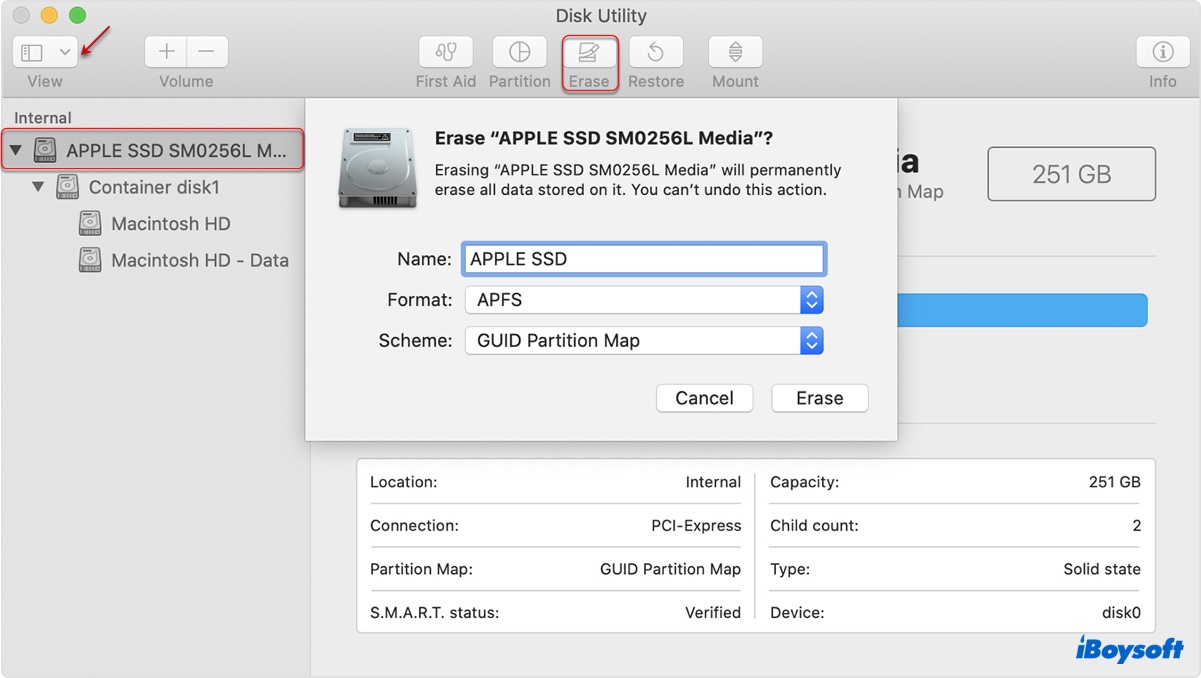
- Name the drive Macintosh HD or another name of your choice.
- Select APFS as the format if you're installing macOS 10.13 High Sierra or later; choose Mac OS Extended (Journaled) if you're installing macOS 10.12 Sierra or earlier.
- Set the scheme to GUID Partition Map.
- Click Erase.
- After the erase process is complete, close Disk Utility.
- Select "Reinstall OS X (macOS)" and click Continue.
This time, the startup disk should appear and allow you to install the operating system to it. Suppose you want to resell the Mac; then you can press Command + Q when your Mac restarts to the setup assistant. If there is no disk to install OS X, continue with the next solution.
Share this solution to help other users who have no disk to install OS X Yosemite or other Mac OSes.
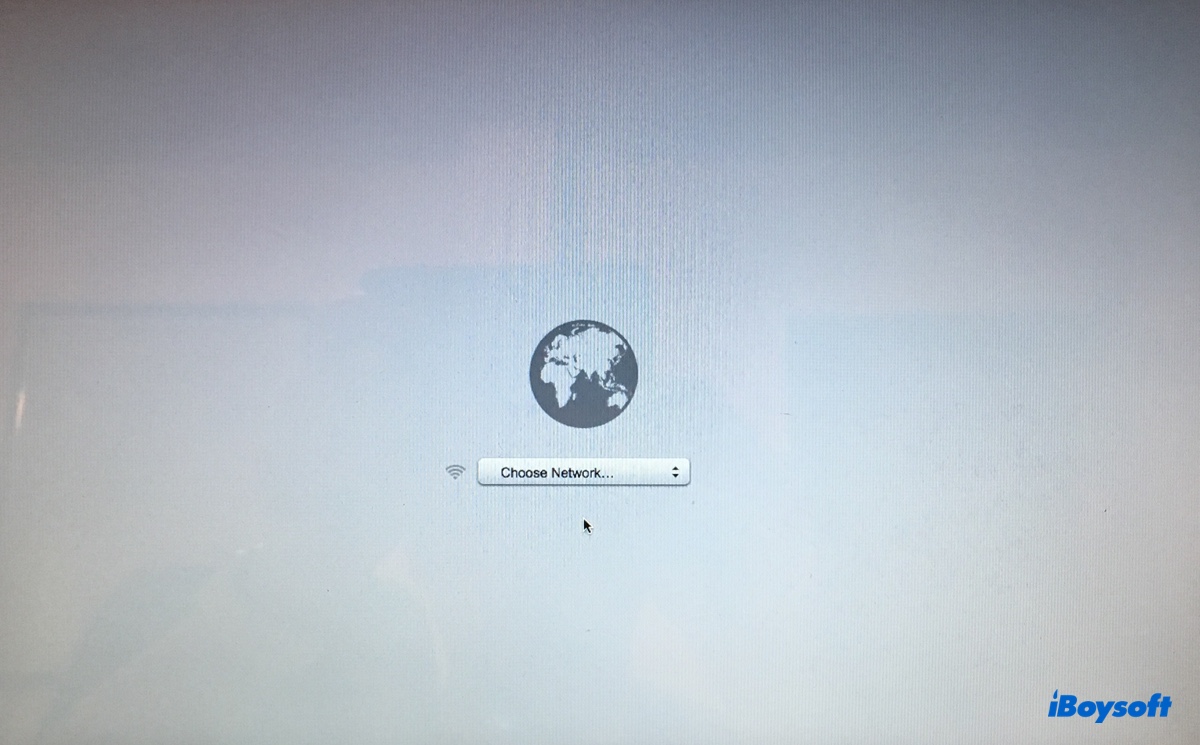
Solution 2: Try Internet Recovery Mode
You can also boot into Internet Recovery Mode to install the operating system if no disk appears when reinstalling OS X or macOS from the built-in Recovery Mode. This is helpful if you find no disk in Disk Utility with the steps in Solution 1 as well.
Note that Internet Recovery is only available on Intel-based Macs, as Apple Silicon Macs have only one recovery mode. Here's how to enter Internet Recovery on Intel-based Macs:
- Shut down your Mac.
- Press the power button, then immediately press and hold Option + Command + R.
- Release the keys when you see the spinning globe.
- Select a WiFi and enter its password.
- When getting to the macOS or OS X Utilities window, select Disk Utility > Continue.
- Repeat the steps in Solution 1 to format your Mac and reinstall the operating system.
If that doesn't do the trick, use Shift + Option + Command + R instead of Option + Command + R in step 2.
Solution 3: Erase the Container
If Disk Utility failed to erase the physical drive that was formatted with APFS, you can perform on the container instead. To do that, simply select the Container disk of your Mac's internal hard drive and click Erase.
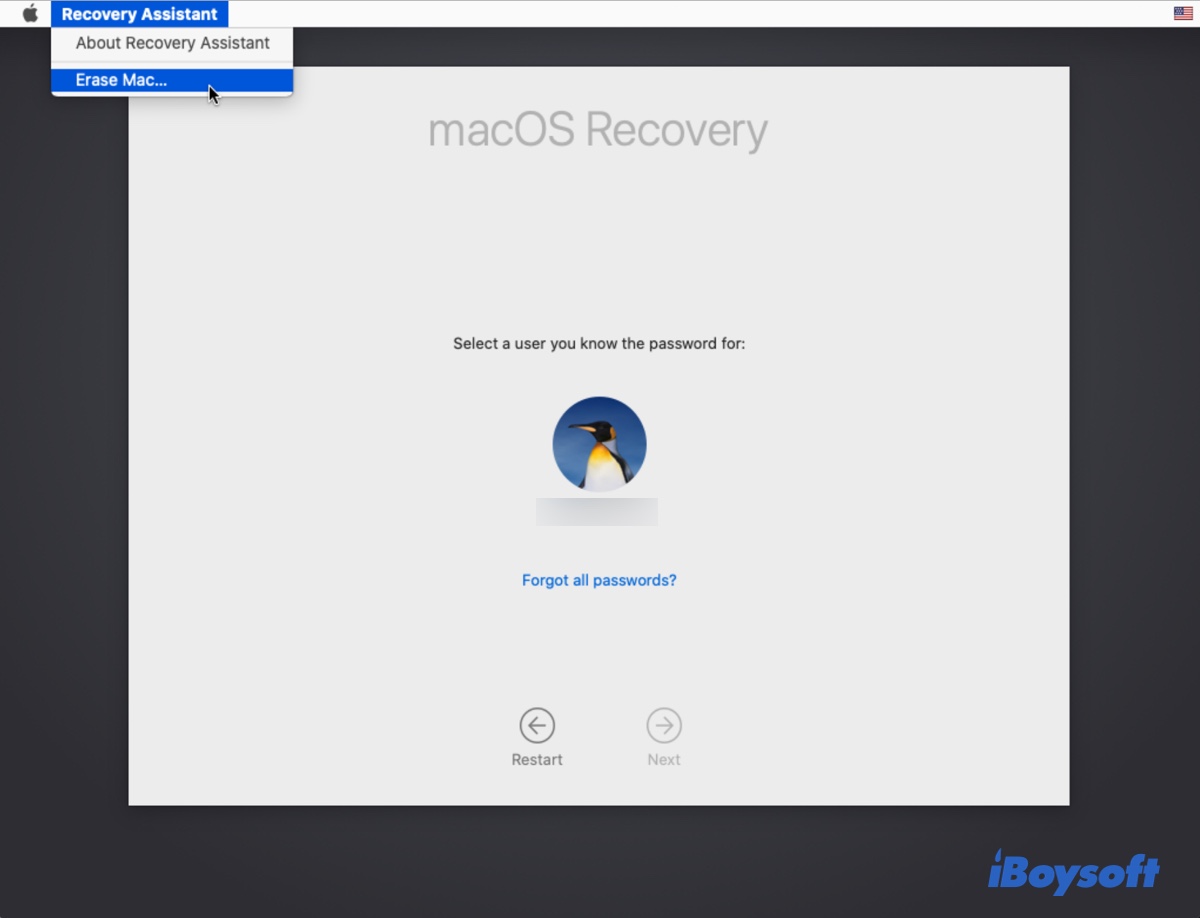
Solution 4: Erase Mac from Recovery Assistant
If there's still no disk available to reinstall macOS or OS X, try erasing your Mac from the Recovery Assistant menu. Follow these steps:
- Boot into macOS Recovery if you haven't.
- Click Recovery Assistant > Erase Mac from the menu bar.
- Click Erase Mac two more times to confirm the action.
- Hold the power button to turn off your Mac if it restarts to a flashing question mark.
- Reboot your Mac into Recovery Mode again.
- Reinstall macOS or OS X.
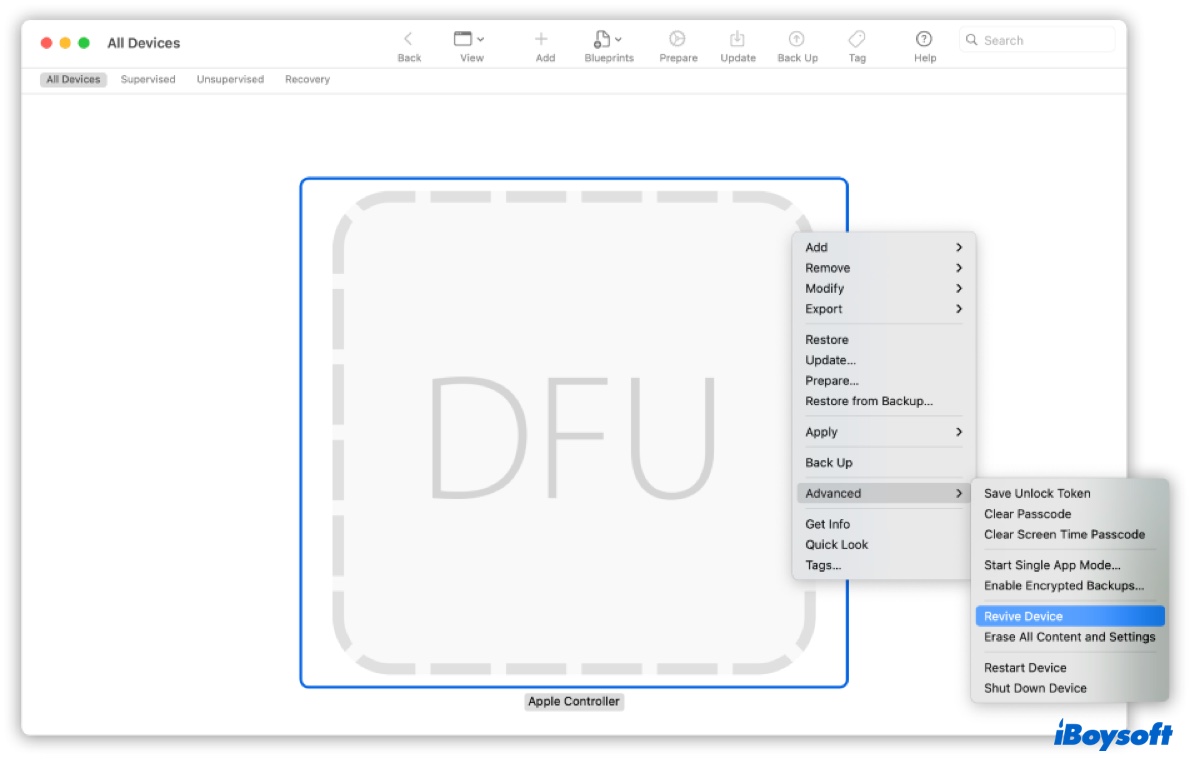
Solution 5: Revive or restore your Mac using Apple Configurator
If your Mac has a T2 chip or Apple Silicon chip and you have another spare Mac, you can fix the disk not showing up when reinstalling macOS issue by reviving or restoring the firmware of your Mac with Apple Configurator. Try to revive your Mac first and retry installing macOS or OS X. If it's unsuccessful, you can restore the firmware instead.
- A revive updates the firmware and recoveryOS to the latest version. It won't affect data on your Mac.
- A restore does the same job as a revive, but it also erases the internal hard drive and installs the latest macOS version on your Mac. It will delete all data on your Mac.
The steps to revive or restore different types of Macs are different. You can follow Apple's official guide to learn more details.
How to revive or restore an Apple Silicon Mac?
How to revive or restore an Intel-based Mac?
Solution 6: Rebuild the Fusion Drive
If you have just replaced one of your Fusion Drives or split them into separate volumes using software, it will appear as two drives instead of one on your Mac, which may be why there's no disk to select when installing OS X.
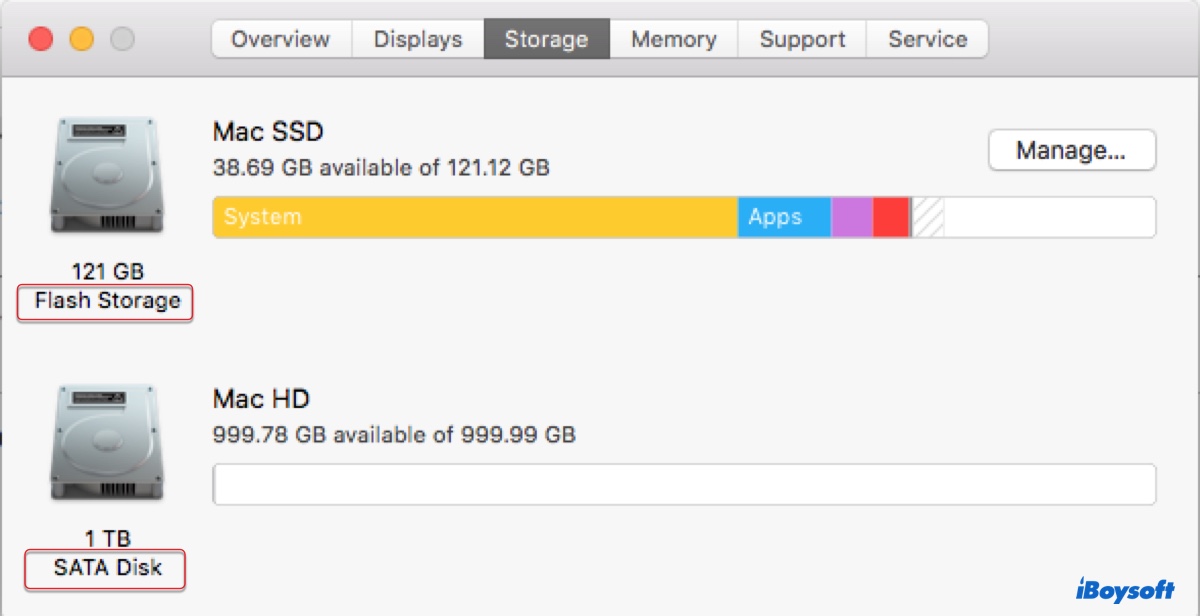
If you're uncertain whether you have a Fusion Drive or the drive has been split, disconnect any external storage devices from your Mac and check it in the Storage overview:
- On macOS Ventura or later, go to the Apple menu > System Settings. Click General > Storage.
- On macOS Monterey or earlier, go to the Apple menu > About This Mac > Storage.
- If you see a drive labeled Flash Storage, it's an SSD.
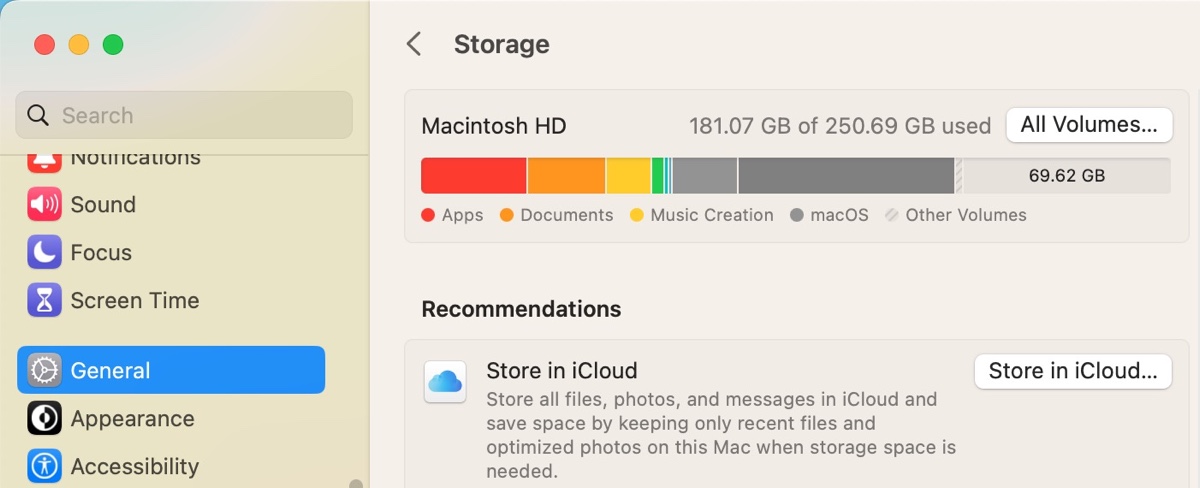
- If you see a drive named Fusion Drive, it's a working fusion drive that doesn't need to be rebuilt.
- If you see two drives, one labeled Flash Storage with a capacity of 24GB, 32GB, or 128GB and another is an HDD with at least 1TB space, it's a split Fusion Drive and needs to be recreated.
Go through the following steps to rebuild the split Fusion Drive to fix the "reinstall macOS no disk" issue:
If you are/were running macOS Mojave or later:
- Boot into macOS Recovery.
- Select Utilities > Terminal from the menu bar.
- Type the command below and hit Enter.diskutil resetFusion
- Type Yes when prompted and press Enter.
- Quit Terminal when the operation is successfully done.
- Choose "Reinstall macOS" and finish the macOS installation.
If you are/were running macOS High Sierra or earlier:
- Boot into macOS Recovery.
- Select Utilities > Terminal from the menu bar.
- Type the command below and hit Enter.diskutil list
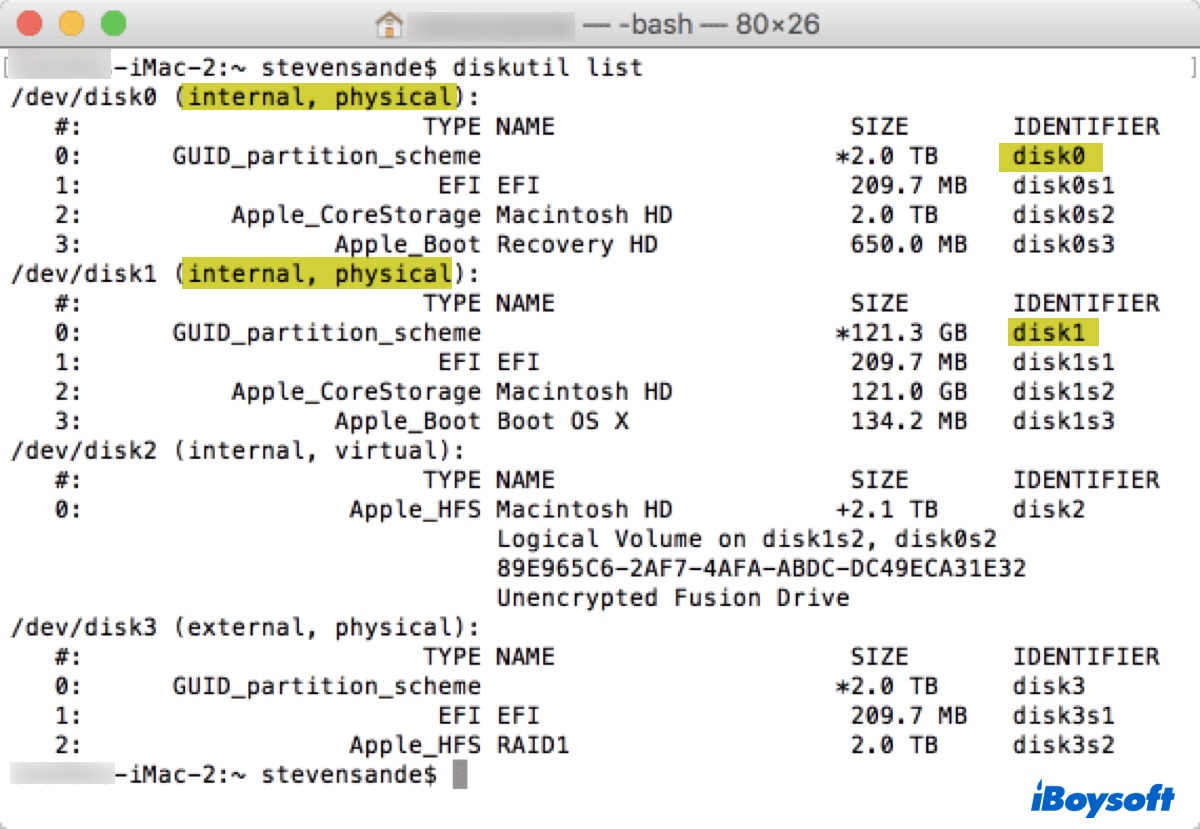
- Note down the disk identifier of the two internal physical hard drives. (Usually, the identifiers are disk0 and disk1)
- Run the following command in Terminal after replacing identifier1 and identifier2 with the info you found in the previous step.diskutil cs create Macintosh\ HD identifier1 identifier2Example: diskutil cs create Macintosh\ HD disk0 disk1
- If it returns a disk unmounting error, execute the following command with each of the identifiers and retry the command in step 5.diskutil unmountDisk identifierExample:
diskutil unmountDisk disk0
diskutil unmountDisk disk1 - Type the following command and hit Enter.diskutil cs list
- Find the string of numbers appearing next to "Logical Volume Group" for the volume named Macintosh HD.
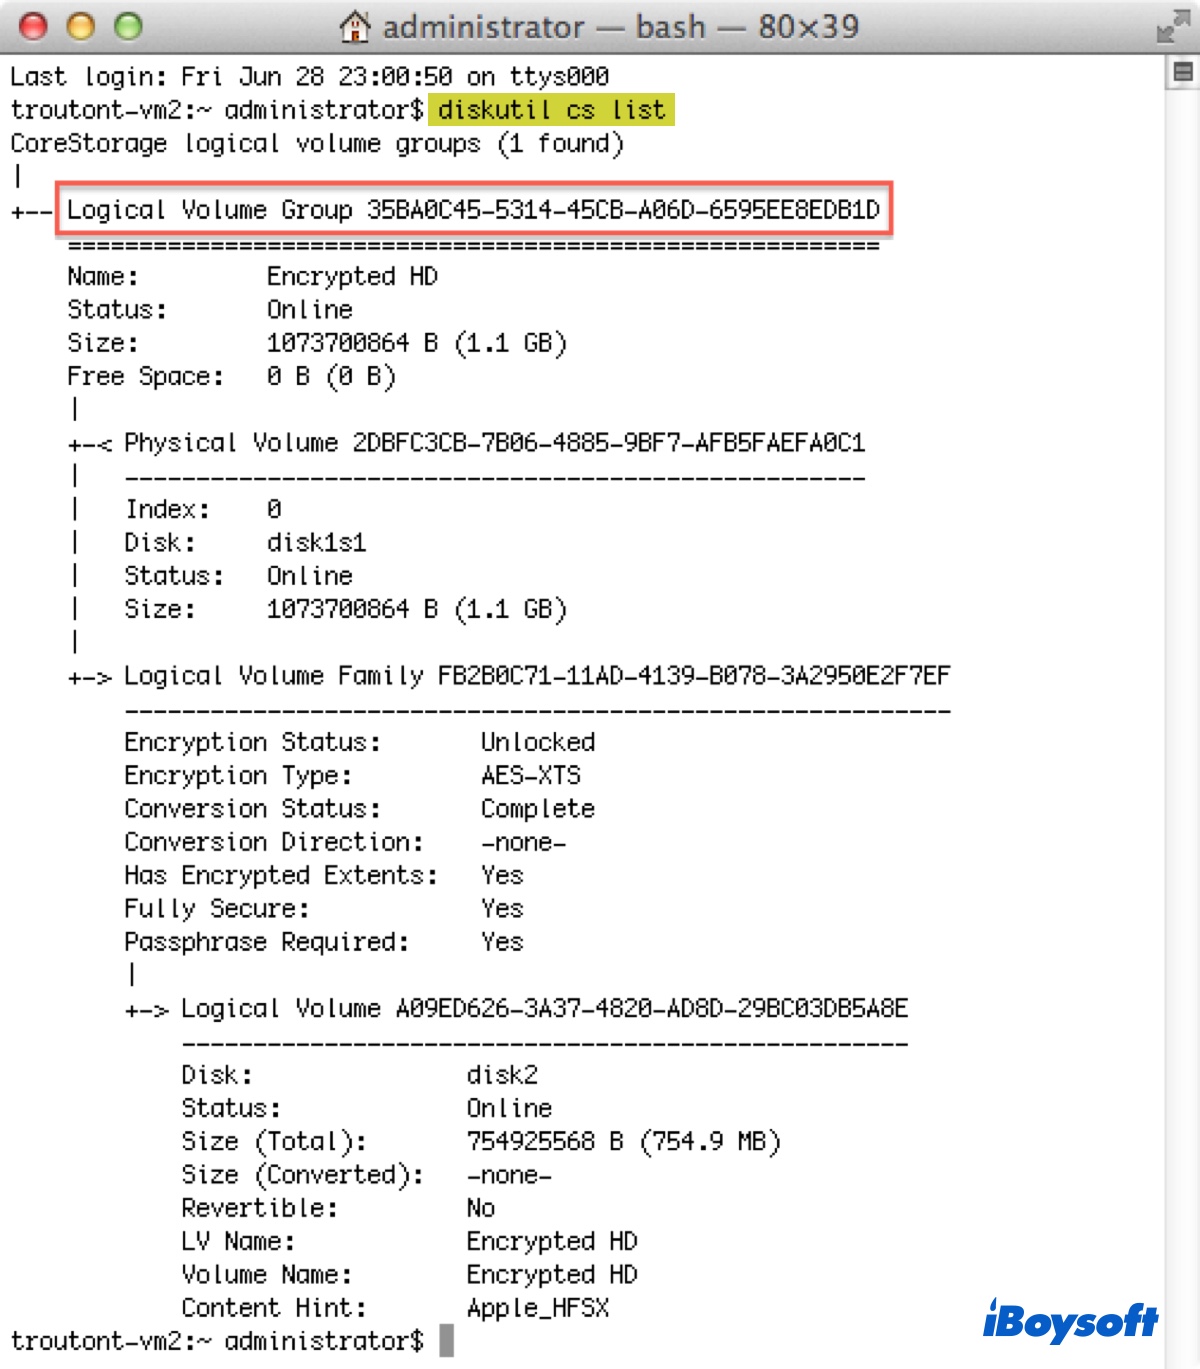
- Execute the following command after replacing logicalvolumegroup with the number you found in step 8.diskutil cs createVolume logicalvolumegroup jhfs+ Macintosh\ HD 100%Example: diskutil cs createVolume 4853AFC3-BF97-9834-A407-35421FD2815A jhfs+ Macintosh\ HD 100%
- Quit Terminal after the operation is complete.
- Reinstall macOS or OS X.
Solution 7: Use the original Apple hard drive
Some users may find "select the disk where you want to install" not showing disks after they have changed to an NVMe SSD. This is likely more common on Macs that never have macOS 10.13 High Sierra or later installed.
The support for NVMe SSD started with macOS 10.13 High Sierra. If you want to install an NVMe SSD on your Mac, you need to have macOS 10.13 or a later version installed before making the hardware change. This way, the system firmware is updated to support the NVMe SSD. Otherwise, you can't install macOS on the SSD.
If you still have the original hard drive, you can reconnect it to your Mac, install macOS 10.13 or later on it, then replug the new SSD and use solution 1 to complete the installation.
If the original hard drive has already failed, try finding another one that's compatible with your Mac model to update the firmware.
Hopefully, after trying one of the above solutions, you no longer have the no disk to select dilemma when reinstalling OS X or macOS.
Conclusion
We've covered 7 solutions to help users who are having issues with reinstalling macOS or OS X due to the disk being blank beneath the message "Select the disk where you want to install macOS." You can apply them to all Mac operating systems, no matter whether you have no disk to install OS X El Capitan, macOS Sierra, macOS Monterey, or another version.
FAQs about the 'no disk to install OS X or macOS' issue
- QWhat to do if there is no disk on MacBook Pro to reinstall OS X?
-
A
If there's no disk on your MacBook Pro to reinstall OS X, you need to reformat your Mac and retry the installation.
- QWhat happens if I don't see disk to install macOS?
-
A
If no disk is showing to install macOS, you can't finish the installation and may fail to boot up your Mac.
- QHow do I reinstall macOS X without disc?
-
A
To reinstall Mac OS X without discs, you can boot into Recovery mode.