Cloning is best when you need a complete, replica of a drive, including its structure, system files, partitions, and bootable capability. It's useful for full backups or drive upgrades.
In addition to cloning the Mac hard drive to an external SSD, you can also clone external storage media such as USB flash drives on your Mac for various purposes: backing up your data, upgrading your drive, duplicating USB drive bootable, and so forth.
If you want to clone a USB drive on your Mac, stay tuned to know the specific methods.
| Workable solutions | Difficulty level | Recommendation rate | Install software or not |
| Use iBoysoft DiskGeeker | Low | High | Yes |
| Utilize Disk Utility's Restore feature | Medium | Medium | No |
| Create a disk image | Medium | Medium | No |
What to prepare to clone USB drive on Mac?
To ensure the success of cloning USB stick using the Mac, you have to make some preparations as below before proceeding to the detailed steps:
- Prepare another drive as the destination drive for the clone.
- Back up the files on the destination drive first, cloning will overwrite all data.
- The capacity of the destination drive should be larger than(or at least the same as) the source drive.
Share this post with others who want to clone USB drive Mac!
Clone USB drive on Mac with iBoysoft DiskGeeker: the best solution
Although there are several ways you can choose to clone a USB flash drive on your Mac, the best way is to use third-party Mac cloning software. Within a few clicks, you can easily clone the USB drive to the target drive connected to your Mac.
Among these Mac clone tools, iBoysoft DiskGeeker stands out, this all-in-one disk management tool for Mac helps create a 1-to-1 copy of your startup disk or external drive to a target disk fast and stably.
iBoysoft DiskGeeker: All-in-one Disk Management Tool for Mac
- Clone all contents from the Mac hard drive to the target disk
- Clone external USB drives, SSDs, HDDs, etc., to the destination drive
- Read/write Bitlocker-encrypt drives and NTFS drives on Mac
- Encrypt/unlock drives with FileVault or BitLocker on Mac
- Prevent virus attacks via setting USB Defender
- Clean junk files and unwanted files from hard drives
- Manage USB drives, flash drives, external hard drives
Read-only & risk-free
Steps to clone USB drive on Mac with iBoysoft DiskGeeker:
- Click the download button above to download the iBoysoft DiskGeerker installation package. Double-click the installation package and follow the on-screen guide to install it on your Mac.
- Connect the source USB drive and the destination drive to your Mac. Ensure the connection-related parts are not defective and that both drives are recognized on your Mac.
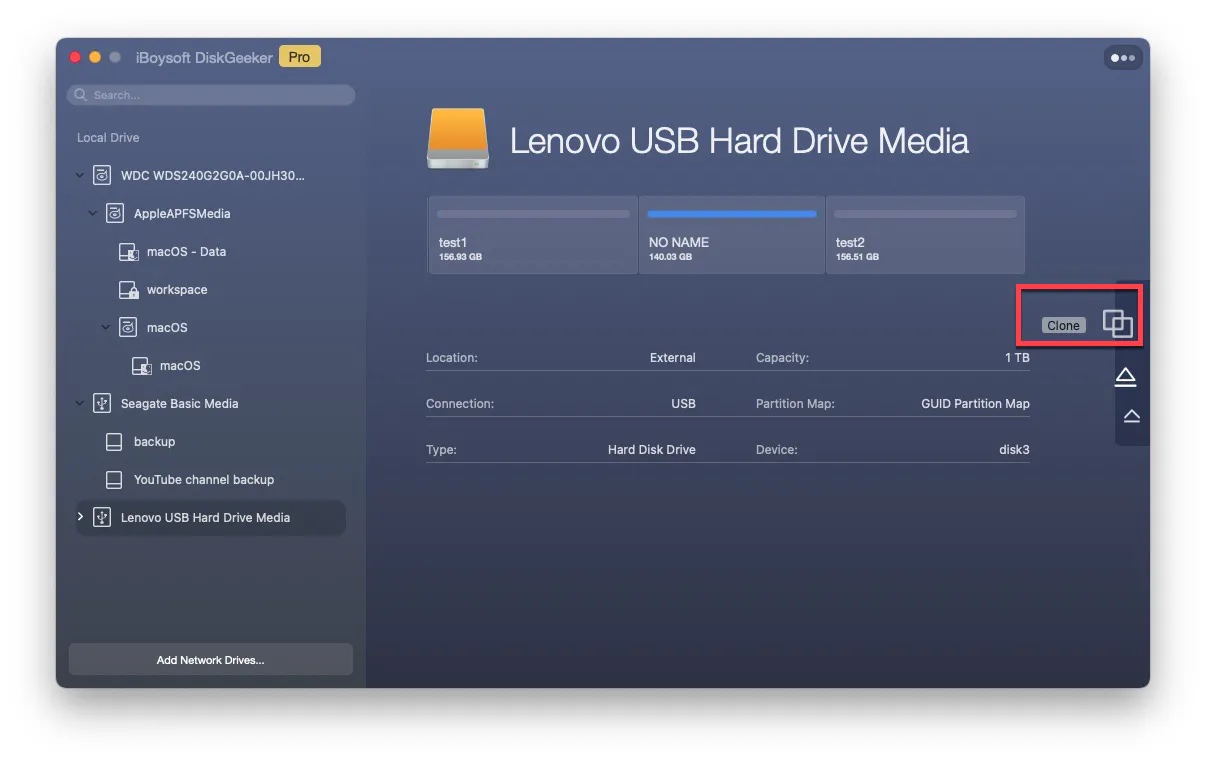
- Open iBoysoft DiskGeeker, on the main interface, all the detected drives and volumes are displayed. Select the whole USB drive instead of the volume/partition from the list.
- Then click the Clone button from the right-side toolbar.

- On the pop-up window, select the destination device, and click the Start cloning button at the right-bottom.
- Click OK to confirm the operation and it will start to clone.
Once it starts, the cloning process cannot be stopped. Besides, always keep your Mac powered on or make sure it has enough power. Should you unintentionally end the process, the disk cloning will automatically start again the next time the destination disk is connected to your Mac.
Let more people know the best solution to clone USB stick on Mac!
Clone USB drive on Mac via Disk Utility's Restore feature
In addition to third-party drive cloning software for Mac, you can clone USB drive Mac with Disk Utility, the built-in macOS utility. There is a Restore button on the toolbar of Disk Utility. When you restore from one volume to another, an exact copy of the original is created. Hence, you can use it to clone USB stick on Mac.
- Open Disk Utility from Finder > Applications > the Utilities folder.
- Ensure the source drive and destination drive are plugged into your Mac.
- Click the View button and choose Show All Devices.
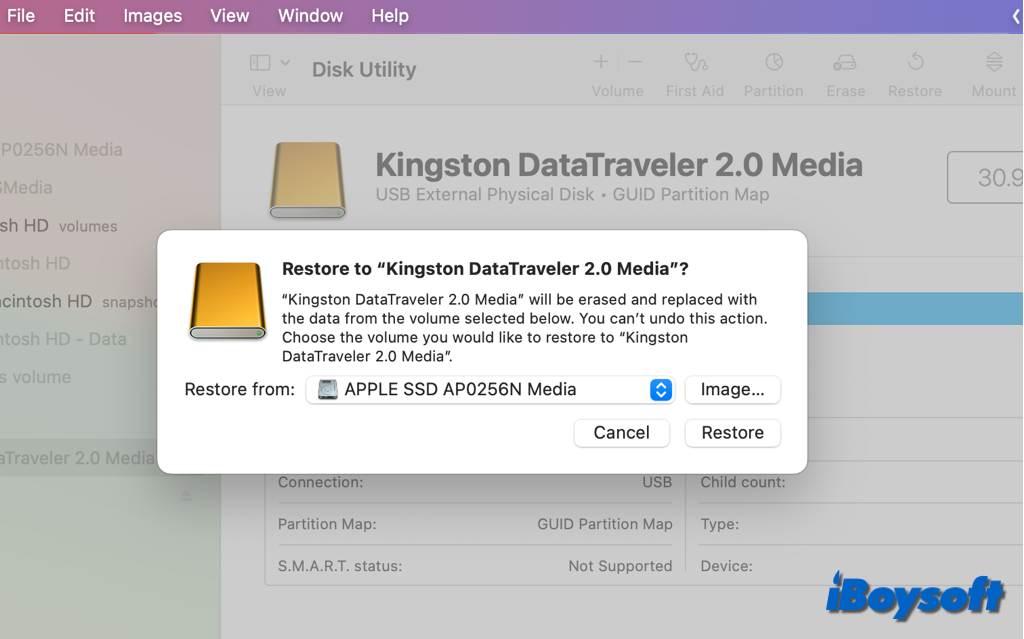
- Choose the destination drive to store the copy of the USB drive first, and click Restore. Make sure you select the correct target drive, this chosen drive will be erased.

- On the prompt window, click the "Restore from" box and select the source USB flash drive, then click the Restore button.
- Click Done when the process completes.
Clone USB drive on Mac by creating a disk image
There is another alternative method you can consider when you want to clone a USB drive on your Mac, that is creating a disk image for the target USB flash drive on Mac. A disk image is a compressed copy of the contents of a disk or folder. With it, you can quickly copy the USB drive to another disk.
Note: You can't create images of individual APFS volumes. You can't create images of APFS containers on Mac computers with Apple silicon or an Apple T2 Security Chip. Instead, you can use the Mac cloning software such as iBoysoft DiskGeeker.
Steps to create a disk image from the connected USB drive on Mac:
- Launch the Disk Utility app from the Utilities folder in Finder > Applications.
- Select the USB flash drive on the left side list.
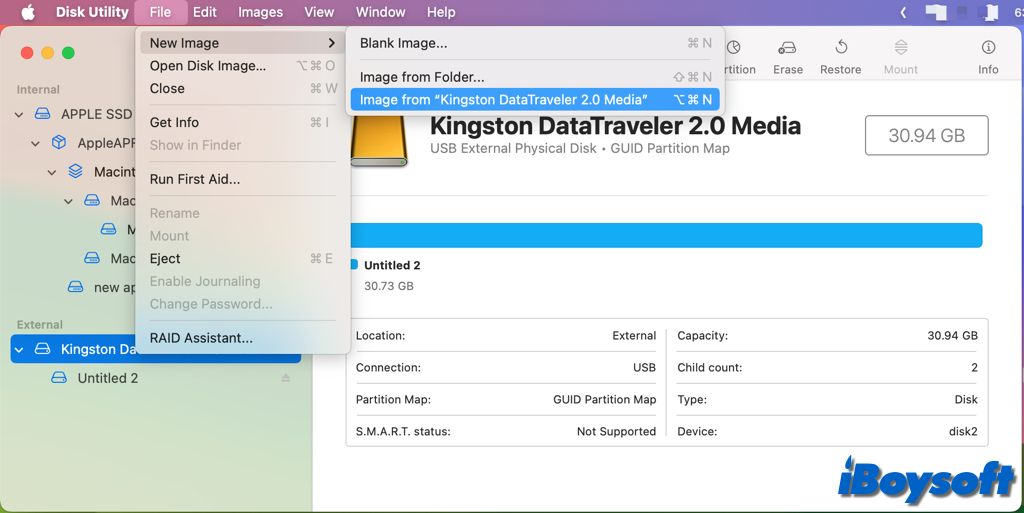
- Click File on the app menu, and choose File > New Image > Image from (your USB drive name).

- Give the disk image a filename, add tags if needed, and select a location for saving. When you save the disk image file in the Finder and open it, this is the name that shows up.
- Click the Format pop-up menu, then choose an option: Read-only, Compressed, Read/write, DVD/CD master.
- If you want to encrypt the disk image, click the Encryption pop-up menu, then choose an encryption option.
- Click the Save button, then click Done.
When you clone USB drives on your Mac, make sure you have chosen the correct source drive and the destination drive. Among these three solutions for cloning USB drives on Mac, using third-party Mac cloning software is the easiest way. You can download and try iBoysoft DiskGeeker on Mac.
If you find these solutions helpful, click the button to share them!
