
Written by
Jenny Zeng
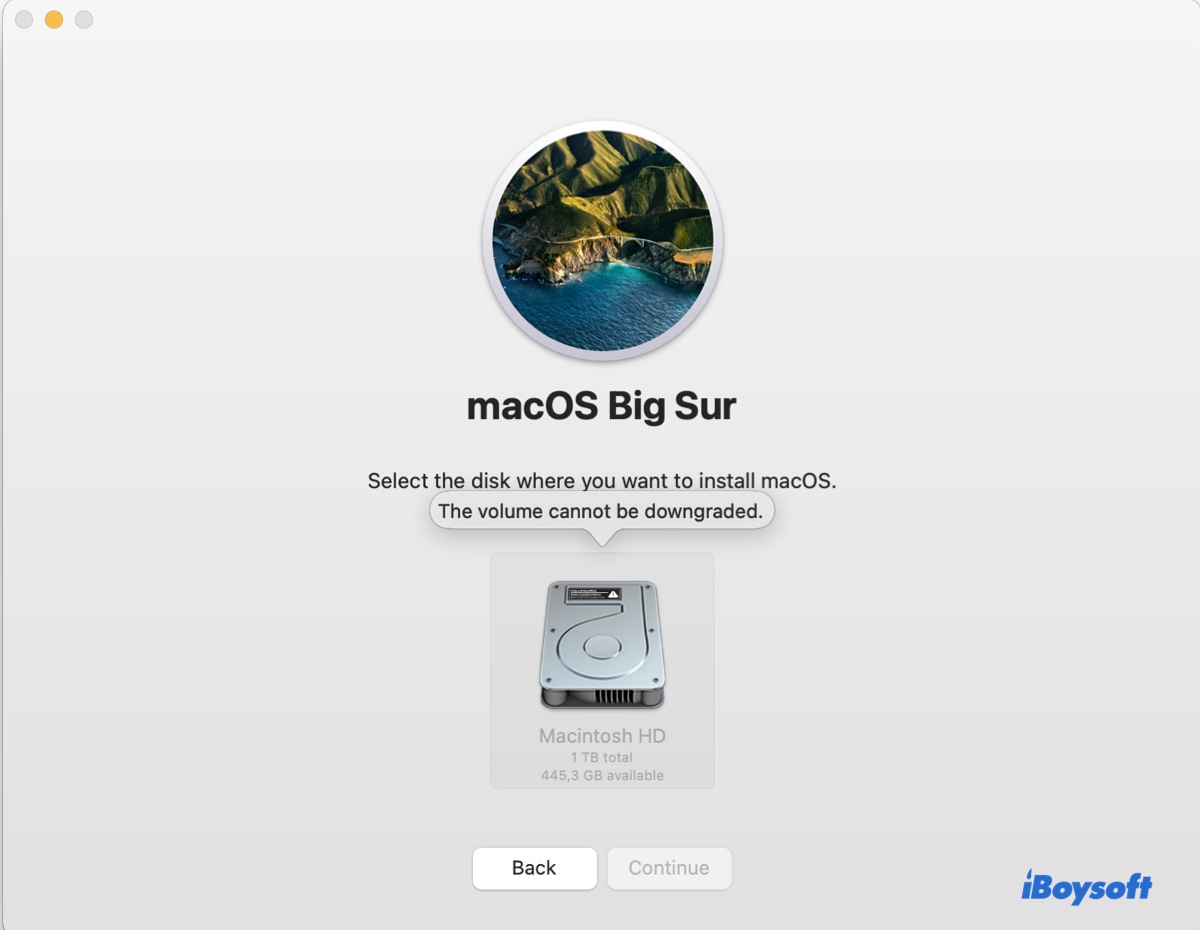
Fix 'The volume cannot be downgraded' [Sonoma/Ventura/Monterey]
When trying to reinstall or downgrade macOS, you may get the error message "The volume cannot be downgraded" in the phase where it prompts you to select the disk where you want to install macOS.
The error may occur when reinstalling or downgrading macOS from Recovery Mode, using a bootable USB installer, or by directly running an older (or sometimes newer) macOS version over the current operating system.
In this article, we'll walk you through the steps to fix the error and help you downgrade or install macOS successfully.
How to fix 'The volume cannot be downgraded' on Mac?
macOS sends the error "The volume cannot be downgraded" when it considers that the macOS version you're trying to install is older than the one that you're currently running. The idea is that you can't install the macOS that's released earlier than your current macOS unless the internal hard drive is erased.
Also, you can't downgrade to a macOS version that's earlier than the one your Mac is shipped with, even if your Mac is erased. That said, you can't install Monterey on a Mac that's preinstalled with Ventura.
Step 1: Back up your Mac
To fix "The volume cannot be downgraded," you need to erase your Mac, which will remove all data on the internal hard drive. Therefore, you must back up your Mac before proceeding. You can take a Time Machine backup, clone your hard drive, or simply transfer the important files to an external storage device.
Step 2: Erase your internal hard drive
After you have backed up your files, follow the steps below to erase your Mac:
- Turn off your Mac.
- Boot into macOS Recovery Mode.
Intel-based Macs: Press the power button, then immediately press and hold the Command + R keys until you see the Apple logo.
Apple Silicon (M1 & M2) Macs: Press and hold the power button until you see the system volume and the Options button, then click Options > Continue. - If asked, choose a volume to recover and click Next.
- If requested, select an administrator account, click Next, then enter the password and click Continue.
- In the macOS Utilities window, select Disk Utility and click Continue.
- Click View > Show All Devices.
- Select the physical internal hard drive (the topmost drive) and click Erase.
- Name the drive Macintosh HD.
- Choose APFS as the format if running macOS High Sierra or later.
- Keep the scheme GUID Partition Map.
- Click Erase.
Step 3: Reinstall the macOS version you want
Now that your Mac has been erased, you're free to install any compatible macOS version that's not older than the one your Mac came with.
To reinstall the macOS version last installed on your Mac, boot into Recovery Mode, then select "Reinstall macOS" and follow the onscreen instructions.
To reinstall macOS from a bootable macOS installer:
If you have an Intel-based Mac, press and hold the Option key right after you press the power button, then select the bootable macOS installer and click the Up arrow.
If you have an M1 or M2 Mac, press and hold the power button until "Loading startup options" shows up, then select the bootable macOS installer and click Continue.
When you get to the macOS Utilities window, you can click "Install macOS" to finish the installation. After that, you can restore the data you backed up to the new OS.
Hopefully, these steps have managed to resolve the error "The volume cannot be downgraded" on macOS Sonoma, macOS Ventura, macOS Monterey, or earlier. If you find this post helpful, please share it with others.