Taking a photo on your iPhone has been easier than ever, but have you ever wondered how to take a picture on Mac? You may need to upload and change a profile image for registration or take a picture while having a video conference. As you may notice, there's a camera located in the middle of your Mac screen. This post will show you how to make use of the built-in webcam to take a photo on a Mac.
Method 1: How to take a picture on Mac with Photo Booth
Although Mac users can visually see the camera on the screen, not every user knows how to make use of it. Actually, you can either run third-party apps or use Apple's built-in app, Photo Booth, to take a photo with Mac. To find and launch Photo Booth on Mac, you need to:
- Finder > Applications > Photo Booth.

(Alternatively, you can go to Launchpad to find the Photo Booth or search for it in Mac Spotlight.) - Open it and you can click the camera in the middle of the bottom.
(You can see the Effects option on the windows. By clicking on the Effects button, you can try different filters, including Space Alien, Dizzy, Frog, etc. Try them out and find a favorite one.)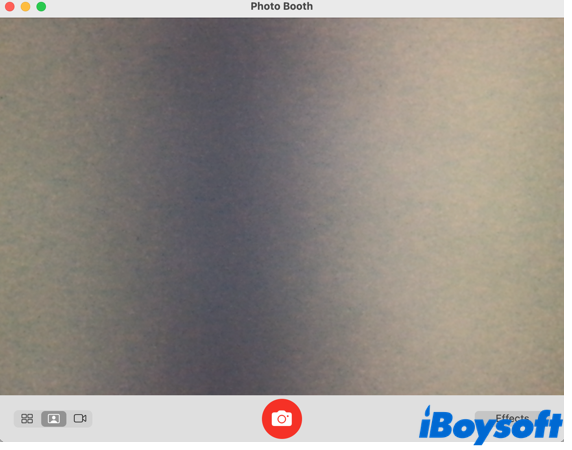
- Right-click the picture you just took and choose Export.
- Select the file path you want to save.

So easy, right? But this way can only take pictures on Mac in front of the camera. To continue taking photos on Mac, click on the X button of the photo.
Method 2: How to take a picture on Mac with an iPhone camera
Have you encountered the issue that your Mac asks you to use your iPhone as a Webcam? This is a function called the Continuity Camera. With it, your iPhone can serve as your Mac's webcam or microphone, leveraging its advanced camera capabilities and additional video effects. This can be done wirelessly or via a USB cable.
Before we learn how to take pictures on Mac, let's set and ensure the settings with Continuity Camera:
- Ensure your Mac runs macOS 13 or later, and your iPhone has iOS 16 or later.
- Sigh into both devices with the same Apple ID.
- Enable Wi-Fi and Bluetooth on both devices.
- Mount your iPhone not lock it.
Tips: For all Continuity Carema options, macOS 14 and iOS 17 are required.
Now let's begin to learn how to take pictures on Mac with an iPhone camera:
- On your Mac, open an app with camera or microphone access, such as FaceTime or Photo Booth.
- Select your iPhone as the camera or microphone in the prompt window.
(To use your iPhone on a Mac, your iPhone's screen must be turned on.)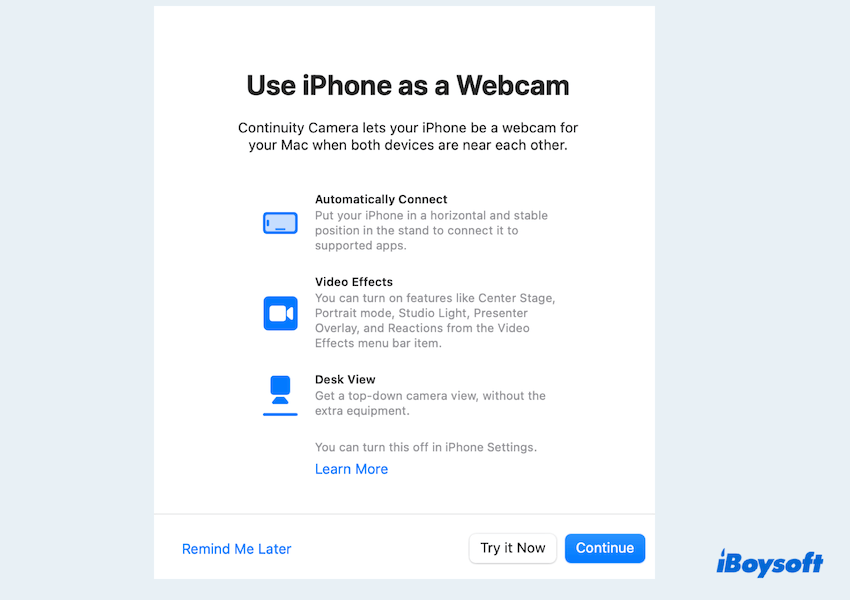
- Take a photo as you use on iPhone, and the photos will be saved on the Mac.
So amazing, right? Why not share these ways to help more people? Make the Mac take photos flexibly on phones~
Method 3: How to take a picture on Mac with right-click menu
If you need to frequently take photos on Mac, there's an easier way to launch this program without going through folders and programs every time. With a small utility, you can open the Photo Booth with one click and start to take photos on Mac.
iBoysoft MagicMenu is the best Mac right-click enhancer that's able to customize your Finder menu and boost your work efficiency. By offering a wide range of functions to the right-click menu, you can fix how to take a photo on Mac with the Quick Access category.
- Free download, install, and open iBoysoft MagicMenu.
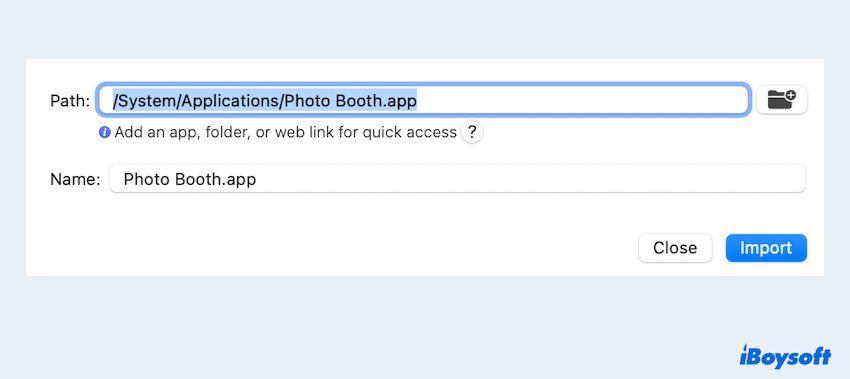
- Click Quick Access on the right menu, choose + icon then click the folder icon.
- Find and click Photo Booth in the Applications folder, then click Open at the bottom.
- Choose Import.
- Right-click anywhere on the desktop or an open folder, and choose Quick Access > Photo Booth.
So useful, right? Besides this category, iBoysoft MagicMenu comes with other handy features such as Copy To, Move To, Uninstall, and many more to make your right-click menu much more useful. Free download and try this right-click enhancer now~
Conclusion
This post covers a detailed guide on how to take pictures on Mac, including where to find the camera app, how to use it, and how to save the images. Plus, you learn a new way to quickly access programs by using the best Mac right-click enhancer, iBoysoft MagicMenu. If you have any further questions, leave a comment below!
- QHow to take a photo on MacBook Air?
-
A
1. Press Command + S to open Mac Spotlight. Type in Photo Booth in the search bar and open it from the results.
2. Add a visual effect to your image as you wish. Hit the camera button to take a photo on Mac.
3. Right-click on the picture and save it to a desired location.
- QHow to take a picture on MacBook Pro?
-
A
1. Click on Launchpad from Mac Dock on your MacBook Pro. Find Photo Booth and click on the icon.
2. Get ready to take a photo on Mac by selecting the mode and effect. Once prepared, click on the red button to take a picture on MacBook Pro.