iBoysoft MagicMenu Online Help
Getting Started
iBoysoft MagicMenu is a right click enhancer that helps Mac users get better control of the right click menu in macOS.
It adds new options such as New File, Copy/Move To, Quick Access, Menu Editor, and other useful shortcuts to the control panel of the right click on Mac. It also allows users to add new categories and self-developed functionalities to the right click context menu, making this utility user involved and tailored.
Supported Operating Systems
macOS 26 Tahoe, macOS 15 Sequoia, macOS 14 Sonoma, macOS 13 Ventura, macOS 12 Monterey, macOS 11 Big Sur, macOS 10.15 Catalina, macOS 10.14 Mojave, macOS 10.13 High Sierra.
How to Install iBoysoft MagicMenu?
Step 1: Download iBoysoft MagicMenu at https://iboysoft.com/magic-menu/ and double click the .dmg file.
Step 2: Follow the onscreen instructions to finish the installation process.
Step 3: Head to the Launchpad to find the installed iBoysoft MagicMenu.
Step 4: Start to use iBoysoft MagicMenu.
Note: If you failed to enable Finder extension, the pop-up will ask you to enable it again after Mac restarts. Please enable Finder extension first.
How to Activate iBoysoft MagicMenu?
iBoysoft MagicMenu provides a lite version that is free for you. You can use the functions including New File, Copy/Move to, and Quick Access on your right-click menu.
If you click the downlod button next to a desired extension in the Extension store, a window will pop up saying the feature is not supported by the current version.
Simply click the Upgrade button to open the purchase page. After successful purchase, you'll receive the license key and the download link for the iBoysoft MagicMenu Standard version. Follow the steps above to install the standard version, then all the extensions and features are available for you.
Step 1: Click iBoysoft MagicMenu icon on the menu bar and select Activate from the dropdown menu to open the activation window.
Step 2: Enter the license key to the license bar and then click Activate.
Note: Please make sure you have internet access (either eithernet or Wi-Fi) while activating iBoysoft MagicMenu. Have no internet access or have other questions? Please contact us via [email protected].
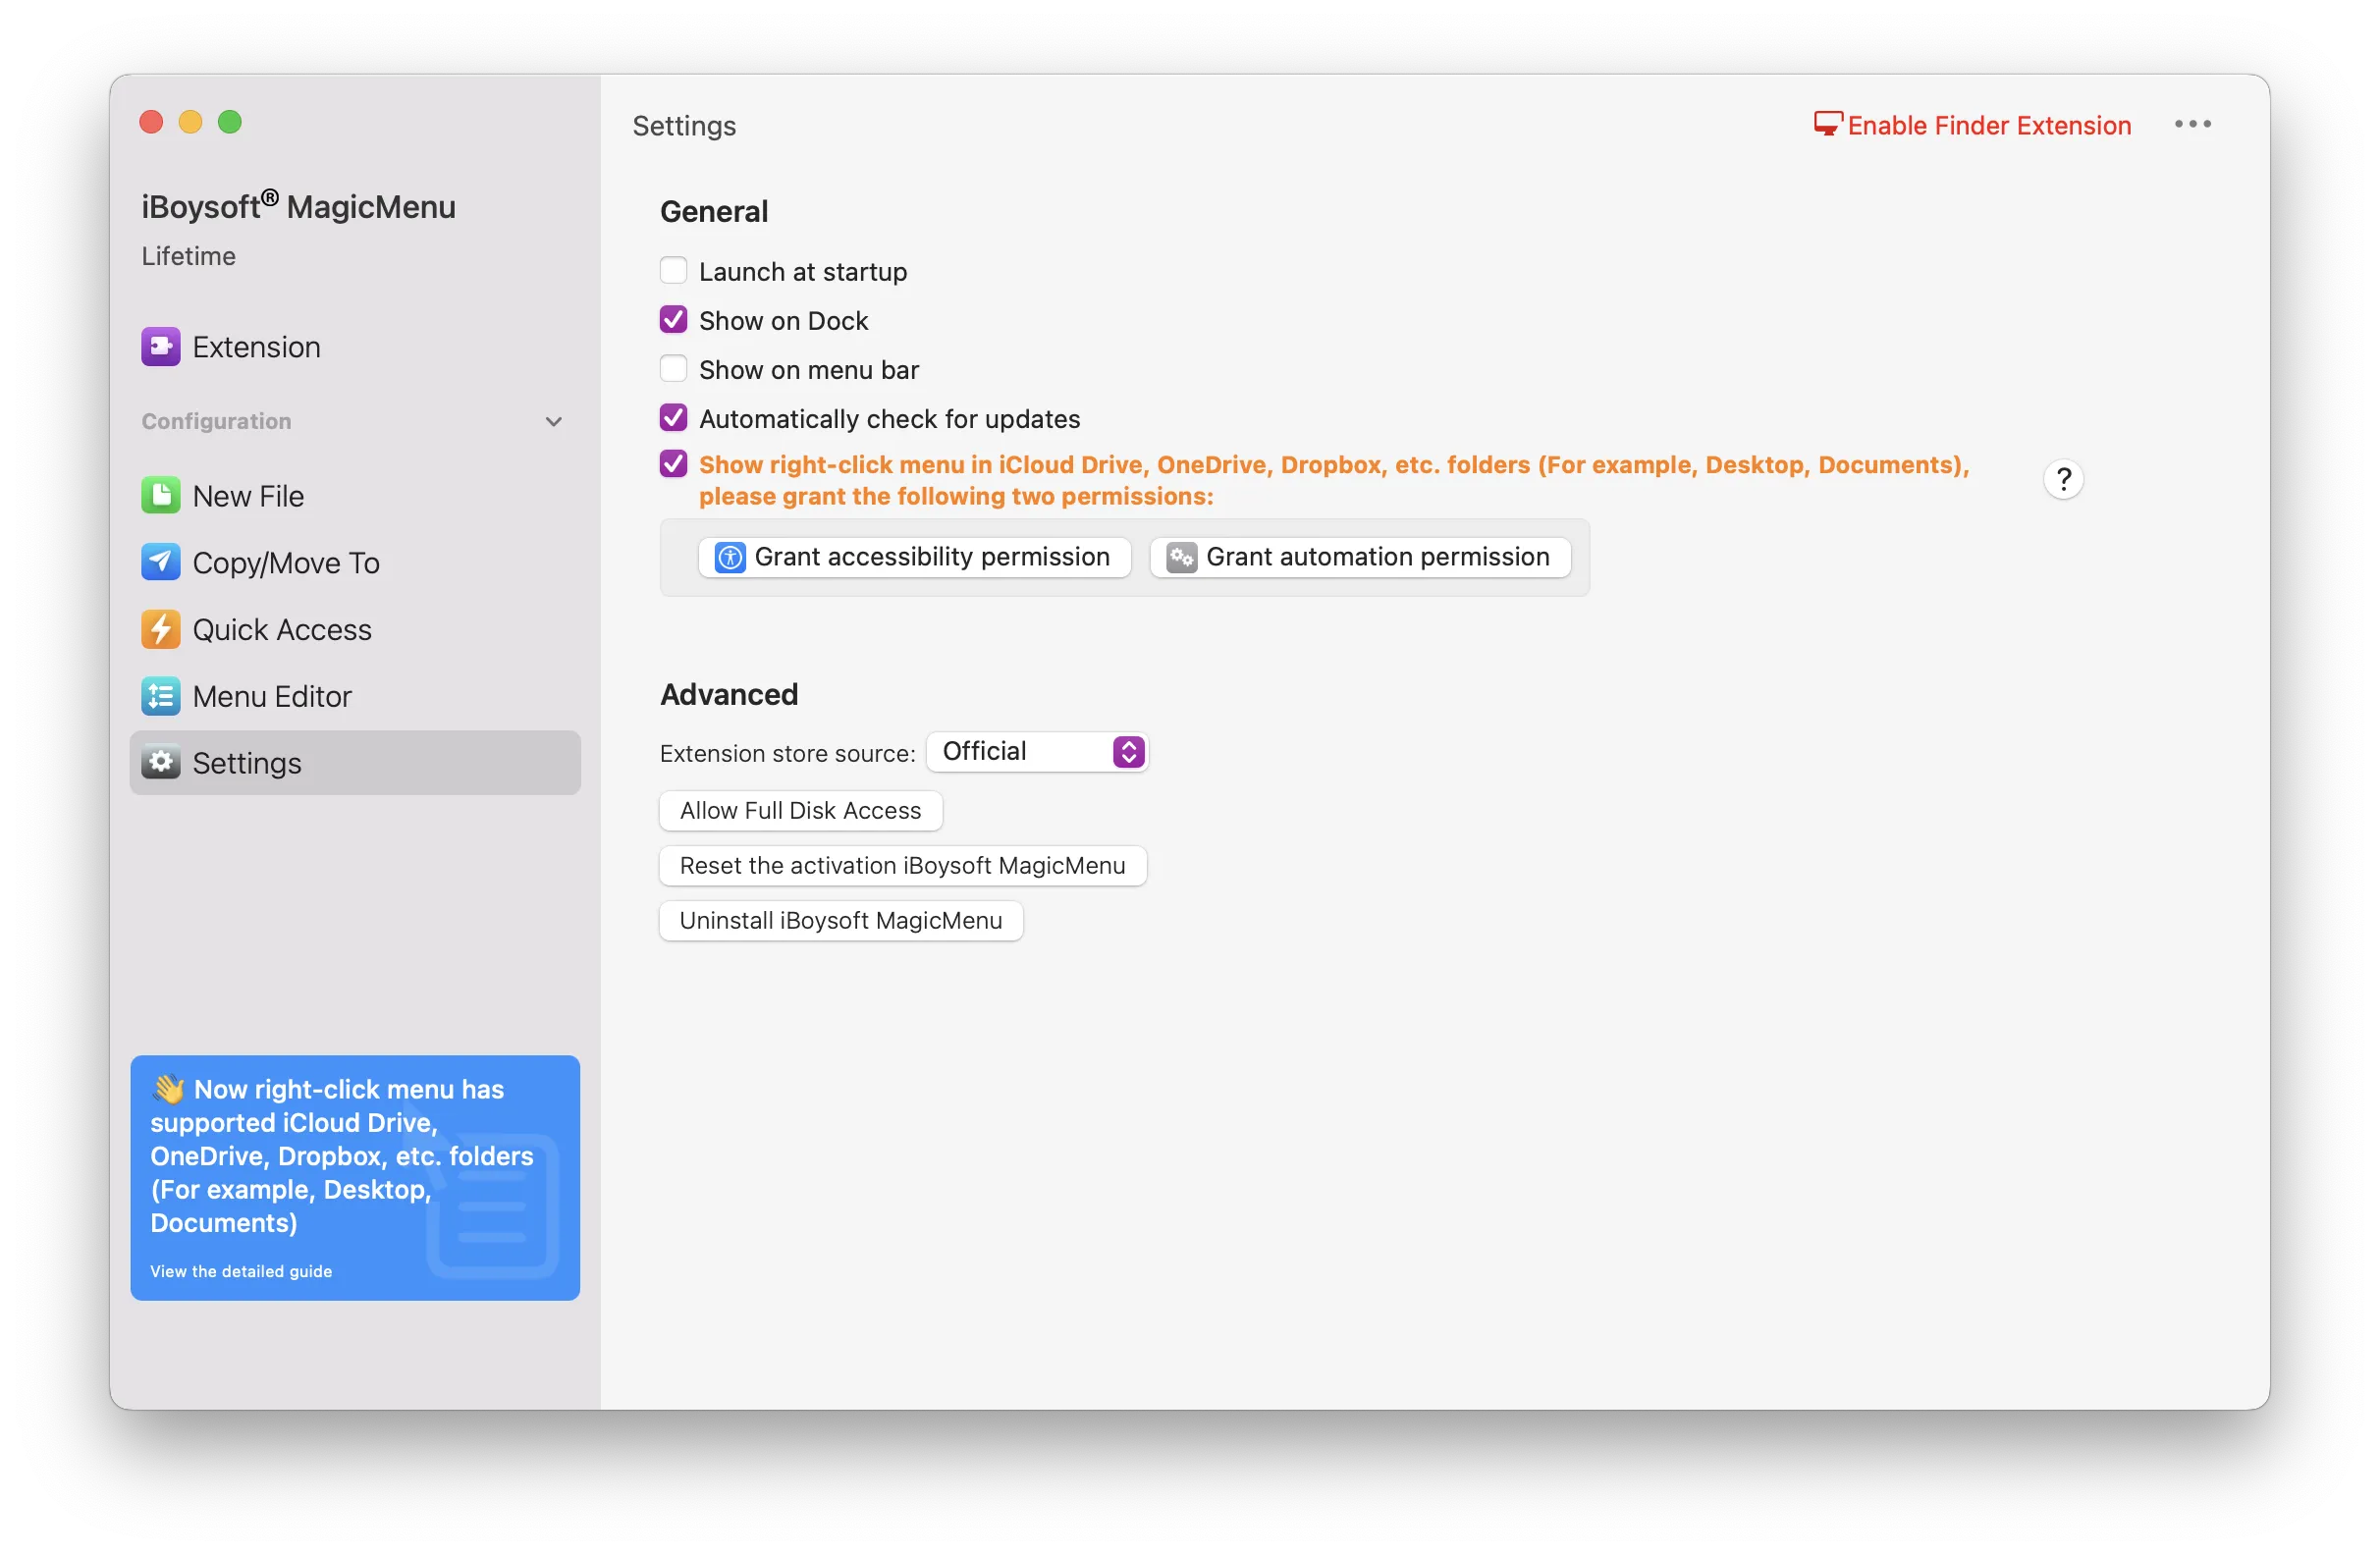
How to enable right click menu in cloud synced folders?
Now iBoysoft MagicMenu has supported to show right-click menu in iCloud Drive, OneDrive, Dropbox, etc. folders (For example, Desktop, Documents). Before that, you need to grant accessibility permission and automation permission in Settings.
Supported File Types for New File Creation
The defualt file types that iBoysoft MagicMenu allows you to create a new file with include TXT, RTF, Doc, Adobe Illustrator, Doc - 07, WPS DPS, WPS ET, Keynote, Markdown, Numbers, Pages, Plist, PPT, PPT - 07, Adobe Photoshop, Python, Ruby, Shell, WPS, XLS, XLS - 07, XML.
iBoysoft MagicMenu also allows you to manually add any wanted file types to be created.
Note: The default file types can't be deleted or edited.
How to Create a New File?
You can directly create a new file on your desktop or in an opened folder by right clicking the blank space.

If you need to change the default new file formats in the right click context menu, or the name, icon, and description of a single template, go to Menu Editor.
Note: If the default file types can't meet your needs, you can manually add a new template file.
How to Add a New File Type?
A template file is a file you select and add to iBoysoft MagicMenu as a template you want to create a new file with. It can be a blank file or a file with pre-edited content such as invoice, contract, and notice. There is no limit on how many file types you can create with the same file extension.
Step 1: Click New File in the sidebar.
Step 2: Click the + button to add a new template file.
Step 3: Click the folder icon to browse and select a template file to the software.
Step 4: Enter a name orand description for the new template and click Import.
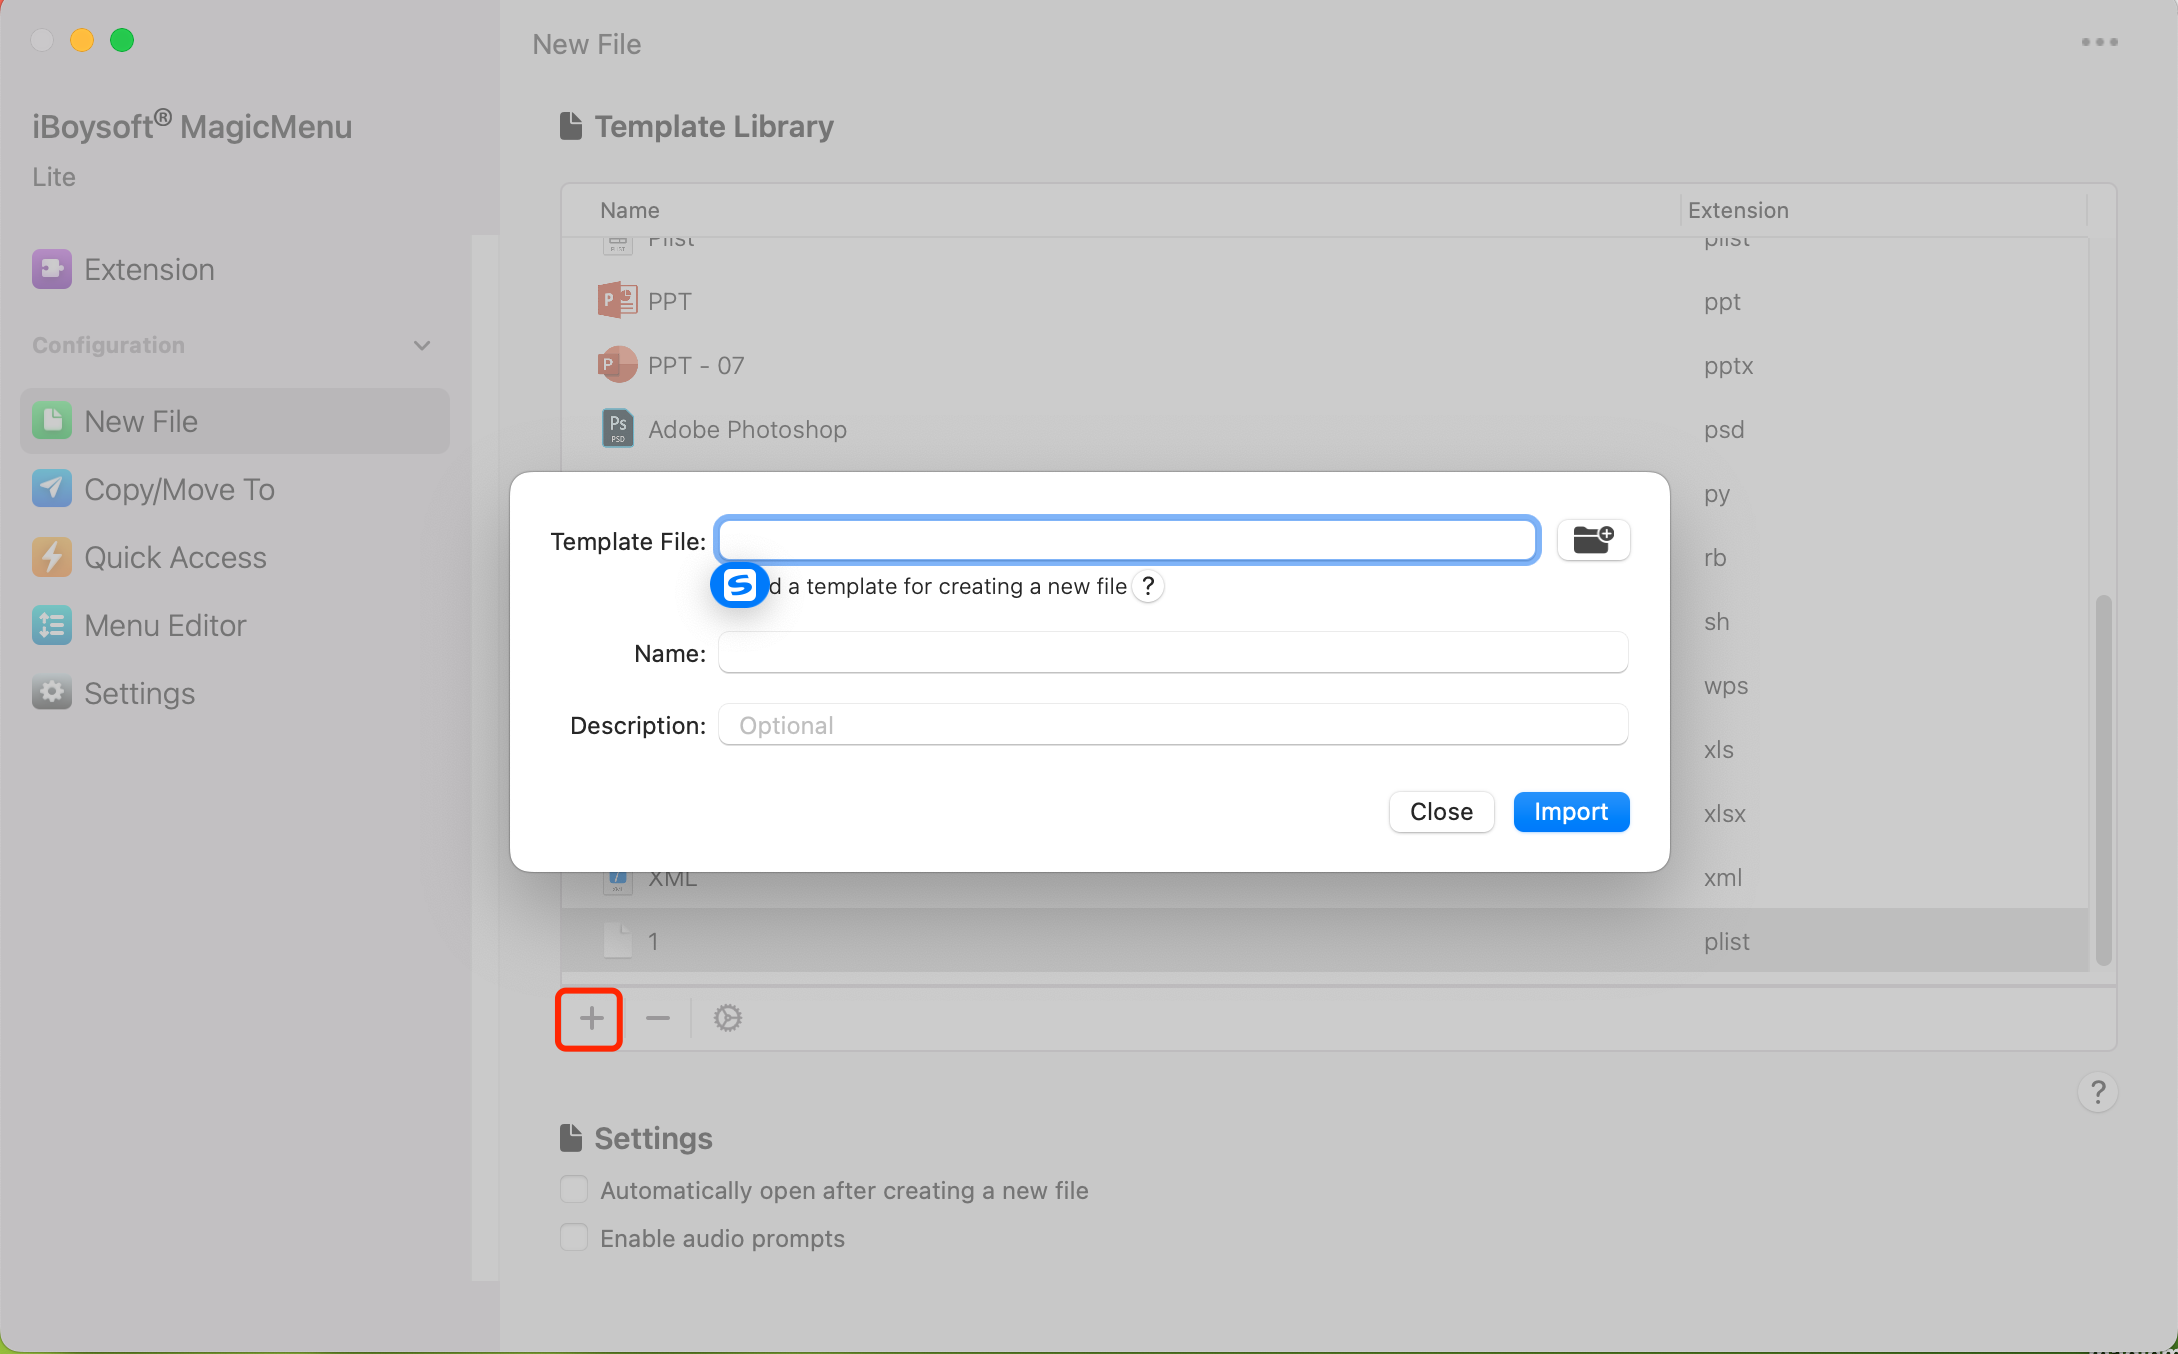
Note: The displayed name will be the file extension by default if you don't name it.
Step 5: Create a new file by right clicking on the blank space.
How to Delete a File Template?
Note: The default file types can only be deleted in Menu Editor.
Step 1: Select a file template you added in New File windows.
Step 2: Click the - icon under the templates list.
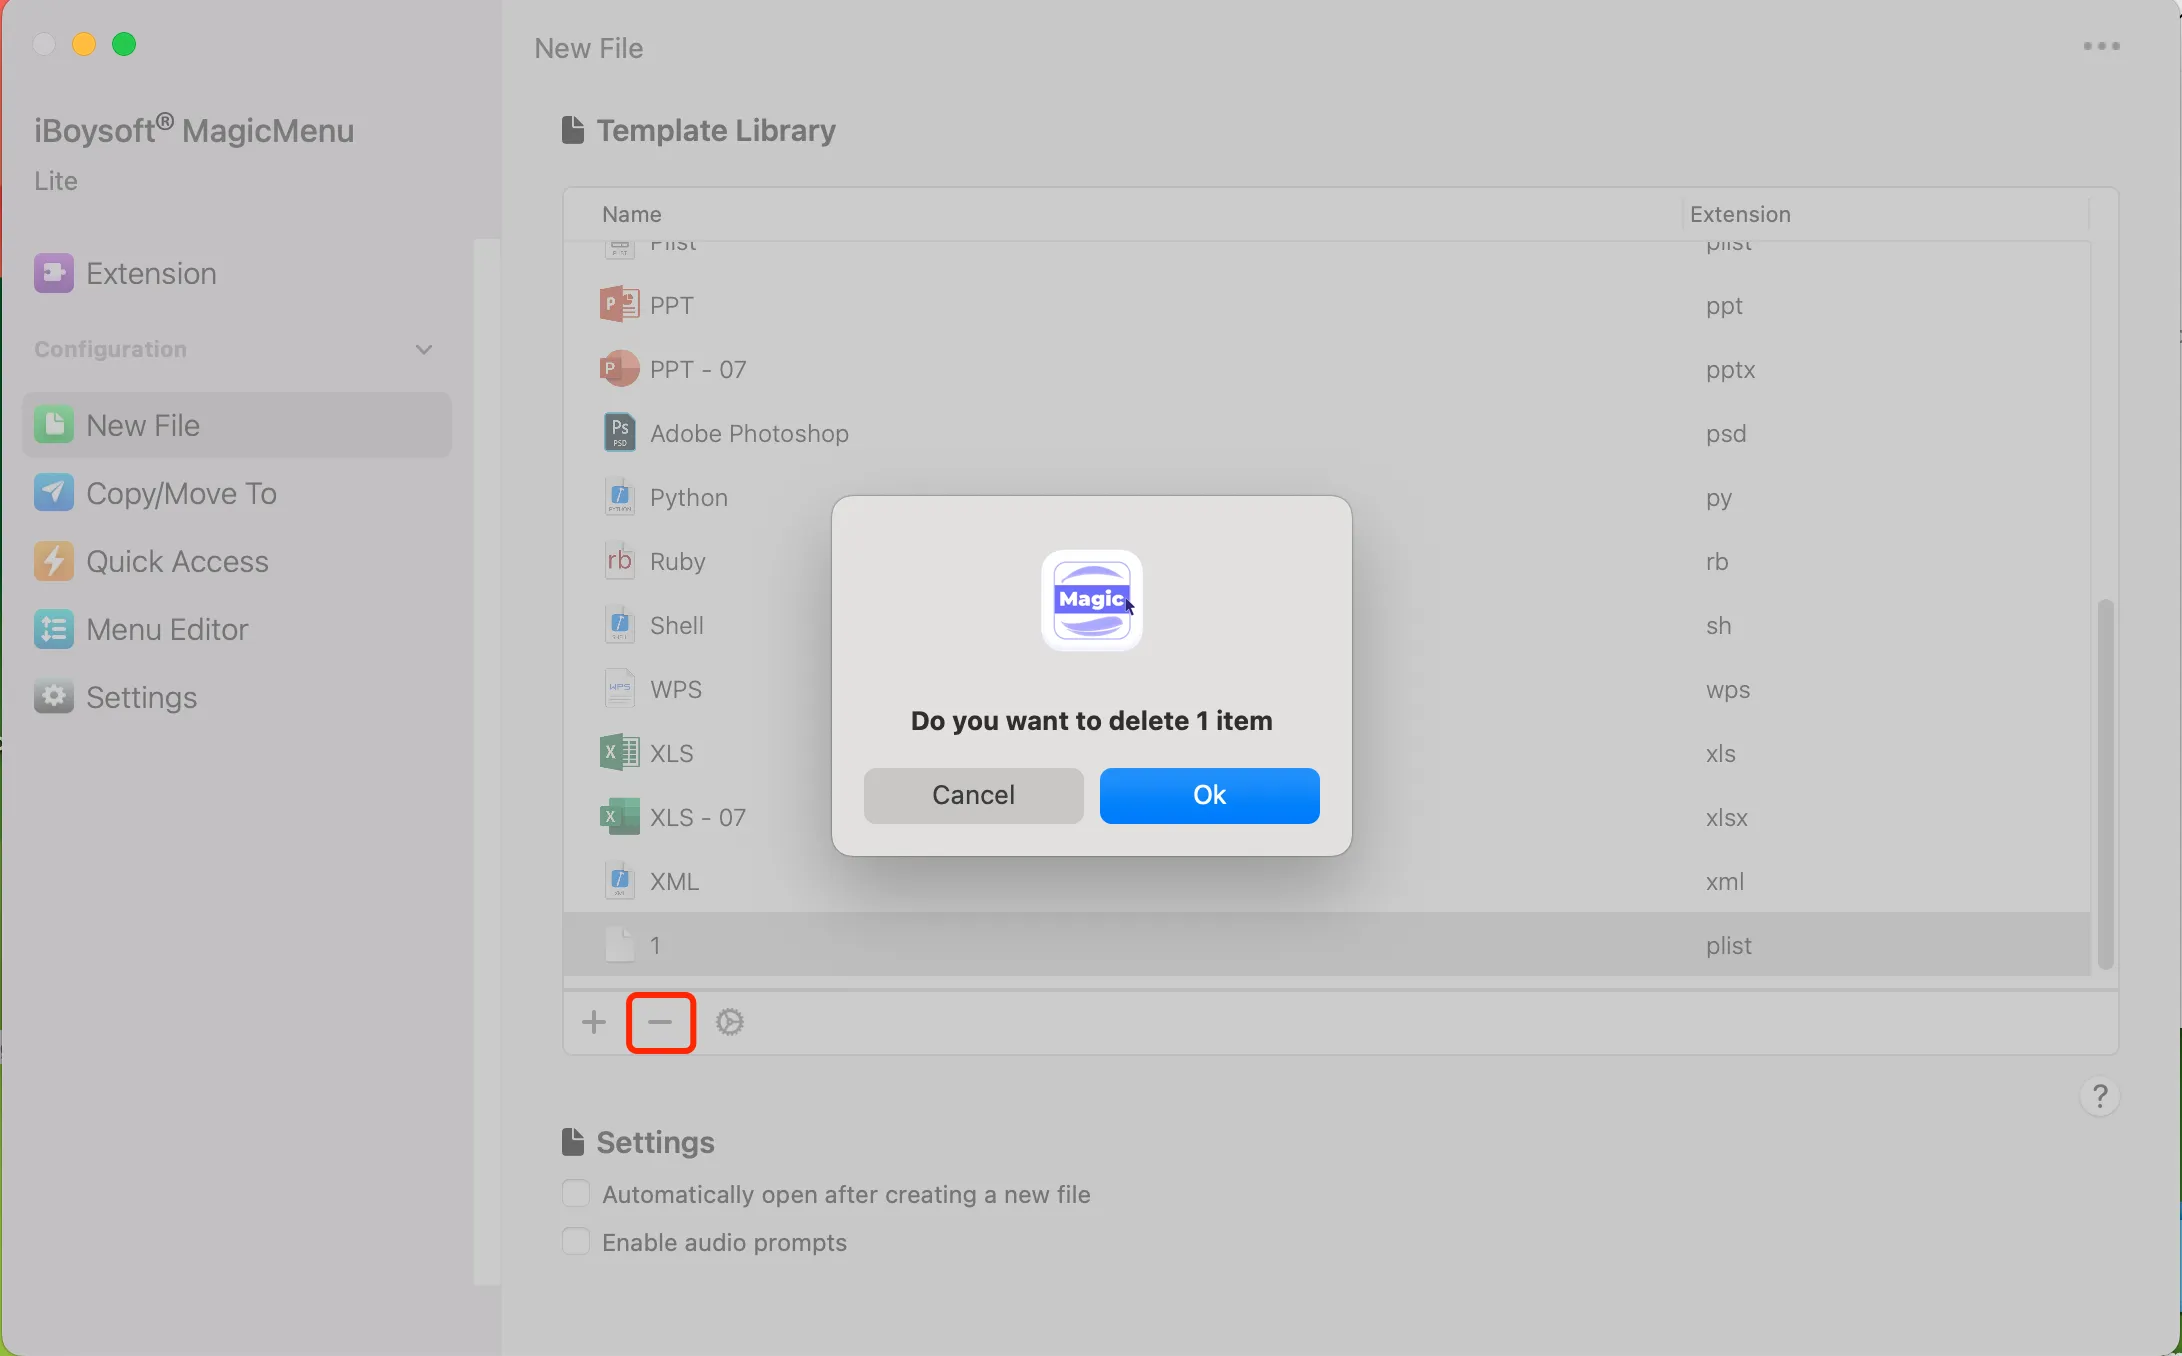
Step 3: Click Yes to comfirm.
Note: The default file types can only be edited in Menu Editor.
How to Copy/Move Files to a Target Path?
There are two ways to send files to a target folder or disk with iBoysoft MagicMenu:
Move To: send the selected file to the target path and delete the original copy.
Copy To: send the selected file to the target path and keep the original copy.
Note: The first time you send files to an external storage device, you will be asked to allow Full Disk Access. Follow the steps:
- Click Full Disk Access at the bottom corner of your external device.
- Click on the yellow lock icon at the bottom. You will be asked to enter the password if there is.
- Click + and add iBoysoft MagicMenu to this list.
- Launch iBoysoft MagicMenu again.
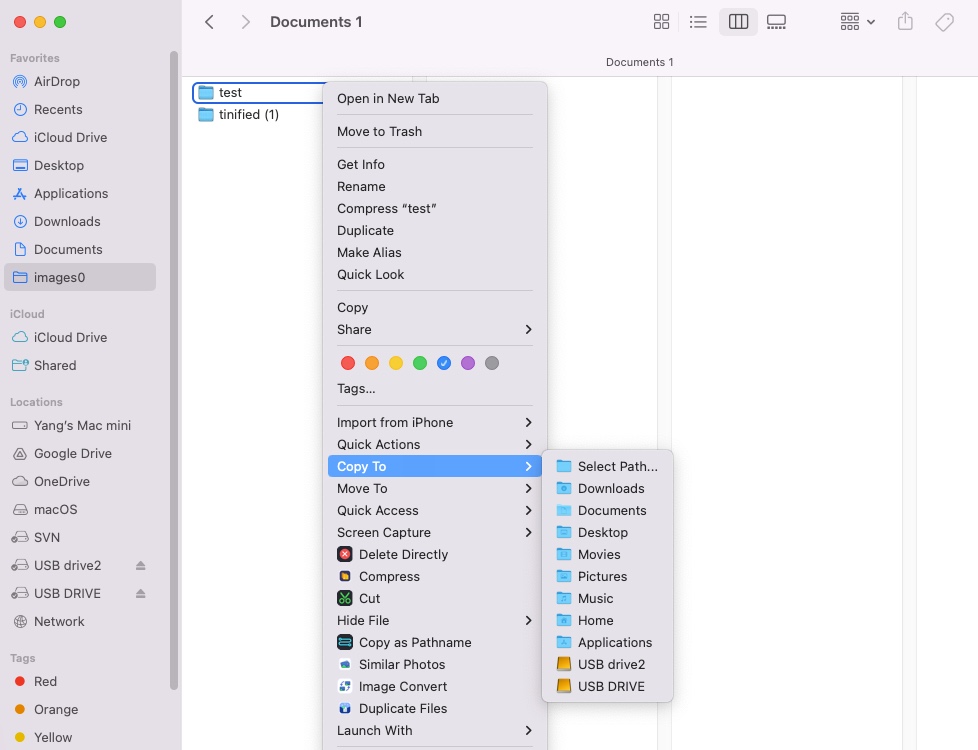
Step 1: Select a file you want to send.
Step 2: Right click on it and select Copy To or Move To.
Step 3: Select a destination.
All Mac's Library folders will appear as default paths. If you want to change the default paths, open the Main UI, click Copy/Move To section and untick the box under Sub Menu.
If you would like to send files to another location, you can manually add the new location as a target path.
How to Add a New Path to the Copy/Move to Destination?
Step 1: Open iBoysoft MagicMenu and go to Copy/Move To window.
Step 2: Click the+ button under the window.
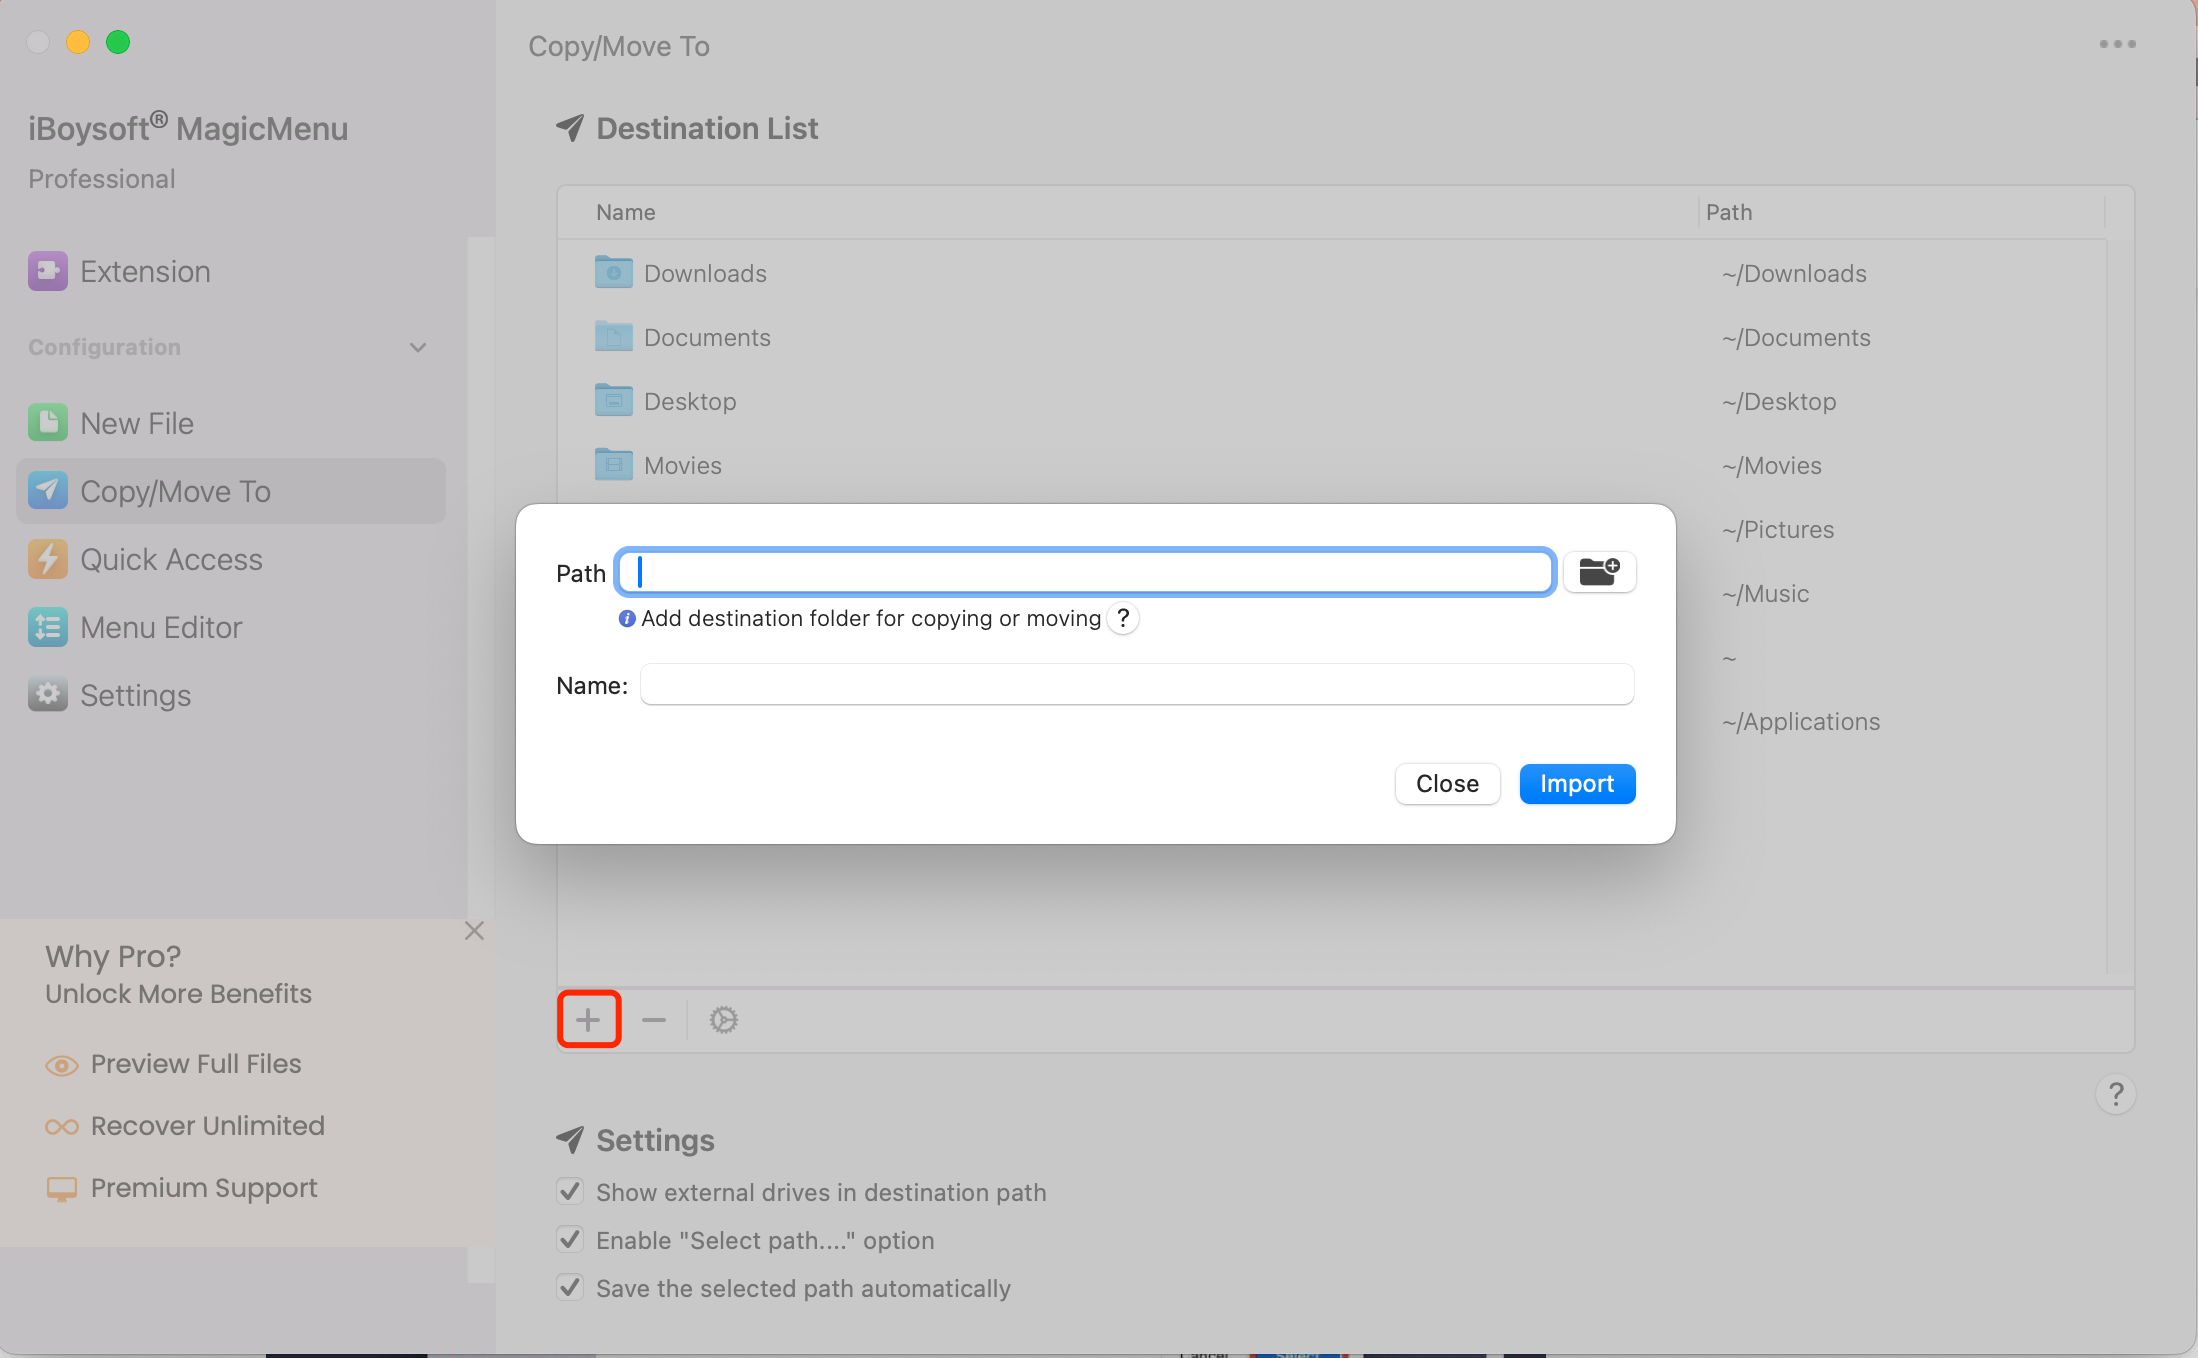
Step 3: Select an entire disk (both internal or external), a partition, or a folder and click Open.
Step 4: Name the new path and click Import and the new path will be automatically added to the sub menu of your Copy to and Move To options.
Step 5: Right-click on a file and select Copy To or Move To the newly added target path.
How to Delete a Path from the Copy/Move to Destination?
Note: The default Libray folders can only be deleted in Menu Editor.
Step 1: Select a path in Copy/Move To window.
Step 2: Click the - button under the window.
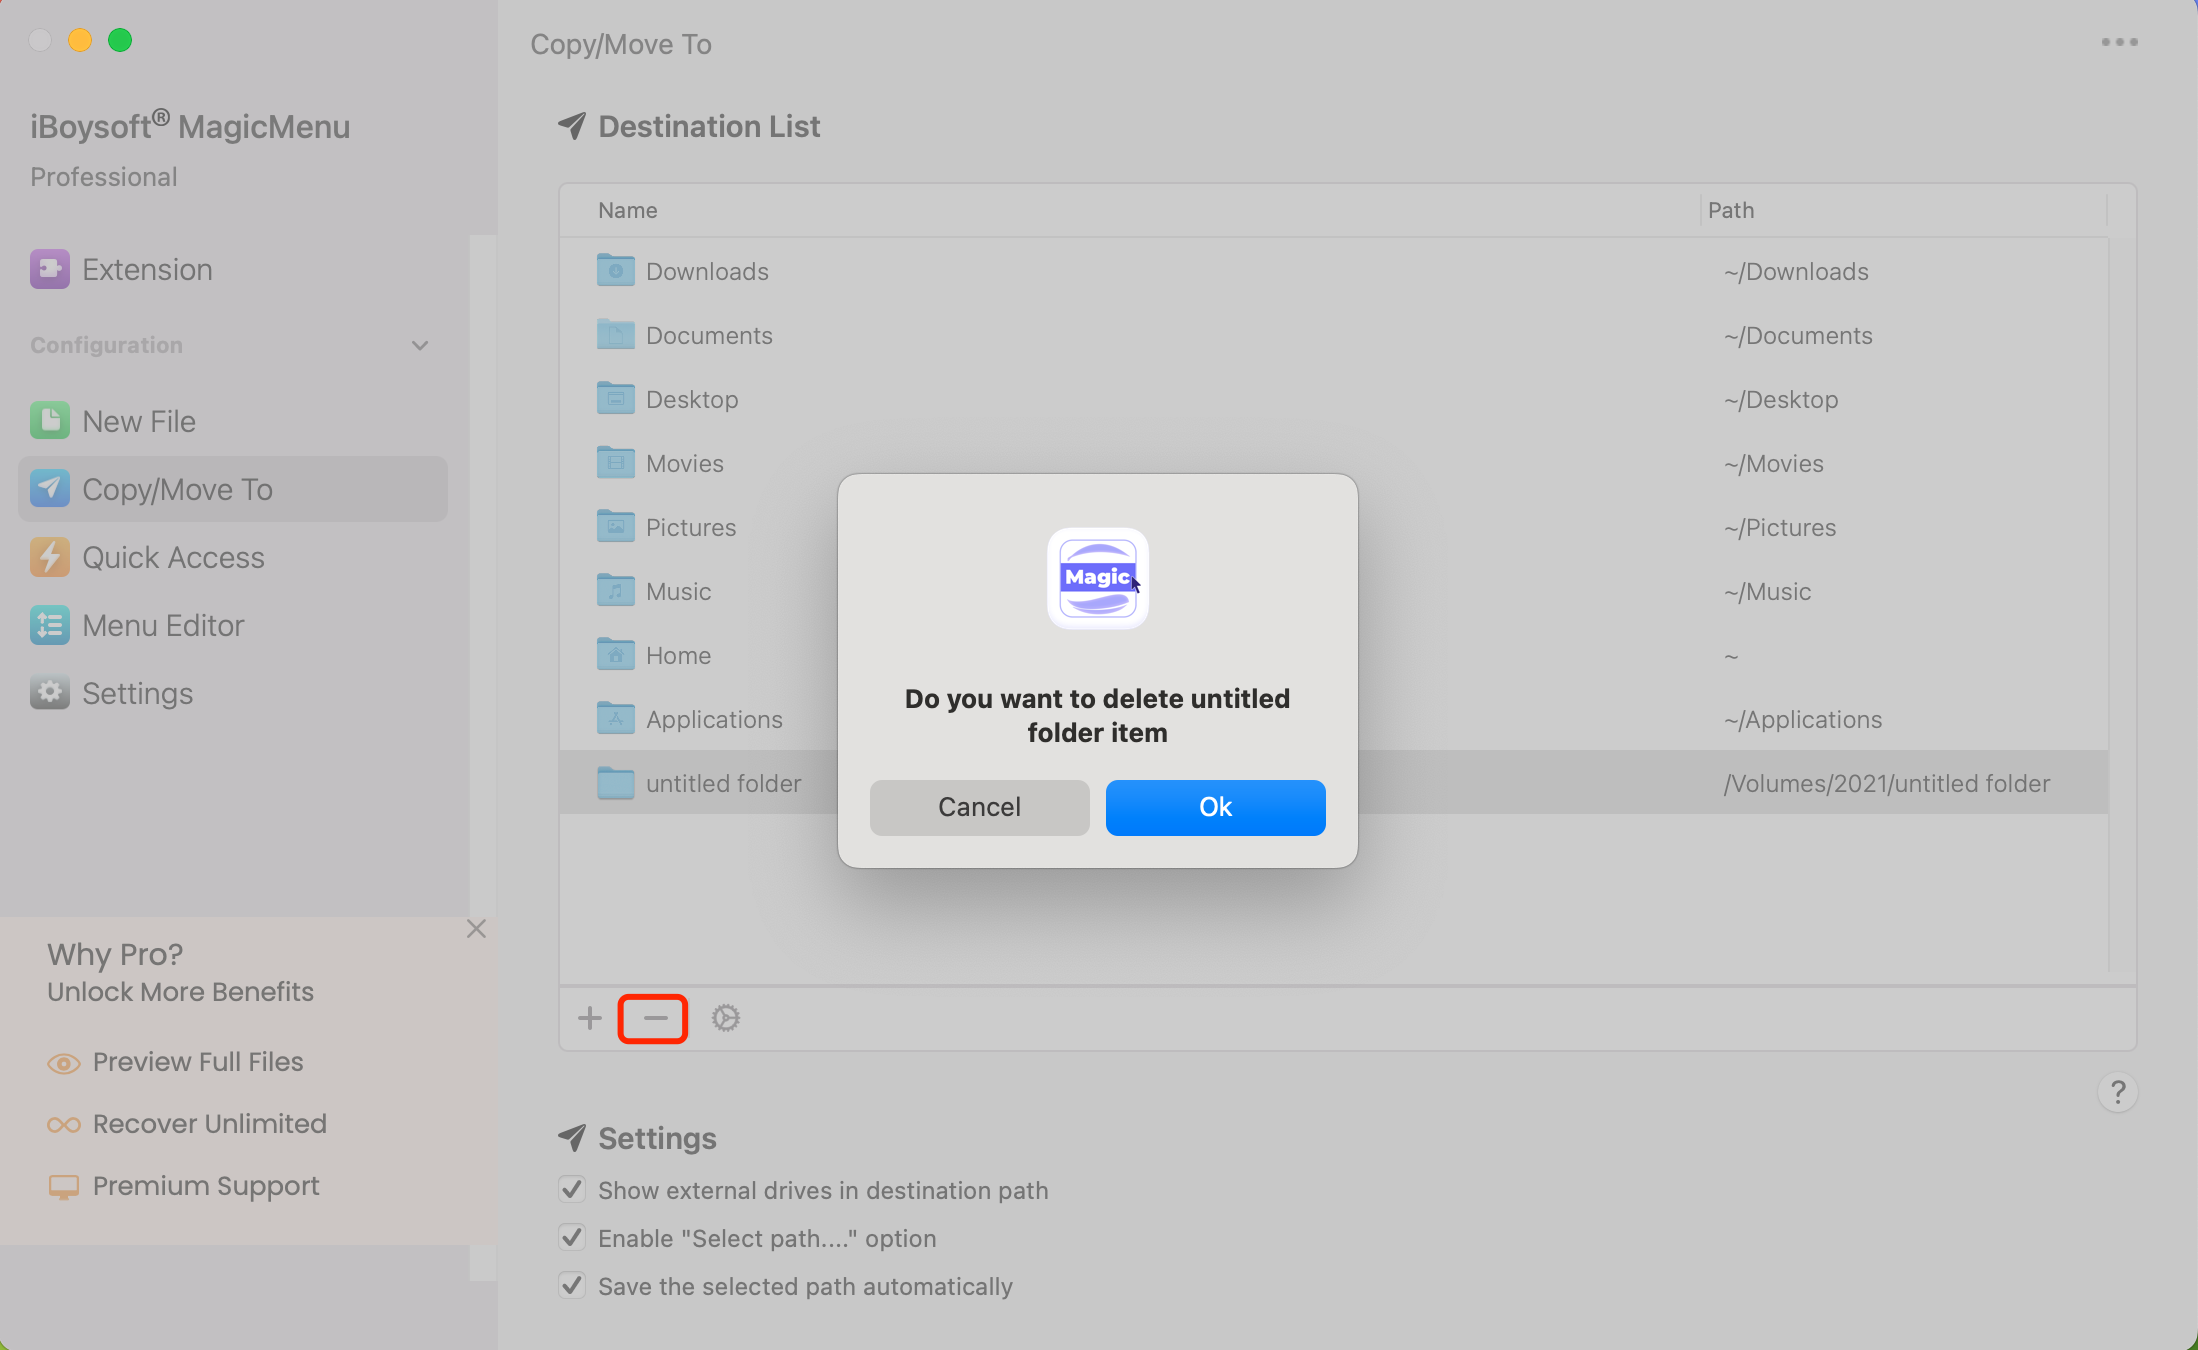
Step 3: Click OK to confirm.
What is Quick Access?
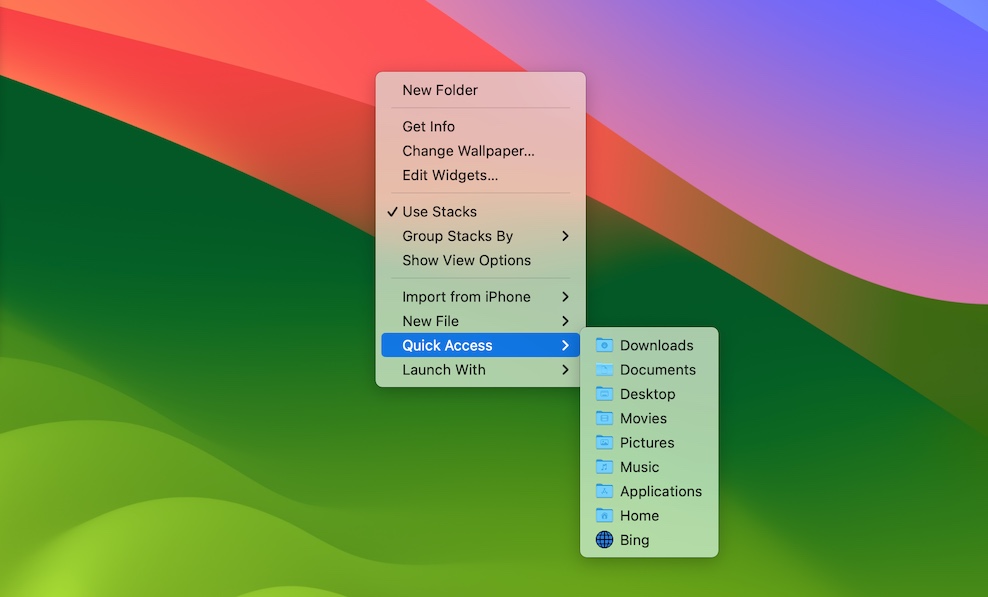
Quick Access is a feature that allows users to open an application, a file, a folder, or a web link with a righ click on the blank space. It saves much time going through folders or web searches to find the wanted item.
How to Add an Item to Quick Access?
By default, iBoysoft MagicMenu allows you to quickly access Mac's Library folders and Bing.com. You can mannually add an item to your right click menu for quick access.
Step 1: Open iBoysoft MagicMenu Main UI and Click Quick Access on the left panel.
Step 2: Click the + button under the window.
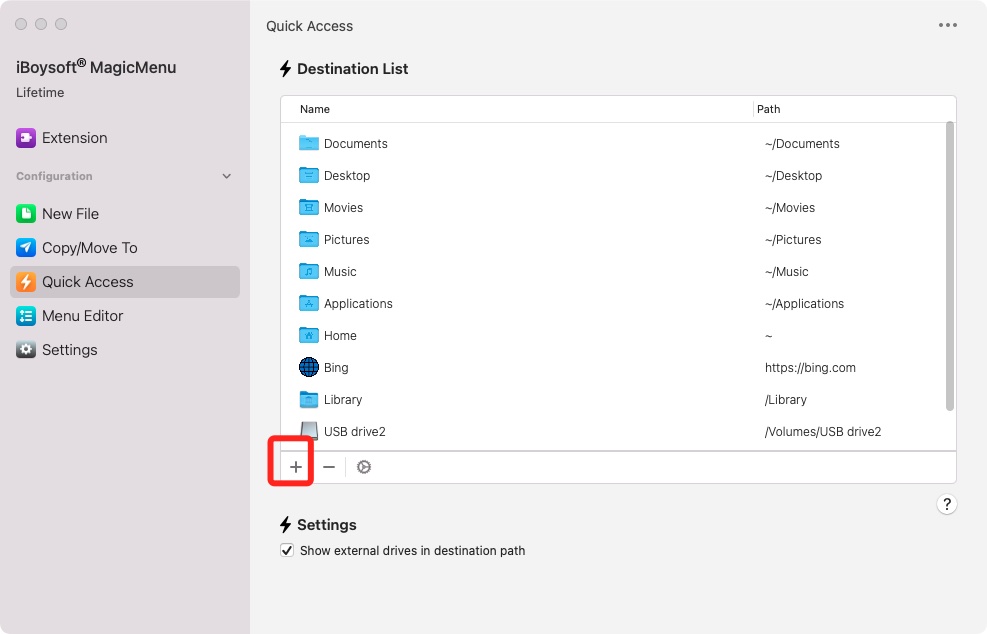
Step 3: Click the folder icon to browse to select a local app, folder, partition, or disk. Or You can copy and paste a webpage URL to the Path section.
Step 4: Name the new destination and click Import and the new item will be added to the sub menu of Quick Access automatically.
How to Delete an Item from Quick Access?
Note: Default items in Quick Access can only be deleted in Magic Editor.
Step 1: Open iBoysoft MagicMenu Main UI and Click Quick Access on the left panel.
Step 2: Select an item in Quick Access window.
Step 3: Click the - icon under the window.
Step 4: Click Ok to confirm.
Note: Default items in Quick Access can't be edited here, please go to Menu Editor.
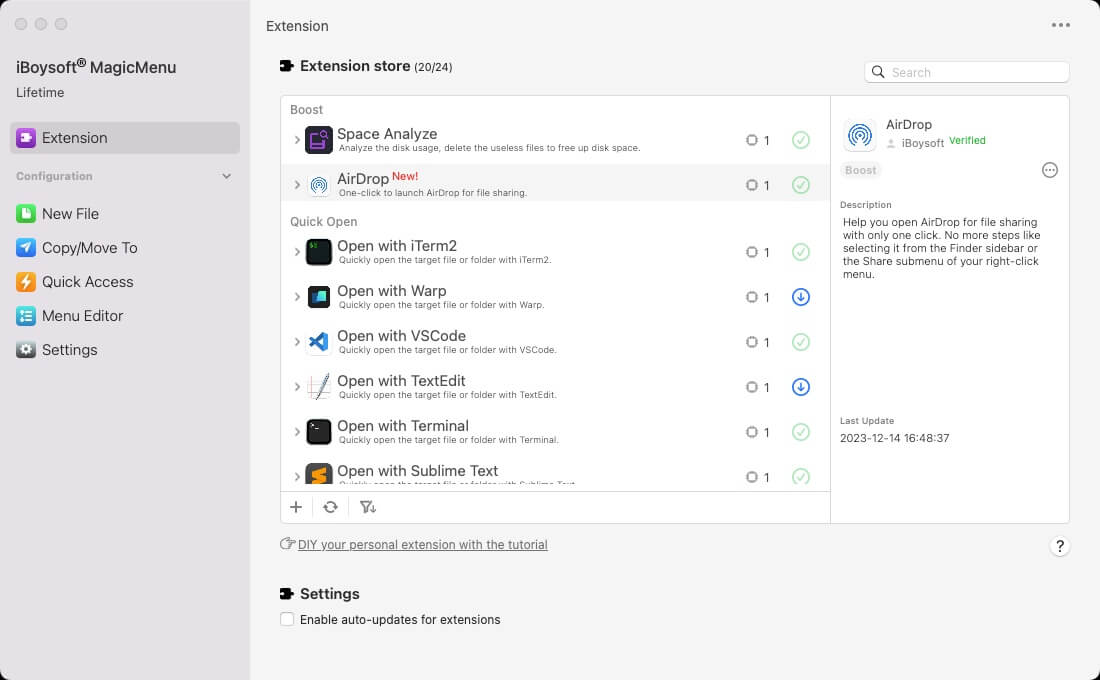
What is Extension store
Extension store contains many more useful functionalities you can add to the context menu of your right click. It includes Boost, Quick Open, Shortcut, and Utility folders and they will selectively appear in your main right click menu based on the scenario. Simply .click the Install button next to each extension, you can add it to your right click menu
Also, you are allowed to add self-developed functions to the existing folders or create new categories for better control of functions in Extension store.
Boost
- Space Analyze: Scan the disk and folder by listing the files by category to help you analyze the space usage quickly
- AirDrop: Directly right-click to use AirDrop to send selected files on a Mac
Quick Open
- Open with iTerm 2: Quickly open the target file or folder with iTerm2
- Open with Warp: Quickly open the target file or folder with Warp
- Open with VSCode: Quickly open the target file or folder with VSCode
- Open with TextEdit: Quickly open the target file or folder with TextEdit
- Open with Terminal: Quickly open the target file or folder with Terminal
- Open with Sublime Text: Quickly open the target file or folder with Sublime Text
- Open with JetBrains Apps: Quickly open the target file or folder with JetBrains Apps
- Open with HexEdit: Quickly open the target file or folder with HexEdit
- Open with Cursor: Quickly open the target file or folder with Cursor
- Open with CoderRunner: Quickly open the target file or folder with CoderRunner
- Open with BBEdit: Quickly open the target file or folder with BBEdit
- Open with Atom: Quickly open the target file or folder with Atom
Shortcut
- Hide: Hide your private files and folders to avoid unauthorized access on Mac
- Delete Directly: Delete the selected item directly without moving it to the Trash
- Cut: Cut the selected file or folder for pasting
- Copy as Pathname: Copy the path of a file for quick location and acces
Utility
- Uninstall App: Completely uninstall your unwanted application and associated files
- Similar Photos: Find similar and duplicate photos fro easy file organization
- Screen Capture: Capture the contents of your computer display as an image
- Image Convert: Convert the image file format to any mainstream format
- Duplicate Files: Search for and display duplicate files for quick deletion
- Compress: Compress a file or folder for less space consumption and fast transfer
How to Add an Extension?
Note: This service is waiting to be enabled.
Step 1: Click the + button at the bottom of the Extension store.
Step 2: Select an iBoyosft verified extension and click Open.
Step 3: Click Ok when it is installed successfully. The newly added extension will be grouped to Local in Extension store.
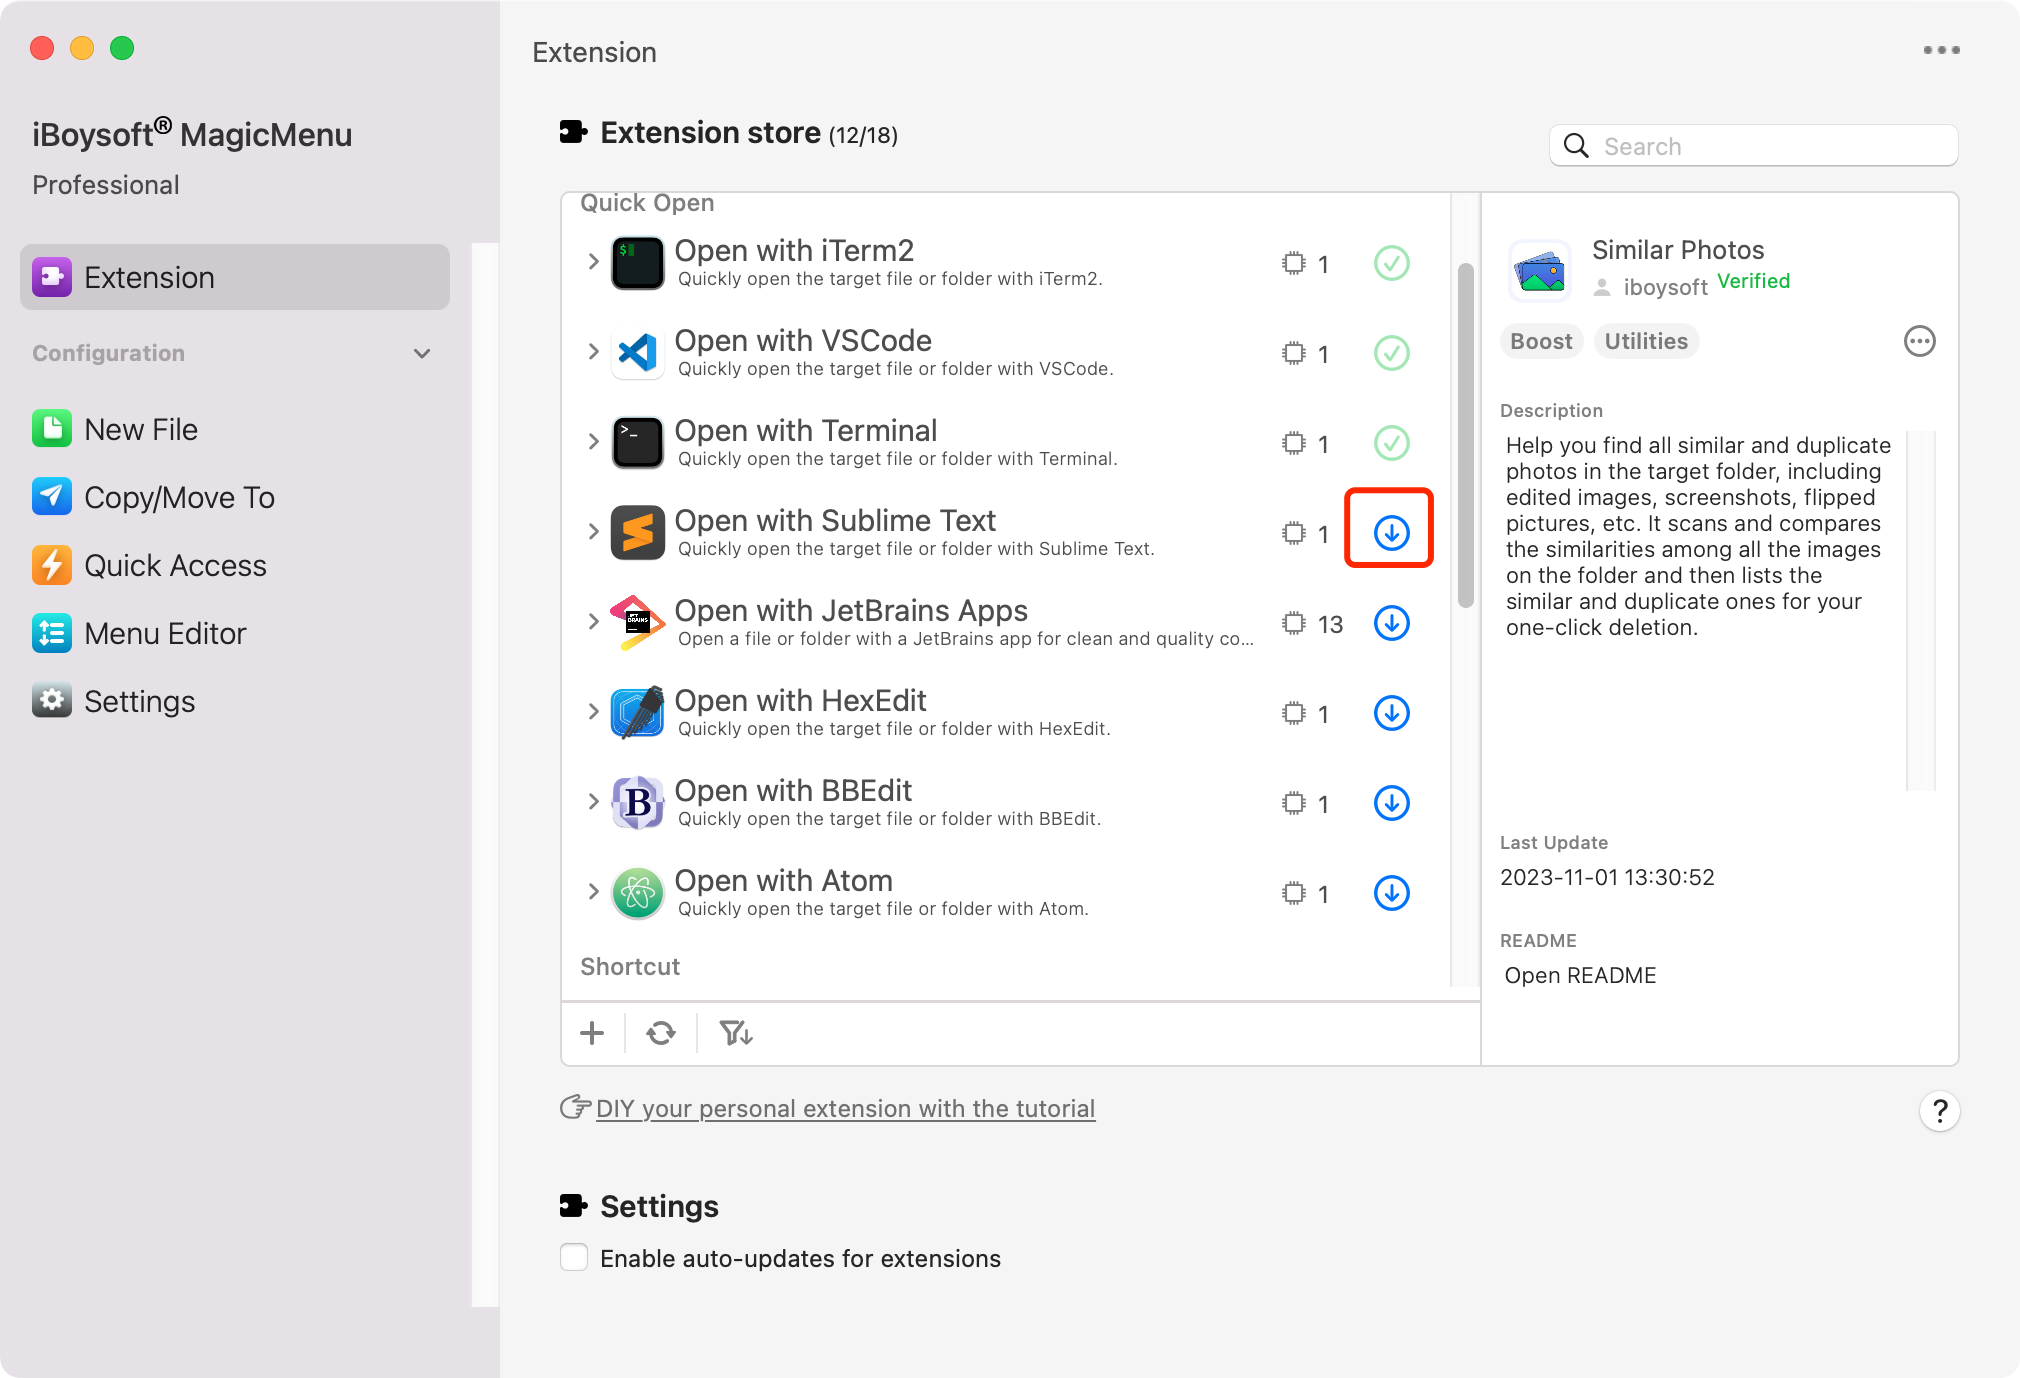
How to Install an Extension?
Step 1: Open the Extension store.
Step 2: Click the download button next to the wanted extension.
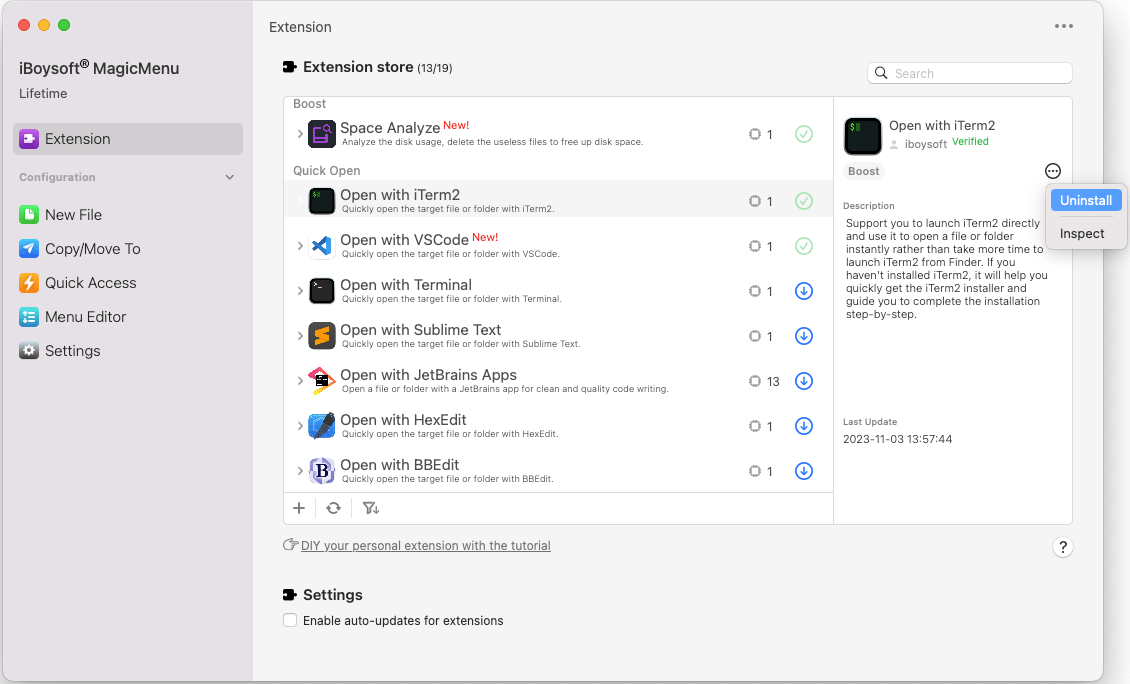
How to Uninstall an Extension?
Step 1: Select the extension you want to uninstall.
Step 2: Click the circle with three dots and choose Uninstall.
Note: If you want to edit the info of the extension including the name, icon, and description, go to Menu Editor.
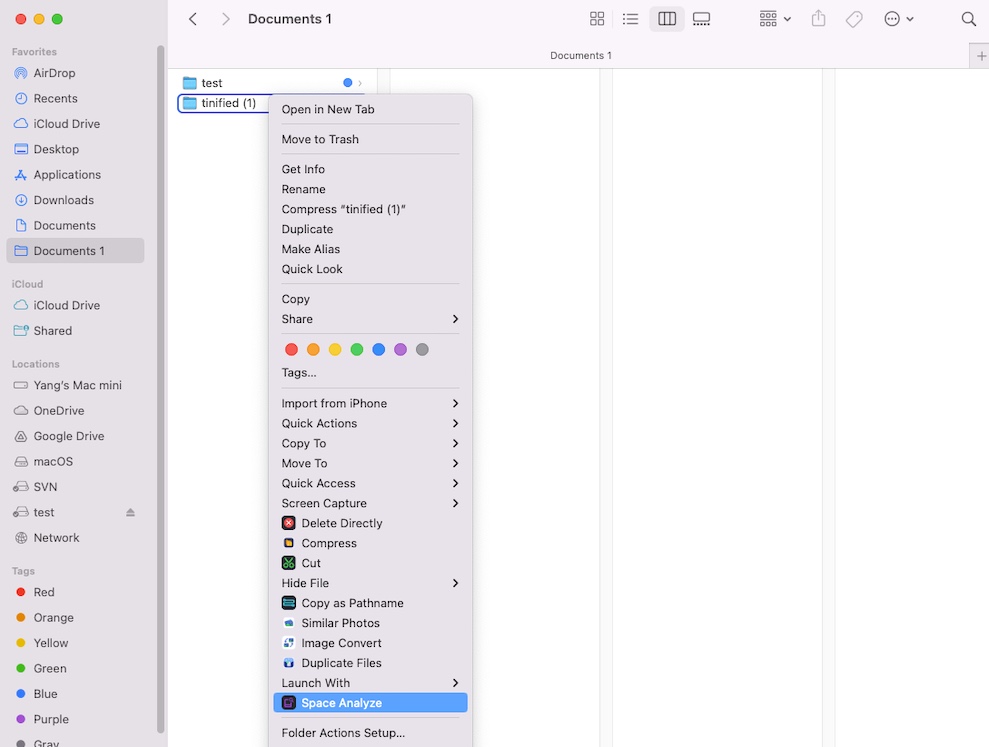
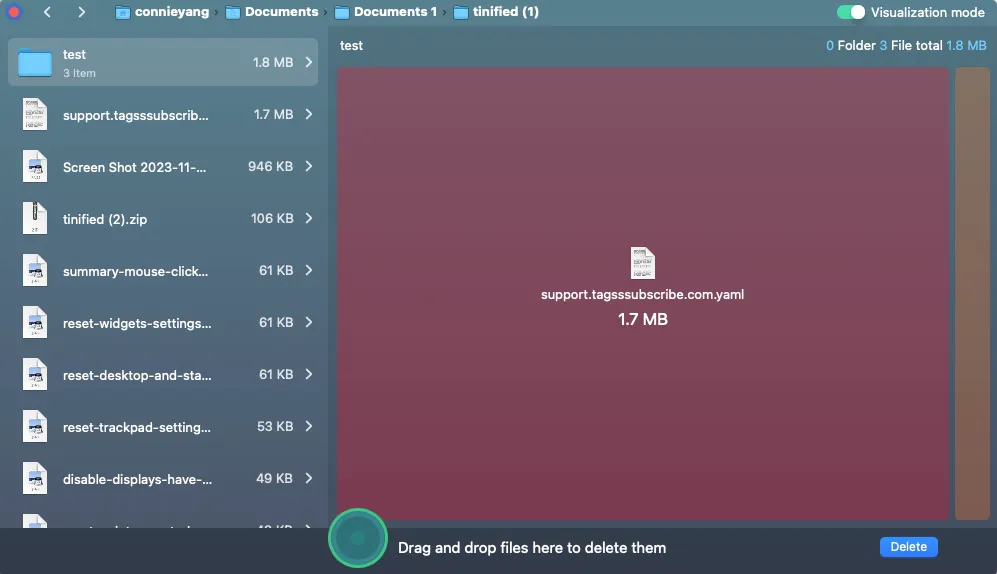
How to Analyze the Space of a Disk or Folder?
The Space Analyze function helps you proceed with quick useless file deletion to get more available space by scanning the target disk or folder and listing the files stored in it by category.
Step 1: Right-click on the disk or folder you want to analyze.
Step 2: Select Space Analyze.
Step 3: Browse the files, select your unwanted ones, and then click Delete to remove them.
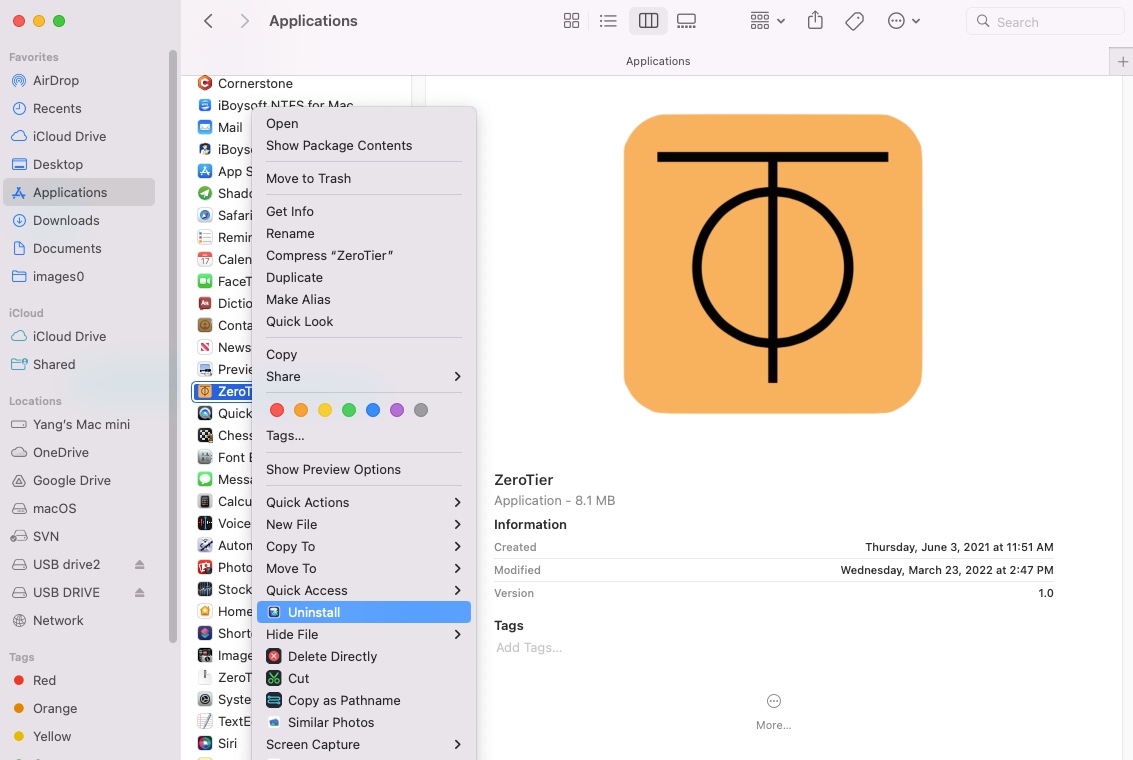
How to Uninstall Applications?
The newly added Uninstall feature of iBoysoft MagicMenu enables you to uninstall any unwanted applications from Mac with ease.
Step 1: Locate the application you want to delete in the Applications folder.
Step 2: Right-click the unwanted app and choose Uninstall.
Step 3: You'll be prompted by a window which lists all associated files of the application. Select them all to delete or uncheck the files you need.
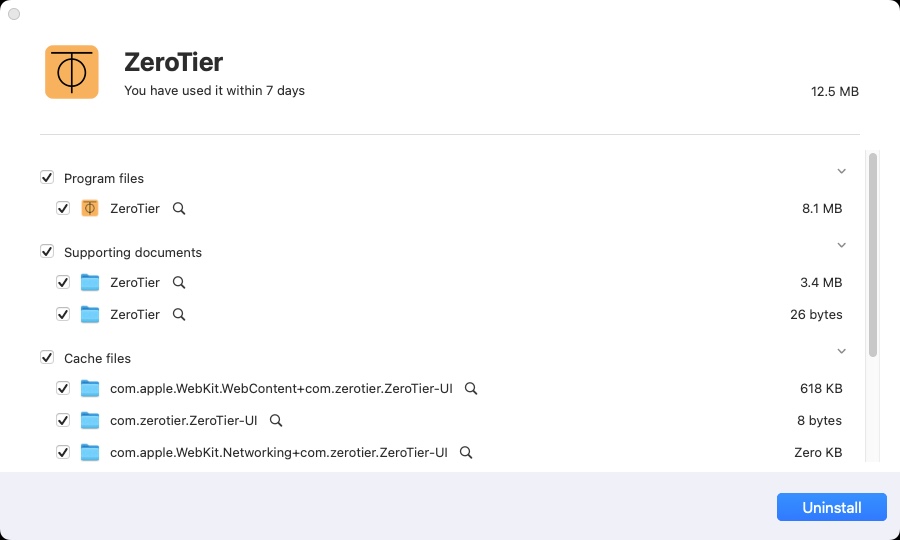
Step 4: Click the Uninstall button to proceed with the uninstallation.
Step 5: Click Yes when a notification reads Whether to uninstall XX (the application name) and remove the selected files.

Step 6: When it completes, choose Close to quit.
How to Compress Files?
Step 1: Right-click on the selected folder or files you want to compress and choose Compress.
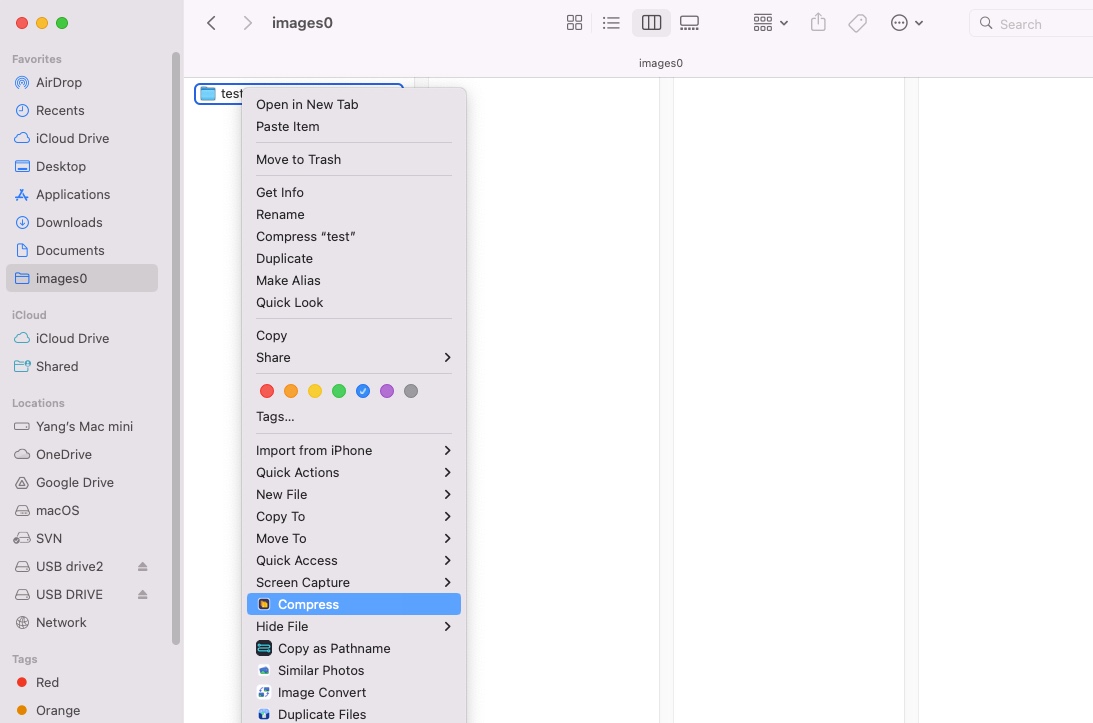
You can also click the Add files button on the compression window to add more files.
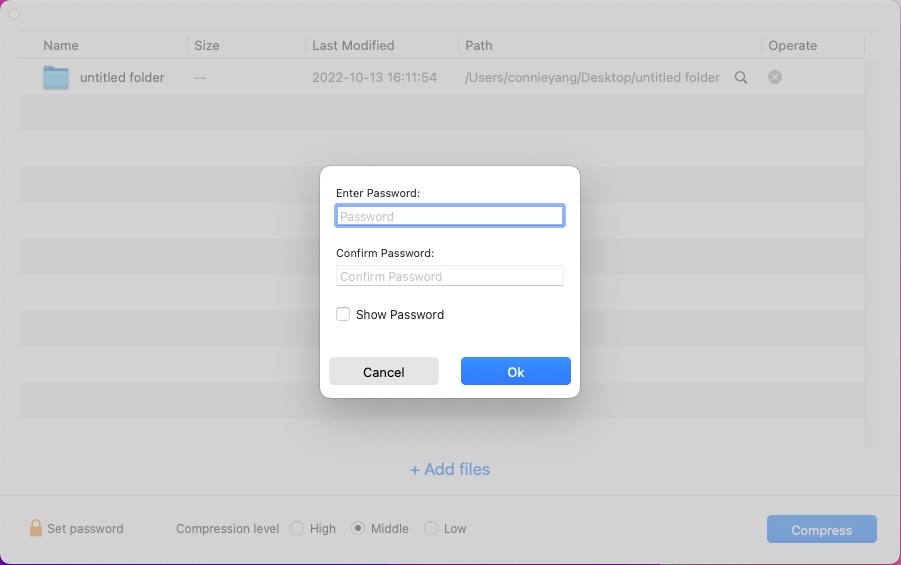
Step 2: Set a password for the archive. (optional)
Step 3: Choose a compression level.
There are three compression levels, including High level, Middle level (default), and Low level. The higher the level you choose, the smaller the archive size and the longer the compression process will be.
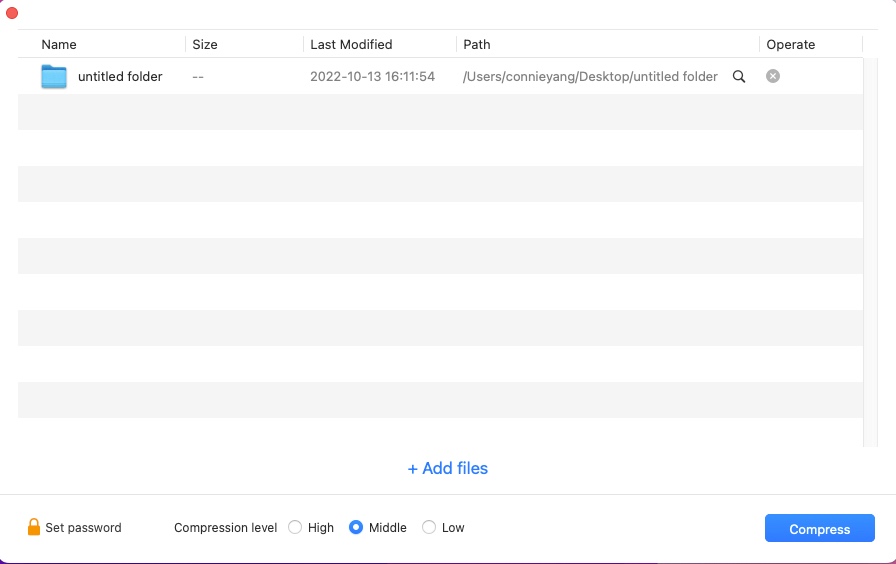
Step 4: Click Compress and select a destination to save your compressed files.
How to Find Duplicate Files?
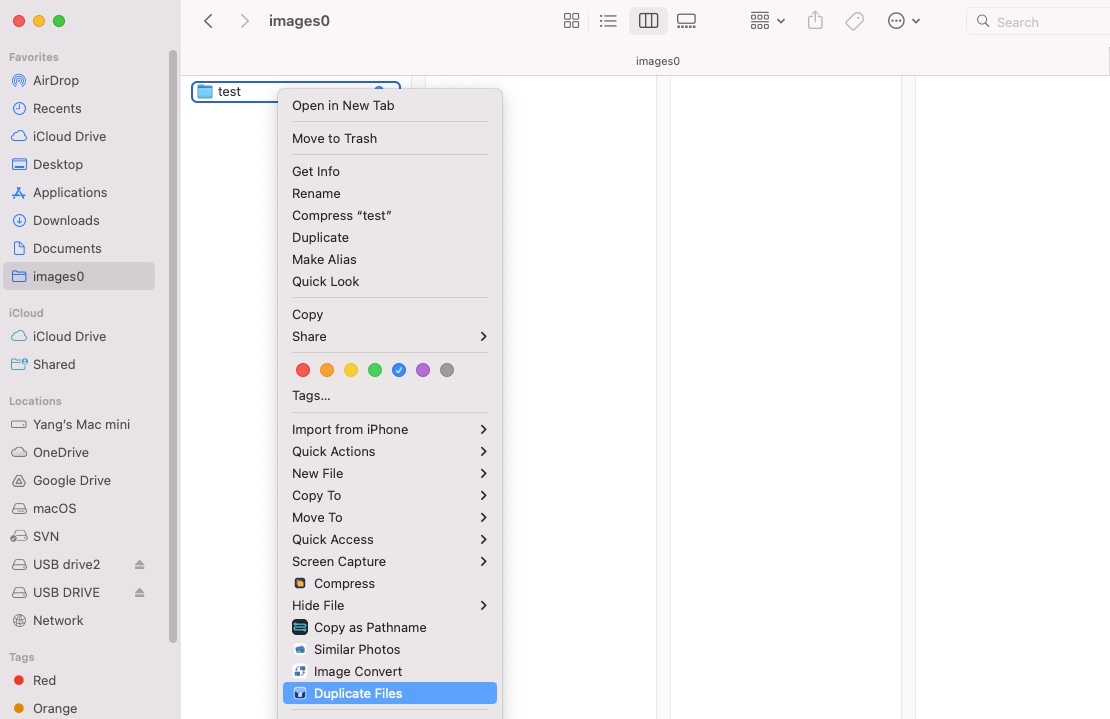
Step 1: Right-click on the folder that contains the duplicate files.
Step 2: Select Duplicate Files on the context menu.
Step 3: Check the results and choose the duplicate files you want to delete.
Step 4: Click Delete selected files to remove them from your Mac.
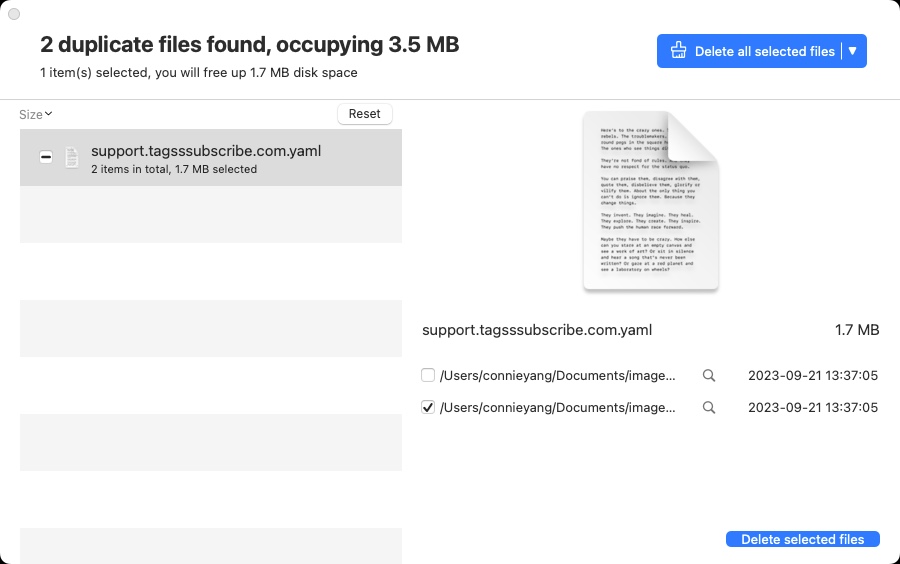
By default, all the searched duplicate files are selected, if you want to delete them all, just click the Delete all selected files button on the top corner.
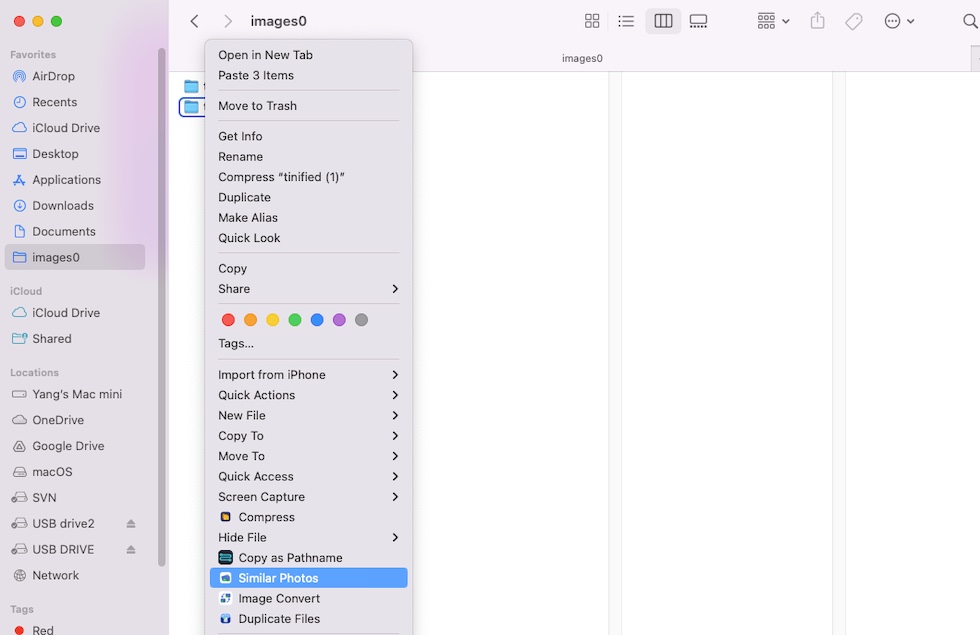
How to Find Similar Photos?
Step 1: Right-click on the selected folders or photos and choose Similar Photos.
Step 2: Wait for the search process to finish.
Step 3: Check and select the duplicate photos you want to clean.
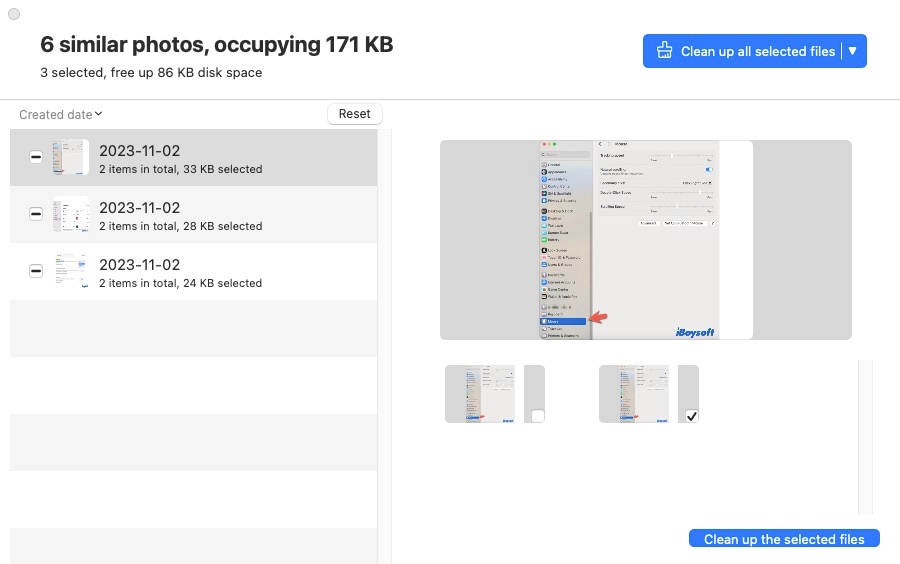
Step 4: Click Clean up the selected files to delete the selected duplicate photos.
All the similar photos are chosen by default, you can also click the top Clean up all selected files to remove them all at once.
How to Convert A Specific Image?
ImageConvert supports you convert JPG, PNG, WEBP, GIF, BMP, TIFF, ICO, and HEIC images to JPG, PNG, or WEBP.
Learn more about the Image Convert extension before using it.
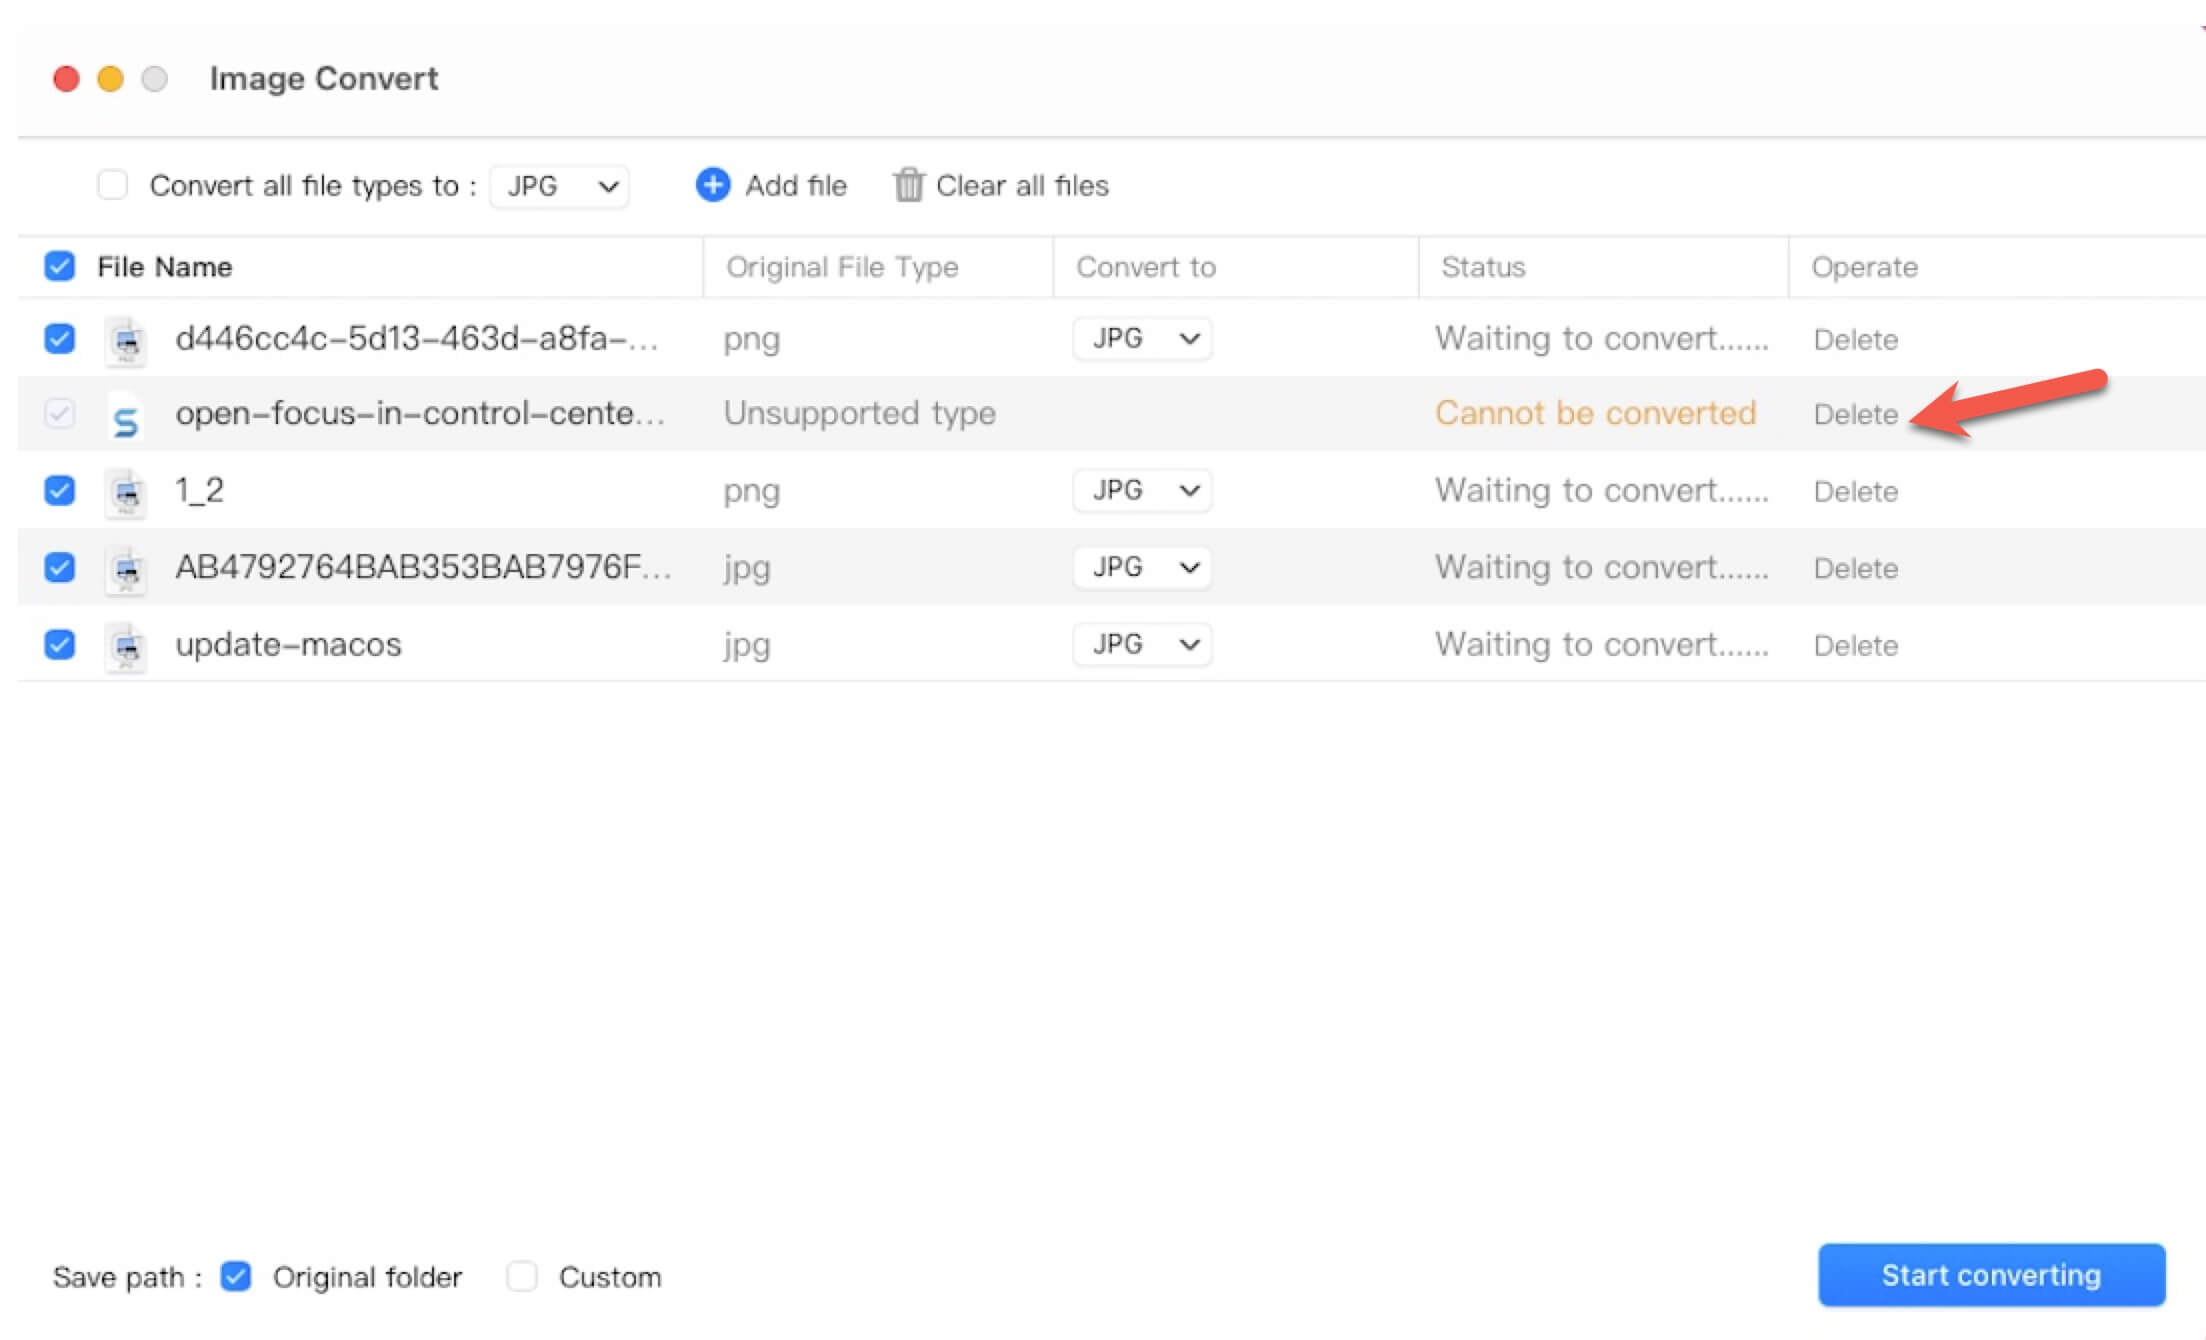
Note: There are several situations that will lead to image conversion failure:
1. The format of the file you want to convert is not supported.
2. The size of the file is over 33MB.
3. The macOS that you're using (macOS 10.13) does not support WEBP.
4. The file is damaged.
5. The file name doesn't contain a suffix.
6. The file you prepare to convert is stored on a read-only volume or drive.
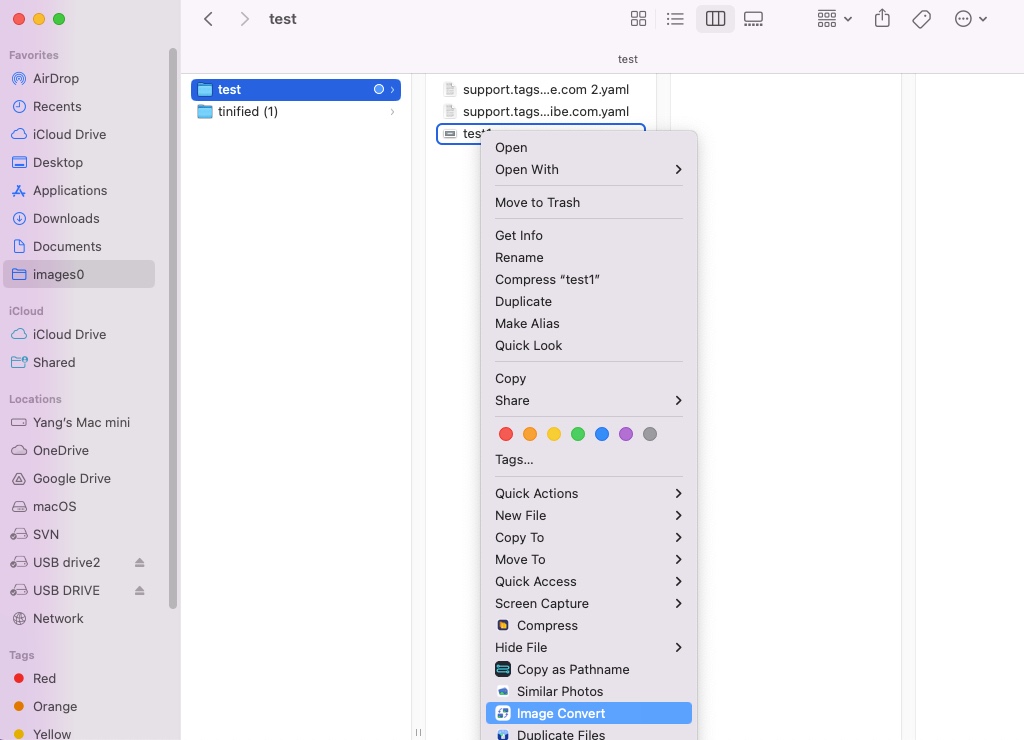
Step 1: Select the image you want to convert in Finder.
Step 2: Right-click the target image and choose Image Convert.
Step 3: Choose a file type that you want the image to convert to.

Step 4: Choose a location to save the converted file. You can save it to the original folder or tick Custom to re-select a new path for the file.
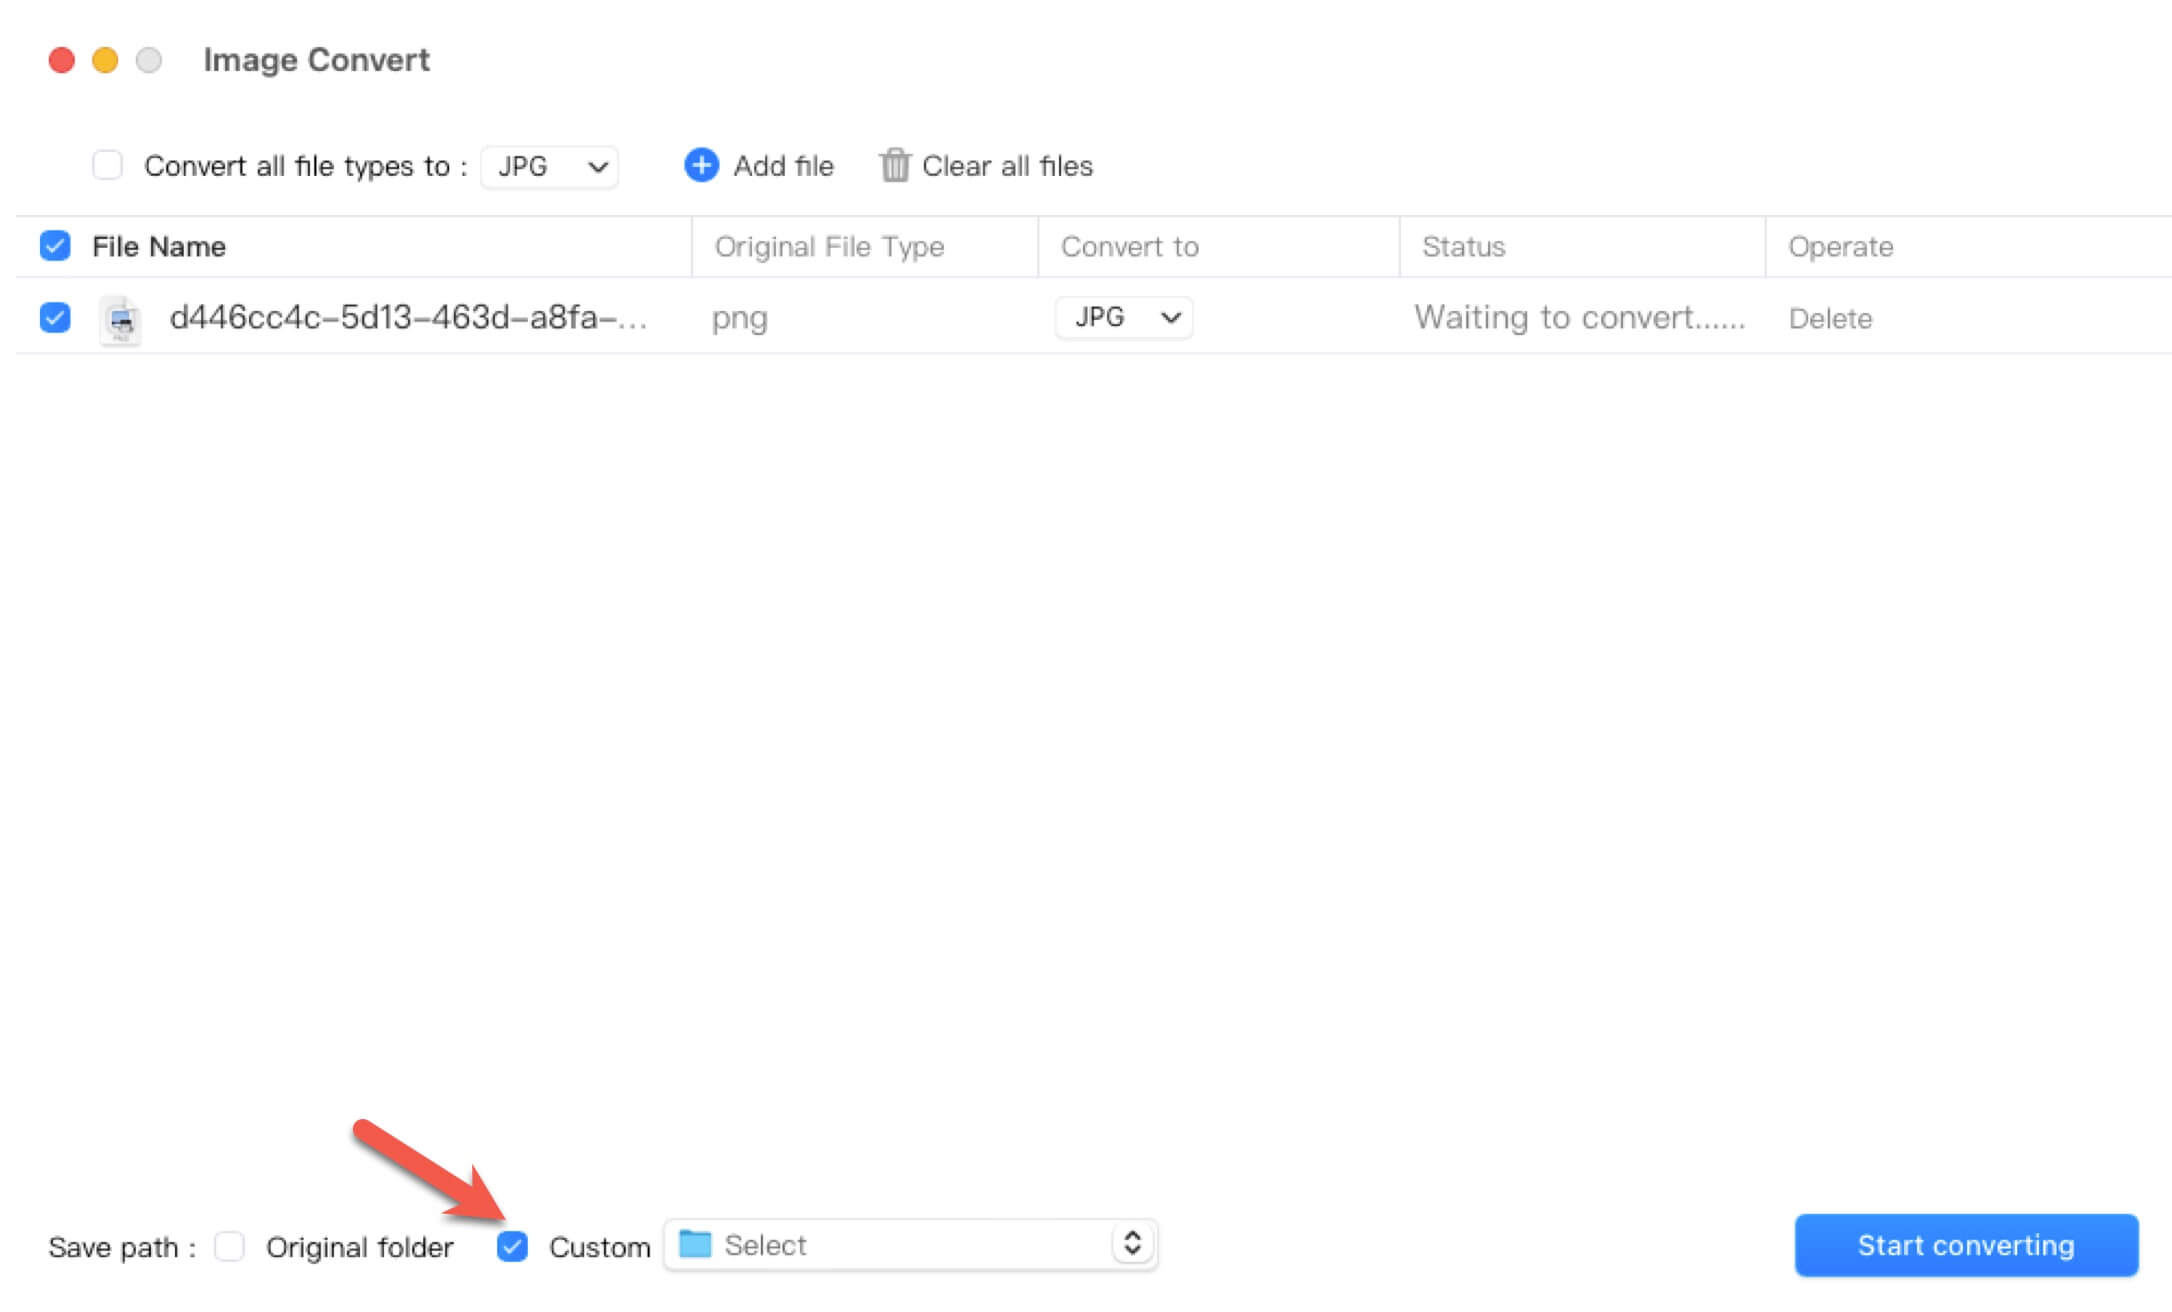
Step 5: Click Start converting. Wait until the process is finished and click OK.
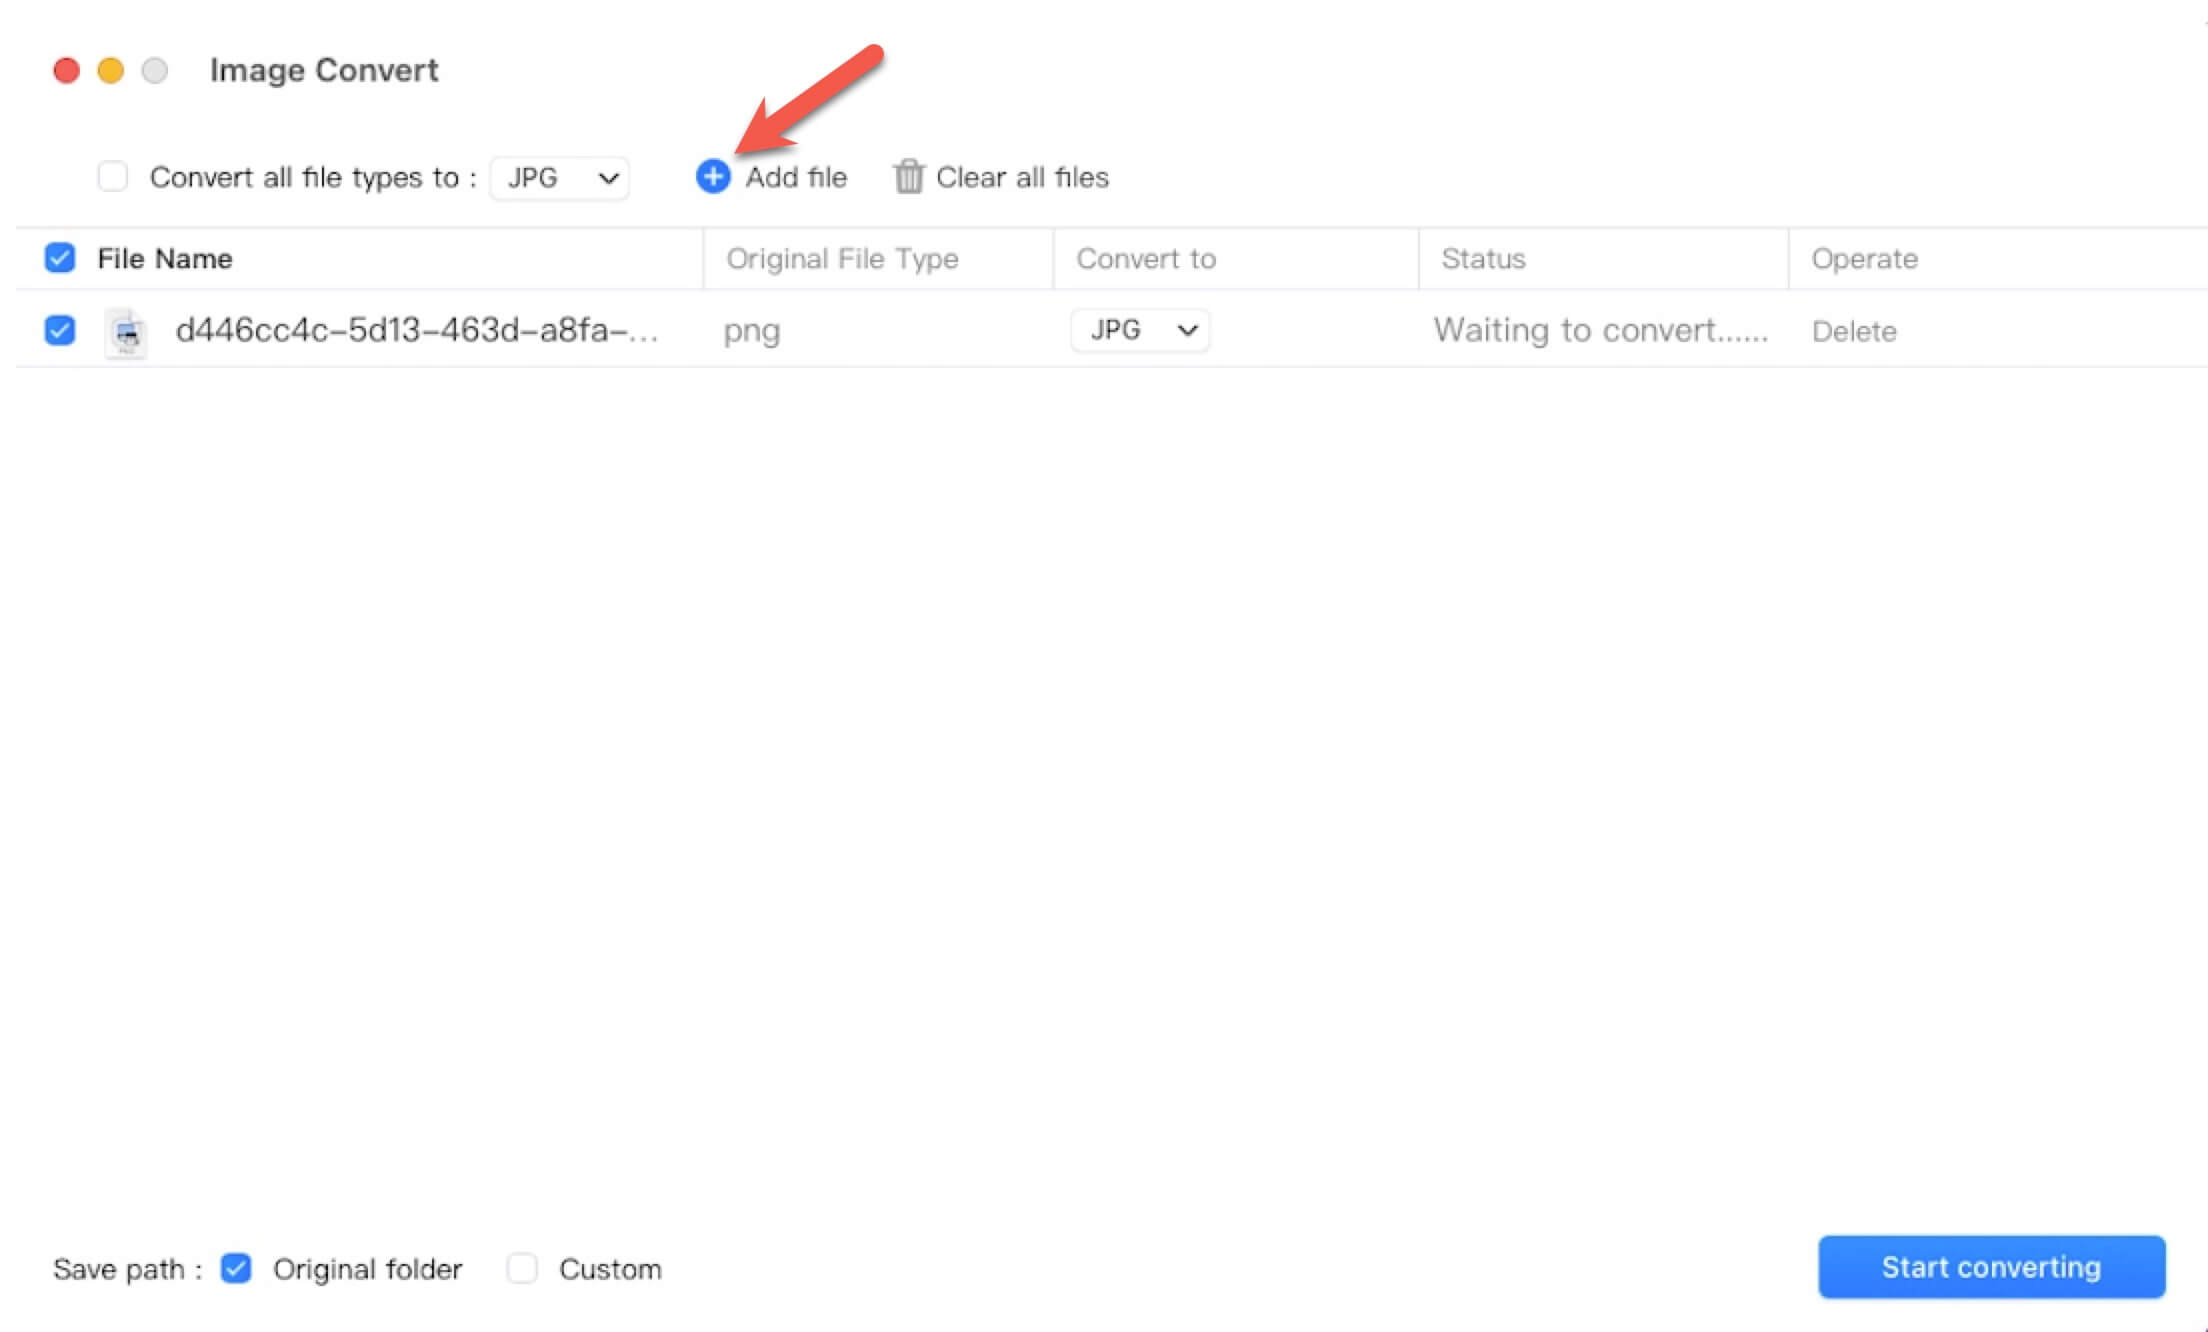
How to Add Images for format Conversion?
Step 1: Click the Add file button on the top of the Image Convert panel.
Step 2: Select your wanted images. If you don't find a file in the list, switch Image files to All files at the bottom to display files of all formats.
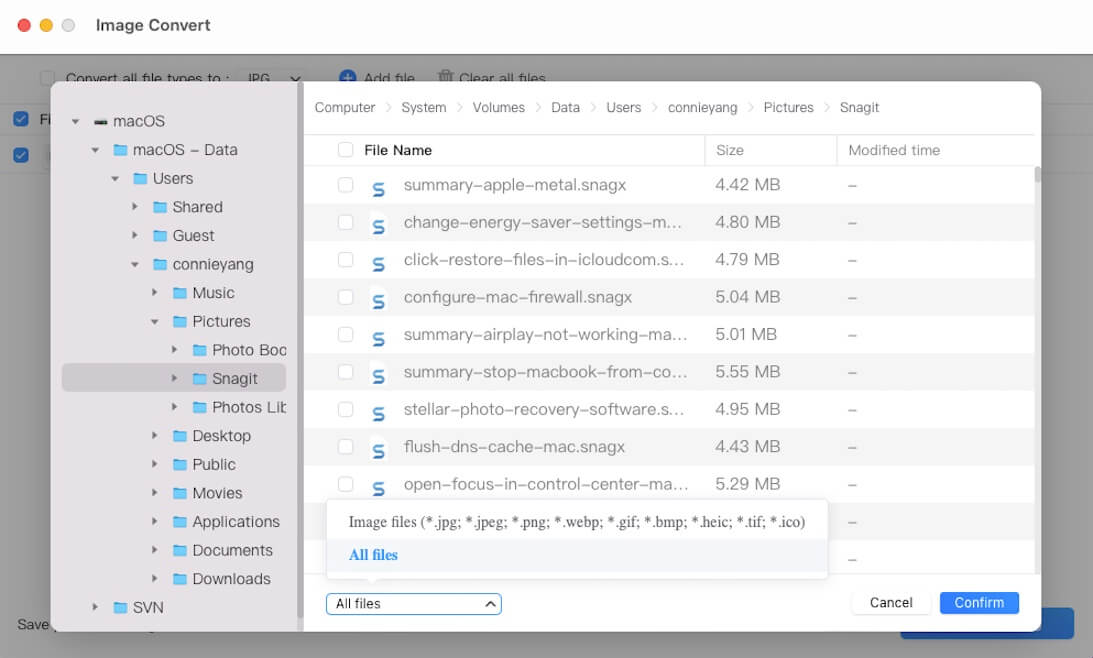
Step 3: Click Confirm to add them.
All the added files on the list are selected by default and the File Name option (which is used to choose all files) is ticked. If you don't want to convert a certain image, you can uncheck it. Or, you can click the Delete button next to it to remove it from the list.
If you want to re-select all the files, you can click the top Clear all files button to remove all the added files from the list.
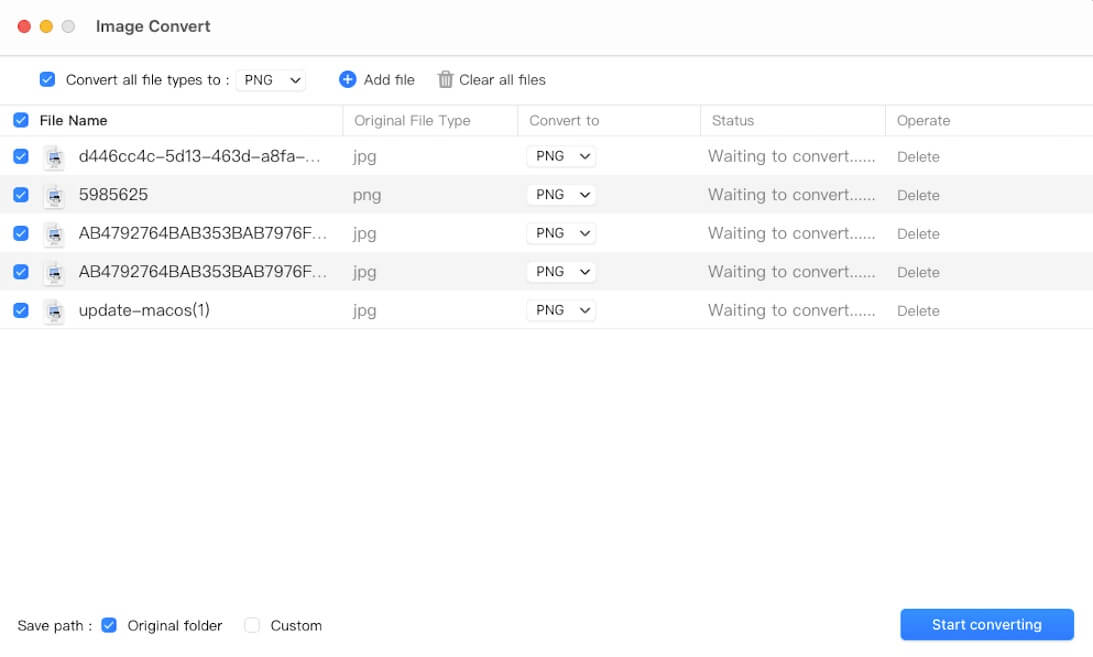
How to Batch-convert Images?
You can also batch-convert images to the same format or different formats.
Step 1: Select all the pictures that you want to convert in Finder, right-click on them, and choose Image Convert.
Step 2: Tick Convert all file types to and select an output format.
Note: If you want to convert the images to different formats, deselect the Convert all file types to option and select the specific file formats for different images.
Step 3: Choose a path to save the converted files, the original folder, or the custom one.
Step 4: Click Start converting and wait until the process is done.
What is Quick Open?
Quick Open enables you to quicly launch with the seleted item such as file, folder, image, etc, with the code editing application/extension you prefer. In the Extension store, you can install extensions under the Quick Open section, when you select an item and right click on your Mac, you can choose Launch with from an app to open the selected items quickly.

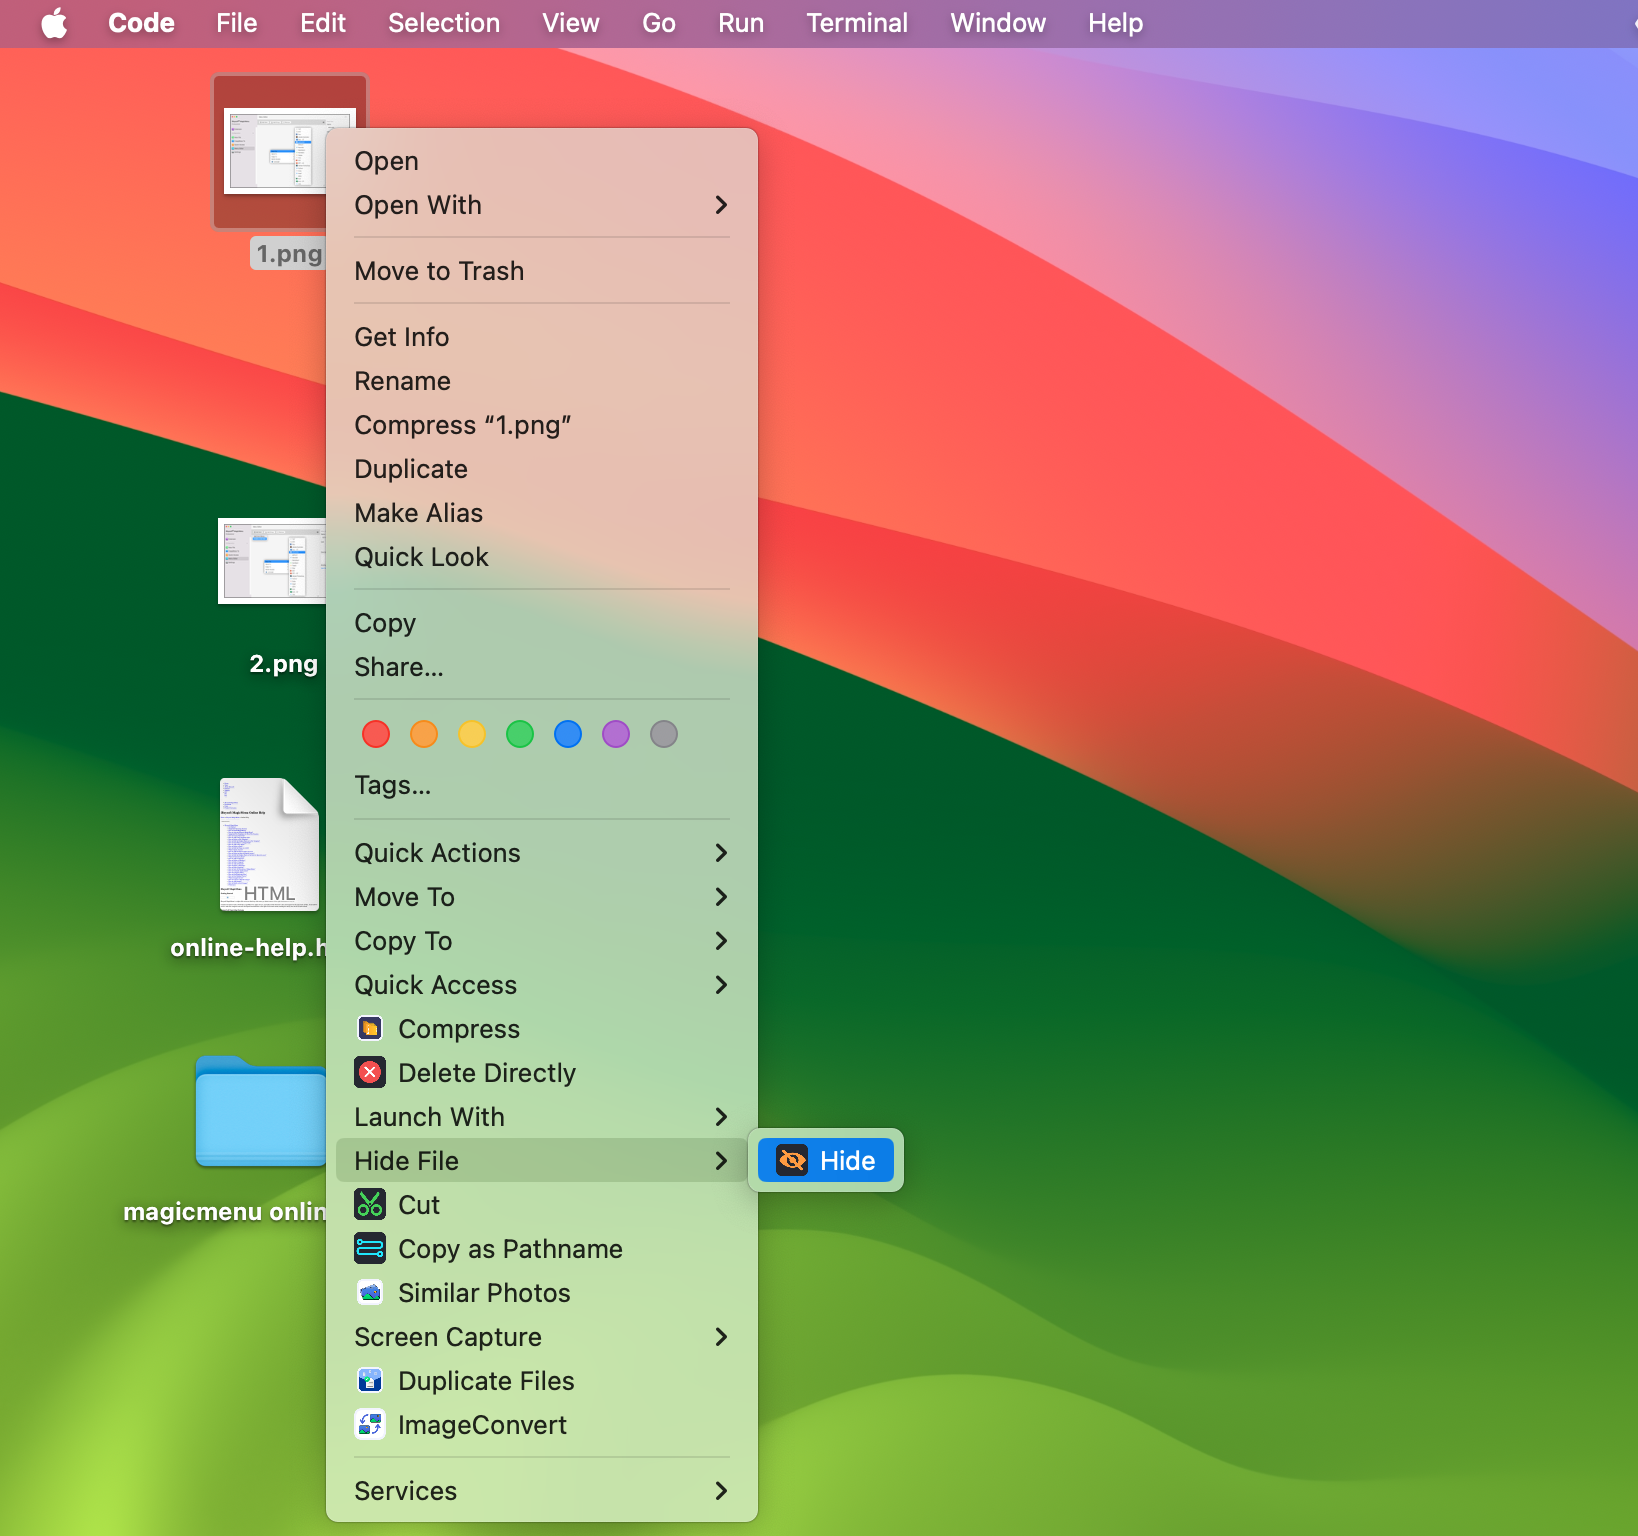
How to Hide a File?
Step 1: Right-click the selected item on your Mac.
Step 2: Go to Hide File on the right click menu and click Hide.
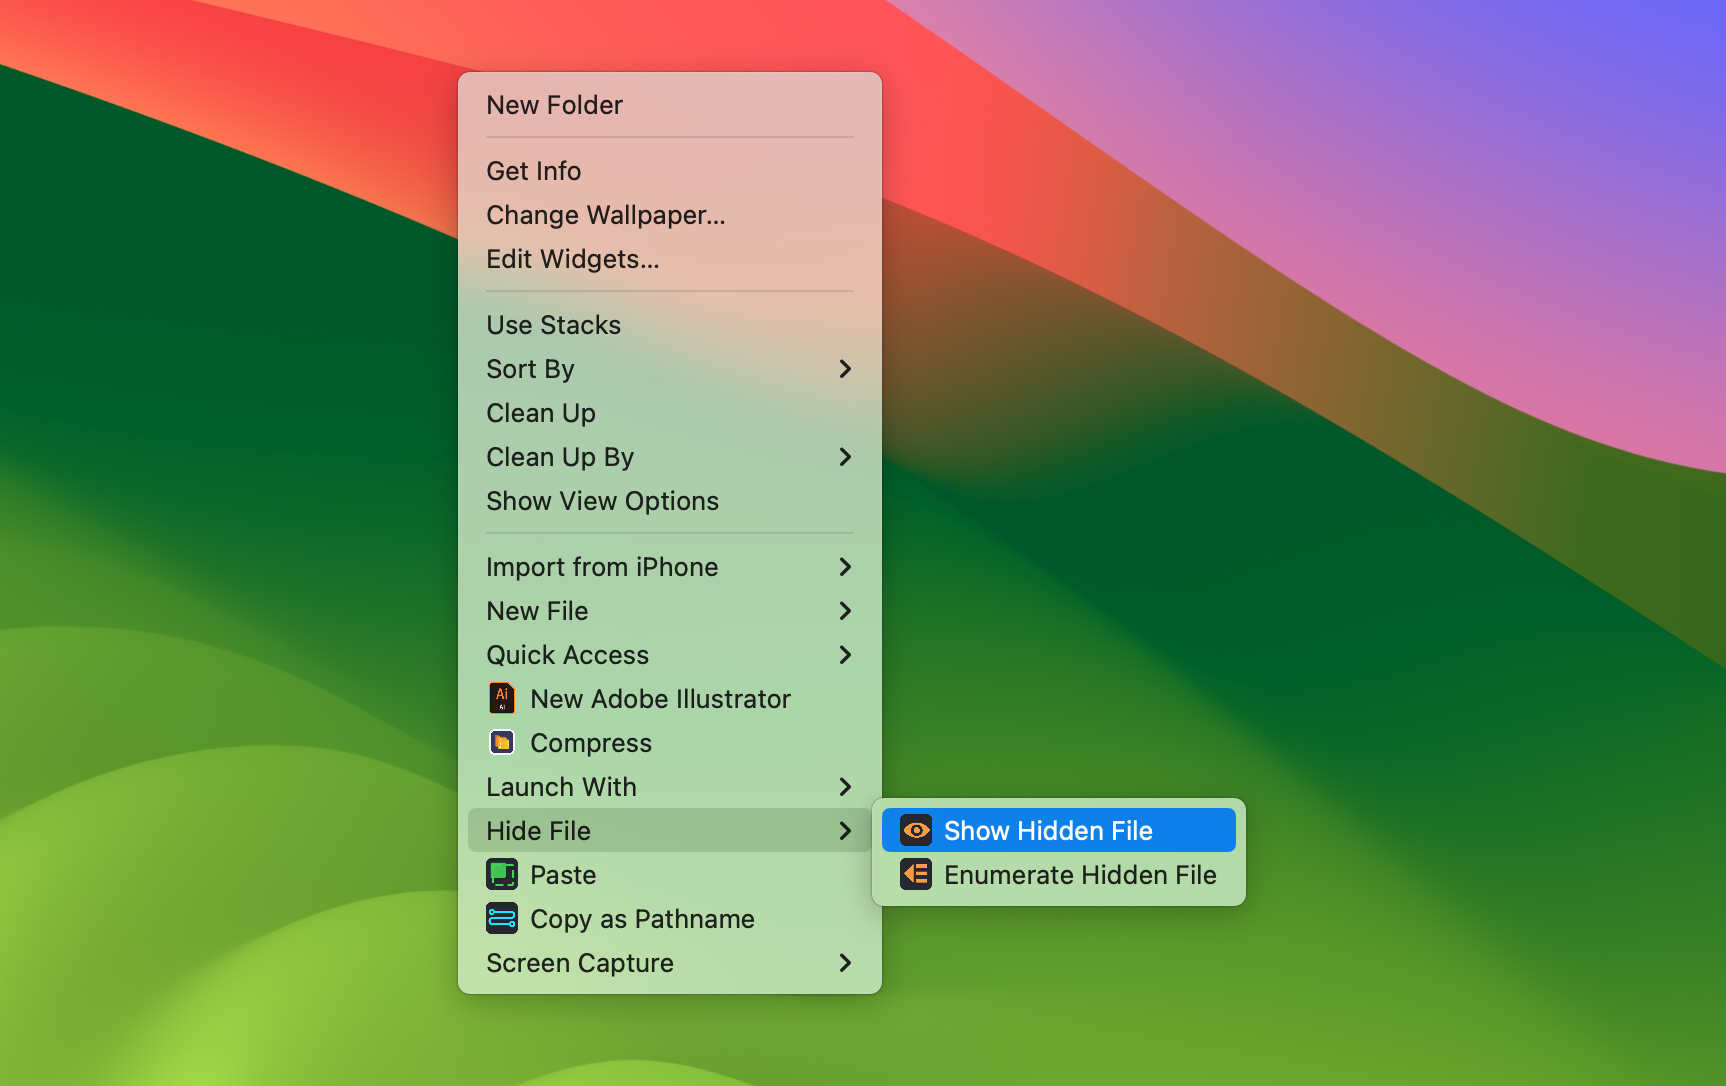
How to Unhide a File?
Step 1: Right-click on the blank space where you hide the file.
Step 2: Go to Hide File on the right click menu, click Show Hidden Files to put back all hidden files, or click Enumerate Hidden File and click Show File next to the desired item to unhide it.
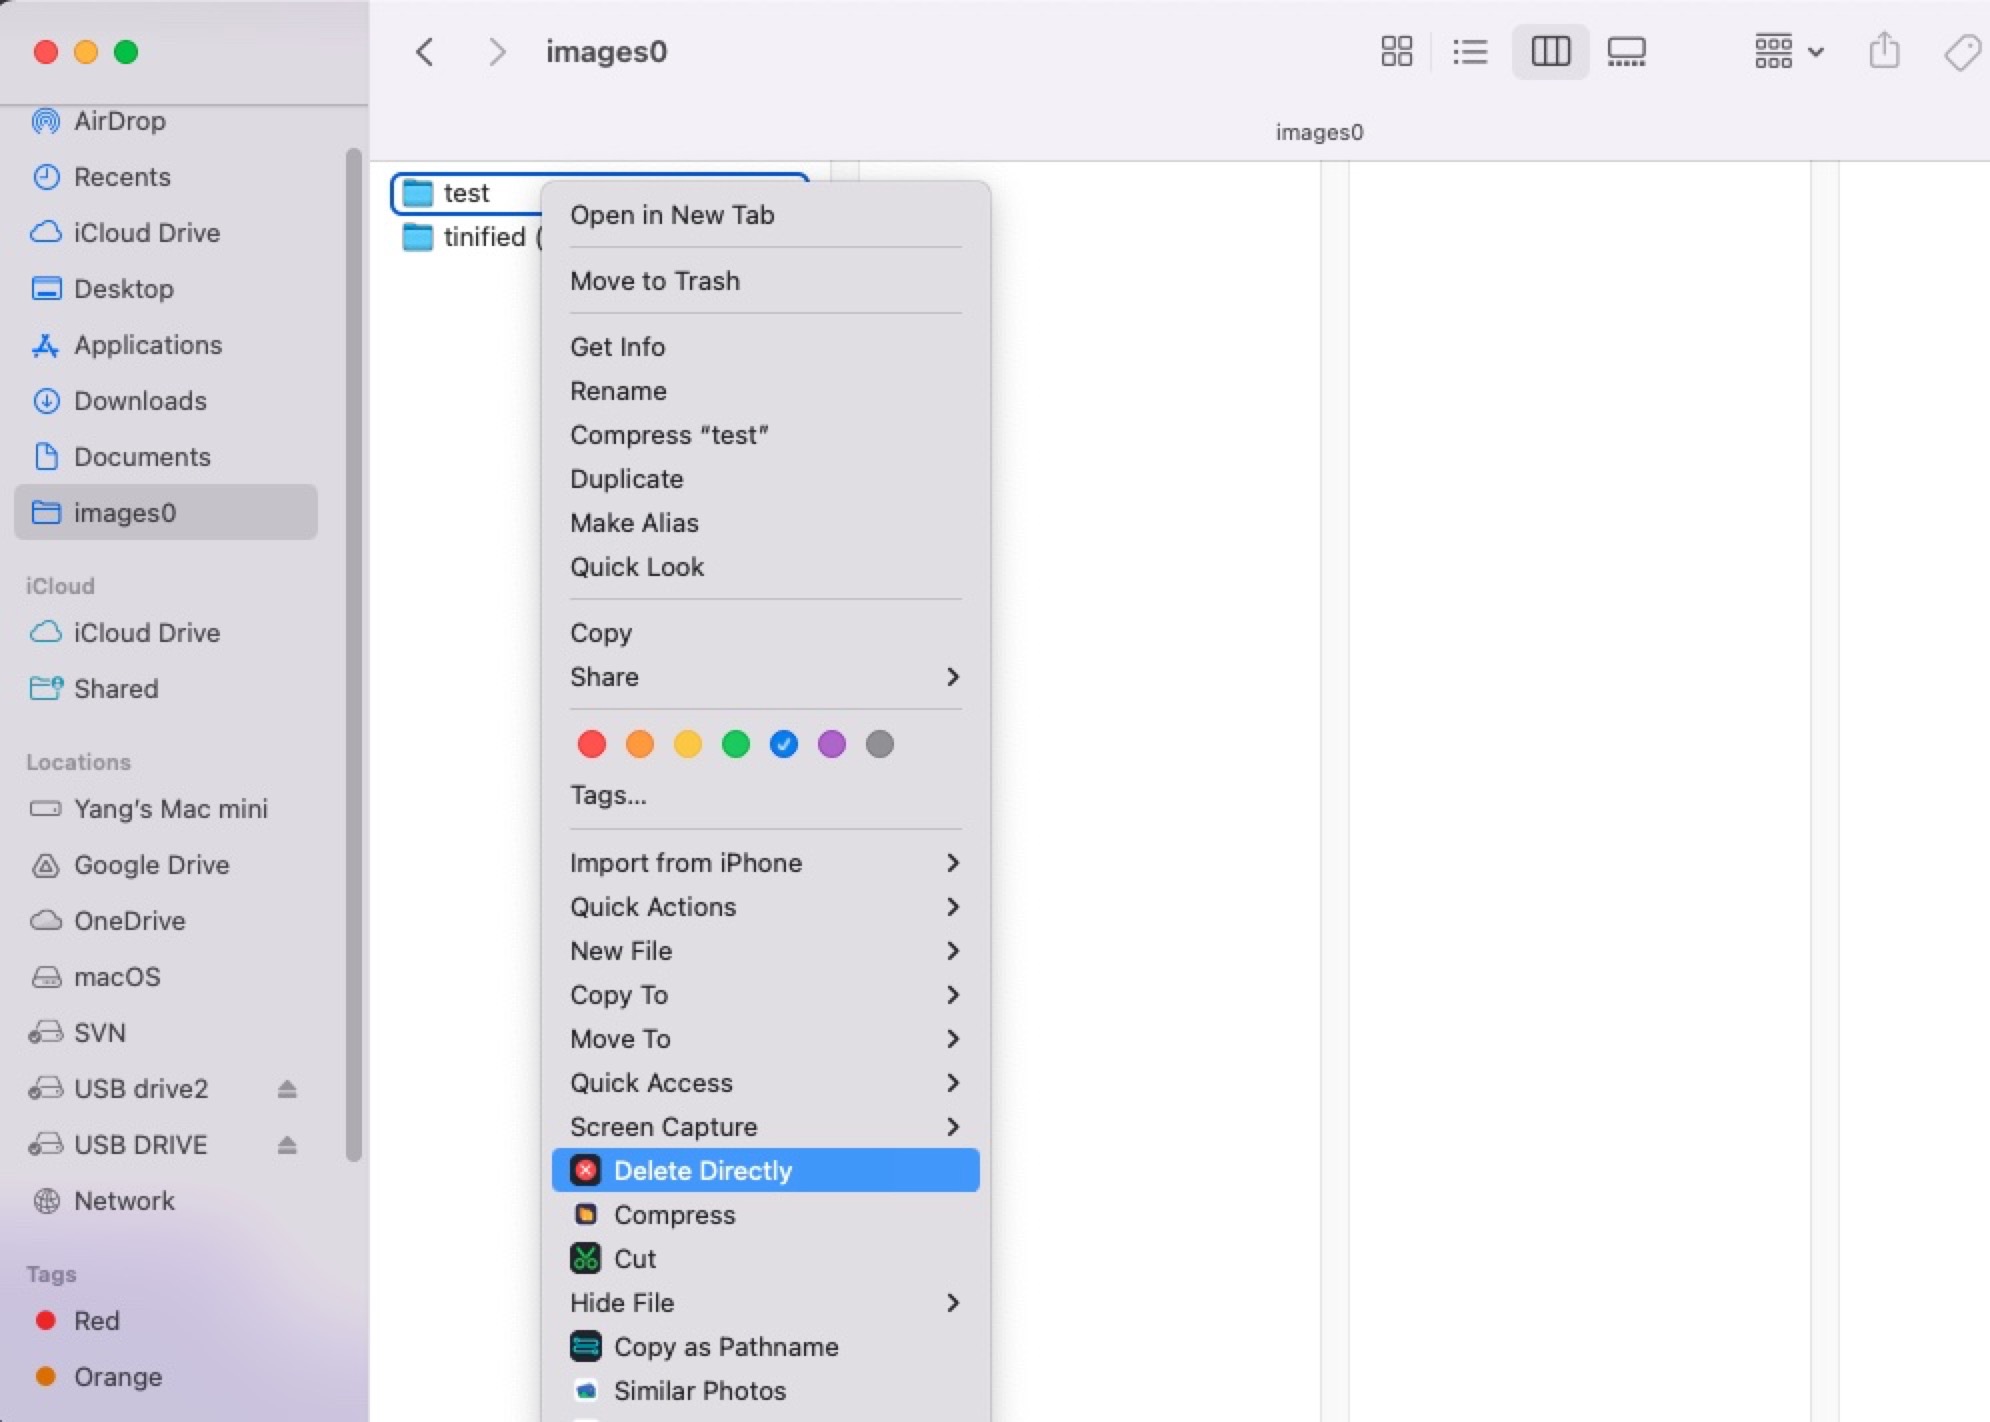
What is Delete Directly?
It enables you to compeletely delete the selected item from your Mac instead of moving it to your Mac Trash. Just right click the selected item you want to delete and choose Delete Directly from the right click menu.
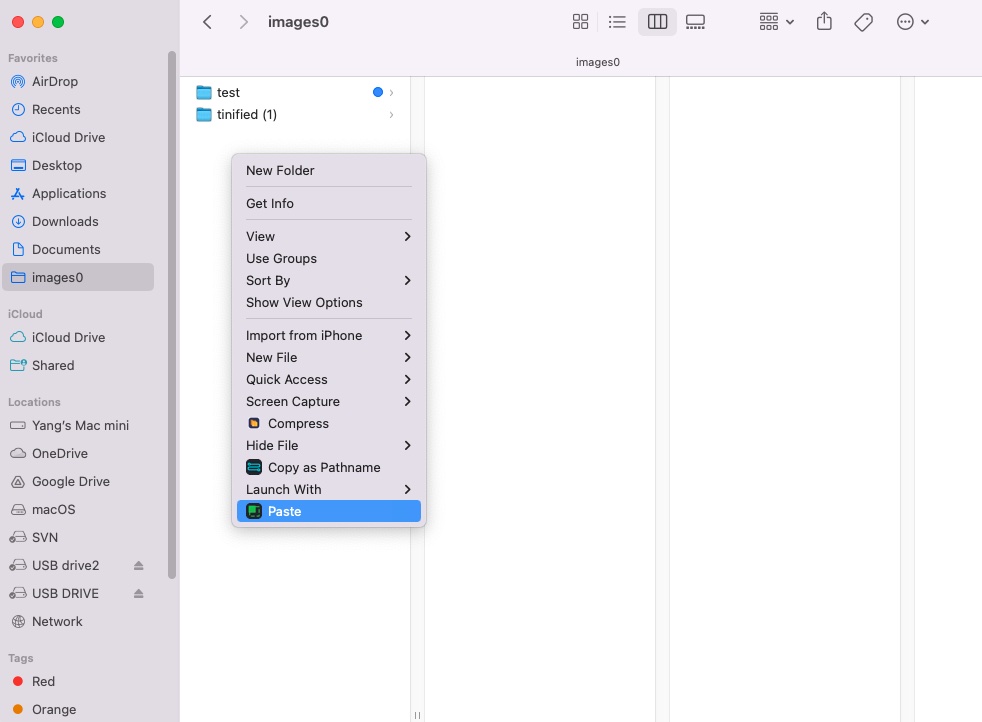
How to Cut a File or Folder?
Step 1: Right-click the file or folder you want to cut and choose Cut from the context menu.
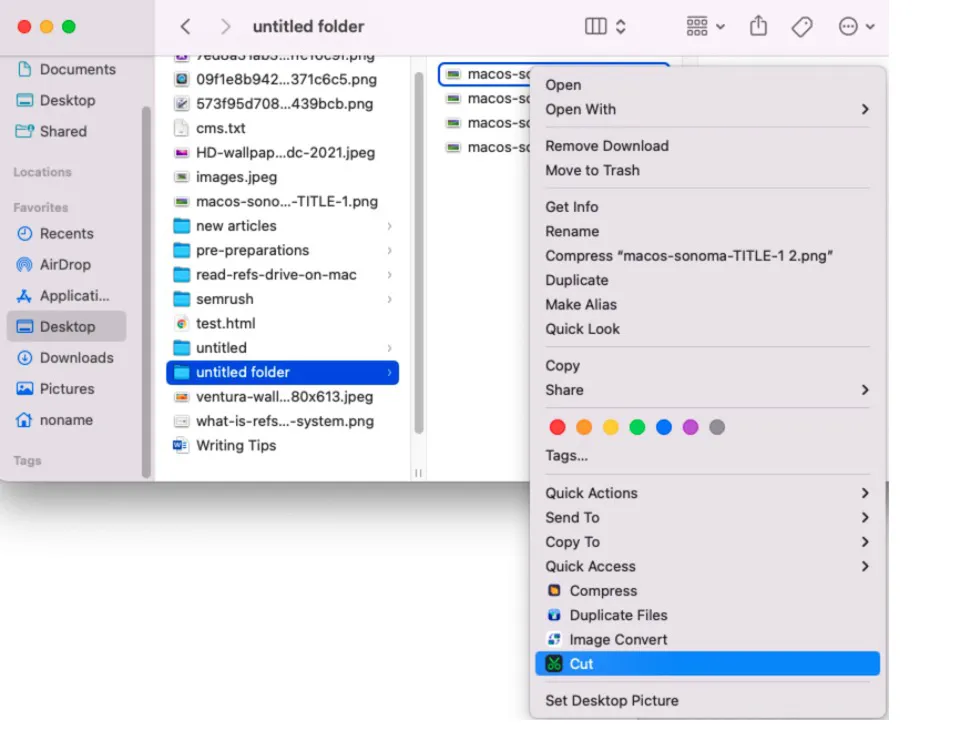
Step 2: Go to the destination folder, right-click any blank place in the folder, and select Paste from the dropdown menu.
How to Copy as Pathname?
Step 1: Select a file you want to copy its file path and right-click it.
Step 2: Select Copy as Pathname from the right-click menu.
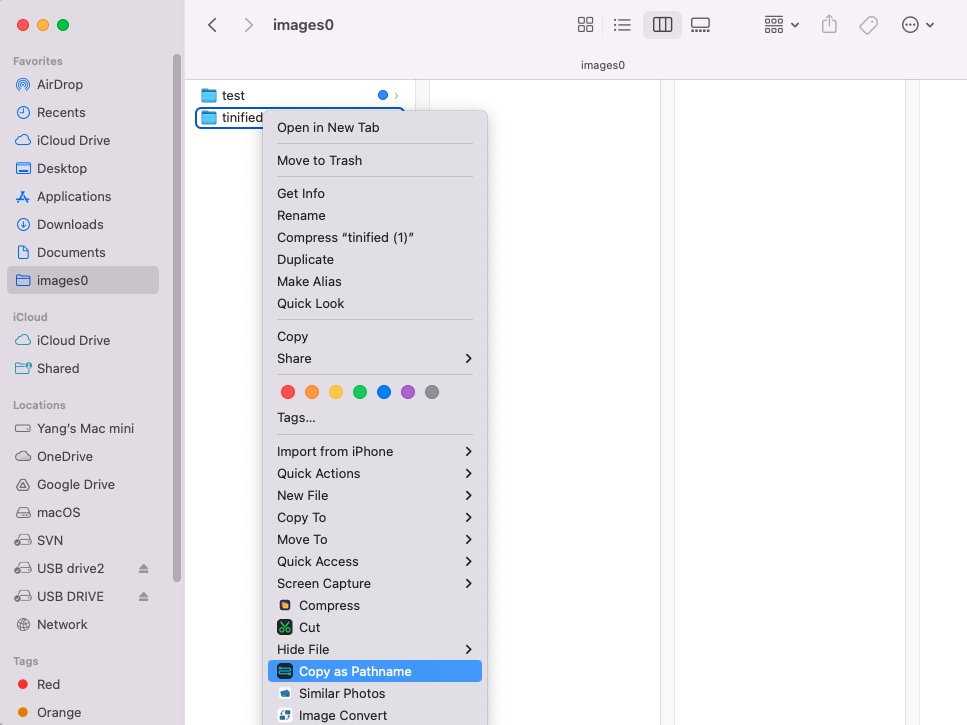
Step 3: Paste the file pathname to the destination place.
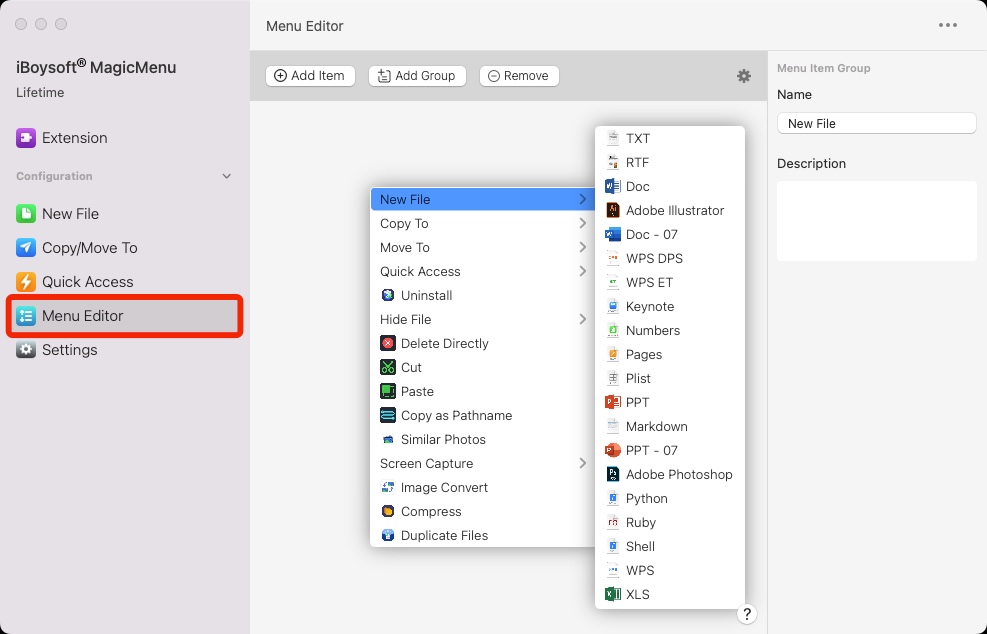
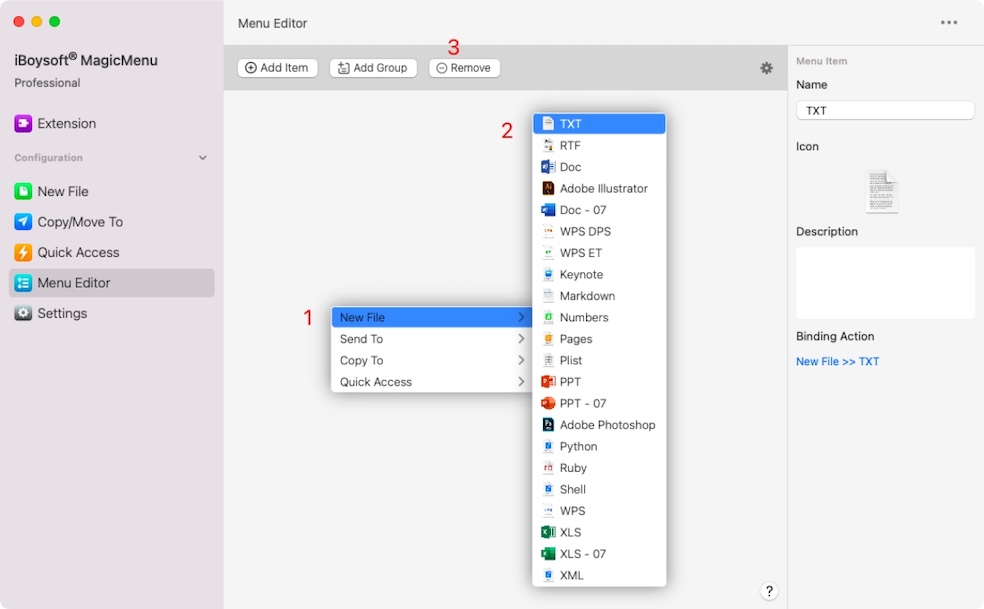
What is Menu Editor?
Menu Editor is a newly-add console of iBoysoft MagicMenu. It allows you to customize your personal context menu. You can add an item or group, remove item or group, and redefine an item/group there. Then, you’ll get a right-click menu that only contains your wanted items and groups.
How to Edit a Group?
All Groups in iBoysoft MagicMenu are editable and you can open Menu Editor in the app's main interface to implement this mission.
Step 1: Go to Menu Editor and select the Group you want to edit.
Step 2: Head to the right panel, you can carry out the following editing triages:
Rename the Group in the Name edit box.
Add a description to the Group in the Description edit box.

How to Add an Item to a Group?
iBoysoft MagicMenu adds four default groups to your right-click menu: New File, Move To, Copy To, and Quick Access.
You can go to Menu Editor to add your wanted item to any of the four groups.
Note: If you want to cancel the item adding, click Esc to quit the window.
Step 1: Go to Menu Editor.
Step 2: Choose a group that you want to add an item to.
Step 3: Click the Add Item button on the top menu bar.

Step 4: Select Add from library or Create a new item to add an item.
Add from library: directly add an item from iBoysoft MagicMenu's library.
Create a new item: add an item that allows you to custom its tag.
To redefine the new item:
- 1. On the right panel, click Select from library.. to select an item from iBoysoft MagicMenu's library.
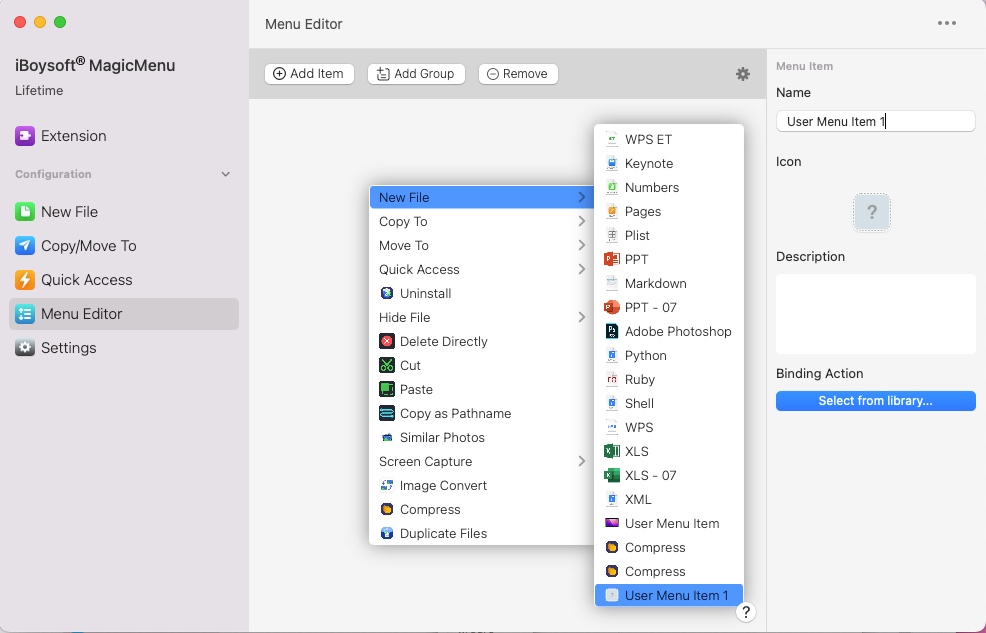
- 2. Rename the item in the Name section.
- 3. Click the question mark in the Icon section to customize the item's icon.
- 4. Add some descriptions to the item.
How to Remove an Item or Group?
Note: Remove only hides the item but not delete it from iBoysoft MagicMenu. You can add them again when needed.
Step 1: Go to Menu Editor.
Step 2: Select the item or group you plan to remove from the context menu.
Step 3: Click the Remove option on the top menu bar.
How to Edit an Item?
Step 1: Go to Menu Editor and choose the item you want to edit.
Step 2: Move to the right panel where you are gonna complete the editing:
Give the Item a new name in the Name tab.
Click the question icon under in the Icon section to upload a new icon you like. Only JPG, PNG, and other common picture formats are supported.
Fulfill descriptions in the Description box.

How to Change Items' or Groups' Order on the Context Menu?
Step 1: Open the Menu Editor window.
Step 2: Choose the item in group or directly select a group, and then drag it up or down to the desired location. You can only move one item at a time or group.

Settings
iBoysoft MagicMenu offers Settings in allowing users to change the default settings and make it fit perfectly.
You can find the Settings tab on the left panel of the main interface of iBoysoft MagicMenu.
General
- • Launch at startup: Launch iBoysoft MagicMenu Main UI at system startup.
- • Show on Dock: Display iBoysoft MagicMenu icon on Mac's Dock.
- • Show on menu bar: Display iBoysoft MagicMenu icon at the Apple menu bar.
- • Automatically check for updates: Notify you when there is software update available.
Settings
- • Reset the activation iBoysoft MagicMenu: Reset this utility to the default state. This action will delete all registration information.
- • Uninstall iBoysoft MagicMenu: Delete iBoysoft MagicMenu from your Mac.
- • Allow Full Access: Enable iBoysoft MagicMenu to have full disk access to your storage devices.
New File, Copy/Move To, and Quick Access sections under the Configuration tab have respective settings.
New File Settings:
- • Automatically open after creating a new file: The new file you create on your Mac will open automatically, you needn't to double-click it to open.
- • Enable audio prompts: A sound notifies you after creating a new file.
Copy/Move To Settings:
- • Show external drives in destination path: Display detected external storage devices in destination path without manually adding them to Copy/Move To window.
- • Enable “Select path…” option: Enable users to add a frequently-used path.
- • Save the selected path automatically: If you use Select Path... option for copying and moving a file or a folder, the selected path will be automatically added to Copy To and Move To as a target path.
- • Quick Access Settings: Show external drives in destination path: Display detected external storage devices in destination path without manually adding them to Copy/Move To window.
FAQ
Q: The right click menu doesn't show up.
A: 1. Check if you enable cloud synced folder.
2. Check if iBoysoft MagicMenu is running.
3. Check if the service is running: On your Mac, choose Apple menu > System Settings, then click General in the sidebar. Click Login Items & Extensions. (You may need to scroll down.) Allow apps to run in the background: close the option "bash" and then turn it on.