After upgrading to macOS Ventura, your SD card not showing up on your Mac. It is strange. Here's a similar case from MacRumors forums:
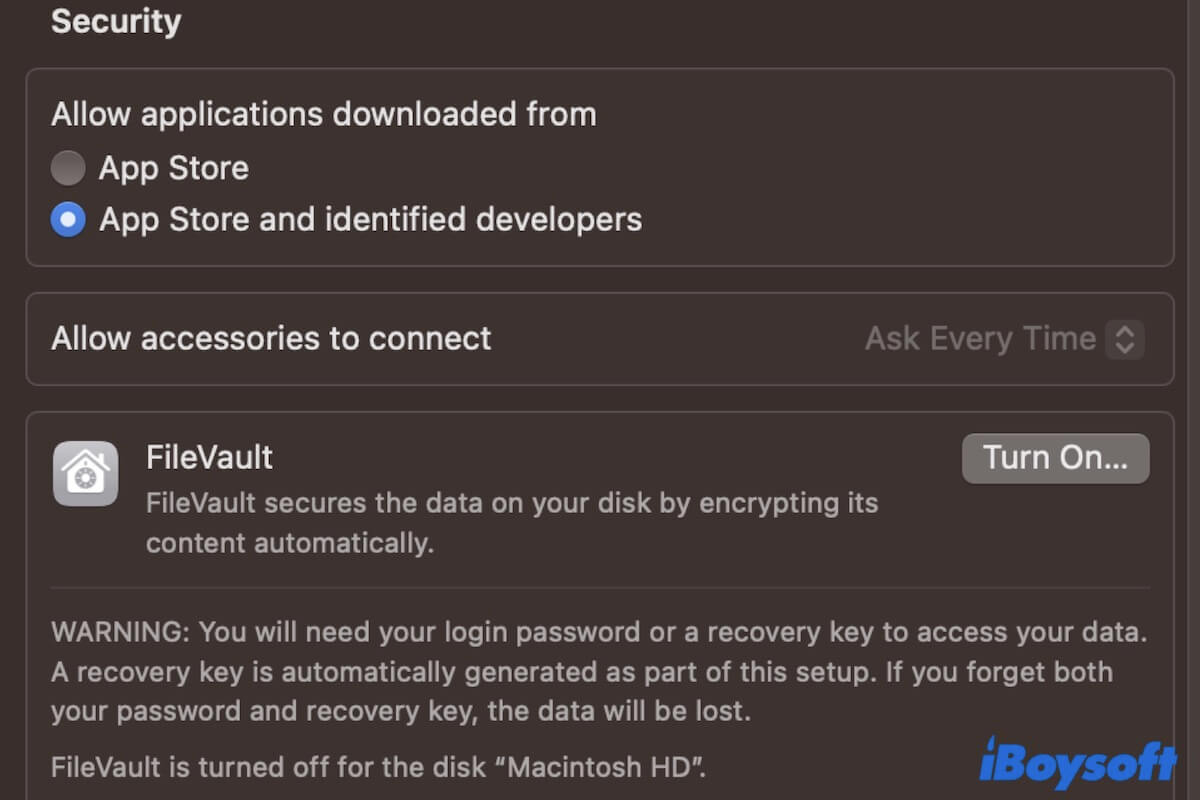
I plug my SD card into the SD card slot on my MacBook Pro (2022, M1 Max). The system asks if I want to connect the device. But my permission doesn't work. The SD card doesn't show up on my MBP. The setting of "Allow accessories to connect" is grayed out. I've enabled Lockdown mode. Whether it is related to this?
The new Lockdown mode and accessory security management feature designed for MacBooks with Apple silicon running macOS 13 or later blocks your SD cards from being connected and recognized by the system.
You barely need to reset the security settings to make your SD card show up on your Mac again.
However, SD cards not working on Mac is a complicated problem. You can follow this full guide to fix your SD card that doesn't work in Lockdown mode on Ventura.
How to fix SD cards not working or showing up in Lockdown mode after updating to Ventura:
| Scenarios | Workarounds |
| SD card doesn't work in Lockdown mode on Ventura | 1. Disable Lockdown mode 2. Restart the Mac & change the settings of "Allowing accessories to connect" |
| SD card still not showing up after disabling Lockdown mode | 1. Check Finder preferences 2. Check the connections and reconnect the SD card 3. Use iBoysoft DiskGeeker to detect, fix & mount the SD card 4. Reformat the SD card 5. Update your Mac |
Free download iBoysoft DiskGeeker to detect, fix, and mount your SD card on your Mac if the system fails to show it up. Moreover, it also supports fixing inaccessible, corrupted, or unmountable SD cards and external hard drives on a Mac.
Share to help your followers out of the trouble.
Solutions to SD card doesn't work in Lockdown mode on Ventura
The SD card doesn't work in Lockdown mode on Ventura may be due to security settings and also can result from other causes. So, go ahead to follow the ways in this part carefully to let it appear on your M1 or M2 Mac again.
Disable Lockdown mode
Lockdown mode is an optional feature in macOS Ventura and later that protects Mac laptops with Apple silicon from external connections' unknown attacks.
You probably have enabled it. Thus, your SD card doesn't work in Lockdown mode on macOS Ventura. A simple Lockdown mode disabling will fix the trouble.
Here's how to turn off Lockdown mode on your Mac:
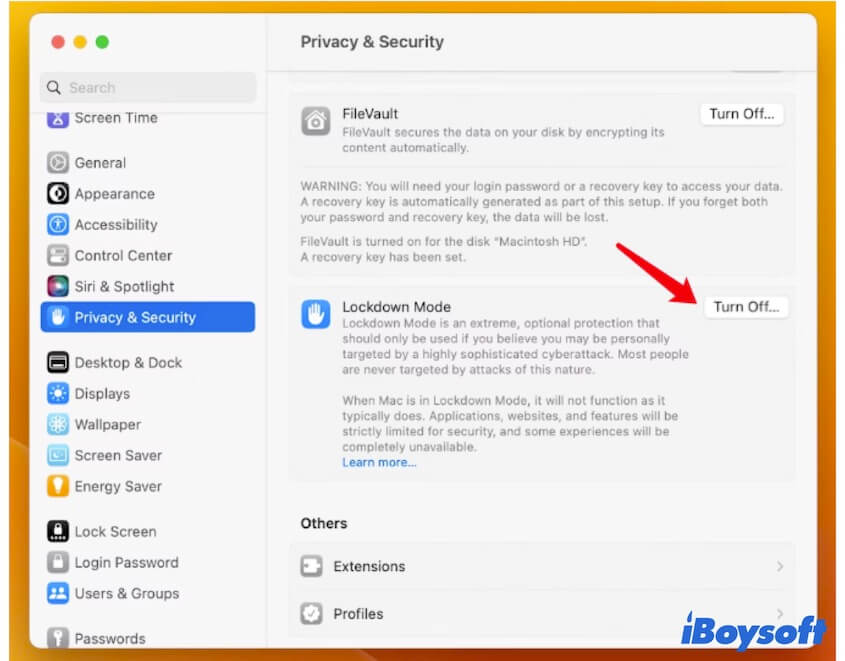
- Click on the Apple menu > System Settings.
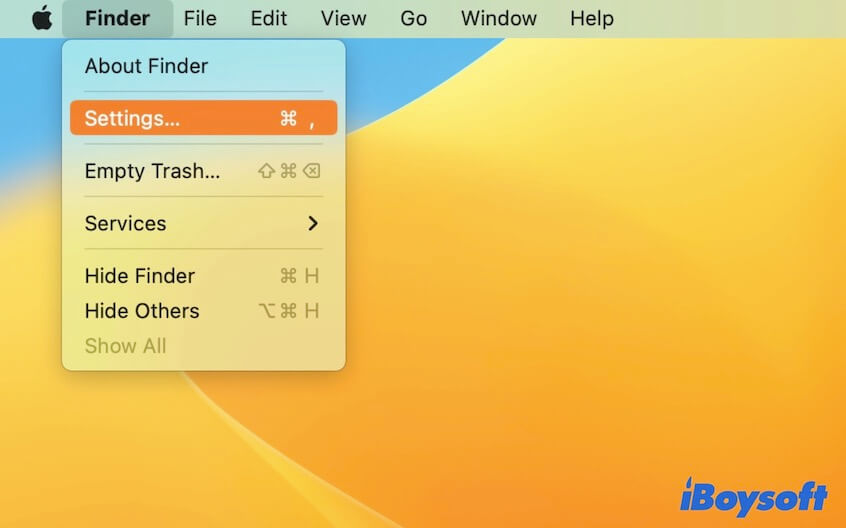
- Select Privacy & Security from the sidebar.
- Click the "Turn Off" button next to Lockdown Mode.
Then, reconnect your SD card to your Mac to check if it displays.
Restart the Mac & change the settings of "Allowing accessories to connect"
If your permission to allow your MacBook to connect your SD card doesn't work as the accessory security setting is grayed out, you can unplug your SD card and restart your Mac to exclude the temporary system errors that may cause this trouble.
If a restart makes the accessory security setting editable again, you can change it to allow your SD card to be automatically recognized and show up on your Apple silicon Mac.
Here's how:
- Unplug your SD card.
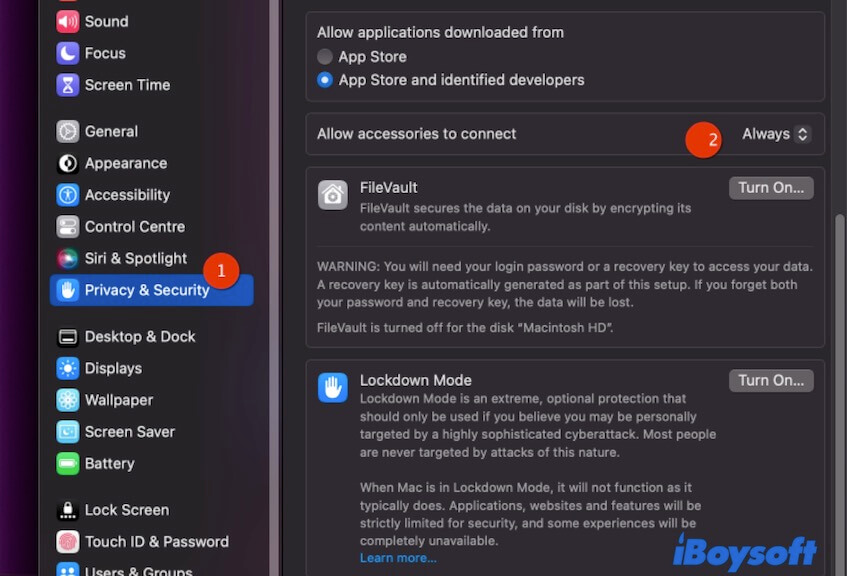
- Go to the Apple menu > System Settings.
- Select Privacy & Security and reset the options of "Allow Accessories to connect" to "Always."
- Reconnect your SD card.
Share the ways to help more people who are also in dilemma.
SD card still not showing up? Try these fixes
Weirdly, after disabling the Lockdown mode and changing the accessory connection settings, your SD card still doesn't appear on your desktop and Finder sidebar. Don't worry, follow the workarounds below to fix your SD card that's not working on your Mac.
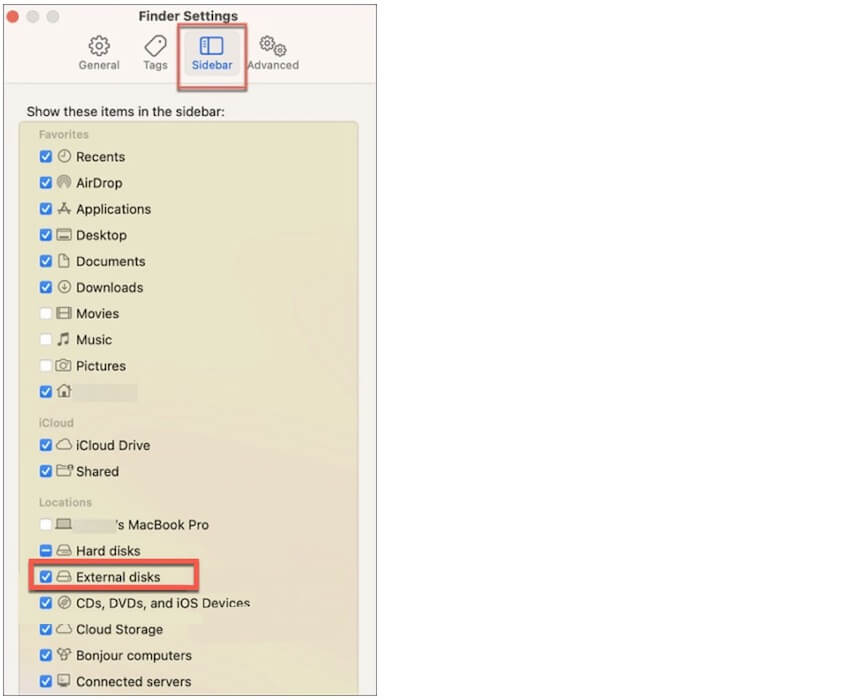
Check Finder preferences
Maybe you've set the preferences to not allow your connected devices to display on your desktop and in Finder. So, your SD card doesn't show up on your Mac in these locations.
To let your SD card show up again, get about to change your Finder preferences.
- Open Finder.
- Click Finder on the top Finder menu bar and select "Settings."
- Click on "General" and check "External disks" to allow the connected external devices to show up on the desktop.
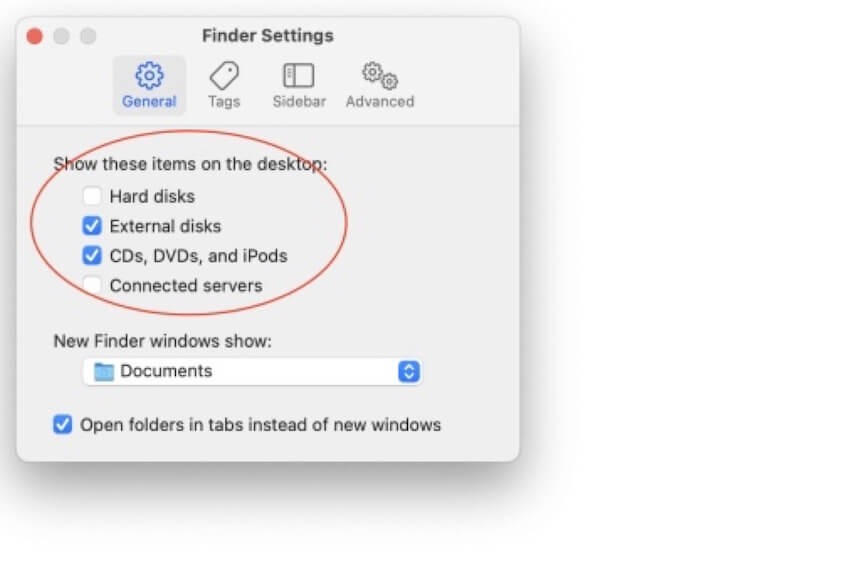
- Click on the Sidebar, and check "External disks" under the Locations section to allow the connected external devices to appear on the Finder sidebar.
Check the connections and reconnect the SD card
Perhaps, you haven't connected your SD card to your Mac correctly, causing it can't be detected by the system. So, try these checks and reconnect your SD card.
- Check your SD card's compatibility with the slot on your MacBook.
- Ensure the metal contacts on the SD card face down and point toward the MacBook.
- Check and clean the SD card slot on your MacBook.
- Check if the SD card reader is workable and compatible with your card (if you use it). Go to the Apple menu > About This Mac > System Report > Card Reader (Under Hardware). If you see its Vendor ID and other information, it means that the card reader works.
- Check if the SD card has a lock slider. If it has, move it to the side opposite to Lock.
- Slowly reconnect the SD card to your Mac. If it still doesn't show up on the desktop, restart your Mac.
Use iBoysoft DiskGeeker to detect, fix & mount the SD card
If macOS still can't make the connected SD card show up on your desktop and in Finder, try iBoysoft DiskGeeker to detect, repair, and mount your SD card on your Mac.
iBoysoft DiskGeeker is a third-party disk management utility. It is specially designed for managing, checking, and fixing the internal hard drive, external disks, SD cards, and other external devices on a Mac; and it also supports data organization and protection on these devices.
How to run iBoysoft DiskGeeker to detect, fix, and mount the SD card:
- Free download, install, and open iBoysoft DiskGeeker on your Apple silicon MacBook.
- Connect your SD card to your Mac correctly, slowly, and tightly.
- Wait to check if iBoysoft DiskGeeker detects and displays the SD card on the left sidebar.
Then, if the SD card shows up on the iBoysoft DiskGeeker sidebar, select a volume on the SD card and click the Open button on the right-side toolbar to access files on it.
If the SD card shows up on the iBoysoft DiskGeeker sidebar but is unmounted, follow these steps:
- Select the SD card and click the "First Aid" button on iBoysoft DiskGeeker's toolbar to try fixing it.
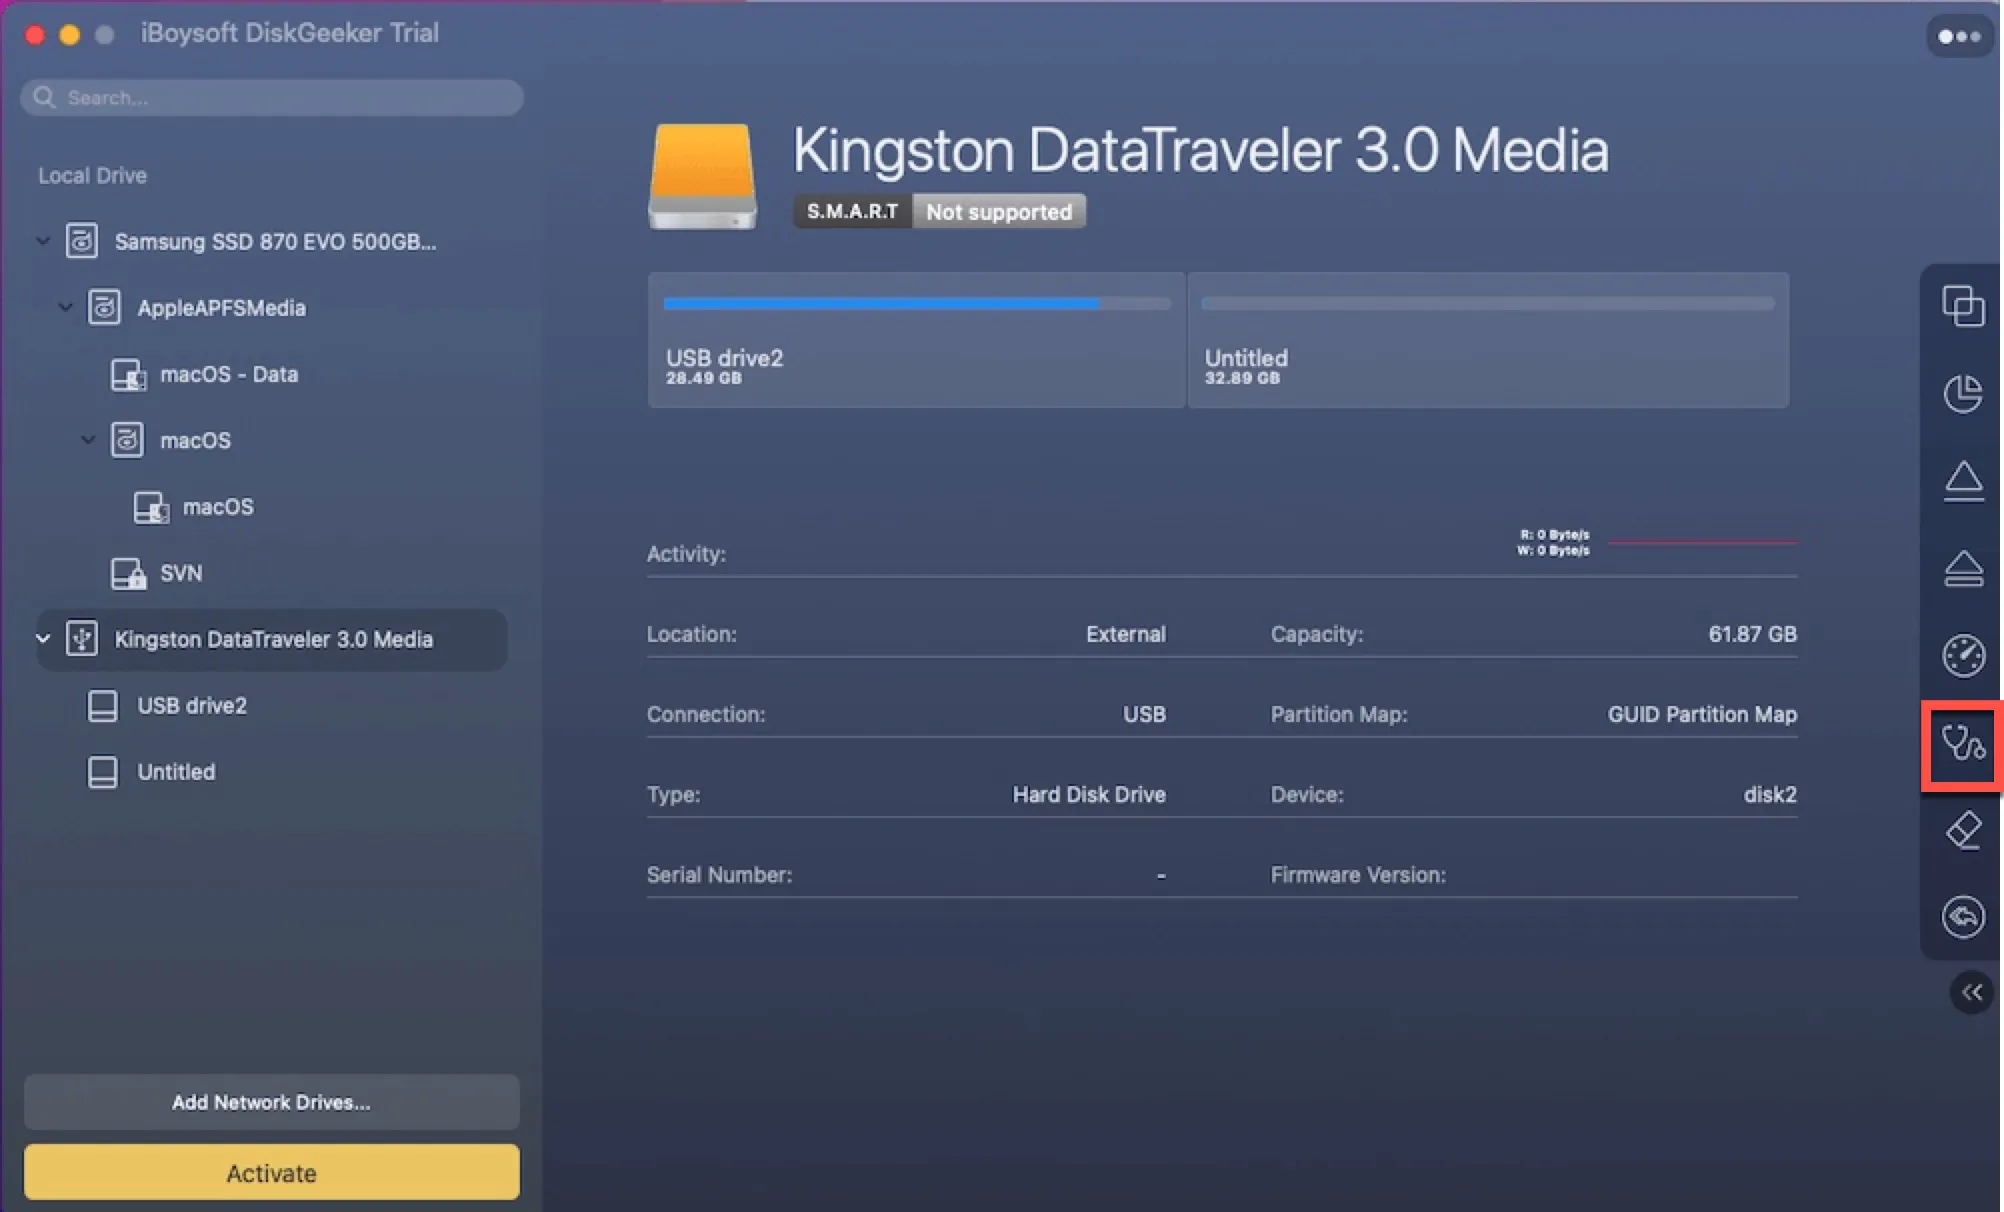
- Select the SD card and click the "Mount" button on iBoysoft DiskGeeker's toolbar to manually mount it.
Note: If the SD card doesn't display on the iBoysoft DiskGeeker sidebar although you've checked the connections, it indicates that the SD card has hardware issues and needs to be sent for repair.
Reformat the SD card
If even iBoysoft DiskGeeker can't help macOS detect, fix, and mount the SD card on your Mac, the SD card probably is seriously corrupted. You have to reformat the unmountable, corrupted, and inaccessible SD card to make it workable and show up on macOS Ventura again.
Nevertheless, reformating the SD card will erase all data on it, leading to permanent data loss. If the files on the SD card are necessary for you, try iBoysoft Data Recovery for Mac to recover them quickly.
Here's how:
- Free download, install, and open iBoysoft Data Recovery for Mac on your Mac.
- Select the SD card on the software's main interface and click "Search for Lost Data."
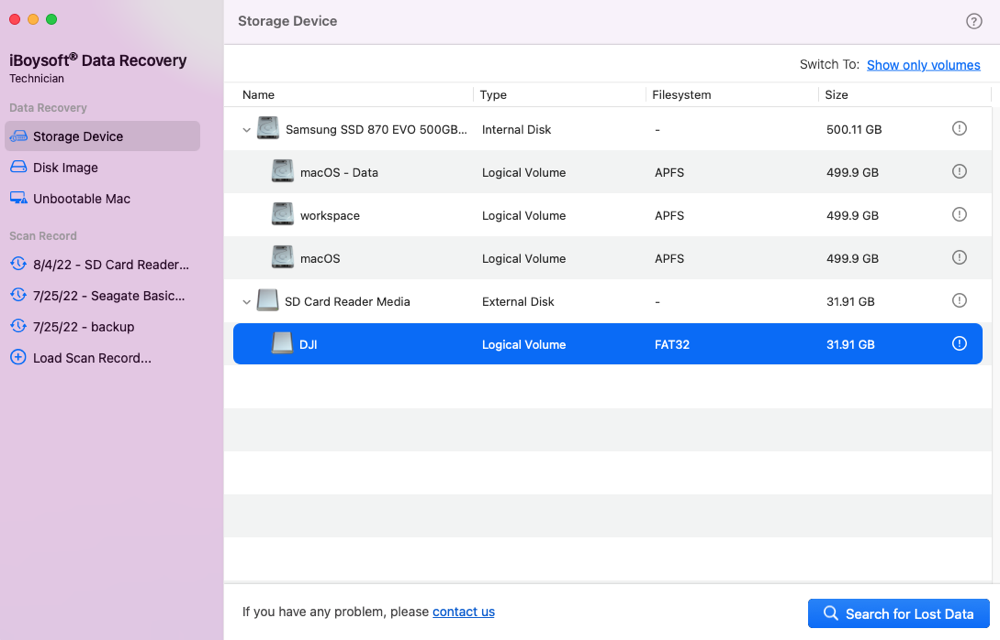
- Wait for the scanning process to end and preview the found files.
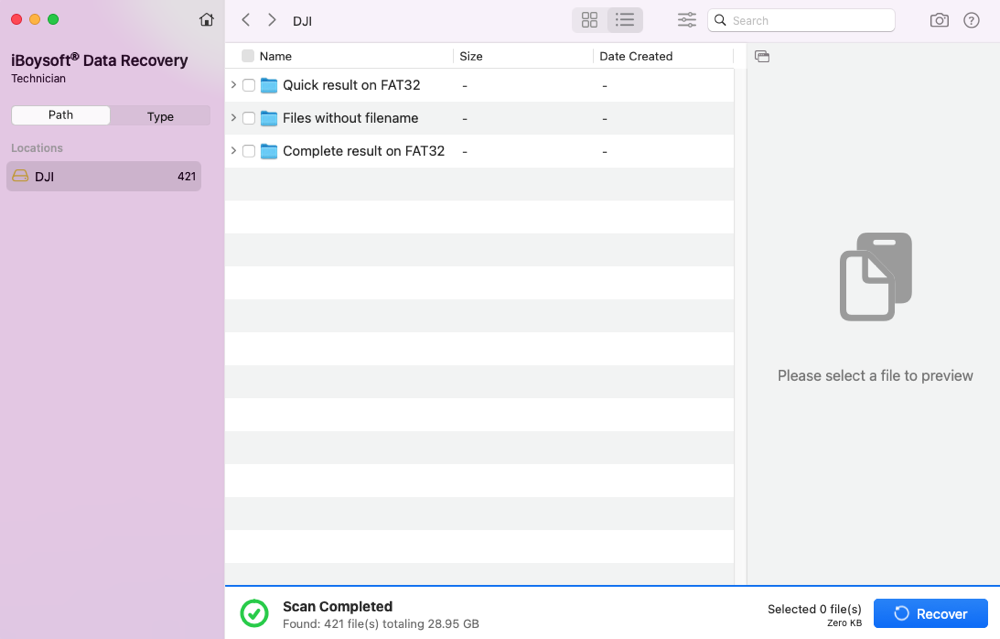
- Select your wanted files and click "Recover" to save them to a different location.
After get back the files on the SD card, you can reformat it now.
Method 1:
- Open iBoysoft DiskGeeker and select the SD card on the left sidebar.
- Click "Erase" on the toolbar.
- Type a name, and choose a format and a scheme for the SD card.
- Click "Erase."
Method 2:
- Open Finder > Applications > Utilities > Disk Utility.
- Select the SD card on the sidebar.
- Click "Erase."
- Name the SD card and select a format and a scheme.
- Click "Erase" and wait for the erasure process done.
Update your Mac
If your SD card still not showing up on your Mac, it may be caused by system bugs or outdated Mac drivers. To fix those, you need to update your Mac. Simply click on the Apple menu > System Settings > Software Update.
If you think this article is helpful for fixing SD cards not working on Mac Ventura, share it with others.
FAQs about SD card doesn't work in Lockdown mode on Ventura
- QWhat is Lockdown mode on Mac?
-
A
Lockdown mode is a security feature released along with macOS Ventura. It is used to manage and limit some features on a Mac. If you turn on it, some functionalities and services on your Mac will be disabled to block the attacks from hackers and spyware.
- QHow do I get my Mac to recognize my SD card?
-
A
You can try these ways to make your Mac recognize your SD card:
Reconnect your SD card slowly and correctly.
Check the SD card slot or change an SD card reader.
Restart your Mac.
Change Finder settings to show up your SD card on the desktop and in Finder.
Check, fix, and mount SD card with iBoysoft DiskGeeker.
Recover data from the SD card and reformat it.