Relying on advanced technologies, your Mac/MacBook has high security, so you are hardly to be a victim of malware compared to Windows. Thanks to the strict audit mechanism of the Apple Store reduces the possibility of having a virus on your Mac/MacBook.
However, macOS is not absolutely safe. Sometimes, because of the high prices of legal apps and the inaccessibility of some websites, you may get the cracked version of apps or browse some unstable or unsafe websites, leading to your Mac/MacBook having a virus or facing theft. Just like the recently heatedly discussed PT.updd malware warning on Mac.
So, protecting your Mac/MacBook from malware or theft becomes a problem for you. Don't worry. This article will offer you 10 ways to protect your Mac/MacBook from malware or theft and it also gives you some ways to find your lost Mac/MacBook.
Share this post with your friends who need it.
10 ways to protect Mac/MacBook from malware and theft
After you install the cracked version of apps or browse unsafe websites, your Mac/MacBook may suffer from malware or theft. So taking some actions to protect your Mac/MacBook from malware and theft is necessary. The following introduces 10 ways for you, you can take to protect your Mac/MacBook.,
Change your lock screen settings
If you usually have your Mac/MacBook opening for a long time without operating, you'd better change your lock screen settings to protect your Mac/MacBook from theft. Maybe you think it's nothing, but it's actually necessary for you. Here are the steps.
macOS Ventura:
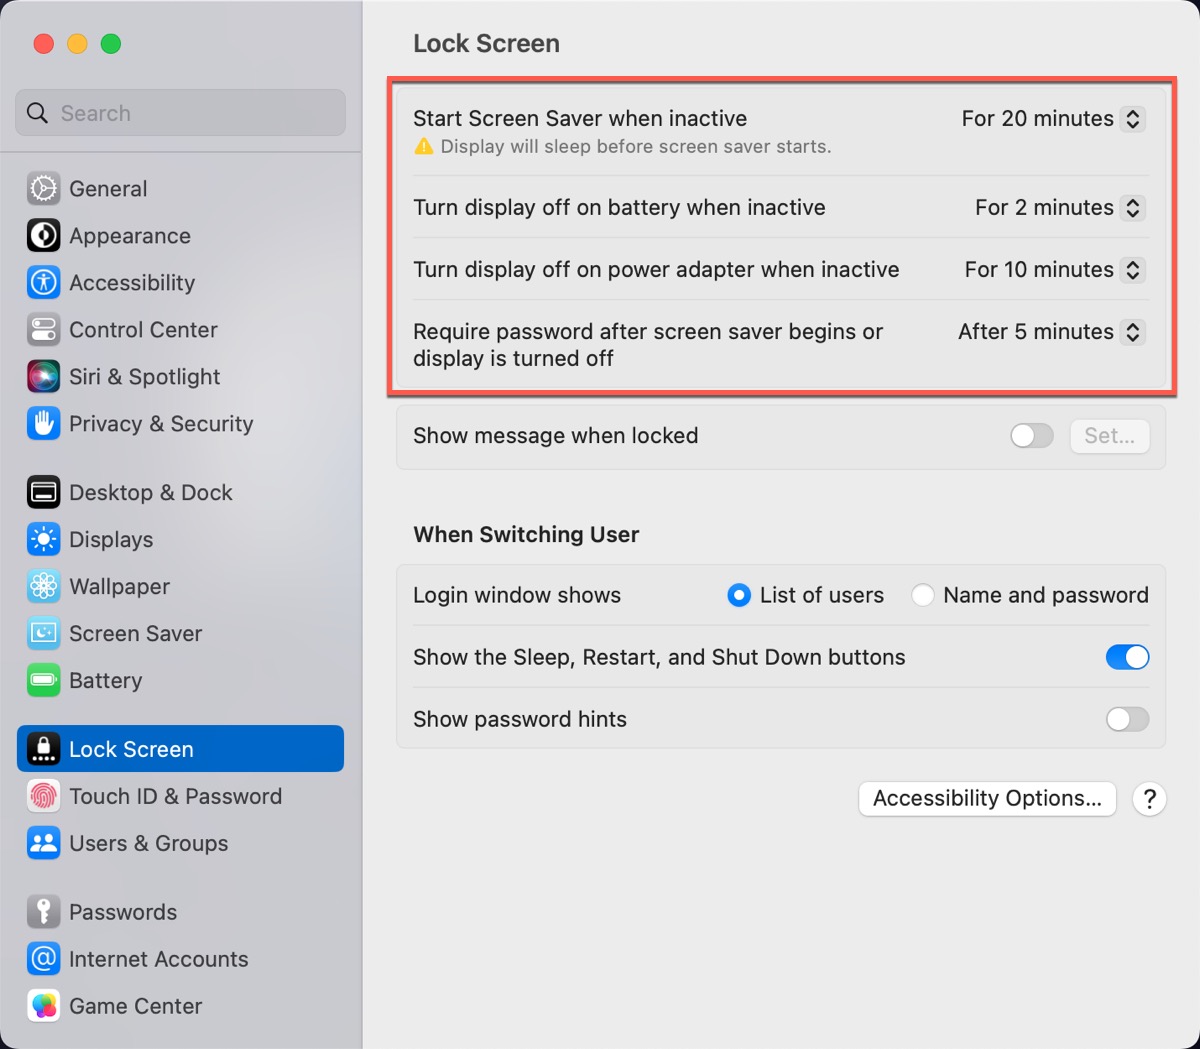
- Open System Settings from Dock or Apple menu.
- Click Lock Screen in the left-sidebar.
- Select Start Screen Sever when inactive and choose a time. (10 minutes is better.)
- Select Turn display off when inactive and choose a time. (10 minutes is better.)
- Select Require password after screen saver begins or display is turned off and choose a duration. (5 minutes is better.)
macOS Monterey or earlier:
- Open System Preferences.
- Click Battery on MacBook, and select a time (10 minutes is better.) using the Turn display off after slide.
Click Energy Saver on the desktop, then click Power Adapter and select a time (10 minutes is better.) using the Turn display off after slider. - Open Security & Privacy, and choose a duration besides Require password after screen saver begins.
Set a strong login password
Setting a strong login password is also a useful way to protect your Mac/MacBook. You may think there is no need to set a password to protect your Mac/MacBook, but if you don't have a password that means someone could gain access to your sensitive information by getting past your login screen.
Here are the steps you can follow to set your login password:
macOS Ventura:
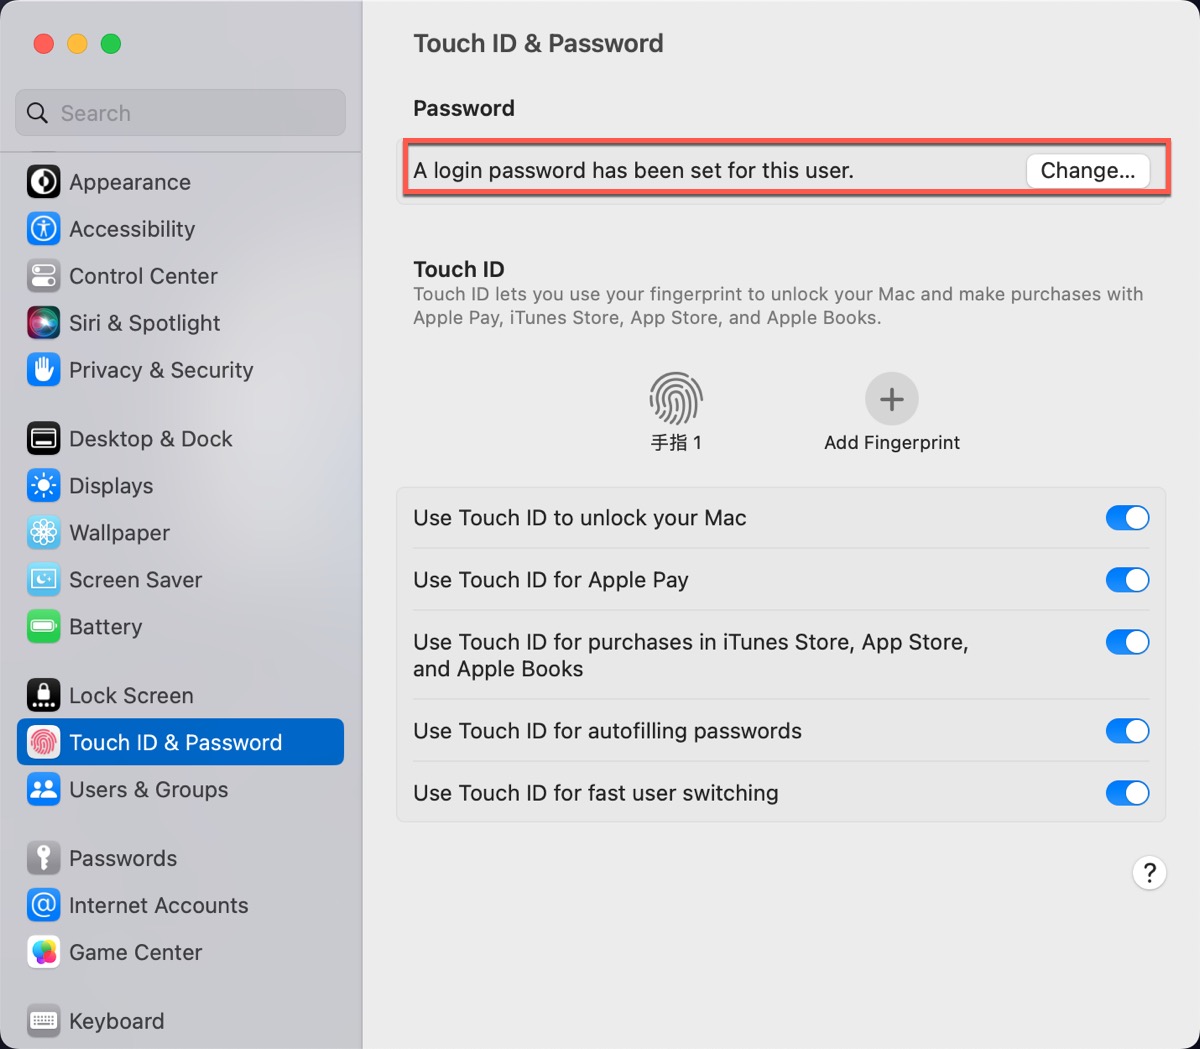
- Open System Settings.
- Select Touch ID & Password in the left-sidebar.
If you have the password, you can change a safer one; and if your Mac/MacBook supports Touch ID, you can add multiple fingerprinters and select one that can be used for the purchase and auto-filing passwords.
macOS Monterey and earlier:
- Open System Preferences.
- Select Security & Privacy.
- Click General.
Now, you can change the existing password or set a password.
Use Apple's Password Manager
You must think that remembering all the passwords on your Mac/MacBook is frustrating, thus you can use Apple's Password Manager to manage your password so that you can just remember only one password.
Apple's iCloud Keychain is a built-in password manager that works with all your devices and can log you into all your software and services.
How to set up iCloud Keychain:
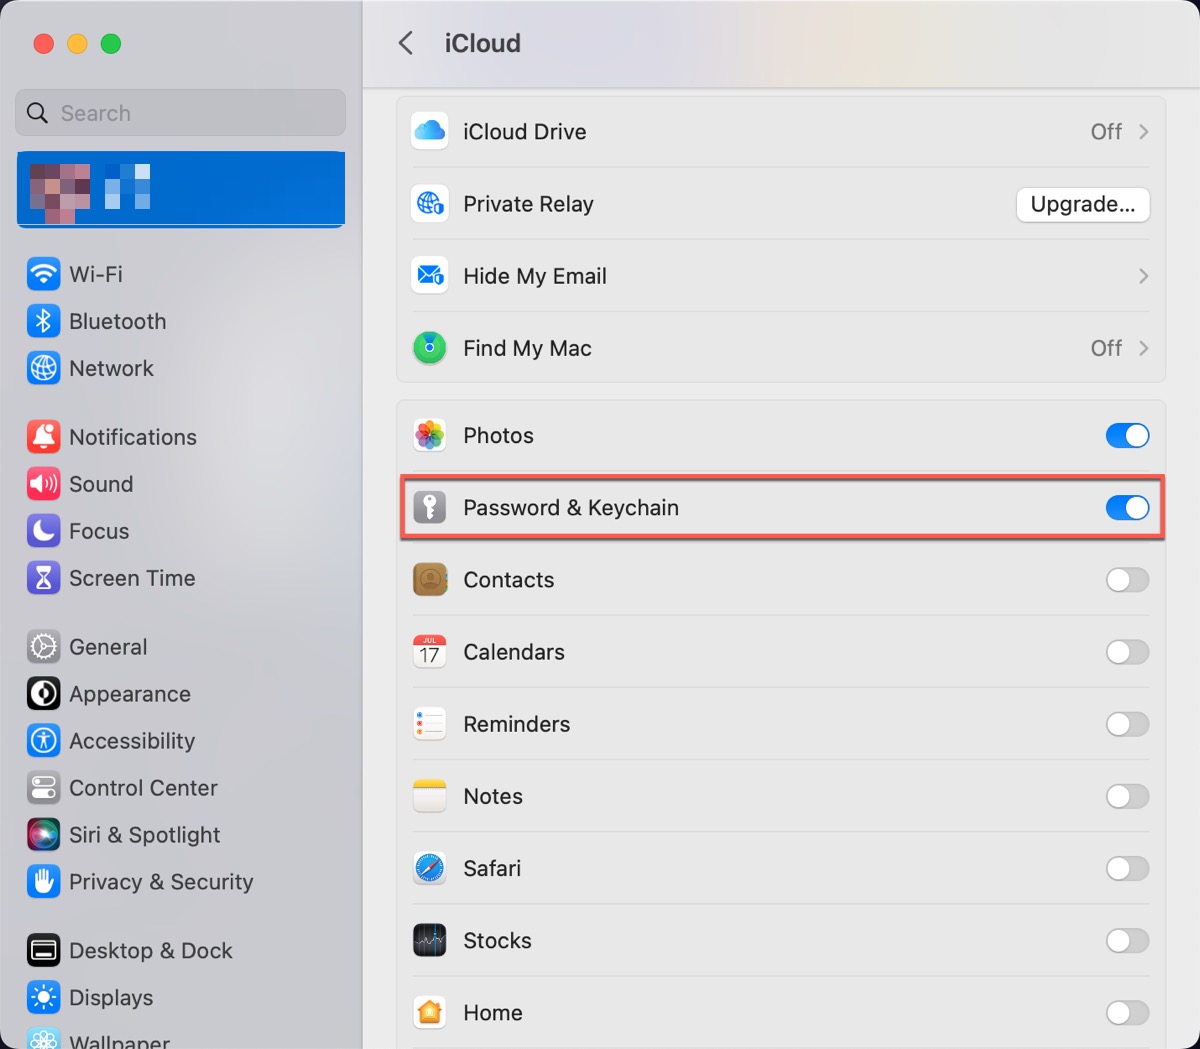
- Open System Settings or System Preferences.
- Click Apple ID at the top.
- Click iCloud.
- Click the Password & Keychain button and switch to on.
Set up multiple users
If someone wants to use your Mac/MacBook, you can set them up as their own users so that they can't access your data. And if someone wants to access your Mac/MacBook, you can set up a temporary Guest User.
macOS Ventura:
- Open System Settings.
- Select Users & Groups.
- Click Add Account… and enter your password to unlock.
- Type in the user's full name and account name.
- Set a password and click Create User.
macOS Monterey and earlier:
- Open System Preferences.
- Select Users & Groups.
- Click the lock icon and enter your password.
- In the New Account choose Standard.
- Fill in the Full Name, Account Name, and Password.
- Click Create User to finish.

If you want to set up a temporary Guests User, choose the account in the list and then click Allow user to administer this computer. In this way, you don't need to change your password as they can't change your settings, and all files they saved are deleted once they log out.
If you think the above ways are helpful, share this post with more people.
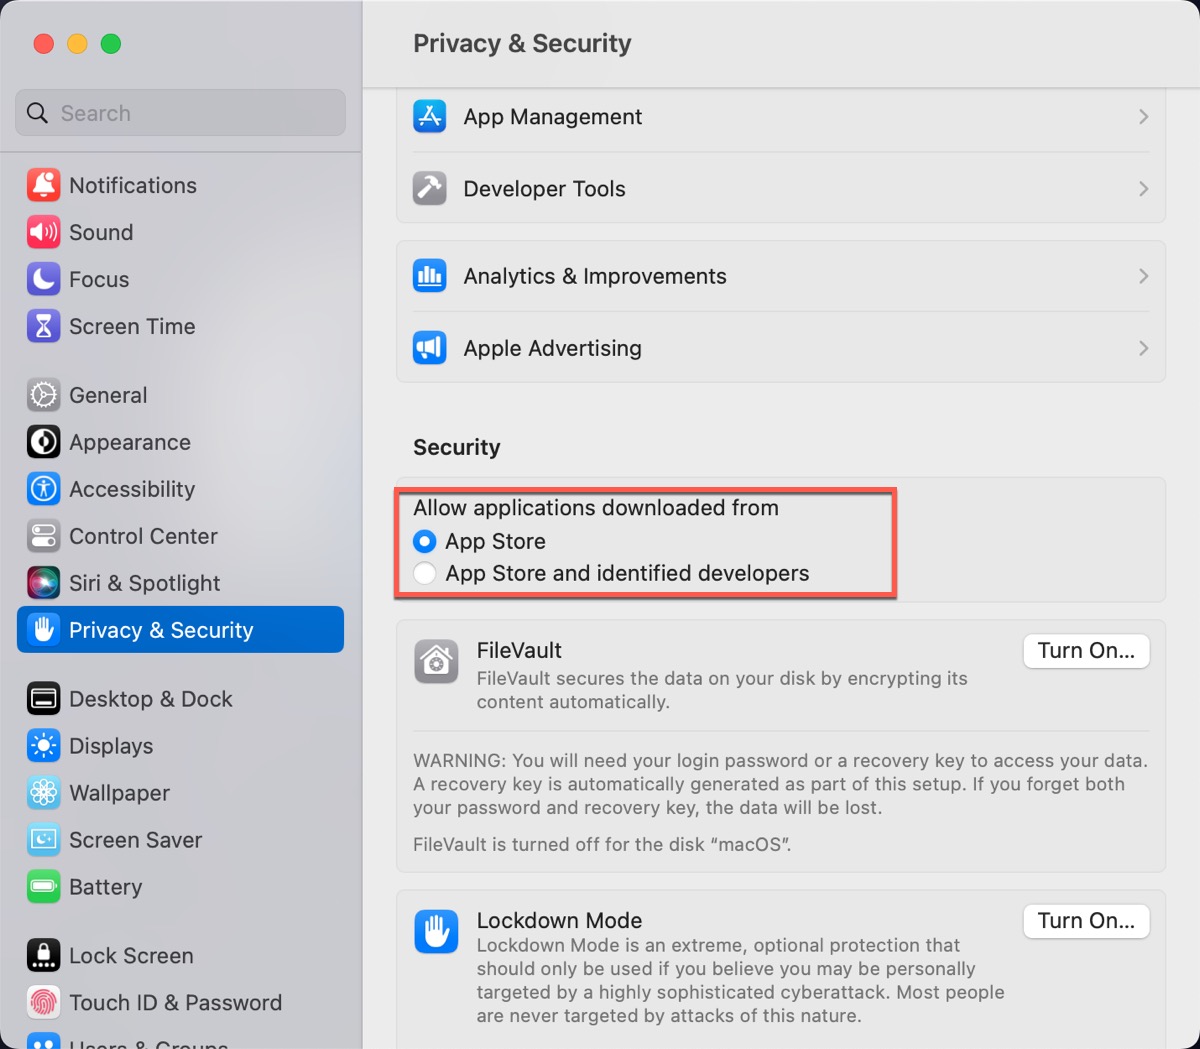
Limit your apps download
Gatekeeper is one of the safest features on your Mac/MacBook, which can stop you from installing anything that hasn't been verified by Apple and warn you any time when you try to install an app from the web and block the installation of some apps. The most powerful security way to download apps on Mac/MacBook is to only install in Apple Store.
Now, follow the below steps to limit your app's download.
- Open System Settings/System Preferences.
- Choose Security & Privacy in the left sidebar.
- Select Apple Store under the Allow applications download from section.
Keep your software up to date
If Apple issues an update, you need to update your software instantly, otherwise, all of Apple's protections will be no good to you.
Follow the steps to check your software update.
macOS Ventura:
- Open System Settings.
- Turn to General > Software Update.
macOS Monterey and earlier:
- Open System Preferences.
- Click Software Update.
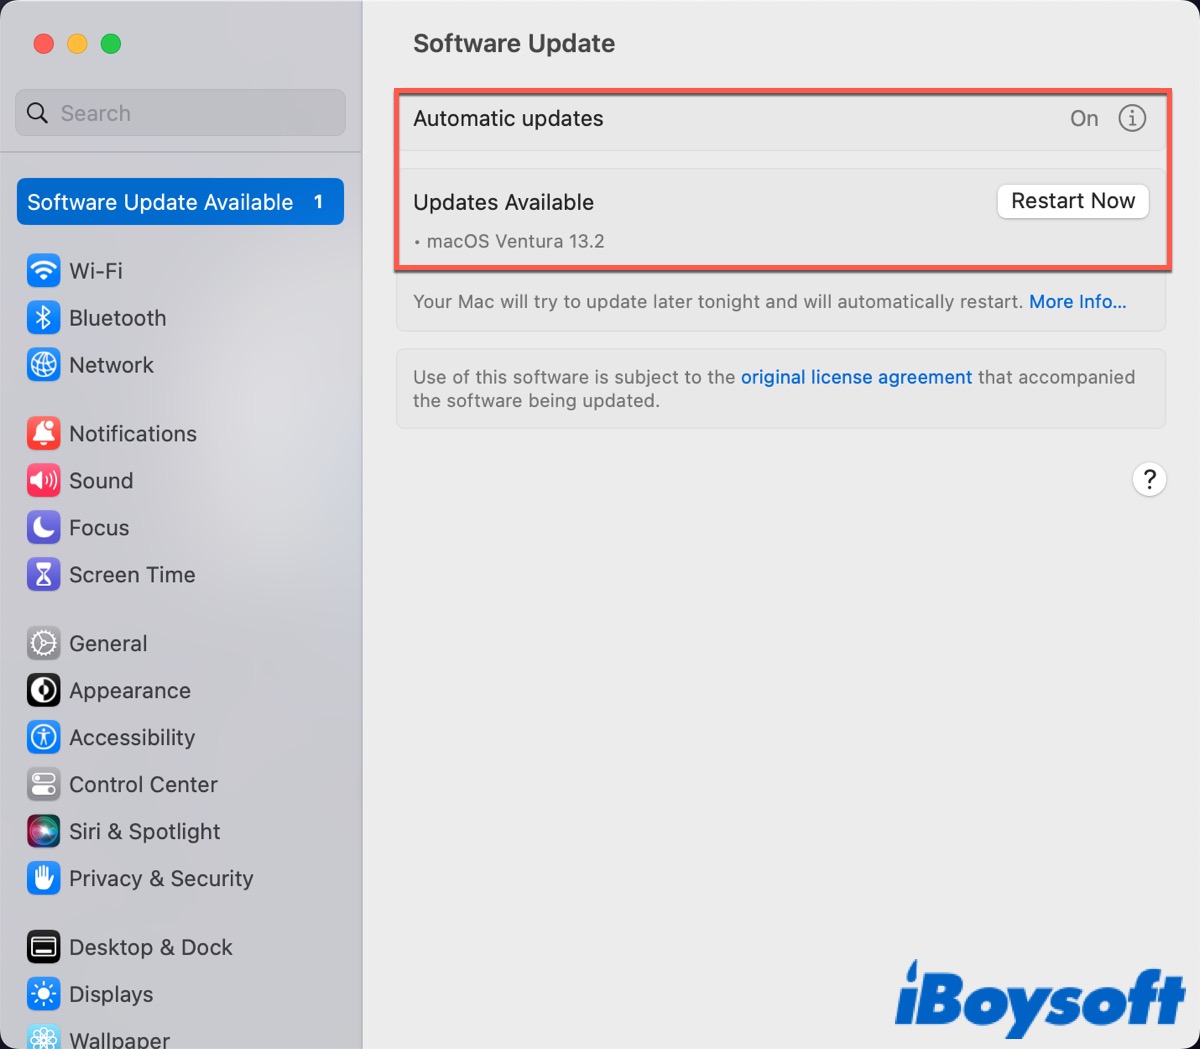
Your Mac/MacBook will check the software update automatically. If one is available, click Update Now. Turn on Automatical Updates on macOS Ventura or select Automatically keep my Mac up to date on macOS Monterey or earlier.
Lock down your Mail
Your Mail is as much of a risk as Safari or Chrome, so locking down your Mail is also important. It can block someone who uses tracking pixels hidden in images to tell them you have opened the Mail to confirm that the email address is in use.
- Open Mail > Settings > Privacy.
- Check Protect Mail Activity is selected.
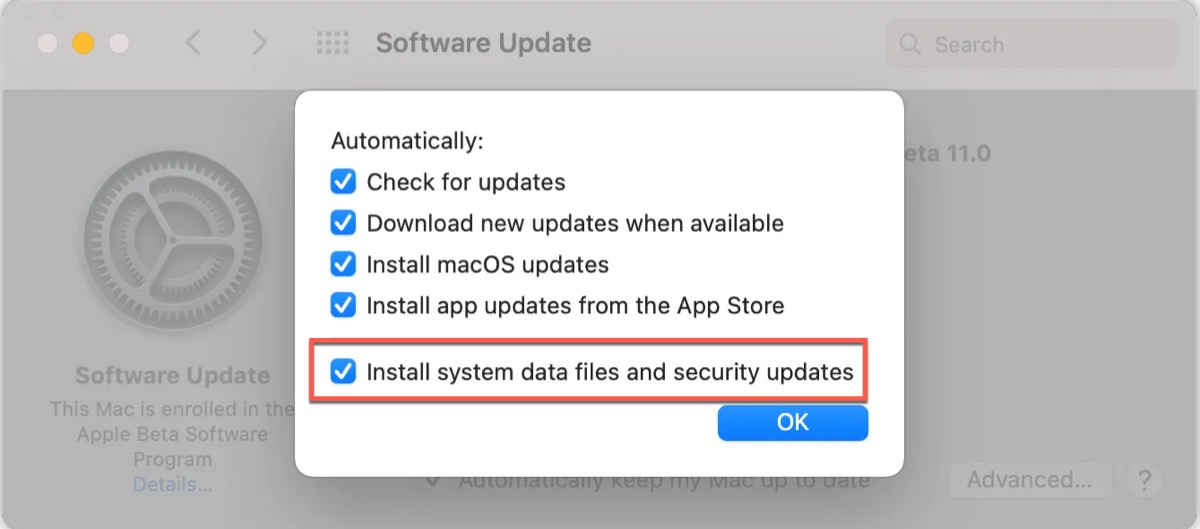
Use XProtect antivirus
If malware or a bad app has bypassed GateKeeper, macOS built-in its own antivirus called Xprotect, which can block and remove any detected malware on your Mac/MacBook.
By default, XProtect is updated by Apple. Go to System Preferences > Software Updated > Advanced, and ensure that the box next to “Install system data files and security updates” is checked.
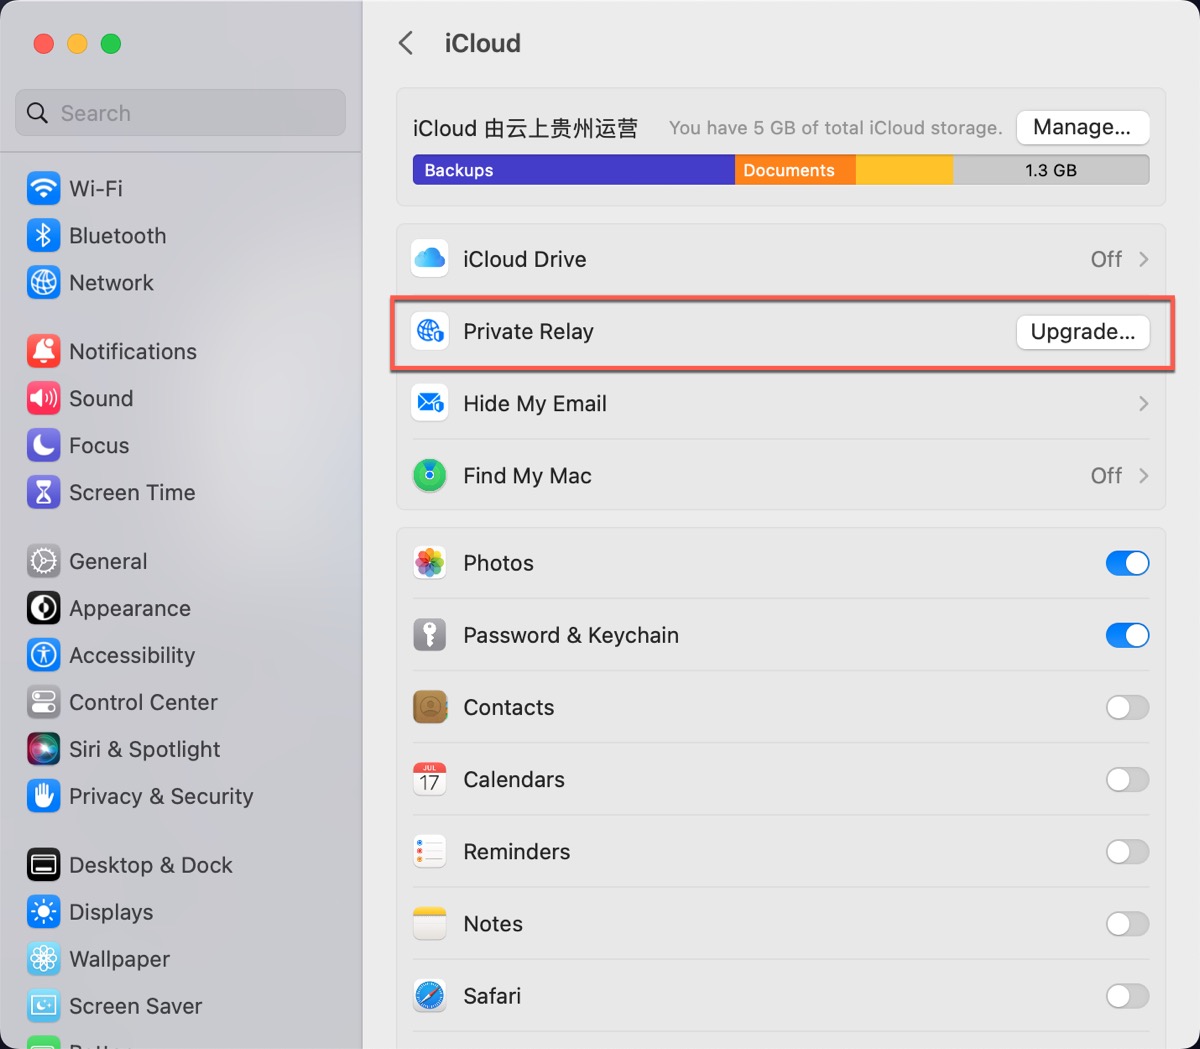
Use VPN
You can open VPN on your Mac/MacBook to offer another protection, which will encrypt all your data and keep your data completely private.
Apple offers its own VPN called iCloud Private Relay for anyone who pays for iCloud+, and it can only encrypt your web traffic but cannot hide your region. Besides, it can only work with Safari.
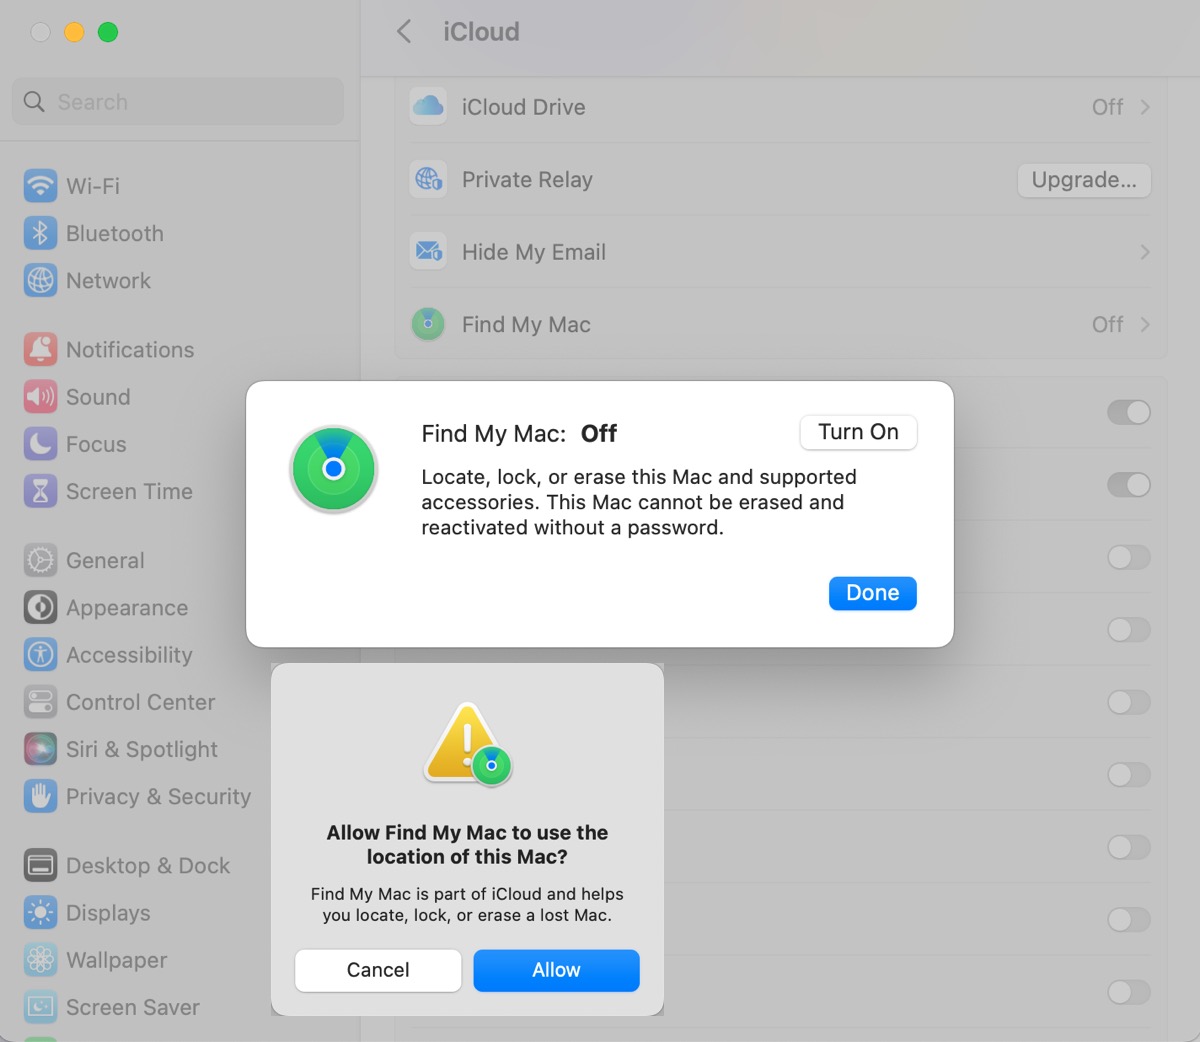
Turn on Find My Mac
Find My is a built-in app on your Mac/MacBook, which can help you locate your Mac/MacBook on the map or erase your Mac/MacBook when it has been stolen or lost.
- Open System Settings/System Preferences.
- Click on your Apple ID.
- Click on iCloud.
- Find Find My and turn it on.
When asked to Allow Find My Mac to use the location of this Mac, click Allow. And then, type in your password and open your Location Services in Security & Privacy.
Related read: Protect My Mac from Viruses: Things You Should Know in 2022
If you have been through malware or theft, you can take the above ways to protect your Mac/MacBook from malware and theft. Share this post to more people to learn how to protect their own Mac/MacBook.
FAQ about protecting Mac from malware and theft
- QHow do I protect my Mac from theft?
-
A
You can remotely lock your Mac with a passcode to help prevent unauthorized access. In addition, tap Activate under Mark As Lost in the Find My app, or select Lock on iCloud.com.
- QCan an Apple MacBook be targeted by malware?
-
A
Actually yes. Although Mac has powerful built-in security features, it can still be infected by malware.
- QDoes Apple have theft protection?
-
A
Yes, it's AppleCare+ with Theft and Loss. If you purchase Apple Care +, you can get everything included in AppleCare+ and up to two incidents of theft or loss coverage every 12 months.