Released on October 24, 2022, macOS Ventura is by far the most recent macOS version. It comes with a redesigned System Settings app, and a number of new features, including Stage Manager, Continuity Camera, Freeform, Duplicate Photos album, and improvements to apps like Mail, Safari, Spotlight, Messages, and so on.
Many Mac users have upgraded their Macs to enjoy this new release. If you're looking to install macOS Ventura on your Windows PC, you'll need to use a virtual machine. In this guide, we'll show you how to install macOS Ventura on VMware, which is a popular virtual machine software for running macOS on Windows PC.
Tips: You can also install macOS on VirtualBox to run it on Windows.
How to install macOS Ventura on VMware on Windows PC?
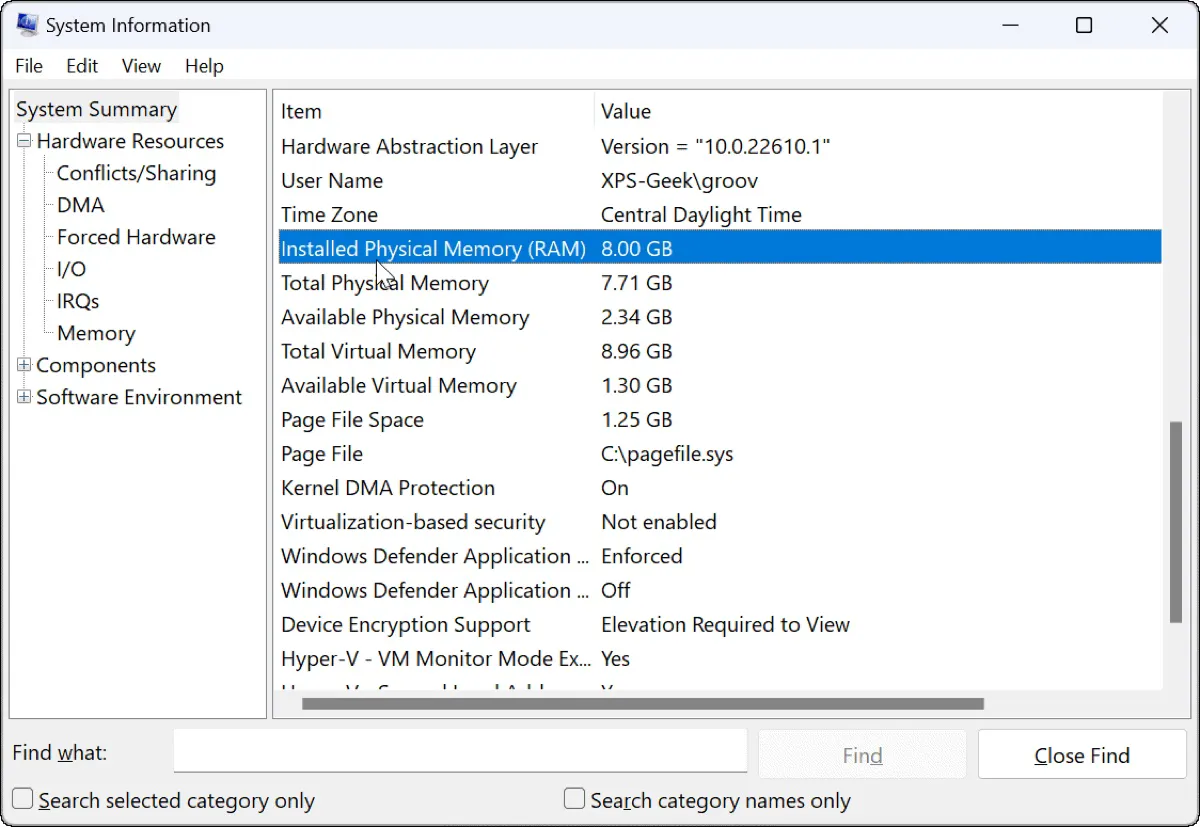
To run macOS Ventura on your PC, you'll need at least 8 GB RAM installed and 80 GB of free hard disk space. So, before we begin, you should check to ensure your Windows PC meets the requirements. Here's how to view the amount of RAM and storage available on Windows:
- Click on the Start menu button in the bottom left corner of your screen.
- Type "System Information" into the search bar and press Enter.
- In the System Information window, look for the "Installed Physical Memory (RAM)" and "Total Physical Memory" fields. These fields will display the amount of RAM installed on your computer.
- To view the amount of storage on your computer, click on Components > Storage in the left-hand menu of the System Information window.
- In the Storage window, you will see a breakdown of your hard drive(s) and the amount of used and free space.
If your Windows PC satisfies the minimum specifications, you're good to go.
Note: Installing macOS Ventura on VMware will not erase data on your Windows PC as VMware allows you to create a virtual machine, which runs independently of the host operating system. However, it's always important to back up your data before making any major changes to your computer system.
How to install macOS Ventura on VMware on Windows PC? (Quick steps)
- Step 1: Download the macOS Ventura ISO
- Step 2: Install VMware Workstation or Player
- Step 3: Download and Install Unlocker for VMware
- Step 4: Create a macOS Ventura virtual machine
- Step 5: Modify the macOS Ventura .vmx file
- Step 6: Format the virtual hard drive for macOS Ventura
- Step 7: Follow the on-screen instructions to install macOS Ventura on VMware
- Step 8: Install VMware Tools
Step 1: Download the macOS Ventura ISO
macOS Ventura is designed to run exclusively on Apple hardware, which means that you cannot simply install it on a Windows PC like you would with other operating systems such as Windows or Linux. Instead, you'll need to create a virtual machine on your Windows PC using the virtualization software VMware Workstation, which emulates the hardware of a Mac and allows you to install macOS Ventura as a guest operating system.
To create a macOS Ventura virtual machine on a Windows PC, you will need the macOS Ventura ISO file, which contains a complete copy of the macOS Ventura installer. This can only be done on a Mac. If you have one, you can create the macOS Ventura ISO file yourself.
If not, you can download the Mac operating system for Windows directly.
If you need an earlier version of macOS Ventura, try to download the macOS 13.3.1 Ventura ISO file we created for you.
Step 2: Install VMware Workstation or Player
VMware has two products that allow you to run macOS Ventura on a Windows PC: VMware Workstation Pro and VMware Workstation Player, also known as VMware Workstation and VMware Player. Both products are similar in terms of functionality, but there are some differences between them.
Licensing: VMware Workstation is a paid product that requires users to purchase a license to use. VMware Player, on the other hand, is a free product that can be downloaded and used without any cost.
Functionalities: VMware Workstation provides more features than VMware Player. For example, Workstation can clone virtual machines and manage encrypted virtual machines, whereas Player doesn't have these features.
Compatibility: VMware Workstation can run on Windows, Linux, and macOS, while Player is only available for Windows and Linux. Additionally, Workstation can run a wider range of virtual machines, including those created in other VMware products like vSphere and Fusion.
Performance: While both products offer good performance, Workstation is generally faster than Player, especially when running multiple virtual machines at the same time.
To conclude, if you need a professional virtualization product with advanced features and support for a wide range of operating systems and virtual machines, go with VMware Workstation. However, if you just need a basic virtualization product to run macOS Ventura on your Windows PC and don't want to pay for a license, VMware Player is a better choice.
Once you've decided, you can click the links below to download the VMware of your choice and follow its instructions to install it on your Windows PC.
- Download VMware Workstation (License-required)
- Download VMware Player (Free)
During the installation, ensure to select "Install Windows Hypervisor Platform (WHP) automatically" and enable "Enhanced Keyboard Driver" and "Add VMware workstation console tools into the system path" if available.
Step 3: Download and Install Unlocker for VMware
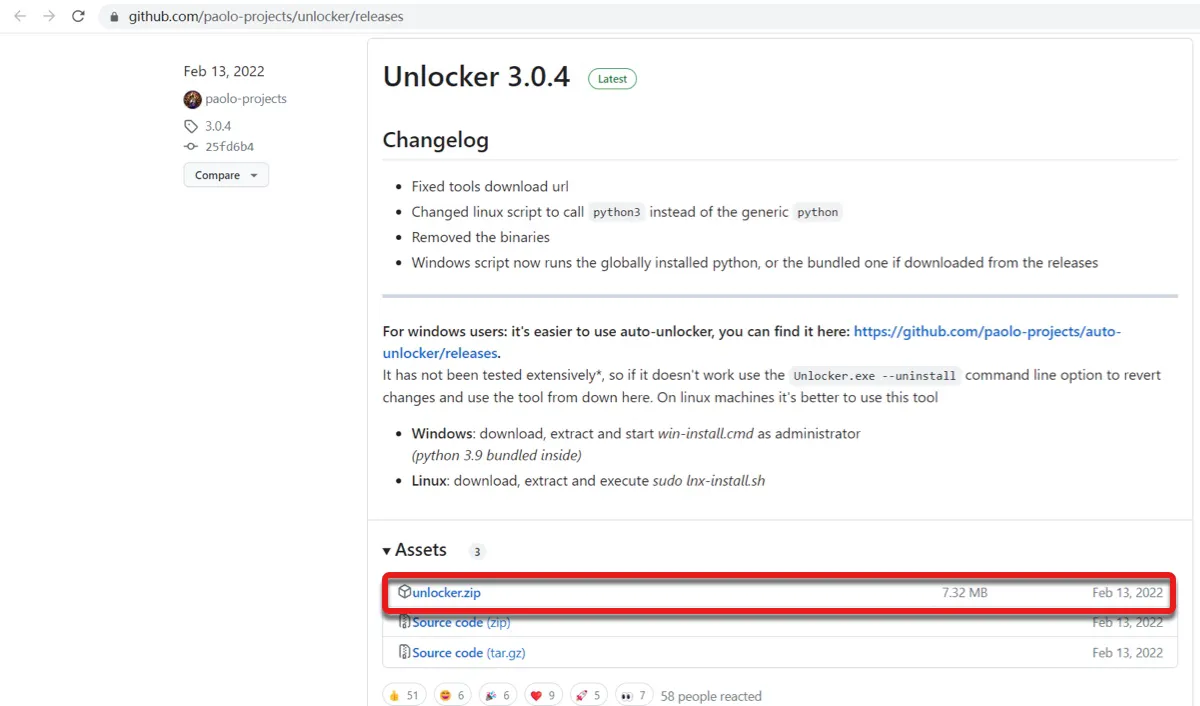
The third step to install macOS Ventura on VMware is to install the auto-unlocker tool for macOS virtual machines. It can bypass the restrictions preventing macOS virtual machines from running on non-Apple hardware. You can get the Unlocker from Github.
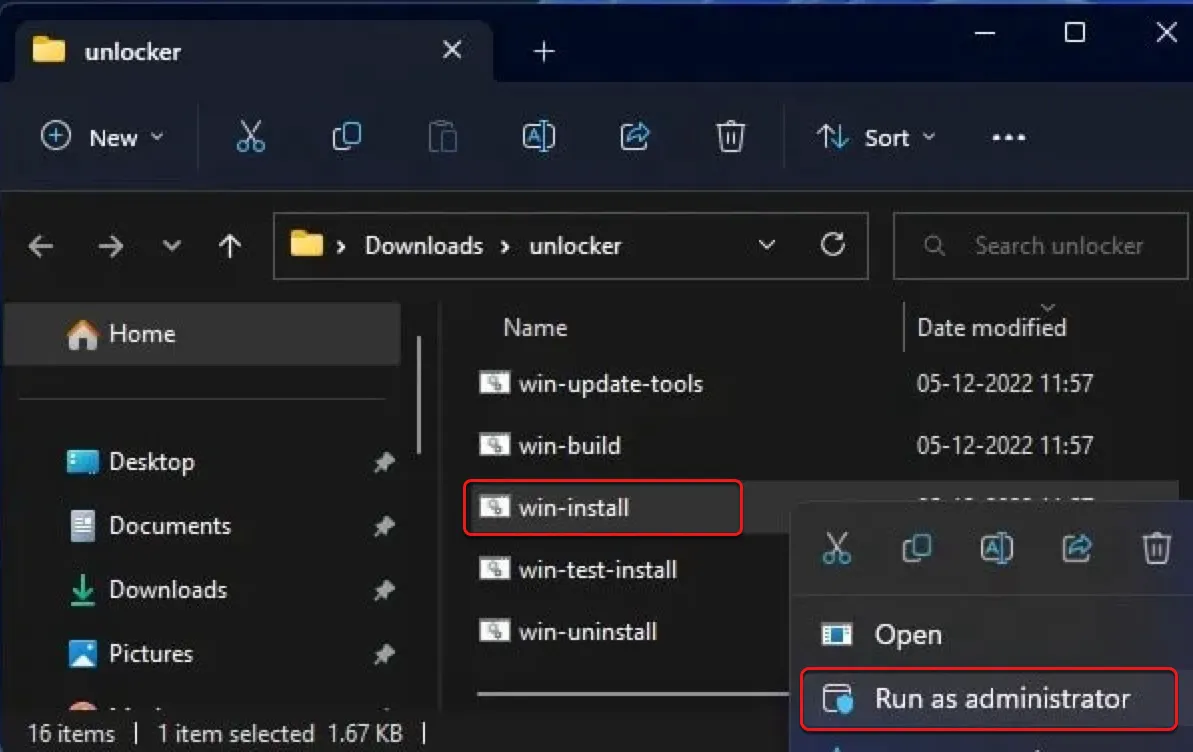
Then unzip the file, open the extracted folder, and right-click on the win-install.cmd file and select "Run as administrator.
Step 4: Create a macOS Ventura virtual machine
After the Unlocker is installed, you can launch VMware to create the macOS Ventura virtual machine by taking the following steps.
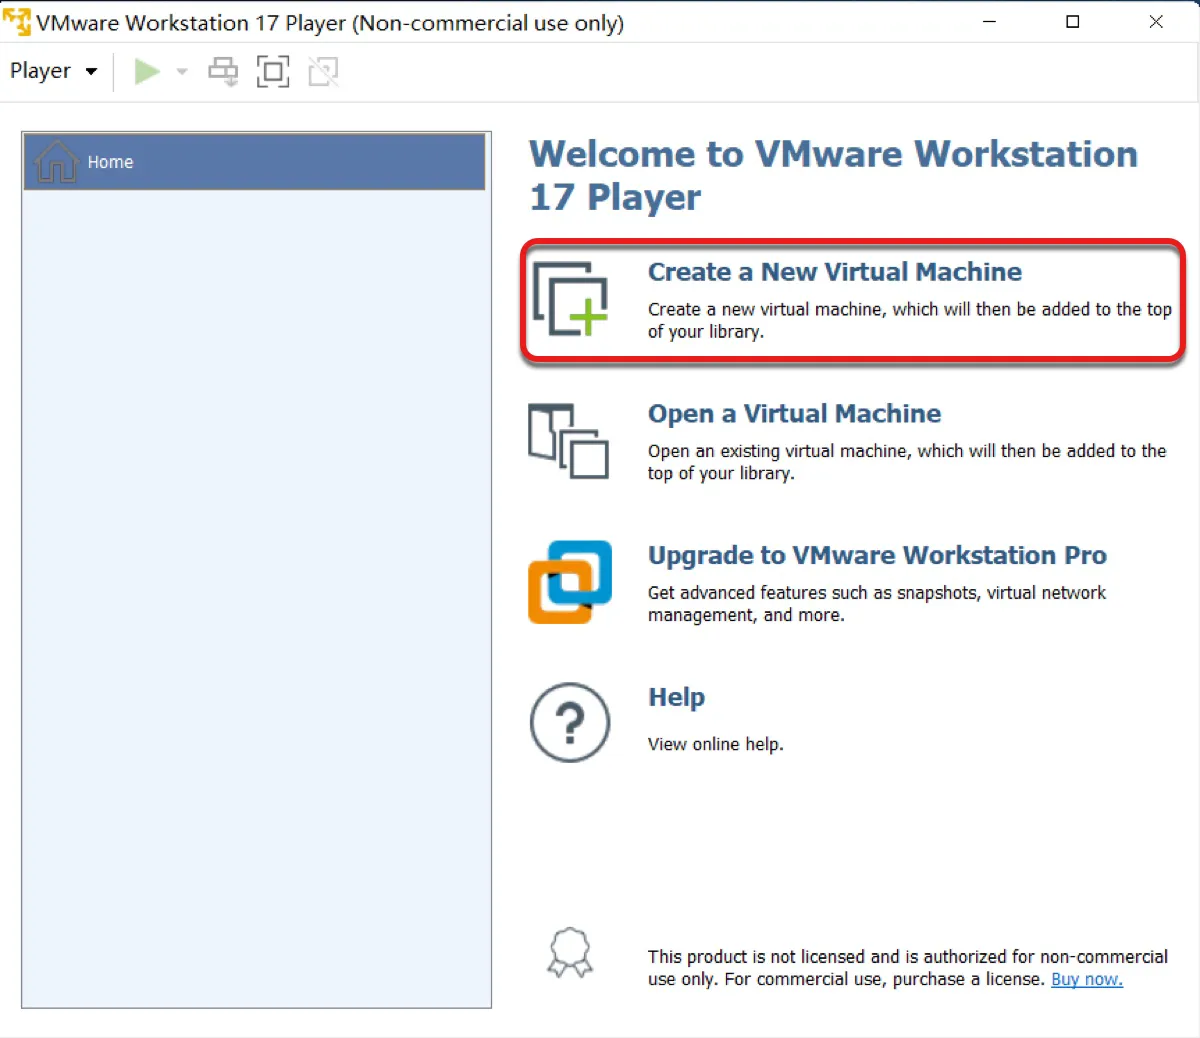
- Launch VMware Workstation or Player and click "Create a New Virtual Machine."
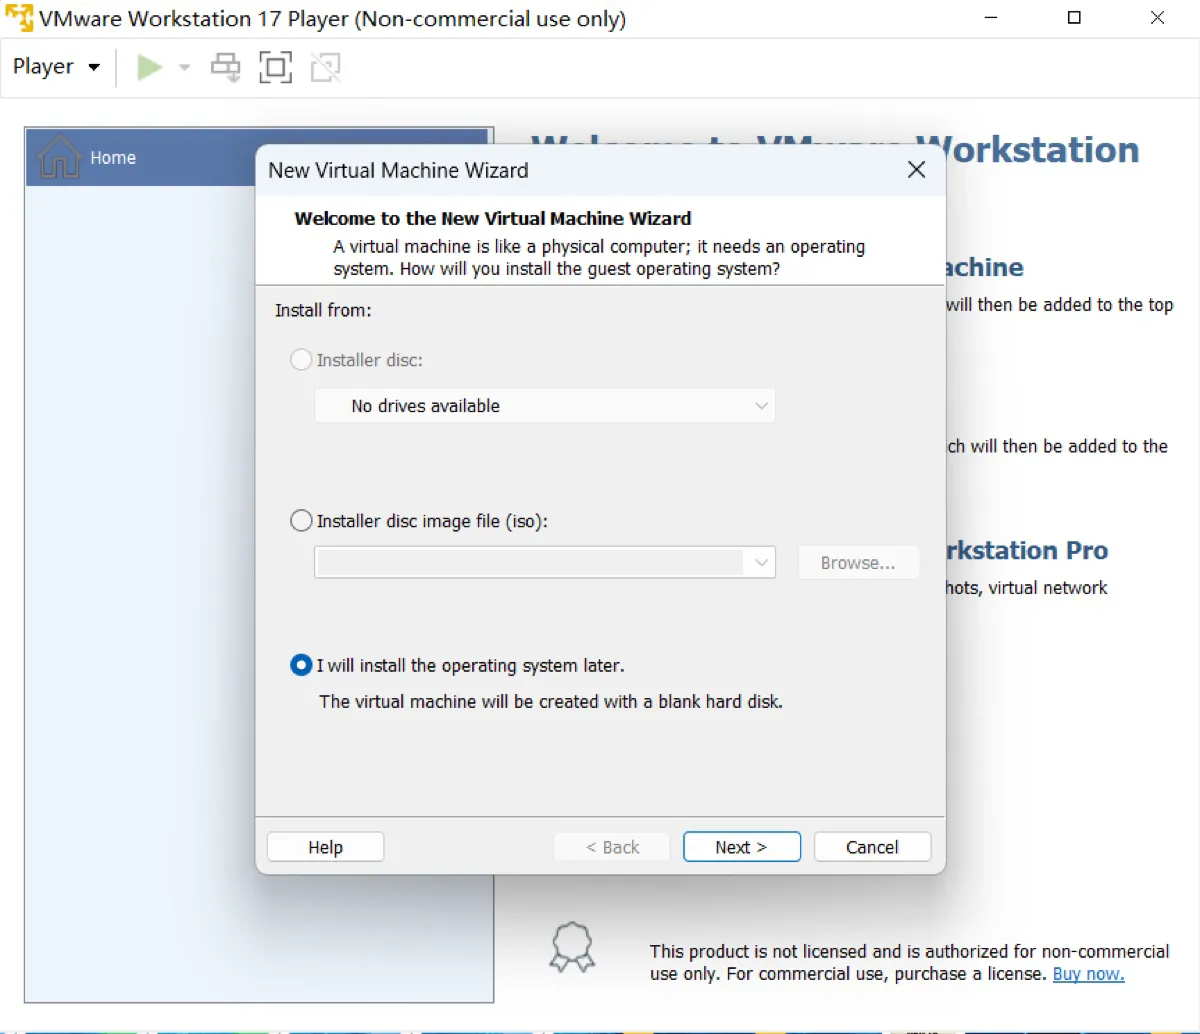
- Select "I will install the operating system later" and tap Next.
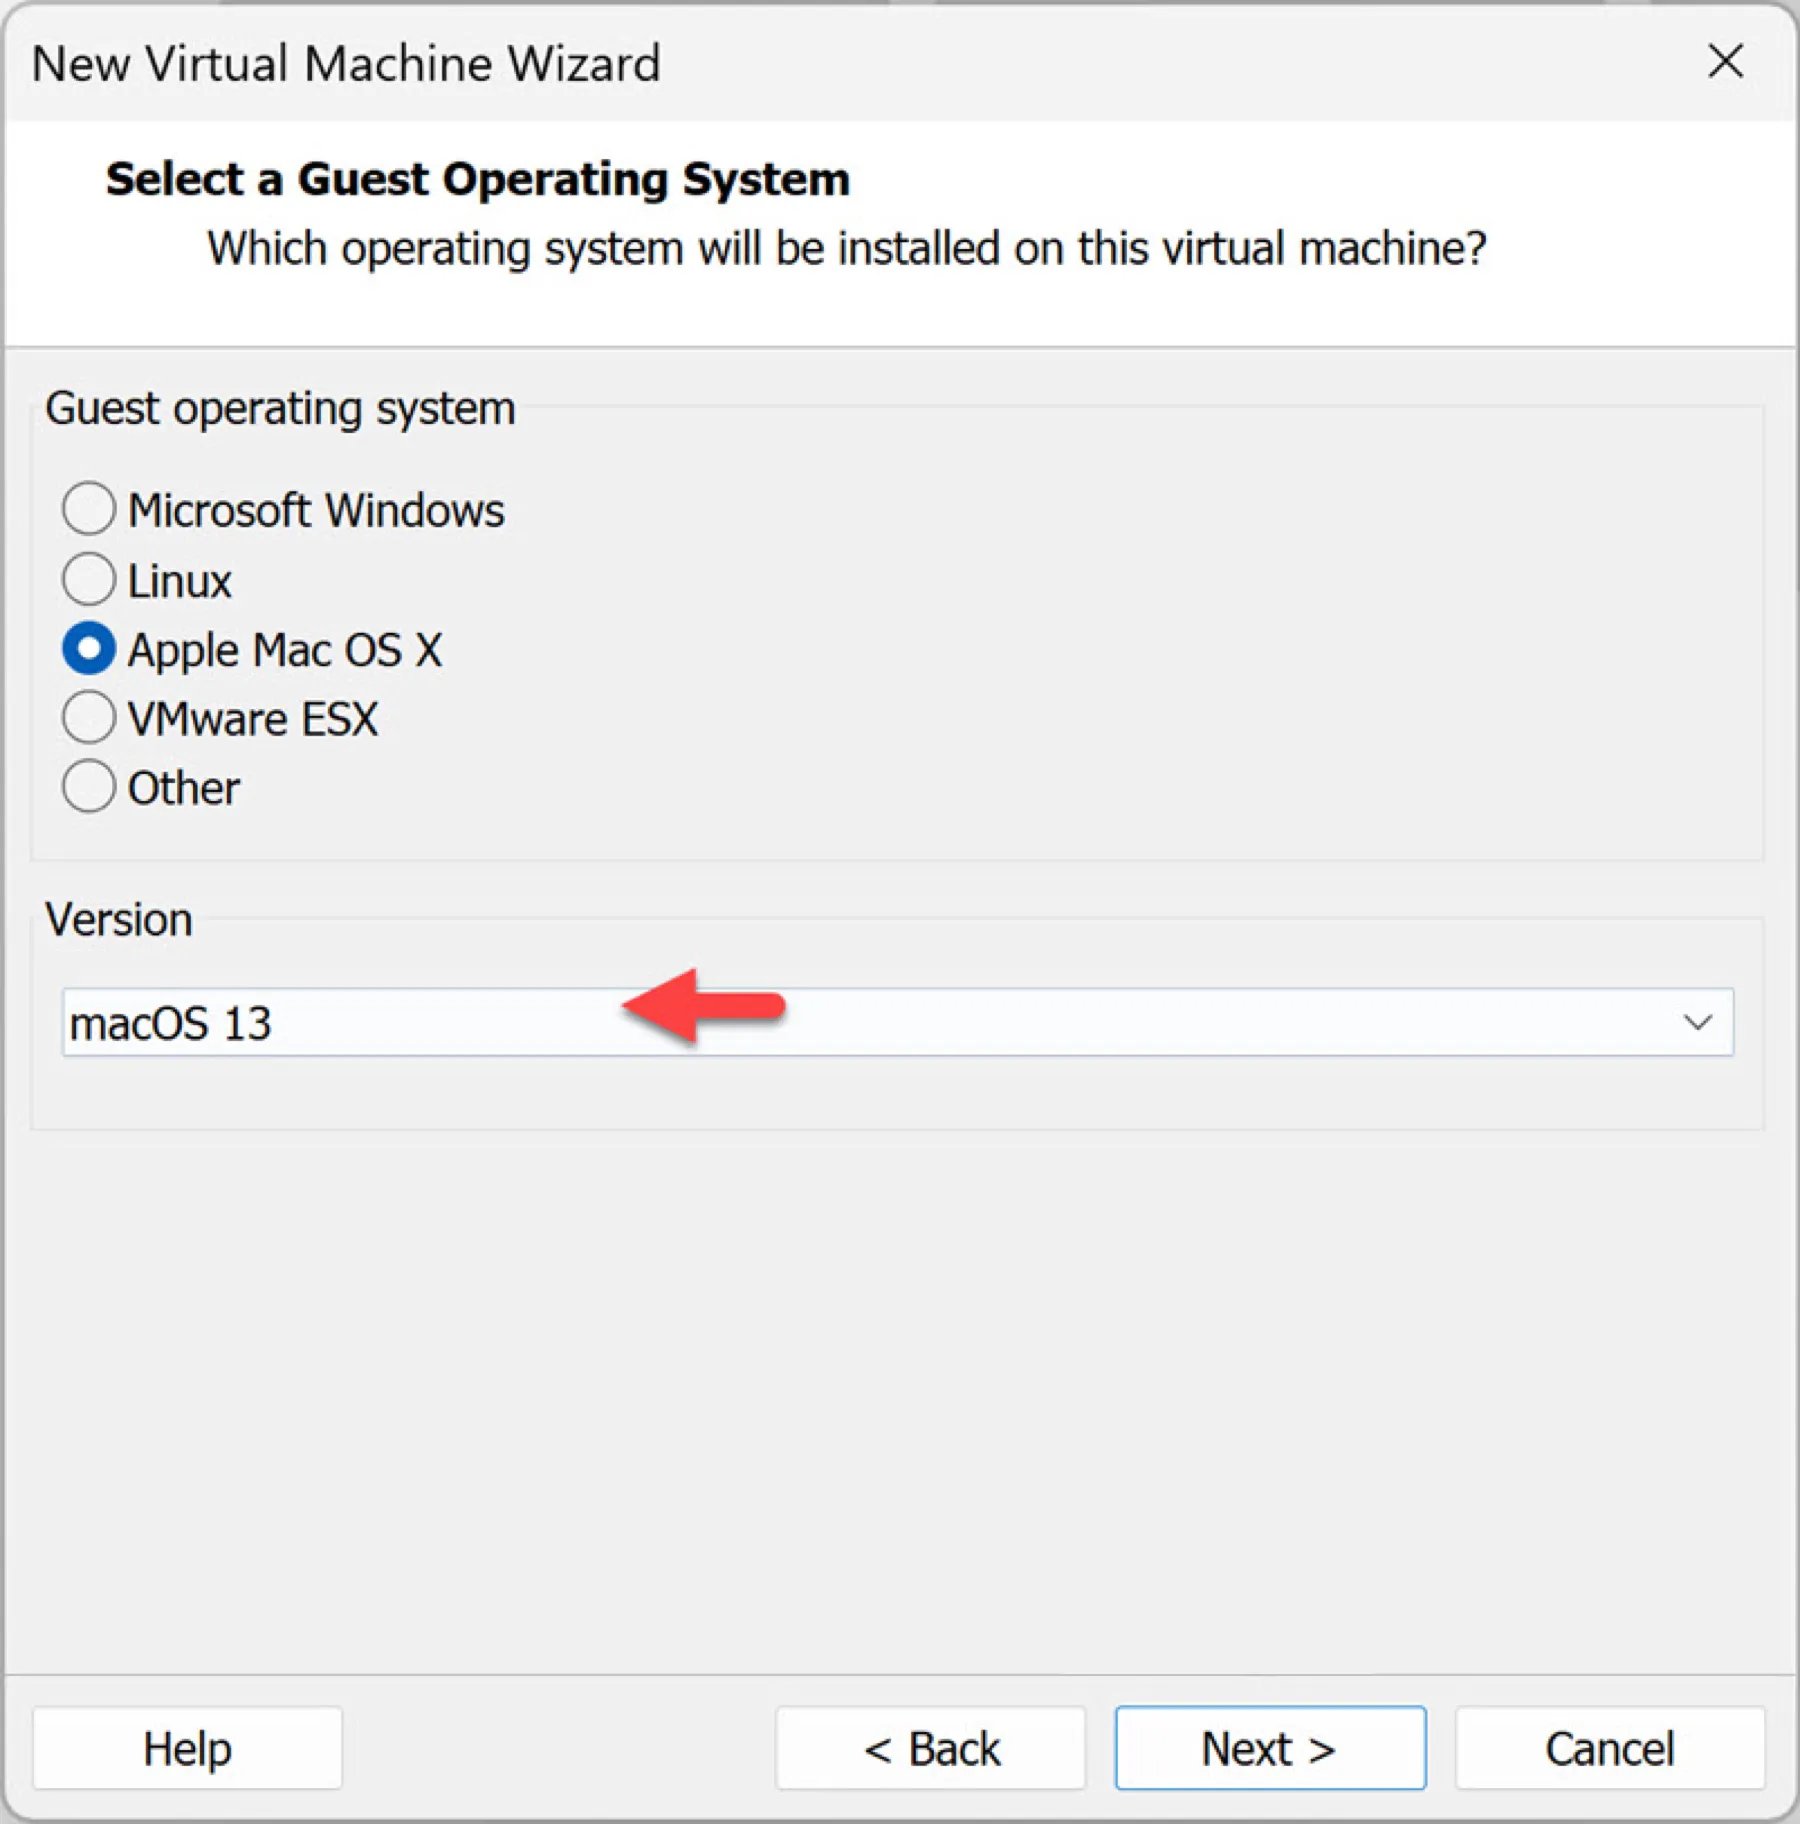
- Choose "Apple Mac OS X" as the guest operating system and select macOS 13, then click Next. (This option won't be available if you haven't installed the Unlocker.)
- Enter a name for the virtual machine and select a location to save it.
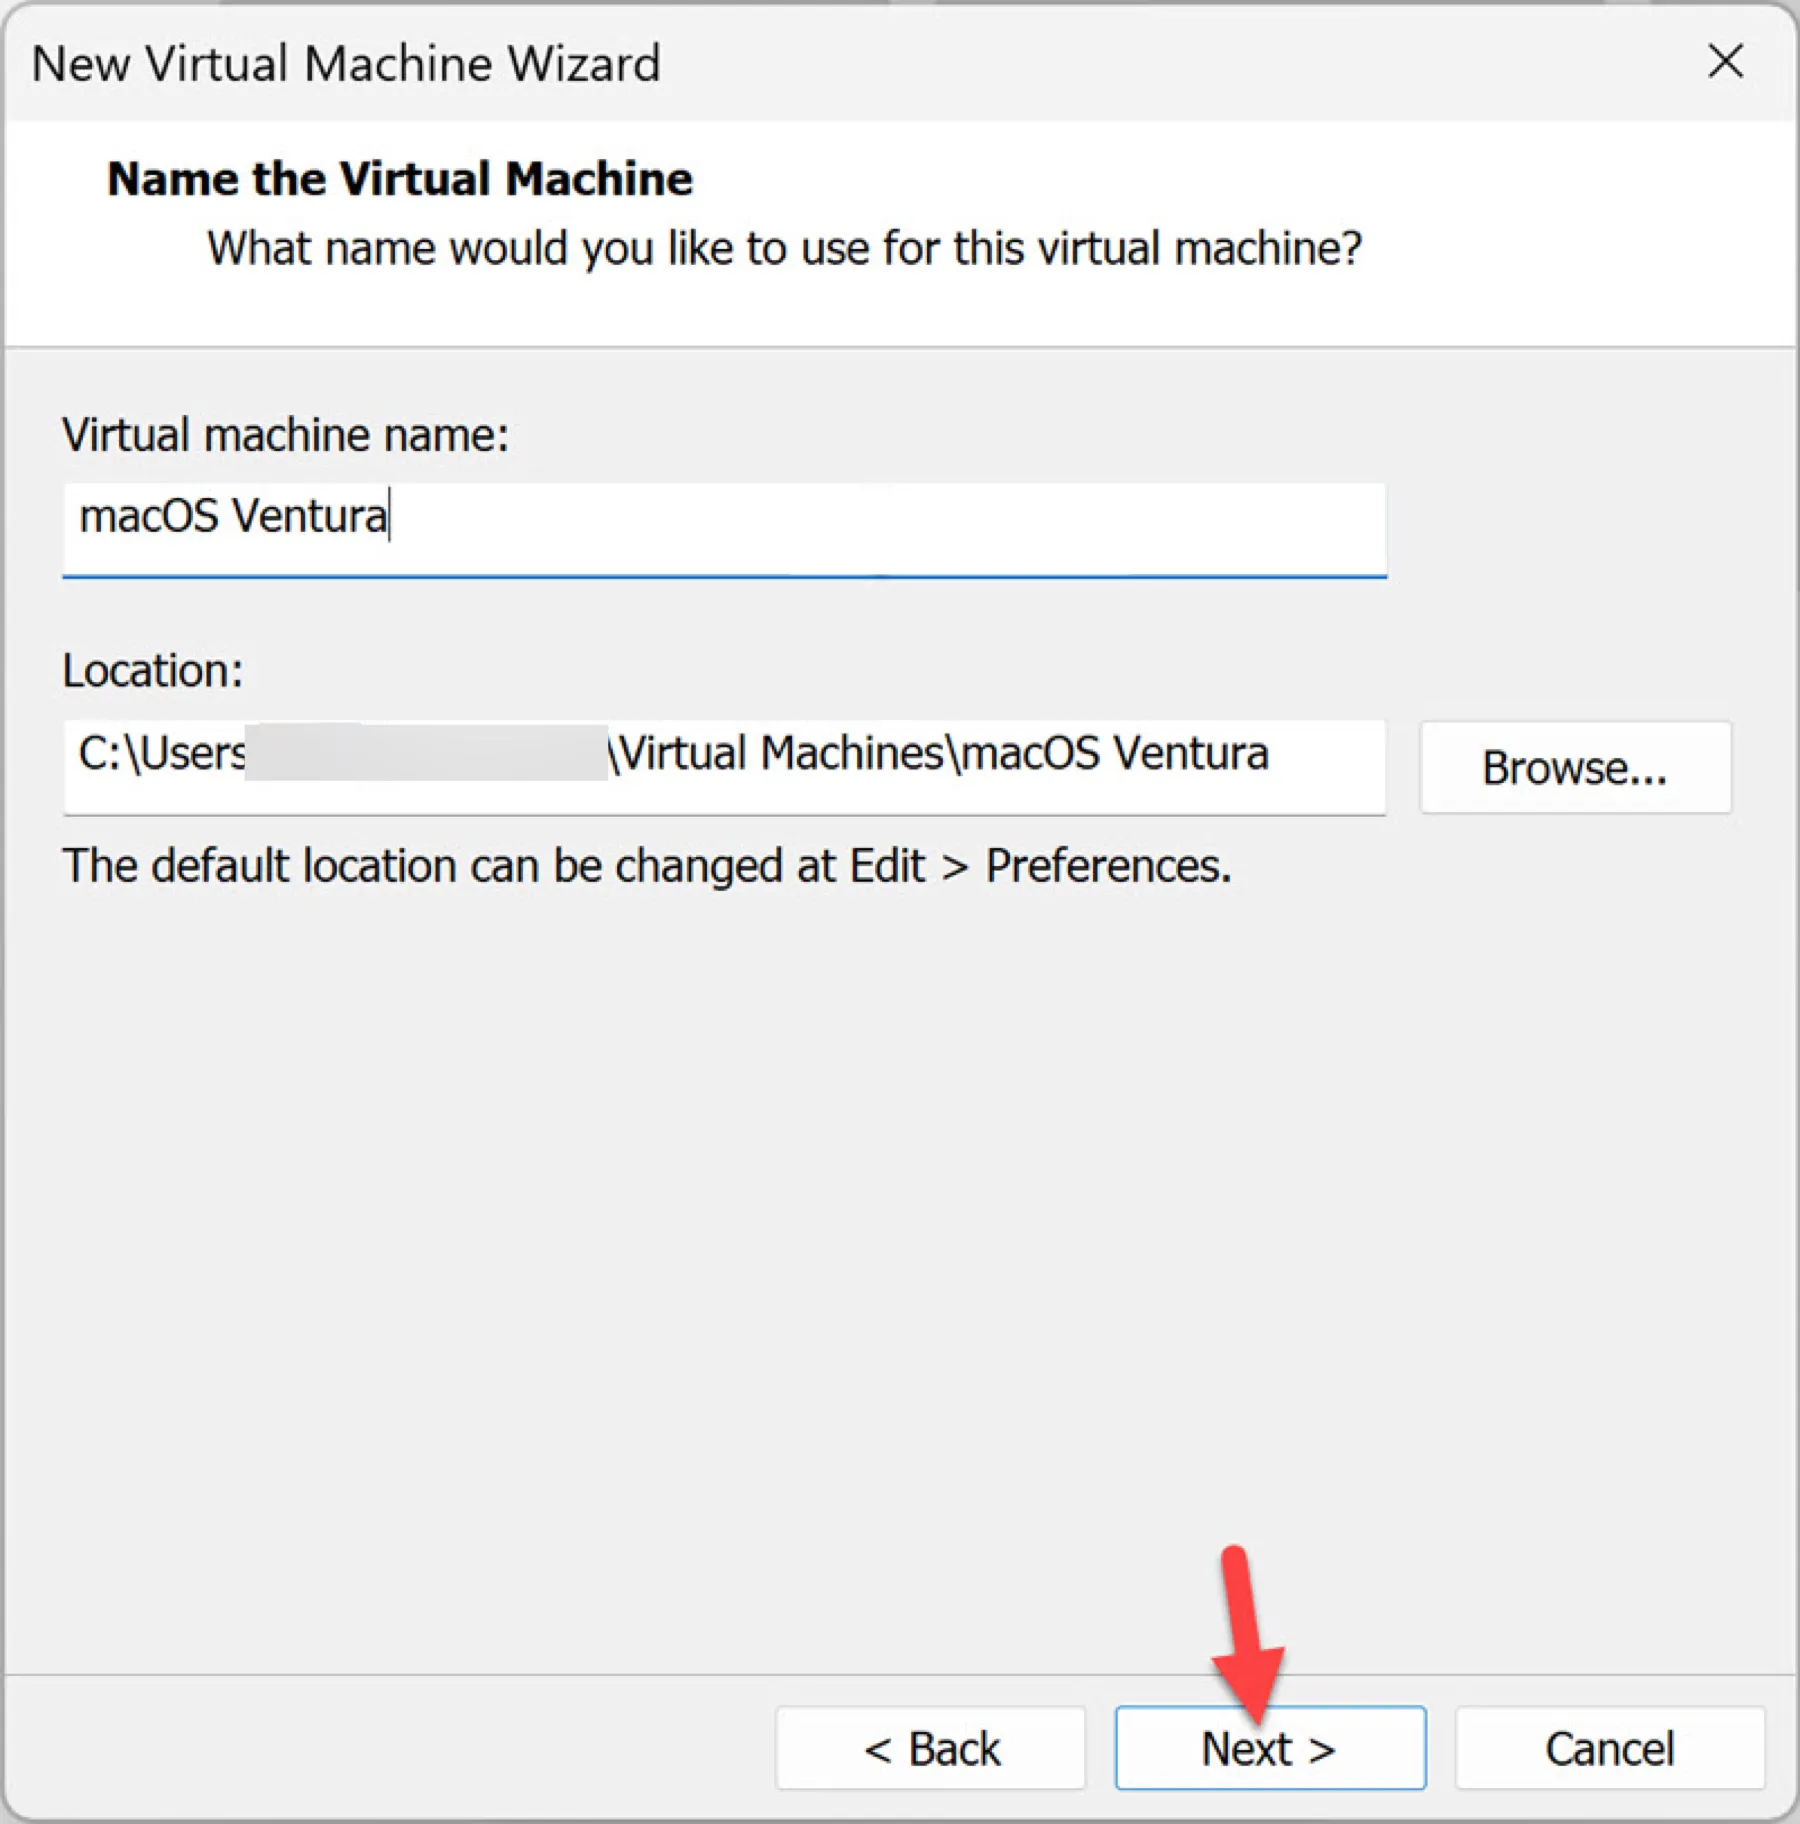
- Click Next.
- Specify the maximum disk size as 80 GB or above (e.g.120 GB).
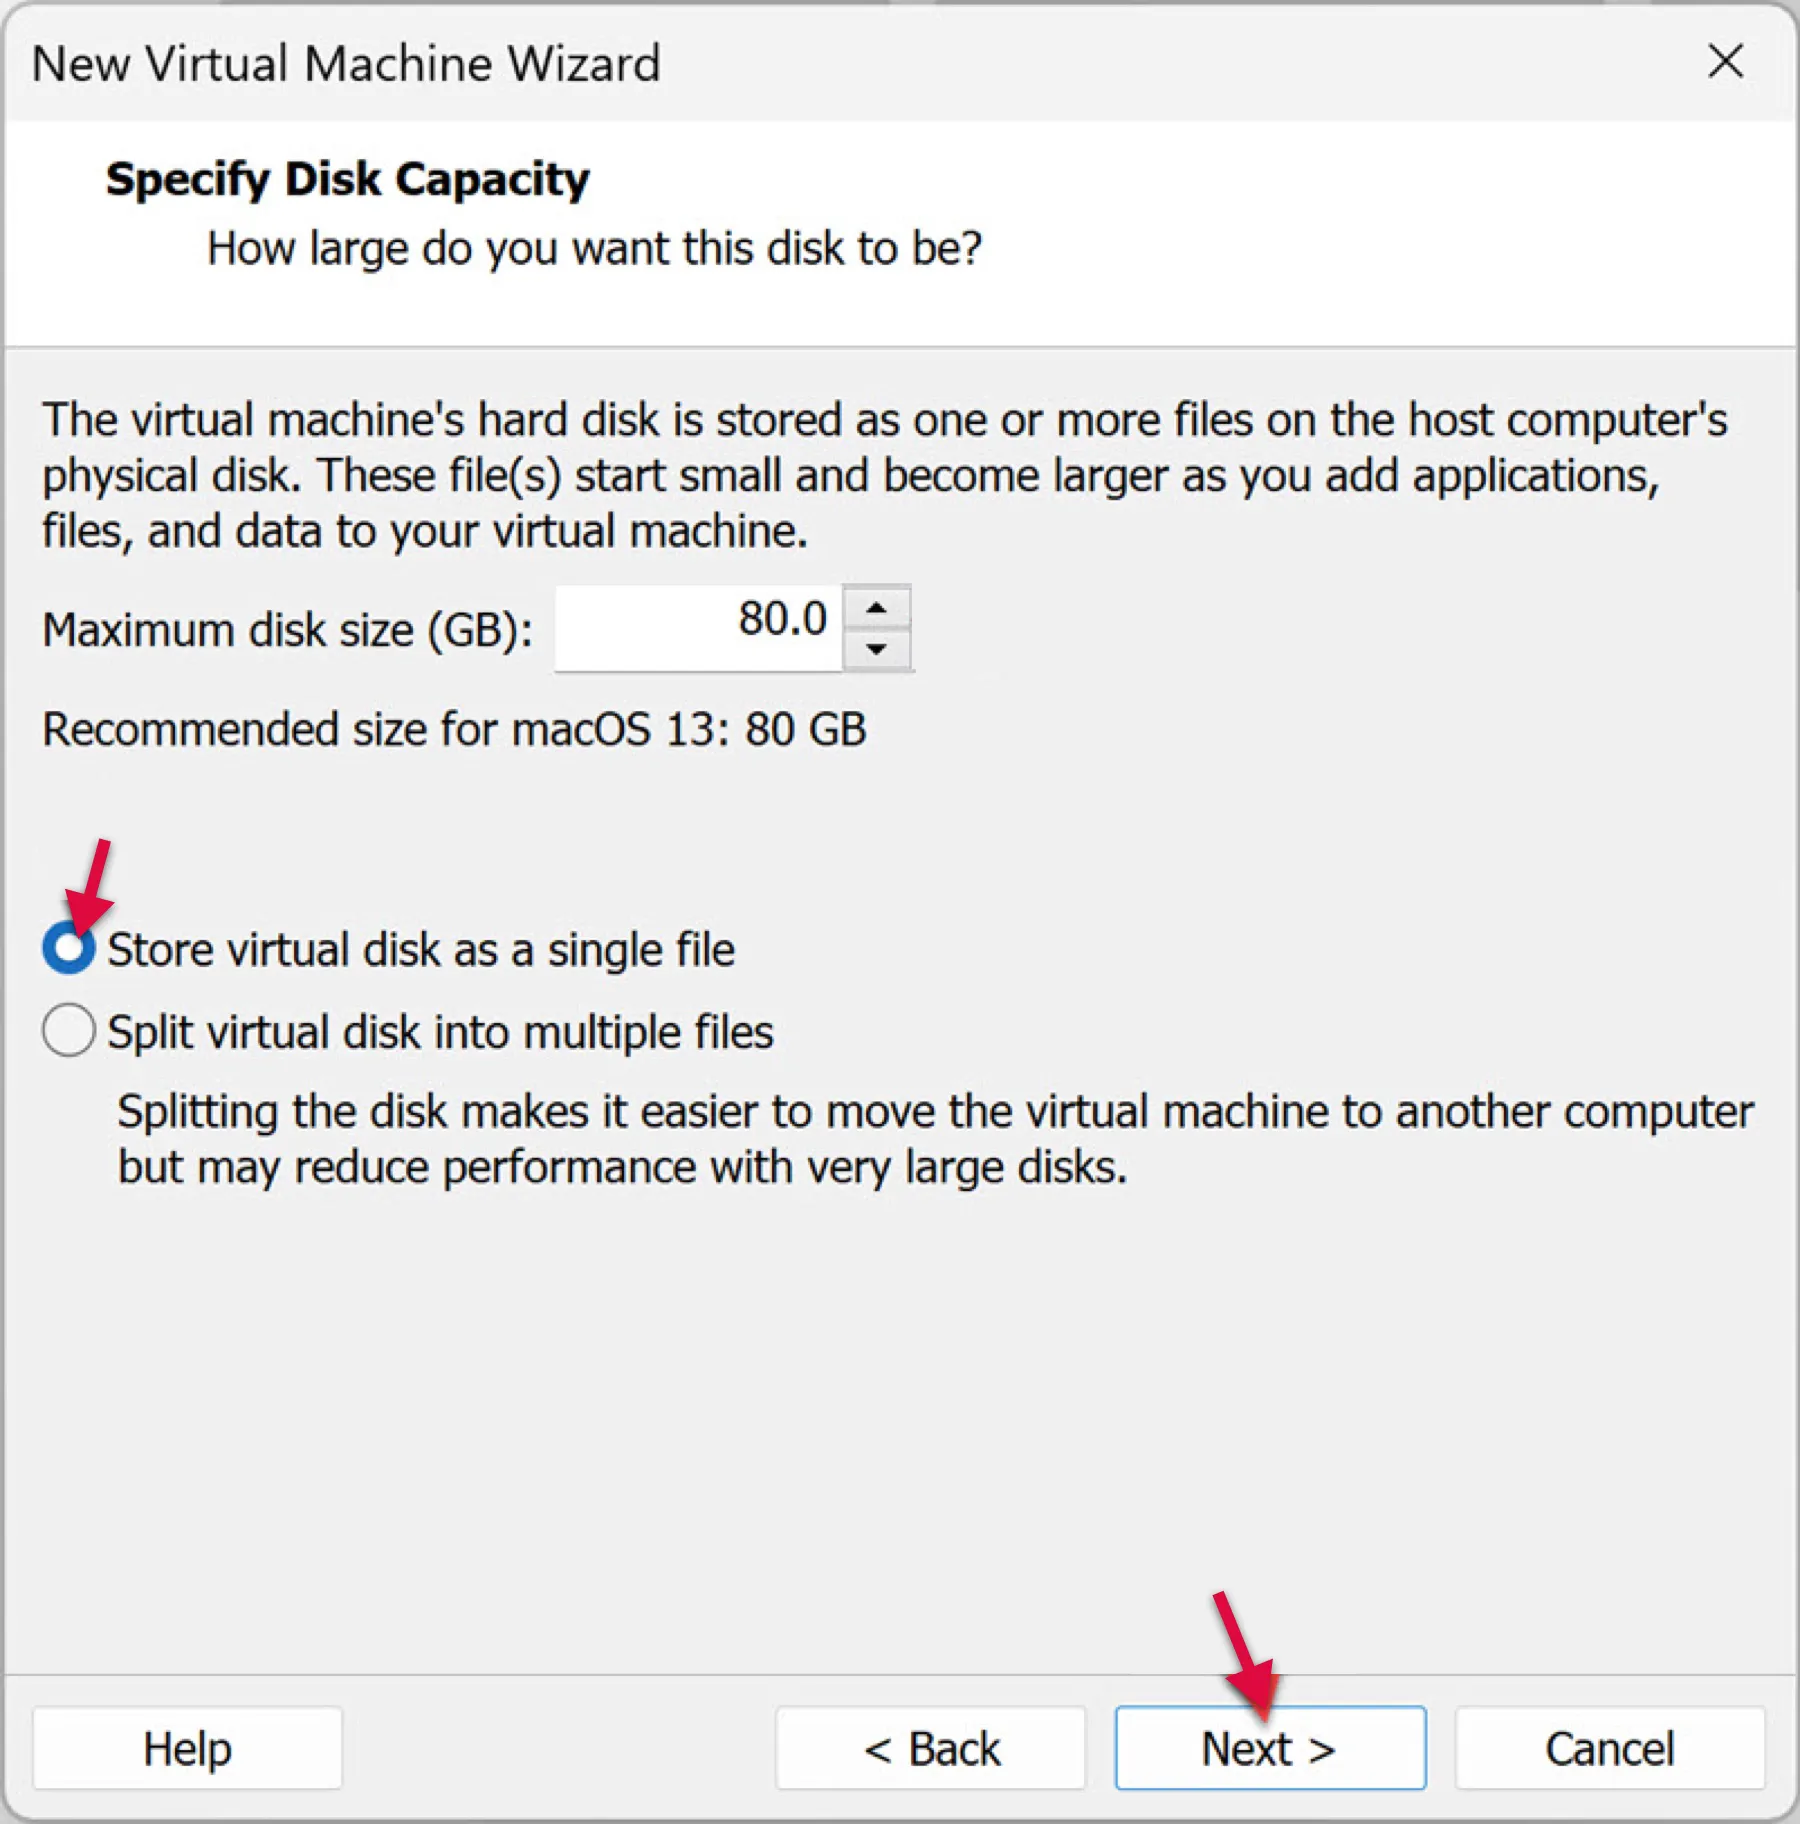
- Choose "Store virtual disk as a single file" and click Next.
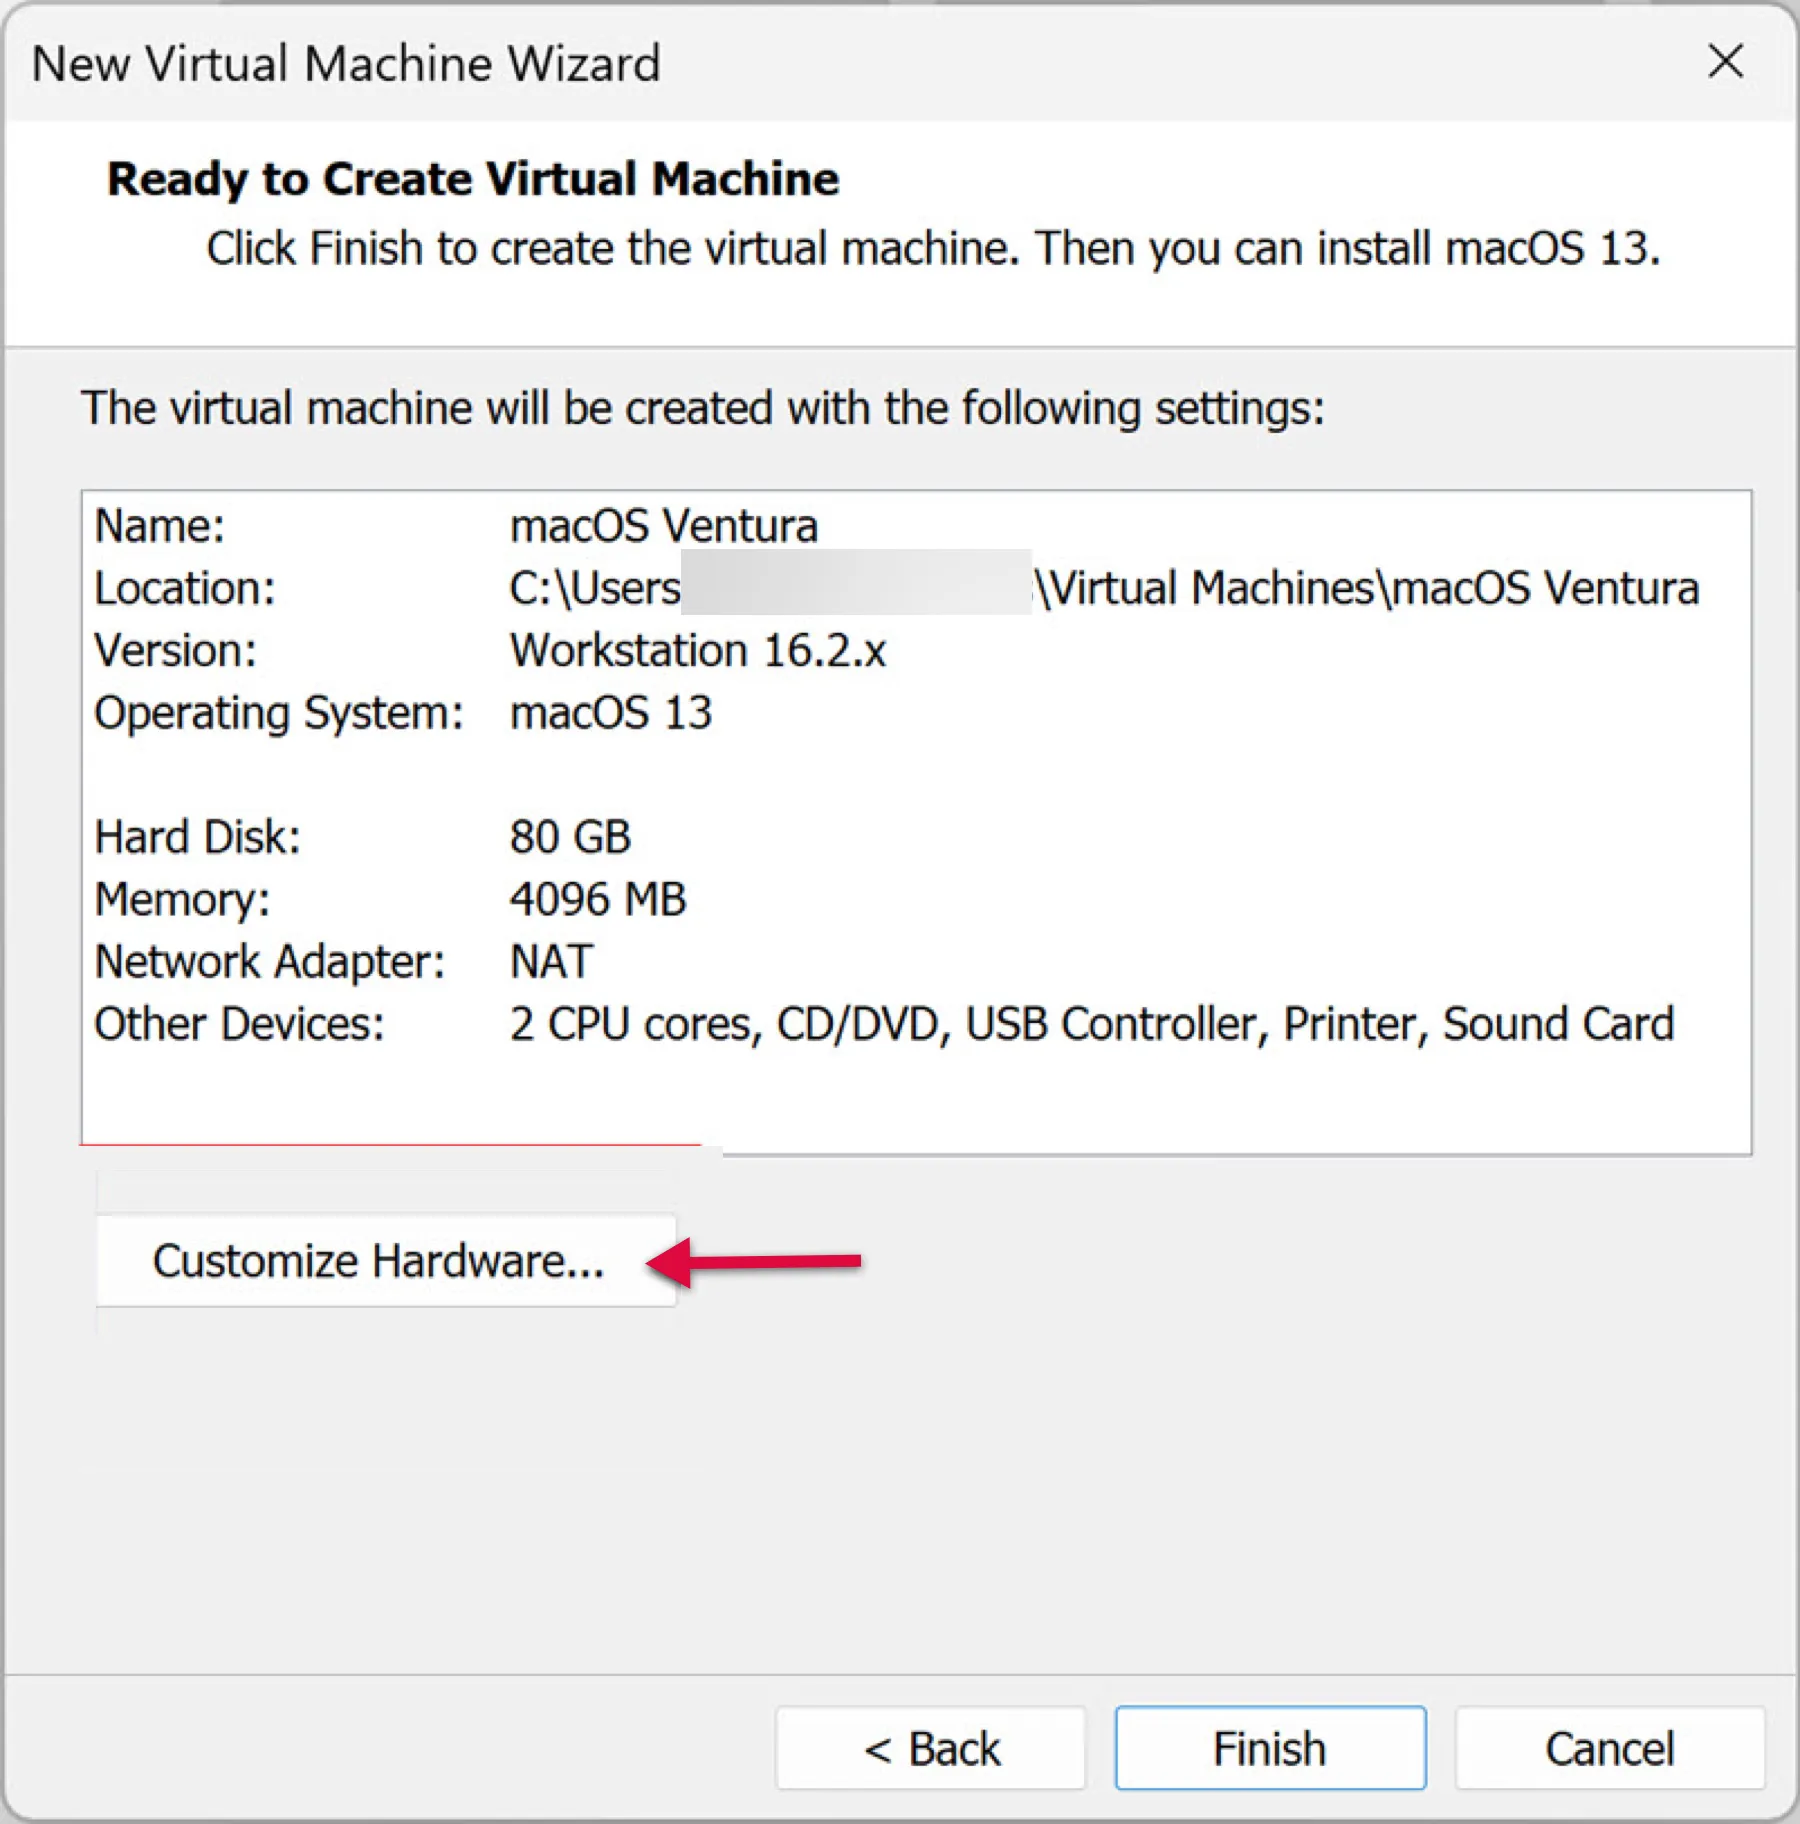
- Click "Customize Hardware."
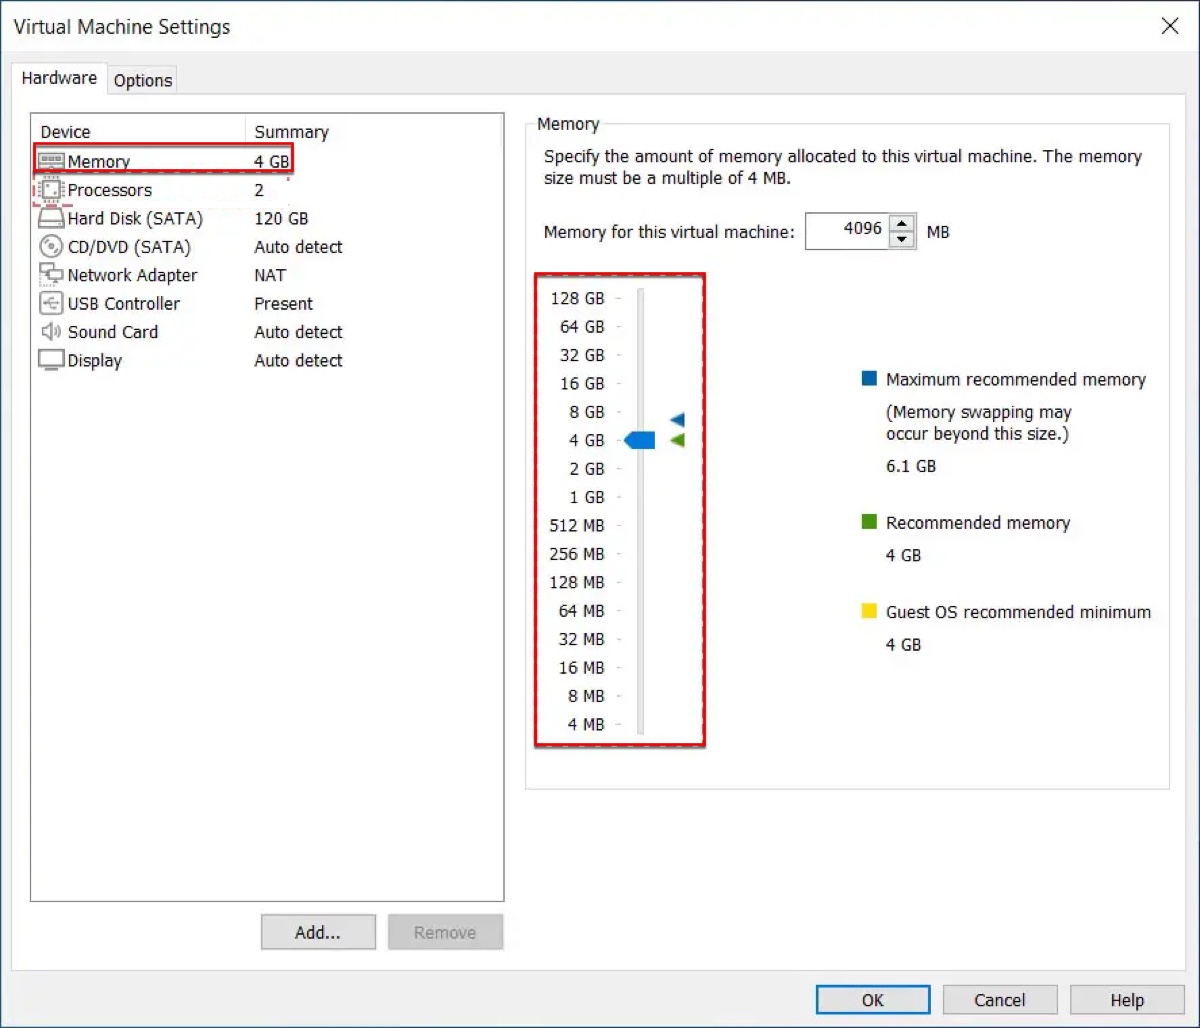
- Select Memory from the left side and set the memory to 4 GB and above (If your PC has 16 GB of RAM, consider allocating 8 GB to the virtual machine).
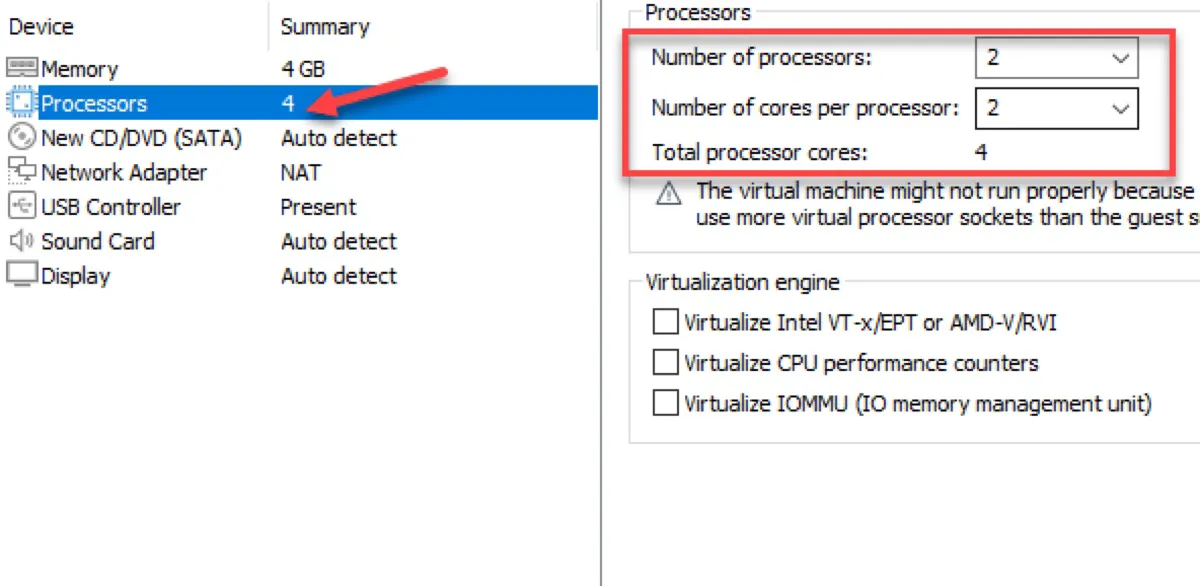
- Click Processors and set the "Number of cores per processor" to 2 or higher cores depending on the resources of your system (If your PC has 8 cores, you can allocate 4 cores to the virtual machine for better performance).
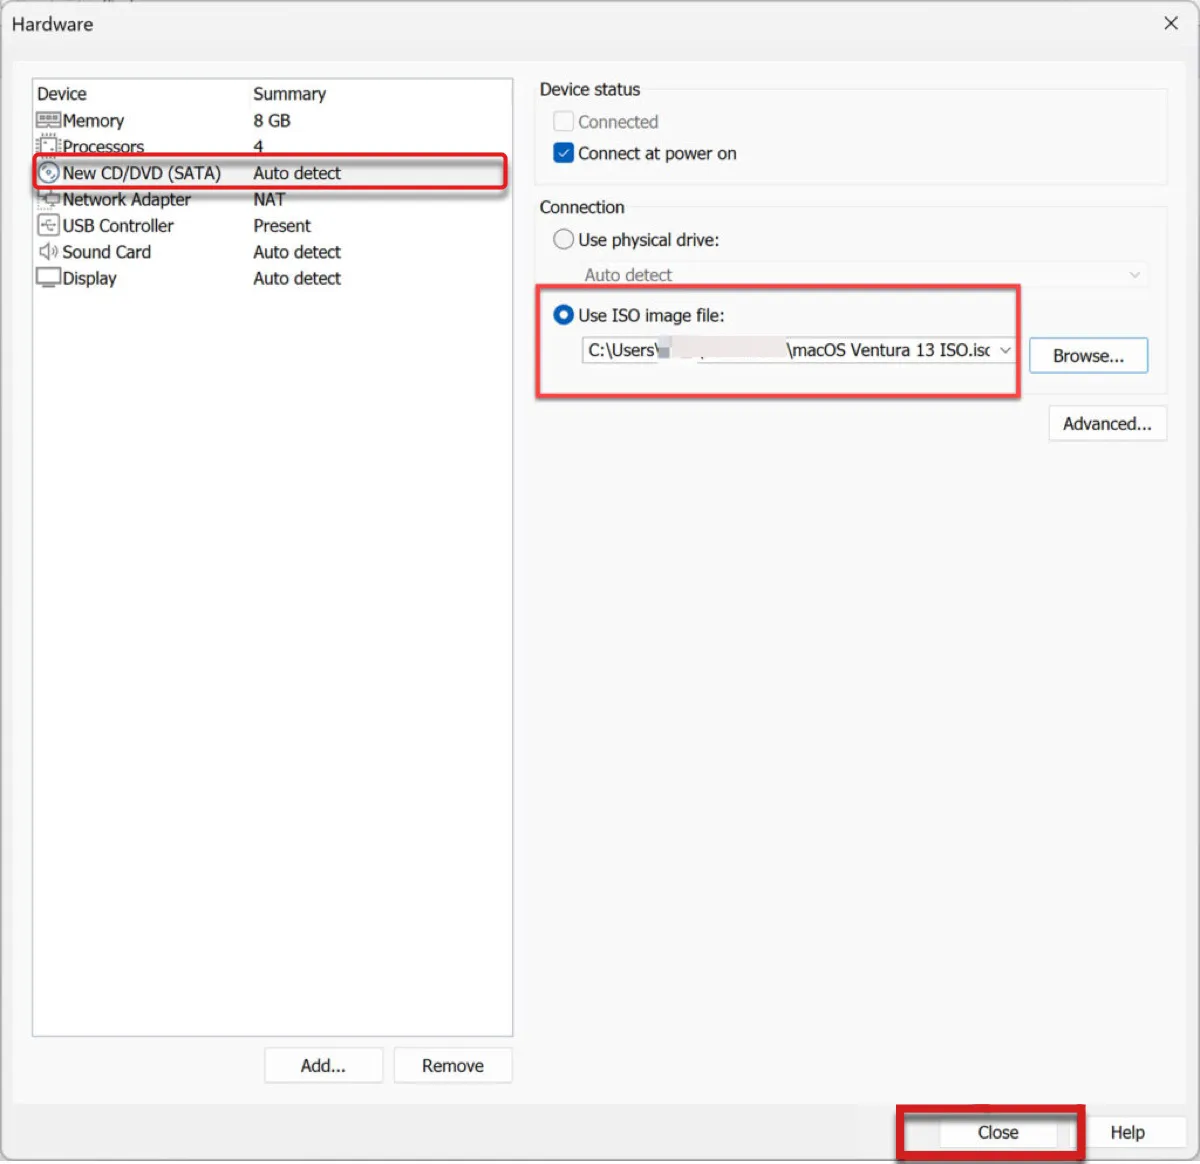
- Choose "New CD/DVD (SATA)" and click on "Use ISO image file."
- Browse and select the macOS Ventura ISO file you downloaded earlier and click Close.
- Click Finish.
- Exit Vmware Workstation or Player.
Step 5: Modify the macOS Ventura .vmx file
After configuring the virtual machine settings, you need to edit the macOS Ventura virtual machine settings to make it compatible with VMware. To do this:
- Navigate to the directory where you saved the virtual machine.
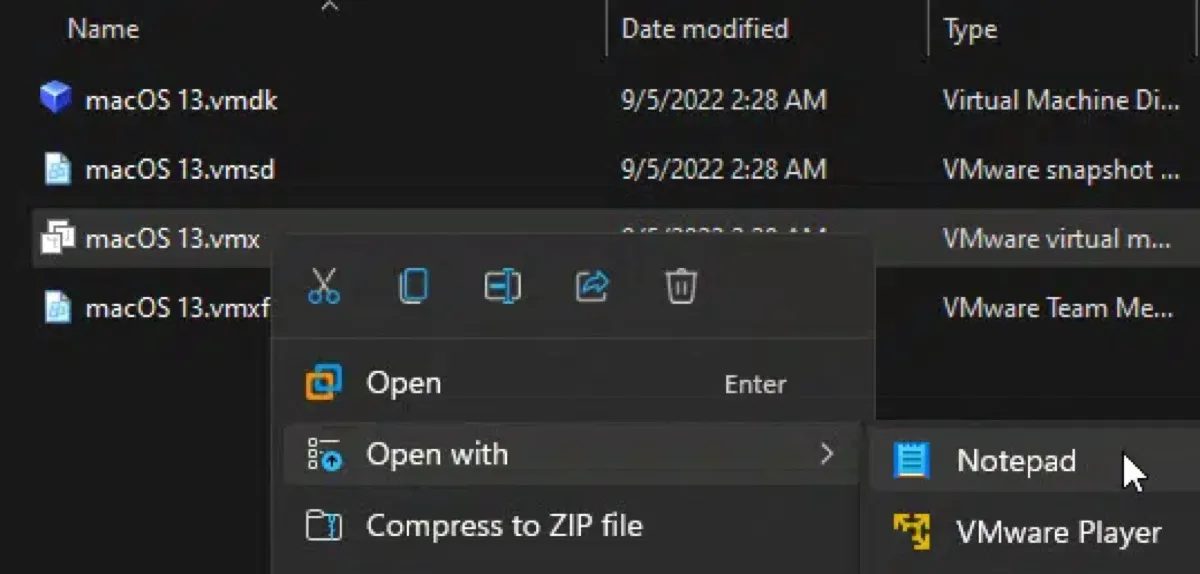
- Right-click "macOS 13 Ventura.vmx" or the "macOS 13 Ventura" file with the type "VMware virtual machine configuration.
- Click "Open with" and select Notepad.
- Locate the code Ethernet0.VirtualDev = "e1000e" and replace "el000e" with vmxnet3 to fix the internet settings.
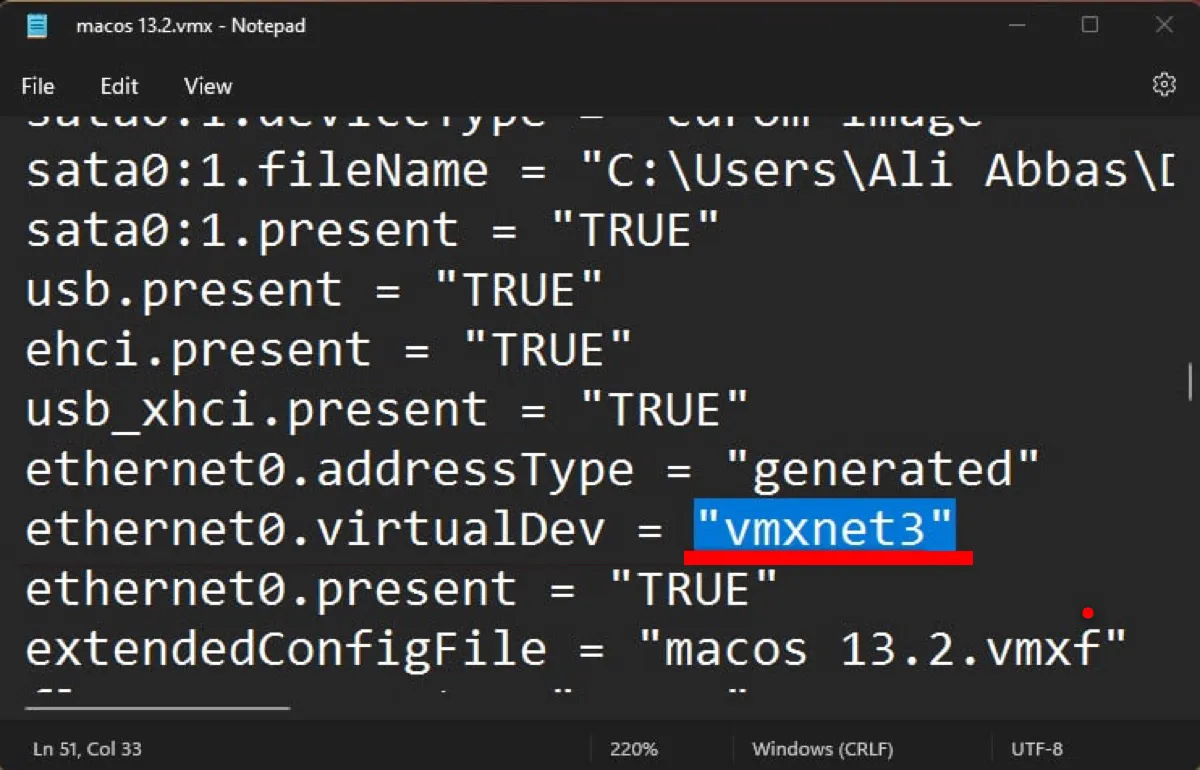
- Scroll down to the bottom of the text and add the following code.smc.version = "0"

- Click File > Save and close the window.
Step 6: Format the virtual hard drive for macOS Ventura
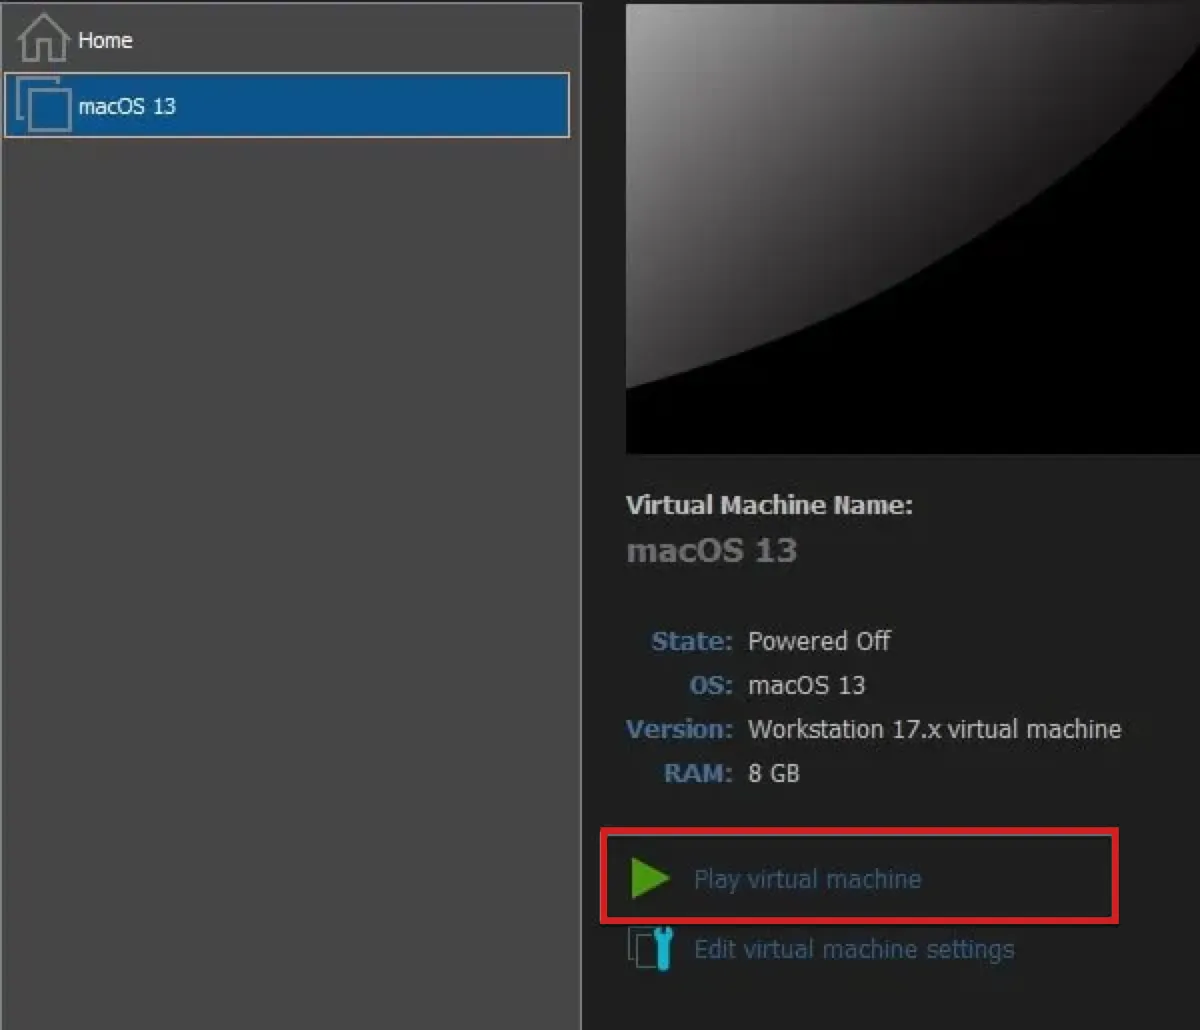
- Open VMware Workstation or Player.
- Select your macOS 13 virtual machine and click "Play virtual machine."
- Wait for the system to boot.
- Select a language you'd like to use when running macOS Ventura.
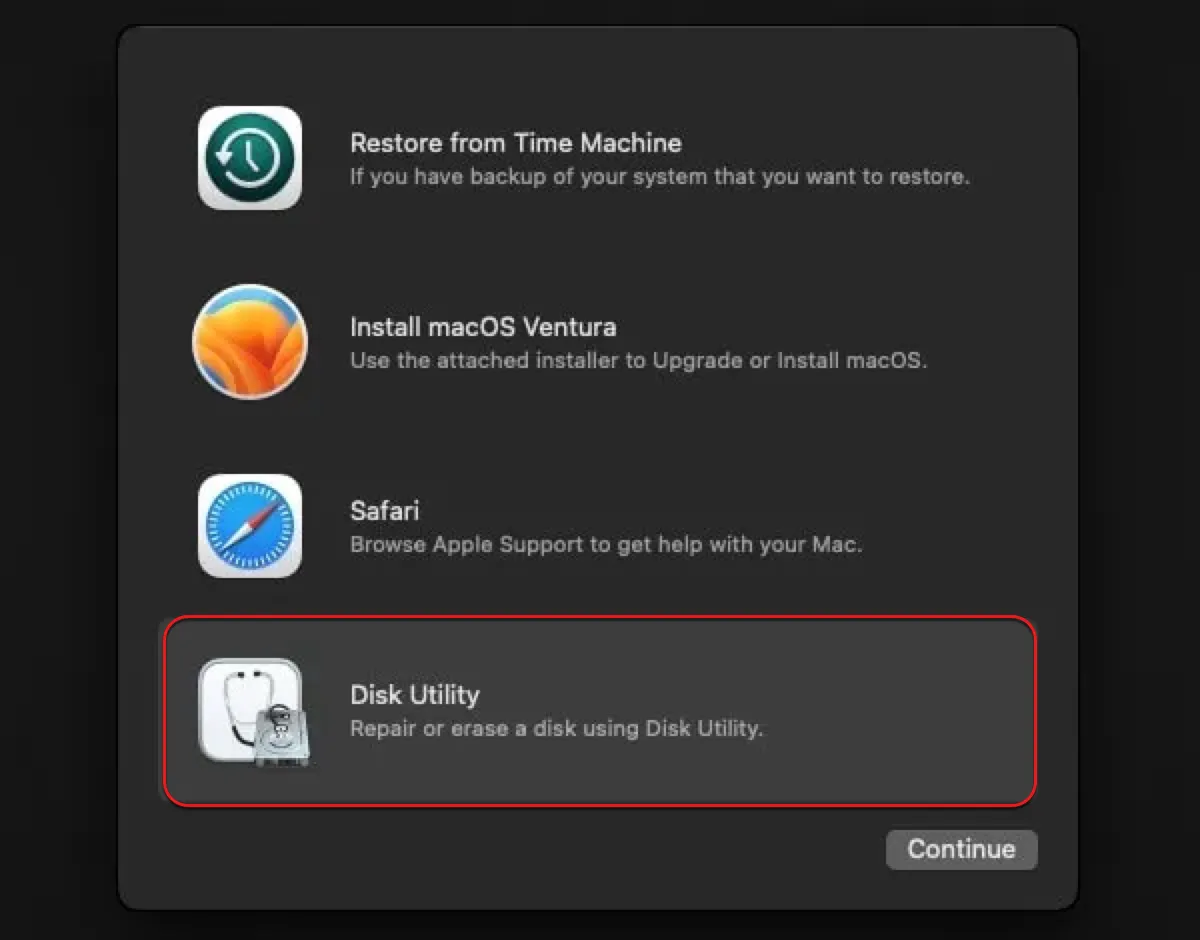
- In macOS Recovery, choose Disk Utility and click Continue.
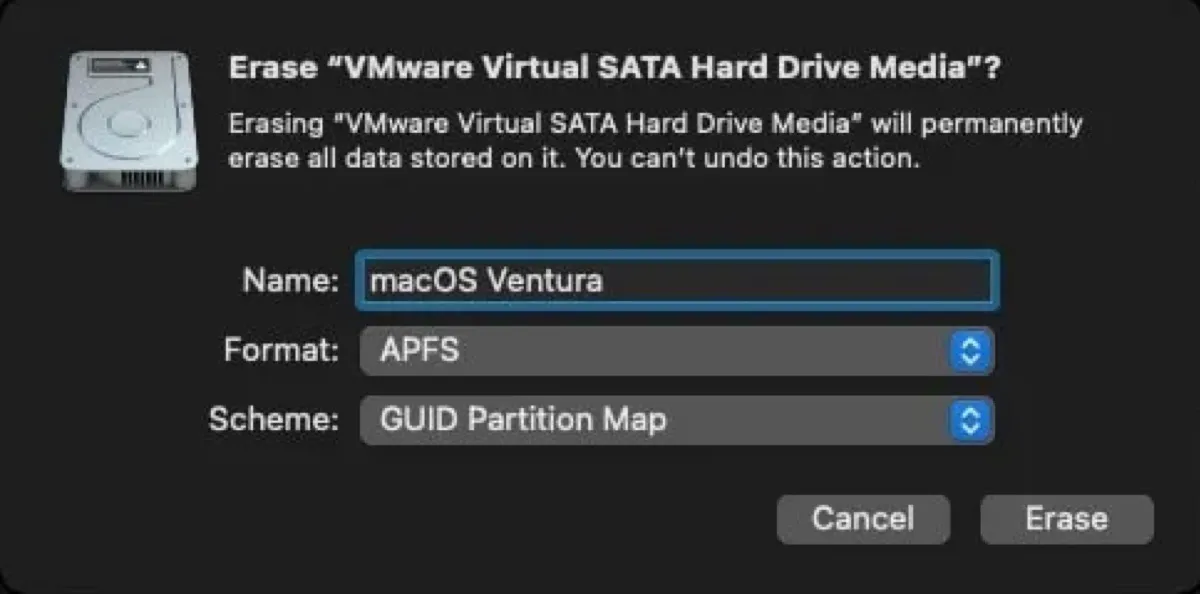
- Select your virtual machine hard drive (labeled similar to VMware Virtual SATA Hard Drive Media) from the left and click Erase.

- Name the drive.
- Set its format to APFS and scheme to GUID Partition Map.
- Click Disk Utility from the upper-left menu bar and select "Quit Disk Utility."
- Select "Install macOS Ventura" and click Continue.
Step 7: Follow the on-screen instructions to install macOS Ventura on VMware
- Click Continue to start the macOS Ventura installation.
- Accept the terms.
- Select the formatted virtual machine disk and click Continue.

- Wait while the setup wizard copies system files to your disk.
- Follow the prompts on the screen to install macOS Ventura on VMware and complete the installation process.
Step 8: Install VMware Tools
Congratulations! You have installed macOS Ventura on your Windows PC now. The last step is to install VMware Tools to fix graphics issues and gain additional functionalities like full-screen support and actions between the host operating system and macOS Ventura, such as dragging and dropping, copying and pasting, time synchronization, mouse integration, etc.
The VMware Tools are also helpful for optimizing the performance of your macOS Ventura virtual machine. To do this:
- In macOS Ventura virtual machine, click VM from the top-left menu bar and select "Install Vmware Tools."
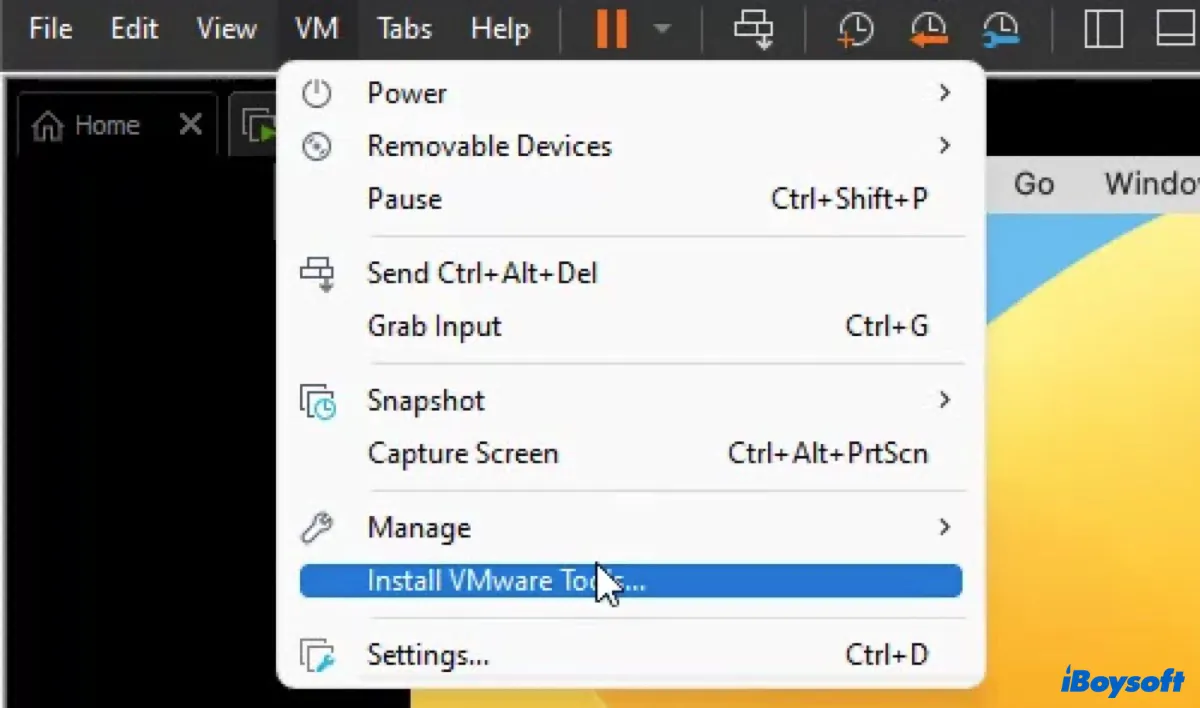
- When a window pops up, click "Install Vmware Tools."
- Click Continue twice and then tap Install.
- Enter your user account password to authorize the installation.
- Click "Install Software."
- Click OK to allow the software to modify your computer.
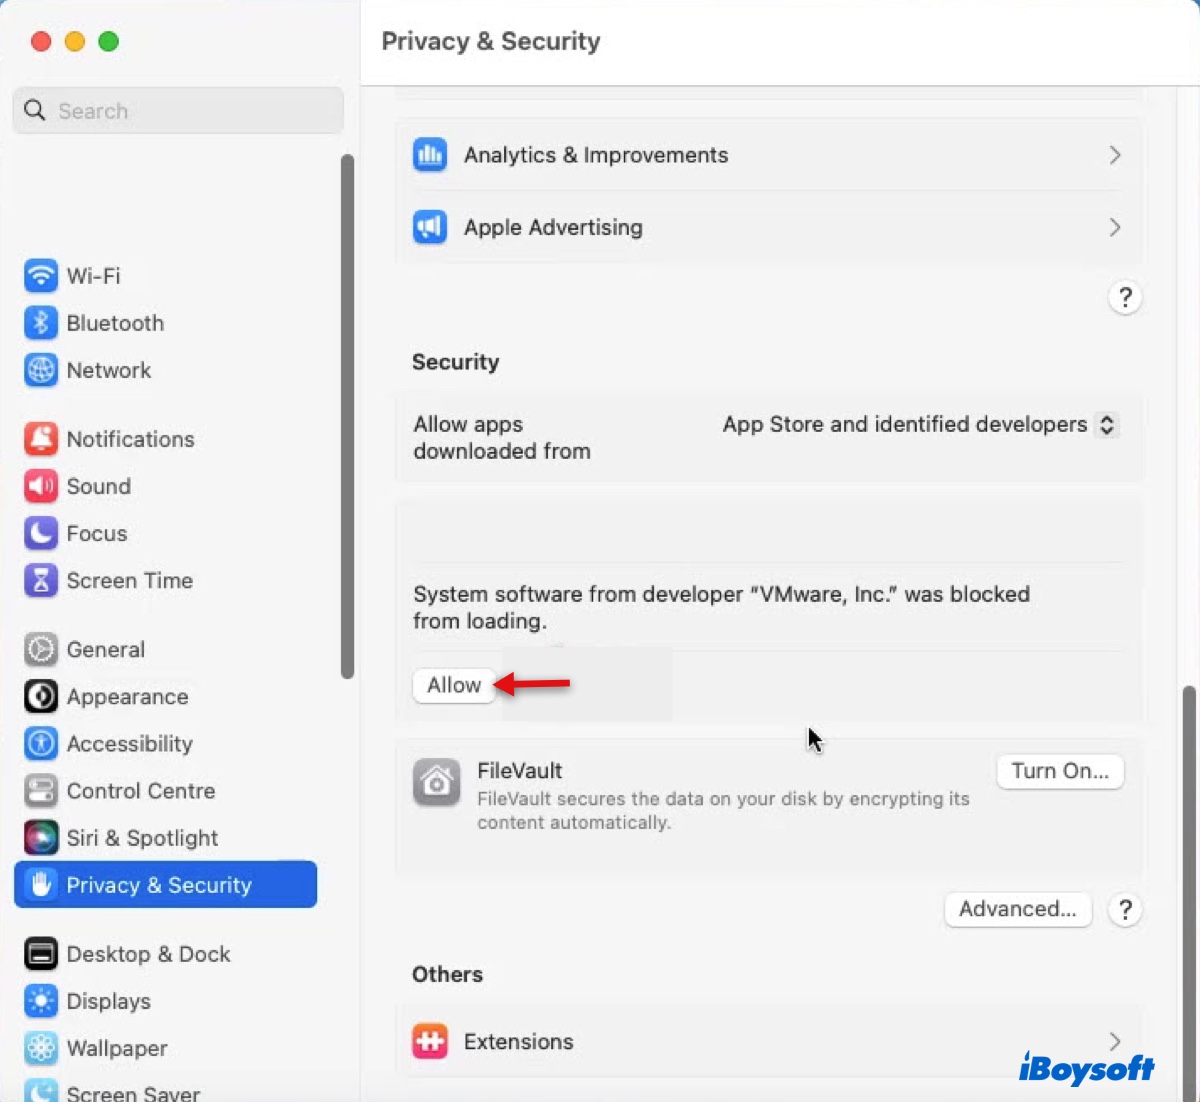
- Tap "Open System Settings."
- Click the Allow button next to the warning "System software from developer "VMware, Inc." was blocked from loading."
- Enter your user account password and hit Unlock.
- Click Restart.
- Go to the Apple menu > System Settings > Privacy & Security.
- Select Accessibilities and toggle "vmware-tools-daemon" on.
Also read:
How to Install macOS Catalina on VMware on Windows? (Full Guide)
How to Install macOS Monterey on VMware on Windows? (Stepwise)
Now, you should be able to run macOS Ventura on Vmware on your Windows PC. Share this article to benefit other Mac users.
How to use NTFS-formatted drives on macOS Ventura virtual machine?
NTFS is a proprietary file system owned by Microsoft, which is only readable on macOS but not writable. That being said, you can't edit, delete, or save files to your Windows partition and NTFS-formatted external drives when running macOS Ventura or other macOS versions.
To fix the read-only issue of NTFS on Mac operating systems, you can either reformat your drive with a file system that's compatible with both Windows and macOS, such as exFAT or FAT32, or use a third-party NTFS for Mac tool.
The former will delete all data on the NTFS drive and isn't applicable to your Windows system partition. So, the latter is often a better option for people who prefer not to format their drive and would like to access files on their Windows partition even when using macOS Ventura.
If you've decided to go with an NTFS for Mac tool, we recommend you try iBoysoft NTFS for Mac. It's a professional NTFS driver that grants you full read-write access to NTFS-formatted drives on macOS Ventura.
This reputable NTFS for Mac tool doesn't require you to relaunch it after a reboot or reconnecting of the NTFS drive. It will automount your drive in read-write mode, providing a smooth experience.
Grab the free download here!
Also read: How to Install Any macOS on VMware on Windows PC? [Step-by-Step]
Share the tool to help more people manage and access their NTFS drives on macOS Ventura virtual machine!
FAQs about macOS Ventura VMware virtual machine
- QCan I run macOS on VMware?
-
A
Yes, you can run macOS on VMware. If you wish to run macOS on a Windows PC, you can choose the free VMware Workstation Player or the higher-level VMware Workstation Pro, which requires you to pay for a license.
The former is suitable for basic use, such as running one macOS version on Windows. The latter is designed for power users who need to have more control over their virtual machines and require more advanced features for their work.
- QHow to install macOS Ventura on VMware Workstation Pro 17?
-
A
You can follow the steps in this article to install macOS Ventura on VMware Workstation Pro 17.
- QHow do I configure VMware to run macOS Ventura smoothly?
-
A
To configure VMware to run macOS Ventura smoothly, you can allocate more CPU cores and RAM to the virtual machine, enable 3D acceleration, and install VMware Tools.
- QHow does VMware different from other virtualization software like VIrtualBox?
-
A
VMware is different from other virtualization software in that it has specific optimizations for running macOS, which makes it more efficient and stable.