macOS Ventura introduced a great feature to the Photos app, which can automatically find duplicate photos and videos and allow you to merge the duplicates to free up storage space.
While this option seems to be straightforward, some users have encountered issues using it. They have reported experiencing Photos Duplicates not showing or the Duplicates album disappearing from the Photos app.
Here, we will help you resolve the issues and delete duplicate photos on Mac.
Tips: While the native Photos app is a great starting point, it has two major limitations: it only scans your Photos Library, and it primarily looks for exact matches. If you have duplicate photos sitting in your Downloads folder or an external drive, the Photos app simply won't see them.
When I'm in an urgent crunch to reclaim storage, I rely on iBoysoft Cleaner. Unlike the macOS Duplicates feature, which is restricted to a single app, this tool allows me to scan any folder in much less time.
To find duplicate photos on Mac from any folder:
Step 1: Free download, install, and launch iBoysoft Cleaner.
Step 2: Click Similar Photos.
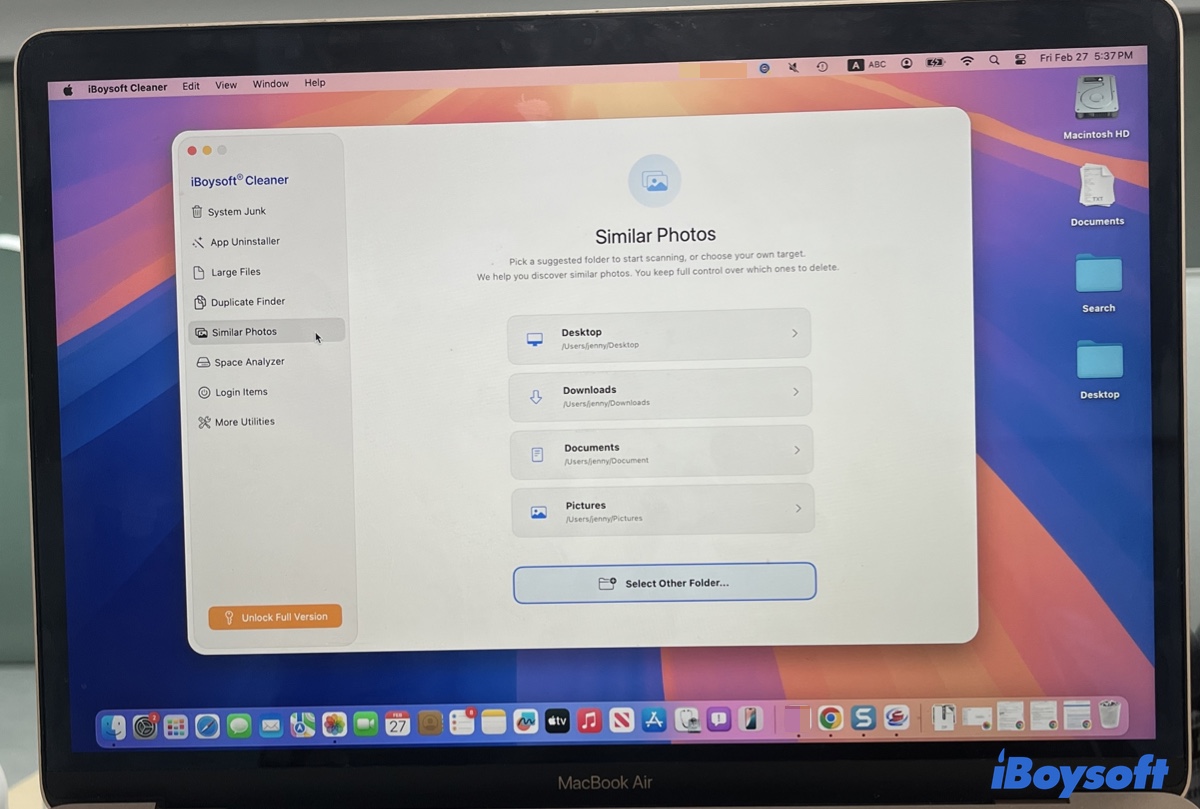
Step 3: Choose the folder where the photos are stored.
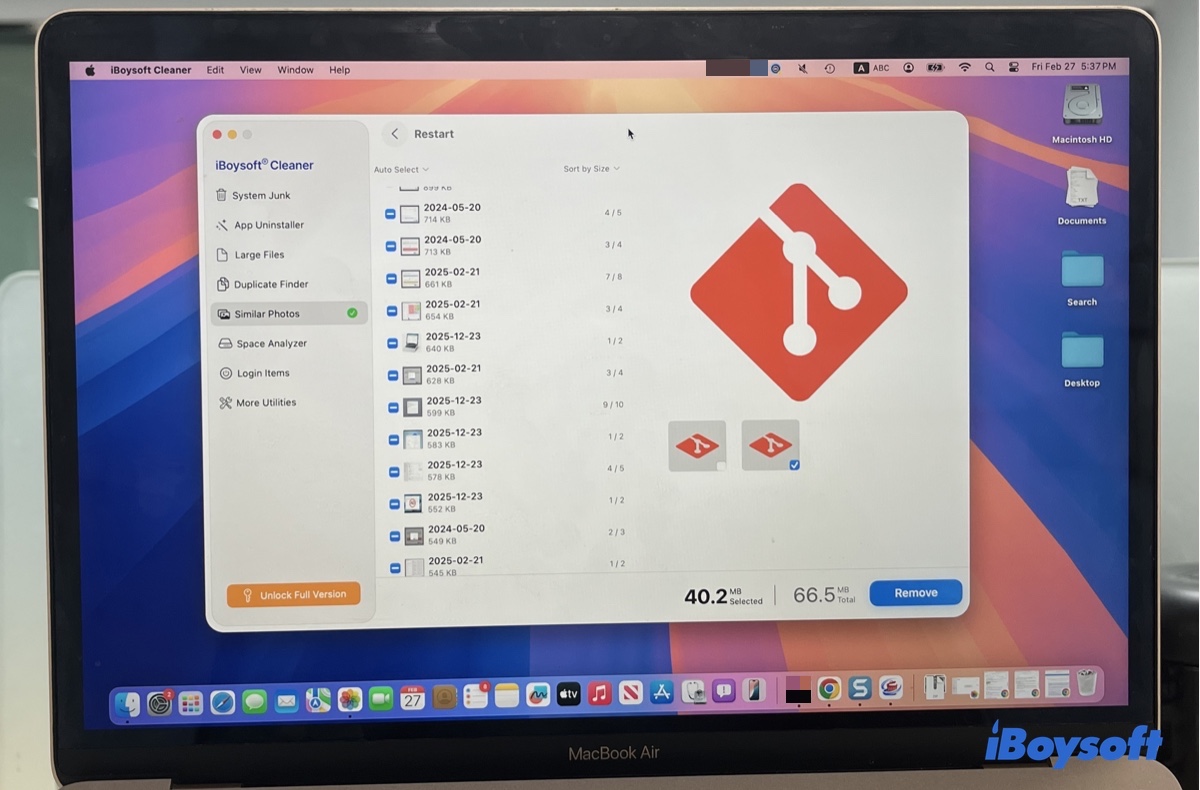
Step 4: Once the scan is complete, check the results.
Step 5: Click the Remove button to remove duplicate photos.
How to delete duplicate photos on Mac?
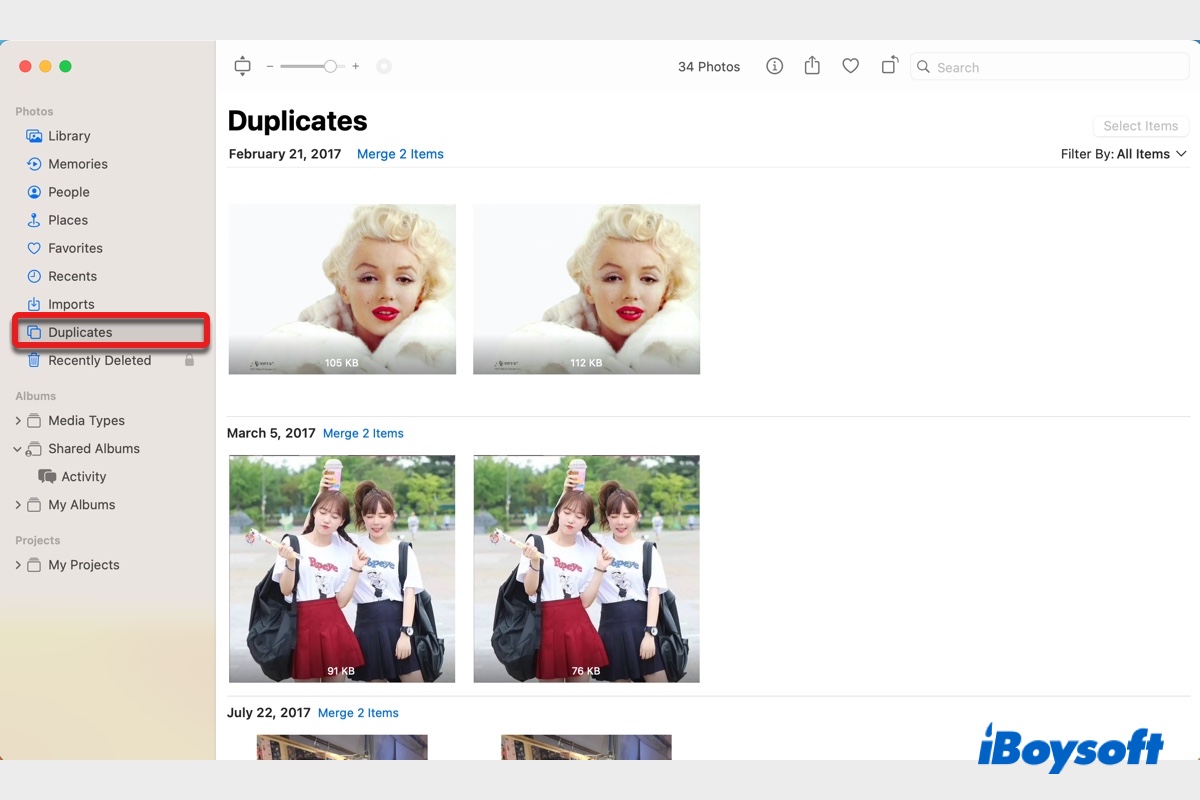
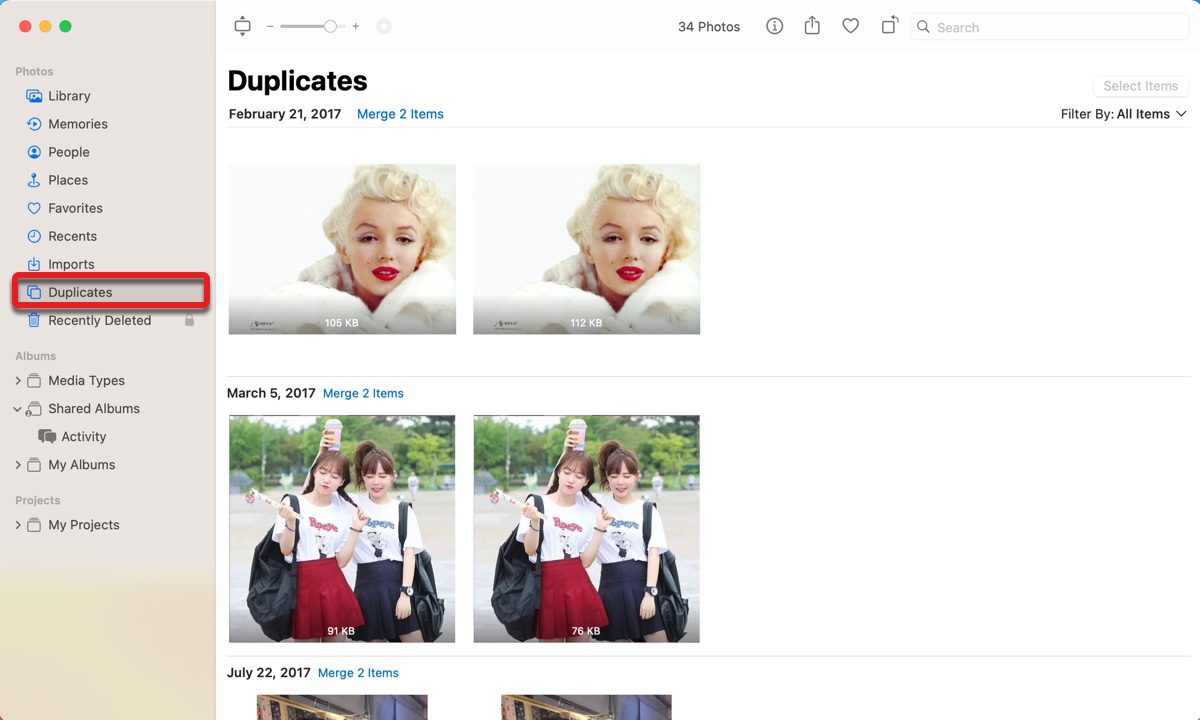
Since macOS Ventura, Apple has added a new Duplicates album to the Photos app, accessible from the left sidebar. Inside it, the detected video or photo duplicates are listed chronologically with a Merge option next to each set.
When you merge the items, it will keep the version that has the highest quality and most metadata and move the rest to the "Recently Deleted" folder. For instance, if you have two duplicates, one has a higher resolution, and another has more metadata, the Photos app will combine the best qualities from both copies into one image and retain it.
It's worth mentioning that the Photos Duplicates album will only appear when there are indeed duplicates in your Photos library.
Warning: Photos typically scan your library to find duplicates when you're not using the app and your Mac is plugged into power.
How to find, merge, and delete duplicate photos on macOS Ventura and later:
- Open the Photos app.
- Select the Duplicates folder from the left.
- Click "Merge n Items" beside each set to remove unwanted duplicates.
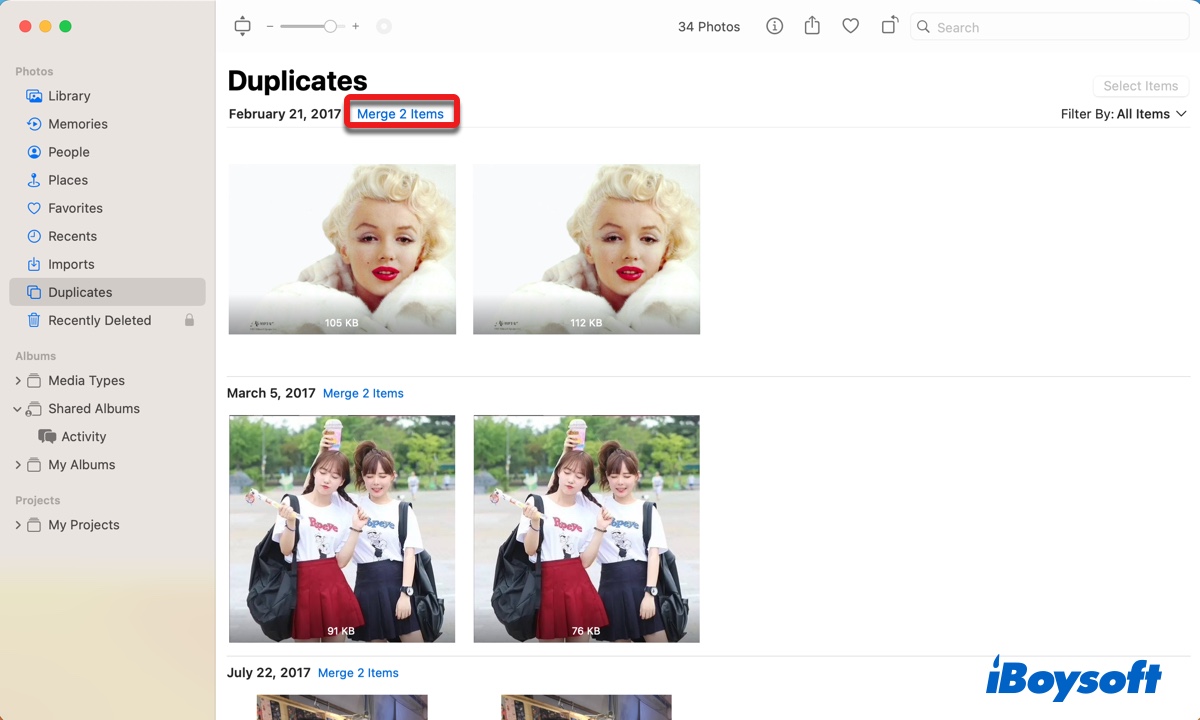
- Tap "Merge n Items" again to confirm the action.
If you want to batch-merge multiple duplicate photos on Mac, you can click on one image first, then hold down Shift or Command and click other duplicates to select them. After that, click the "Merge n Items" button at the top-right of the window to get rid of the unnecessary duplicates.
If you want to remove all duplicate photos at once, select one image, click Edit > Select All from the menu bar, then tap the "Merge n Items" button at the top right.

The removed duplicates will stay in the "Recently Deleted" folder for 30 days before being permanently deleted in case you need to restore them. Note that if all duplicates are merged, the Duplicates album will disappear. But it will show up again when new duplicates are found.
Now that you know how to delete duplicate photos on Mac, don't forget to share the steps with your friends.
How to fix duplicate photos not showing up on Mac?
If you can't find the Duplicates album on macOS Ventura or later, or the Photos app is not finding duplicates, try the following tips:
Tip 1: Give your Mac more time.
It takes time for your Mac to index your photo library and find duplicate photos and videos. This may be several hours or days, depending on the size of your photo library and the tasks running in the background.
Since the detection process usually happens when your Mac is connected to power and not running other critical tasks, you can follow the steps below to reduce the needed time:
- Quit the Photos app.
- Shut down your Mac and choose not to reopen apps on startup.
- Turn your Mac on.
- Log in to your Mac without launching any apps.
- Let your Mac sit overnight without going to sleep. (Change macOS sleep settings)
Tip 2: Import duplicate photos to the Photos app to trigger the feature.
If you've followed tip 1 and waited for several days, try importing some duplicate photos into the Photos app to see if it can activate the duplicate feature. You likely still need to wait for some time, but it can likely accelerate the process.
Tip 3: Disable Spotlight access for photos and reenable it.
For the Photos Duplicates album to appear, your Mac has to index your photo library using Spotlight first. Therefore, if the Duplicate searching feature doesn't work or can't find all the duplicate photos, you can rebuild the Spotlight indexing for photos to restart the detection process.
- Go to the Apple menu > System Settings.
- Select "Siri & Spotlight."
- Scroll down on the right and click "Spotlight Privacy."
- Click the ( + ) button.
- Select Pictures from the left and click Choose.
- Click Done.
- Wait a few seconds.
- Select the added Pictures folder and click the ( - ) button.
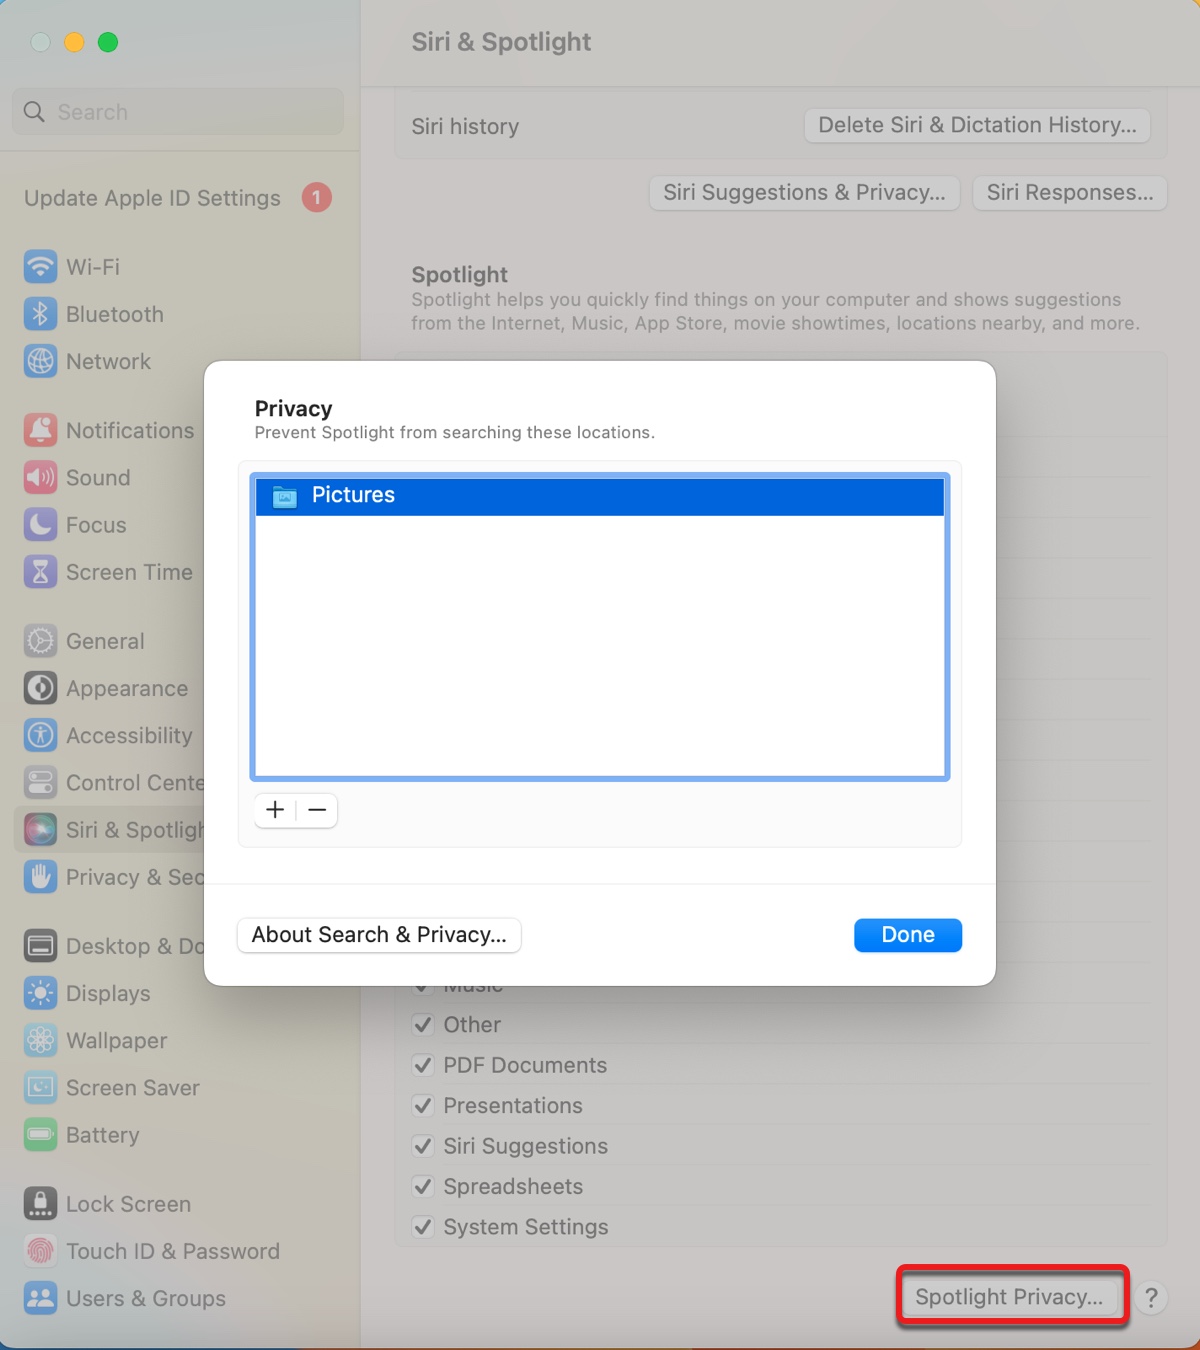
- Click Done.
Spotlight will then reindex your photo library. This may take some time, depending on the size of your photos. You can leave your Mac on and charged without running applications to allow the system to find duplicates.
Tip 4: Restart the photoanalysisd process in Activity Monitor.
Photoanalysisd is a macOS photo library analysis agent that scans and analyzes photo libraries for Memories, People, and scene- or object-based searches in the background. If it's running into issues, it will render the Photos Duplicates album not show up or not find duplicates.
To avoid such problems, you can restart it in Activity Monitor, as guided below.
- Open Activity Monitor from the Applications > Utilities folder.
- Type "photoanalysisd" in the top-right search bar.
- Select the process and click the ⤬ button.
- Tap "Force Quit."
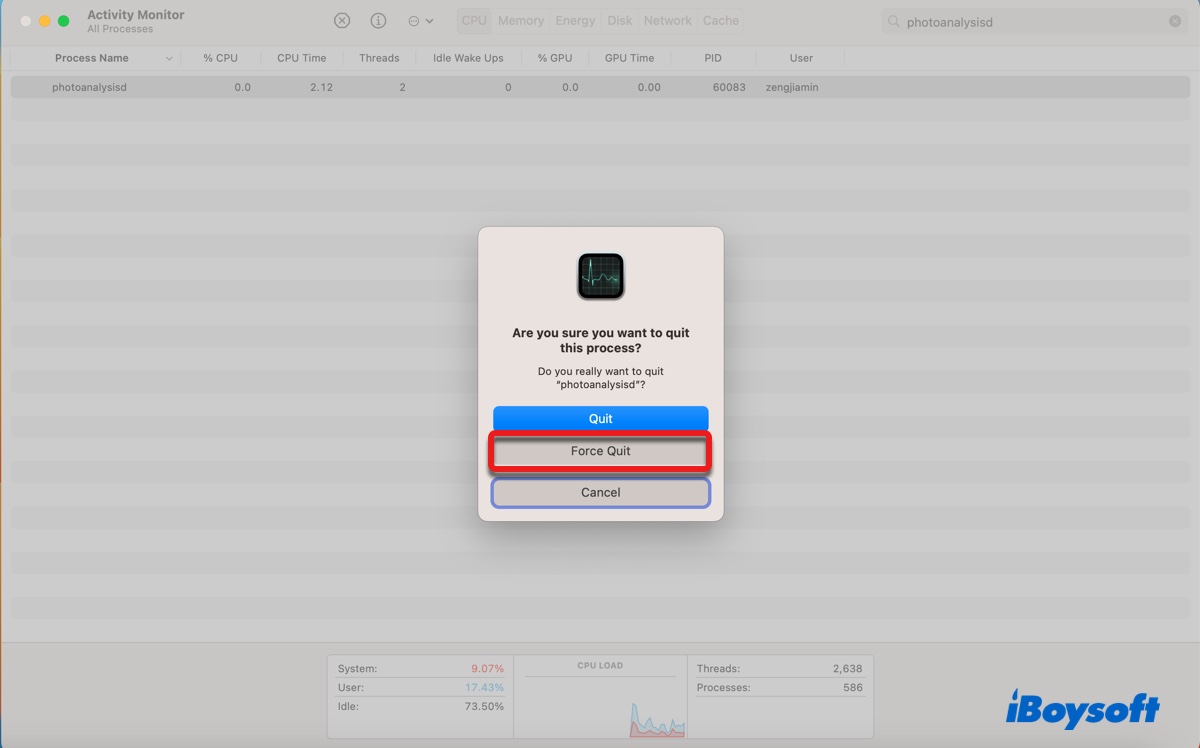
After the photoanalysisd process is quit, it will automatically restart to analyze your photo library. Wait patiently as suggested in tip 1.
FAQs
- QHow do I find duplicates in Apple photos?
-
A
To find duplicate photos on Mac, open the Photos app and click the Duplicates album on the left sidebar.
- QHow do I get rid of all my duplicate photos?
-
A
Here's how to get rid of all of your duplicate photos on Mac:
On macOS Ventura:
1. Open the Photos app.
2. Click the Duplicates album.
3. Select one image and click Edit > Select All.
4. Click "Merge n Items."
On macOS Monterey or earlier:
These macOS versions don't have a built-in duplicate photo search feature. You need a third-party tool to remove duplicate photos.
- QWhy are my photos duplicated in Photos?
-
A
The most likely reason why your photos are duplicated is that you have uploaded them twice. That may occur when you merge different libraries or importing new photos.
- QIs there a way to remove duplicate photos on Mac?
-
A
Yes. There are a few ways to remove duplicate photos on Mac.
① Manually searching photos of the same name, size, or time of uploading in Finder.
② If you're running macOS Ventura, open the Duplicates album in Photos to delete duplicate photos.
③ Use third-party duplicate photos cleaner to eliminate duplicates.