
Don't prefer the newest macOS versions, want to run macOS High Sierra on a Windows PC for testing, app compatibility, or just using and learning? VMware Workstation or Player can virtualize High Sierra smoothly using a DMG or ISO installer - no USB required.
Tips: If you've changed your mind and want to run the latest macOS Tahoe on your PC, take the steps in this guide: How to Install macOS Tahoe 26 on Windows PC?
Why can't use a macOS bootable USB?
- Creating a bootable macOS installer is designed for Mac hardware only (Intel or Apple Silicon).
- Windows PCs use different firmware (BIOS/UEFI) and don't have the Apple-specific drivers needed to run macOS.
- macOS is not officially supported on non-Apple hardware — installing it on a Windows PC (a "Hackintosh") requires extra steps like special bootloaders (Clover, OpenCore), custom kexts (drivers), and compatibility patches.
Moreover, macOS High Sierra ISO is better, because a DMG can sometimes work, but VMware usually doesn't recognize it directly. Let's begin, from preparing the ISO to first boot, to installing macOS High Sierra VMware on Windows.
Note: To achieve close-to-native performance, you can build a Hackintosh and run macOS directly on your PC hardware. Alternatively, you may install macOS on VirtualBox, a free virtualization tool, to install and use macOS in a virtual environment.
Preparations for installing macOS High Sierra VMware
Before starting to install macOS High Sierra VMware on Windows, you'd better do these comprehensive preparations:
(1) Minimum hardware & storage
At least 4GB RAM, 2 CPU cores, and 40GB of free disk space for the VM (more = better).
Tip to free space: Uninstall unused apps, empty the Recycle Bin, and clear temp files before creating the VM. Learn more about how to remove junk files on Windows.
(2) macOS High Sierra ISO installer
On Mac, you can either download the ready-made macOS High Sierra ISO file from the Internet (Not safe; not the latest 10.13.6 ISO file; Difficult and time-consuming), or get the macOS High Sierra DMG file using iBoysoft DiskGeeker for Mac and convert it into an ISO file.
Follow the steps below to create a macOS High Sierra ISO file on an external drive:
- Download, install, and launch iBoysoft DiskGeeker for Mac on your Mac.
- Connect your external drive, then select "Create boot disk".
- Click "Get" near macOS 10.13 High Sierra.
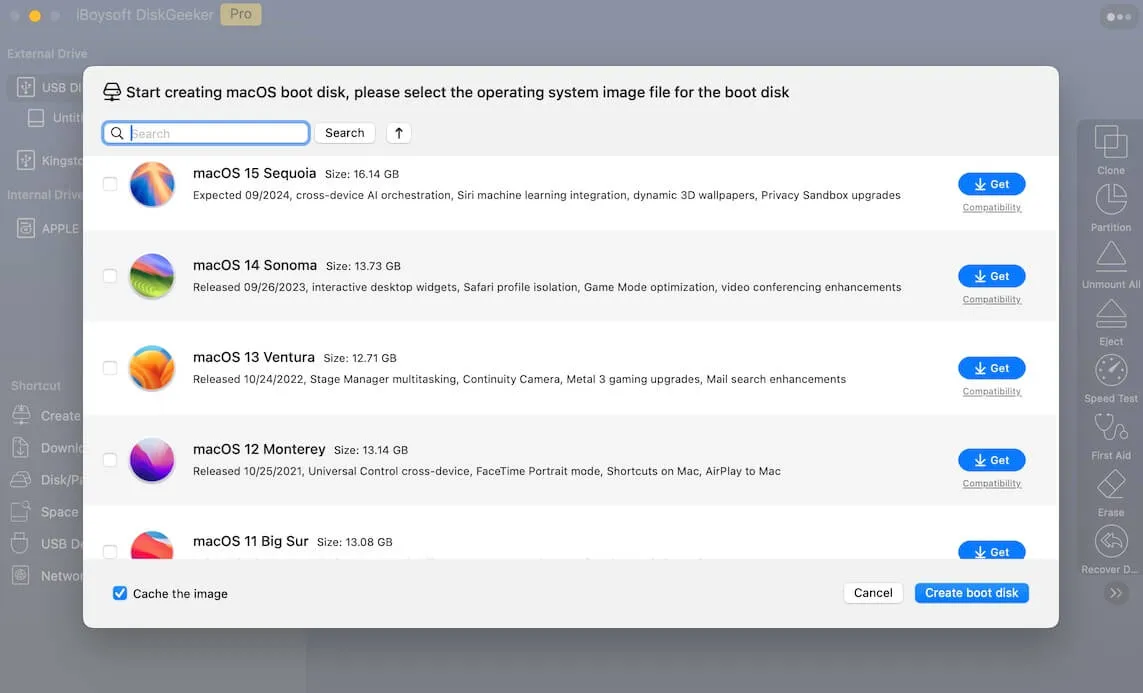
- Select the external drive to save the file.
- Wait for the process, then open Terminal.
- Run the command "hdiutil convert dmg_file_path -format UDTO -o ~/Desktop/HighSierra.cdr".
(To get the file path, simply drag and drop the file into Terminal.) - Rename the file: "mv ~/Downloads/HighSierra.cdr ~/Downloads/HighSierra.iso".
Remember to move the final macOS High Sierra ISO file into your external drive~
(3) Software ready
- VMware Workstation Pro Download (paid) or VMware Workstation Player (free for personal use).
- VMware Unlocker (adds "Apple macOS" as a guest OS option in VMware on Windows).
Why not share these perfect preconditions?
Steps to install macOS High Sierra on VMware
Let's take 6 steps to install macOS High Sierra on VMware on a Windows PC:
Step 1: Unlock VMware
We have already installed VMware Workstation and VMware Unlocker in preparation, now:
- After installing, don't start VMware yet, then close VMware completely.
- Open the VMware Unlocker installer package.
- Right-click "win-install.cmd" and choose "Run as administrator".
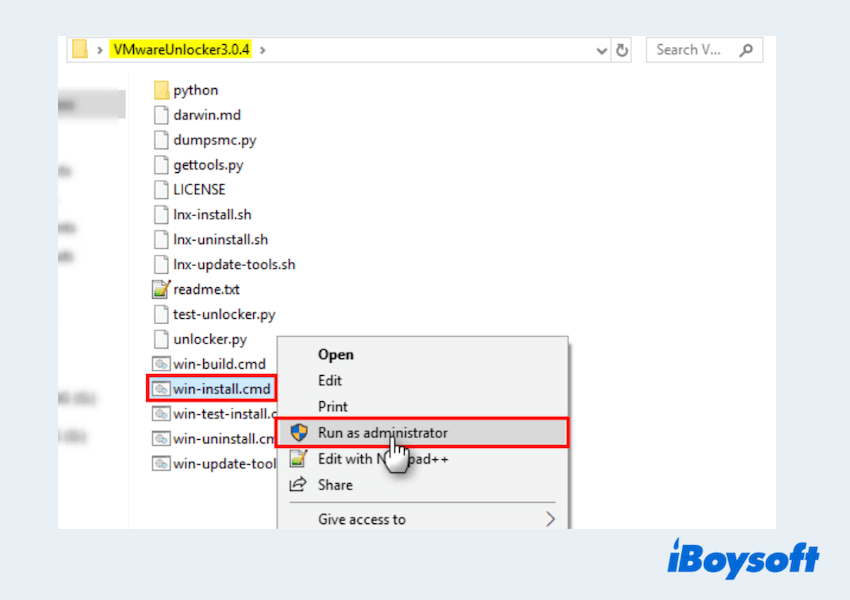
- Wait until it finishes patching VMware.
- Launch VMware Workstation to confirm Apple macOS appears in the guest OS list.
Step 2: Create a new virtual machine
Once you've gathered all the required files and tools, you can move on to setting up a virtual machine for macOS High Sierra. Here's the process: (If you'd rather skip the setup, you can download a pre-built macOS High Sierra VMDK file instead.)
- Open VMware Workstation.
- Choose "Create a New Virtual Machine".
- Choose "Typical (Recommended)", then tap "I will install the operating system later".
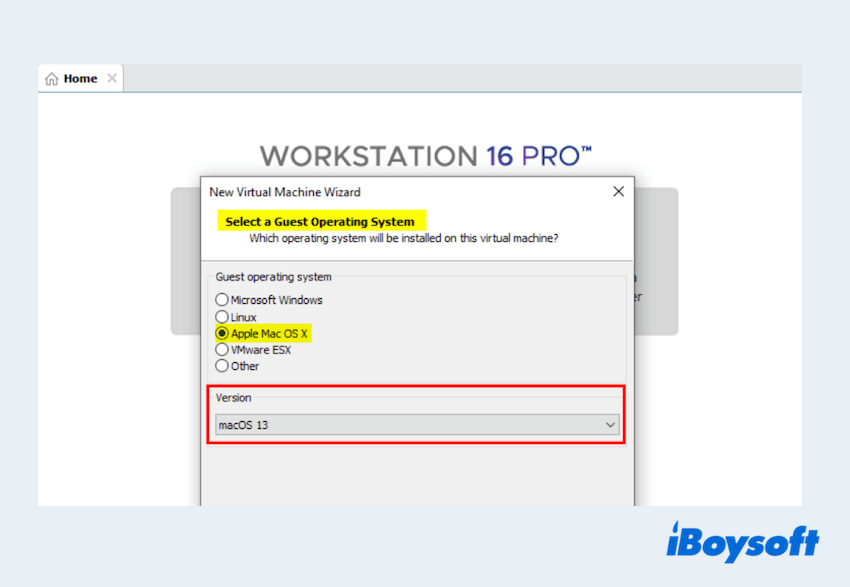
- Set the Guest OS: Apple Mac OS X; Version: macOS 10.13 (Or the closest available to High Sierra).
- Name the VM (e.g., macOS High Sierra) and select a storage location.
Step 3: Configure VM settings
Before booting the installer, optimize the VM:
- Open VMware Workstation and select your macOS VM.
- Right-click it and choose Settings.
- Set these:
Memory (RAM): 4GB minimum; 6–8GB recommended if your PC allows.
Processors: 2 cores minimum; 4 cores recommended.
Hard Disk: 40GB+ (SATA, single file or split—either is fine).
CD/DVD (SATA): Use ISO image file > browse to your HighSierra.iso.
(Choose the macOS High Sierra ISO file you stored in the preparations)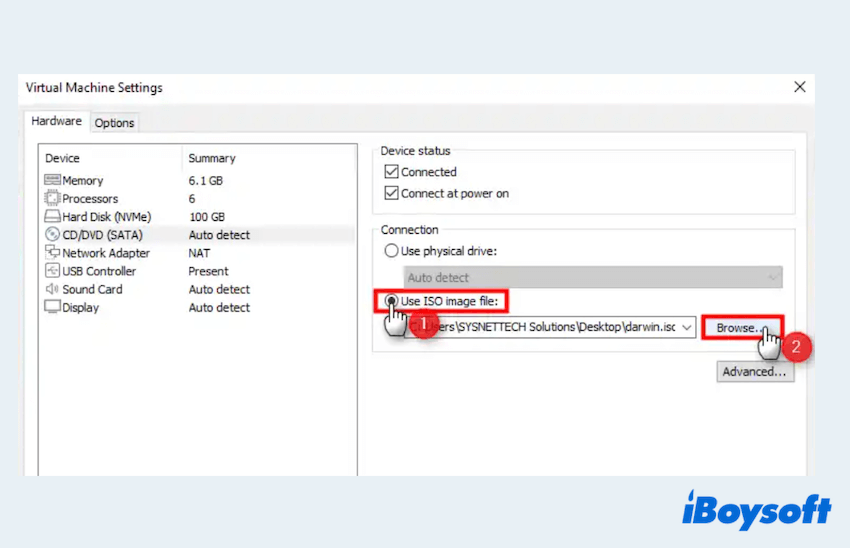
USB Controller: Enabled.
Sound/Network: Optional (can leave defaults).
Display: Enable 3D acceleration if available (helps smooth graphics). - Click Close > Finish.
Performance tips: Close heavy Windows apps while installing. If you have an SSD, store the VM there.
Step 4: Edit VMX file
A tiny config tweak improves compatibility:
- Power off the VM (don't start it yet).
- Go to your VM folder (e.g., Documents\Virtual Machines\macOS High Sierra).
- Right-click the .vmx file > Open with > Notepad.
- Add this line at the end: smc.version = "0".
- Save and close the file.
Step 5: Boot and start installation
Then it's time to install macOS High Sierra on VMware:
- Power on the VM. It should boot from the ISO into macOS Utilities.
- Open Disk Utility: Select the VMware Virtual Disk.
- Click Erase > Name (e.g., Macintosh HD).
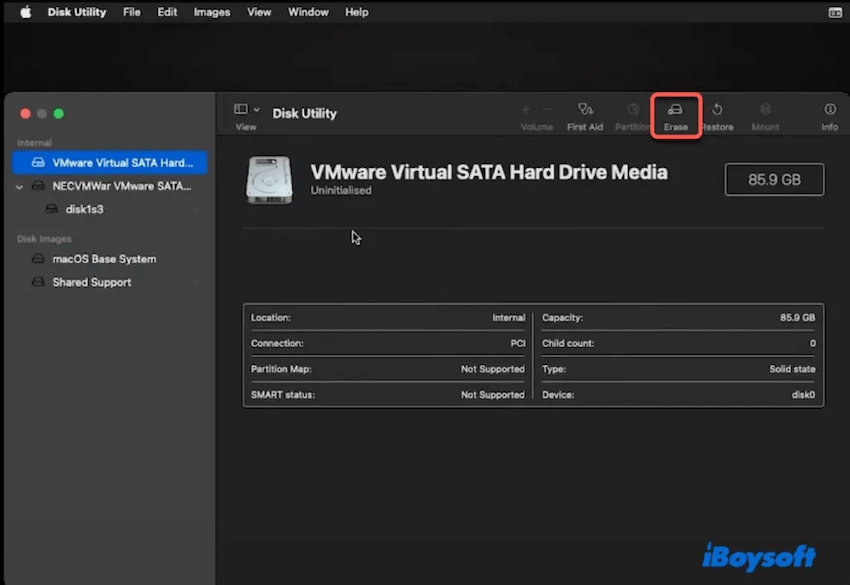
- Set the Format: APFS (preferred) or Mac OS Extended (Journaled) if APFS isn't offered. Scheme: GUID Partition Map (if shown).
- Click Erase, then Done, and close Disk Utility.
- Choose Install macOS > select your newly erased disk.
- Follow on-screen prompts. The VM will reboot multiple times—let it continue.
- When installation completes, you'll land in the Setup Assistant.
Note: If you see a boot loop or stuck Apple logo: Power off VM > re-open settings > confirm ISO is still attached, cores/RAM are sufficient, and smc.version = "0" is in the VMX. Try switching disk format (APFS to HFS+) if needed.
Step 6: Set up the first boot
After installing, setting up during the first boot is also important:
- Pick your country/keyboard, skip Migration Assistant (clean install).
- Create a local user account.
- Choose Don't use iCloud for now (you can add later).
- Once on the desktop, install VMware Tools (highly recommended):
Open VMware menu > VM > Install VMware Tools.
(You will be asked to enter the password.)
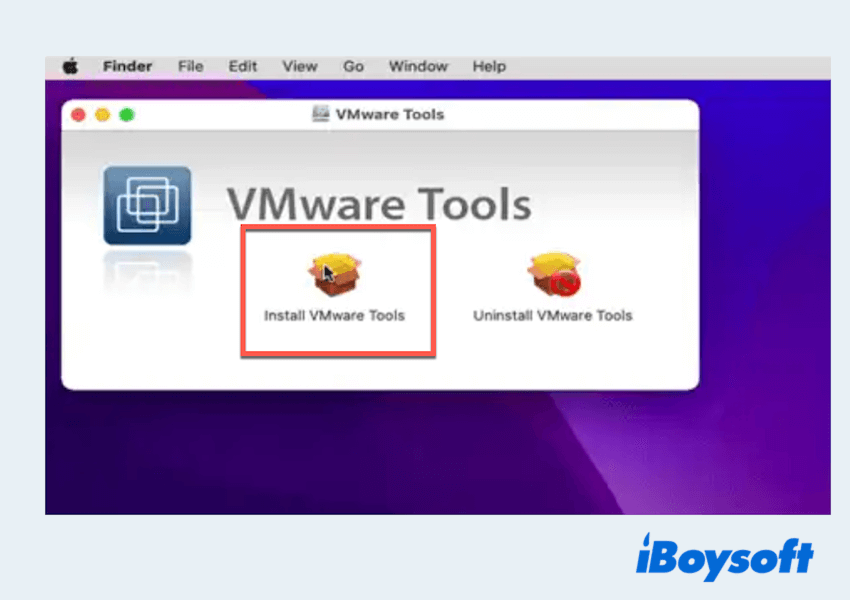
- In macOS, open the mounted VMware Tools installer > Install > Restart.
Have you learned these ways to install macOS High Sierra on VMware? Please share these ways to help more people.
FAQs about installing macOS High Sierra VMware
- QHow to create a bootable installer macOS High Sierra?
-
A
Download High Sierra from the App Store on a Mac, insert a USB (16GB+), then use Terminal with the createinstallmedia command to make it bootable. But for unsupported Macs, or a safer download, iBoysoft DiskGeeker for Mac is a better choice.
- QCan you still download macOS High Sierra?
-
A
Yes, Apple still provides the installer from its official support page.
- QHow to do if I can't see Apple macOS option in VMware?
-
A
Install and run VMware Unlocker as Administrator, then restart VMware to enable the Apple macOS option.