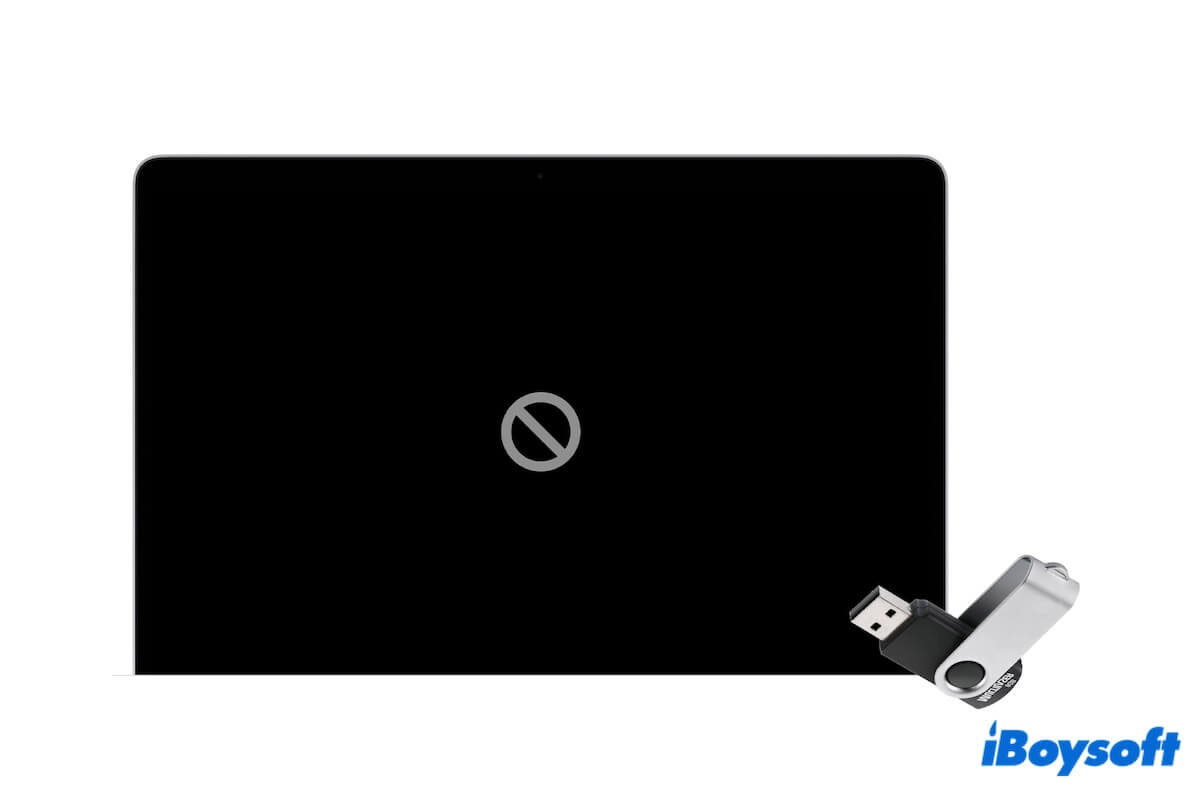
Your Mac won't boot from a USB drive but shows a prohibited sign on the black screen. Does that mean your USB installer is unbootable? It might be or might not be since the causes are various.
I will explain the issue's meaning, analyze its causes, and list the feasible solutions, all based on my experience and troubleshooting journey.
If your macOS Catalina USB installer is not bootable, follow: How to fix the USB Catalina installer not bootable.
What does the prohibited sign 🚫 mean on your Mac?
The prohibited sign (a circle with a line through it) on your Mac's startup screen indicates that your Mac doesn't find a valid macOS system to boot from.
Now that your Mac fails to boot from the USB installer, it means the bootable USB installer doesn't contain a valid macOS system, either the macOS is incompatible with your Mac or it is corrupted.
Explain the meaning to others who see a prohibited sign when booting from the USB installer.
Mac won't boot from USB drive with a prohibited sign, what to do?
No matter your Mac won't boot from the USB drive and shows a prohibited sign 🚫 due to an incompatible macOS or a corrupted system, you can follow my methods to troubleshoot it.
Check the compatibility
To check whether your Mac is compatible with the USB macOS installer, go to the Apple menu > About This Mac to view your model information and query the compatibility on support.apple.com.

If your Mac doesn't support the macOS version on the USB, you can use a virtual machine to run the unsupported macOS version on your Mac. Otherwise, re-create the bootable USB with a compatible macOS.
If your Mac supports the macOS version, it shows that the macOS installer is corrupted. Just re-create a new one. Please move to the next part.
Recreate a bootable USB without Terminal
Creating a bootable installer for macOS requires using Terminal by default. It makes the creation process quite complex and easy to fail. That is why many people find that their USB drives can't boot their Macs despite the expense of creation.
Here, I provide you with a much simpler method - using iBoysoft DiskGeeker. This disk management utility allows you to create a bootable macOS installer with only a few clicks. No Terminal required and much faster than the common method.
Here's how:
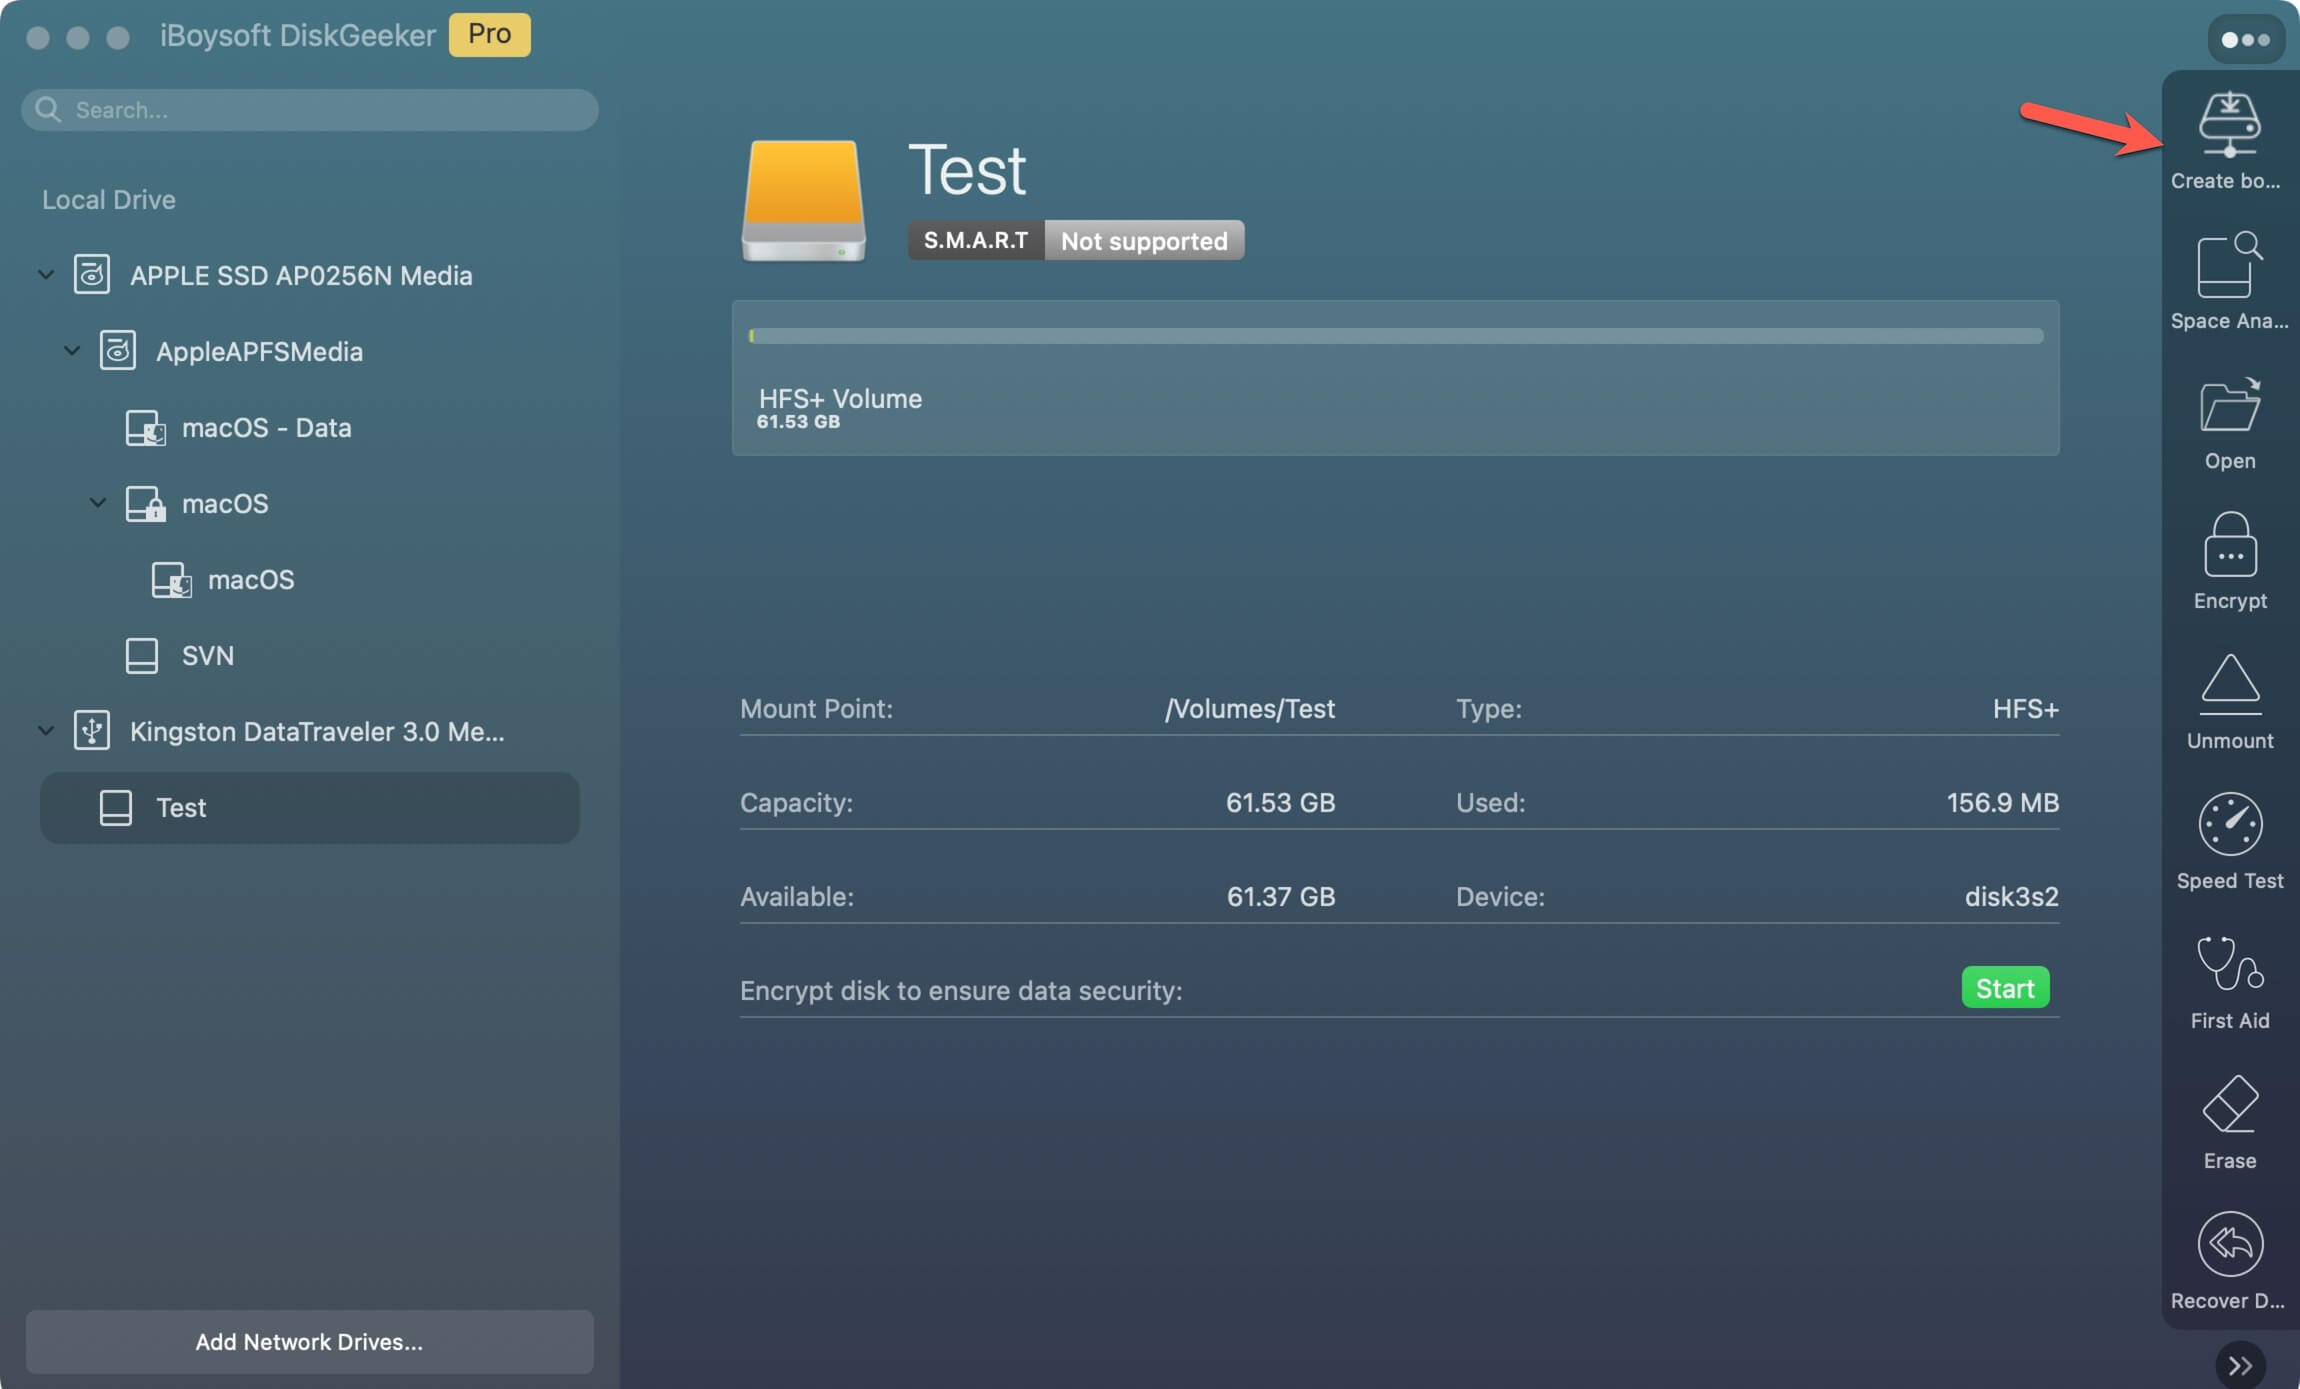
- Free download, install, and open iBoysoft DiskGeeker.
- Connect your external hard drive to your Mac.
- Select a volume on the external drive on the software's sidebar and click Create boot disk.
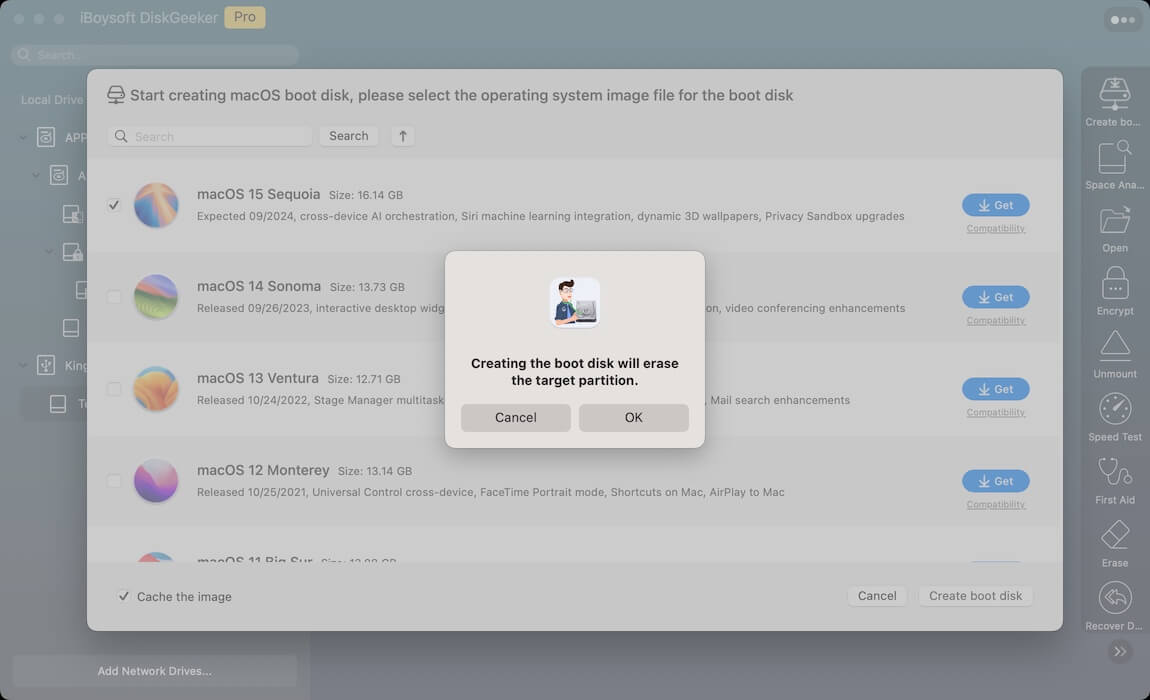
- Click Continue on the pop-up warning that the data on the volume will be erased.
If you need the data on the volume, back it up first. - Select the desired macOS version, click Create boot disk > OK to begin downloading the macOS DMG file.
- Wait for the download process to finish and click Continue to start creating the macOS bootable installer.
- Wait for the bootable installer creation process to complete.
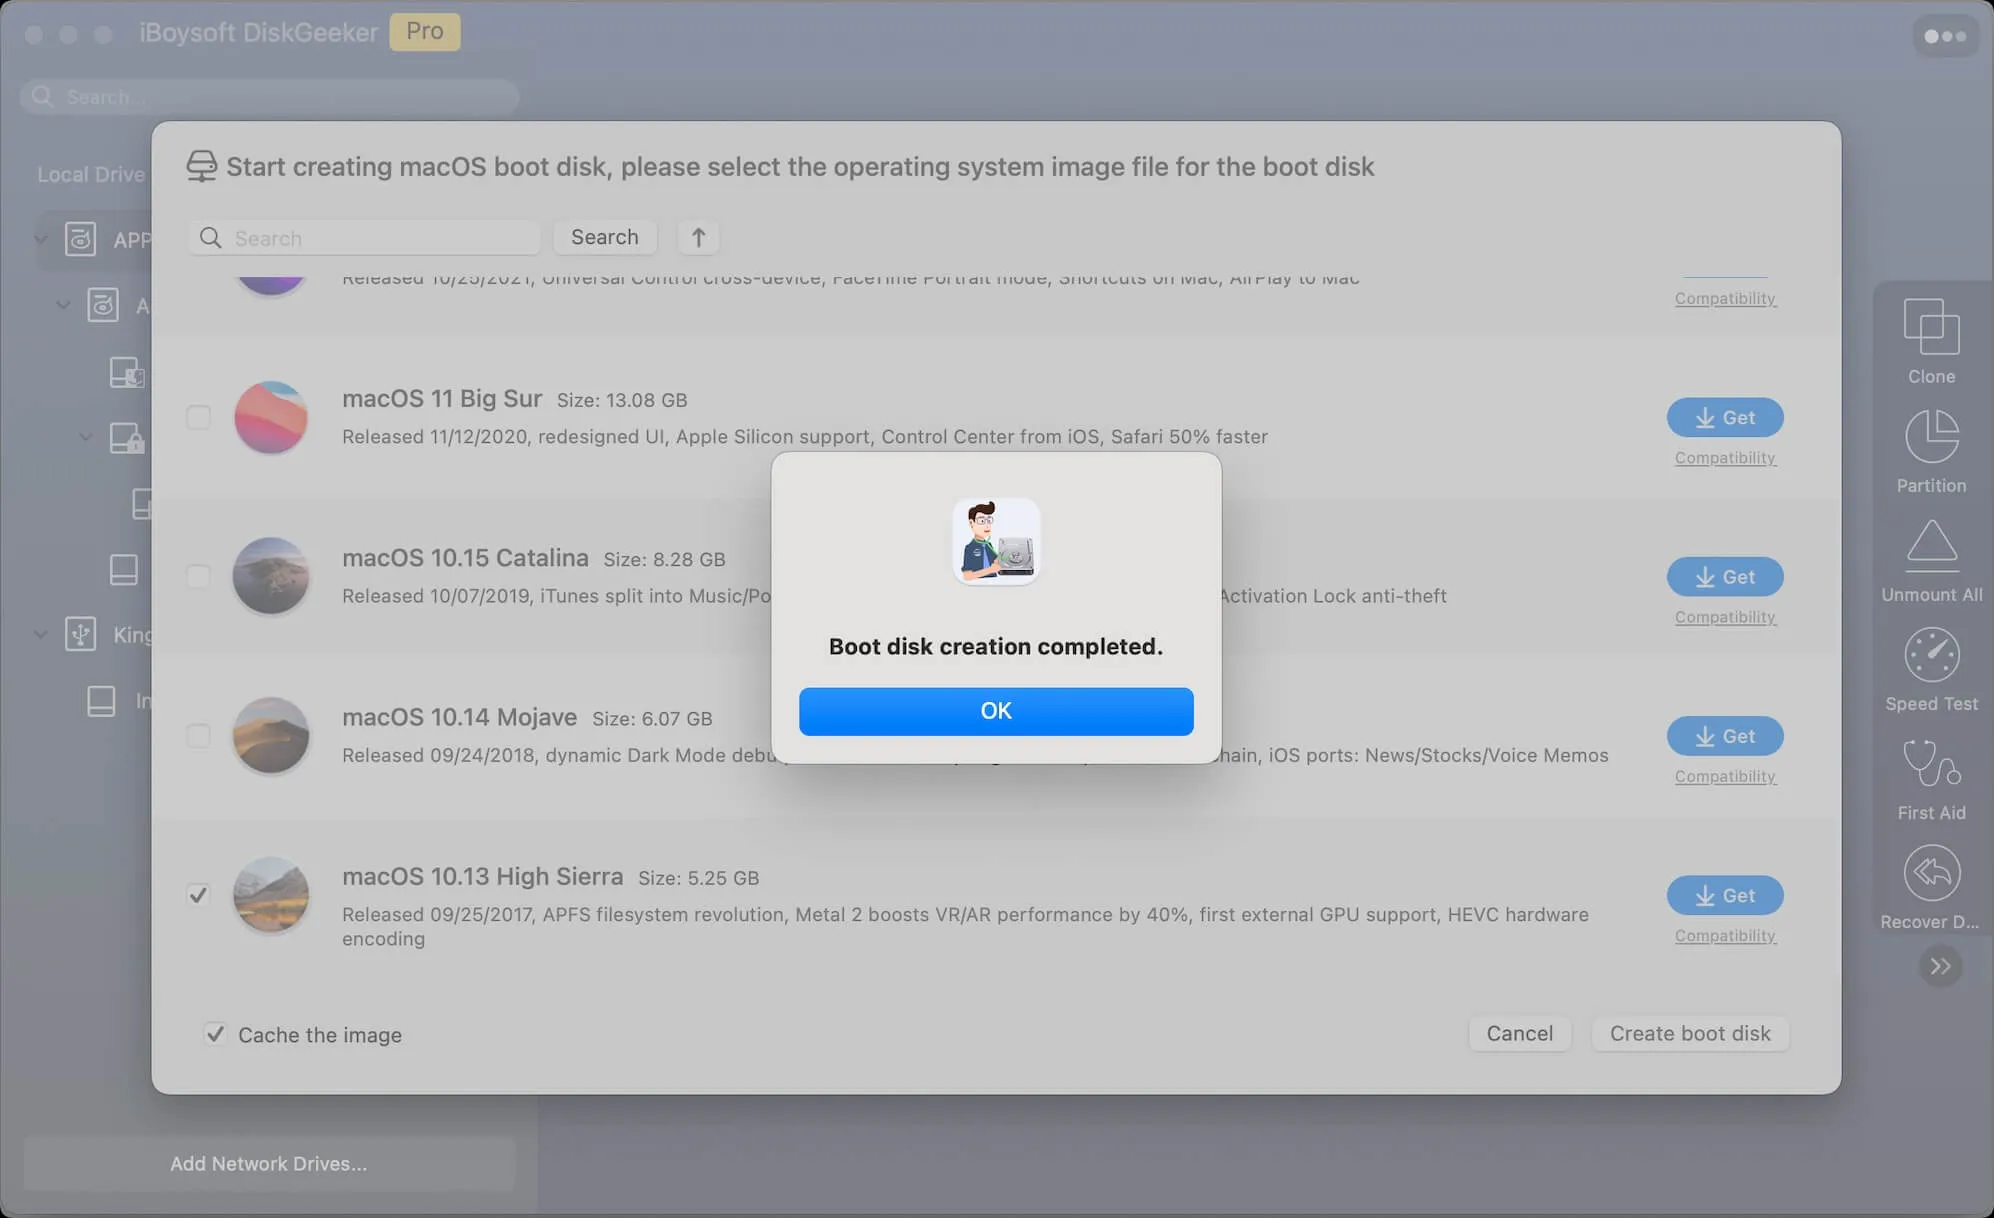
Now, you have a bootable USB macOS installer. You can use it to boot up your Mac successfully without the appearance of the prohibited sign and the black screen.
Share this easy-to-operate way to create a bootable macOS installer as a rescue when a bootable USB is not showing up on your Mac.
Recreate a bootable USB with Terminal
If you would like to use the Terminal to create a bootable installer for macOS, you can compare your steps with mine as a reference. Please pay attention to each step to avoid the prohibited sign from showing up again when booting your Mac from the bootable USB installer.
Step 1. Prepare a clean USB drive
The USB drive or secondary volume should be formatted with Mac OS Extended. The drive or volume should have at least 32 GB capacity for macOS installer storage and running. However, for smoother and quicker performance, a larger capacity is better.
If you create a bootable macOS installer for Apple silicon Macs, you need to format the USB drive or volume to APFS.
- Connect the USB drive to your Mac.
- Open Disk Utility from Launchpad > Other.
- Select the USB drive and click Erase.
Remember to back up your data before erasing.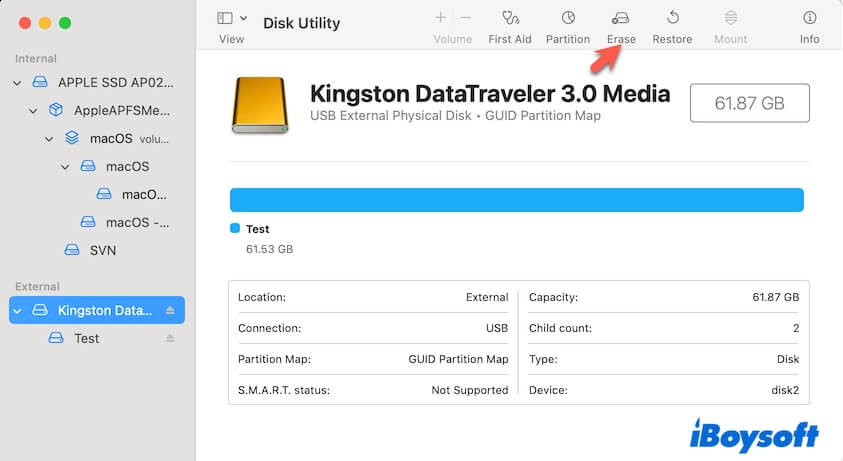
- Enter a name, choose Mac OS Extended (Journaled) and GUID Partition Map, and click Erase.
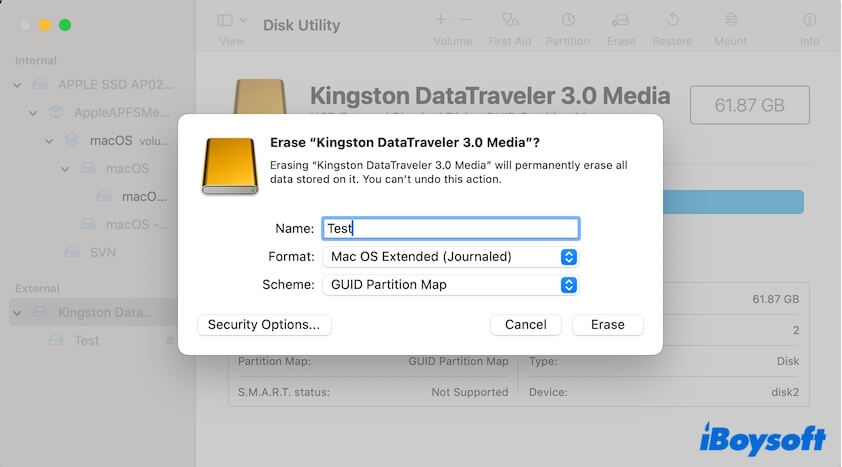
- Wait for the erasing process to end.
Step 2. Download the full macOS installer
To download the target macOS installer, go to the Apple App Store. Make sure the macOS version you'll download is compatible with the Mac model you'll boot the USB bootable installer from.
Notably, you should keep your internet stable and powerful. An unstable or broken network may cause the download failure or the macOS installer corruption.
Here are the quick links to the latest macOS versions:
Download macOS Sequoia
Download macOS Sonoma
Download macOS Ventura
If you can't find and download the older macOS versions from the App Store, you can get them from iBoysoft DiskGeeker.
This tool allows you to download macOS DMG files for bootable installer creation at a much faster speed, including macOS High Sierra, macOS Mojave, macOS Catalina, macOS Big Sur, macOS Monterey, macOS Ventura, macOS Sonoma, and macOS Sequoia.
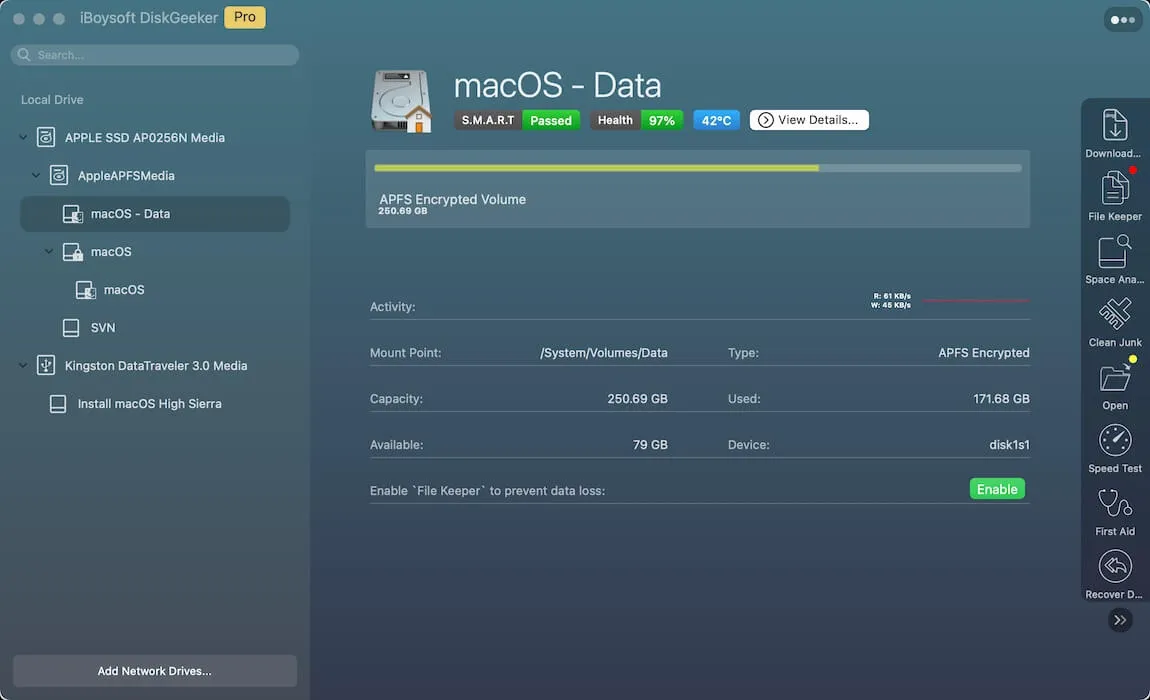
- Download, install, and open iBoysoft DiskGeeker.
- Select the Macintosh HD volume and click Download Image.
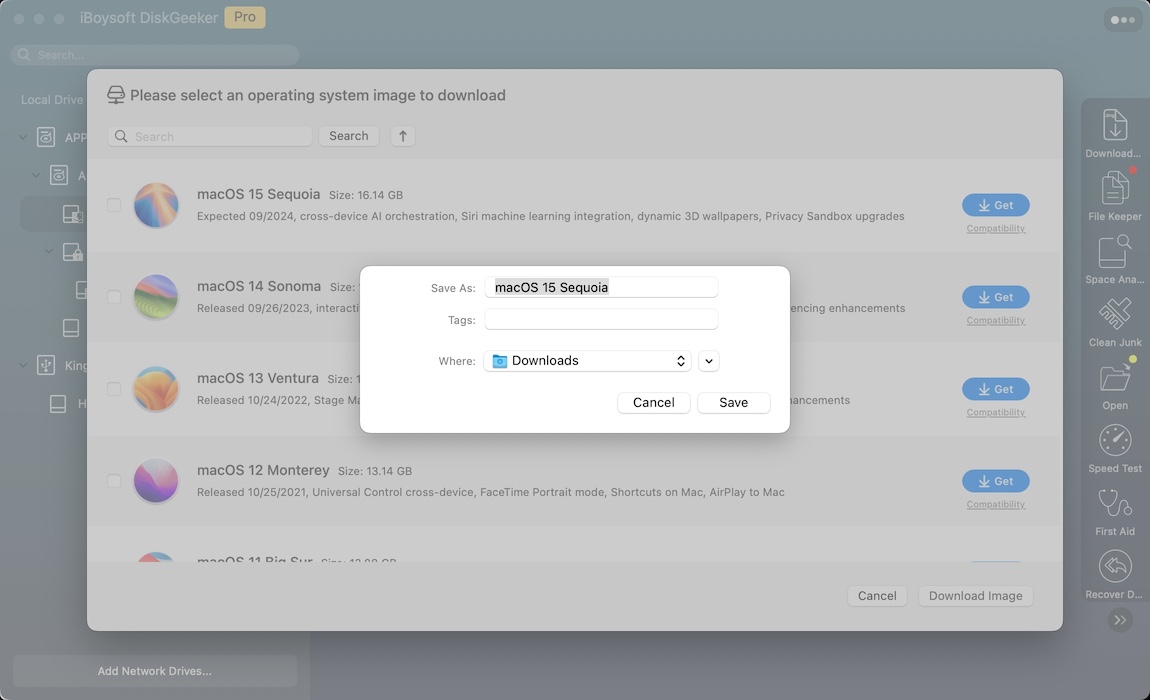
- Click the Get button next to your wanted version, select where to save the macOS installer, and click Save to start downloading.
Step 3. Create a bootable installer for macOS
After preparing the external drive and the macOS installer, you can put your hands to create the bootable USB macOS installer with Terminal.
- Connect your external USB drive to the Mac.
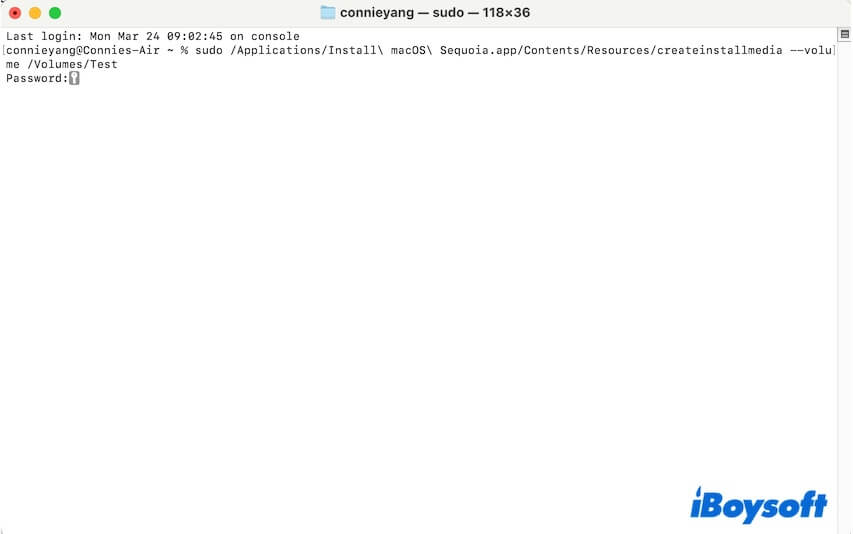
- Open Finder > the Applications folder > the Utilities folder > Terminal.
- Copy and paste the command line of your macOS version into the Terminal window.
Replace "MyVolume" with the name of the volume where you'll create the bootable installer.
Replace "Applications" with the location where the installer stores it on your Mac if it is not in the Applications folder.
Sequoia
sudo /Applications/Install\ macOS\ Sequoia.app/Contents/Resources/createinstallmedia --volume /Volumes/MyVolumeSonoma
sudo /Applications/Install\ macOS\ Sonoma.app/Contents/Resources/createinstallmedia --volume /Volumes/MyVolumeVentura
sudo /Applications/Install\ macOS\ Ventura.app/Contents/Resources/createinstallmedia --volume /Volumes/MyVolumeMonterey
sudo /Applications/Install\ macOS\ Monterey.app/Contents/Resources/createinstallmedia --volume /Volumes/MyVolumeBig Sur
sudo /Applications/Install\ macOS\ Big\ Sur.app/Contents/Resources/createinstallmedia --volume /Volumes/MyVolumeCatalina
sudo /Applications/Install\ macOS\ Catalina.app/Contents/Resources/createinstallmedia --volume /Volumes/MyVolumeMojave
sudo /Applications/Install\ macOS\ Mojave.app/Contents/Resources/createinstallmedia --volume /Volumes/MyVolumeHigh Sierra
sudo /Applications/Install\ macOS\ High\ Sierra.app/Contents/Resources/createinstallmedia --volume /Volumes/MyVolume - Press Return and enter your admin password.
- Type Y if asked whether to erase the volume to continue the process.
If Terminal fails to erase the volume, go to Disk Utility to format it and start from scratch. - Click OK if asked whether to allow Terminal to access files on the removable volume.
- Wait for the macOS bootable installer to be created.
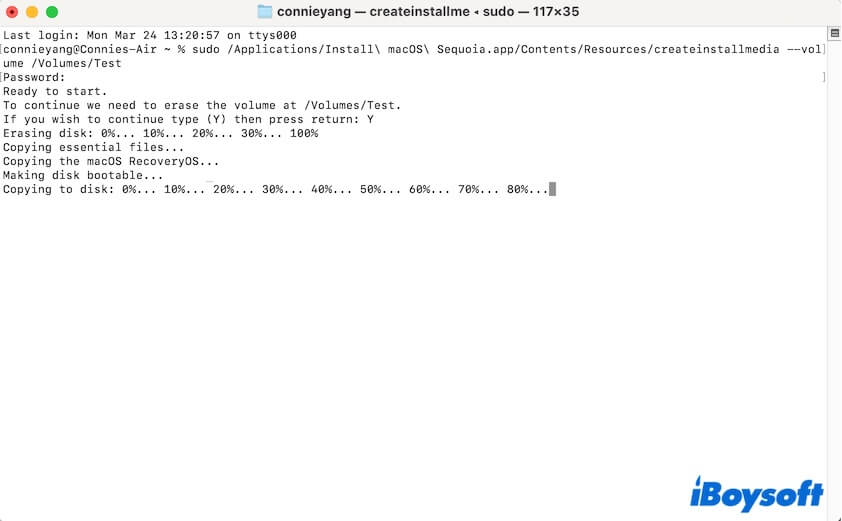
Note: The process is a little bit long. During that time, keep your Mac charged and the USB drive well-connected to your Mac.
If making a compatible bootable macOS installer with Terminal feels complicated and time-consuming, try iBoysoft DiskGeeker. It makes the process quick, easy, and hassle-free, saving your time and effort.
Related articles:
How to boot a Mac from the USB drive
Fix 'Startup Security Utility no administrator was found'
If you fix the Mac OS X installer showing a prohibitory sign but not booting the Mac with this post, share it with more people.