To reinstall Windows, perform a clean installation, troubleshoot a problematic PC, set up multiple computers without repeating downloading ISO files, upgrade Windows, etc., you may want to create installation media for Windows 10/11, which allows you to boot Windows from the USB flash drive/DVD containing system files.
🔔 If you need to explore all Windows ISO files, get them from the Windows ISO download center. If you need an old Windows ISO? Follow: Windows Download Repository (Old & Latest)
There are 3 free ways to create Windows installation media:
- Create Windows 10/11 installation media via the Windows media creation tool (Download Windows 10 Pro or download Windows 10 Home first)
- Create a bootable USB for Windows 10/11 using Rufus - an open-source utility
- Create installation media for Windows 10/11 with CMD - complicated steps
Need a Windows 11 bootable USB installer? Simple download it: Windows 11 Bootable USB Download.
Tips: In fact, you can create the Windows installation media without the Media Creation Tool. Check out the following articles for more inspiration:
How to Create Windows 7 Bootable USB Installer for UEFI & BIOS?
Here is what you need to create installation media:
- A computer with a stable and quality internet connection.
- A blank USB flash drive/external hard drive with more than 8GB, or a DVD.
Note: Creating installation media will erase all data on the target USB flash drive/external disk, if there are important files, quickly and easily clone the drive with iBoysoft DiskGeeker for Windows.
Let's dive into each method to create Windows installation media on a PC.
Method 1. Use the Windows media creation tool
Microsoft's method for creating installation media is the media creation tool. You can download the ISO file to your local disk or use the media creation tool to make a bootable USB flash drive. This utility does not work with an existing Windows ISO image since it needs to download the ISO to make a bootable drive.
Here's how to create Windows 10 installation media via the media creation tool:
- Visit the Windows 10 ISO download center to download and install it.
- Open the MediaCreationToolW10.exe and wait till you see the Setup wizard.
- Then, tap Accept to agree to the license terms.
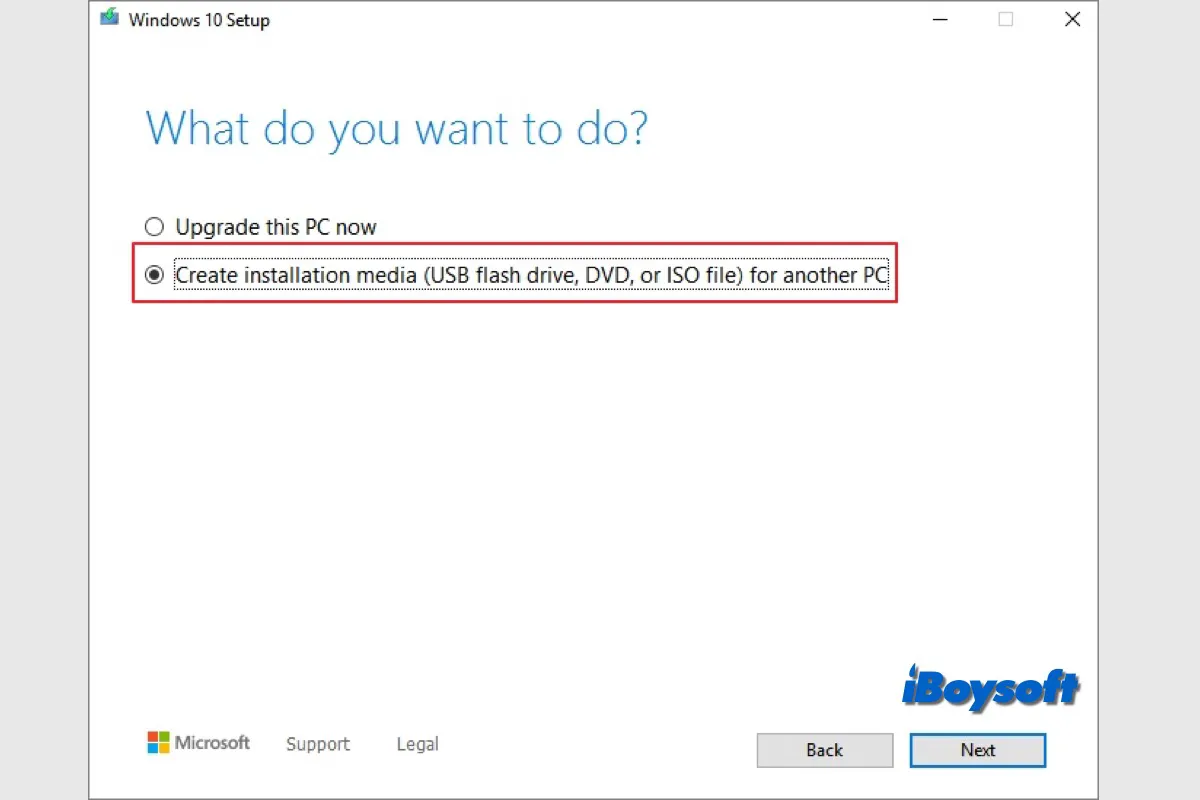
- Select "Create installation media (USB flash drive, DVD, or ISO file) for another PC", and click Next.

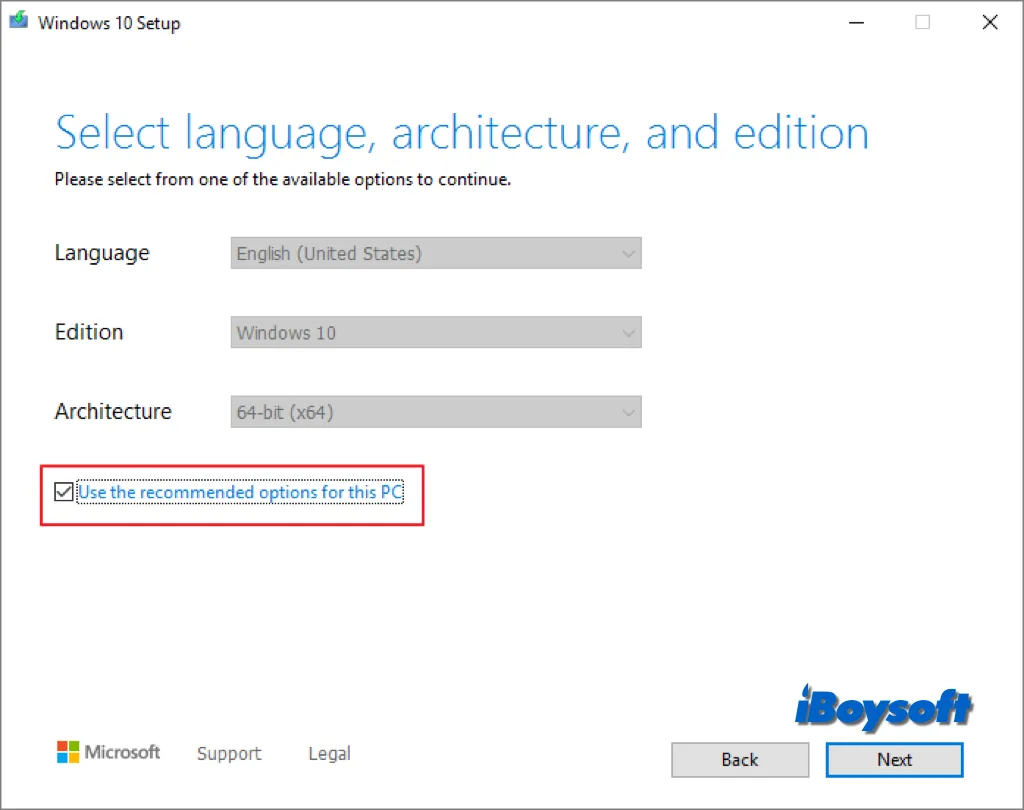
- Choose a language, edition, and architecture for Windows 10. If you have different specification needs, different from the windows existing on your PC, uncheck the "Use the recommended options for this PC" box, then click Next.
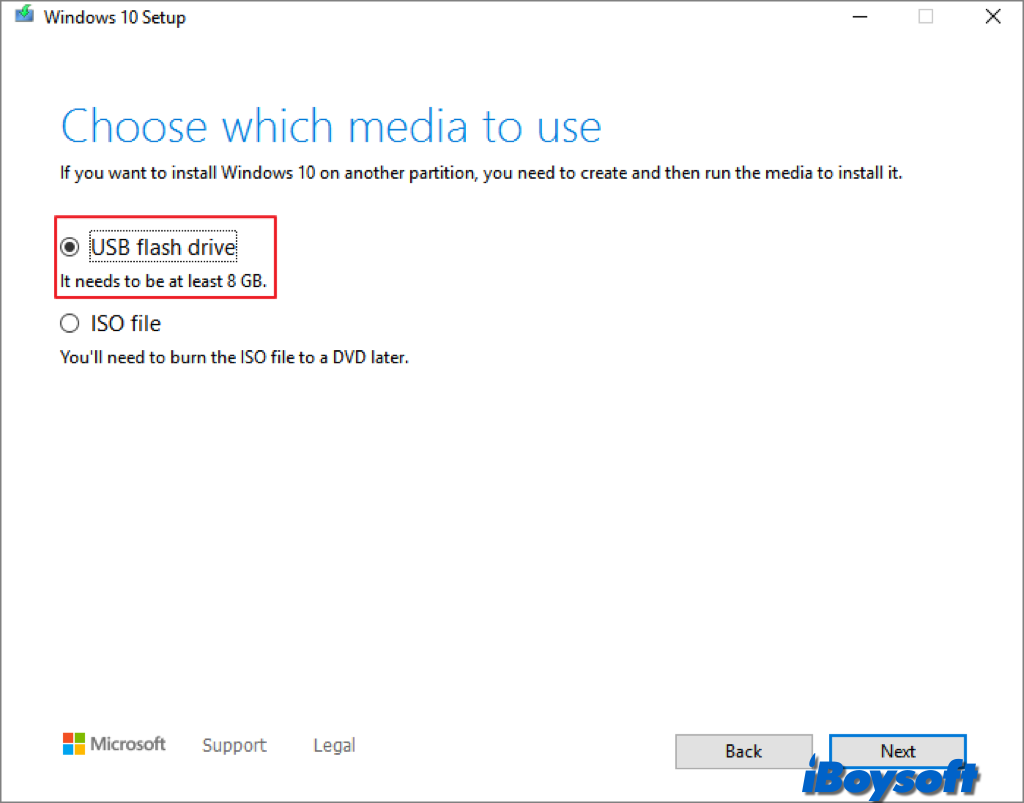
- Choose which media to use, select USB flash drive, and click Next.
- Select the target USB flash drive, and click Next > Finish to create the USB installation drive.
Method 2. Install Rufus to burn ISO to USB drive
An open-source tool called Rufus helps with formatting and creating Windows bootable USB drives. It operates quickly and requires no installation. You can use the executable file right away after downloading it. To make a Windows 10/11 bootable USB using Rufus, follow the instructions below.
Tips: If you need a specific feature update of Windows 11, such as Windows 11 25H2, visit the Windows 11 Update Download Center. It provides direct links to all Windows 11 updates.
- Head to the Windows ISO download page to download Windows 11 ISO (or download Windows 10 disk image file(ISO).
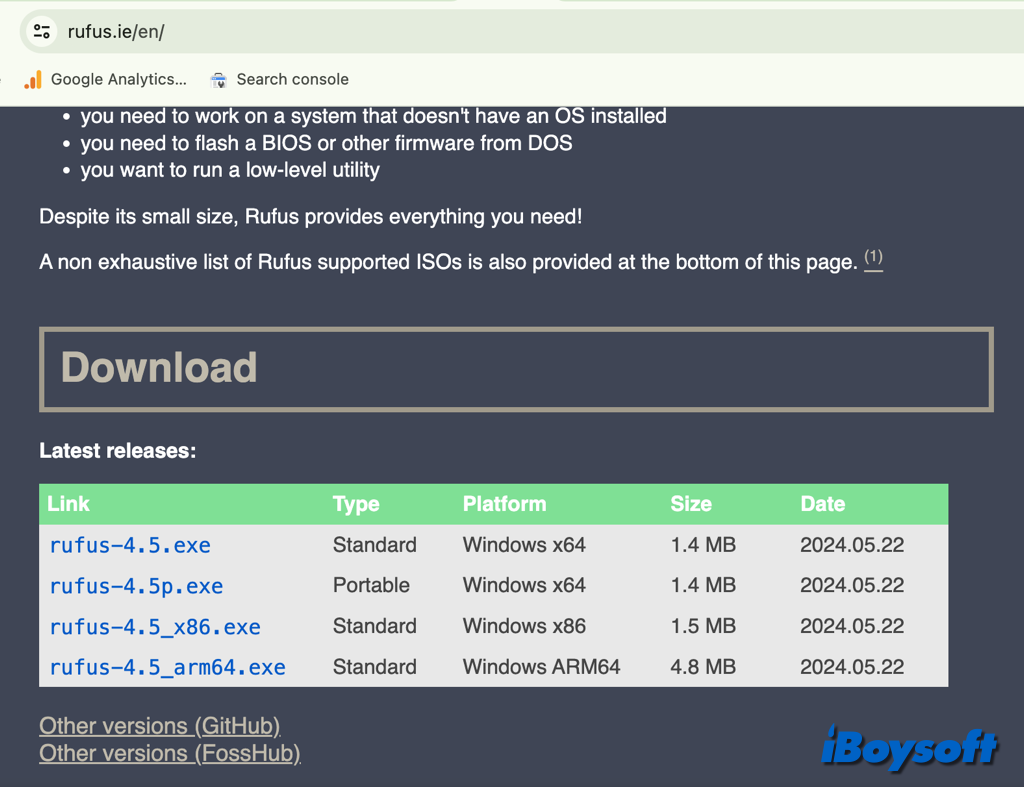
- Go to the Rufus official site and download the utility under the Download section.
- Open Downloads on your PC and double-click the executable file to launch Rufus.
- Tap the Application Settings button at the bottom (third from left).
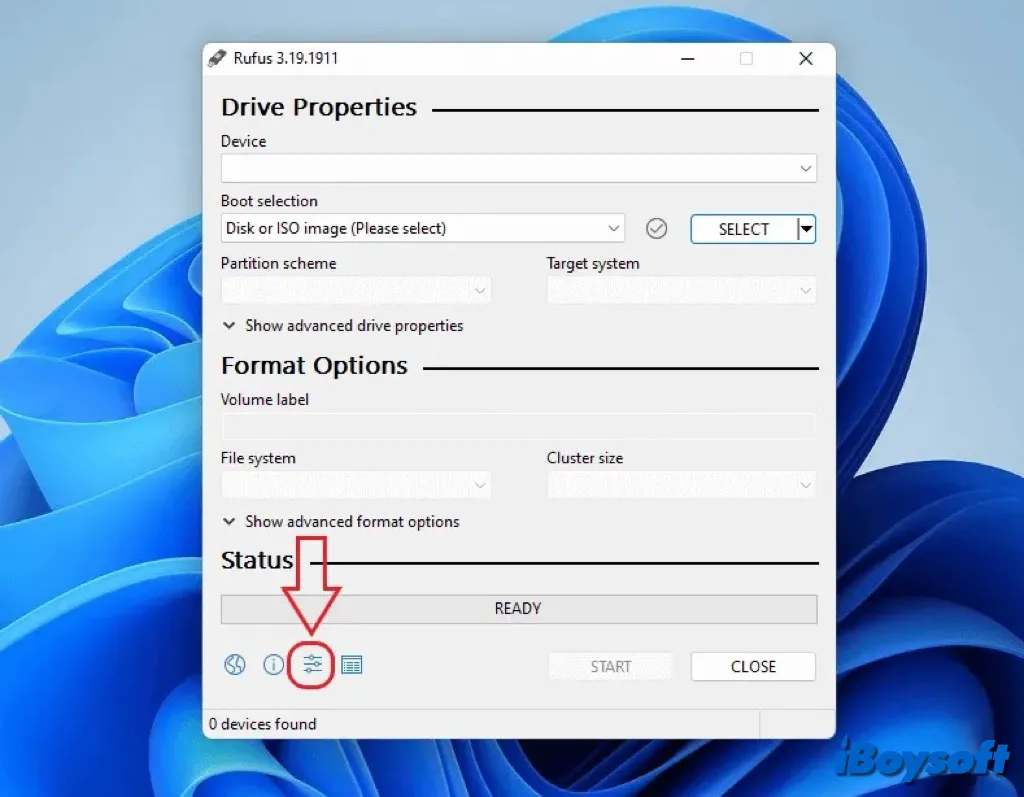
- Expand the drop-down menu of Check for updates, select Daily (Default), and click Close.
- Close the main windows and relaunch Rufus.
- Select your USB under the Device section, choose the downloaded ISO file under the Boot selection section, and click Select.
- Navigate to the location of the Windows 10/11 ISO file, select the file, and click Open.
- Choose Standard Windows 10 Installation (TPM 2.0 + Secure Boot) under the Image Options tab.
- Set the Partition scheme (GPT) and Target system (UEFI) as default and name your USB drive under the Volume label tab.
- Set all other options as default. Check the boxes against Quick format and Create extended label and icon file options.
- Click Start at the bottom-right to start creating a Windows bootable USB.
Method 3. Run commands in the Command Prompt
In addition, there is another Windows native command-line tool - Command Prompt, you can use it to create Windows installation media by running the right commands. Here's how to create a Windows bootable USB using the diskpart command:
- Connect the USB drive to your Windows PC.
- Type cmd in the search bar and launch Command Prompt by clicking Run as administrator.
- Type the command "diskpart" and hit Enter.
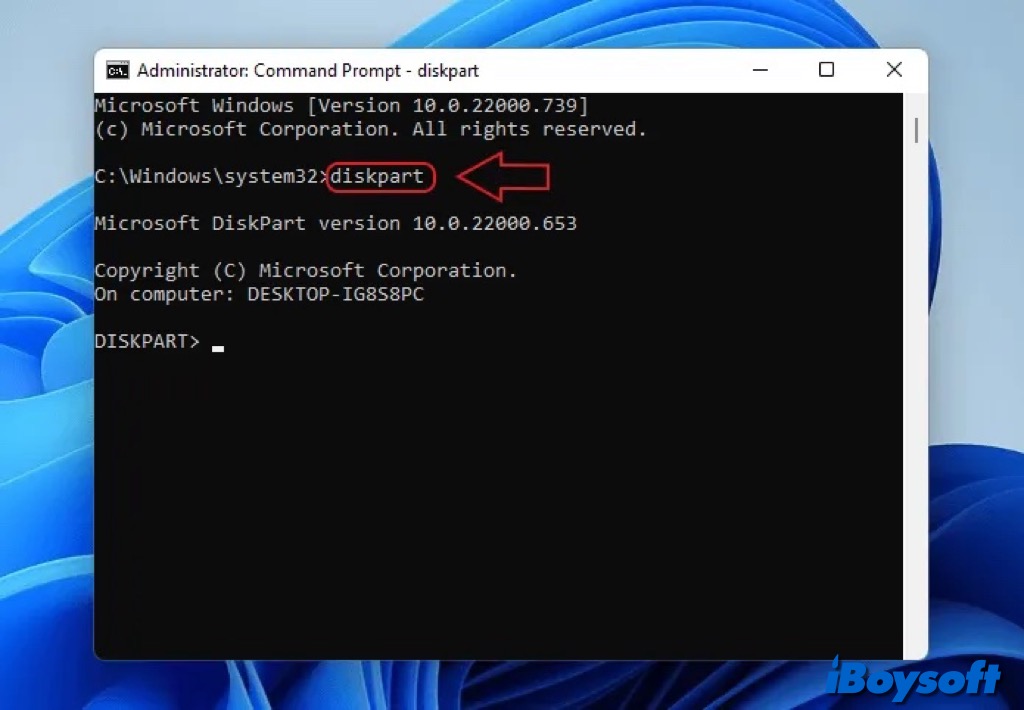
- Type the command "list disk" and press Enter to list your USB drives.
- Enter the command "select disk 1" (replace digit 1 with the USB's number in the list) press Enter to choose the target USB drive.
- You need to format the USB drive using the command "clean" and press Enter.
- Type the following commands one by one and press Enter after each. (Replace the letter X with a letter you prefer)create partition primarylist paractiveselect partition 1format FS=NTFS label=”bootableUSB” quick overrideassign letter=Xexit
- Type the following command to mount the ISO file and press Enter. (Replace with the correct path of the ISO file on your PC)PowerShell Mount-DiskImage -ImagePath "C:\path\to\Windows10.iso"
- Type the following commands and press Enter after each.DiskpartList volumeExit
- Then, insert the following commands one by one and press Enter after each. (Replace the letters X and E with the suitable letters for the ISO file and USB, respectively.)E:cd bootbootsect /nt60 X:xcopy E:\*.* X:\ /E /F /H
Share the method you prefer to create Windows 10/11 installation media!
Bonus tip: Boot Windows PC from the Windows installation media
Once you have successfully created Windows installation media for the wanted Windows version, you can proceed to boot your PC where you want to reset settings, reinstall Windows, or upgrade OS from the Windows installation media, here are the steps:
- Connect the Windows installation media drive to the computer where you want to install Windows.
- Restart the PC and enter the BIOS or UEFI settings by pressing a specific key (such as F2, F10, or DEL) during startup.
- Locate the boot order settings and move the bootable USB drive to the top of the list.
- Save your settings and exit the BIOS or UEFI, then restart the PC to let it boot from the USB drive.
- When the Windows installation screen appears, follow the on-screen guide to complete the installation.
Also read:
Windows 11 Update Download Center (25H2, 24H2, 23H2, 22H2, 21H2).
Windows 10 Update Download Center (22H2 & Earlier) or download Windows 10 ISO without Media Creation Tool.
If you think this post is helpful, click the button below to share it!