A macOS Ventura bootable USB installer serves several purposes. It allows you to perform a clean install of macOS Ventura, upgrade multiple Macs without downloading the full installer on each machine, downgrade macOS, boot an unbootable Mac, install macOS on unsupported Macs, and more.
In this article, we'll explain how to create a bootable macOS Ventura USB install drive on Mac & Windows.
(If you want to upgrade to the latest macOS version, create a bootable USB installer for macOS Tahoe.)
Tips: Prepare an external USB drive with at least 15GB of storage space. Back up the important files on it because the process will reformat the drive, deleting all data.
How to create macOS Ventura bootable USB on Mac?
Notably, the common way to create a bootable installer for macOS is from Terminal. But it doesn't always work and is way more complex than a guided tool. So, we'll discuss two ways to create a macOS Ventura bootable USB on Mac. You can choose the one that's most convenient for you.
| How to create macOS Ventura bootable USB | No need to download macOS Ventura elsewhere | Easy to follow | Fast | Command-line knowledge |
| Use iBoysoft DiskGeeker to create bootable USB from DMG | ✅ | ✅ | ✅ | ❌ |
| Use Terminal to make Ventura bootable USB from app installer | ❌ | ❌ | ❌ | ✅ |
Way 1: Create macOS Ventura bootable USB from DMG
If you value efficiency and effectiveness, we recommend you create the macOS Ventura bootable USB with an install disk creator like iBoysoft DiskGeeker. It's much simpler to use than the command-line tool. With it, you only need to click a few buttons to make a bootable installer for macOS Ventura, which can save time and avoid errors you may otherwise encounter in Terminal.
If you prefer a free bootable disk creator tool, check out DiskMaker X.
Here's how to create a bootable macOS Ventura USB install drive from DMG:
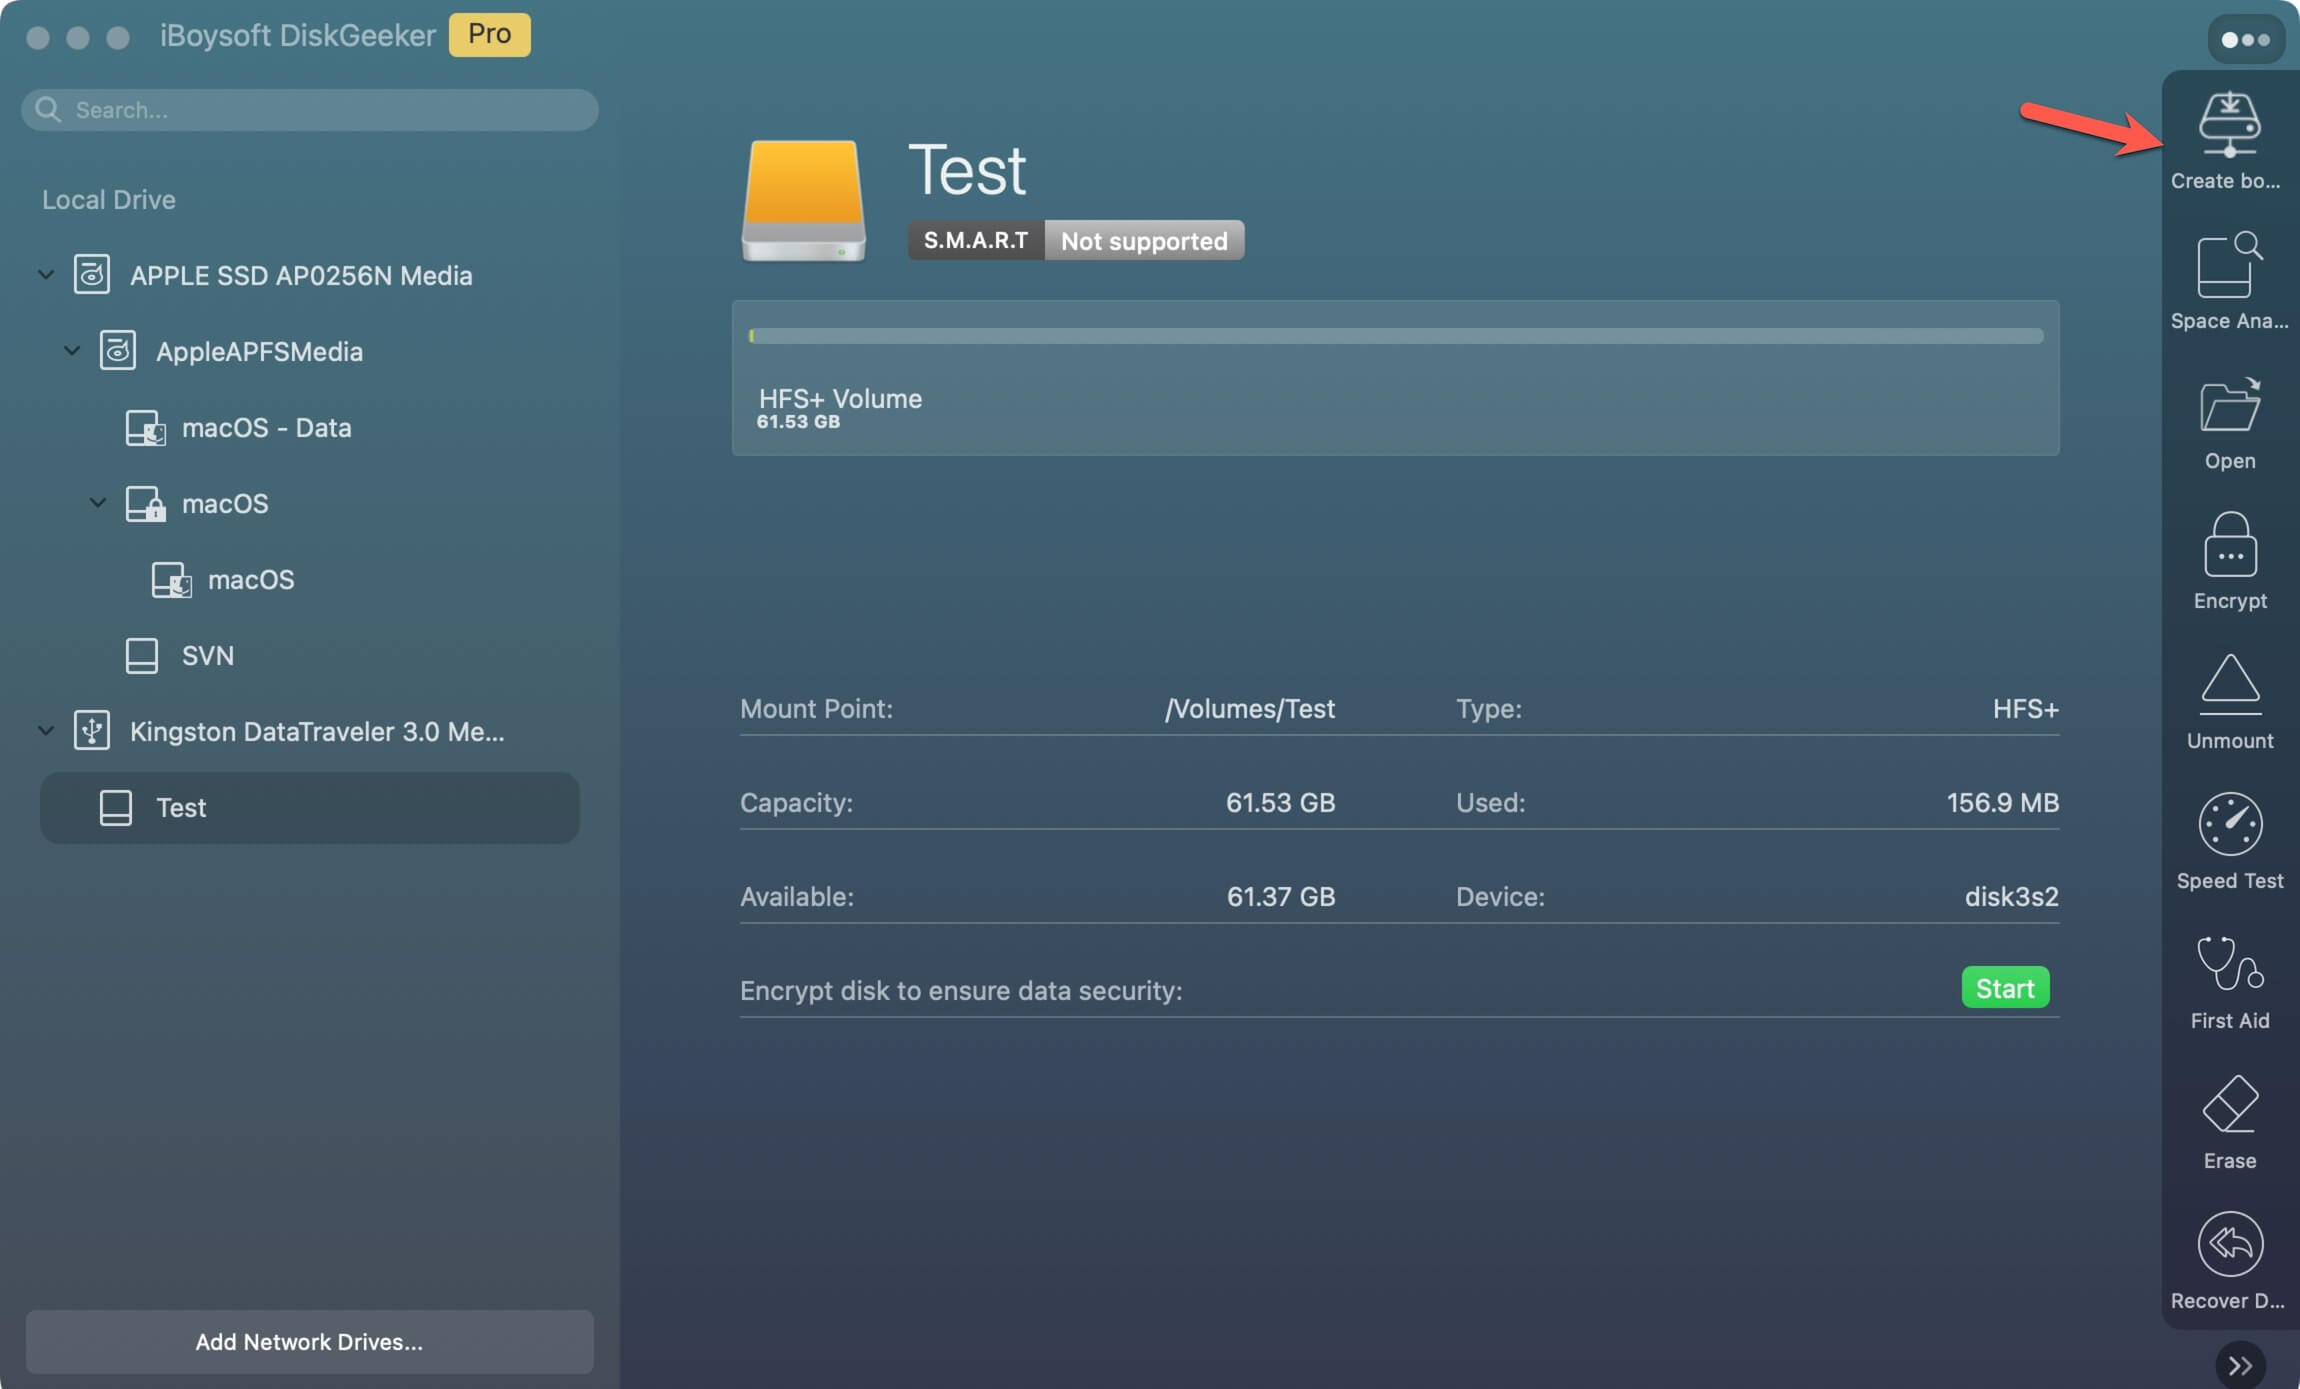
Step 1: Download and install iBoysoft DiskGeeker.
Step 2: Open the software, select the USB drive from the left, and click Creat boot disk.
If you receive a pop-up window that says the drive will be formatted, click Continue.
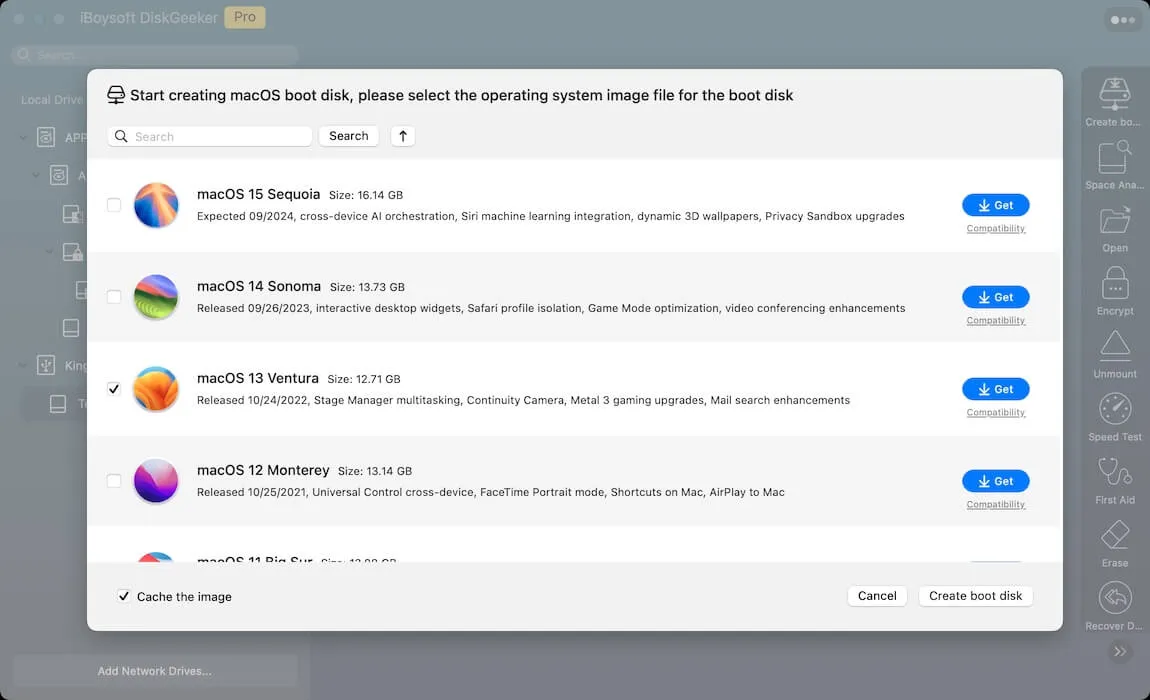
Step 3: Select macOS 13 Ventura and click Create boot disk.
Step 4: Tap OK when seeing the window stating "Creating the boot disk will erase the target partition."
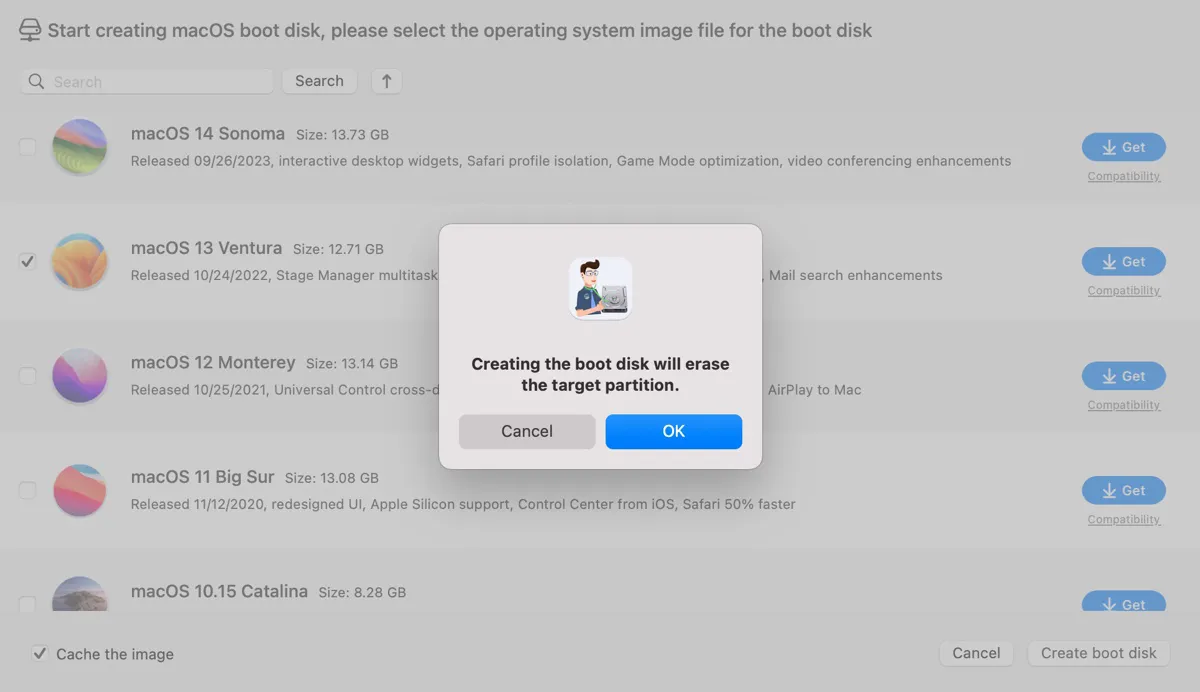
Step 5: It will begin downloading the macOS Ventura DMG installer and then create the install disk automatically after confirming with you that the USB can be erased.

Now, you can boot your Mac with the external USB to install macOS Ventura or use tools in macOS Recovery mode.
Share the tool to benefit others who need to create a bootable USB installer for Mac!
Way 2: Create a macOS Ventura bootable USB installer in Terminal
If you'd like to use Terminal instead, take the following steps to create a bootable macOS Ventura USB install drive:
- Download the macOS Ventura full installer to your Applications folder.
- Connect the USB drive to your Mac.
- Launch Disk Utility.
- Tap View > Show All Devices.
- Select the physical disk (the top layer) of your external drive and click Erase.
- Name it MyVolume.
- Choose Mac OS Extended Journaled in the Format field.
- Keep the Scheme GUID Partition Map.
- Click Erase.
- Open Terminal.
- Type the command below and press Enter.sudo /Applications/Install\ macOS\ Ventura.app/Contents/Resources/createinstallmedia --volume /Volumes/MyVolume
- Input your administrator password and press Enter. (You won't see the password on the screen for security reasons.)
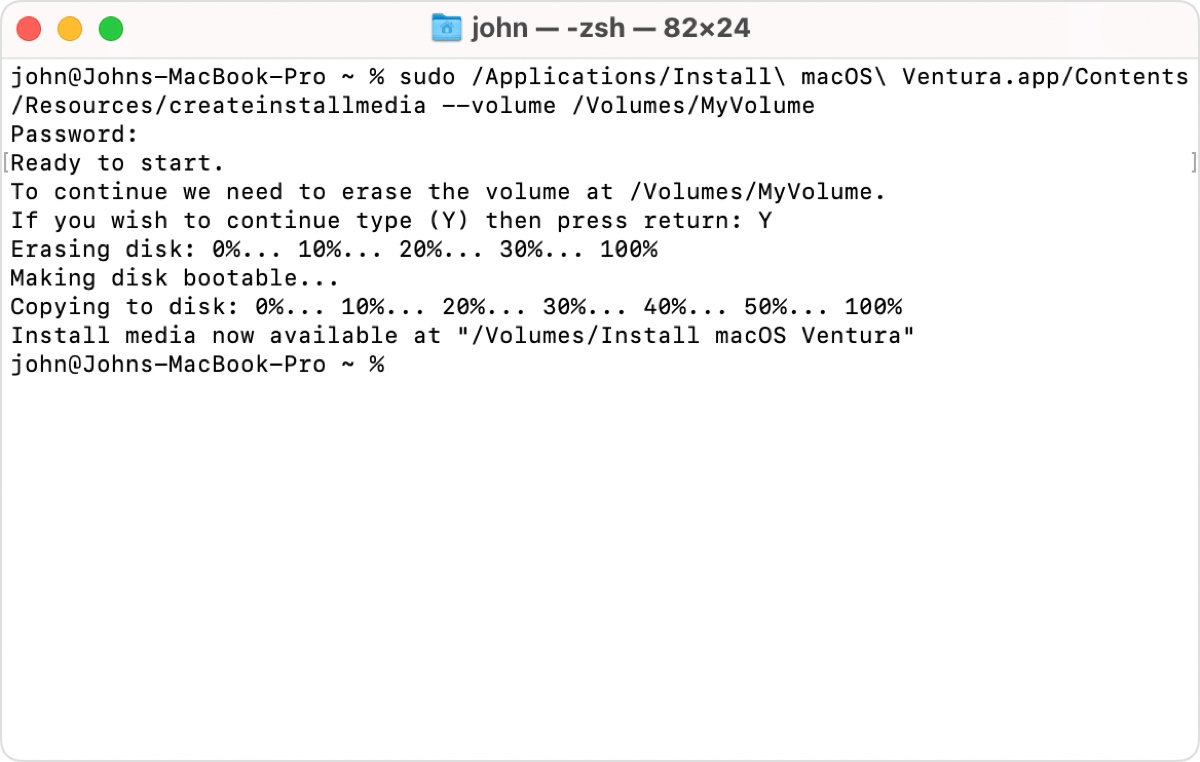
- Type Y and press Enter to confirm you need to erase the drive.
- Click OK when you see an alert that Terminal wants to access files on a removable volume.
- When "The install media is now available" appears, the external drive will be renamed Install macOS Ventura.
- You can now close Terminal and boot from the macOS Ventura bootable USB. (Unable to create the macOS bootable USB installer?)
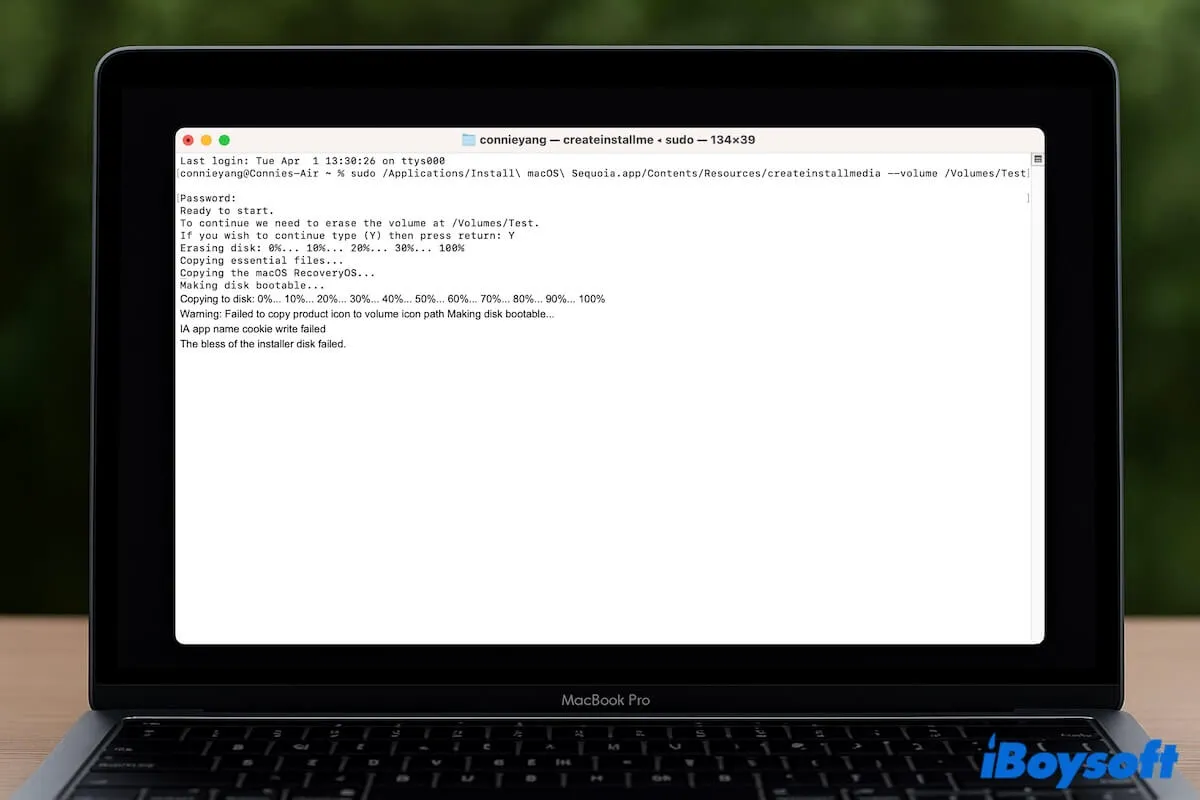
If you encounter the error "The bless of the installer disk failed" when creating the macOS bootable installer with Terminal, follow this post to resolve it.
Share these two ways to create a macOS Ventura bootable USB on a Mac!
How to create macOS Ventura bootable USB on Windows?
If your Mac won't boot, you can make a bootable USB for macOS on Windows to boot it and reinstall macOS Ventura.
Here's how to create a macOS Ventura bootable USB on Windows:
- Plug the external drive into your Windows PC.
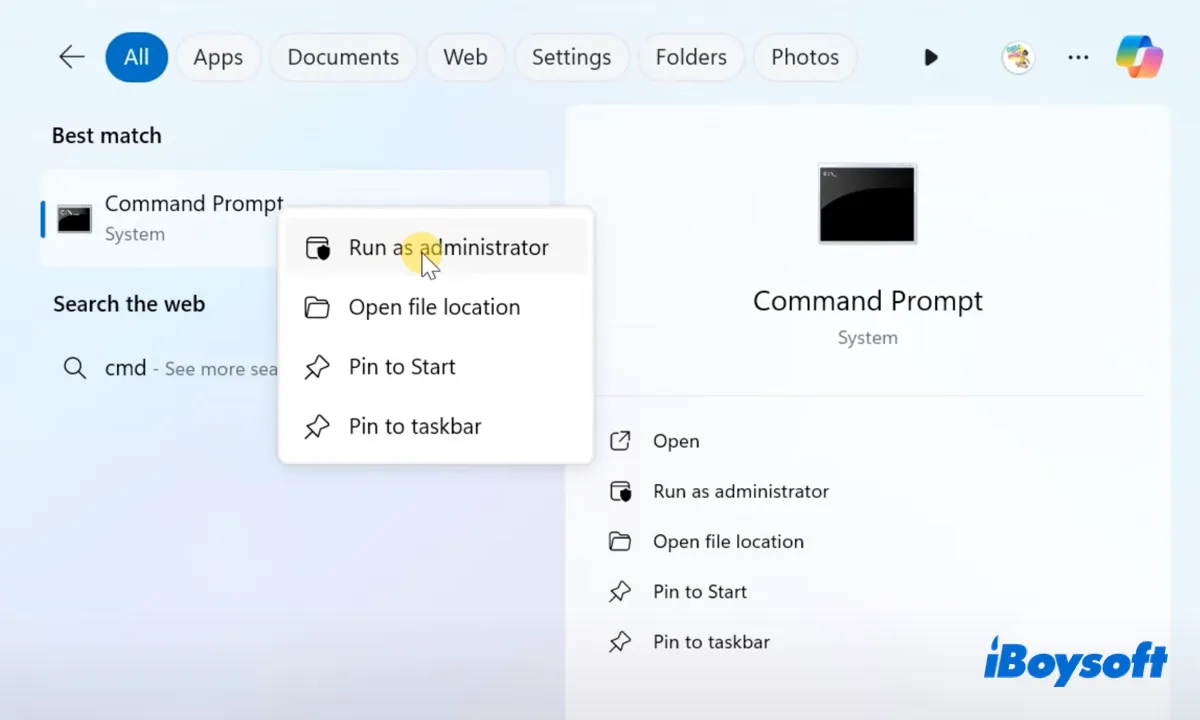
- In the search box on the taskbar, type Command Prompt.
- Right-click the result - Command Prompt and choose Run as administrator.
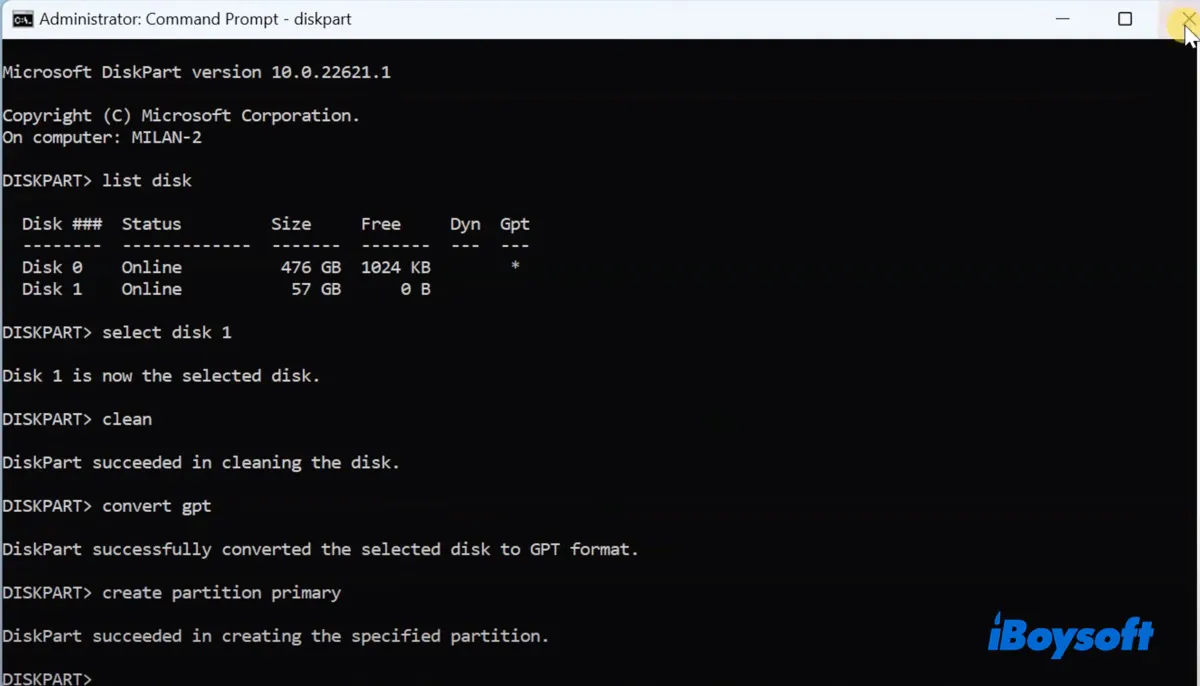
- In the command-line interface, type the following commands one by one and press Enter after each command to execute it.diskpartlist diskselect disk 1 (If your USB isn't disk 1, change the number.)cleanconvert gptcreate partition primary
- Download the macOS Ventura DMG file.
- Download and install TransMac.
- Extract the compressed file.
- Open the folder, double-click setup, and follow the instructions to install TransMac.
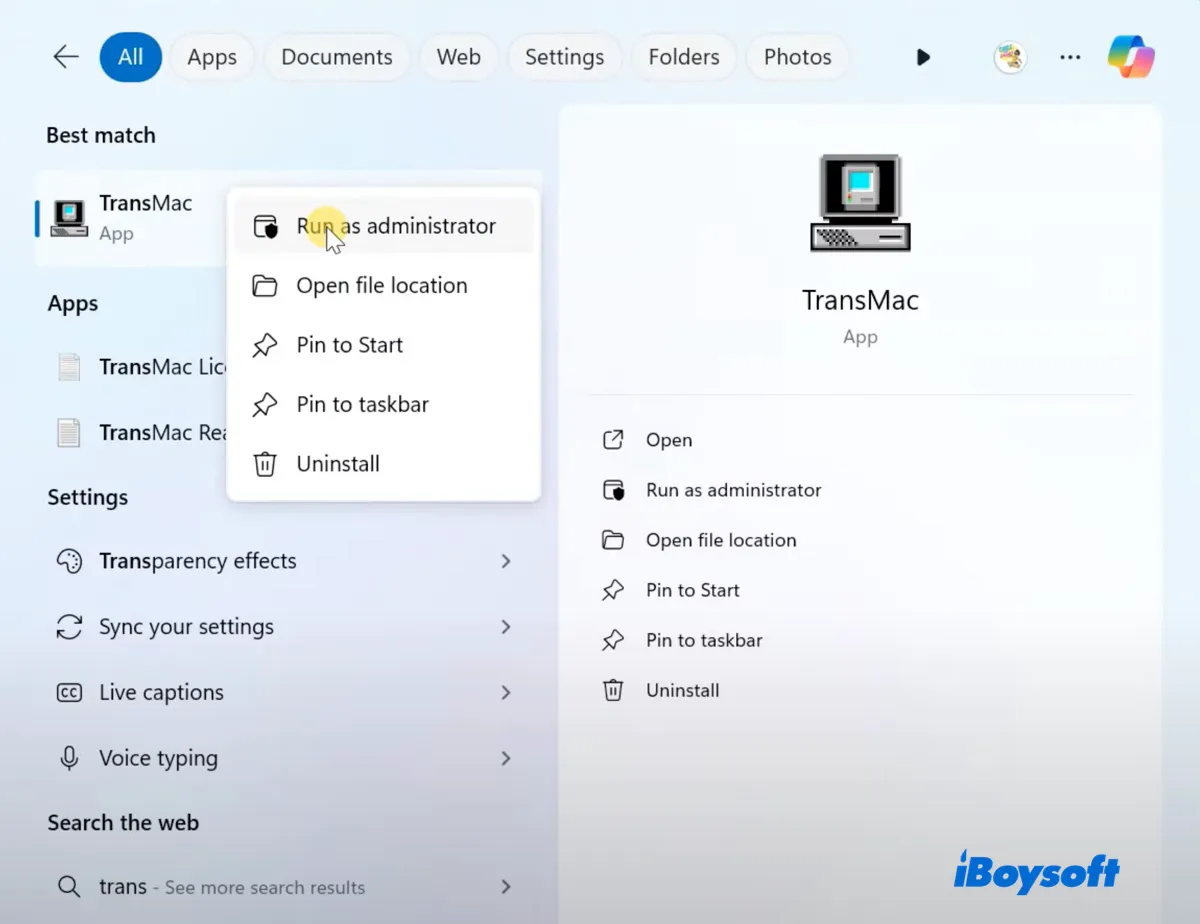
- Type TransMac in the search bar, right-click on the result, and choose Run as administrator.
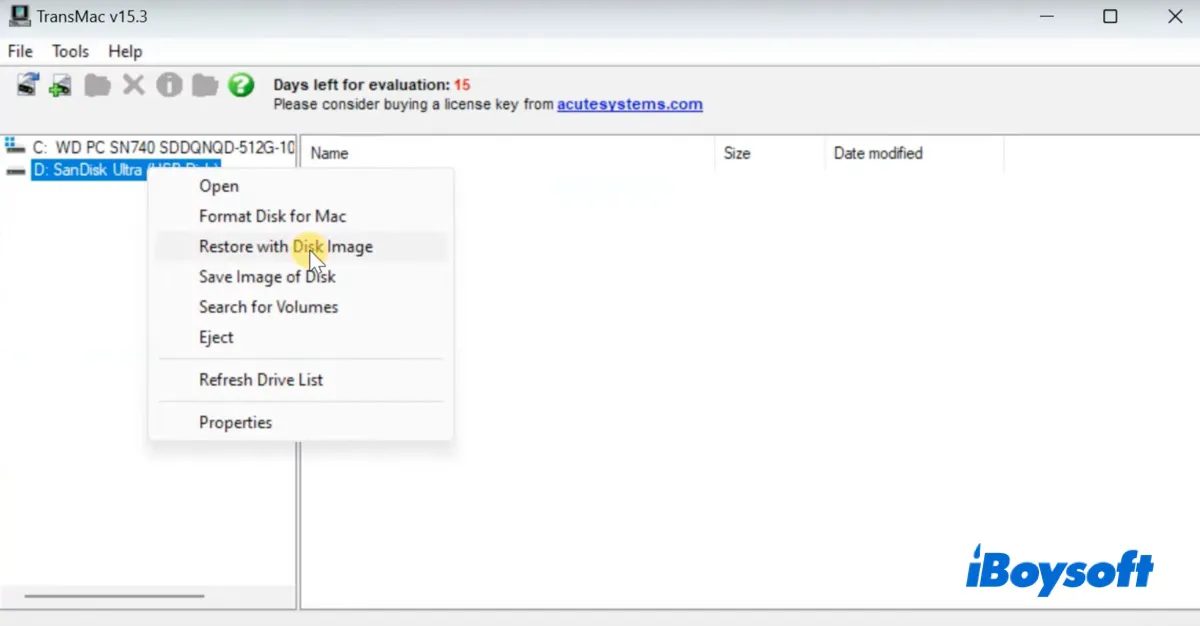
- Right-click on the USB drive and select Restore with Disk Image.
- Click Yes.
- Choose the macOS Ventura DMG file you have downloaded.
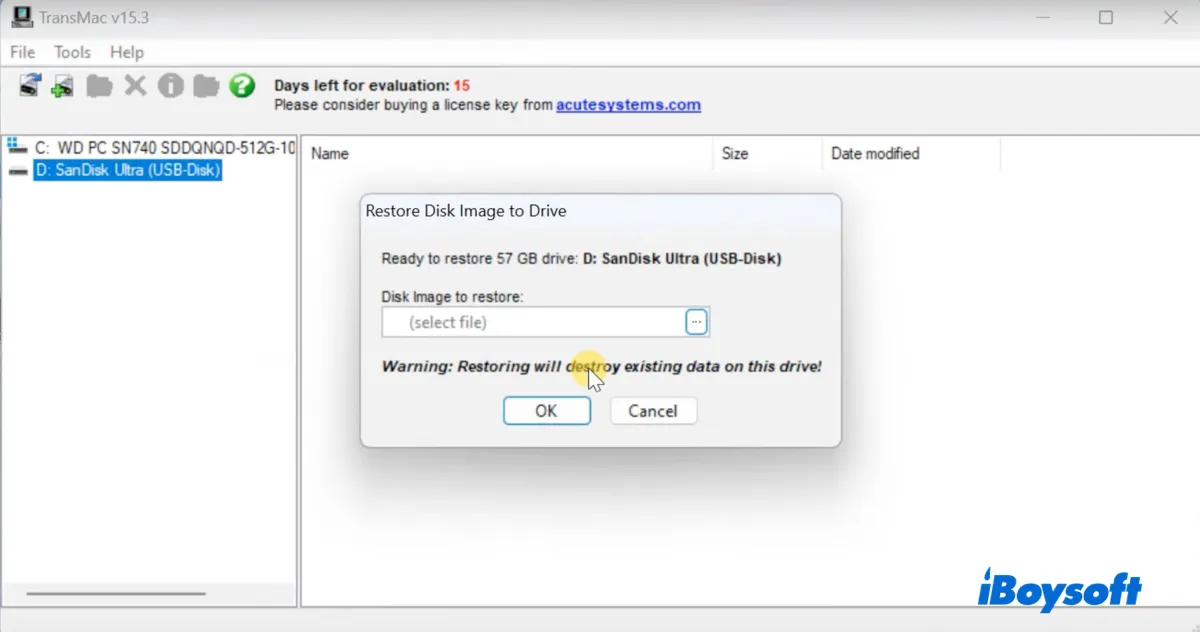
- After that, it will start to format your USB drive and restore the macOS Ventura DMG to it.
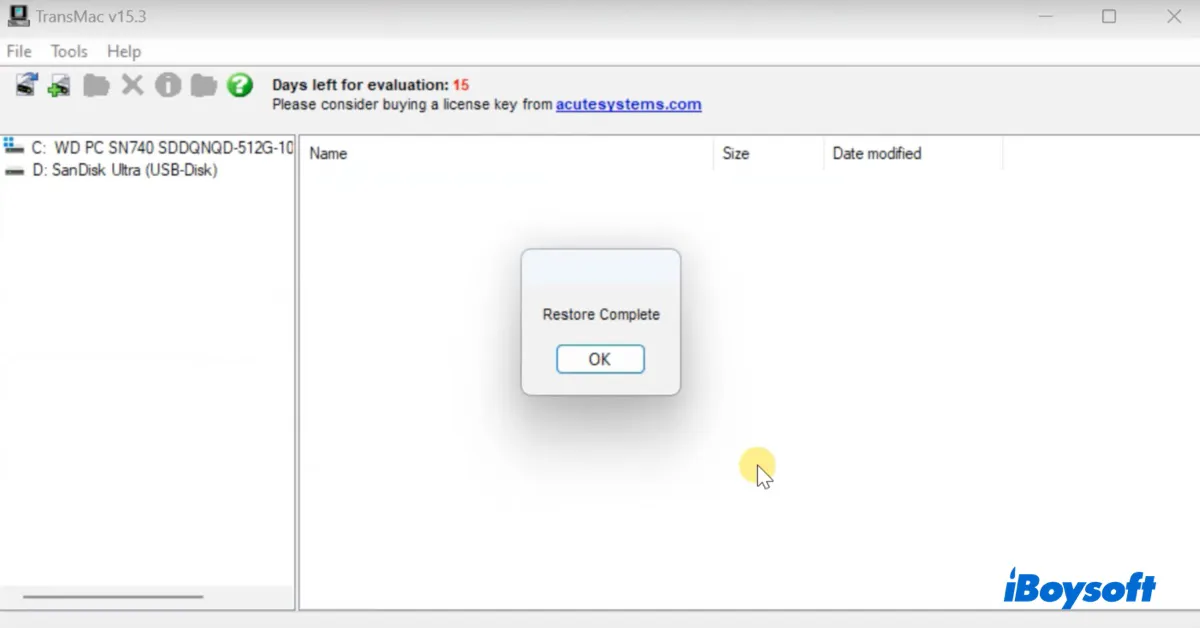
- Once done, safely eject the USB drive from your PC.
Help us approach more users who need to create macOS Ventura bootable USB on Windows by sharing this post!