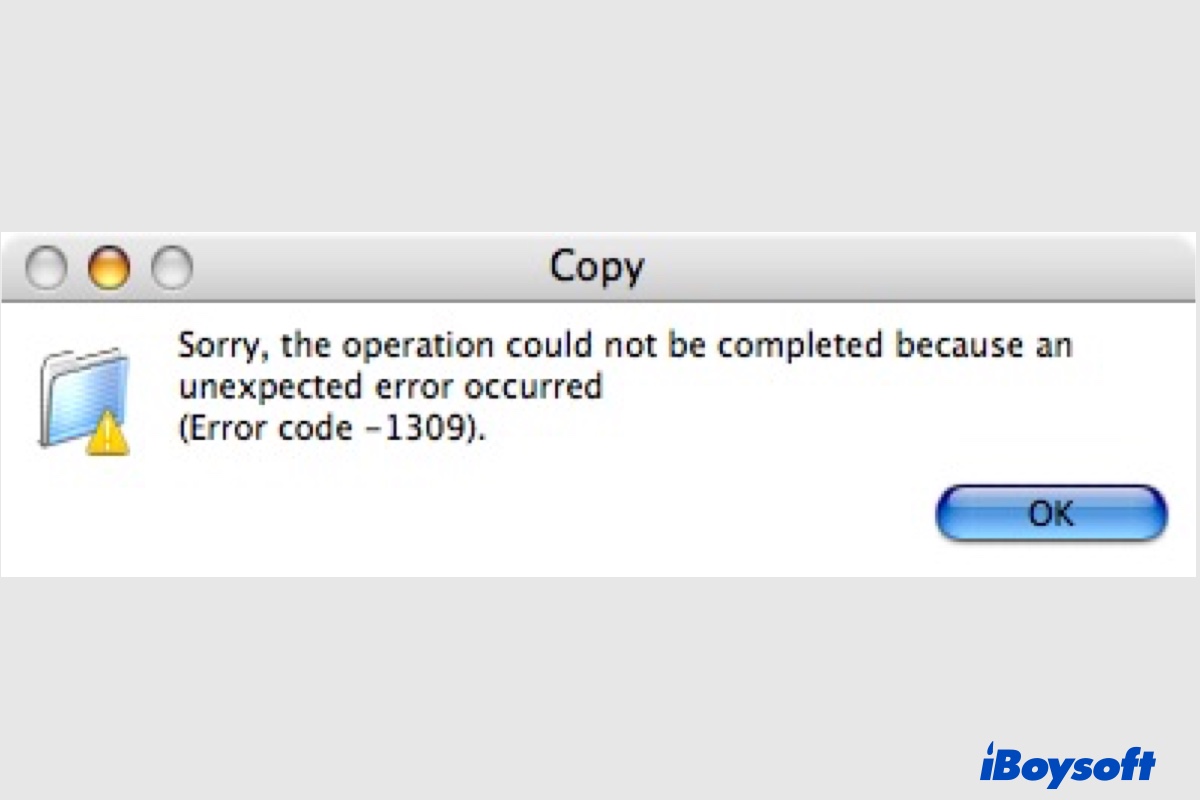
Error code 1309 happens when copying over large files from your Mac to an external hard drive, USB flash drive, or SD card. It usually appears when the transfer reaches 4 GB with the full message reading, "Sorry, the operation could not be completed because an unexpected error occurred (Error code -1309)."
Here, we will discuss what error code 1309 is and how to eliminate it.
What is error code 1309 on Mac?
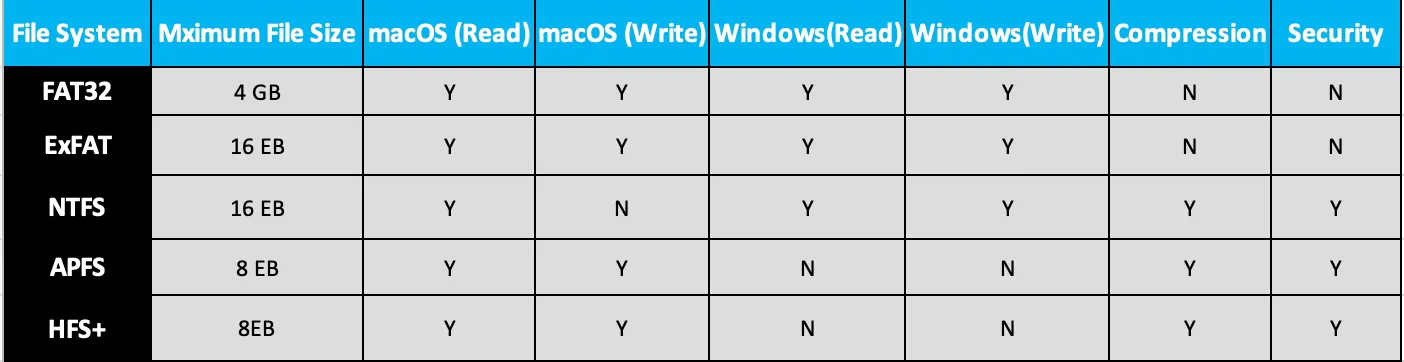
MacBook error code 1309 occurs when the size of the files you want to transfer exceeds the maximum file size the external storage's file system allows. As shown in the table below, FAT32 has the lowest maximum file size - individual files on a FAT32 drive can't exceed 4 GB, making it the primary culprit of error 1309 on Mac.
That being said, you will receive error code -1309 on Mac when the files need to be transferred from your Mac to a FAT32-formatted drive containing individual files larger than 4 GB.
Apart from that, error code -1309 may also pop up if the files copied from your Mac are corrupted, or the receiving drive is disconnected by accident.
Is the information about Mac error code -1309 helpful? Click the button below to share it with your friends.
How to fix error code 1309 on Mac?
Since Mac error code -1309 could result from file corruption or drive disconnection, you should double-check to ensure the files needing transfer can be opened and viewed as usual, and the external disk is firmly connected and charged.
Then you should confirm whether your drive is formatted with FAT32 using the steps below:
- Plug the external USB or hard drive into your Mac.
- Right-click the drive's icon and select "Get Info."
- Locate the information next to "Format."
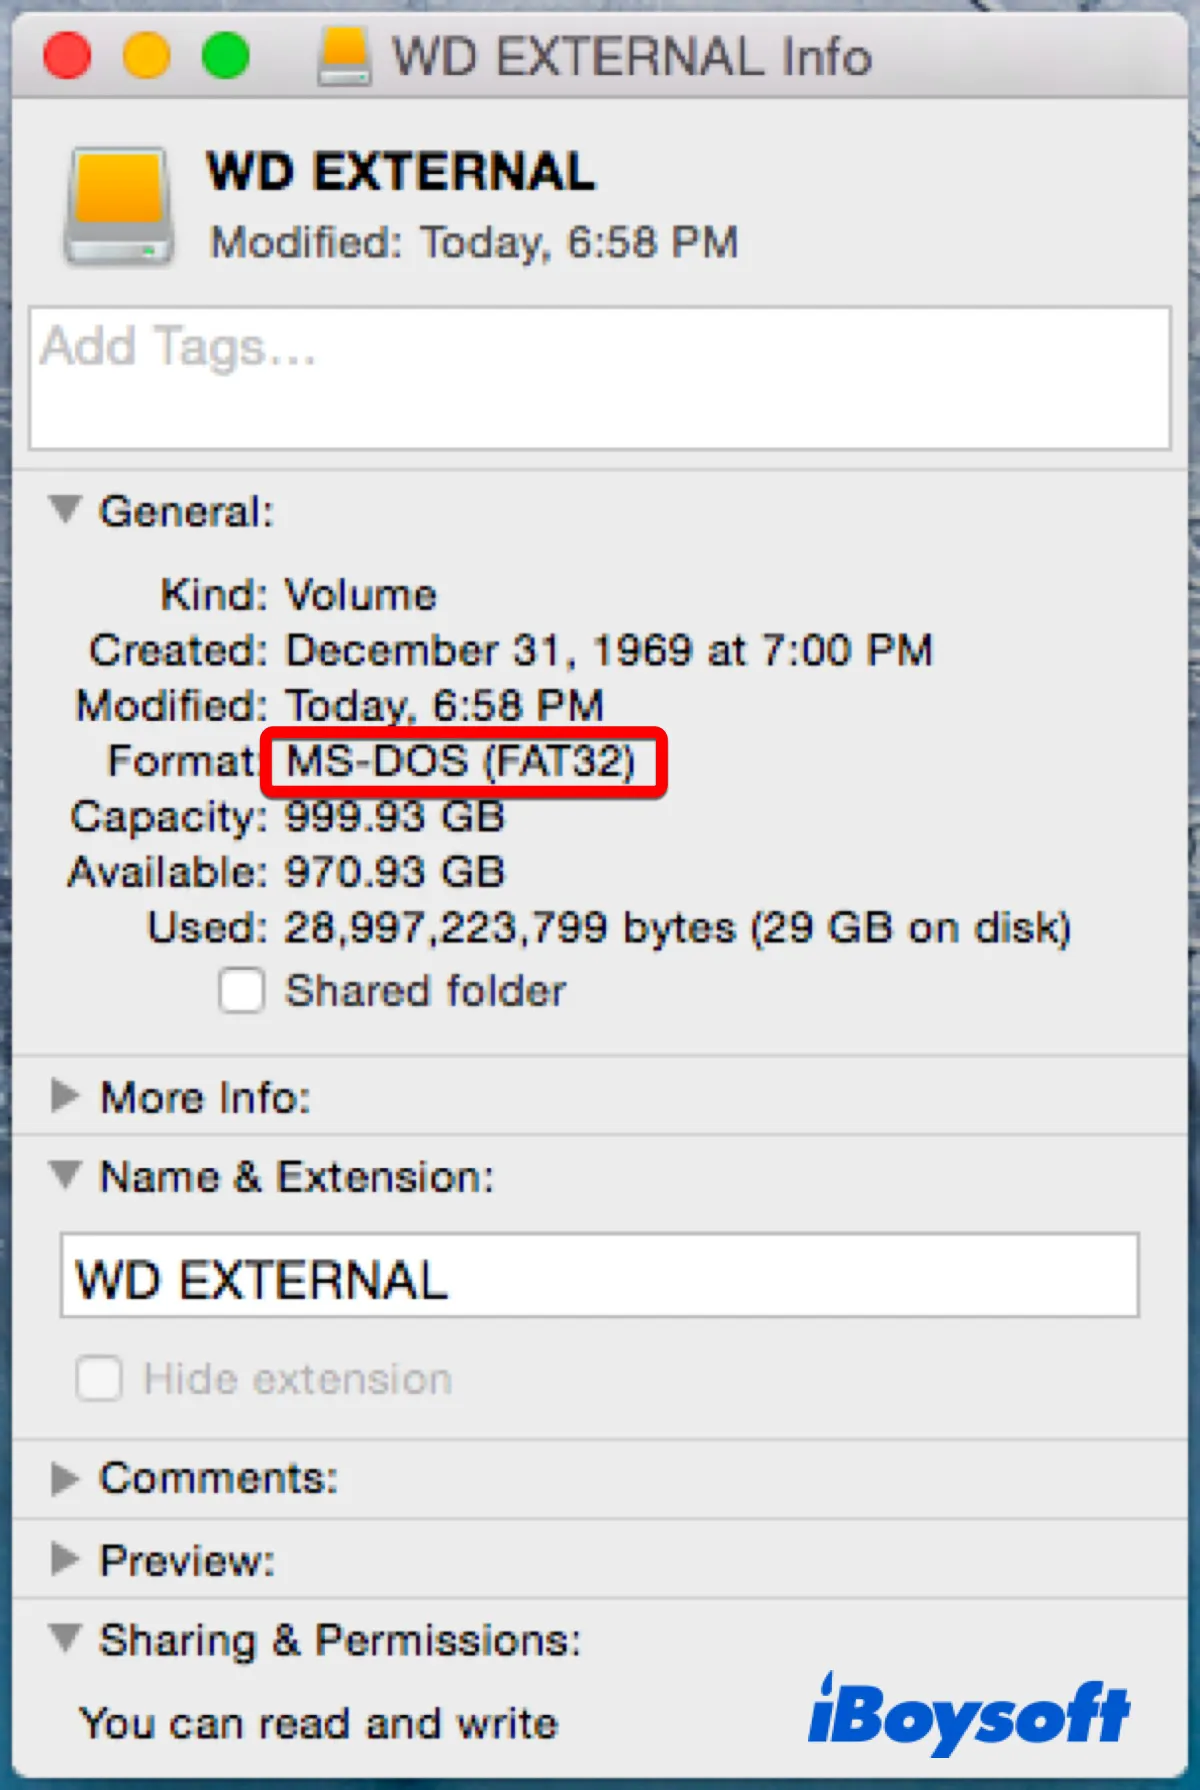
If the format is MS-DOS (FAT32), you have Five ways to get around error code 1309 on Mac.
- Split files larger than 4 GB into smaller segments
- Compress files larger than 4 GB to a smaller size
- Add a partition to your current drive and format it with a file format that has a larger maximum file size.
- Reformat the drive to a file system that accommodates a larger file size (Recommended most after backing up data)
- Consider another alternative to transfer or save files
Note: It's worth mentioning that the first two methods only work if you intend to use the FAT32 drive as a media for file transfer but not to open the file on the drive. Go to methods 3 & 4 if you want to save and open large files freely on your external drive, as segmenting and compressing files only bypass FAT32's file size limitation but don't change it.
Split the large file into smaller segments
Now that we know error 1309 is caused by the file size limitation of FAT32, we can avoid it by splitting files larger than 4 GB into several segments. If it's a large video file, you can use the built-in tools like QuickTime Player or iMovie to split it into small clips.
Besides, you can utilize a third-party file splitter or execute commands in the Terminal app to segment files of various types. Here's how to copy files larger than 4 GB to a FAT32 drive using Terminal commands:
- Open Terminal from the Applications > Utilities folder.
- Type in the command below and hit Enter to move to your FAT32 external drive.cd /Volumes/drivename/If you encounter error 1309 when copying to a Sandisk USB drive named FLASHDRIVE, the command will be cd /Volumes/FLASHDRIVE/
- Input another command and press Enter to split the large file into 4 GB parts:split -b4000m filepath prefixTo execute this command, first type in split -b4000m, drag and drop the file from your Mac to Terminal to get the file path, then enter a name prefix such as vid for the segmented file.
- Open the FAT32 drive, and you should see several files labeled as vidaa, vidab, vidac, etc.
Note that the split files may not be opened until they are merged. Therefore, if you want to view the original file, you must first join them together and save the merged file to your Mac.
- In Terminal, execute the following command to move to your desktop or another folder where you want to save the merged file to.cd desktop
- Run another command to merge split files.cat /Volumes/drivename/prefix* > filename.extensionFor instance, continue with the examples given above and suppose the file name is "school" with the extension mov, the command should be cat /Volumes/FLASHDRIVE/vid* > school.mov
Compress the large file into a smaller size
Similarly, you can compress the larger-than-4 GB file to reduce its size on Mac. It can quickly be done by right-clicking the file and selecting Compress. Then you can drag and drop the compressed file to your FAT32 drive. Nevertheless, you must copy the file to a computer to unzip the file.
Add a new partition to the drive
If your drive is big enough, you can create a new partition with another file system to save those large files while keeping the FAT32 partition. Though repartitioning a drive won't cause data loss, you can back up the essential data on the FAT32 drive to another storage device in case things go astray.
- Launch Disk Utility from the Applications > Utilities folder.
- Select the FAT32 volume from the left side and click the Partition button in the toolbar.
- Click the Add button (+) below the pie chart.
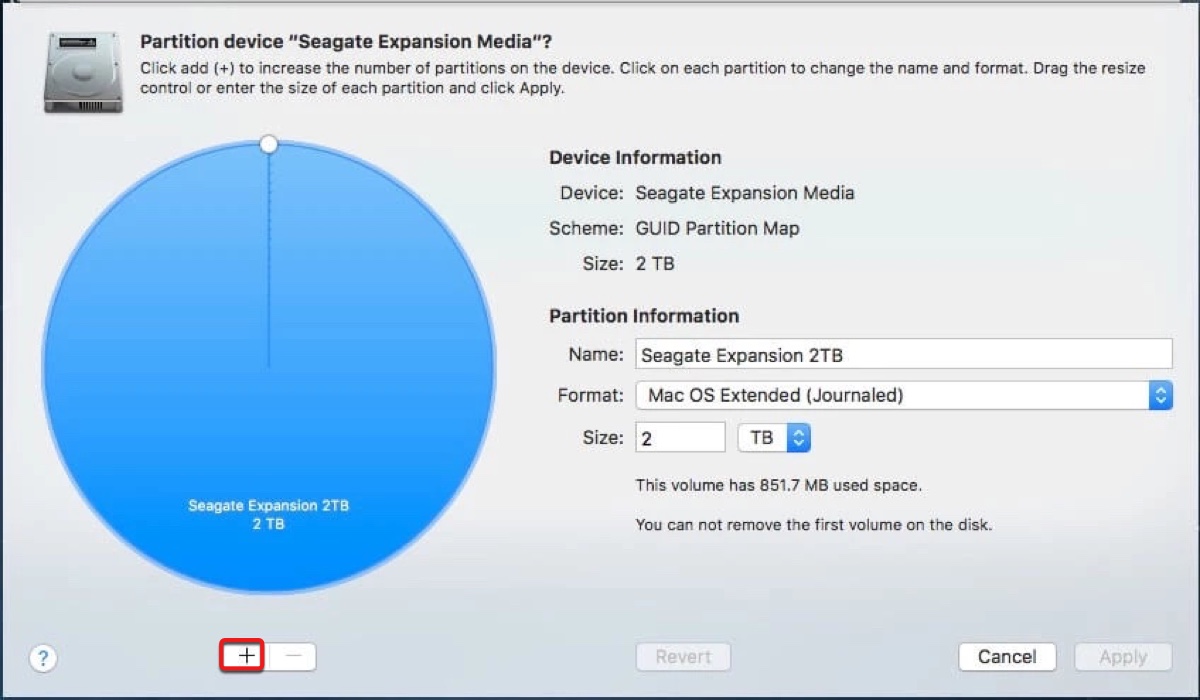
- Tap "Add Partition."
- Name the new partition and select a new file system.
- Enter a size for the partition.
- Click Apply > Partition.
- Copy the files to the new partition.
How to choose a proper file system without the 4 GB limit of FAT32 for an external storage device?
EXFAT: best for cross-platform users who want to use the drive on Windows and Mac
NTFS: best for Windows-only users
APFS: best for Mac-only users running macOS 10.13 and later
HFS+: best for Mac-only users running macOS 10.12 and earlier
Reformat the drive
If your external disk doesn't have enough space for an extra partition, you can also reformat the drive. That way, you can fix error code 1309 on Mac from the source and save large files to the drive without trouble. Since formatting will erase all data on the drive, you must back up those matters to you to another drive beforehand. Then follow the steps below to reformat the drive:
- Open Disk Utility from the Applications > Utilities folder.
- Select the external storage device from the left side and click Erase at the top.
- Give the drive a name and a new file system.
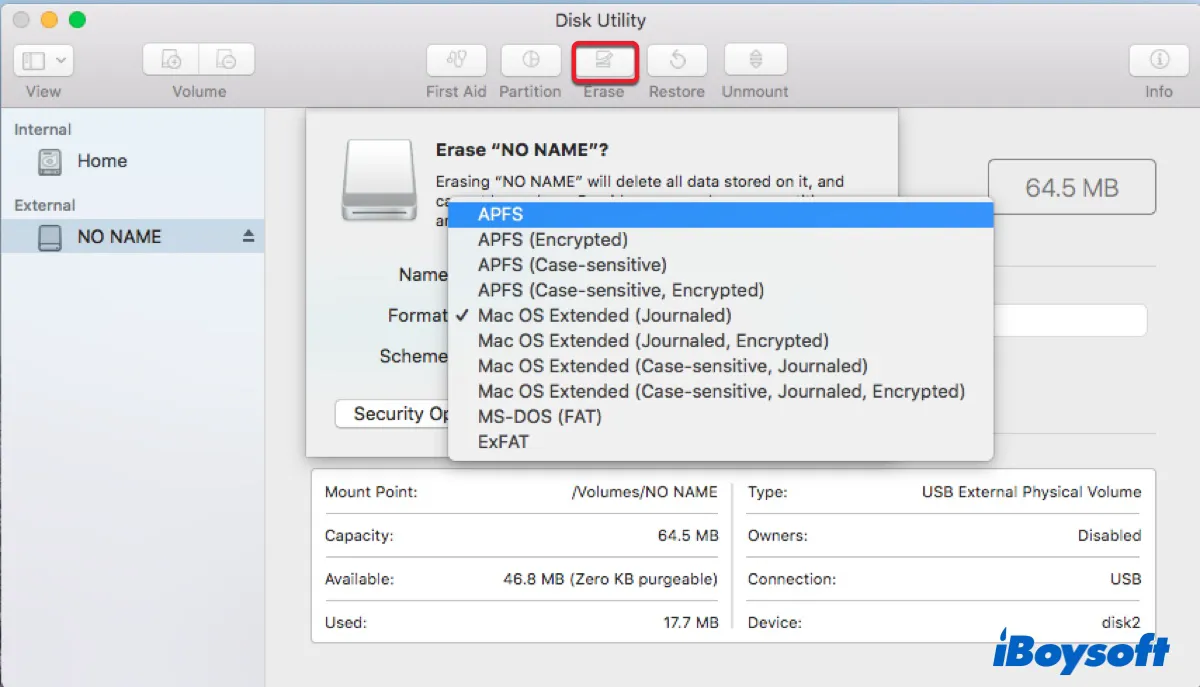
- Click Erase.
Once the erasing process is complete, you can save and open large files on the formatted drive without error 1309.
Use alternative ways to transfer or store large files
Alternatively, you can choose a cloud-based service to transfer or save large files if you don't want to format the drive. You can select iCloud, OneDrive, Dropbox, Google Drive, etc., to sync files to the cloud, then access and share them anywhere online.
Other articles you may be interested in:
Please share this post to help more people if you have solved MacBook error code 1309.