It is a jarring experience to boot up your Mac and find that your Fusion Drive has completely vanished. Unlike a standard drive, a "not showing up" Fusion Drive often means the software link between your SSD and HDD has "split," leaving your files inaccessible and your Mac unable to boot.
The good news is that a "split" drive is often a logical error rather than a hardware failure. This guide will help you determine if your drive is not set to display or is truly split or dead, and walk you through the Terminal commands to fuse them back together.
Check your Fusion Drive risk level first
Before troubleshooting the issue, take a few seconds to decide whether your data is safe and if the Fusion Drive is at high risk.
Does your Mac boot up normally?
If your Mac boots up normally, there's nothing to worry about, as your data is safe. Follow Case 1 or Case 2 for configuring Finder or Disk Utility settings to show Fusion Drive on your Mac.
If your Mac won't boot up, for instance, your Mac boots to a circle with a line through it 🚫 or a folder with a question mark❓, it likely has a split issue. You should recover data first and then continue with Case 3.
Does your Fusion Drive make noises?
Your Fusion Drive is a combination of two physical drives. While the SSD is silent even if it fails, the HDD will produce distinct mechanical noises if it has hardware issues. If you hear any of the noises, stop using your Mac and find professional help.
A rhythmic click: This is caused by the read head failing to find the "home" position on the platter.
Grinding or Whirring: A high-pitched screech or a sound like a small fan hitting an obstruction, indicating bearing failure or a "head crash" where the needle is scratching the disk surface.
The "Siren" Hum: A low-frequency vibration you can sometimes feel through the desk, indicating the motor is struggling to spin the heavy platters up to speed (usually 5400 or 7200 RPM).
| Apple Fusion Drive Problems | Solutions |
| Fusion Drive not showing up on the desktop or in the Finder (Bootable Mac) | 1. Finder > Preferences/Settings. 2. Tick "Hard disks" in the General tab. 3. Tick "Hard disks" in the Sidebar tab. |
| Fusion Drive not showing in Disk Utility (Bootable Mac) | 1. Open Disk Utility. 2. Click View > Show All Devices. |
| Fusion Drive not showing in Disk Utility (Unbootable Mac) | Recover data first, then: Fix 1: Reset the Fusion Drive. Fix 2: Split the Fusion Drive and then reset it. |
| Fusion Drive noises (Unbootable Mac) | Stop running the Mac and find help from professional technicians |
Recover data from the Fusion Drive
When your Fusion Drive is missing or not working, you lose access to the data on your iMac or Mac mini. With a data recovery tool like iBoysoft Data Recovery for Mac, you can get back your photos, videos, audio, documents, emails, and other data from the Fusion Drive in Recovery Mode.
Take the steps below to preview data on the malfunctioning Fusion Drive for free:
- Shut down your Mac.
- Press the power button, then immediately press and hold Option + Command + R.
- Release the keys when you see the spinning globe.
- Ensure your Mac is connected to the internet.
- Choose Utilities > Terminal from the menu bar.
- Type the following command and hit Enter.sh <(curl http://boot.iboysoft.com/fdboot.sh)
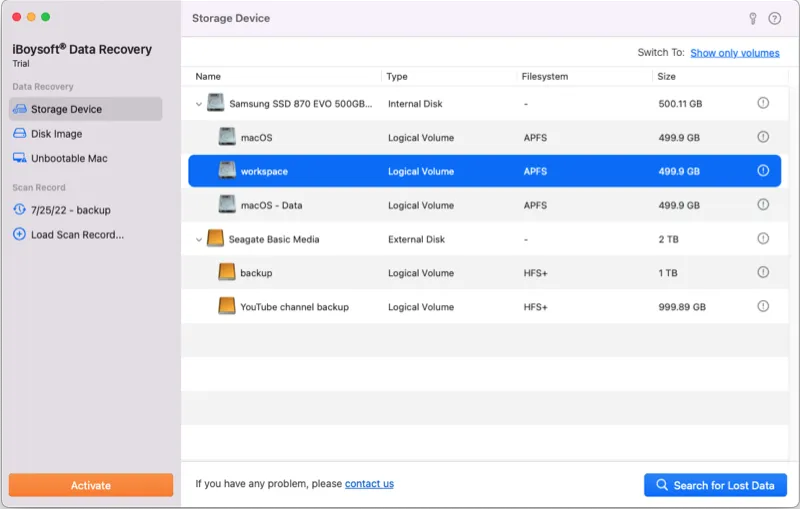
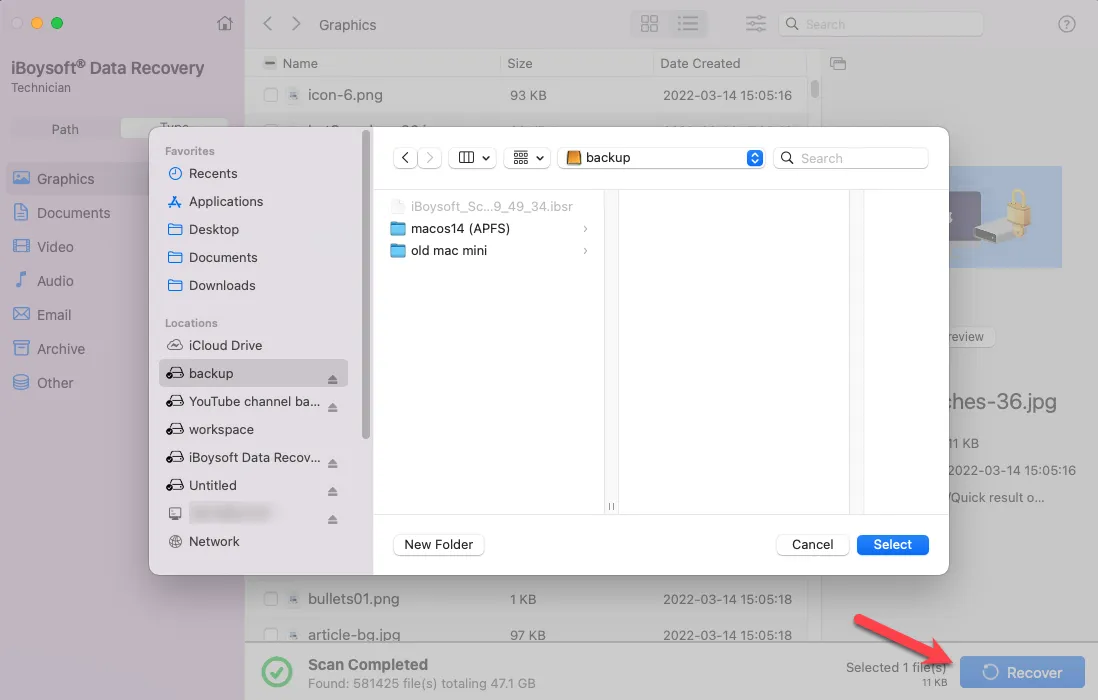
- When iBoysoft Data Recovery for Mac opens, select your Fusion Drive and click "Search for Lost Data."
If you have a split Fusion Drive, select "Fusion Drive" from the left pane. From there, the SSD and HDD should be automatically selected. If not, choose the responding drive yourself. Then click "Search for Lost Data."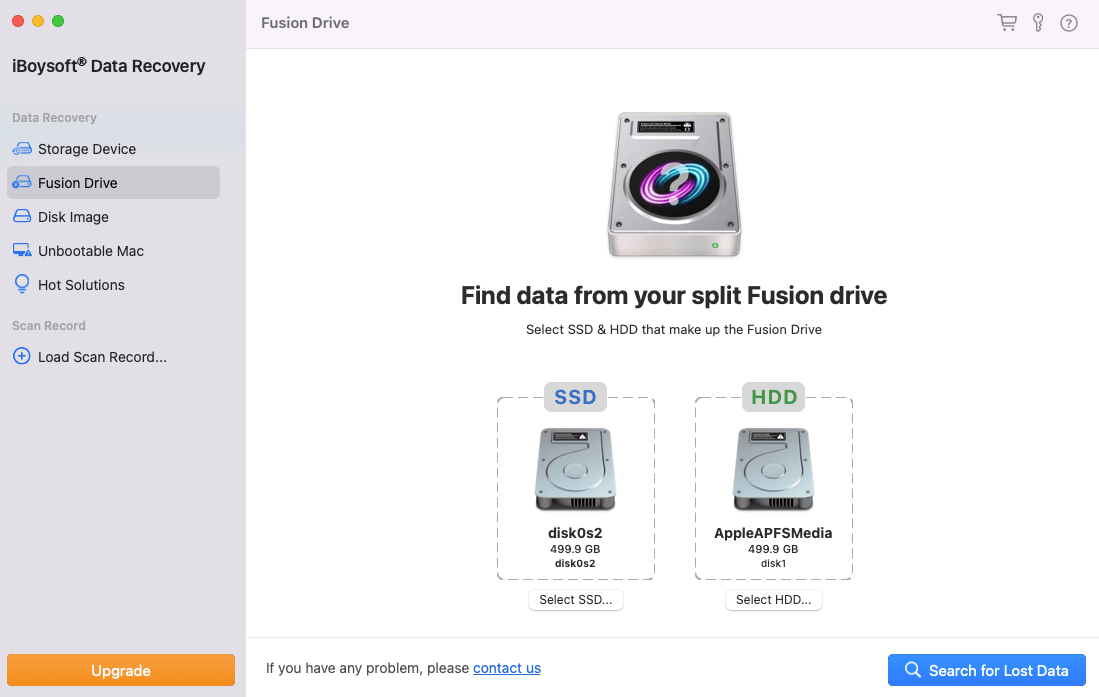
- When the scan is complete, you can filter and preview the files you want back.
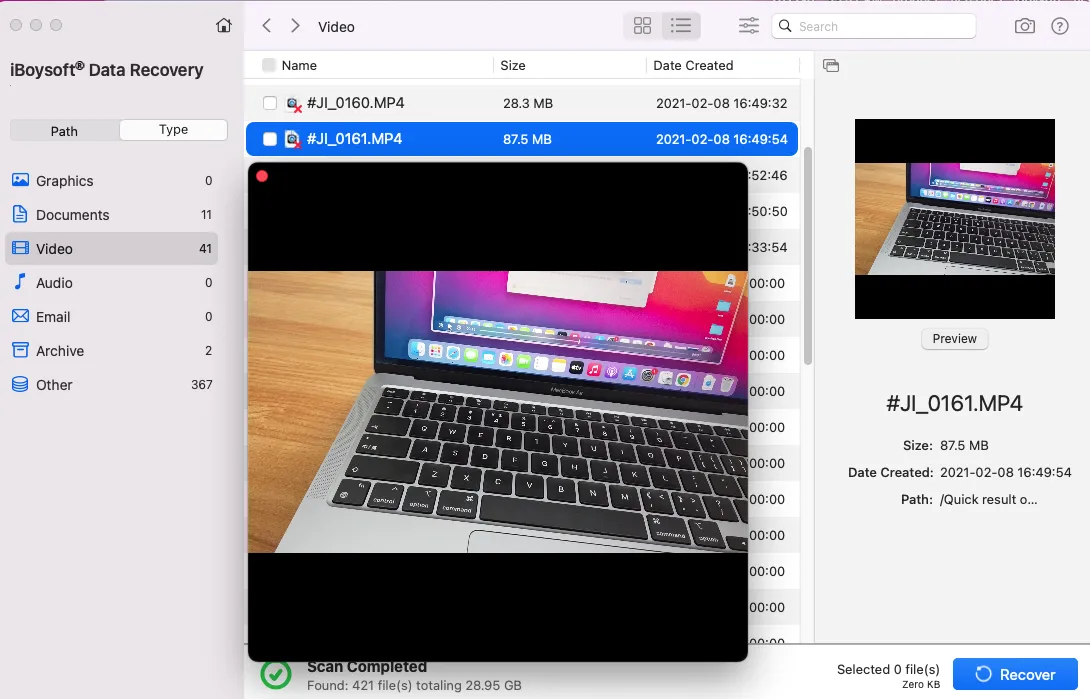
- Plug in an external drive to store the recovered files.
- Select the files you want to restore, click the Recover button, and choose the external drive as the location.
Case 1: Fusion Drive not showing up on desktop or in Finder (Bootable Mac)
If your iMac or Mac mini starts up normally but your Fusion Drive is not showing on the desktop or in Finder's left sidebar, you need to adjust Finder preferences. Here's how to do it:
- Open Finder.
- Click Finder > Preferences/Settings.
- In the General tab, tick the box next to "Hard disks" to show them on the desktop.
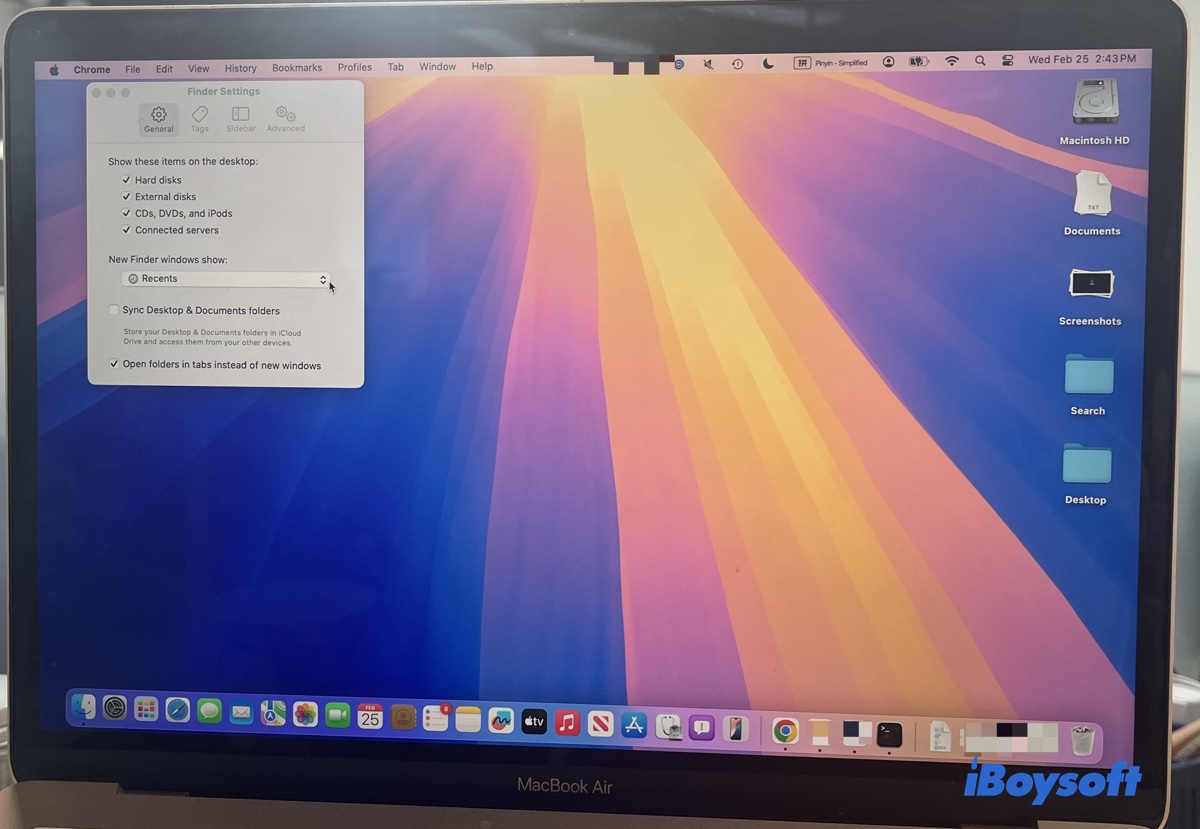
- In the Sidebar tab, tick the box next to "Hard disks" to show them in the sidebar.
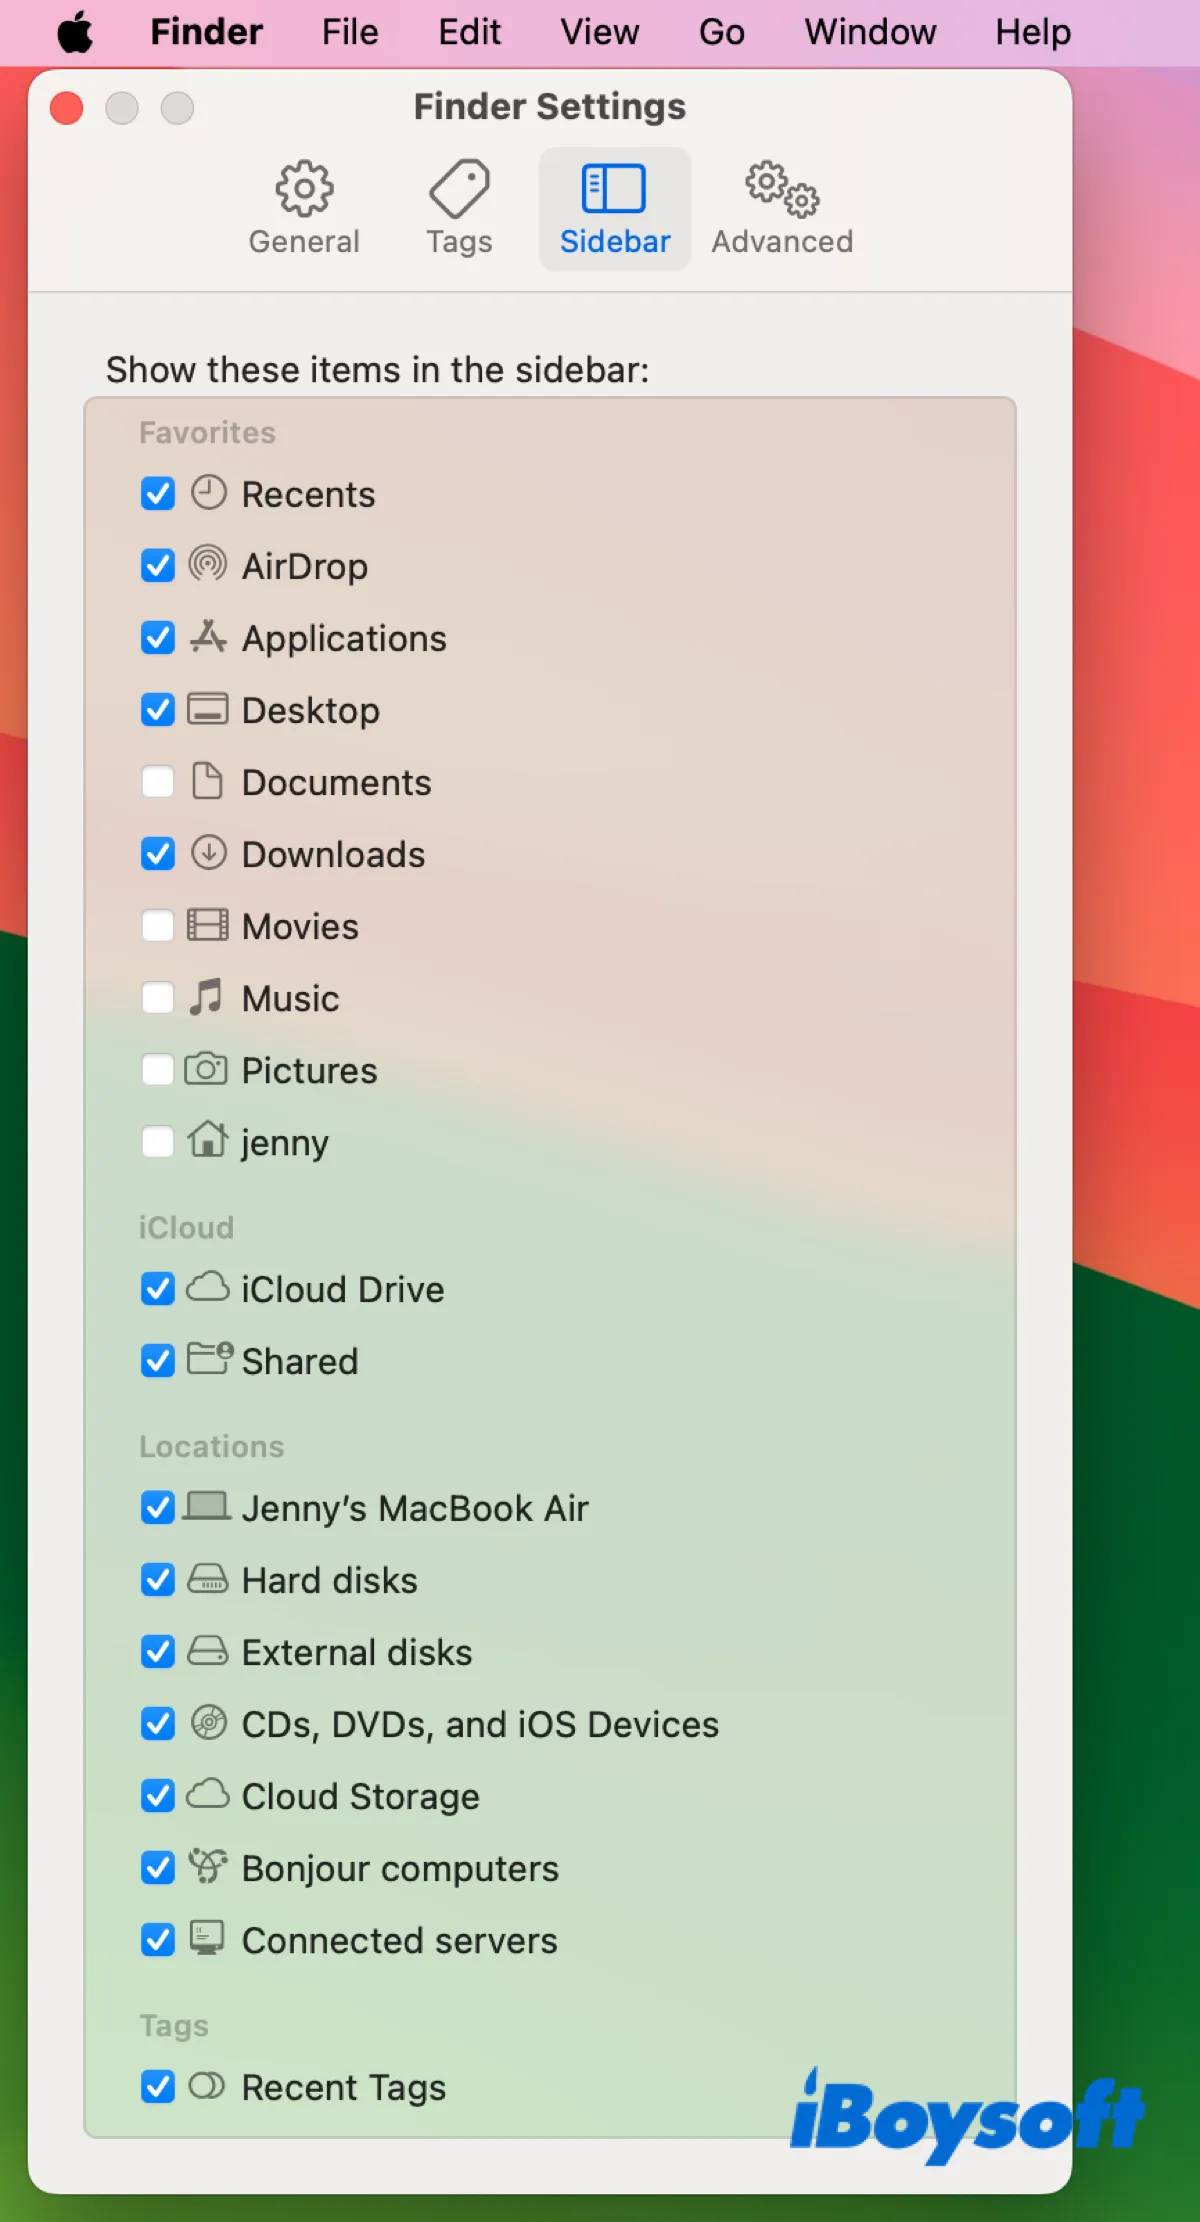
Now, you should see your Fusion Drive on the desktop or in the Finder if everything goes well.
Case 2: Fusion Drive not showing in Disk Utility (Bootable Mac)
If your Mac boots up properly but the Fusion Drive seems to have disappeared from Disk Utility, it's because Disk Utility isn't set to show all devices. To view your Fusion Drive in Disk Utility, simply click View > Show All Devices.
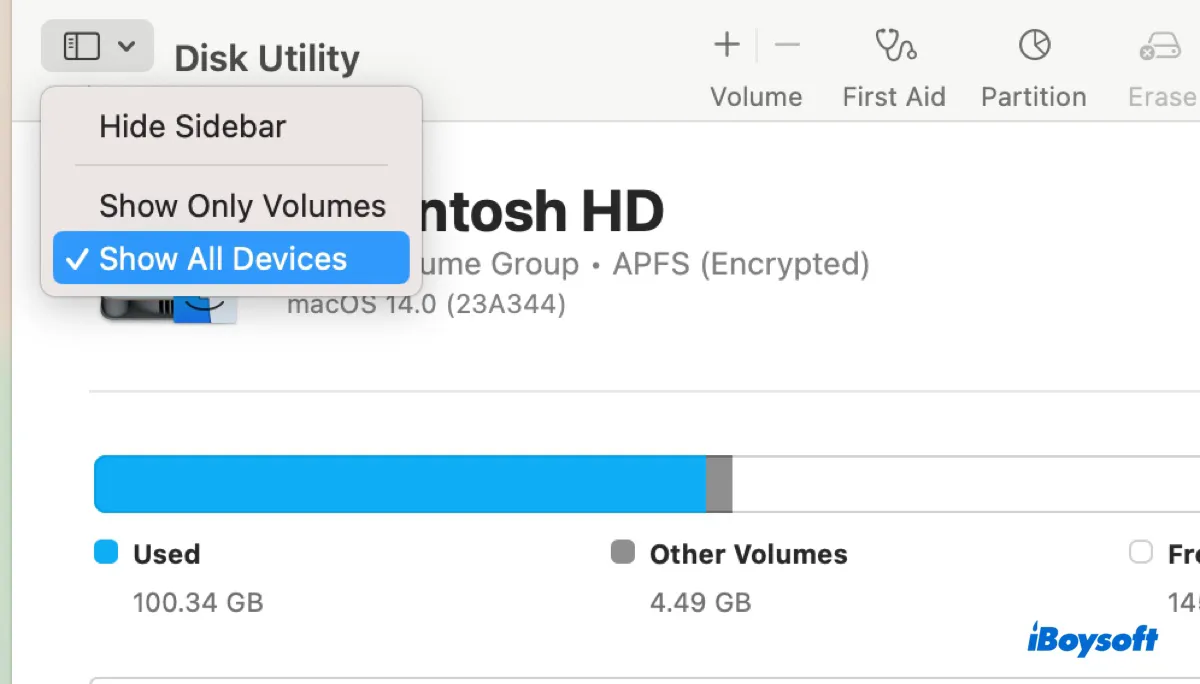
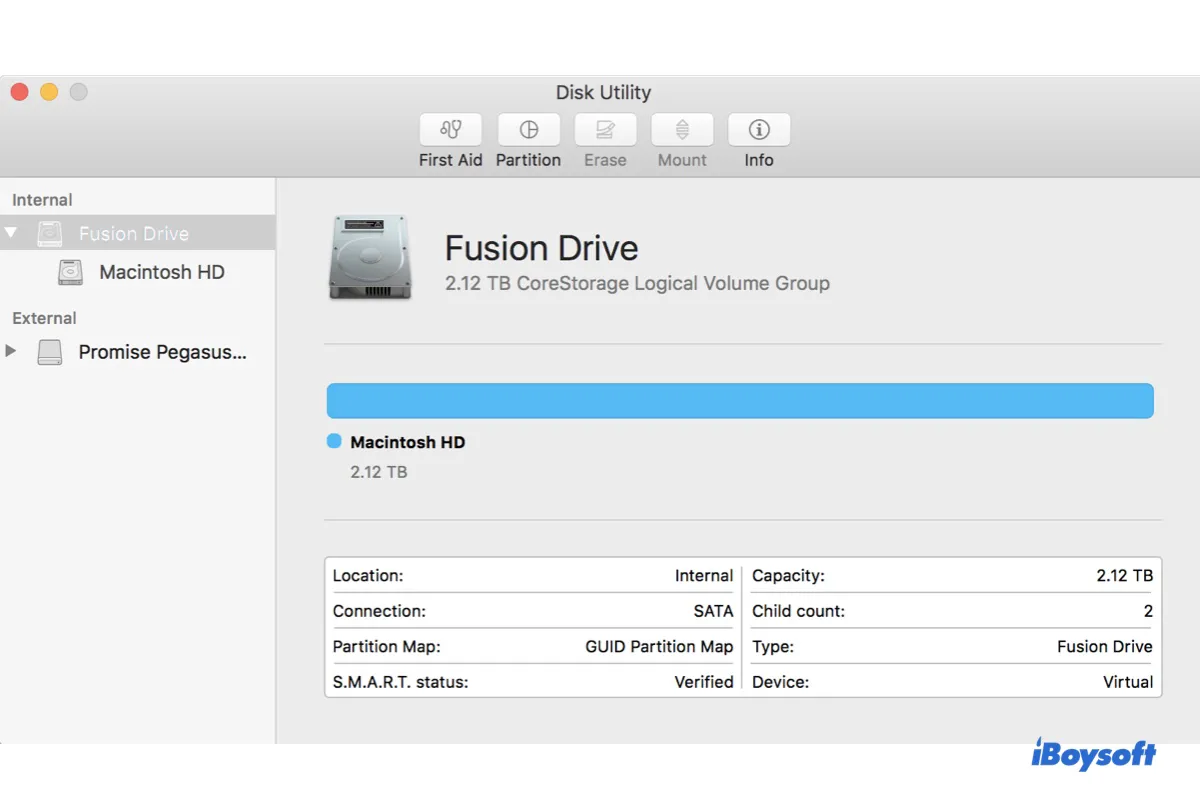
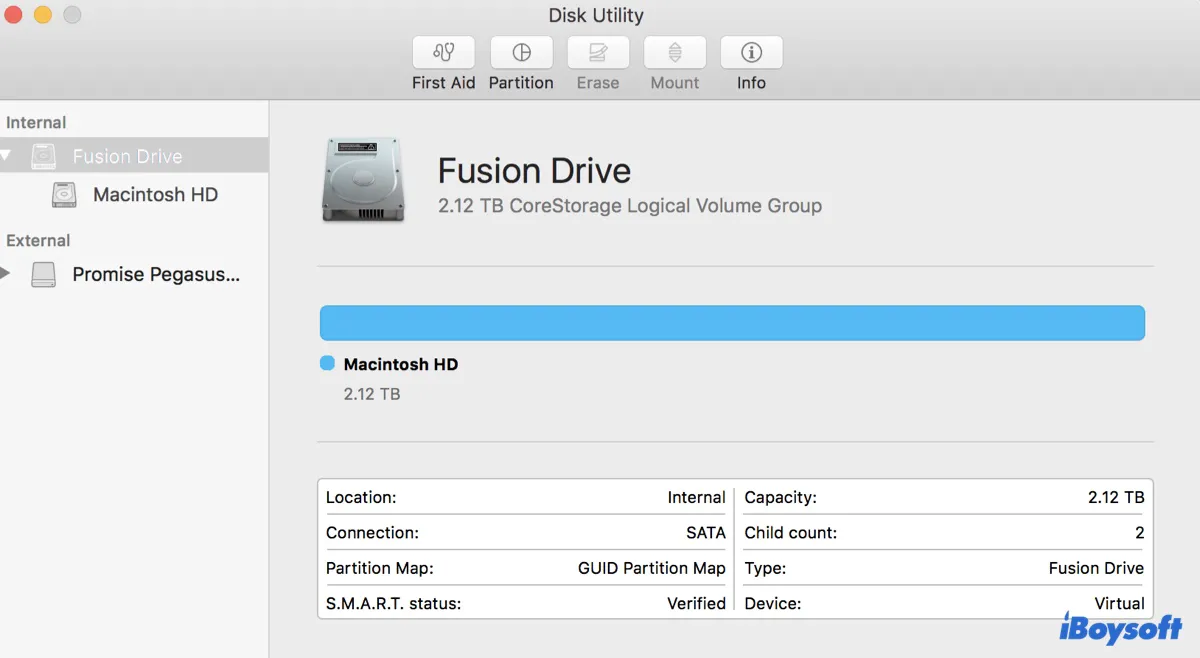
What should a Fusion Drive look like in Disk Utility?
Once you've configured Disk Utility to show all devices, Fusion Drive will appear at the top, as it's the virtual disk of your combined internal hard drives.
If your Fusion Drive is formatted with OS X Extended or Mac OS X Extended, Disk Utility displays the Fusion Drive at the top as a CoreStorage Logical Volume Group with the internal volume (usually named Macintosh HD) beneath it.
If your Fusion Drive is formatted as APFS, Disk Utility displays the Fusion Drive at the top, followed by the APFS container, and then the internal volume Macintosh HD and maybe a Macintosh HD - Data volume if your Fusion Drive has macOS 10.15 Catalina and later installed.
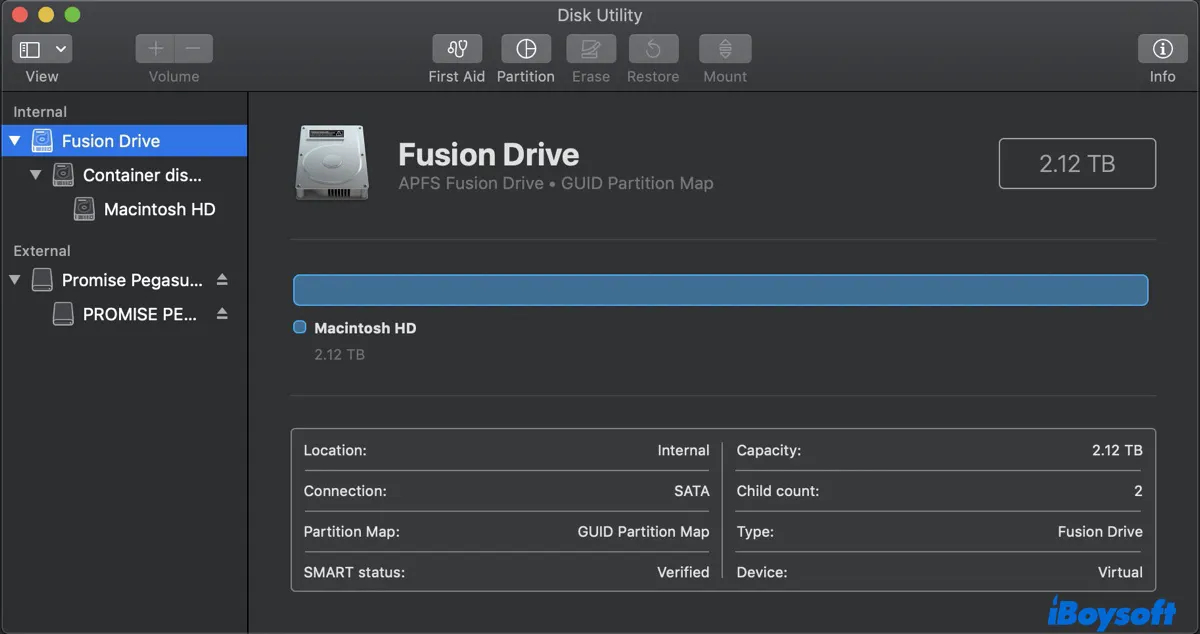
Fusion Drive: This is the virtual Fusion Drive with the total capacity of the SSD and HDD.
APFS container: This is part of the APFS file system that organizes data storage and allows space sharing for volumes within it.
Macintosh HD: The main storage volume on macOS 10.14 Mojave and earlier; the system volume that contains the operating system files and is designed to be separate from the Macintosh HD - Data volume for security and reliability on macOS 10.15 Catalina and later.
Macintosh HD - Data: The volume where your personal data, including apps, documents, photos, and other user-specific files, is stored. This is exclusive to macOS 10.15 Catalina and later.
Case 3: Fusion Drive not showing in Disk Utility (Prohibitory symbol 🚫 or❓question mark folder)
If the Fusion Drive is not showing in Disk Utility in Recovery Mode, you may be encountering one of the following situations:
① You powered on your Mac, which has a Fusion Drive, but it didn't boot up as it should. So, you went to check the Fusion Drive in Recovery Mode and discovered that the Fusion Drive is missing in Disk Utility, and two independent drives emerged: one HDD and one SSD, or maybe one drive is missing and only the SSD or HDD appears.
② You tried to select the Fusion Drive as your startup disk, but it's not showing up.
③ You want to install macOS on the Fusion Drive, but it's not giving you the option.
Does any of this sound like you? If so, you're likely having a split Fusion Drive or an incorrectly formatted Fusion Drive.
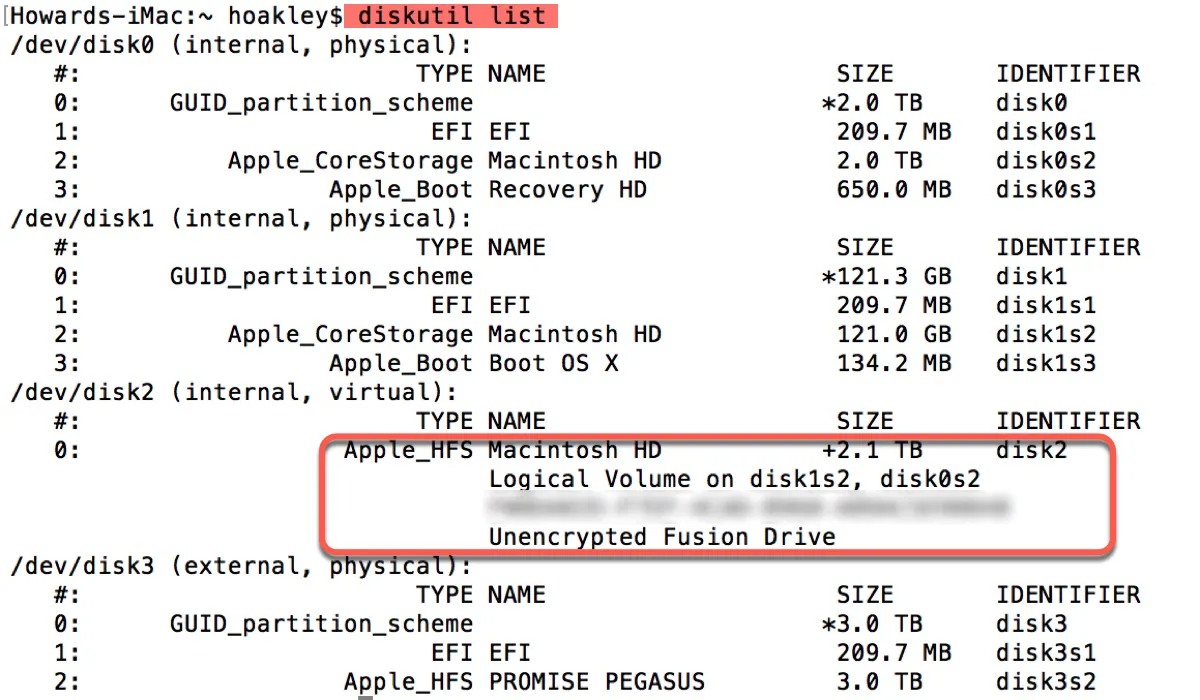
To check whether your Fusion Drive is split, access Utilities > Terminal in macOS Recovery, then run the following command:
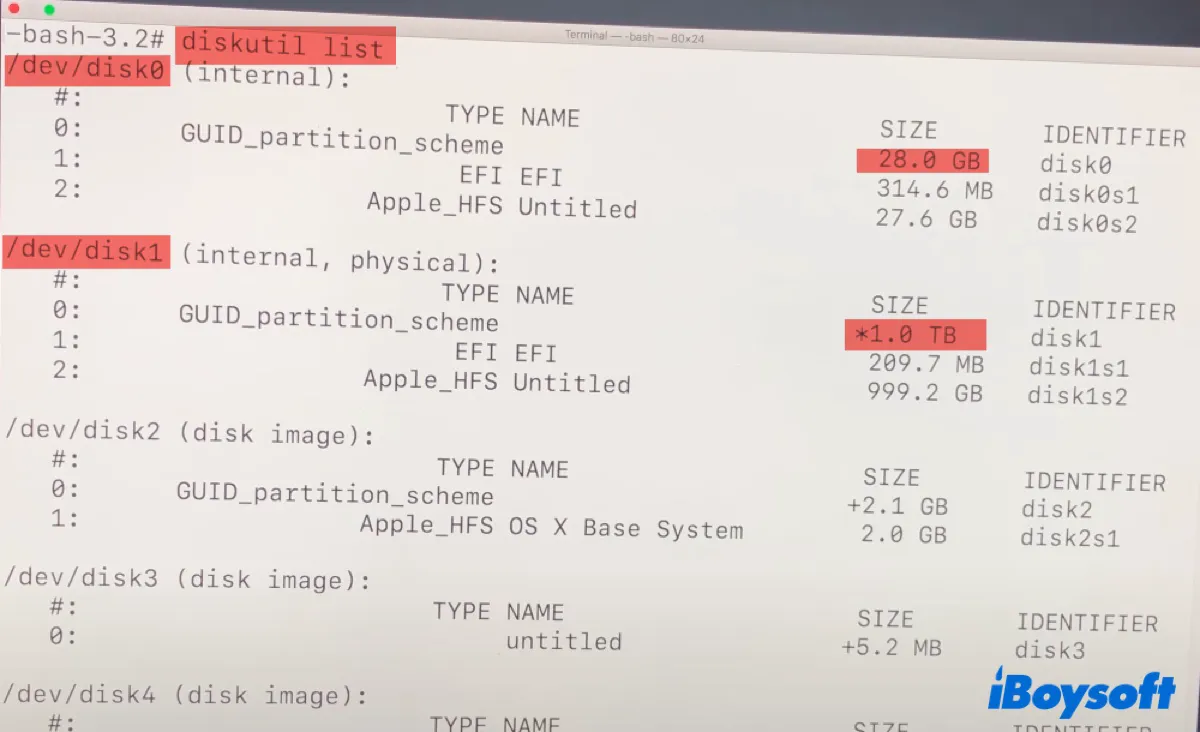
diskutil list
Terminal will provide information about the drives connected to your Mac. Check if there's a virtual volume that has the total storage of your SSD and HDD. It's a logical volume combined from two partitions, such as disk0s2 and disk1s2.
If your Fusion Drive is separated, try solution 1. Otherwise, try solution 2. If the HDD portion of the Fusion Drive isn't visible, it has possibly failed. Make sure you have already recovered or backed up the data, then you can follow the steps below to fix a split fusion drive without losing data.
Solution 1: Fix the split Fusion Drive
When a Mac with a Fusion Drive boots to a circle with a line through it or a folder with a question mark, or the Fusion Drive is not showing up as a startup disk or OS installation destination, it means that it doesn't have a working operating system.
This usually occurs when the Fusion Drive is separated into two drives due to improper formatting, hardware changes, update failure, drive failure, etc. To fix the problem, you must reset the split Fusion Drive into one.
Warning: Resetting the Fusion Drive will permanently delete all data stored on it. Ensure you have recovered the important data before proceeding.
To reset the Fusion Drive on macOS Mojave or later:
- Ensure your Mac is turned off.
- Power it on, then immediately press and hold Command + R.
- Release the keys when you see the Apple logo.
- Choose Utilities > Terminal from the menu bar.
- Type the following command into Terminal and press Enter.diskutil resetFusion
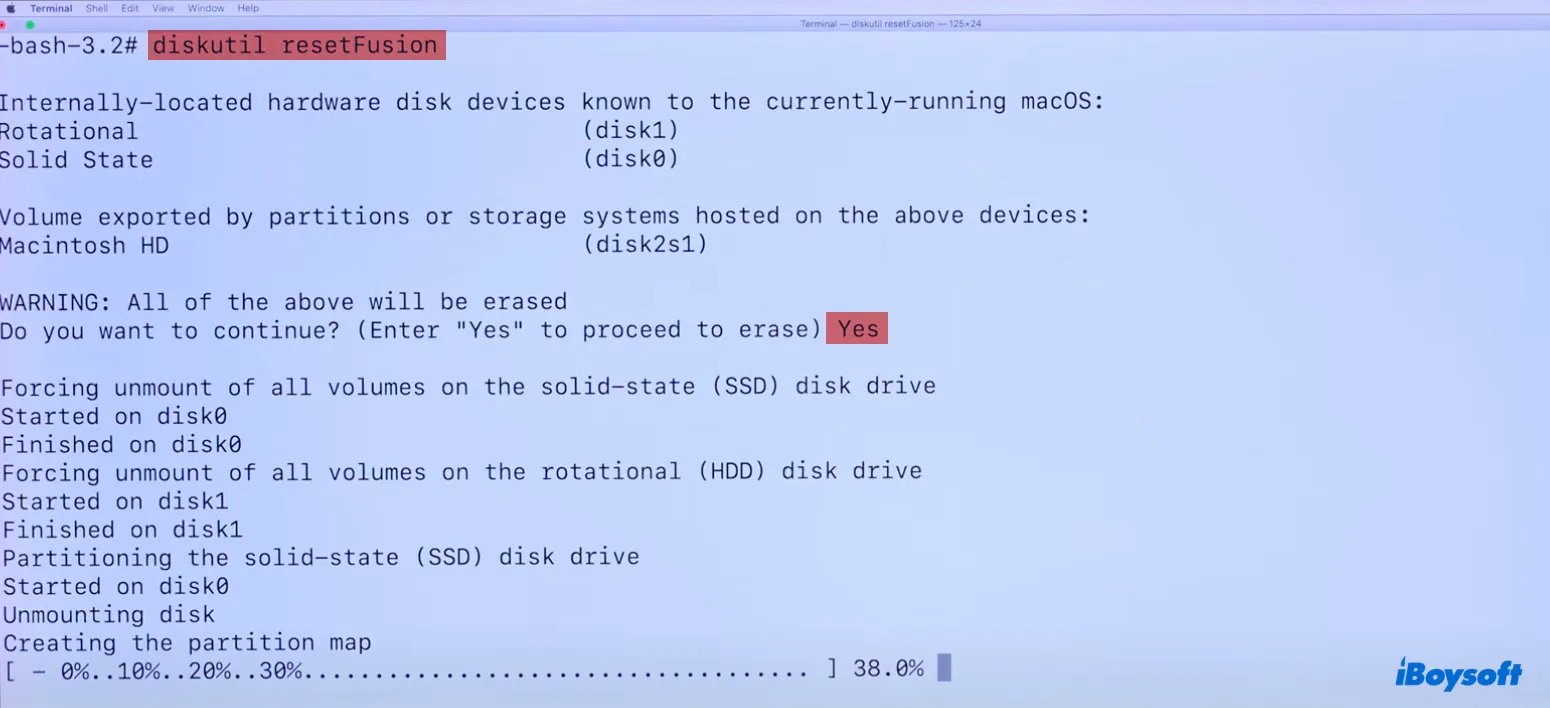
- Type Yes when prompted, and then press Enter.
- Quit Terminal when the process is complete.
- In the macOS Utilities window, select "Reinstall macOS" and follow the onscreen instructions to reinstall the OS.

diskutil resetFusion not working?
If the command diskutil resetFusion is not working, go back to Disk Utility and erase each of the drives with the proper file system (APFS for macOS Mojave or later and Mac OS Extended (Journaled) for macOS High Sierra or earlier), then retry the command.
To reset the Fusion Drive on macOS High Sierra or earlier:
- Ensure your Mac is turned off.
- Turn it on, then immediately press and hold the Command + R keys.
- Release the keys when the Apple logo appears.
- Choose Utilities > Terminal from the menu bar.
- Type the following command and hit Enter.diskutil list
- Note down the identifier of each internal, physical drive that makes up your Fusion Drive. (E.g., disk0 is the SSD with 128GB or less in size and disk1 is the HDD with at least 1TB in size.)
- Input the following command into Terminal and press Enter.diskutil cs create Macintosh\ HD identifier1 identifier2Replace identifier1 with the identifier of the faster SSD and identifier2 with the identifier of the HDD.
E.g., diskutil cs create Macintosh\ HD disk0 disk1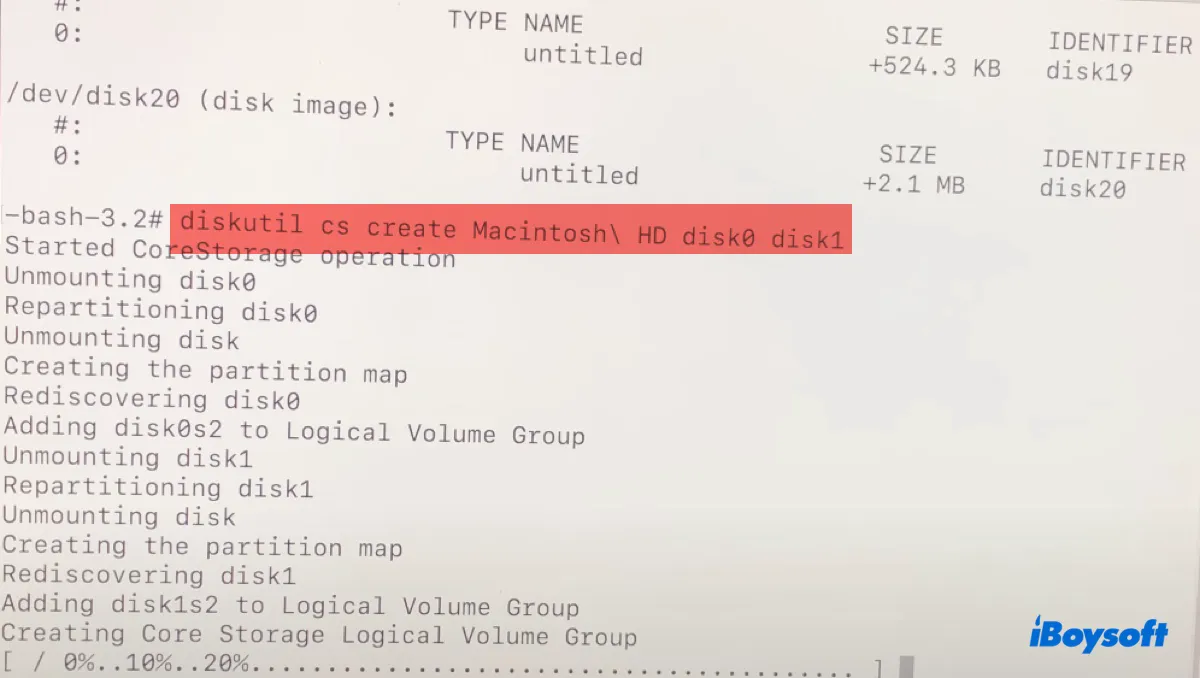
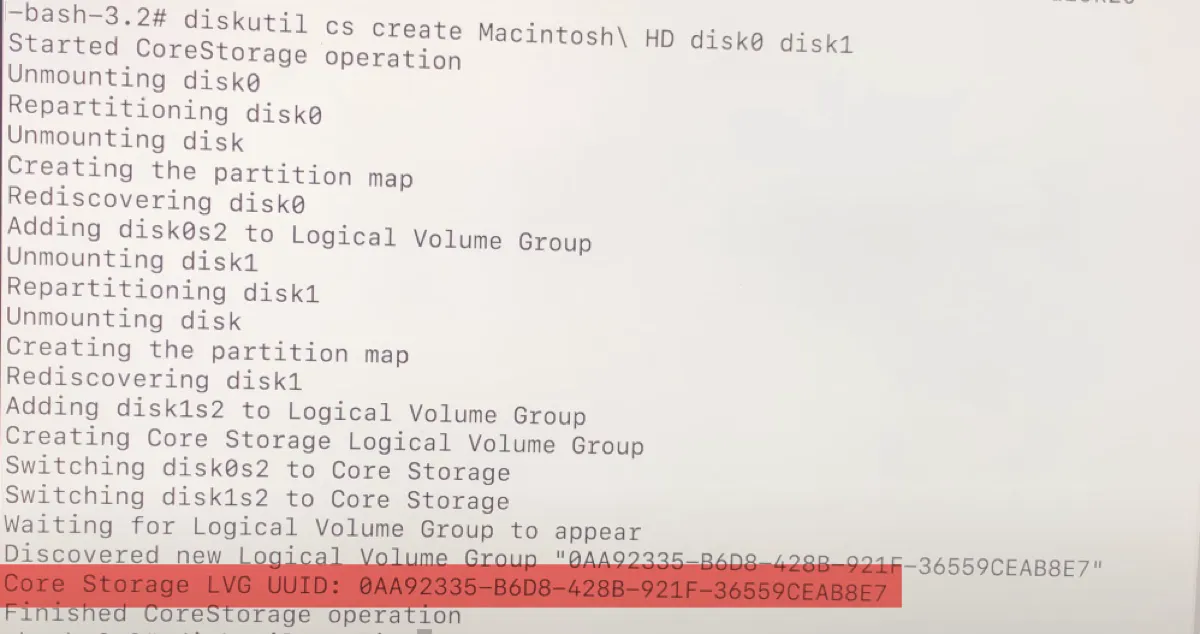
- Wait for the logical volume group to be created and write down its UUID. (e.g., DBFEB690-107B-6EA4-509B-2971D10F5B53)
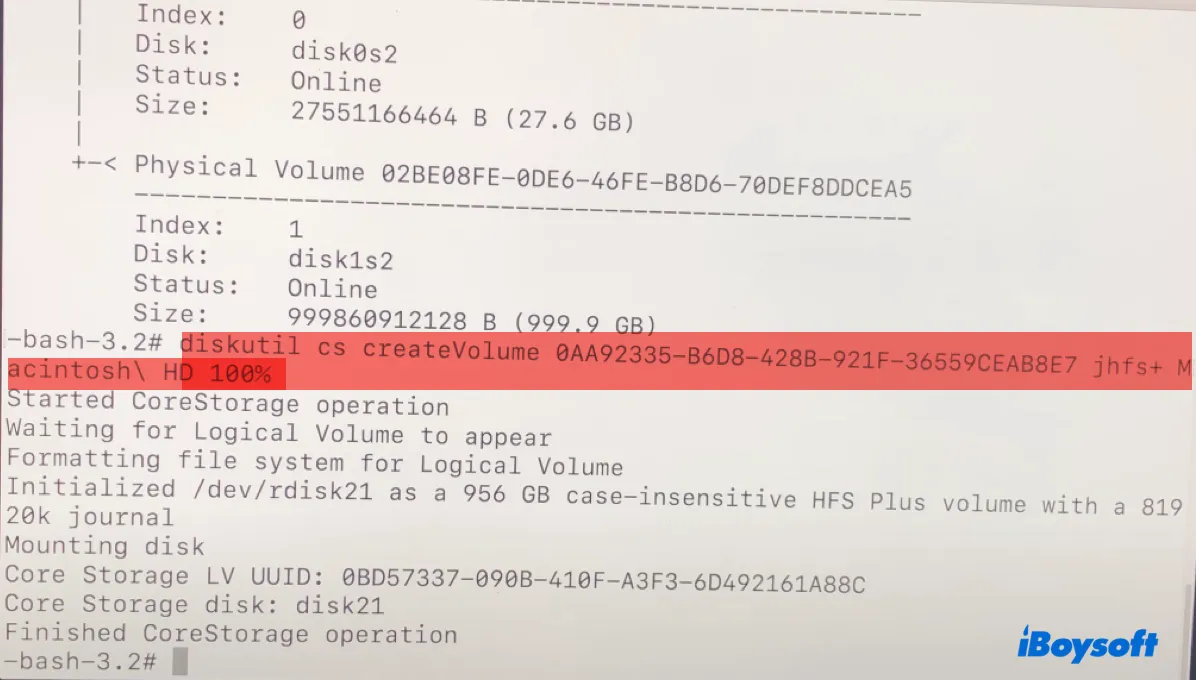
- Type the following command after replacing UUID with the number of the new logical volume group.diskutil cs createVolume UUID jhfs+ Macintosh\ HD 100%
- Once Terminal is done, quit it and go back to the macOS Utilities window.
- Click "Reinstall macOS" and follow the instructions on the screen to complete the installation.
Solution 2: Split the Fusion Drive and reset it again
If Disk Utility displays a CoreStorage Logical Volume Group or something similar that resembles the one labeled "Fusion Drive" but the sub-volume is missing and you can't select it during the OS reinstall, you can split the offending Fusion Drive and then recreate it. The issue often arises after failing to format the Fusion Drive.
Warning: Make sure the data on the Fusion Drive is recovered before continuing.
- In macOS Recovery, open Utilities > Terminal.
- Run the command below and note down the UUID of the Logical Volume Group.diskutil cs list
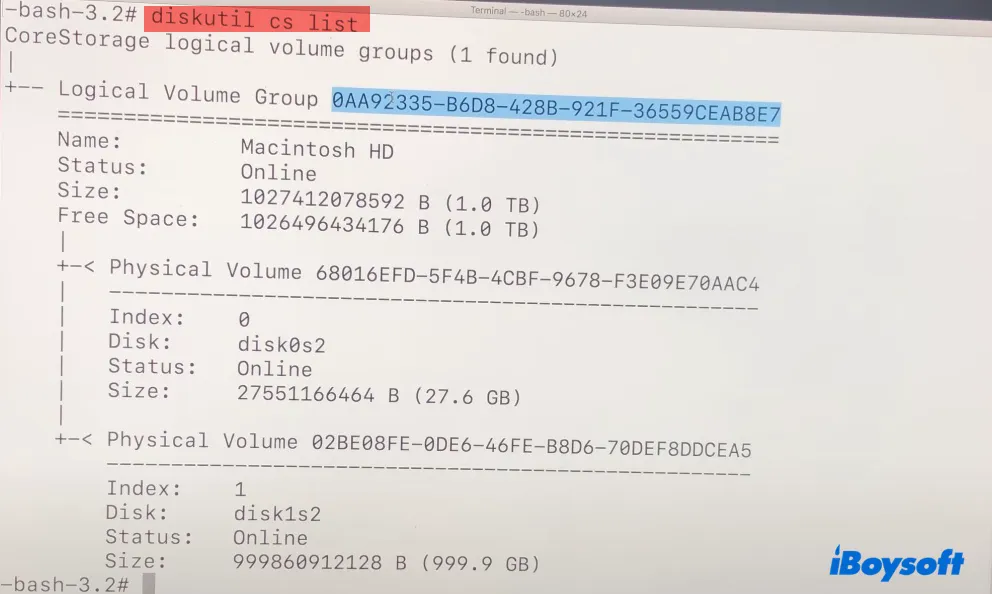
- Run the command below to delete the logical volume group, replacing lvgUUID with the strings of numbers and letters you gained in step 2.diskutil cs delete lvgUUID
- Then reset the Fusion Drive, as we mentioned previously.
Be reminded that these steps only apply to Macs running macOS 10.13 High Sierra and earlier. If your Mac is running macOS 10.14 Mojave or later, you can erase the Fusion Drive instead.
Note: If your Fusion Drive still won't work, it's suggested that you take your Mac to the repair shop for a hardware examination.
Why is your Fusion Drive not showing up on Mac?
If your Fusion Drive is not showing up on Mac, it likely results from one of the following causes:
- Finder isn't set to display internal drives.
- Disk Utility is set to display only volumes.
- The Fusion Drive was split and no longer functions as a whole logical drive.
- One of the drives (likely the HDD) is dead.
FAQs about Fusion Drive not showing up on Mac
- QHow do I know if my iMac has a Fusion Drive?
-
A
To know if your iMac has a Fusion Drive, you can run this command (diskutil list) in Terminal. If you see two physical drives are part of the same logical volume, it indicates a Fusion Drive.
- QHow do I reset Fusion Drive on Mac Terminal?
-
A
If your Mac is using macOS Mojave or later, you can run the command: diskutil resetFusion to reset the Fusion Drive on Mac's Terminal app.
- QWhen to reset Fusion safely?
-
A
Only reset (re-fuse) when the hardware is healthy but the logical link is broken (e.g., after a failed DIY OS install or a 'Split' error in Disk Utility). Never attempt a reset if you hear clicking or grinding from the HDD, as the format process will likely fail and permanently brick the file system.
- QWhich scenarios require professional help?
-
A
Mechanical Failure: If the HDD makes physical noise.
Kernel Panics: If the Mac crashes constantly during the Fusion reset process.