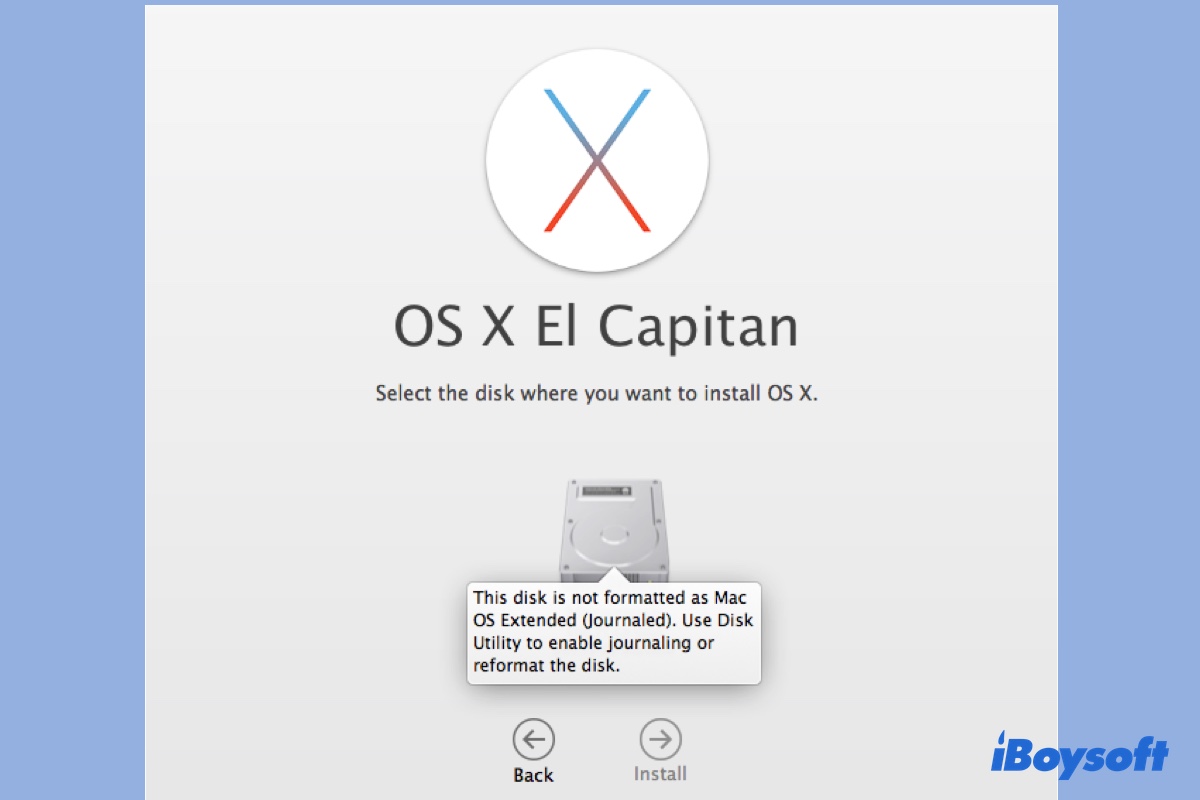
I went to factory reset my Mac but got stuck with the reinstalling process. After I entered Recovery Mode, I clicked "Reinstall OS X" and a bunch of other buttons, which got me to the screen where it says "Select the disk where you want to install OS X." However, the option Macintosh HD is grayed out and it pops up an error saying "This disk is not formatted as Mac OS Extended (Journaled)" when I click on it.
I'm trying to do a clean installation of macOS High Sierra on my 2011 MacBook Air but can't get pass the pop-up message "This volume is not formatted as Mac OS Extended (Journaled)." I went to Disk Utility to erase it, however, the only available format is APFS.
"This disk (volume) is not formatted as Mac OS Extended (Journaled). Use Disk Utility to enable journaling or reformat the disk." is a message that occurs when upgrading or reinstalling macOS or OS X on a Mac. It's common on earlier OS X versions and HDDs.
In this guide, we'll help you understand the reasons behind the issue and get it fixed. Here's a quick summary of the solutions we'll cover to eliminate "This disk is not formatted as Mac OS Extended (Journaled)" on MacBook Pro/Air & desktop Mac:
| Fixes | Quick Steps | Applicable Cases |
| Enable journaling on your disk | 1. Open Disk Utility. 2. Select your disk and click Enable Journaling or File > Enable Journaling. | If your drive is formatted with Mac OS Extended or Mac OS Extended (Journaled) |
| Reformat your disk | 1. Boot into macOS Recovery. 2. Enter Disk Utility. 3. Click View > Show All Devices if possible. 4. Select your physical internal disk and click Erase. 5. Choose Mac OS Extended (Journaled)and GUID Partition Map. 6. Click Erase. | All cases |
Why does it say 'This disk is not formatted as Mac OS Extended'?
The message "This disk is not formatted as Mac OS Extended (Journaled)" can happen when installing OS X El Capitan or an earlier version, or when reinstalling macOS Sierra, macOS High Sierra, macOS Mojave, or macOS Catalina on a hard disk drive (HDD).
The first part is easy to understand, as macOS 10.12 and earlier releases default to Mac OS Extended (Journaled). However, the second half may look a bit confusing if you know that Apple has made APFS the default file system for internal hard drives since macOS 10.13 High Sierra. But the truth is it doesn't apply to hard disk drives.
APFS is best for SSDs and flash storage. While it can work on HDDs, the performance is not optimized, and you might experience slower speeds and responsiveness compared to Mac OS Extended (Journaled). That's why you're prompted to switch to Mac OS Extended (Journaled).
In general, "This disk is not formatted as Mac OS Extended (Journaled)" is mainly caused by the internal hard disk formatted with APFS, Mac OS Extended, or improperly formatted Mac OS Extended (Journaled).
How to fix 'This disk is not formatted as Mac OS Extended'?
To fix "This disk is not formatted as Mac OS Extended (Journaled)," you can enable journaling on your internal hard drive or reformat it with Mac OS Extended (Journaled). Which one to use depends on your Mac's current format. So, the first step is to check your internal hard drive's file system in Disk Utility.
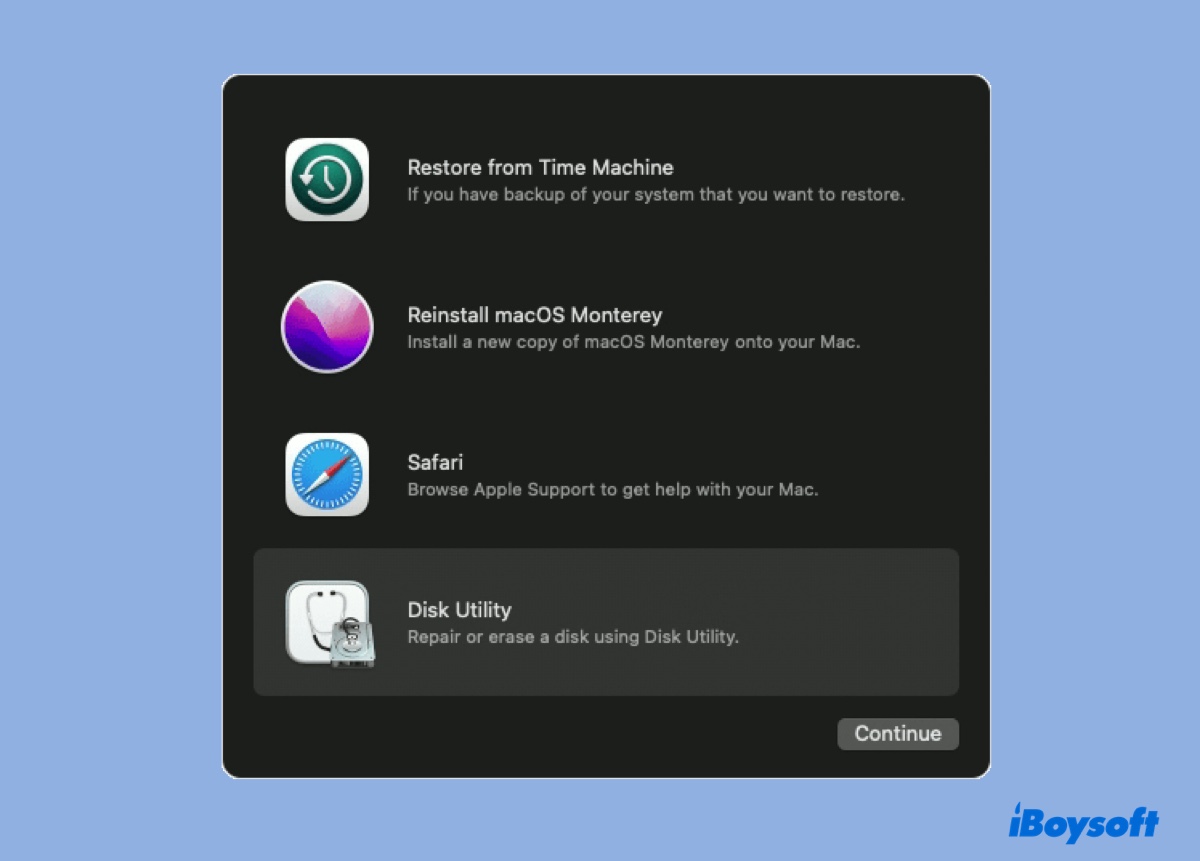
If you're still in Recovery Mode, click Disk Utility > Continue in the OSX or macOS Utilities window. If you're in regular mode, open Finder, then navigate to the Applications > Utilities folder to launch Disk Utility. After that, select your internal disk from the left side to see the file system information.
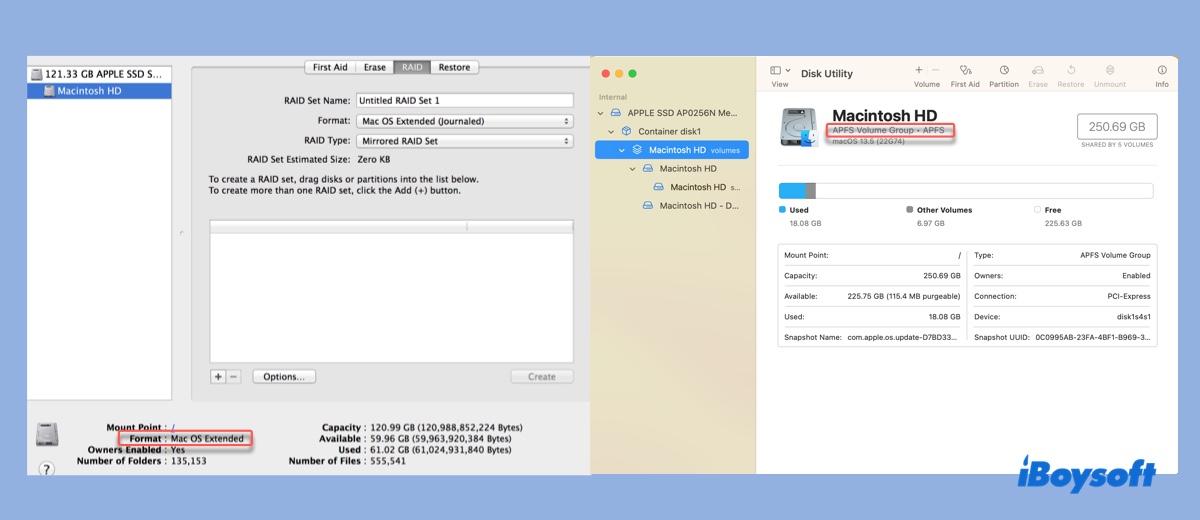
If it says Mac OS Extended, you simply need to enable journaling.
If it says APFS, you need to reformat your drive, which will delete all data on your Mac.
If it says Mac OS Extended (Journaled), which is already journaled, it's usually because your drive isn't properly formatted, or it somehow disabled journaling. You can first try enabling journaling.
Enable Journaling on Mac
Journaling is a feature that keeps records or journals of changes made to the file system. It can help prevent file system corruption and facilitate easier data recovery in the event of a crash or power failure.
On macOS, you can enable journaling for HFS (Mac OS Extended) or HFS+ (Mac OS Extended (Journaled) volumes in Disk Utility or Terminal. Note that it's not available for other file systems.
In Disk Utility, select your internal hard drive, then click "Enabling Journaling" or click File > Enable Journaling, depending on where the option is located on your macOS version.
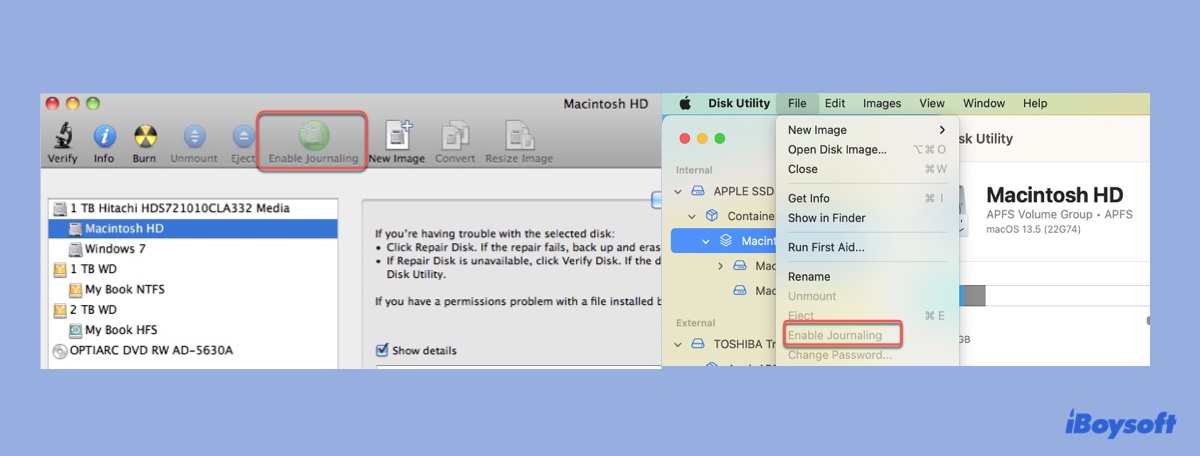
If "Enable Journaling" is grayed out, unmount your drive in Recovery mode and retry. If that still doesn't work, use Terminal to enable journaling with the following steps.
- Open Terminal.
- Type the following command and hit Enter to check all devices connected to your Mac.diskutil list
- Note down the disk identifier of your internal hard drive (e.g., disk0).
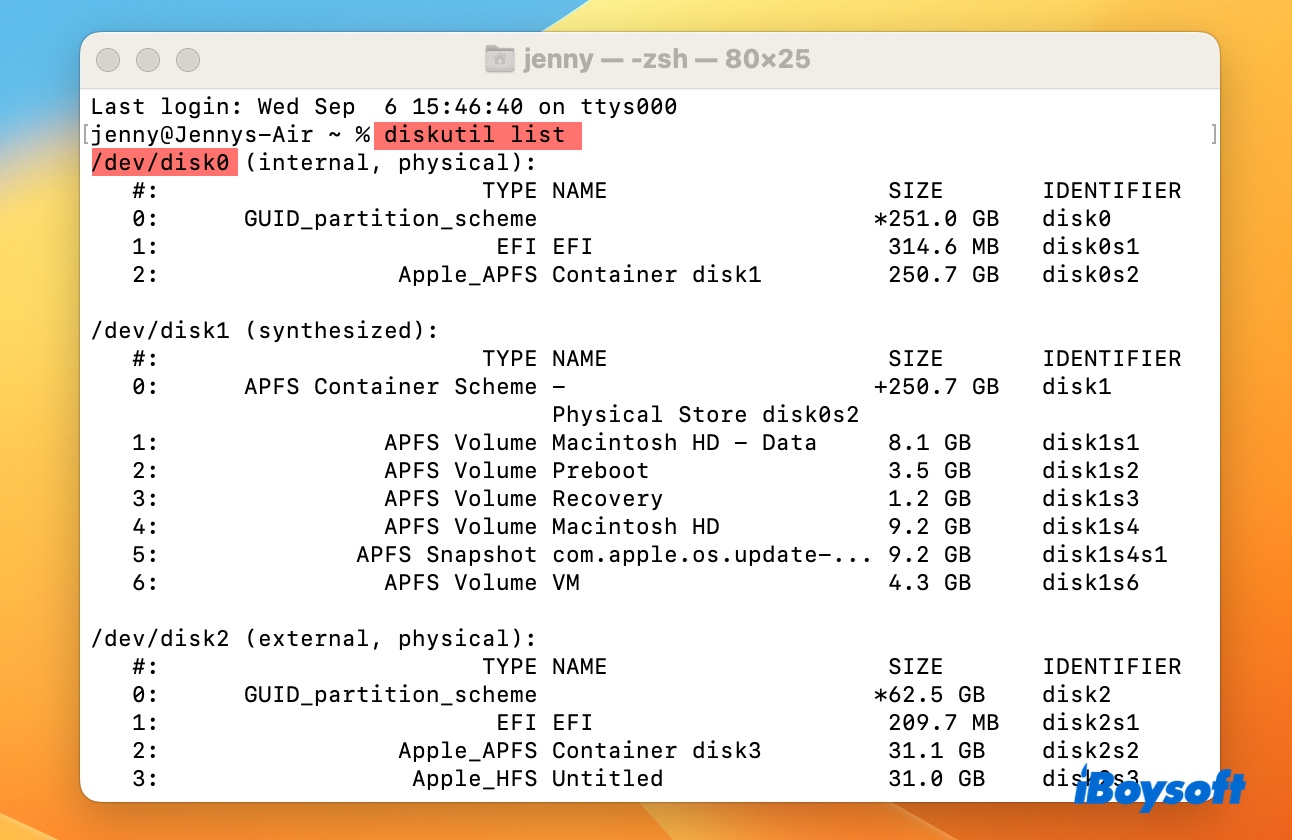
- Run the following command to enable journaling on it (replace disk0 with your disk identifier).sudo diskutil enableJournal disk0
- Enter your admin password and hit Enter.
- Try to install the OS again.
If the error "This disk is not formatted as Mac OS Extended (Journaled)" persists, you'll need to reformat the drive.
Reformat your Mac's internal hard drive
Be reminded that reformatting a drive will erase all data on it, so make sure you back up the essential files before proceeding.
How to fix "This disk is not formatted as Mac OS Extended (Journaled)" on Sierra, High Sierra, and other versions:
- Shut down your Mac.
- Press the power button, then immediately hold down the Command + R keys.
- Release the key when the Apple logo shows up.
- Once in Recovery Mode, click Disk Utility > Continue.
- Click View > Show All Devices if available.
- Select the top-level physical disk (e.g., 1TB Hitachi HDS722391CLA332 Media) and click Erase.
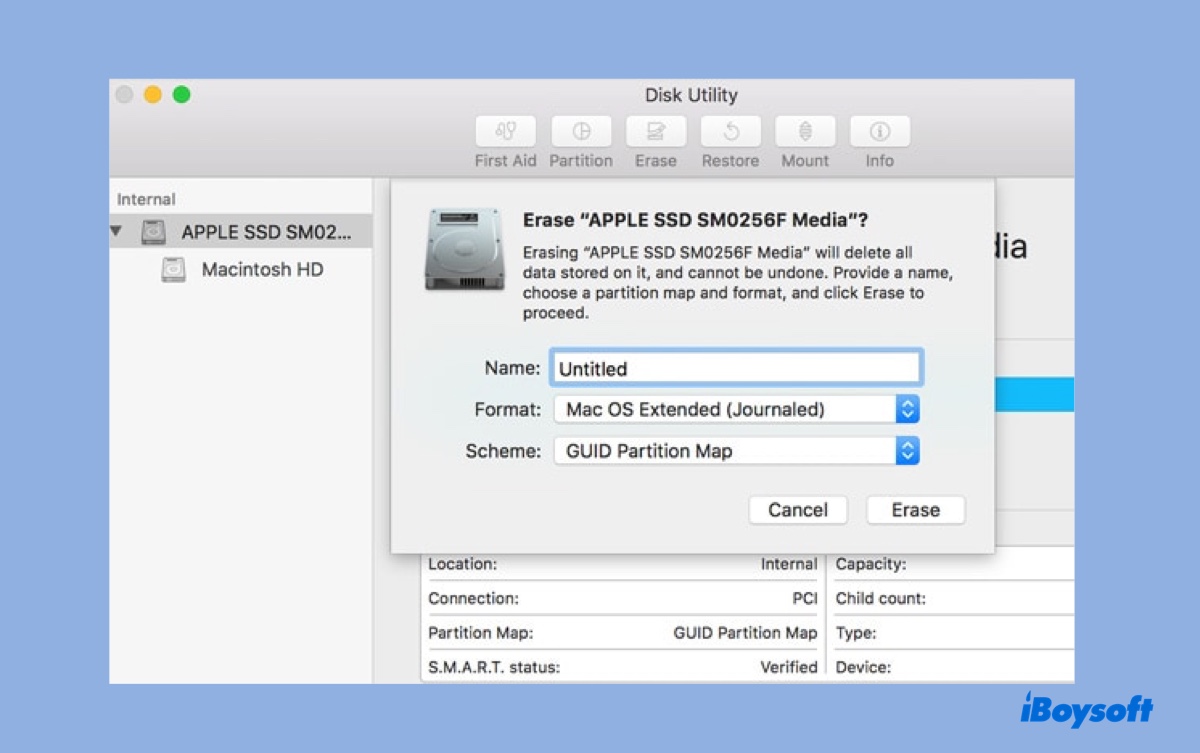
- Give your drive a name.
- Select Mac OS Extended (Journaled) as the format.
- Set the scheme to GUID Partition Map.
- Click Erase.
- Close Disk Utility.
- Click "Reinstall macOS/ OS X" and follow the onscreen instructions to finish the installation.
Note: If you erase the internal volume rather than the top-level physical disk, you may find the option Mac OS Extended (Journaled) not showing up.
If Disk Utility fails to format the startup disk, repeat the steps but use Option + Command + R keys instead at Step 2 to boot into Internet Recovery Mode.
Please share this post if you find it helpful!
FAQs about 'This disk is not formatted as Mac OS Extended'
- QHow do I format a disk for Mac OS Extended?
-
A
To format a disk for Mac OS Extended (Journaled):
1. Open Disk Utility.
2. Click View > Show All Devices.
3. Select the physical disk and click the Erase button.
4. Name the drive.
5. Choose Mac OS Extended (Journaled) as the format.
6. Set scheme to GUID Partition Map.
7. Click Erase.
- QHow to change an external drive from APFS to Mac OS Extended?
-
A
To change an external drive from APFS to Mac OS Extended, you need to erase the physical disk rather than the APFS volume. Otherwise, APFS will be the only option available. Follow these steps:
1. Launch Disk Utilty.
2. Click View > Show All Devices.
3. Select the first not-indented physical disk and click Erase.
4. Name the drive and select Mac OS Extended (Journaled) as the format.
5. Click Erase.
- QHow to format startup disk as a single Mac OS Extended Journaled volume?
-
A
To format your startup disk as a single Mac OS Extended (Journaled), you need to enter macOS Recovery Mode.
1. Start your Mac into Recovery Mode.
2. Open Disk Utility.
3. Click View > Show All Devices.
4. Select the top-level physical disk and click Erase.
5. Choose Mac OS Extended (Journaled) as the format.
6. Keep GUID Partition Map as the scheme.
7. Click Erase.
- QIs Mac OS Extended Journaled the same as APFS?
-
A
No, Mac OS Extended (Journaled) is different from APFS. Mac OS Extended (Journaled)," often called HFS+, is the file system that preceded APFS. APFS, which stands for Apple File System, is a newer file system introduced by Apple in macOS High Sierra. They have different architectures, features, and were designed with different objectives in mind.