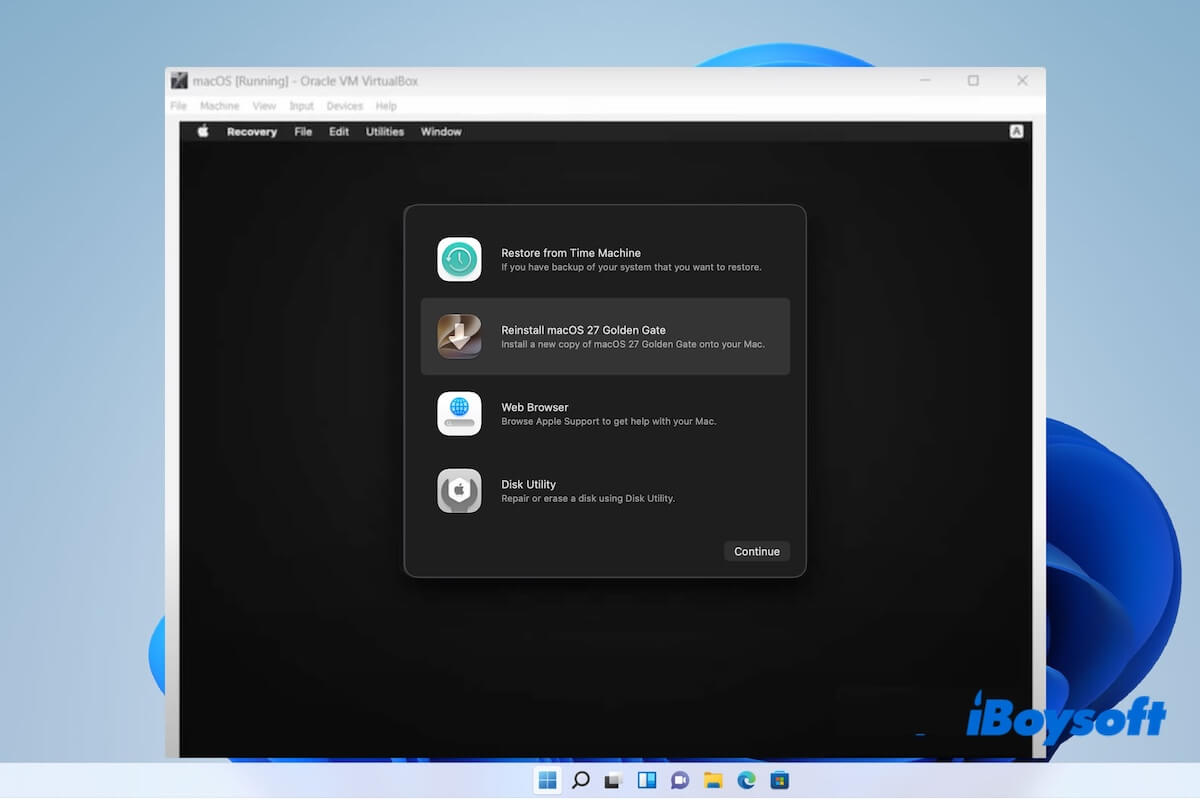
If you want to run macOS 27 Golden Gate on a Windows PC, the first thing to know is that macOS 27 is designed for Apple hardware, while most Windows PCs use Intel or AMD processors and PC hardware that macOS does not officially support.
In the past, users could run older macOS versions on Windows through virtual machines or Hackintosh setups. With newer macOS releases and Apple's shift to Apple silicon, however, getting macOS 27 running on a Windows PC has become more complicated and hardware-dependent.
This guide explains what you need to know before attempting the installation, including the basic hardware requirements, how to create a macOS Golden Gate installer, and the available methods for installing and running macOS 27 Golden Gate on a Windows PC.
Basic requirements
To install macOS 27 on a Windows PC, your devices should meet the basic requirements:
- Compatible Intel PC: Use a 64-bit Intel processor with macOS-compatible hardware, including the motherboard, GPU, and Wi-Fi/Bluetooth adapters.
- UEFI firmware: UEFI boot support is required for an OpenCore-based installation.
- Compatible GPU: Make sure the graphics hardware is supported by macOS 27 to ensure successful booting and graphics acceleration.
- RAM and storage: At least 8 GB of RAM and 50–64 GB of available SSD space are recommended.
- USB flash drive: Prepare a 16 GB or larger USB drive for creating the macOS installer; 32 GB is preferable.
Step 1. Prepare Windows for the macOS Golden Gate Installation
Before you start installing macOS 27 on your Windows PC, you should adjust a few Windows virtualization settings. These changes help the virtualization software access your PC's hardware virtualization features and reduce potential conflicts with Windows virtualization and security layers.
1. Check whether virtualization is enabled
Virtualization must be enabled for VirtualBox or VMware to use your CPU's hardware virtualization capabilities.
- Right-click the Taskbar and select Task Manager.
- Go to Performance > CPU.
- Find Virtualization and make sure that it shows Enabled.
If it is disabled, enable Intel VT-x or AMD-V/SVM in your computer's UEFI/BIOS settings.
2. Turn off memory integrity
Memory Integrity is a Windows security feature that uses virtualization-based security. On some virtual machine configurations, it can interfere with third-party virtualization software.
- Search for Core Isolation in the Windows search box.
- Open Core Isolation settings.
- Turn Memory Integrity off.
Note: Disabling Memory Integrity reduces some Windows security protections. Consider turning it back on after completing the installation if your virtual machine setup does not require it to remain disabled.
3. Disable Hyper-V
Hyper-V can also affect how VirtualBox or VMware accesses hardware virtualization. If your chosen macOS setup requires Hyper-V to be disabled, you can prevent its hypervisor from launching at startup.
- Search for "Command Prompt."
- Right-click it and select "Run as administrator."
- Enter the following command: bcdedit /set hypervisorlaunchtype off
- Restart your PC to apply the changes.
After restarting, Windows will no longer launch the Hyper-V hypervisor at boot, which can help avoid virtualization conflicts during the macOS installation.
Step 2. Download macOS 27 Golden Gate ISO
The macOS Golden Gate ISO is a disk image containing the macOS 27 installer in a format for virtualization software. On a Windows PC, you can use the ISO to create a virtual macOS installation in VirtualBox or VMware without needing a physical Mac or USB installer.
It is vital to download the ISO file from a reliable source to ensure the security and success of macOS 27 installation.
You can download the macOS Golden Gate ISO from iBoysoft DiskGeeker for Windows, which is a notarized Windows disk manager.
Steps:
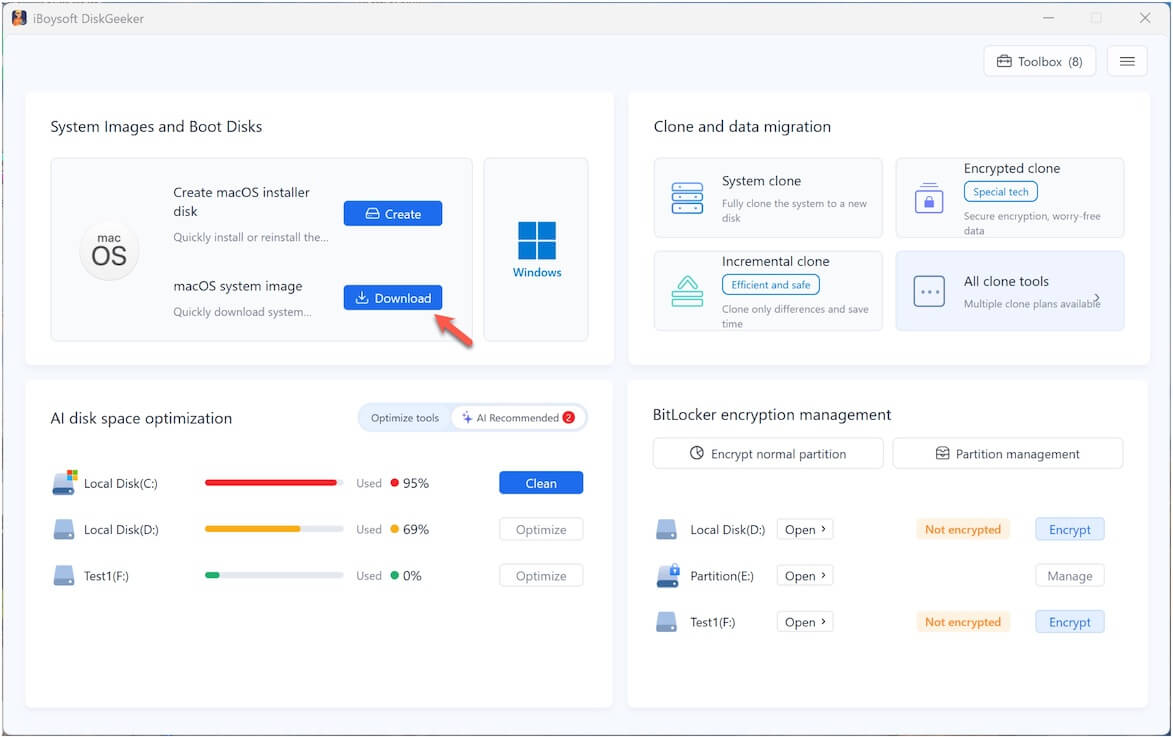
- Install and open iBoysoft DiskGeeker for Windows.
- Click Download next to macOS system image.
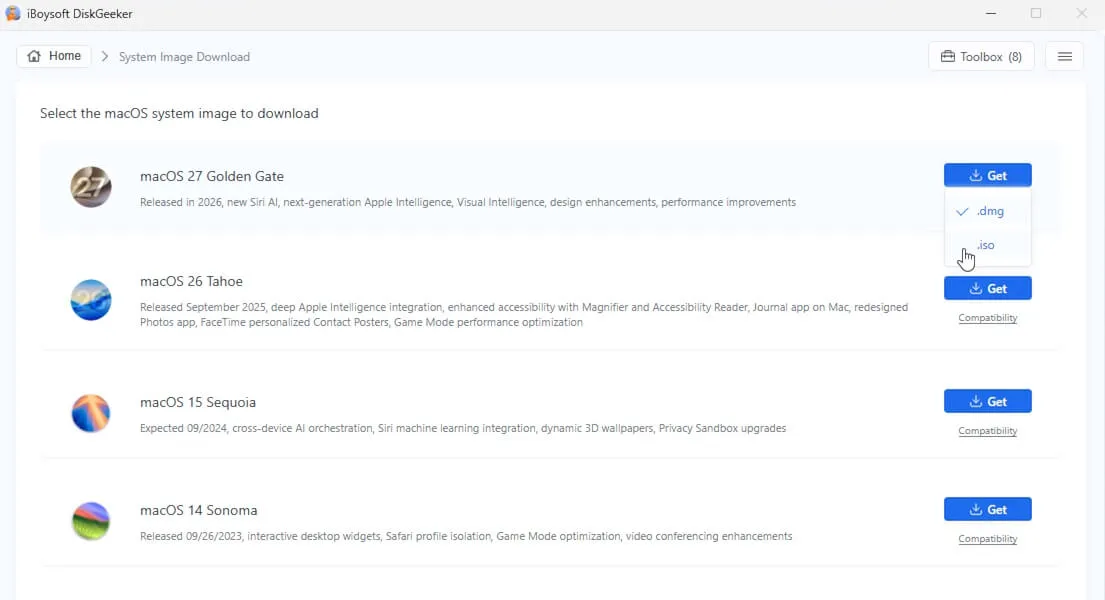
- Click Get next to macOS 27 Golden Gate and select .iso.
- Choose a location to save the ISO file, then wait for it to download.
Step 3. Install VirtualBox
To install macOS Golden Gate on a Windows PC, you need virtualization software such as Oracle VM VirtualBox. In this guide, we'll use VirtualBox to create and run the macOS Golden Gate virtual machine.
Notably, we also suggest downloading the VirtualBox Extension Pack. It is used to enhance the capabilities of VirtualBox.
1. Download and install VirtualBox
Before downloading VirtualBox, make sure your Windows PC meets its system requirements. VirtualBox supports Windows 10, Windows 11, and supported Windows Server.
To download and install VirtualBox:
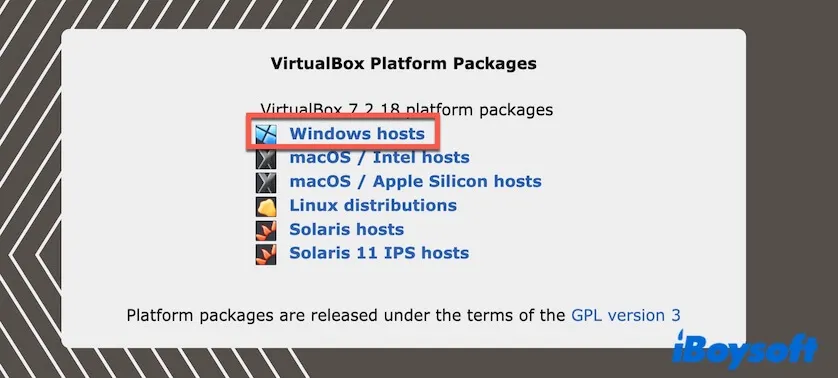
- Go to the VirtualBox downloads page.
- Under "VirtualBox Platform Packages," click "Windows hosts" to download the Windows installer.
- Open the downloaded .exe file.
- Follow the on-screen instructions to complete the installation.
2. Install the VirtualBox extension pack
The VirtualBox Extension Pack adds extra features to the base VirtualBox installation, including enhanced USB support and other advanced virtualization capabilities. Installing it can provide additional functionality when configuring and running virtual machines.
To install the Extension Pack:
- Open the VirtualBox downloads page.
- Find the VirtualBox Extension Pack section.
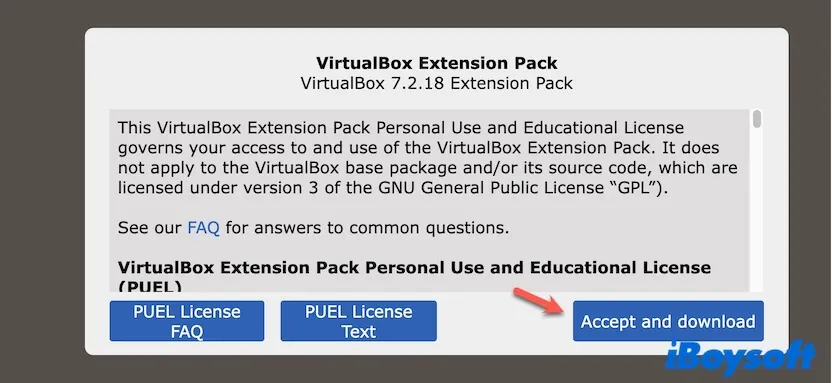
- Review the license agreement and click Accept and download.
- Open the downloaded file.
- Follow the on-screen instructions to install it in VirtualBox.
Step 4. Create a macOS Golden Gate virtual machine in VirtualBox
After installing VirtualBox, you can create a virtual machine for macOS Golden Gate and configure its hardware resources.
1. Create a new virtual machine
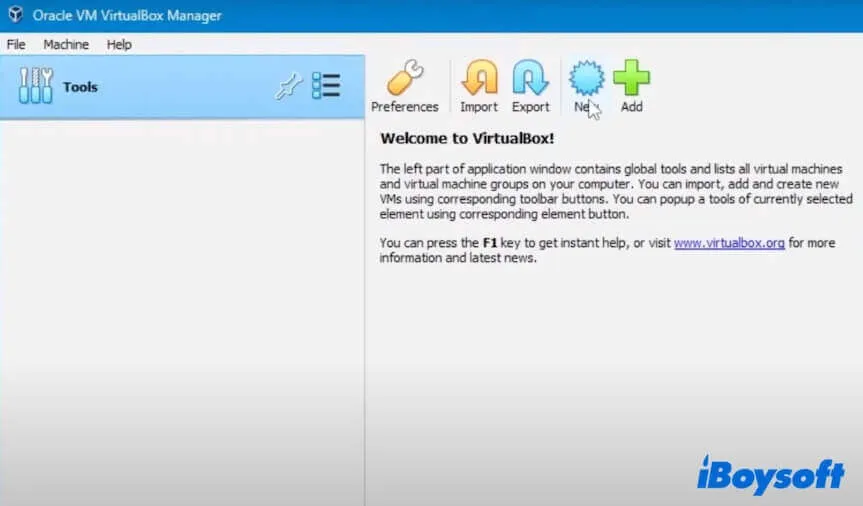
- Open VirtualBox on your Windows PC.
- Click New in the toolbar.
- Enter a name for the virtual machine, such as macOS 27.
- Keep the default location in the Folder field, or choose another location with enough free space.
- Under ISO Image, click the drop-down menu and select Other.
- Select the macOS Golden Gate ISO file you downloaded earlier.
- Set Type to Mac OS X and Version to Mac OS X (64-bit), if these options are available in your VirtualBox version.
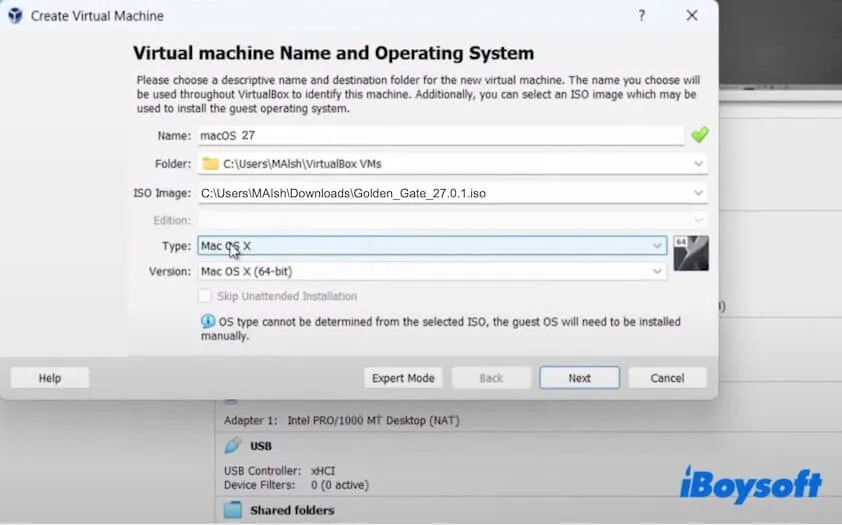
- Click Next.
2. Allocate memory and processors
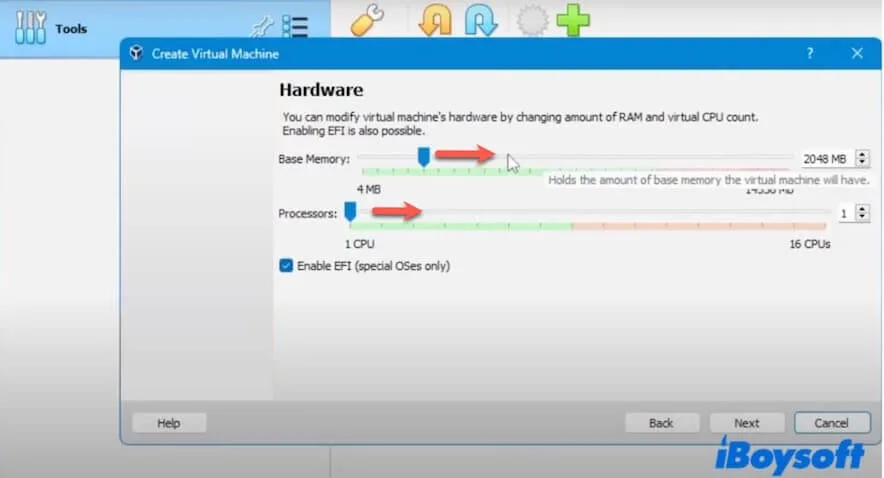
VirtualBox will ask you to allocate part of your Windows PC's hardware resources to the virtual machine.
Base Memory: Allocate enough RAM for macOS Golden Gate while leaving sufficient memory for Windows. Avoid allocating so much memory that the slider enters the red area, as this can leave Windows with insufficient available RAM.
Processors: Assign at least 2 CPU cores to the virtual machine. Avoid assigning an excessive number of CPU cores, as the host Windows system also needs processor resources.
Click Next when you're finished.
3. Configure the virtual disk
- If prompted to create a virtual hard disk, select Create a Virtual Hard Disk Now.
- Set the virtual disk size to 80 GB or more.
- Click Next and review the virtual machine configuration.
- Click Finish to create the virtual machine.
An 80 GB or larger virtual disk gives macOS Golden Gate enough storage space for the operating system, applications, updates, and user files. However, allocating more virtual disk space does not by itself make the virtual machine run faster or more smoothly.
Your macOS Golden Gate virtual machine is now created. In the next step, you'll need to adjust additional VirtualBox settings before starting the macOS installation.
Step 5. Configure VirtualBox settings for macOS Golden Gate
Before starting the macOS Golden Gate virtual machine, adjust several VirtualBox settings to provide the VM with the hardware resources and virtual devices it needs.
Open VirtualBox, select the macOS Golden Gate virtual machine, and click Settings.
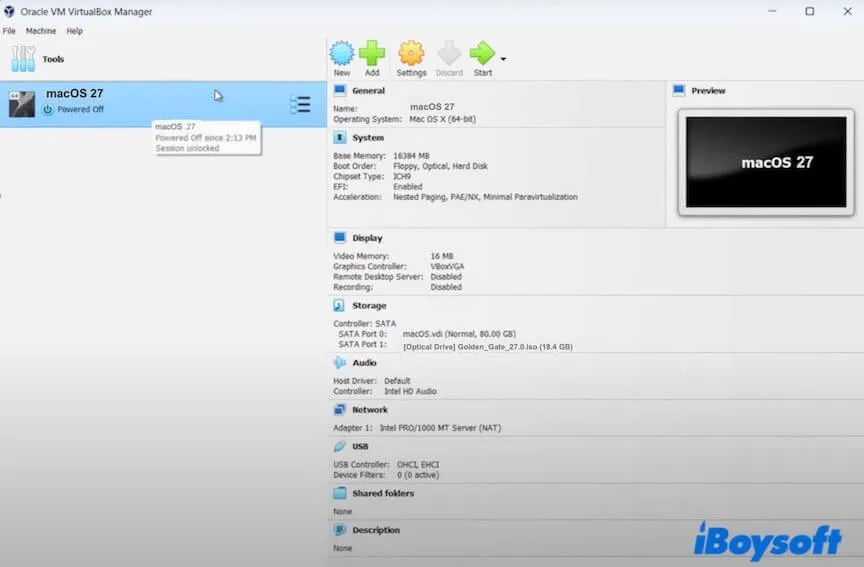
Then:
1. Adjust system settings
- Select System from the sidebar and configure the following options:
Base Memory: Allocate enough RAM for macOS while leaving sufficient memory for Windows. Avoid entering the red area, which indicates that allocating this much memory may leave too little RAM for the host system.
Boot Order: Keep Optical and Hard Disk enabled. You can place Optical before Hard Disk when you need the VM to boot from the macOS installer ISO.
Extended Features: Make sure Enable I/O APIC is selected. This is also required when using more than one virtual CPU.
Enable EFI: Enable EFI/UEFI firmware for the macOS virtual machine. Apple systems use EFI-based firmware, and VirtualBox provides EFI as an alternative to legacy BIOS firmware.
Hardware Clock in UTC Time: Enable this if required by your macOS VM configuration. VirtualBox uses this option to present the guest with the hardware clock in UTC rather than the host's local time.
- Click OK to save the changes.
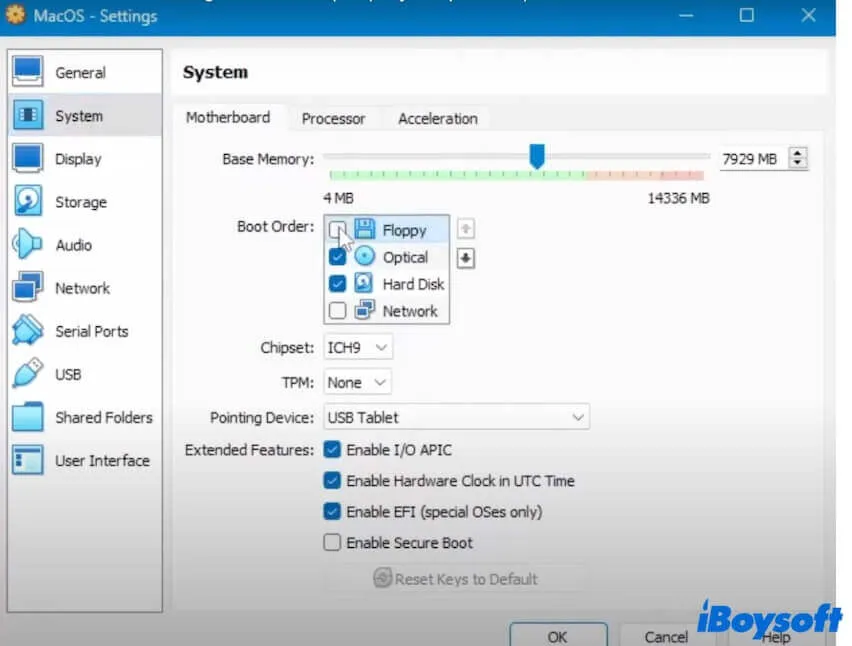
2. Configure display settings
- Select Display from the sidebar.
- Set Video Memory to 128 MB, the maximum supported value in VirtualBox.
- Enable 3D Acceleration if your macOS Golden Gate configuration requires it.
- Click OK to save the changes.
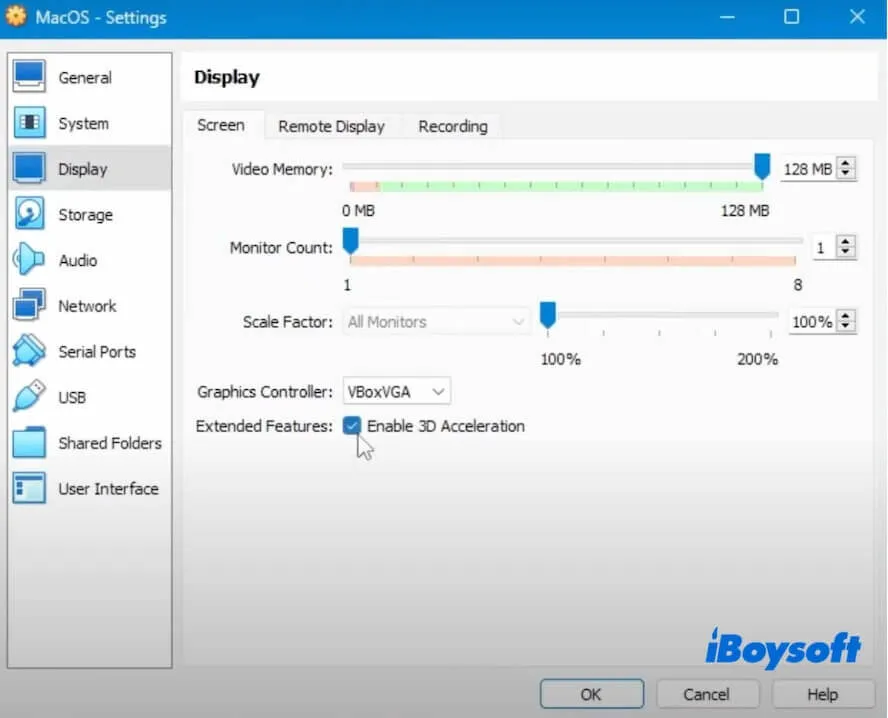
3. Configure network settings
- Select Network from the sidebar.
- Under Adapter 1, make sure Enable Network Adapter is selected.
- Set Attached to to NAT if you only need the macOS VM to access the internet through your Windows PC.
- Use Bridged Adapter instead if you need the virtual machine to appear as a separate device on the same local network as your Windows PC. With bridged networking, VirtualBox connects the VM's virtual network interface to a physical network adapter on the host.
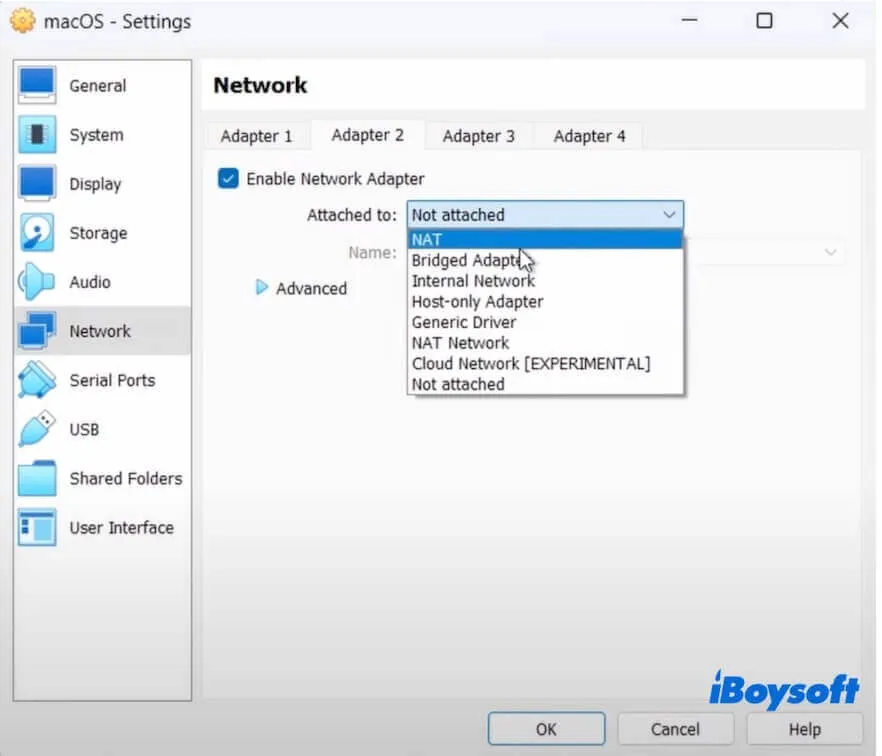
You generally do not need to enable a second network adapter just to install macOS. The original instruction to enable Adapter 1 and then configure Adapter 2 as a Bridged Adapter is therefore unnecessary unless your particular setup requires two network interfaces.
4. Configure USB
- Select USB from the sidebar.
- Enable the USB 3.0 (xHCI) Controller if you need USB 3.0 device support in the macOS virtual machine.
- Choose another USB controller only if it is required by your particular VM configuration or hardware.
- Click OK to save the settings.
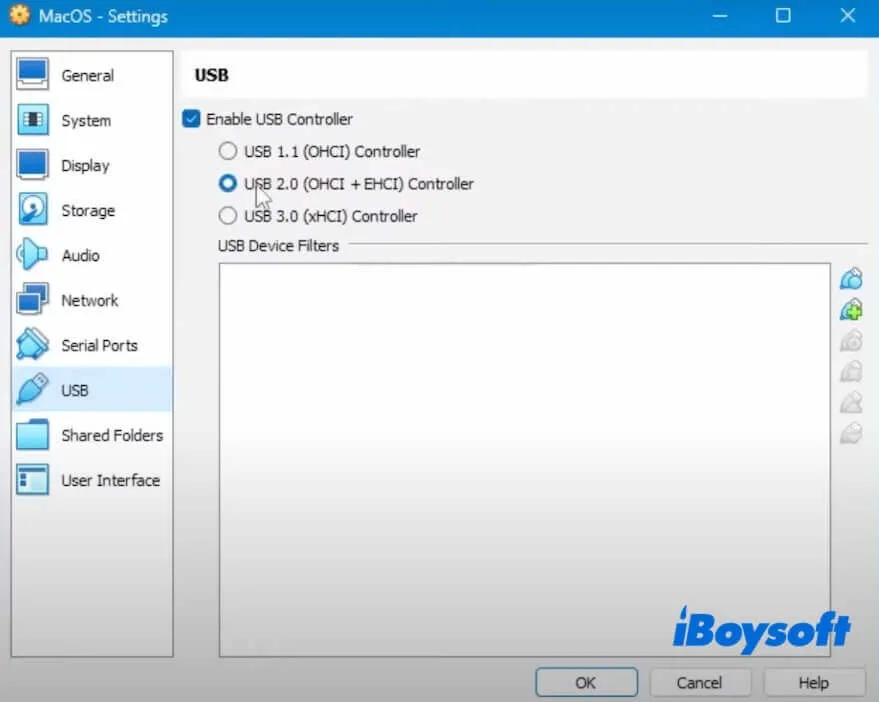
After configuring the VM, close VirtualBox before proceeding to the next step.
Step 6. Configure VirtualBox ready for macOS 27 installation with CMD
Before starting the macOS Golden Gate virtual machine, you may need to apply additional VirtualBox configuration through Command Prompt. These commands modify certain virtual hardware, CPU identification, firmware, and SMC-related settings that can affect macOS guest compatibility.
Because the commands differ between Intel and AMD processors, first check which CPU your Windows PC uses.
1. Check your processor type
On your Windows PC, go to Settings > System > About and look for the processor information.
Once you know whether your PC uses an Intel or AMD processor, use the corresponding command set below.
2. Run commands to configure VirtualBox
- Type cmd in the Windows search box.
- Right-click Command Prompt and select Run as administrator.
- Enter the following command to switch to the VirtualBox installation directory:
cd "C:\Program Files\Oracle\VirtualBox\"If you installed VirtualBox in a different location, replace the path with your actual VirtualBox installation directory. - Apply the commands:
Note: If you named your VM differently, replace macOS 27 in the commands below with the exact name of your virtual machine.
If your Windows PC uses an AMD processor, enter the following commands:
VBoxManage.exe modifyvm "macOS 27" --cpuidset 00000001 000106e5 00100800 0098e3fd bfebfbff
VBoxManage setextradata "macOS 27" "VBoxInternal/Devices/efi/0/Config/DmiSystemProduct" "iMac19,3"
VBoxManage setextradata "macOS 27" "VBoxInternal/Devices/efi/0/Config/DmiSystemVersion" "1.0"
VBoxManage setextradata "macOS 27" "VBoxInternal/Devices/efi/0/Config/DmiBoardProduct" "Iloveapple"
VBoxManage setextradata "macOS 27" "VBoxInternal/Devices/smc/0/Config/DeviceKey" "ourhardworkbythesewordsguardedpleasedontsteal(c)AppleComputerInc"
VBoxManage setextradata "macOS 27" "VBoxInternal/Devices/smc/0/Config/GetKeyFromRealSMC" 0
VBoxManage modifyvm "macOS 27" --cpu-profile "Intel Core i7-6700K"
VBoxManage setextradata "macOS 27" "VBoxInternal/TM/TSCMode" "RealTSCOffset"If your Windows PC uses an Intel processor, enter:
VBoxManage.exe modifyvm "macOS 27" --cpuidset 00000001 000106e5 00100800 0098e3fd bfebfbff
VBoxManage setextradata "macOS 27" "VBoxInternal/Devices/efi/0/Config/DmiSystemProduct" "MacBookPro15,1"
VBoxManage setextradata "macOS 27" "VBoxInternal/Devices/efi/0/Config/DmiBoardProduct" "Mac-551B86E5744E2388"
VBoxManage setextradata "macOS 27" "VBoxInternal/Devices/smc/0/Config/DeviceKey" "ourhardworkbythesewordsguardedpleasedontsteal(c)AppleComputerInc"
VBoxManage setextradata "macOS 27" "VBoxInternal/Devices/smc/0/Config/GetKeyFromRealSMC" 1 - Press Enter after entering the commands. When all commands have been executed, close Command Prompt.
Note: The commands above are configuration workarounds commonly used for running macOS guests in VirtualBox. Their effectiveness can vary by VirtualBox version, macOS version, and host hardware. Oracle officially describes macOS guest support in VirtualBox as experimental and unsupported.
Step 7. Install macOS Golden Gate in VirtualBox on Windows
Once VirtualBox and the macOS Golden Gate virtual machine are configured, you can start the VM and install macOS 27.
1. Start the macOS Golden Gate virtual machine
- Open VirtualBox.
- Select the macOS Golden Gate virtual machine from the sidebar.
- Click Start.
- Wait for the macOS recovery or installer environment to load.
2. Erase the virtual disk
Before installing macOS, you need to format the virtual disk for macOS.
- Select your preferred language, such as English, and continue.
- Select Disk Utility from the macOS Utilities screen.
- In Disk Utility, select the virtual disk representing the entire VM disk. It may appear as VBOX HARDDISK or a similar name.
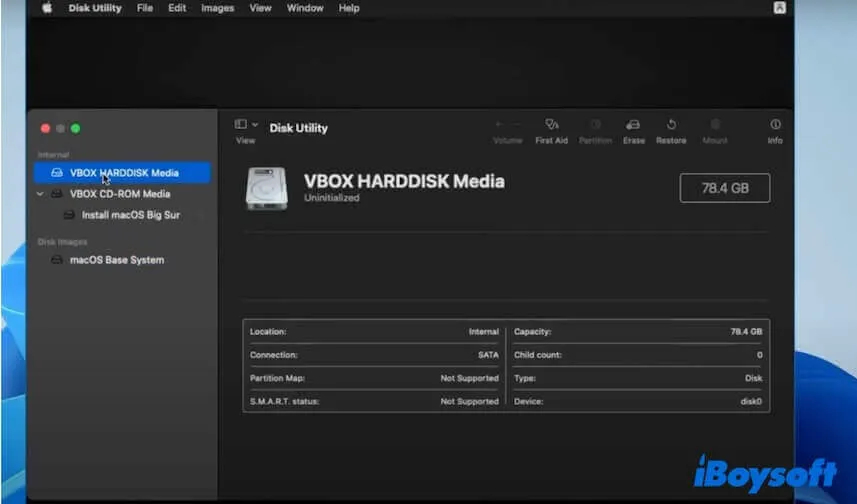
- Click Erase.
- Enter a name for the virtual disk.
- Set Format to APFS.
- Set Scheme to GUID Partition Map.
- Click Erase.
- When the process finishes, click Done.
- Quit Disk Utility to return to the macOS Utilities screen.
3. Install macOS Golden Gate
- Select the Reinstall macOS 27 Golden Gate option.
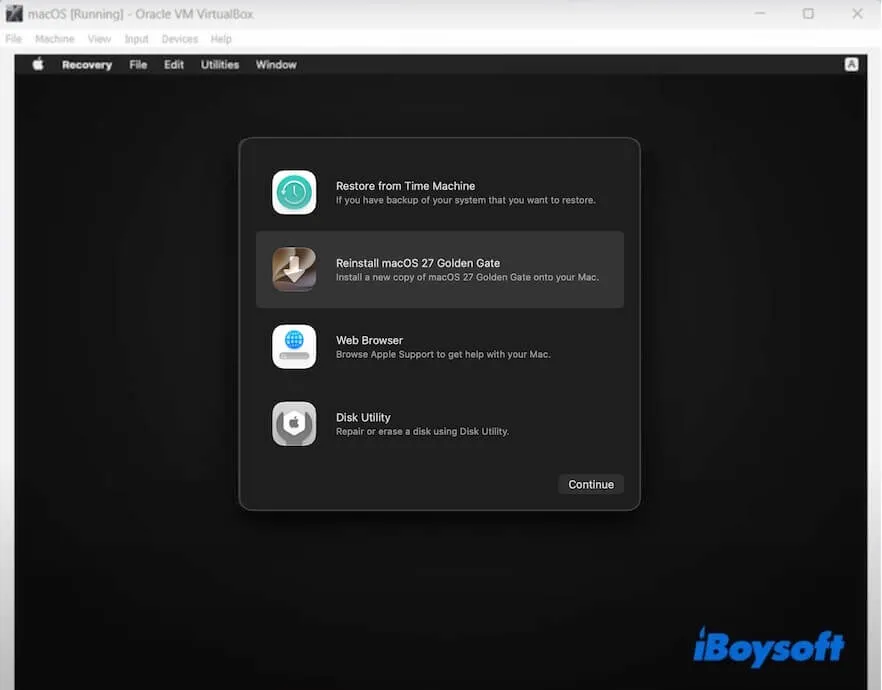
- Click Continue.
- Follow the on-screen instructions.
- When prompted to select an installation disk, choose the virtual disk you just erased.
- Continue with the installation and wait for macOS Golden Gate to complete the setup.
The virtual machine may restart several times during installation. Keep the VM running and follow any additional on-screen instructions.
Once the installation is complete, macOS Golden Gate will start in VirtualBox, and you can complete the initial macOS setup, configure your preferences, and then run macOS 27 in VirtualBox on your PC.
Troubleshooting: If the installation gets stuck or the virtual machine fails to boot, don't immediately start the entire process from scratch. First, shut down or restart the virtual machine and check the VirtualBox settings and configuration commands from the previous steps. If the problem persists, you may need to recreate the VM and repeat the installation.
Common problems when installing macOS Golden Gate on Windows
The VM stops at the Apple logo
This usually indicates a mismatch between the macOS image, virtual hardware, CPU configuration, or boot settings.
Check the VM configuration and make sure the VirtualBox commands were applied to the correct VM. If it still hangs, the issue may be a compatibility limitation rather than a single incorrect setting.
The installer reboots continuously
The virtual disk may not be configured correctly, or the boot order may return to the installer instead of the system disk.
Make sure the virtual disk is attached and, after installation, remove the ISO or set the virtual hard disk as the first boot device. If the VM continues restarting, check the CPU and EFI configuration, as repeated reboots can indicate a deeper compatibility problem.
The screen is black or extremely slow
Virtual graphics support is limited in many unofficial macOS-on-Windows configurations.
Set the video memory to the maximum available value and check the display settings. If the problem persists, it may be a limitation of the virtual graphics environment rather than insufficient video memory.
Network or audio does not work
The guest may not have a compatible virtual device, or the required driver may not exist for that macOS version.
Check that the corresponding virtual device is enabled in VirtualBox. For network issues, try NAT first; for audio, make sure audio is enabled and try another available virtual controller if necessary. If macOS still does not recognize the device, a compatible guest driver may be unavailable.
macOS breaks after an update
Unofficial boot modifications and patched virtualization components can depend on specific host and guest versions.
Before any update, make a full backup or snapshot. For production work, use a supported Mac or cloud environment instead.
Legal and licensing considerations
Apple's software license terms govern how macOS may be installed and used. Apple's licensing language generally limits macOS use to Apple-branded hardware, and Apple does not provide support for installing macOS on a normal Windows PC.
Licensing rules can vary by jurisdiction and can change over time. Read the current Apple Software License Agreement before setting up any macOS environment, especially for commercial work, redistribution, or cloud hosting.
FAQs
- QCan you install macOS Golden Gate on Windows?
-
A
Not directly. macOS Golden Gate cannot be natively installed on a Windows PC. It is designed for Apple-silicon Macs.
However, if you want to run Golden Gate on Windows, you would need to use a virtual machine or emulation approach.
- QWhy won't my macOS Golden Gate VM boot?
-
A
Common causes include incompatible virtualization settings, unsupported hardware, incorrect installation images, or virtualization compatibility issues.
- QCan I run macOS Golden Gate on Windows 11?
-
A
Windows 11 can serve as the host OS for virtualization, but whether macOS 27 can actually run depends on the virtualization method and hardware configuration.