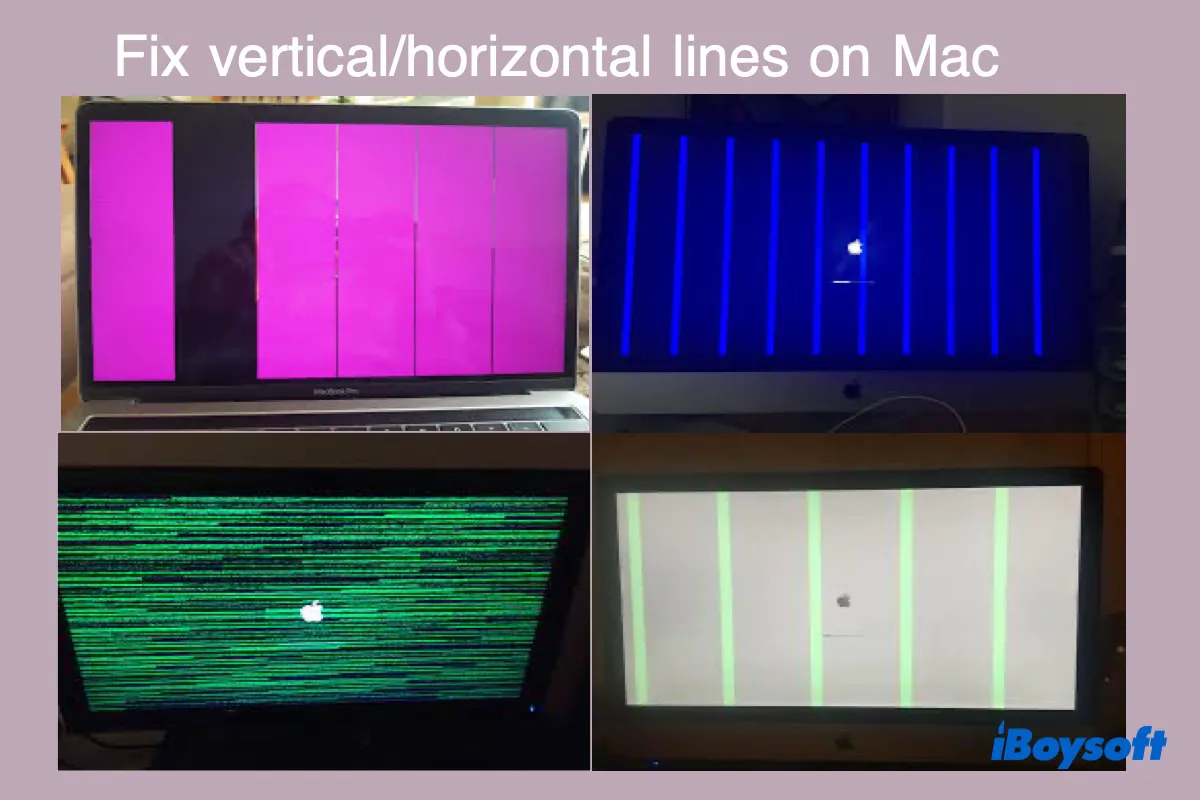
Are you encountering colored lines on Mac? Actually, many users have had or are experiencing similar issues like you on their MacBook Pros, MacBook Airs, Mac minis, or iMacs. These screen glitches, horizontally or vertically presented, may appear to take part of or all your Mac screen with green lines, purple lines, black lines, pink lines, blue lines, yellow lines, etc., and sometimes lines with several colors.
To stop it from interfering with your work, we'll explain why these lines appear on your Mac screen and how to fix them.
If the lines only show at the bottom of the screen, it's a different problem. You can follow: Fix horizontal black lines at the bottom of the MacBook Pro screen.
Share this post on your social platforms to help more people!
Why does my Mac screen have colored lines?
After looking into the "MacBook Pro screen lines" issue, we found many discussions regarding but not limited to the following scenarios:
- Green vertical lines on MacBook Pro screen
- Purple vertical lines on MacBook Pro screen
- Vertical black lines on MacBook screen
- Horizontal lines on MacBook Air screen
Regardless of the color, these vertical or horizontal lines on Mac screen could be caused by:
- Mac overheating (T-con board)
- Failed Mac fan
- Dirt-blocked air vent
- Software errors
- Outdated graphics card driver
- Loose or damaged screen cable
- Problems with Mac's motherboard or graphics card
- Damaged LCD panel due to dropping Mac
Though it's hard to pinpoint a cause for your case, you can follow the guide below to troubleshoot the issue on Mac.
Think this post helpful? Share it immediately!
How to fix green lines on Mac screen?
This section describes solutions to fix the green lines on MacBook Pro/MacBook Air/Mac mini/iMac and ways to figure out what caused the green lines on MacBook Pro screen & other Mac models. Again, these solutions also apply to vertical or horizontal lines on Mac with different colors. Don't forget to check if the lines are gone after a solution.
- Reset the NVRAM and SMC
- Cool your Mac
- Move your Mac screen to different positions
- Wake up Mac from sleep mode
- Update Graphics card driver
- Lower the resolution
- Switch to DisplayPort
- Enable color filters
- Adjust the white points
- Boot into Safe Mode
- Run Apple Diagnostics
- Check for an existing service program
- Take a screenshot
- Connect to an external display
- Unplug and plug the display/LVDS cable
- Replace thermal paste
Reset the NVRAM and SMC
NVRAM( Non-volatile Random Access Memory) is a small amount of memory on Mac that stores settings such as display resolution, startup disk selection, and recent kernel panic information.
SMC(System Management controller) stores crucial hardware settings such as thermal management, video switching, power functions, etc.
Resetting the NVRAM and SMC are often on the top of the solution list to resolve the "green vertical lines on MacBook Pro screen" issue, especially for those appearing at startup.
To reset NVRAM on Mac:
- Shut down your Mac.
- Hit the power button to turn on Mac.
- Press and hold the Option + Command + P + R keys.
- Release the keys when you hear the startup sound for the second time or when the Apple logo appears and disappears twice.
Check if that eliminates the green lines on Mac screen. If not, you need to reset SMC on Mac. Please be reminded that you don't need to reset SMC on any M1 Mac, and the process to reset SMC on Intel-based Macs differs depending on your Mac model.
Note: Resetting NVRAM will restore all your personalized hardware settings to default on Mac, so you will need to set them back later if you want.
Cool your Mac
Mac has an optimal temperature ranging from 100°F (40°C) to 192°F (89°C). If exceeded, you will experience Mac slowing down or visual glitches like the green vertical lines on MacBook Pro screen. Climate and Resource-intensive tasks like video editing are the biggest culprits for overheating. Here is how to check your Mac's temperature:
- Open Finder > Applications > Utilities > Terminal.
- Type in the following command and hit Enter.sudo powermetrics --samplers smc |grep -i "CPU die temperature"
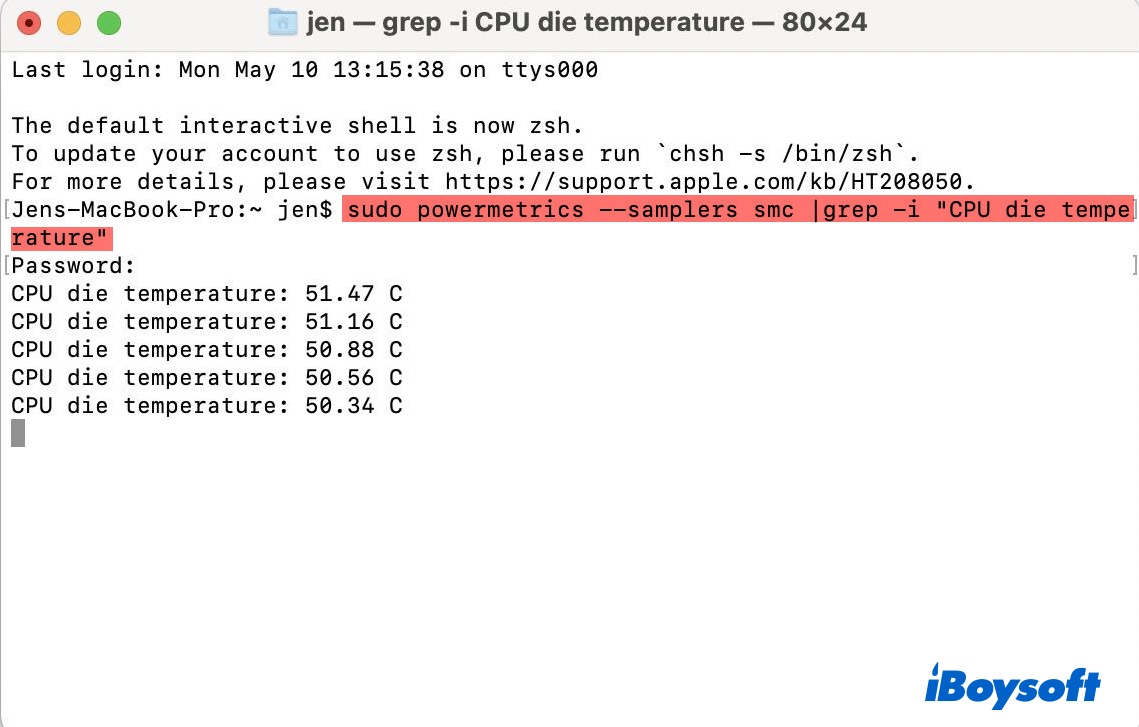
If your Mac is overheating or you live in hot weather, you should get an external cooling pad or a nifty app that increases fan speed to cool down your Mac.
The horizontal lines on top and bottom of your screen are also likely to show under heavy usage and when doing tasks that require video processing. In which case, you can close the lid and let it rest for enough time (hours or a day) to see if the lines disappear.
Move your Mac screen to different positions
A quick fix to resolve the horizontal lines on Mac caused by the connection issues between the internal hardware and the display is to slowly change the angle of your Mac's screen until the lines vanish. You can also close the lid then open the lid.
Wake up Mac from sleep mode
Another trick you can try is to put your Mac to sleep, wait for some time, then press any key to wake it up.
Update Graphics card driver
Since the horizontal or vertical lines on Mac could be a result of outdated graphics card drivers, it makes sense to get the driver updated. Given that the graphics card driver is included in the macOS update, you can go to the Apple menu > System Preferences > Software Update to check the available macOS version and follow the onscreen instructions to update the driver.
Lower the resolution
If you are running a Mac mini and having green vertical lines on the right side of your monitor, lower down the native resolution to something like 1080p, then switching it back is a potential fix.
Switch to DisplayPort
Consider switching to a DisplayPort cable if your Mac mini is connected to an external display with the HDMI cable. Or try another HDMI cable.
Enable color filters
If your Mac screen has flickering lines, you can get rid of them by enabling the color filter. Thanks to the smart Mac user who gets experimental, this simple fix has helped many save several hundreds of dollars. Follow these steps:
- Go to Apple menu > System Preferences.
- Click Accessibility > Displays.
- Under the "Color Filters" tab, tick the box next to "Enable Color Filters".

The custom Color Display Profile may also render your MacBook Pro screen flickering. To stop it from happening, you can set the Color Display Profile to default.
- Go to Apple menu > System Preferences.
- Click Displays, and select Default for display.
Adjust the white points
The way to adjust the white points on Mac differs based on macOS versions. For users running macOS Catalina or later, refer to this Apple document.
- Go to Apple menu > System Preferences > Displays.
- Click Color > Calibrate > Continue.
- In the "Select a target white point" window, move the slider around until the lines disappear.
- Click Continue twice, then name the profile "Color LCD Calibrated Less Lines".
Boot into Safe Mode
Booting into Mac Safe Mode can bypass software bugs that result in the vertical green lines on Mac by only loading essential programs. The process varies in Intel-based Macs and M1 Macs.
For Intel-based Macs:
- Turn off your Mac.
- Press and hold the power button, then immediately hold down the Shift key until the login screen appears.
- Log into your Mac.
For M1 Macs:
- Turn off your Mac.
- Press and hold the power button for 10 seconds until you see the startup window.
- Select the startup disk while holding the Shift key.
- Click "Continue in Safe Mode".
- Release the Shift key.
If you can get rid of the green lines on Mac screen in Safe Mode, you know the default settings and basic device drivers are not causing the trouble but some third-party software. Restart your Mac to see if the lines persist. If so, try deleting the recently installed applications, then test it again.
If the lines on Mac screen don't go away in Safe Mode, it's likely a hardware issue.
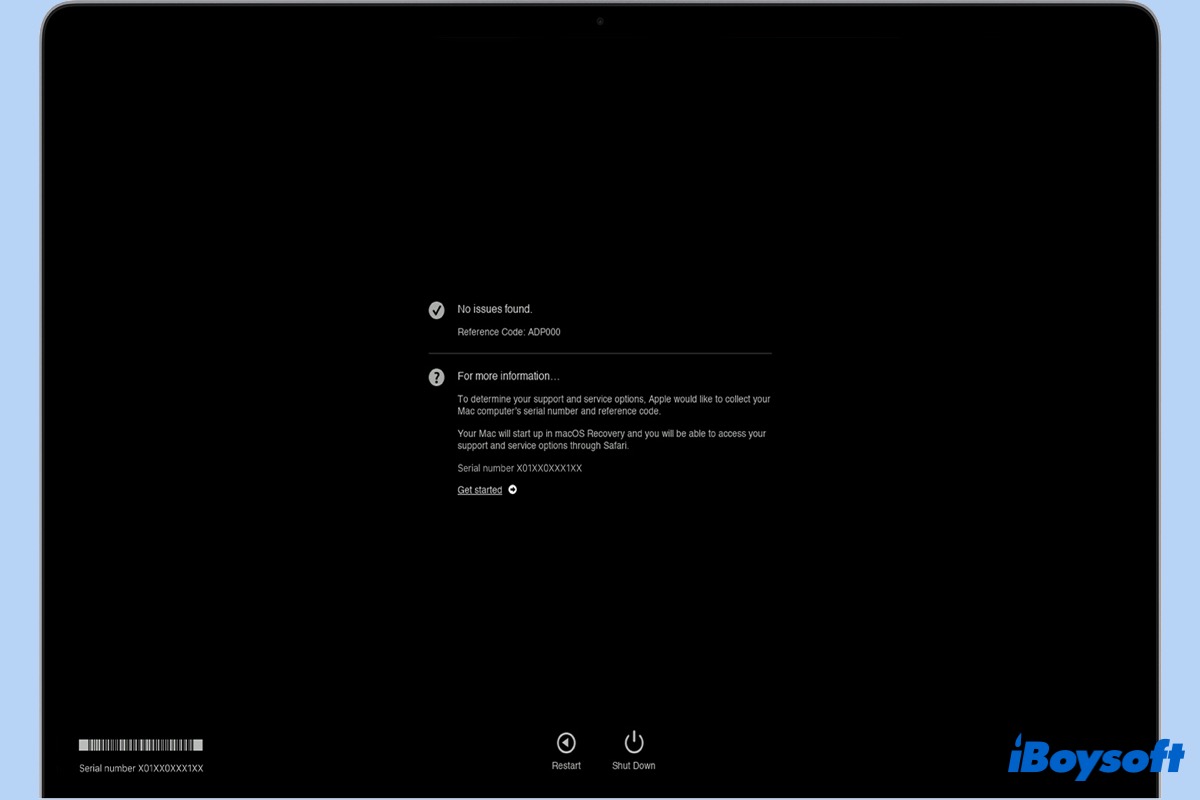
Run Apple Diagnostics
Apple Diagnostics helps you figure out which hardware component is at fault and may cause the vertical green lines on Mac screen. Here are the steps to run Apple Diagnostics:
- Turn off your Mac and disconnect all external peripherals except for the power, keyboard, mouse, display, and Ethernet connection.
- Initiate Apple Diagnosis.
Intel-based Mac: Press the power button and immediately hold down the D key until you see a progress bar or the window requiring you to choose a language.
M1 Mac: Turn on Mac and continue to hold down the power button until you see the Startup Options window. Then press Command + D keys. - Wait for Apple Diagnosis to finish checking your Mac.
Check for an existing service program
Apple has released a free worldwide service program for 13-inch 2016 MacBook Pros experiencing flexgate issue with MacBook Pro display. If your Mac has vertical lines on the screen, you can contact Apple for further examination.
Although the post specifies the free program is only for MacBook Pro manufactured in 2016, you can still give it a try since forum users reported getting a free replacement of the lid and top case for a 13-inch MacBook Pro 2017 six months out of warranty.
Take a screenshot
To decide whether the vertical/horizontal lines on Mac are a display issue or a GPU issue, you can take a screenshot if possible.
If the lines show up in the screenshot, it's likely a GPU problem.
If the lines don't show up in the screenshot, it's likely a display problem.
Connect to an external display
If the green lines appear when Mac starts up, or you cannot take a screenshot, another way to determine if your display or the GPU causes the problem is to use an external display.
Connect an external monitor or HDTV to your MacBook and check if the lines appear on the second screen. iMac featuring Target Display Mode is a good choice for you, and you can use it as an external monitor by running the unique characteristics.
If the lines appear on the external display, you likely have a GPU problem.
If the lines disappear on the external display, you are likely having a display problem.
Either way, these are hardware problems requiring a professional's help. You can contact Apple Support to make an appointment with a nearby repair center.
Note: If you are handy and good with machines, here are two more things you can do to get rid of the horizontal/ vertical green lines on Mac screen.
Unplug and plug the display/LVDS cable
Often, the horizontal or vertical lines are caused by a loose or damaged display cable. If you use an old Mac model, you can order a screwdriver kit to take off the bottom plate. Then locate the LVDS cable (a wide thick cable in the top left with a cushion on top), flip the silver lock up and slide the cable out carefully.
Check whether the connections are in good condition and plug it back cautiously. When you hear two clicks on both sides, clip the silver thing back.
Replace thermal paste
Replacing thermal paste requires more experience; therefore, it's recommended to get video tutorials before acting. Once you open the bottom, you should look around the logic board and connectors for damages. If you see loose connections, gently push them in connectors with a plastic tool.
If you don't see any stains or damages, you can carefully pull out the logic board and re-apply a qualified thermal paste on the CPU and GPU.
If your Mac has thin green lines while booting up and the boot hangs on a grey screen, you can try to replace the AMD chip with the instruction in this forum post.
If none of these solutions discard the green lines on MacBook Pro screen, likely, you have a defective display assembly that needs to be replaced by Apple.
If this post is helpful, share your successful experience with more people right now!